Surprisingly enough, or not, legacy systems can still be found across many organizations. IBM MQ is a family of message-oriented middleware products that IBM launched in December 1993. It was called MQSeries initially and was renamed WebSphere MQ in 2002 to join the suite of WebSphere products. In April 2014, it was renamed to IBM MQ.
We can mainly see the use and the need for integration with these products in banks systems. BizTalk Server provides two ways to communicate with IBM MQ:
By using the MQSeries built-in adapter that will act as a bridge between Microsoft BizTalk Server and IBM MQSeries servers:
The MQSeries adapter is available with the BizTalk Server installation. It supports transactional and non-transactional messaging by setting the Transaction Supported property in the MQSeries adapter transport properties
The MQSeries adapter uses the MQSAgent2 COM+ application to put/get messages into the IBM WebSphere Queue Manager
The MQSeries adapter requires IBM’s MQSeries Server for Windows to reside on the client system to communicate with an IBM WebSphere Queue Manager running on Windows or non-Windows. MQSeries Server for Windows is not a Microsoft product and must be obtained from your IBM WebSphere MQ program
By using the Host Integration Server (HIS) that provides a WCF Channel for MQ and BizTalk Adapter for MQ Series Client (MQSC) — depending on the version of BizTalk Server you are using that will support a variety of IBM WebSphere versions:
The MQSC adapter is a light-weight component of MQ that does not require the MQSeries Queue Manager run-time code to reside on a client system. The MQSC adapter is available in the BizTalk Adapters for Host Systems installation part of Host Integration Server (HIS). This adapter can connect to an IBM WebSphere Queue Manager on Windows or non-Windows. It also supports transactional and non-transactional messaging
This whitepaper’s goal is not how to install and configure MQSeries, neither compare the advantages or disadvantages of using this adapter compared to MQSC. Instead, this whitepaper’s focus is on improving the performance of the MQSeries adapter to better support low latency scenarios that most of the time are required in financial transactions.
Where I can download it
You can download the whitepaper here:
You can also find, download and enjoy several other free whitepapers of my own here:
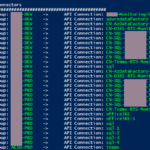
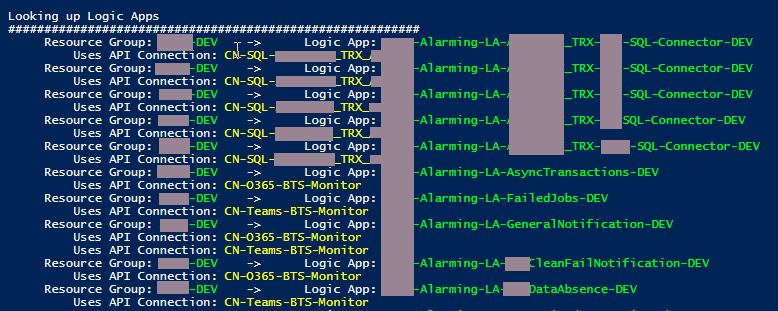
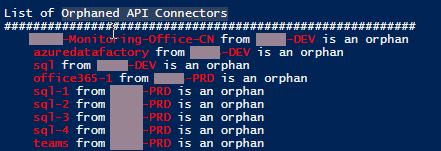
Recently I wrote my version of a script that Mike Stephenson initially created: Find Orphaned Azure API Connectors with PowerShell. This PowerShell script will look at all of the API Connections in a specific resource group and then inspect every Logic App in your resource group to check if the API Connections are being used or not. The goal of this script, of course, is to identify orphaned API Connections in a single Resource Group quickly and effectively.
I modify the original script to have a better output or at least a different output that works better for my needs. Automatically add a Deprecated tag on all the API Connectors with the value True or False. And add additional capabilities on the generation of the output report in a CSV format.
The only limitation of this script is that it only checks a specific Resource Group. So, if you have 3 or 4 Resources Groups, you need to configure this script and run it 3 or 4 times.
To streamline this process and not waste so much time, I decided to create a new version of this script. This new script will look at all the API Connections in all resource groups on a single Azure Subscription and then inspect every Logic App in that specific Resource Group (RG) to check if the API Connections of that RG are being used or not.
What’s new on this PowerShell script:
It will check in all Resources Groups available on a single Subscription if API Connections are being used or not.
Subscription Details output is improved and with coloring to better read
List of available API Connectors group by Resource Group output is improved and with coloring to better read
List of Logic Apps and API Connectors association group by Resource Group and Logic App output is improved and with coloring to better read
List of Orphaned API Connectors order by Resource Group output is improved and with coloring to better read
Download
THIS POWERSHELL SCRIPT IS PROVIDED “AS IS”, WITHOUT WARRANTY OF ANY KIND.
You can download Find Orphaned API Connectors in all Resource Groups from GitHub here:
Do you feel difficult to keep up to date on all the frequent updates and announcements in the Microsoft Integration platform and Azure iPaaS?
Integration weekly updates can be your solution. It’s a weekly update on the topics related to Integration – enterprise integration, robust & scalable messaging capabilities and Citizen Integration capabilities empowered by Microsoft platform to deliver value to the business.
The standard BizTalk Deployment task does a decent job in deploying the application, but it doesn’t handle changing tokens or registering DLLs in GAC.
To deploy in multiple machines or to change your Bindings according to your environment, you have to make your file dynamic. This means, replacing your connections with variables.
Let’s start with the basic:
Creating the project and installing it in DEV
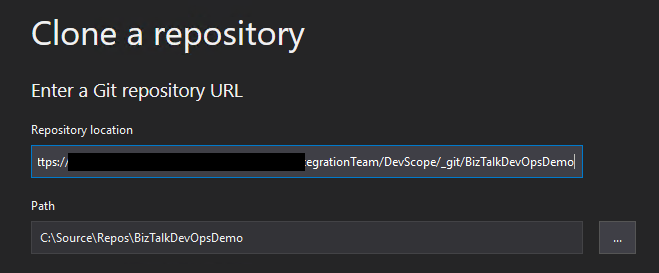
As always, it’s better to first create the DevOps repository and clone it in your machine.
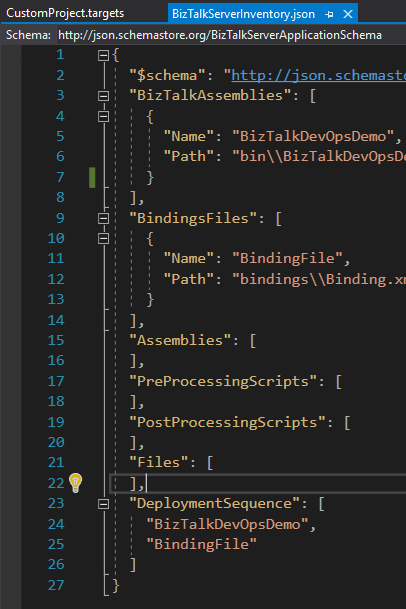
Having this created, you need to get your project working and have a Deployment Project as well. This will contain the needed DLLs and Binding files pointers to your BTS project. This will also contain the Application name to be deployed and some other configurations.
You will see that you can set the Biztalk Assemblies path as well as other Assemblies, Pre and Post processing scripts and the Deployment Sequence. This is one of the most important steps, because, as you know, it does matter in which order you deploy your BT Assemblies.
When referencing your BT projects, do make sure that the Application Project is using the same framework version as your other projects. If it’s not the same version, it will not be able to copy the DLLs to the referenced Path and will not build successfully.
Building this project will generate a ZIP file that contains all that is needed. You can try to publish it directly, after configuring the application.
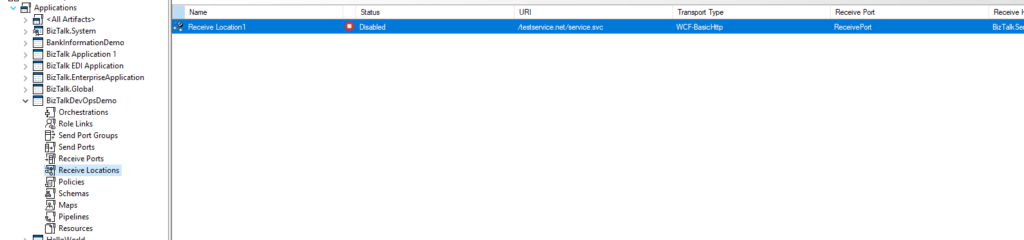
The bindings file that is created with the project is just an empty template, so you’ll want to deploy your application in your Dev Environment and create those bindings. It will make a difference if you export your application bindings when it’s started and when it’s stopped, so keep that in mind.
For this example, I’m going to export the bindings with the Application fully stopped.
Your standard Bindings export will carry the ports and URIs/connections straight from the Admin console. Through a little magic, we will configure these values to be dynamic and it’s super easy.
Making your Bindings dynamic for deployment
Now you’ve exported the bindings and you want to make it ready for DevOps and to accept multiple configurations.
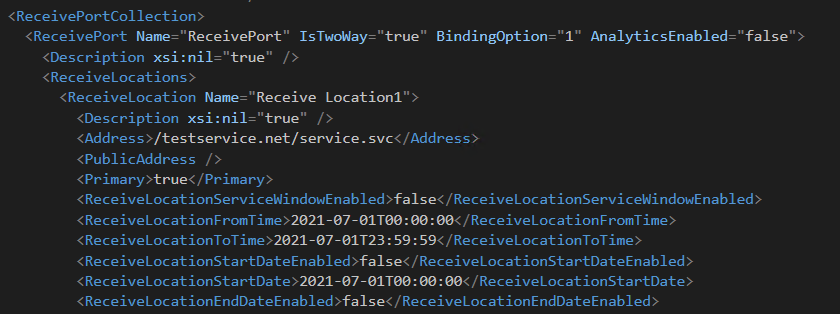
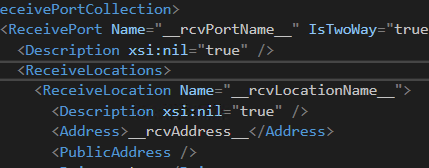
From my example, you can see that the ReceiveLocation and ReceivePort names are static. If we tokenize this, you can call it whatever you want, therefore reducing the risk of colliding with other existing ports in your end systems.
So, keeping in mind the desired token, I’m going to replace these values, ReceiveLocation address included, with a variable and token identifier. With a few magic touches, we end up with something like this:
And that’s it. Of course, this is a very small and simple example, but even with a goliath project, it will still be the same pattern. You find what you want to make dynamic, tokenize it, save and upload your changes to your Repo.
Building your Pipeline and Release Pipeline
Now you have your source code in your Repository, your bindings ready for dynamic changes and you want to deploy it.
You will need to set up your build Pipeline before you can get your Release ready, so get to work.
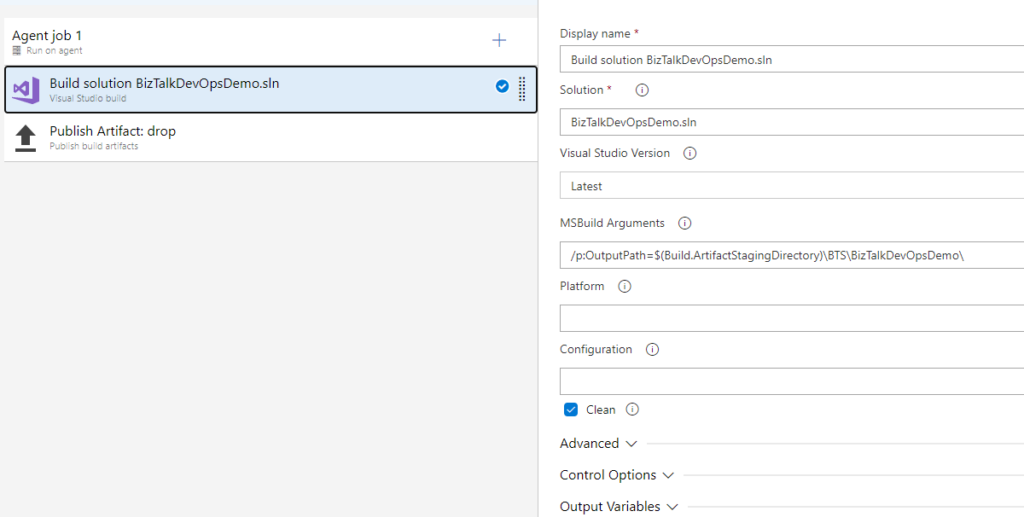
The Pipeline itself doesn’t need to be too complicated, you just need to build your Solution, with or without the OutPath argument (I found that setting this would make my life easier in some projects) and publish the drop.
With your drop created, your Release pipeline needs the following tasks:
Extract Files – to unzip your file
Replace Tokens (a great extension by Guillaume Rouchon, more info here)
Archive Files – to zip it back
BizTalk Server Application Deployment – I recommend this, but you can do it with PowerShell
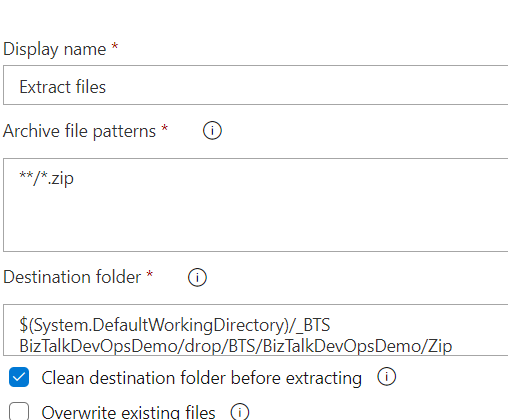
Extracting your file contents is straight forward, you just need to select your zip in your drop contents and a destination folder. Keep in mind that you will need to know where it lands, to zip it back.
Replacing the Tokens is just as before, you select the *.XML mask or point directly to your bindings and select the Token that it should be looking for. Remember, that the variables you define are case sensitive. You can also use a Variable Group, it is a great way of knowing your environment specific variables or common variables that your might have.
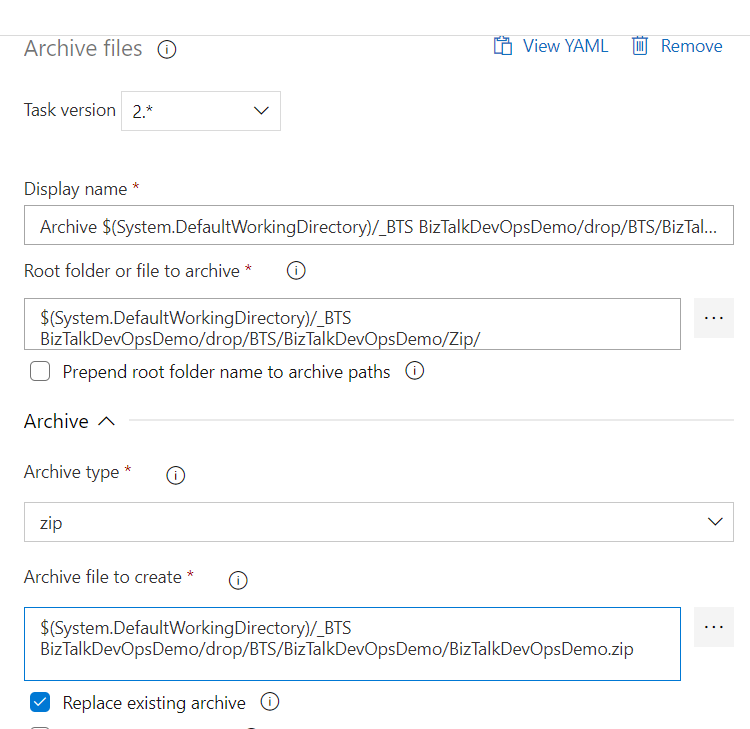
Once this is done, you can proceed to recreate the Zip file and it’s contents. The destination folder you’ve selected when Unzipping will now be the Root folder you are pointing to.
Remember to tick out the “Prepend root folder name to archive paths” option. If you keep this selected, your file will end up with a structure like “Zip / bindings” instead of just “bindings” and the deployment will fail, because it’s not the expected folder structure. Also, tick the “Replace existing archive” option, else you will create a copy and deploy the original version instead.
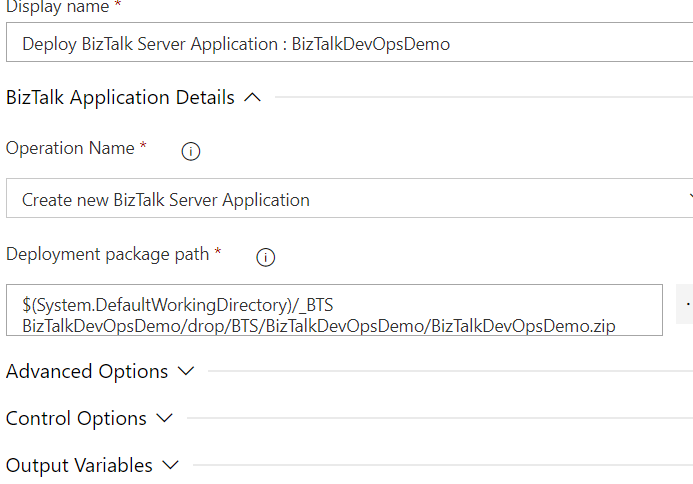
And for the final step, the Deployment Task. I chose to use the standard task instead of PowerShell, because I didn’t want to handle scripts at this point.
Select the Zip package and set the operation to Create. From what I’ve found out, this will Upsert your application, while Update will not create the app if it doesn’t exist.
And this is what you need. If you’ve set everything properly, your Release Pipeline will deploy your Application to your Server and get it up and running, with the parameters you’ve set in your bindings file.
It took a while to understand how this process worked but in the end, it turned out to be very simple and all it took was to apply the same concept we already used with the ARM deployment for Azure resources.
Do you feel difficult to keep up to date on all the frequent updates and announcements in the Microsoft Integration platform and Azure iPaaS?
Integration weekly updates can be your solution. It’s a weekly update on the topics related to Integration – enterprise integration, robust & scalable messaging capabilities and Citizen Integration capabilities empowered by Microsoft platform to deliver value to the business.
Last week was Microsoft MVP renewal time – as you’ll probably have seen – and usually, I share this news firsthand, but this year my wife caught me off guard and in a week of hard work and was faster than me!
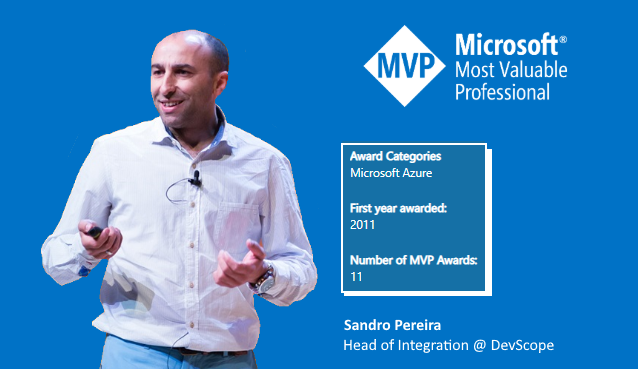
I’m delighted to share with you that on July 1st, I was renewed as a Microsoft Azure MVP (Microsoft Most Valuable Professional) for one more year. This is my 11th straight year on the MVP Program, a fantastic journey that started in 2011, back them as a BizTalk Server MVP. It looks like it was yesterday! And even though it’s already been 11 years, I still feel the same joy, excitement, and privilege of belonging to this group as on the first day!
It is an honor and privilege to be among great minds and community leaders! I want to send a big thanks to Cristina González Herrero, Irene Otero Perez for all the fantastic work managing the program in my region. And to all my fellow MVPs, my beautiful family, my coworkers, and to my team at DevScope, and in special all my blog readers, friends, members of Microsoft Enterprise Integration Community – THANKS! Thanks for your support during these years.
Historically, deploying BizTalk Server solutions across environments is or can be a complicated process depending how complex is your solution. There are many ways to deploy BizTalk artifacts for example:
Importing them as part of an application by using the Deployment Wizard (from an .msi file), importing them using BTSTask.exe – this is the default way to deploy across environments.
You can replace and use allow BTSTask, PowerShell scripts.
Or deploy them from Visual Studio – this is the default way to deploy to your development environment.
During the years, the BizTalk Server Community created an open-source deployment framework called Deployment Framework for BizTalk (BTDF) – https://github.com/BTDF/DeploymentFramework. The Deployment Framework for BizTalk is an easy-to-use toolkit for deploying and configuring your BizTalk solutions. In reality, BTDF is an MSBuild project with custom MSBuild tasks, and it can be customizable according to customer BizTalk project needs, and it is extensible. This framework brings new capabilities and advantages to deploying BizTalk Server solutions, but it also has limitations or disadvantages.
Azure DevOps and Azure Pipelines
Microsoft has introduced automated deployment of BizTalk Applications in BizTalk Server 2016 Feature Packs using Azure DevOps (previously called Visual Studio Team Services – VSTS). In BizTalk Server 2016 Feature Pack 1, automatic deployment and application lifecycle management (ALM) experience was introduced. The automatic deployment process has been improved with the release of BizTalk Server 2016 Feature Pack 2. These features were only available on the Enterprise edition of BizTalk Server 2016.
BizTalk Server 2020 brings all these functionalities out-of-the-box across all editions: Enterprise, Standard, Development, or Branch.
To accomplish this, we need basically 3 steps:
BizTalk Server: Add a BizTalk Server Application project in your Visual Studio solution.
We will not address this topic today.
DevOps: Create a build agent.
DevOps: Create a Build and release Azure Pipeline.
Today we will talk about starting to configure your Azure Pipeline to create a BizTalk Server Build Agent.
Create a Personal Access Token
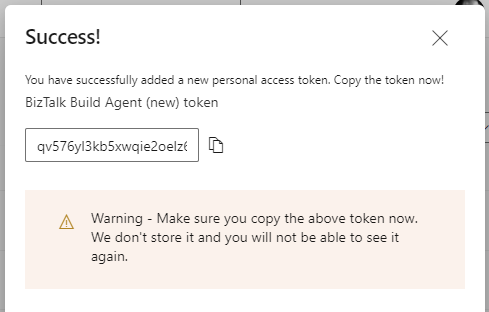
A personal access token (PAT) is created in DevOps. This token is your password and is used by the DevOps build agent to authenticate. The token is only shown when you create it. After that, it isn’t shown anymore. Once you create it, you should save it to another file in a rememberable location.
If you do not have an account, select Create new account, and enter a name. To manage your code, choose your personal preference between Git or Team Foundation Version Control. When finished, your new account is created, you will be able to access Azure DevOps Portal.
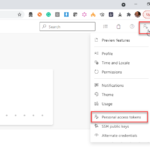
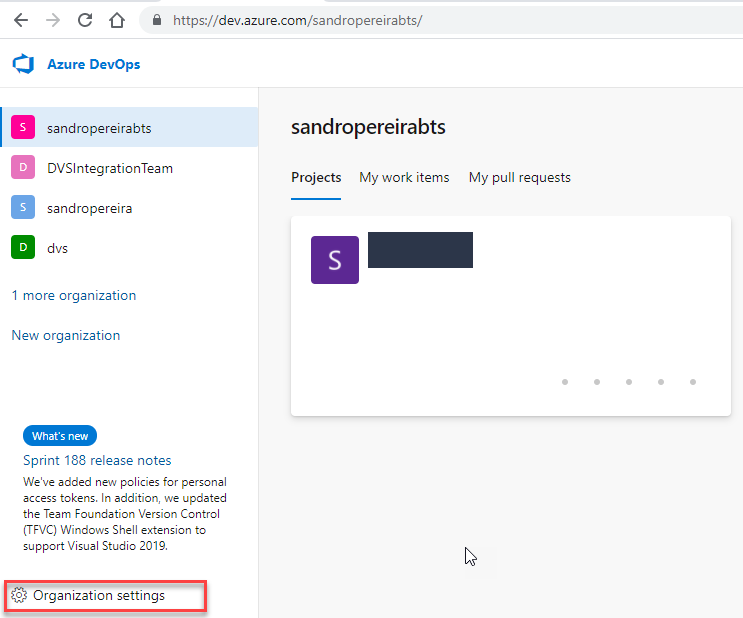
Select your DevOps organization and then click the top second right-side corner icon – User settings – and select User settings > Personal access tokens.
The Personal Access Tokens page will be presented a list of all existing personal access tokens.
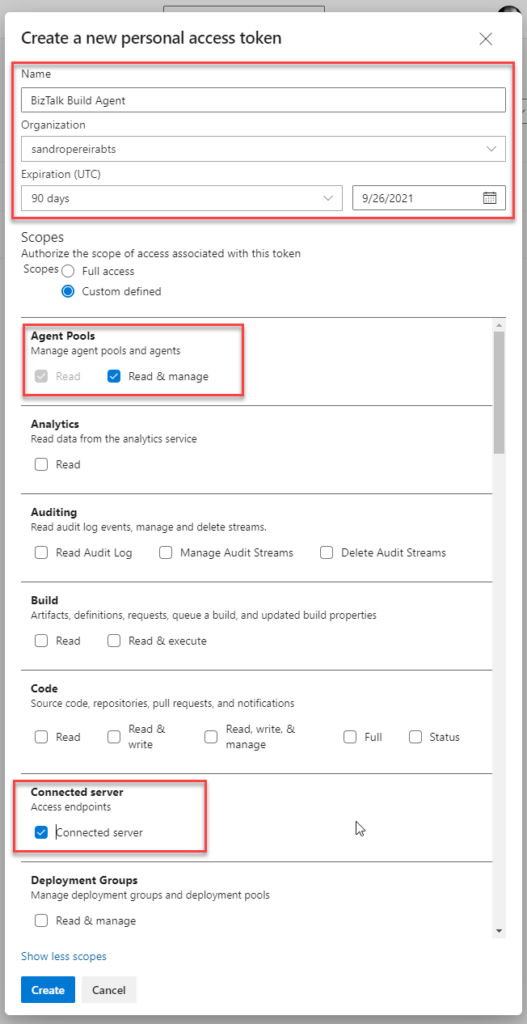
If you don’t have an existing PAT for your agent, select Add, and on the Create a new personal access token page, enter the following configuration:
On the Name property, enter a name for your PAT, for example, BizTalk Build Agent.
On the Organization property, leave the default organization.
On the Expiration (UTC) property, set an expiration date, for example, 90 days.
In Scopes, select Show all scopes, and then select Agent Pools – Read & manage option and Connected server – Connected server.
Select Create to finish the PAT creation.
Important Note: You need to save the token value. You need it in future steps. If you don’t know the access token value and didn’t take note of it anywhere, it cannot be retrieved. In this case, you need to create a new PAT.
Install the Build Agent
The build agent is installed on the BizTalk development computer. If using deployment groups, the build agent is installed on all the BizTalk servers you want to deploy to. Also, use these same steps to add a build computer, which might be different than the BizTalk development computer.
The following steps show you how to install the build agent on a single computer:
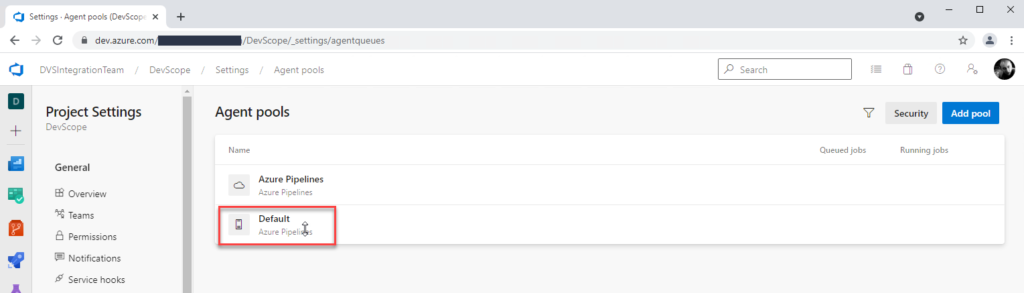
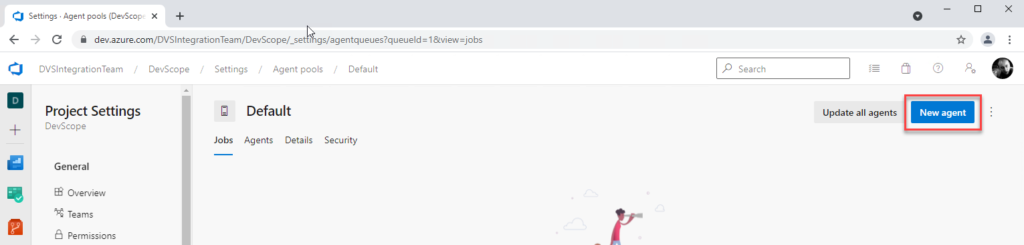
Open your Azure DevOps organization and then select the Organization settings icon and then Agent Pools.
Optional you can choose a Project inside your Organization and then select the Project settings icon and select Agent Pools.
Open Agent pools page, select the Default (Azure Pipelines) agent.
On the Default agent page, select New agent.
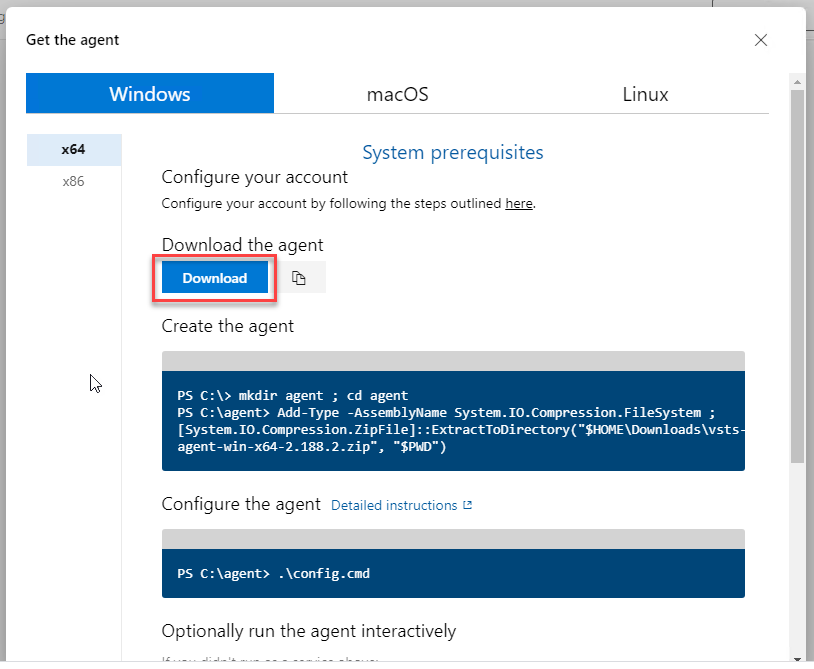
On the Get the agent pop-up window, select your SO, and on the Download the agent section, select Download.
It is important for you to save the file to your Downloads folder – on your BizTalk Server Development machine since the scripts will be referencing that folder.
Depending on your SO, this will download a zip file, for example, vsts-agent-win-x64-2.188.3.zip, that you will need to create the agent on the BizTalk Server Development machine.
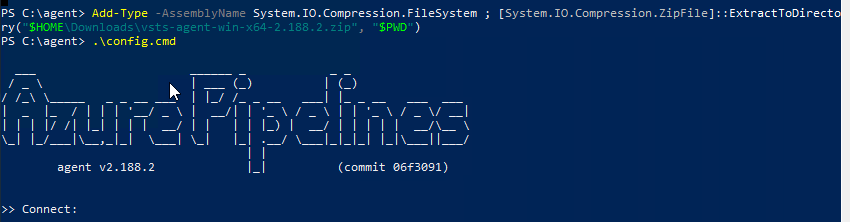
The first step is to create the agent on your BizTalk Server Development machine. To do that open Windows PowerShell as Administrator and type the following command:
Note: The vsts-agent file version changes. Make sure the zip file name is the correct one.
The second step, as you also see in the picture is to configure the agent. To do that type the following command:
PS C:agent> .config.cmd
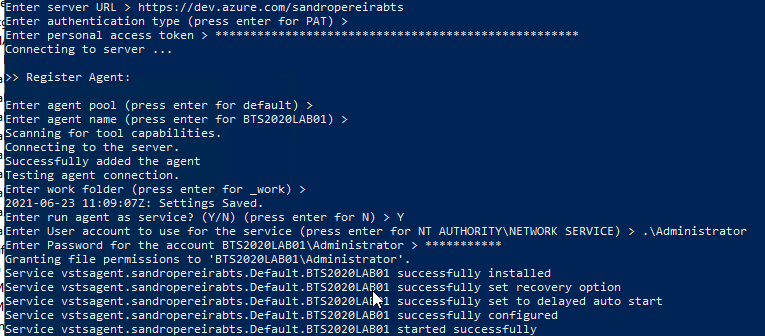
Enter the following details:
Server URL: Type https://dev.azure.com/{your-organization}.
Authentication Type: Enter PAT.
Personal access token: Paste your Azure DevOps token.
Agent pool: Click Enter for assuming the default value.
Agent name: Click Enter for assuming the default value.
Replace: Only displays if you have an existing agent.
Work folder: Click Enter for assuming the default value.
Run agent as a service: Enter Y.
User account: This value is up to you, but you may run into a permissions issue. Consider entering your current logged-on account, which is a local admin.
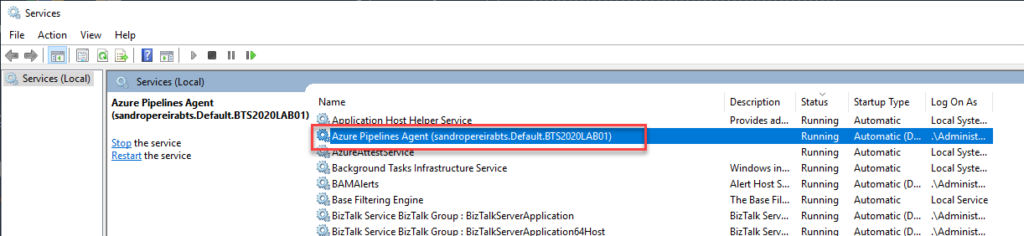
To validate if the agent was properly installed, Open services.msc to see the new service called Azure Pipelines Agent (<organization>.<agent pool>.<server>). The job should be running, otherwise type the following command:
PS C:agent> .run.cmd
Now, if we go back to our DevOps organization > Organization settings > Agent pools > Default (Azure Pipelines) > Agents, you will see your BizTalk Server Development server on the list:
Do you feel difficult to keep up to date on all the frequent updates and announcements in the Microsoft Integration platform and Azure iPaaS?
Integration weekly updates can be your solution. It’s a weekly update on the topics related to Integration – enterprise integration, robust & scalable messaging capabilities and Citizen Integration capabilities empowered by Microsoft platform to deliver value to the business.
I’m not a Dynamics 265 expert, and Dynamics 365 is not my focus area. Nevertheless, I couldn’t ignore the flood of requests to add the new Dynamics 365 logos, especially the App icons. It took a while, but they are finally here.
What’s new in this version?
These are the list of changes and additions present in this major release:
New shapes: There are new shapes on the following Visio Stencils files (.vssx):
MIS Office, Office 365 and Dynamics 365: add the new Dynamic 265 logo, Dynamics 365 App Icons, and Dynamics 365 Mixed Reality Icons.
MIS Azure Stencils and MIS Azure Additional or Support Stencils: there were a few new icons add to the stencils, most of them related to new preview features and integration services like the new Logic App icon.
SVG files: new SVG files added.
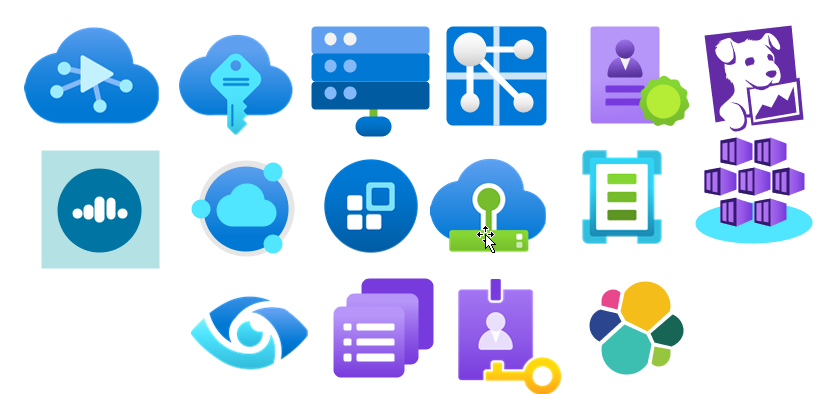
Microsoft Integration, Azure, Power Platform, Office 365 and much more Stencils Pack
Microsoft Integration, Azure, Power Platform, Office 365 and much more Stencils Pack it’s a Visio package that contains fully resizable Visio shapes (symbols/icons) that will help you to visually represent On-premise, Cloud or Hybrid Integration and Enterprise architectures scenarios (BizTalk Server, API Management, Logic Apps, Service Bus, Event Hub…), solutions diagrams and features or systems that use Microsoft Azure and related cloud and on-premises technologies in Visio 2016/2013:
BizTalk Server
Microsoft Azure
Integration
Integration Service Environments (ISE)
Logic Apps and Azure App Service in general (API Apps, Web Apps, and Mobile Apps)
Azure API Management
Messaging: Event Hubs, Event Grid, Service Bus, …
Azure IoT and Docker
AI, Machine Learning, Stream Analytics, Data Factory, Data Pipelines
SQL Server, DocumentDB, CosmosDB, MySQL, …
and so on
Microsoft Power Platform
Microsoft Flow
PowerApps
Power BI
Office365, SharePoint,…
DevOps and PowerShell
Security and Governance
And much more…
… and now non-related Microsoft technologies like:
SAP Stencils
The Microsoft Integration Stencils Pack is composed of 27 files:
Microsoft Integration Stencils
MIS Additional or Support Stencils
MIS AI and Machine Learning Stencils
MIS Apps and Systems Logo Stencils
MIS Azure Additional or Support Stencils
MIS Azure Black and Gray
MIS Azure Old Versions
MIS Azure Stencils
MIS Black and Cyan
MIS Buildings Stencils
MIS Databases and Analytics Stencils
MIS Deprecated Stencils
MIS Developer Stencils
MIS Devices Stencils
MIS Files and Message Types Stencils
MIS Generic Stencils
MIS Infrastructure and Networking Stencils
MIS Integration Fun
MIS Integration Patterns Stencils
MIS IoT Stencils
MIS Office, Office 365 and Dynamics 365
MIS Power BI Stencils
MIS Power Platform Stencils
MIS SAP Stencils
MIS Security and Governance
MIS Servers (Hexagonal) Stencils
MIS Users and Roles Stencils
Organisational Stencils
That you can use and resize without losing quality, in particular, the new shapes.
Download
You can download Microsoft Integration, Azure, BAPI, Office 365 and much more Stencils Pack for Visio from GitHub Here:


 Open Source – Azure Makes it Easy to Run Open-Source Products