This is a topic that has been asked to me a few times, making me wonder how hard it actually was. Working with this nearly every day makes us assume some things are very easy, but not everyone has this insight.
So, exactly do we set variables for different environments and how does it work when we want to replace tokens?
Variables for different environments
Having multiple environments creates the need to have different values assigned to your variables, because, for example, that Test Webservice won’t work in PROD and you definitely don’t want to use that PROD file share and delete files in your DEV/Test environment.
Using Pipeline Variables helps you to set different values to different Stages.
This is extremely helpful because, even though you have to duplicate/triplicate variables, you won’t need to worry about the incorrect value going to the wrong stage. Also, having the Scope set to Release, it will affect all stages.
So, it’s a win-win situation.
But! It’s only valid for this Release Pipeline in specific. If you have another Release and some variables are common, you have to re-do everything… all, over, again.
Send in the Variable Groups!
Variable Groups
The Variable Groups are containers for variables that can be used in multiple Releases and Pipelines. Think of it as a common class in your project that you can reference anywhere.
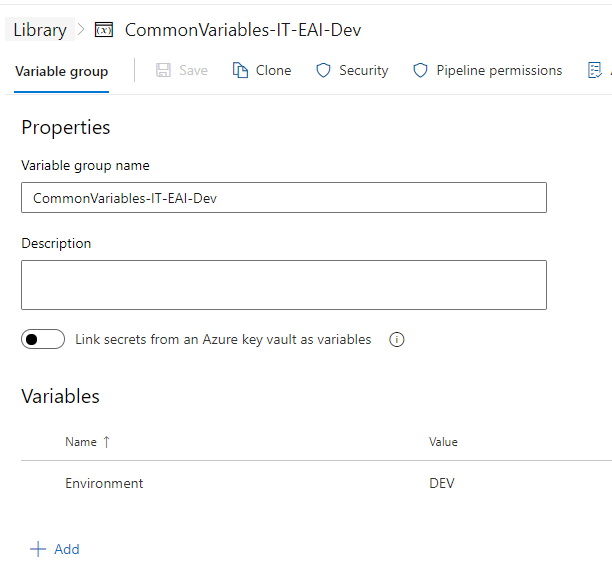
You can define the Groups and their variables in the Library. Inside the group, you can set all the variables you need, and add to it any time as well, and assign the values right away.
Keep in mind that this is thought of as a static group, it’s not supposed to change often.
If you change a variable value or add a new one, it will not be considered in the already created releases. If anything changes in here, you will need to create new releases (not the pipelines) and redeploy them. When you create the release, it takes a snapshot of the values and uses them as they are. Thus the need to create a new one to get those new values.
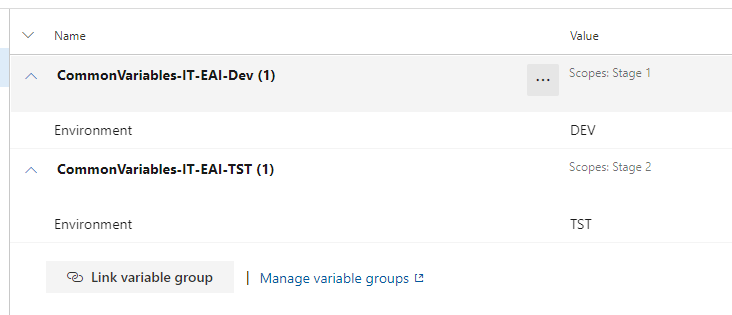
After linking the group to the Release, you will see that you can also set a Scope. This works exactly like the pipeline variables, they will only be used in that specific Stage and nowhere else.
Also, when expanded, you can see the values that are set for that group.
Now, how does the Token Replacement task works with this?
Replace Tokens
This task, our savior (yes, I like it very very much), comes to our rescue once again.
I’ve explained before how to use it and how it works.
But for this post, I’ll explain again. The task searches in the folders/files you’ve defined and tries to match the token that you’re setting in the definition with the one in the file(s). As the token is found, it uses a string.Replace function to inject the values in the files.
It will scour the Variables for a match and take the value to insert in the file.
But how does this link with the Variable Groups?
Well, at runtime, DevOps does a magical thing and sees the groups you’ve defined for a Stage as variables. So technically, it’s as if you’ve defined all the variables in one place and not in groups.
Pretty sweet, right?
So, the Replace Tokens will use all those variables and will try to replace them in your files. You don’t have to define the group or anything, it will just see the whole picture.
Hope this helps you with your automations and deployments.
A few months ago I was involved in an integration project that required sending files to a local file system, that resided in an Azure VM.
This was a bit of an issue, because we had to use the ISE connector and it was in Preview at the time, we had to do a Proof-of-concept and make sure it worked properly.
It all went well, the integration went live and the client was happy.
A couple weeks ago, Michael Stephenson asked for my help, to solve an issue that he was having. The problem was on how to send files to another system.
Now, in an operative system, you’d just move the file over by code or using the UI. But in the integration with Logic Apps, what came out was a JSON message.
Of course you can copy files over to another Azure storage, but in this particular case, we were pulling files with a webservice and dropping them into a local VM. The OOTB connectors help, but they don’t create the file object on their own.
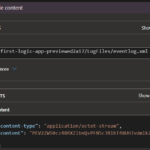
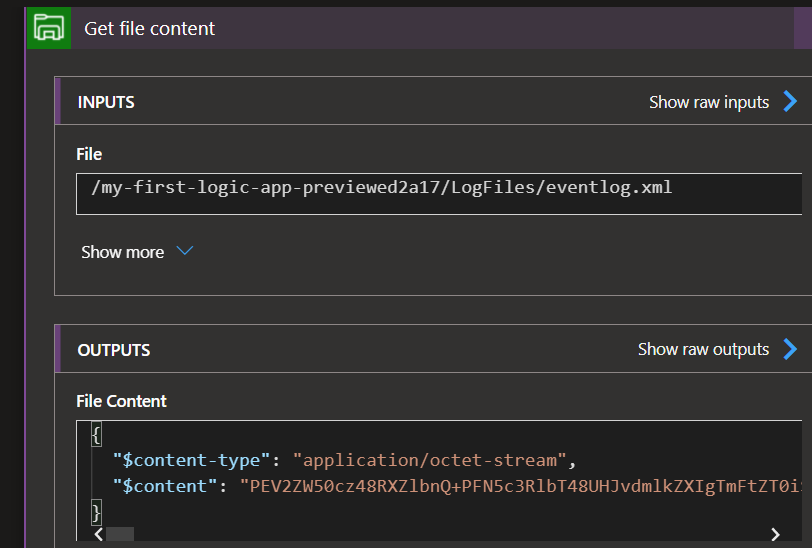
In my example, I’m using an Azure File Storage connector to get the file content. It mimics a Webservice where you’d get the same content. In this case, we’re also getting the content-type in the response.
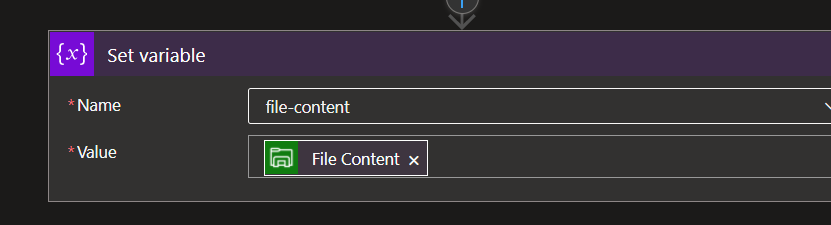
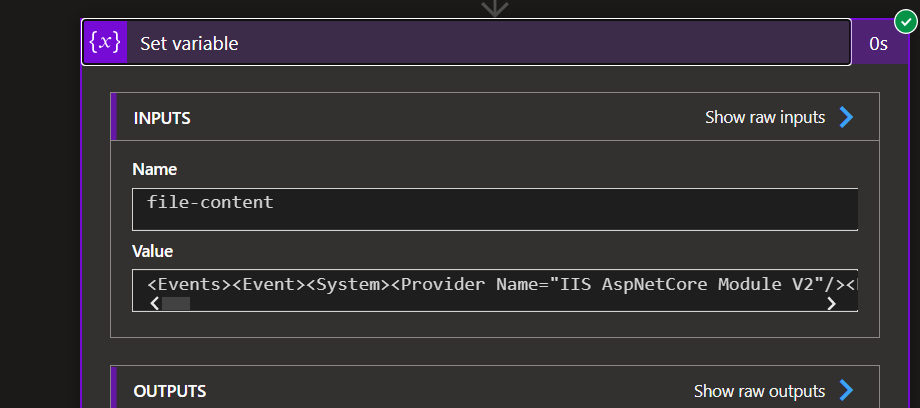
If we set the File content to a variable, it will just send, well, the content itself. In my example, it’s a XML log file, so it’s actually translating the Base64 into a XML string, which is interesting. It might not be properly formatted, but it’s a string at the end of the day, instead of its Base64 representation.
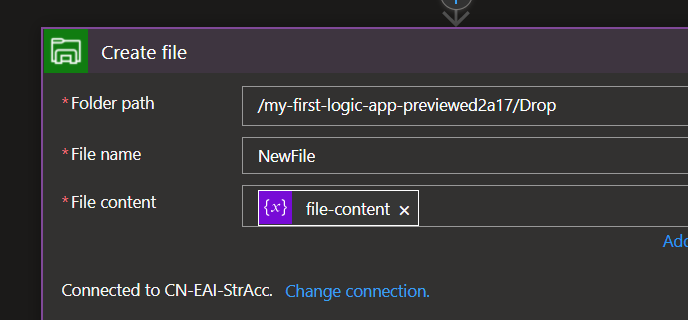
So, we pick up the file, assign the string to a String object and set it to create in the end system.
This works, but creates a string file but this is not what we wanted. We also need to keep the MIME type of the file.
I’ve searched for help in how to achieve this, but there’s no information about it. This is quite shocking, because it almost sounds like Microsoft doesn’t want you to know how to do this or they didn’t took the time to document this.
The good thing, is that it’s quite simple to do this. The JSON object we need to create is extremely simple and very easy to understand how it works.
Let’s get another example. In this case, we have a SOAP web service that returns an array of fields, one of them being the Base64 for the file and the MIME type. This is the perfect example of our issue. As I’ve said before, if I just set the FileData field to a variable, it will end up in sending the string to a file, not caring about what type of file it is.
So, grab those fields into a JSON Parse action, we’re about to jingle some files into your system.
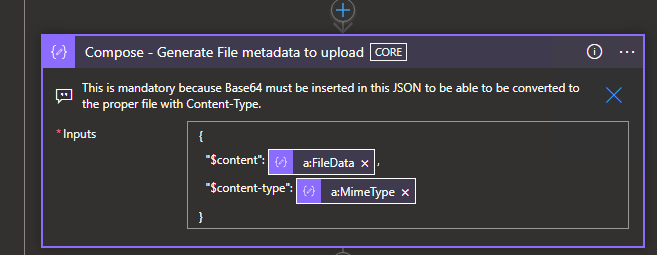
Create a Compose action and…
TA-Daaa! You just need to add a $content and $content-type fields in a JSON object and it will create your file.
It’s this easy!
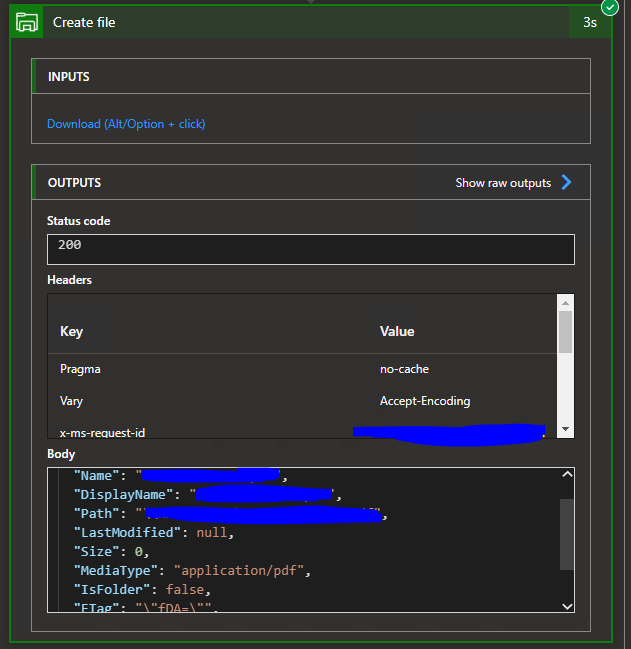
It’s interesting that the GetFile connector provides the answer we needed, but as I’ve said, there’s no actual guide lines for this. There might be a few other metadata fields you can set for a file, I haven’t explored this yet, but it makes sense to be able to do it.
I hope this helps you and takes away one headache before Christmas.
In the previous posts of these series, we’ve talked about how to build and prepare your Logic App for CI/CD. In this last post, I’ll show you how to build your Azure Pipeline, making it prepared for any environment you need.
If you’ve missed the other posts, here are the links for them:
Assuming you already have your repo configured, building the pipeline is fairly simple and quick. I’m not a big fan of using YAML, I find it easier to use the classic editor, having the GUI seems more appealing to me.
Having your repo in place and all the code ready, you need create the Pipeline.
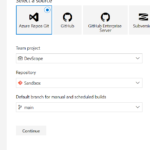
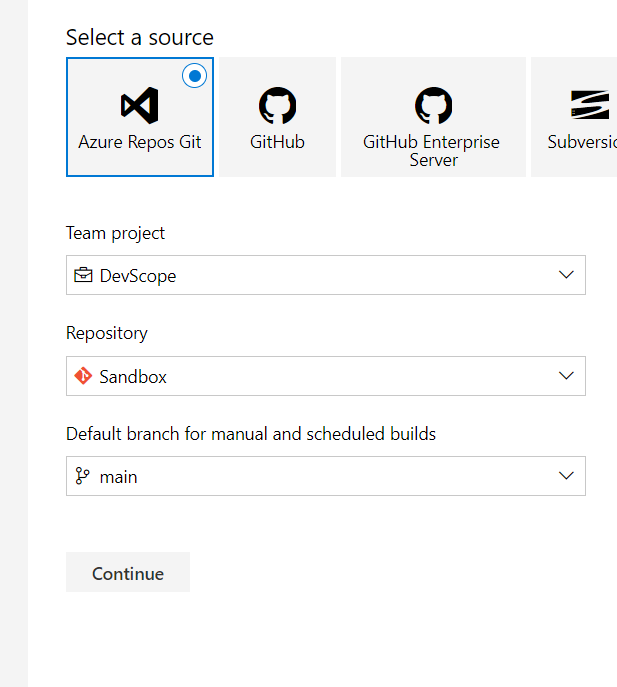
As such, you need to choose the classic editor (or venture yourself in YAML) and select your repo and branch.
The available templates are helpful but if you’re just trying to deploy logic apps, I’d suggest you start with an empty job, because you might have actions that are not necessary and you’ll have to delete them.
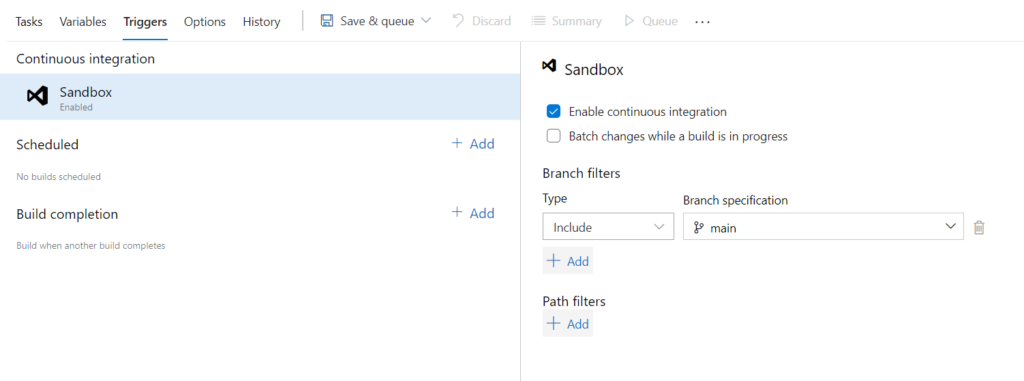
The first thing we’re going to do, is configure the pipeline for continuous integration. It doesn’t take much to achieve this, you just need to activate the needed triggers. By default, it will filter to your main branch, but you can change this and trigger for specific projects and branches. This comes in handy when you have multiple projects and you only want to include some in the build.
After enabling the triggers, you’ll need to add the required tasks to get your pipeline going. You might be getting a few secrets in Key vault, if that’s the case, do remember to add the Azure Key Vault task. This will pull either all the secrets or the filtered ones you’ve selected, keeping them in cache for the pipeline execution. This will be used in the Replace Tokens task, which I’ll discuss a bit down the road.
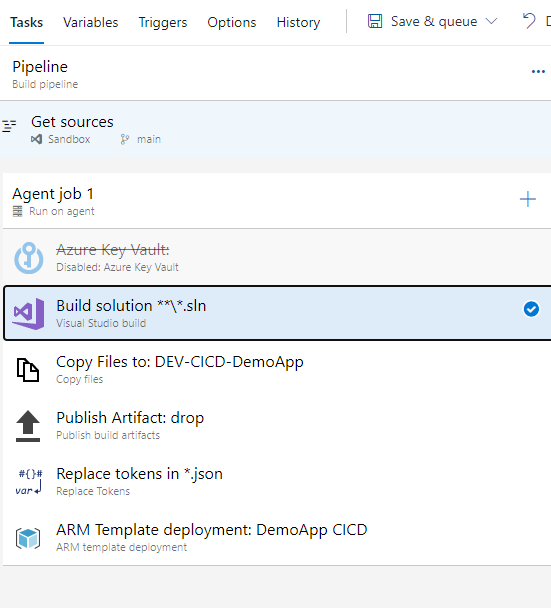
As you can see, it doesn’t take many tasks to have a functional pipeline, ready to deploy your Logic App to the CI environment.
The required tasks are:
Visual Studio build – to build your solution, obviously
Copy files – which will copy the desired files over to a folder in the Drop
Publish build artifacts – makes the drop available to use in the pipeline and the release
Replace Tokens – a very handy tool that allows you to replace your tokens with the variables or group variables values
ARM template deployment
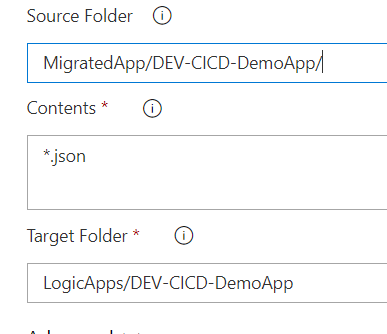
The Copy files task is very simple and easy to use. You take the input folder, copy the files you want/need to the target folder. Easy-peasy-lemon-squeezy.
I’d advise you to set the Target Folder as a named one, when you’re building the Release, it will be easier to find what you need if you divide your assets by name.
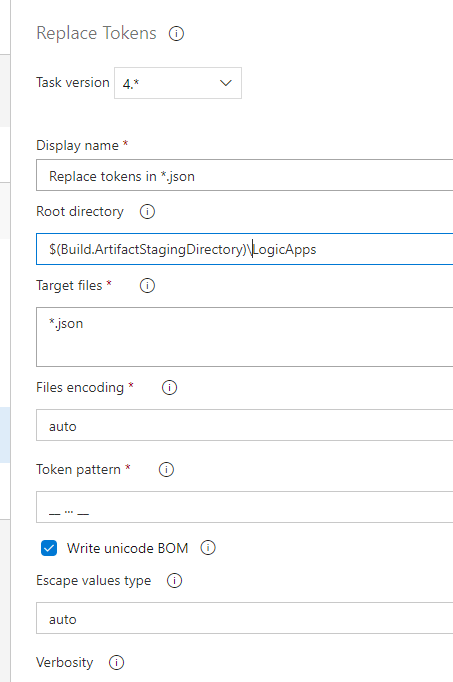
After copying the files, we will replace the tokens. How does this work?
Simply put, the task collects all the variables in memory and searches for the token pattern in all the target files. Given that we wrote our parameters with the __ … __ token, if we use other tokens in the files, it should not affect them. This is by far, in my opinion, the most helpful task in multi-environment deployment. It takes out the need to have multiple files by environment and having tons of variables.
Having the files copied, tokens replaced, our Logic App is ready for deployment in the CI environment. Now, this is not mandatory, you might not want to deploy your LA from the pipeline, you might want to use the Release instead. This is fine, you just need to move the ARM deployment tasks to the Release, it will not affect the outcome nor the pipeline.
As you can see, after selecting the Azure details (Subscription, RG, Location, etc) it becomes easy to select your LA to deploy. Since we used the LogicApps folder, we just need to reference the JSON files and the task will pick them up from the drop folder and deploy them.
Final notes
You’re now ready to go on your adventures and build your Logic Apps, get them ready for Continuous Integration and deploy them. I didn’t approached the Release Pipeline because it’s also very simple. You will only require to create your variables, replace your tokens and deploy the ARM templates.
You can fiddle around with gates, automated deployments, pre-deployment approvals and all, but that is a more advanced feature.
Having multiple releases that you want to joint deploy, you can even build Orchestrations (I can hear all the BizTalk bells ringing in our heads). This is not as simple as isolated deployments, because it does involve some orchestration of the parts (well, duhh).
I hope this small series of posts helped you to solve issues and to improve your deployments.
In the last post we talked about building a Logic App from scratch and gave a few hints on what we would change to prepare for CI/CD.
In this post, we will show you how to prepare your Logic App and template files, how to set and rename your parameters and will hint on how it will correlate with the Azure Pipeline.
So lets recap. We saw that the needed requirements are having VS installed, Azure SDK, Logic Apps for Visual Studio tools extension and an active Azure subscription. We built a new Azure Resource Group project with the Logic Apps template and added a few actions to our LA, nothing too fancy, just enough to show what’s needed.
Now, let’s look at how we will change the code to get it ready.
Changing the JSON code to prepare it for CI/CD is simple but requires attention, because if not done properly, you won’t be able to deploy your template and it might take you a while to find where the problem is. Even though VS gives you a few hints, because Intellisense helps, it might still not explain why it’s failing.
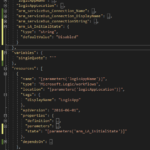
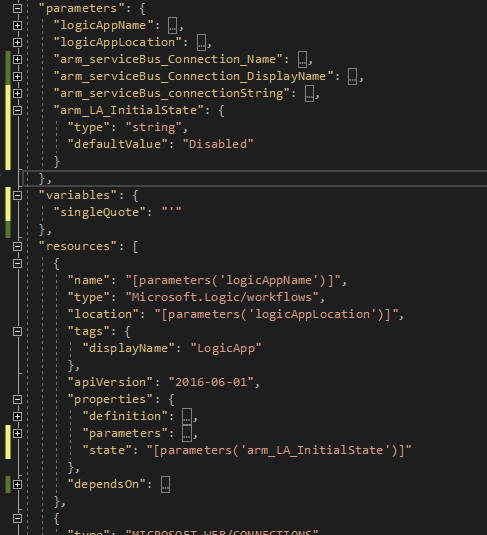
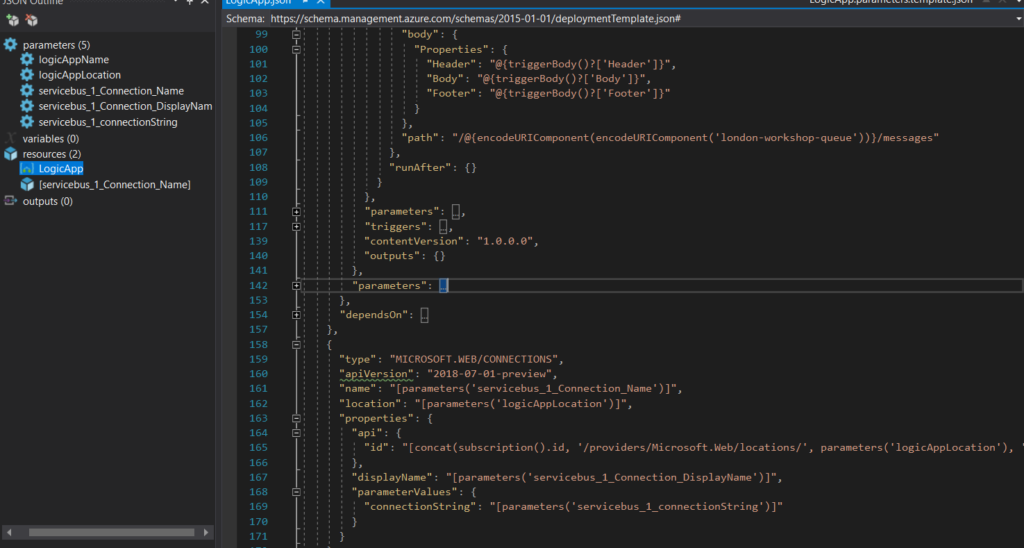
The first thing I like to do is to rename the connection parameters, having “servicebus_1_connectionString” is just horrible and does not help you understand what kind of connection you have. For this case, because we only have one connection, I’ll rename it to “arm_serviceBus_connectionString”, because we’re using an ARM (Azure Resource Manager) template and because this is the type of parameter. I will also add a template variable, named “SingleQuote”, which will be, as you’ve might have guessed, a single quote mark.
If you have other connectors, I suggest you continue changing names to match the same naming convention. It will help you and others to know what that is supposed to be.
After the Logic App file is taken care of, you will also need to apply these changes in the Parameters file.
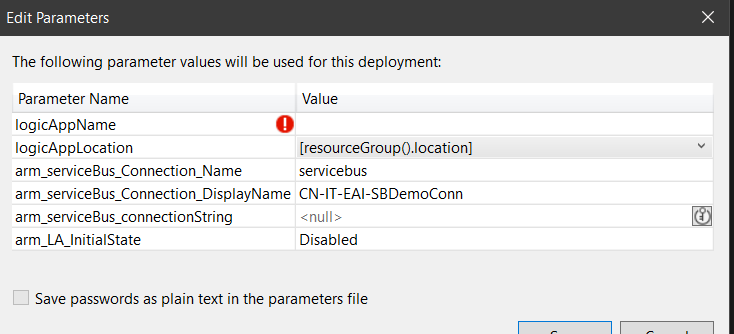
By default, it will be almost empty, just having the logicAppName parameter with a Null value. This will make your deployment fail, because the template isn’t valid.
In fact, you won’t even be able to deploy it, because VS is smart enough to prompt you for the missing values, taking the default ones from the LogicApp.
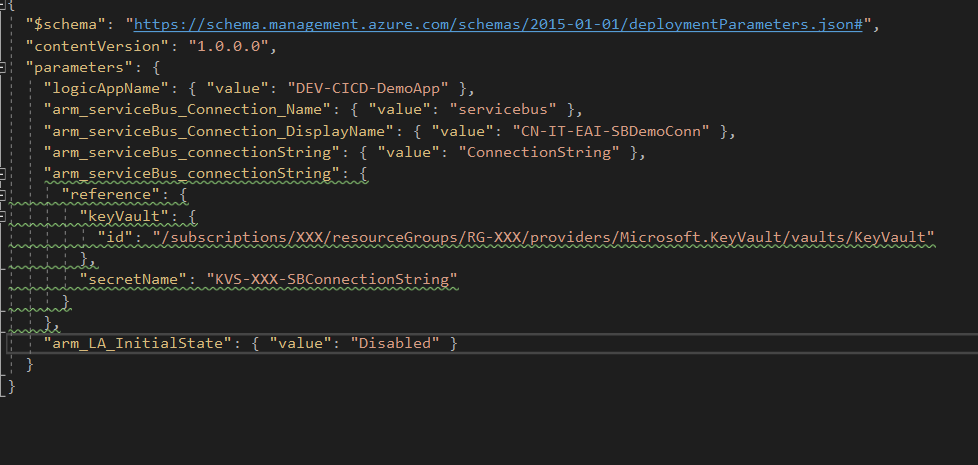
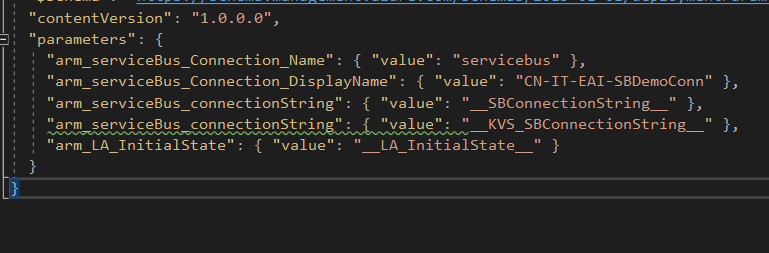
At this point, we’re no longer dealing with the definition, we’re dealing with the values we want the Logic App parameters to have. So, “type” and “defaultValue” no longer apply, you should use “value” directly or, if you’re dealing with KeyVault secrets, you can just reference KV and the secret name.
In this example, I’m setting the SB connection string both ways, to show how it can be done.
If you’ve done everything right, you’re Logic App should be deployed without any fuss.
Now comes the fun part, that is dealing with the Parameters Template file. It is incredibly difficult to do this and it’s going to take several hours. So grab that coffee and get confortable.
You will need to change your values to a token and an identifier, to later use in the Pipeline and releases.
Wow, that took us… 30 seconds, maybe. I’m exhausted and I need a break. You can even get that KV value with the token, you just need to change the identifier to the KV secret name.
We’re sweating over here with all this work.
In the next blog post, we will build the Pipeline and give the hints for the Release as well.
The standard BizTalk Deployment task does a decent job in deploying the application, but it doesn’t handle changing tokens or registering DLLs in GAC.
To deploy in multiple machines or to change your Bindings according to your environment, you have to make your file dynamic. This means, replacing your connections with variables.
Let’s start with the basic:
Creating the project and installing it in DEV
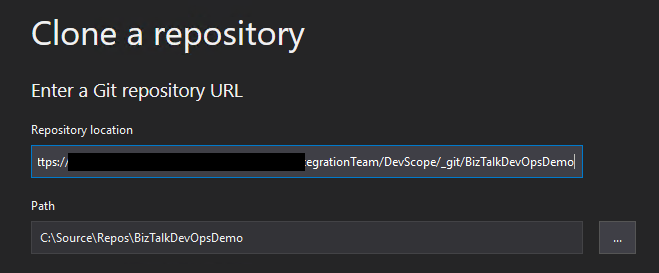
As always, it’s better to first create the DevOps repository and clone it in your machine.
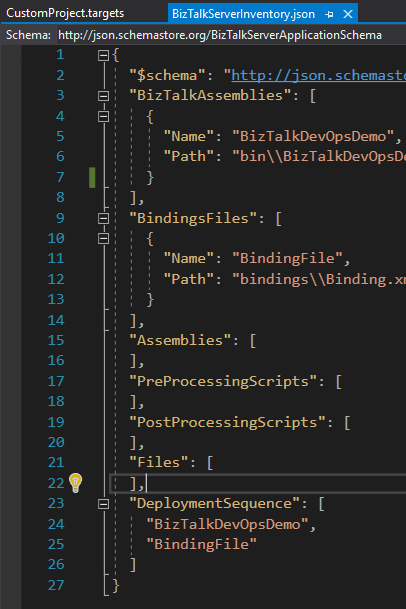
Having this created, you need to get your project working and have a Deployment Project as well. This will contain the needed DLLs and Binding files pointers to your BTS project. This will also contain the Application name to be deployed and some other configurations.
You will see that you can set the Biztalk Assemblies path as well as other Assemblies, Pre and Post processing scripts and the Deployment Sequence. This is one of the most important steps, because, as you know, it does matter in which order you deploy your BT Assemblies.
When referencing your BT projects, do make sure that the Application Project is using the same framework version as your other projects. If it’s not the same version, it will not be able to copy the DLLs to the referenced Path and will not build successfully.
Building this project will generate a ZIP file that contains all that is needed. You can try to publish it directly, after configuring the application.
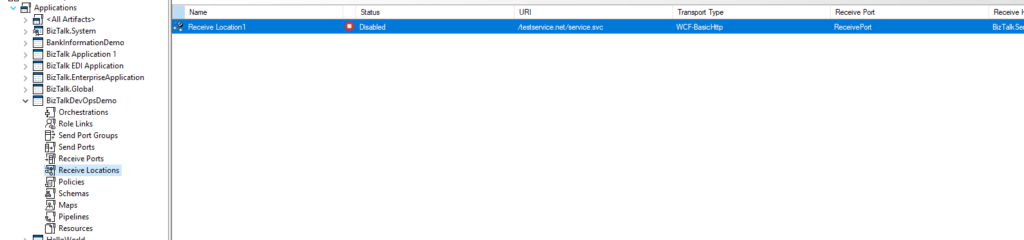
The bindings file that is created with the project is just an empty template, so you’ll want to deploy your application in your Dev Environment and create those bindings. It will make a difference if you export your application bindings when it’s started and when it’s stopped, so keep that in mind.
For this example, I’m going to export the bindings with the Application fully stopped.
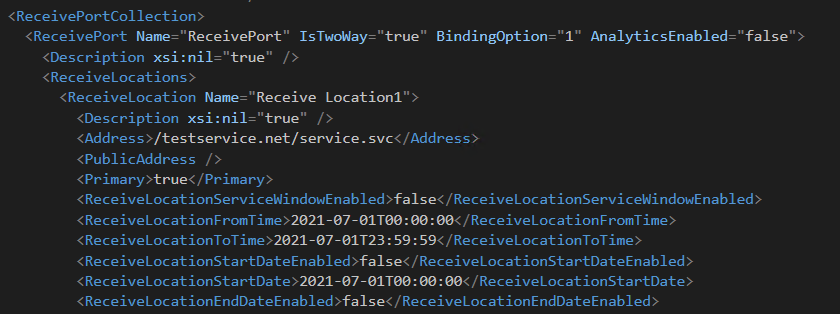
Your standard Bindings export will carry the ports and URIs/connections straight from the Admin console. Through a little magic, we will configure these values to be dynamic and it’s super easy.
Making your Bindings dynamic for deployment
Now you’ve exported the bindings and you want to make it ready for DevOps and to accept multiple configurations.
From my example, you can see that the ReceiveLocation and ReceivePort names are static. If we tokenize this, you can call it whatever you want, therefore reducing the risk of colliding with other existing ports in your end systems.
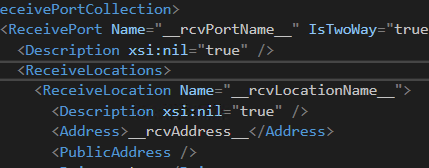
So, keeping in mind the desired token, I’m going to replace these values, ReceiveLocation address included, with a variable and token identifier. With a few magic touches, we end up with something like this:
And that’s it. Of course, this is a very small and simple example, but even with a goliath project, it will still be the same pattern. You find what you want to make dynamic, tokenize it, save and upload your changes to your Repo.
Building your Pipeline and Release Pipeline
Now you have your source code in your Repository, your bindings ready for dynamic changes and you want to deploy it.
You will need to set up your build Pipeline before you can get your Release ready, so get to work.
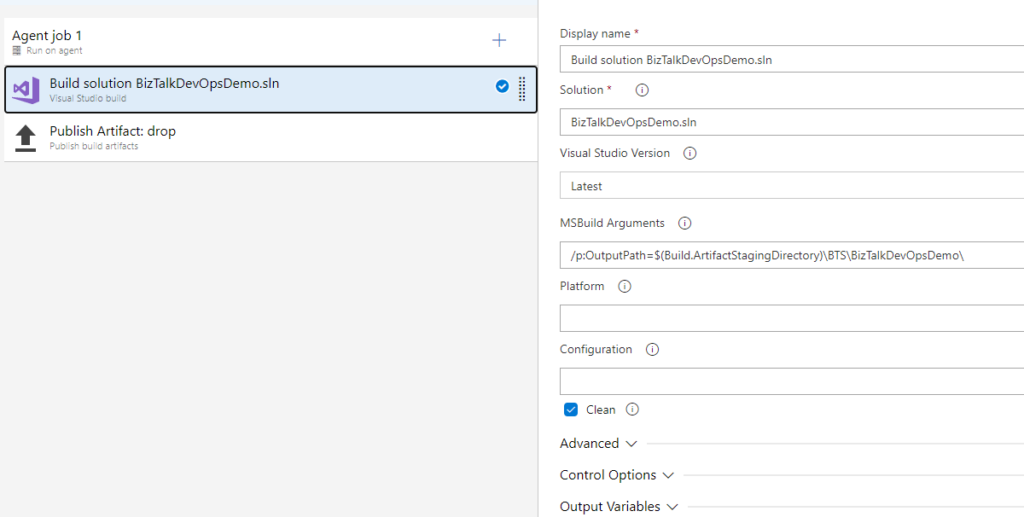
The Pipeline itself doesn’t need to be too complicated, you just need to build your Solution, with or without the OutPath argument (I found that setting this would make my life easier in some projects) and publish the drop.
With your drop created, your Release pipeline needs the following tasks:
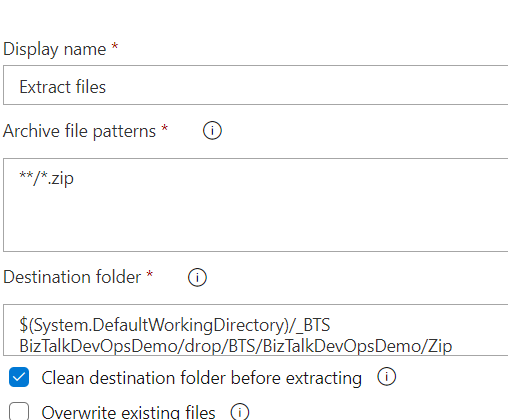
Extract Files – to unzip your file
Replace Tokens (a great extension by Guillaume Rouchon, more info here)
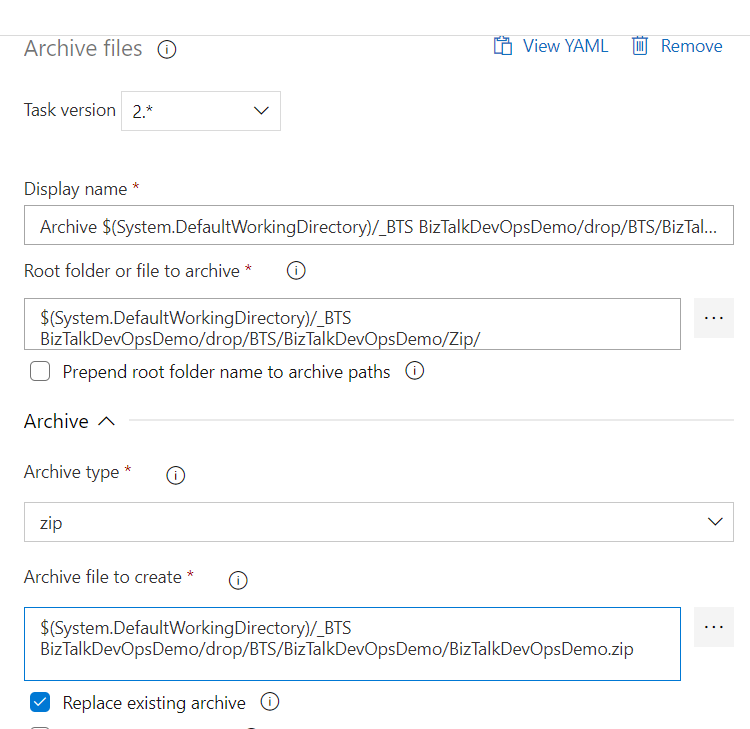
Archive Files – to zip it back
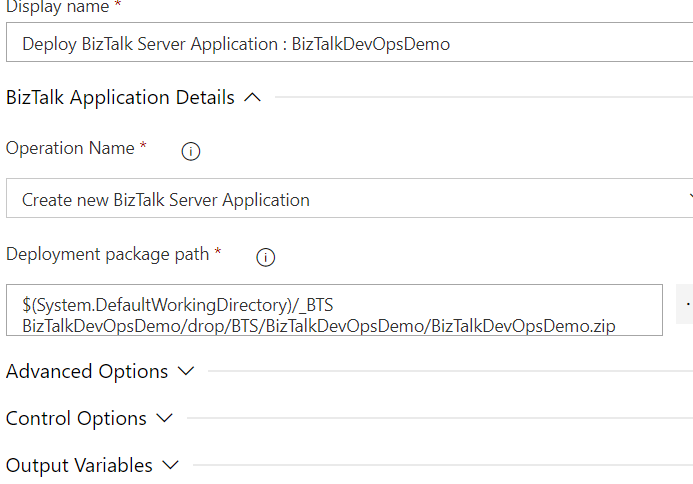
BizTalk Server Application Deployment – I recommend this, but you can do it with PowerShell
Extracting your file contents is straight forward, you just need to select your zip in your drop contents and a destination folder. Keep in mind that you will need to know where it lands, to zip it back.
Replacing the Tokens is just as before, you select the *.XML mask or point directly to your bindings and select the Token that it should be looking for. Remember, that the variables you define are case sensitive. You can also use a Variable Group, it is a great way of knowing your environment specific variables or common variables that your might have.
Once this is done, you can proceed to recreate the Zip file and it’s contents. The destination folder you’ve selected when Unzipping will now be the Root folder you are pointing to.
Remember to tick out the “Prepend root folder name to archive paths” option. If you keep this selected, your file will end up with a structure like “Zip / bindings” instead of just “bindings” and the deployment will fail, because it’s not the expected folder structure. Also, tick the “Replace existing archive” option, else you will create a copy and deploy the original version instead.
And for the final step, the Deployment Task. I chose to use the standard task instead of PowerShell, because I didn’t want to handle scripts at this point.
Select the Zip package and set the operation to Create. From what I’ve found out, this will Upsert your application, while Update will not create the app if it doesn’t exist.
And this is what you need. If you’ve set everything properly, your Release Pipeline will deploy your Application to your Server and get it up and running, with the parameters you’ve set in your bindings file.
It took a while to understand how this process worked but in the end, it turned out to be very simple and all it took was to apply the same concept we already used with the ARM deployment for Azure resources.
Continuous Integration/Continuous Delivery is a development practice that enables you to accelerate your deployments and delivery time to the customer, by reliably releasing software at any time and without manual intervention.
For this post series, I will explain how to enable this practice, oriented to Logic Apps and Azure Pipelines.
We will start by Building the Logic App, using Visual Studio. I will not approach Logic Apps Preview, because since it’s still a preview feature, many changes can happen and render all this useless.
As you may know, to create Logic Apps in Visual Studio, there are a few requirements, such as:
Visual Studio 2015, 2017, 2019 or greater, if available
Azure SDK
Azure Logic Apps Tools for Visual Studio Extension (if using VS)
An active Azure subscription
Time, will and patience.
After you have all this installed, you can begin to create and let your creativity flow!
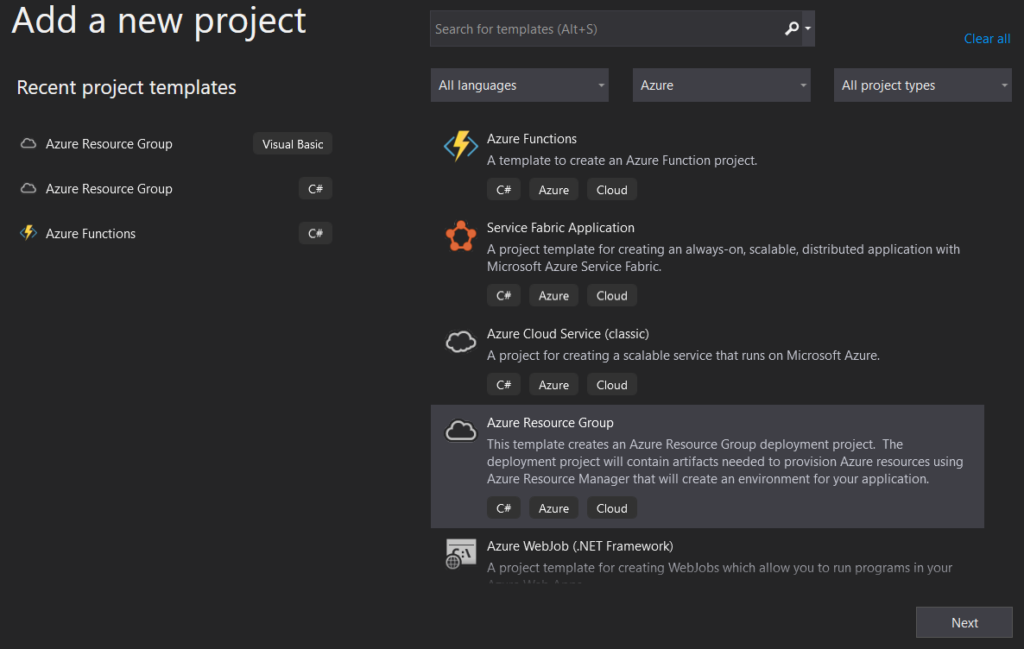
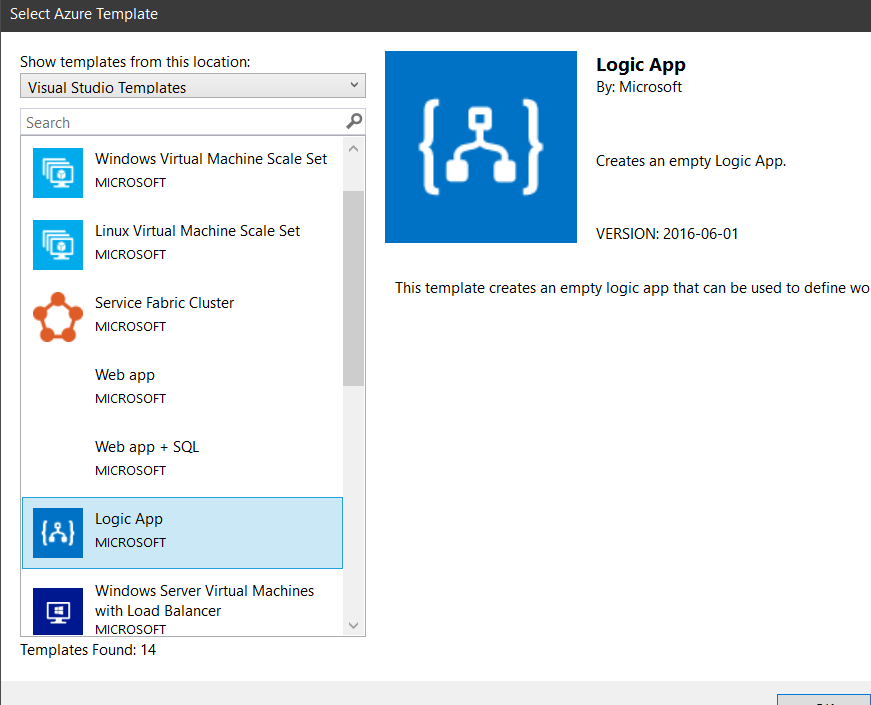
We’ll start from scratch. Open you VS and start a new Project, by selecting the Azure Resource Group C# template and the Logic App template after that.
You will end with a new Project, and Solution if it’s the case, with 3 files. The PowerShell file is the deployment script that VS uses to automate the ARM deployment. Only in a special case do you need to fiddle with this file.
The other two files are the Logic App code and the Parameters file. You will need to create a new one, to be used as a Template for the Azure Pipeline. So go ahead and copy the Parameters file and change the name to LogicApp.parameters.template.json .
You should end with something like this.
This Parameters Template file will contain our Tokens, which will be replaced in the Pipeline using the “Replace Tokens” Task. In the coming posts, I will explain how it works and why we’re using it.
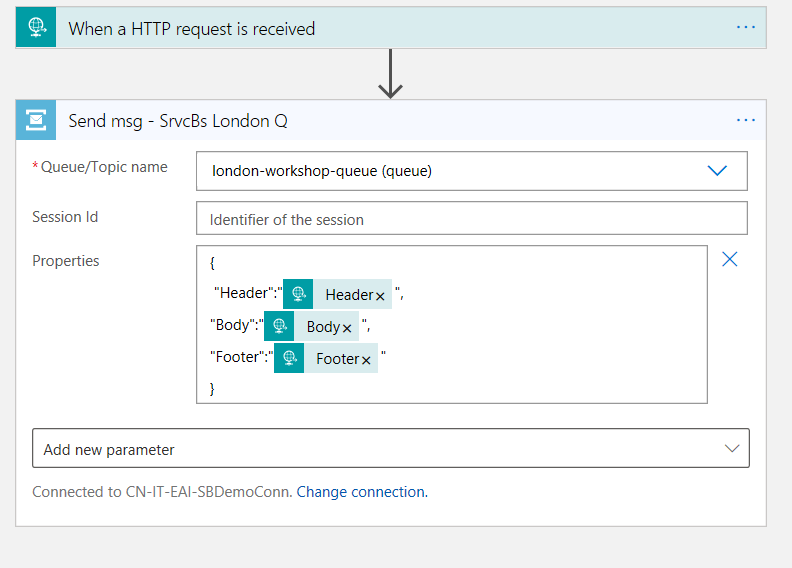
For the sake of simplicity, I’ll just use the Service Bus connector, where depending on the input, I’ll send a message to the Queue with the provided information.
After creating the connection, you will see that, in the back code, several parameters and a Resource node were created as well, that contain the link and inputs for this connection.
Even when working in a single Resource Group, it is a good practice to prepare this for CI CD, because even though it’s static, connections change and instead of having to re-do all of it, you just need to re-deploy the pipeline with the new configurations.
We will not be making any changes to the Resource node, but to the action path and parameters. This will define that instead of having a fixed value, it will point to the parameter itselft, making it possible to have an ARM parameter configurable in the Pipeline.
While dwelling in my thoughts, a memory came to my mind. In my college time, I was present a challenge to make a recursive Fibonacci algorithm, in LISP without using Loops.
This was a challenge, because as you may know…
(these are probably my favorite programming comics)
But this gave me the idea of testing this concept in Logic Apps.
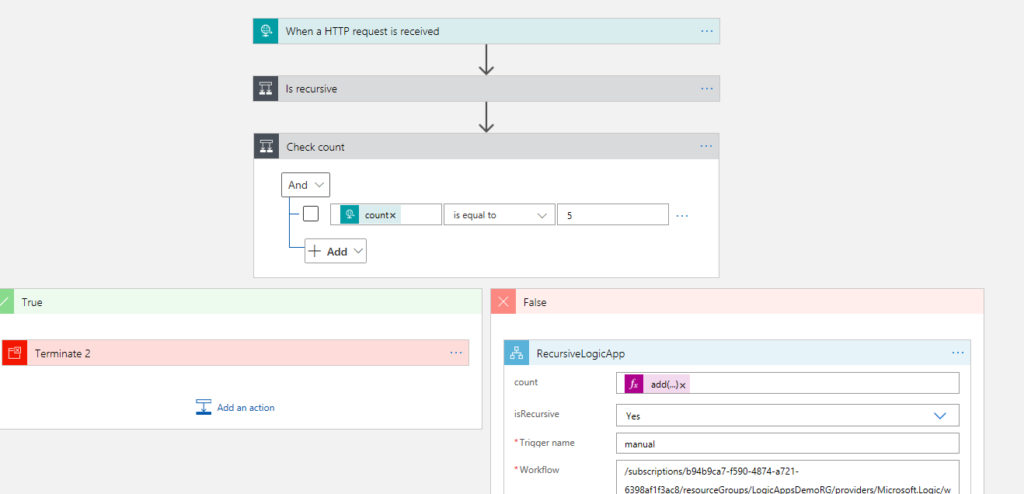
I’ve built a fairly simple LA just to test and with minimal inputs.
Before I could add the recursive connection to the Logic App, I had to deploy it first, because you can only call a LA or a Function if it’s already provisioned.
So, I’ve added the action after deployment, saved and tried to deploy again, and this came up:
This means that Logic Apps, by default, do not support recursive calls.
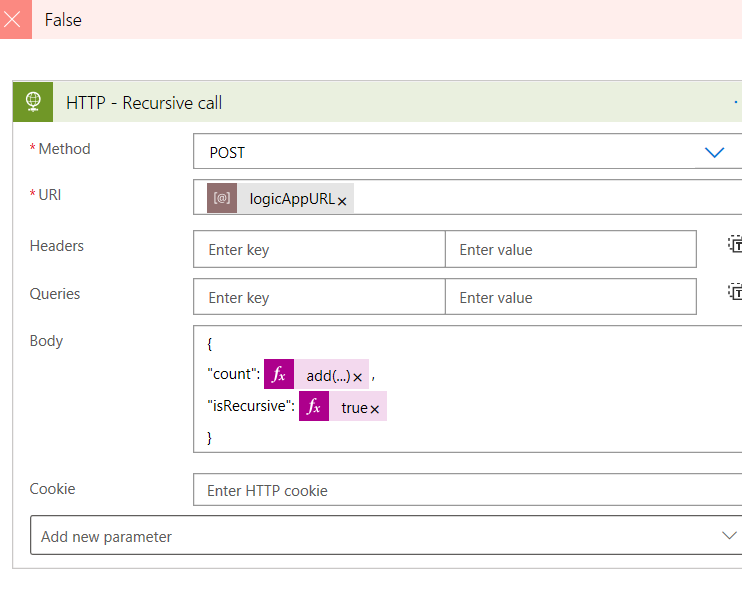
But I’m stubborn and I don’t give up easily. So, what would be the best way to call a LA knowing that I’d have to treat it like an external API?…
The answer is super simple. HTTP action!
We already have the URL, because we deployed it before, so there’s nothing stopping us from doing this.
No objections this time, so let’s test!
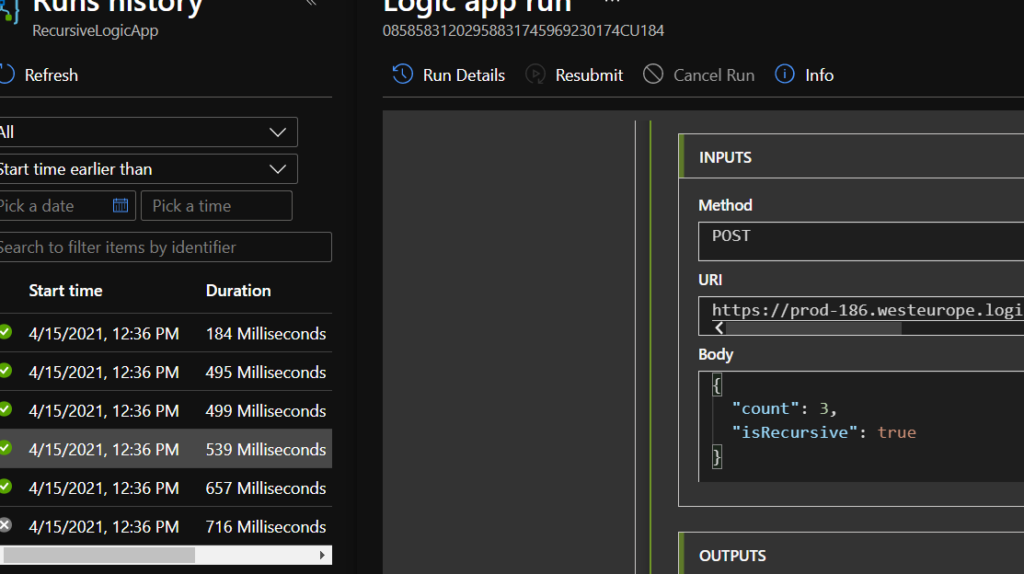
TA-DAAA! How easy was that? In my case, I’ve used a simple counter to add and loop, but you can use any other condition to recursively loop through your logic, for example until a SQL record is updated.
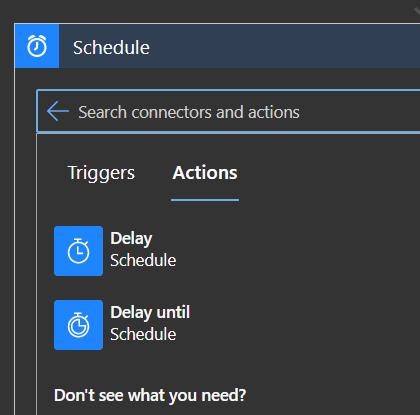
You can add delays to ensure that you won’t be making calls every second, or delay until a specific time. The possibilities are endless.
Sometimes we have the need to perform a kind of “fire and forget” pattern in Logic Apps. Todays post is a short one, but very useful one.
Usually, a Logic App will have a synchronous pattern, meaning you call it and you will have to wait for it to finish processing.
But how do we configure our LA to receive a request and continue processing without us having to wait for it?
It’s quite simple actually, although not a very pretty thing to do.
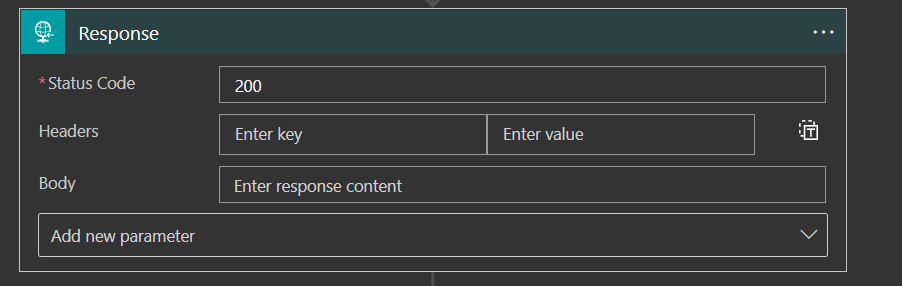
The way to achieve this is to set a Response action right after the trigger action and in the settings, set the “Asynchronous Response” to true. It’s not pretty as I’ve said, but it will set the path for the async pattern we’re looking for.
There should be a flag that you could set in the Trigger to automate this and send back a response like this, but so far, this feature is not available yet.
The response will be sent to the calling system, whatever it is, with the status code 202 Accepted.
You can also set custom headers and a body, but it might not help much.
As you can see, the Response will automatically set a location header for you to “ping” to check the status. By default, the engine will refresh every 20 seconds.
So that’s all there is to it, it’s a simple way to achieve an asynchronous pattern with Logic Apps, although not very pretty, but it works!
As part of development guides, it’s always a good idea to have a fallback plan and handle errors.
You can be 99.999% confident that your code won’t fail, but that 0.001% chance happens. “Anything that can go wrong will go wrong” – Murphy’s Law
And so, we resort to our very dear friend, Try-Catch.
In Logic Apps, it’s not exactly an out-of-the-box functionality, but it’s actually quite simple to achieve this and with a few steps. Also, there are multiple ways to catch your errors.
In this post, we will try two approaches:
Using a For-Each loop
and a Filter Array action.
Since I’ve started developing LAs, I’ve used the For-each loop approach but it had some flaws. It involved using a Parse Json to catch only the error message, but not all actions have the same schema.
So, the idea of the Filter array came to play. It’s actually quite easy as well and easy to maintain. You’ll find the same issue with the schemas, but it’s a faster approach.
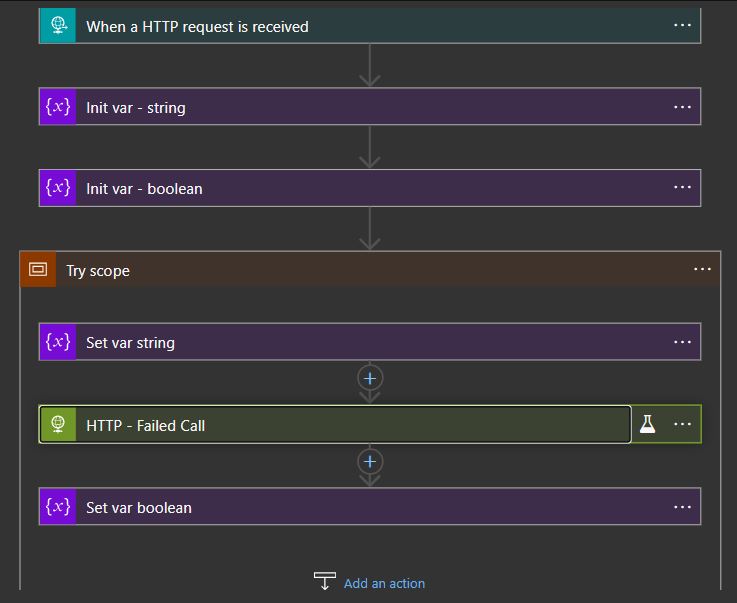
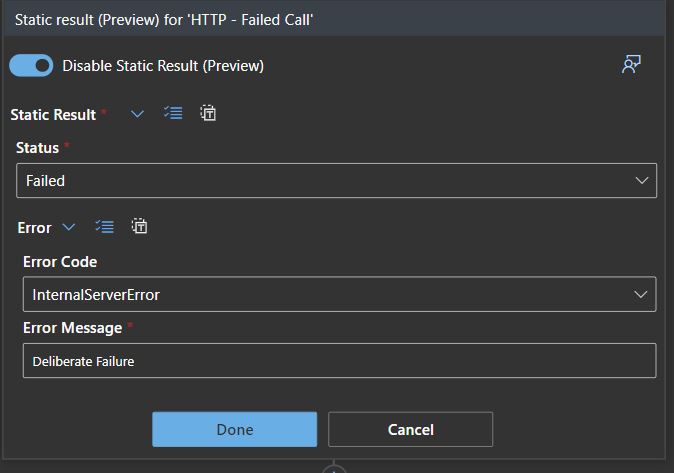
Let’s dig in. I started to build a simple Logic App, just creating a couple of variables and an HTTP call that I know that will fail. I mocked the results to ensure the outcome is what I needed.
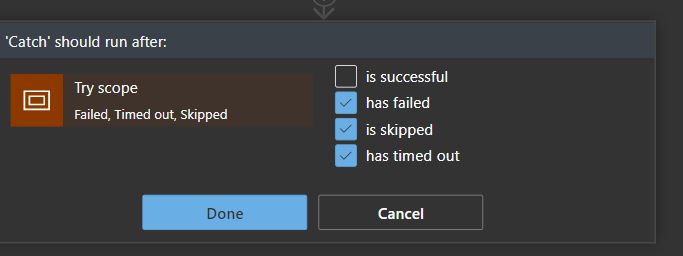
I’ve also built a scope, creating the Try block and a second scope to handle the Catch block. You’ll have to set the “Run after” properties to only trigger on errors, skips or timeouts, if not, it will run on success.
It will always relate to the previous scope.
The For-Each loop approach
Now we start to build our Error handler. I’ve chosen the For Each loop first because it was faster to create since I’m used to it and even have some templates for it as well.
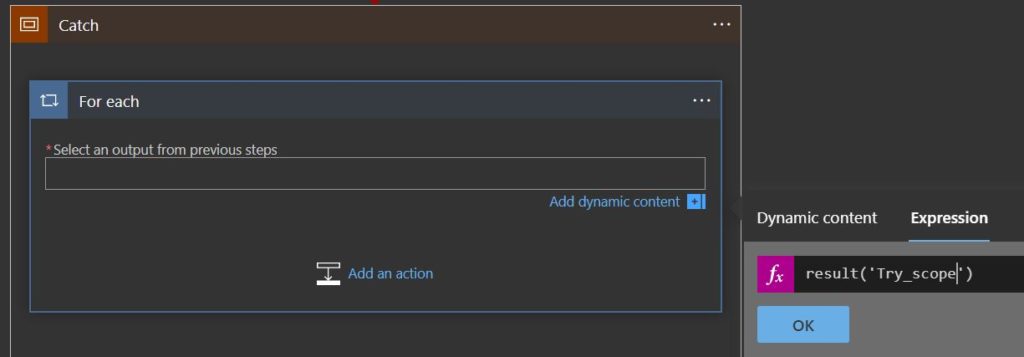
The For Each action requires an array action to iterate on, which means we need to find one. The Scope isn’t a loop, so what will we relate it to?
Well, the scope might not be, but there are N actions inside it, so if you search in the expressions box or the documentation, you’ll find the “result” expression, which records every result of the contained actions within a given scope.
Now, remember, this will need to point to the action you want, but you will not have it in the Dynamic Content, you need to write it using the _ for spaces, because this expression handles the JSON node name like if you’re working in the back code.
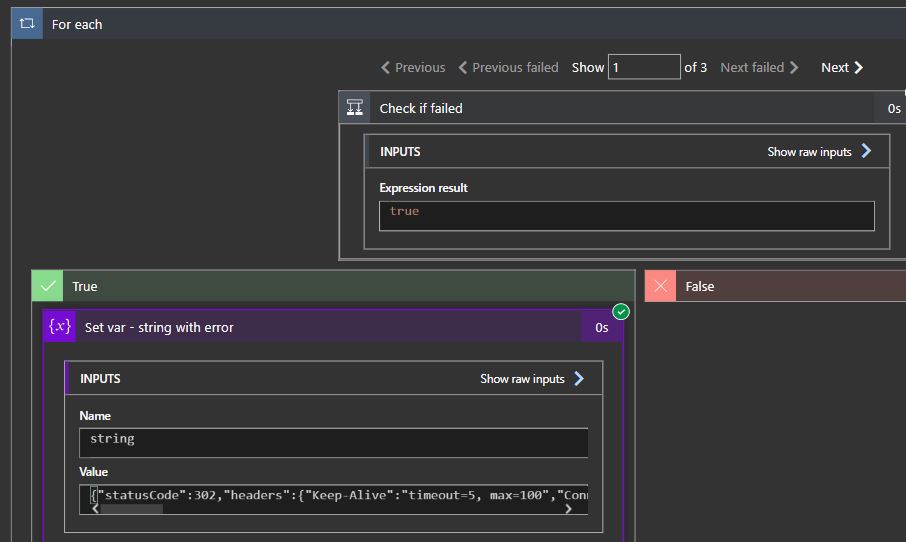
Once you have this set, you just need to create a condition to check if the status of the action was “Failed“. Pretty simple.
If you test the execution, you’ll see that the loop is working and iterating the actions batch that the “result” expression returns.
I’m just returning the action outputs in the error string, which will contain the StatusCode, Headers and Body. It should help to diagnose a possible error.
Let’s try the Filter array now.
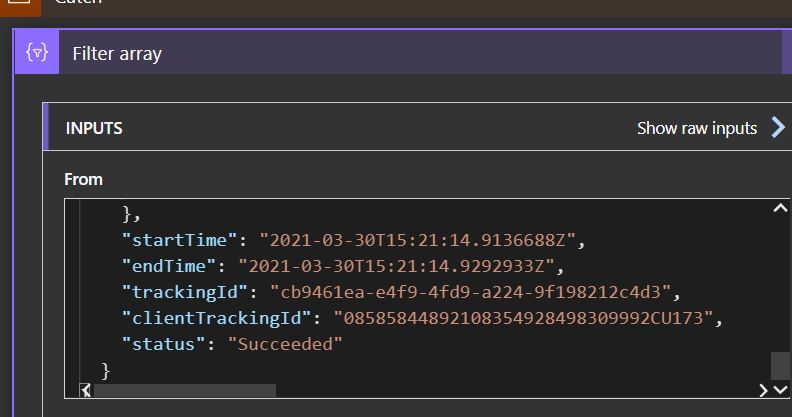
The Filter Array action approach
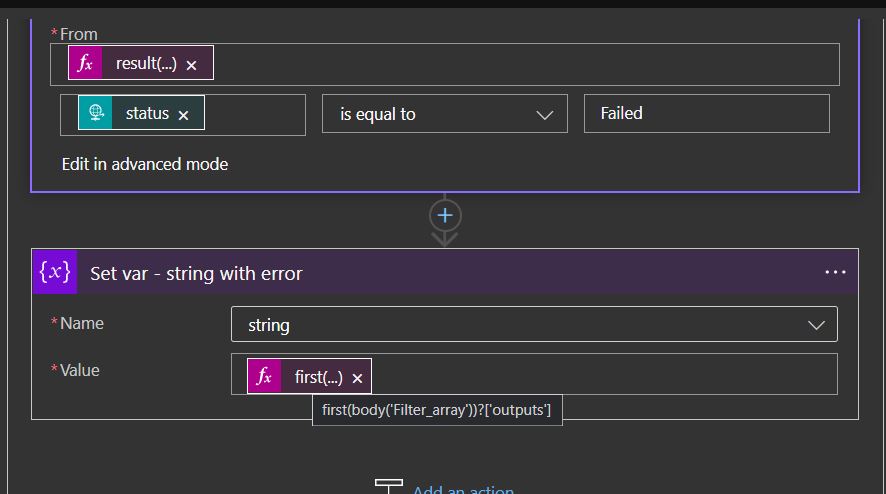
Similar to the For Each, we need to iterate through an action that contains child actions. We use the same “result” expression pointing to the same scope as the “From” property and choose “item()?[‘status’]” as the node to search for. Also, we only want the failed actions, so the node should be equal to “Failed“.
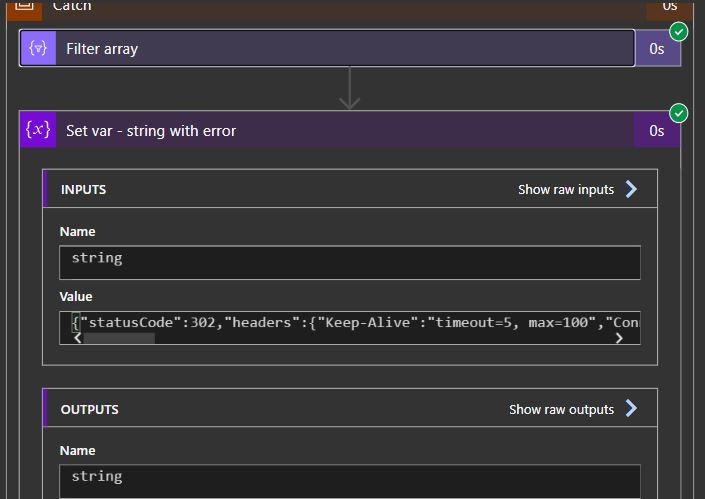
As for the error message, it’s a bit different from the For Each type. We’re still picking up the Outputs but we need to get the first action from the Filter array action.
The end result should be the same, as we’re picking up the same info as with the For Each loop.
Usually, an action will return a JSON record as the result of its execution. There are some fields that will always be present, like “Status” and “Tracking ID”. There’s no easy way to find this info, so you have to deconstruct one or more actions to find it. With the information you have now, you can get it from anywhere, you just have to use the “Result” expression.
Here you can see some fields in the Set var action I created and how the status is recorded. For tracking purposes, the execution engine records the begining and end timestamps as well as other useful data.
Now that you know how, it’s time to get working and make your Logic Apps sturdier and with a proper error handling.
Everyday we learn new things and when it comes to Logic Apps, we tend to learn even more, because it’s always shifting and new components are added. If we’re using ARM templates, the deployment brings out some challenges and with it, new things to learn (and lots of cute little things that make you want to bang your head against a brick wall).
Usually when we work with a CSV file we tend to keep the sorting according to the specification. It isn’t always alphabetical nor descending/ascending.
Sometimes, it’s just a real mess but it makes sense to the client and to the application that is consuming it.
A few days ago, whilst working on a client project and after dozens of tests, we started to see errors in our CSV file, where the headers and columns were arranged in a alphabetical sorting. This was not my intent, when I built the CSV array I wanted it to be in a certain order.
So why was this array now being sorted, who gave that command and how could I correct it?
Why and who:
As we dig in the Logic App code, we see that the Logic App is JSON in its core (my god, shocking development!). As such, it will follow JSON rules on sorting. If we set / append our variable with an array, even though that array won’t show up ordered in our code, it will when we deploy it to our Resource Group.
Lets prove this.
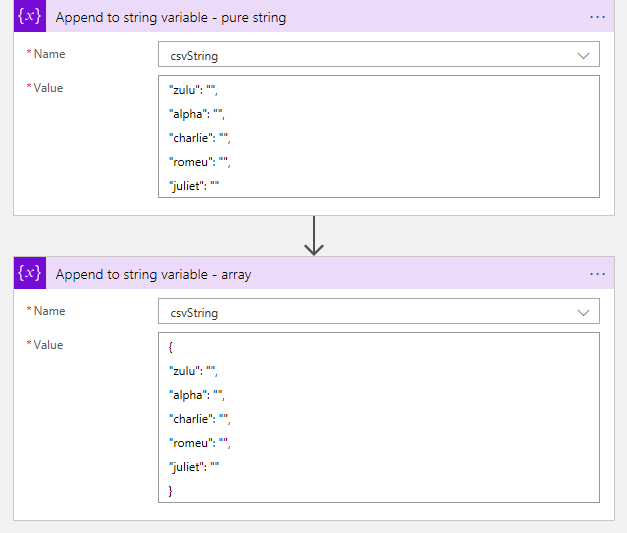
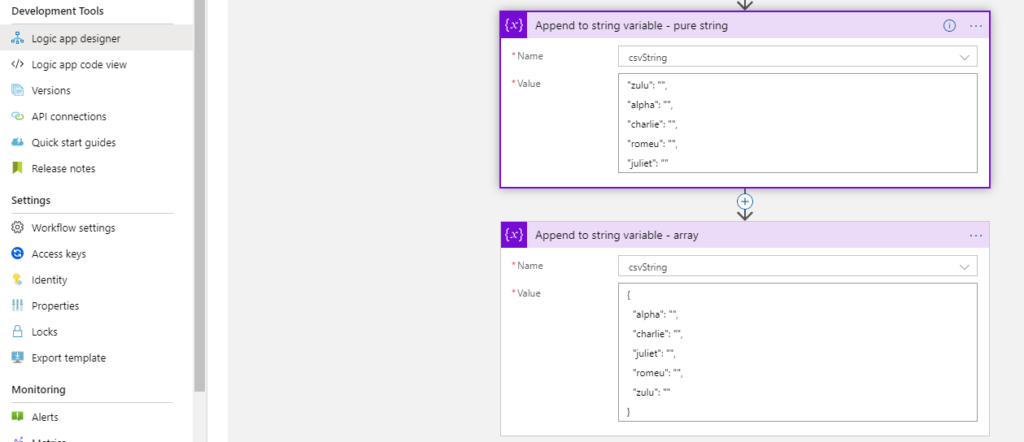
First, we set our LA in Visual Studio and initialize a string. Then we set two values to it ( “Append to string variable”) . One as a string and the other as an array.
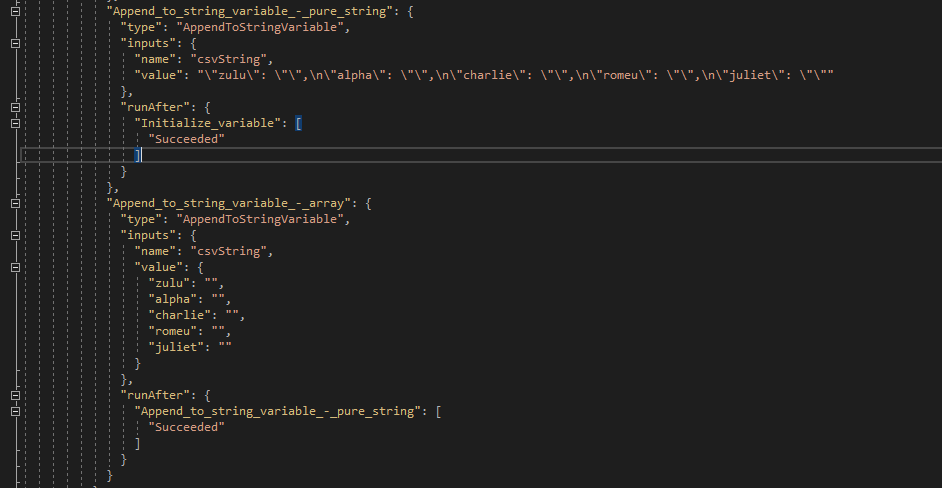
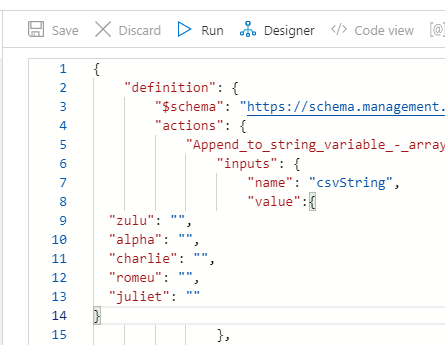
Let’s look at the back code.
Looking good so far. Our strings are set and it’s in the order we want.
Lets deploy it to our RG and check again.
Well, there it is. In ARM deployment, if we write a JSON object, on deployment it gets sorted and will appear like this in the designer tool in Portal.
Funny thing is that if we change our object to the string we want, the designer will not recognize this as a change and doesn’t let you save.
Even in Code View the changes are not recognized.
But if we add other text to it, the changes are now recognized and Portal allows to save.
But still, it won’t show you the changes and will still sort out your CSV array, once again because it’s JSON.
A few weeks ago, this behavior wasn’t noticeable I had a few Logic Apps in place with the string array in a specific order and when deploying it didn’t get sorted.
I searched in Azure updates to see if anything was mentioned but nothing came up.
How to bypass this issue?
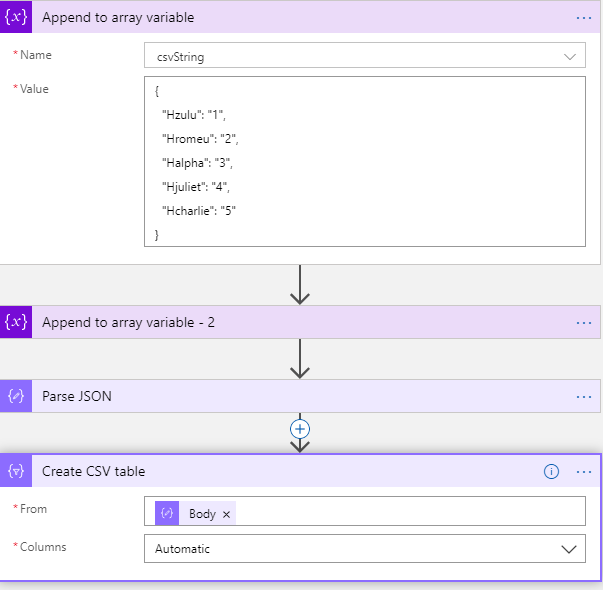
If you’re working with a CSV file like I was, after you build your array, you’ll need to build a CSV table.
The action “Create CSV table” will take care of this from you, but as we know, it will not be in the same format we need.
(notice I’ve switched to array variable because I can’t parse the string in JSON)
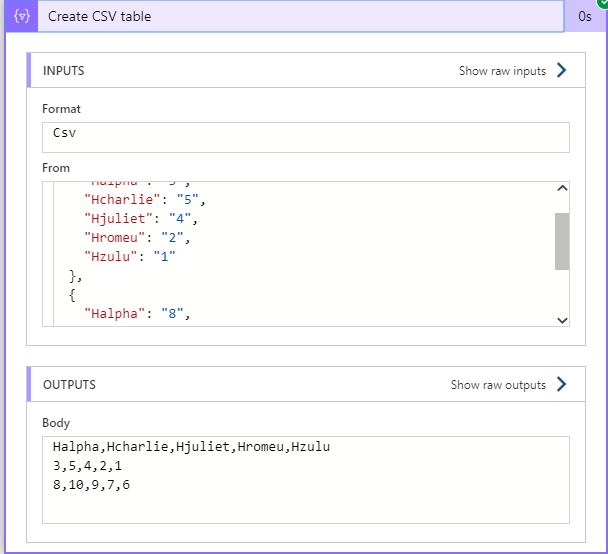
So, leaving the Columns in automatic mode will mess up your integration as you can see. The output will be sorted and it won’t be what you want / need.
What a mess!! This is nothing like we wanted.
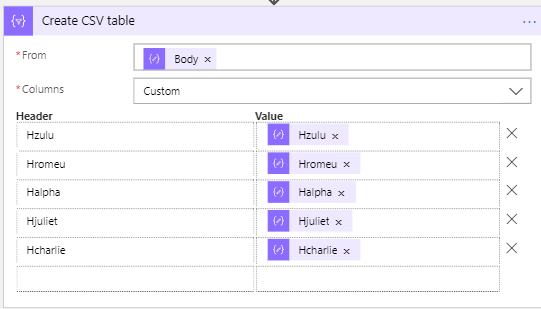
We will need to manually define the columns headers and the value they’re going to have.
If you don’t have many fields, it’s quick to do this, but when you have lots of fields… well, let’s just say I hope you have plenty of time and don’t lose focus.
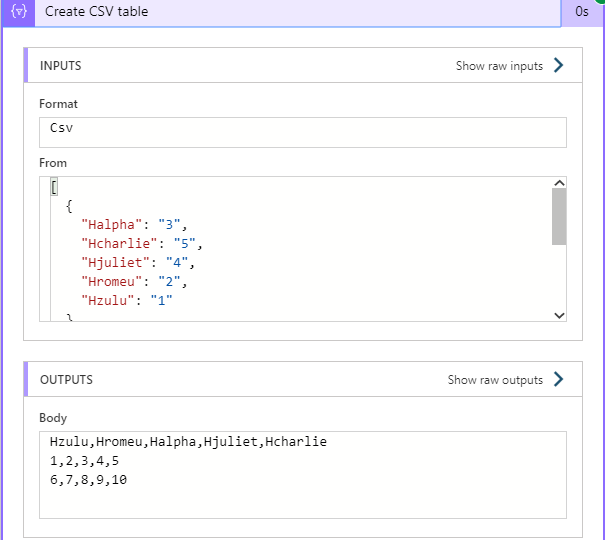
And there we have it. Fields are now displayed correctly, the data is in the right place and we’ve managed to get around this annoying problem.