Do you feel difficult to keep up to date on all the frequent updates and announcements in the Microsoft Integration platform and Azure iPaaS?
Integration weekly update can be your solution. It’s a weekly update on the topics related to Integration – enterprise integration, robust & scalable messaging capabilities and Citizen Integration capabilities empowered by Microsoft platform to deliver value to the business.
Last weekend I delivered a session about BizTalk Server 2020 in action on Global Integration Bootcamp 2020 Madrid, where I spoke about the new features available in the most recent version of the product.
Today I will start this series of blog posts about what’s new in BizTalk Server 2020 by beginning to speak about one of the most expected and log time requested features: XSLT 3.0 Support.
XSLT 3.0 represents a significant upgrade of the XSLT 1.0 (and even XSLT 2.0) standards to become a general-purpose transformation language for the most common data storage and messaging formats.
There are a lot of advantages to using XSLT 3.0 compare with the XSLT 1.0 or, in fact, XSLT 2.0, and the goal here is not to address every single of them, but we can highlight the following one:
Extended Function Set, Sequences, Arrays, and Maps: The initial function set for XSLT1.0 was the same as XPath 1.0 functions and was very limited. Minimal math support, no regular expression support, minimal string manipulation capabilities, no support for set (sequence) operations, no support for dates.
Grouping:
xsl:for-each-group: a set of items can be selected and arranged into groups based on specific criteria (for example, common values); then each group can be processed in turn
special XPath functions within for-each-group: current-grouping-key(), currentgroup()
Variants of <xsl:for-each-group>:
group-adjacent: adjacent items are allocated to the same group if they have common values for the grouping key
group-starting-with: whenever an item matches the pattern, a new group is started with this item
group-by: whenever an item matches the pattern, a new group is started after this item
Sorting:
xsl:sort: can be used inside of <xsl:for-each>, <xsl:for-each-group>, <xsl:applytemplates> and <xsl:perform-sort>. It defines the order in which the data is processed by the instruction.
Several subsequent sort keys can be defined
BizTalk’s default XSL transform engine implementation is based on .Net Framework XSLT Transformations. This support is limited to XSLT 1.0.
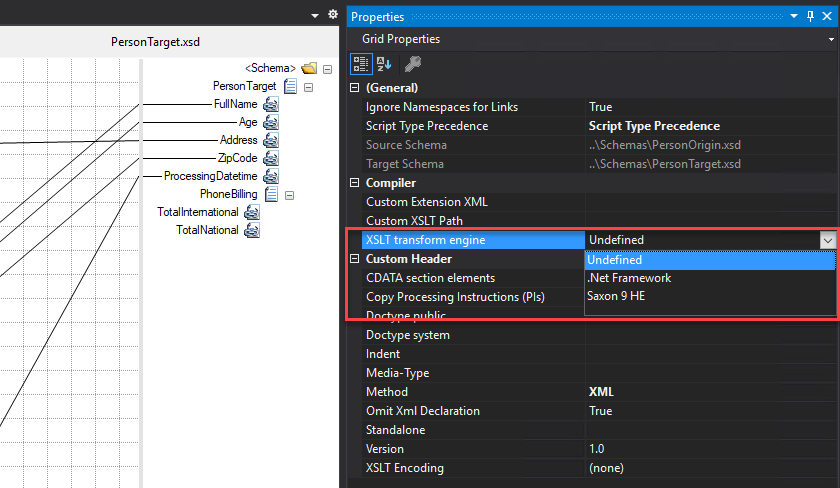
Starting with BizTalk Server 2020, users can choose Saxon:registered: 9 (Saxon 9 HE) as the XSLT transform engine. But most importantly, it will be possible to plug-in your own custom XSLT transform engine.
YYou can implement a custom XSLT transform engine by defining XSLT transform implementation derived from abstract class Microsoft.XLANGs.BaseTypes.ITransform2 in assembly Microsoft.XLANGs.BaseTypes.dll.
This makes it possible for BizTalk server maps to support newer versions of XSLT. Using Saxon 9 HE, we can readily use XSLT3.0.
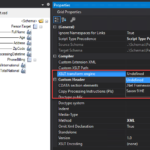
Use XSLT Transform Engine property to specify the XSLT transform engine you wish to use:
This was one of the most expected features, but be careful, this can be a poisoned gift because Saxon 9 HE doesn’t support embedded scripting. As a result, functoids shipped as part of BizTalk may not function well. And for many cases, this can be a showstopper.
The advantages of using XSLT 3.0 with Saxon 9 HE:
Development: The XSLT file can be developed separately and hosted in a BizTalk map. It will simplify specific scenarios, especially scenarios that grouping and sorting are required. As we mentioned above, XSLT 3.0 provides an extended set of functions, which was very limited within XSLT 1.0.
Disadvantages when using XSLT 3.0 with Saxon 9 HD:
Level of effort: Not quite as intuitive, Functoids are easier to read visually on the map grid and therefore Requires “geeky” coding skills.
Overview: You lose the visual map representation. You can conjugate Saxon 9 HE with the BizTalk Mapper, but it is harder to do it.
BizTalk Mapper Editor limitations: except for a few built-in Functoids like Scripting Functoid (not all script types will work properly) or advance Functoids, BizTalk Functoids will not work while using the Saxon 9 HE XSLT Transformation Engine.
BizTalk Development Tool Integration: it is a brand new feature, and it seems that doesn’t have, at least for now, the same level of integration capabilities with the BizTalk Server development tools that we are usual to have and use if we compared with the default transformation engine
Do you feel difficult to keep up to date on all the frequent updates and announcements in the Microsoft Integration platform and Azure iPaaS?
Integration weekly update can be your solution. It’s a weekly update on the topics related to Integration – enterprise integration, robust & scalable messaging capabilities and Citizen Integration capabilities empowered by Microsoft platform to deliver value to the business.
Following my last blog post and while I was trying to fix some issues regarding a BizTalk Server 2020 installation and configuration provided by my intern as is learning process. We end up solving some critical problems that allow us to install the platform’s most important components. Nevertheless, several components like BAM Tools, BAM Portal and BizTalk EDI/AS2 Runtime failed to configure:
Once, we inspect the logfile provide the the BizTalk Server Configurarion Wizard we found the following error message:
[2020-11-10 22:17:18:0674 Error Configuration Framework]Feature: [BAM Tools] Failed to configure with error message [Feature is skipped due to failed validation. Please go to Custom Configuration to fix the validation error.
Validation Error: <Exception Message=”Error validating the SSIS Catalog database. Please ensure SQL Server Integration Services is installed on the local machine and SSIS Catalog is created on target SQL Server.” Source=”BAMTools” HelpID=”idsErrorValidateSSISCatalogDatabase”><Exception Message=”SSIS Catalog (SSISDB) does not exist on server BTS2020LABAVMRG. Please create SSIS Catalog.” Source=”Microsoft.BizTalk.Bam.CfgExtHelper.ToolsHelper” HelpID=”error_SSISCatalogNotExists”/></Exception>]
[2020-11-10 22:17:18:0674 Error Configuration Framework]Feature: [BAM Portal] Failed to configure with error message [The Configuration of Feature ‘BAM Portal’ failed because the dependent Feature ‘BAM Tools’ was not configured. ]
[2020-11-10 22:17:18:0674 Error Configuration Framework]Feature: [BizTalk EDI/AS2 Runtime] Failed to configure with error message [Feature is skipped due to dependent feature (BAM Tools) failed to configure correctly.]
Three distinct errors but the last two are a sequence of the first one, all of them are related to the same cause.
Cause
SSISDB was automatically created during the BizTalk Server configuration process on previous versions if we enable BAM Portal. However, BAM Portal was deprecated in this new BizTalk Server version, and the configuration process no longer created the SSIS Catalog. Instead, we need to create the catalog manually.
If you don’t create the SSIS Catalog manually, you will not be able to configure BAM Portal. Nevertheless, you can always perform this operation whenever you think is required, and after that, configure BAM Portal.
Make sure you also configure SQL Server Database Mail feature if you wish to configure BAM Alerts on your BizTalk Server 2020 environment
Solution
The solution is very simple, we need to manually create the catalog by using the following instructions:
Open SQL Server Management Studio and connect to the SQL Server Database Engine.
In Object Explorer, expand the server node, right-click the Integration Services Catalogs node, and then click Create Catalog.
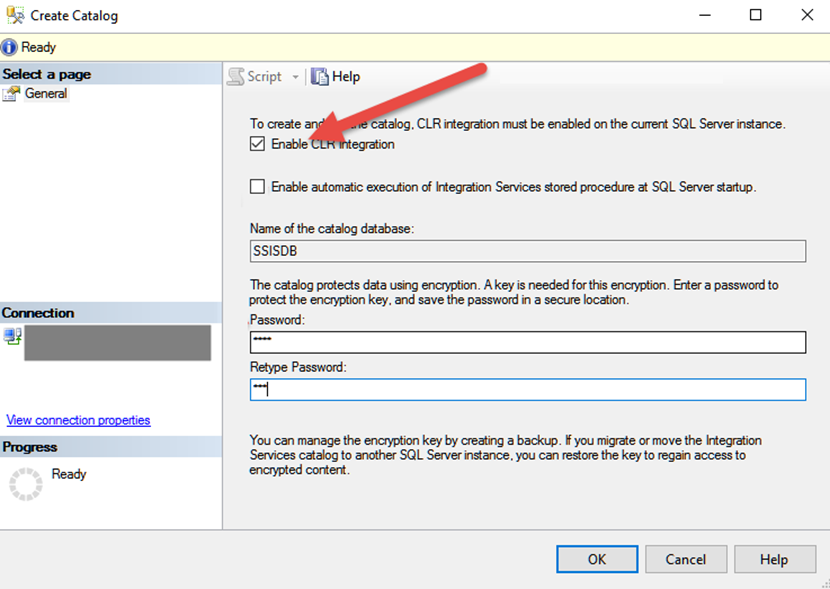
On the Create Catalog window, do the following configuration and click OK.
Select Enable CLR Integration option.
Enter a password to protect the encryption key.
And run the BizTalk Server Configuration again. At the end you will be able to configure all BizTalk Server components.
Do you feel difficult to keep up to date on all the frequent updates and announcements in the Microsoft Integration platform and Azure iPaaS?
Integration weekly update can be your solution. It’s a weekly update on the topics related to Integration – enterprise integration, robust & scalable messaging capabilities and Citizen Integration capabilities empowered by Microsoft platform to deliver value to the business.
As the learning process’s path, all my interns or new team members, regardless of what technologies they will be using more, one of the first things they will do is create a BizTalk Server development environment from scratch. Yes, all my team members will have skills in all Integration technologies, BizTalk Server, Logic Apps, Service Bus, APIM, and the list goes on and on.
I don´t mind or care if you get it right the first time or not. Sometimes it is with failures that we learn best and more. And I find it curious that with these exercises, they will find problems that I would never imagine happening, so sometimes it is a learning process and continuous improvement for both or the team.
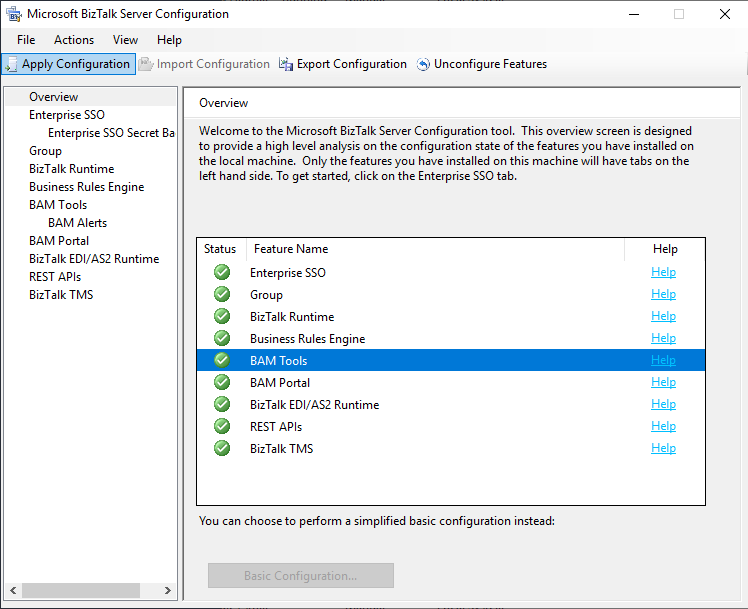
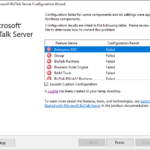
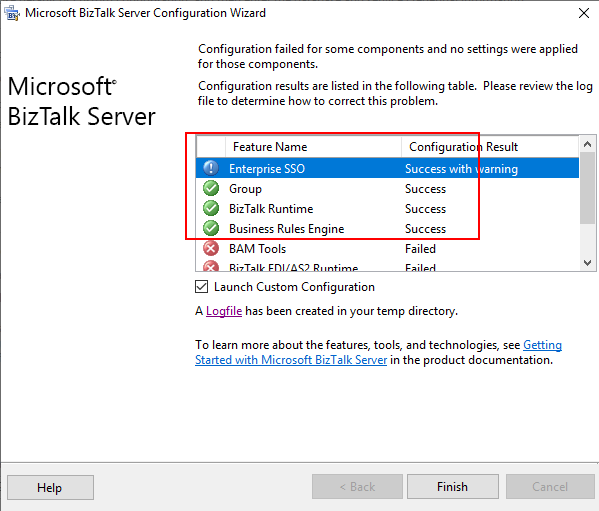
This is one of these cases. My recent team member, while he was trying to configure BizTalk Server using the BizTalk Server Configuration wizard, was getting a failure in all the components immediately:
As he did not understand why this problem was happening, he asked me for help. Once we analyze the log file generated by the configuration wizard, we saw this error:
[2020-11-10 22:08:14:0631 Error Configuration Framework]Feature: [Enterprise SSO] Failed to configure with error message [<Exception Message=”Failed to create the SQL database ‘SSODB’ on SQL Server ‘BTS2020LABAVMRG’ (with SSO Administrator account ‘SSO Administrators’).” Source=”SSO” HelpID=””><Exception Message=”(0xC0002A21) An error occurred while attempting to access the SSO database.
” Source=”SSO” HelpID=””><Exception Message=”An error occurred while attempting to access the SSO database. See the event log (on computer ‘BTS2020LABAVMRG’) for more details.
” Source=”SSO” HelpID=””/></Exception></Exception>]
Basically, this error message does not show any clue or cause as to why this problem is happening. Nevertheless, it will point to you a source to see more details about this issue: the event viewer.
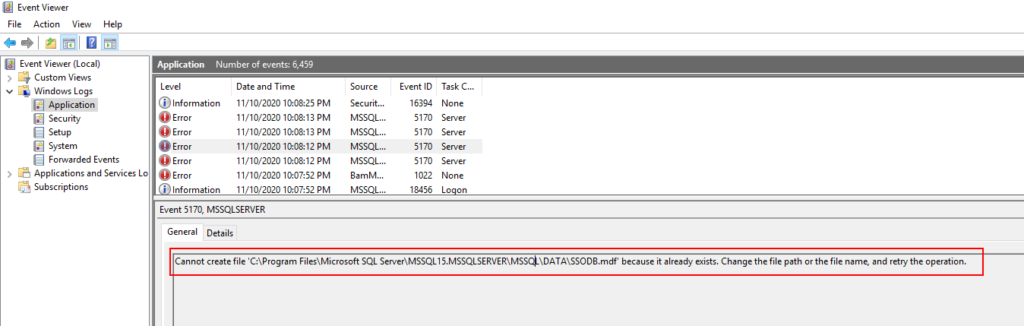
Once we chech the event viewer we got a very clear error message:
Cannot create file ‘C:Program FilesMicrosoft SQL ServerMSSQL15.MSSQLSERVERMSSQLDATASSODB.mdf’ because it already exists. Change the file path or the file name, and retry the operation.
Cause
The reason for this error to happen is clear. The BizTalk Server configuration wizard is trying to create the database files on the default SQL Server folders, but they already exist.
This error happened because my team member initially didn’t install all the required SQL Server components correctly. Once he was trying to add new features to an existing instance, he accidentally created another SQL Server instance.
After that, he uninstalled all the SQL Server instances and appropriately installed all the components, at least for now, let’s assume so. Nevertheless, while he was trying to do a Basic Configuration, he got that “strange” error.
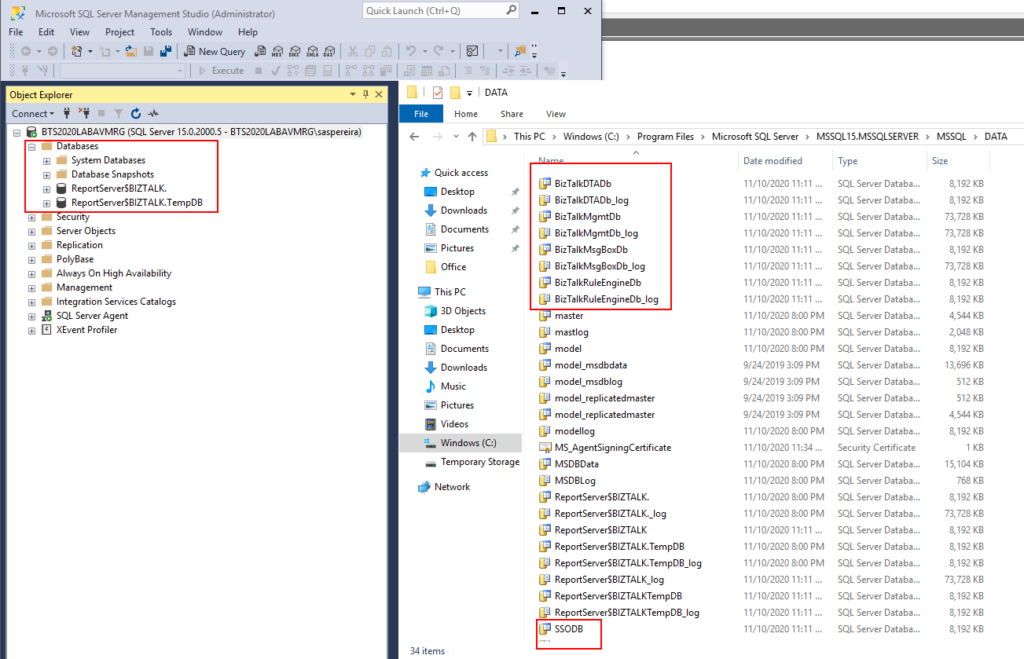
Thru the SQL Server Management Console, we couldn’t see these databases, not only SSO as the error description, but also with all other BizTalk Server databases. But once we saw that folder, we realize that the uninstalls did not delete BD files created before from the hard drive.
Solution
The solution is very simple, delete all the Unnecessary files from that folder, like:
SSO
SSO_log
BizTalkDTADb
BizTalkDTADb_log
BizTalkMgmtDb
BizTalkMgmtDb_log
BizTalkMsgBoxDb
BizTalkMsgBoxDb_log
BizTalkRuleEngineDb
BizTalkRuleEngineDb_log
And run the BizTalk Servr Configuration again. At the end you will be able to configure BizTalk Server.
Hey… but there still errors over there. Indeed, there are, but I will leave that to another post that will be published very soon. However, this blog post’s original error was solved, and we were able to configure the required and critical BizTalk Server components: SSO, Group, and BizTalk Runtime.
We’ve all been through it. A few days ago, I accidentally deleted a Logic App when working for a customer.
I was working on migrating from the Portal resources to a Visual Studio solution, because CI/CD is being implemented.
Luckily it was the Dev environment, but still, there was some developments that I hadn’t migrated yet! Hours of work were lost! Or then again, maybe not.
After some research I found out that there’s no way of recovering or rollback a deleted Logic App. There’s some documentation to recover an App Service but no actual mentions to LAs.
Suggestions have been made in Azure Feedback, but so far, no replies.
So, how exactly do you recover a deleted Logic App?
Well, you have to dig a little bit and do some magic, but you will end up with a working Logic App after this.
Let’s work!
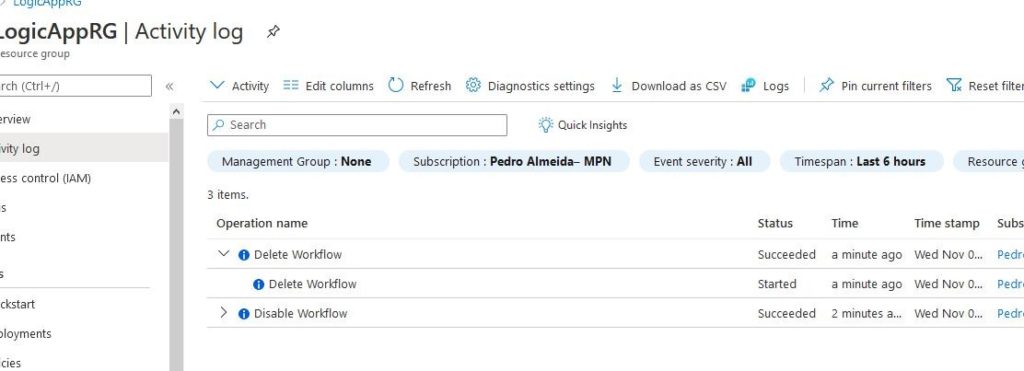
First, you must navigate to the Activity Log of your Resource Group.
There, you will find the last operations executed. This may not be easy, in this example I only have a few operations, but in the client tenant, I had to scavenge through a few days of logs.
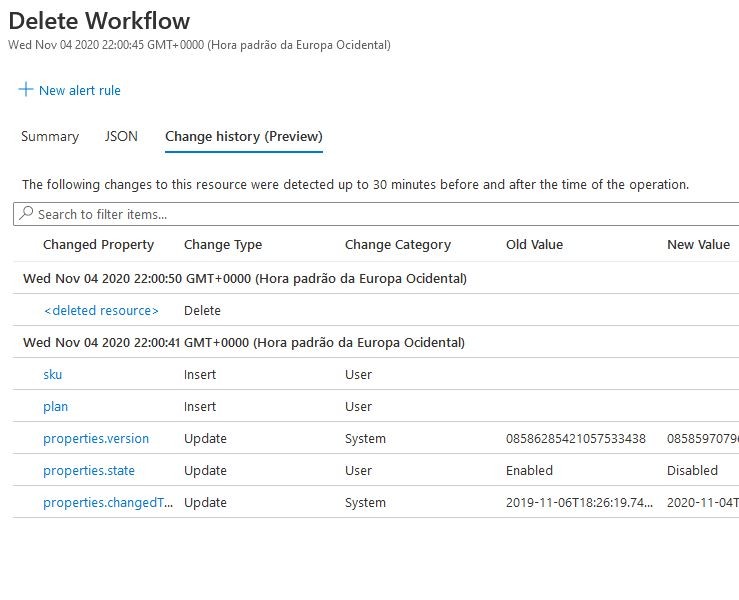
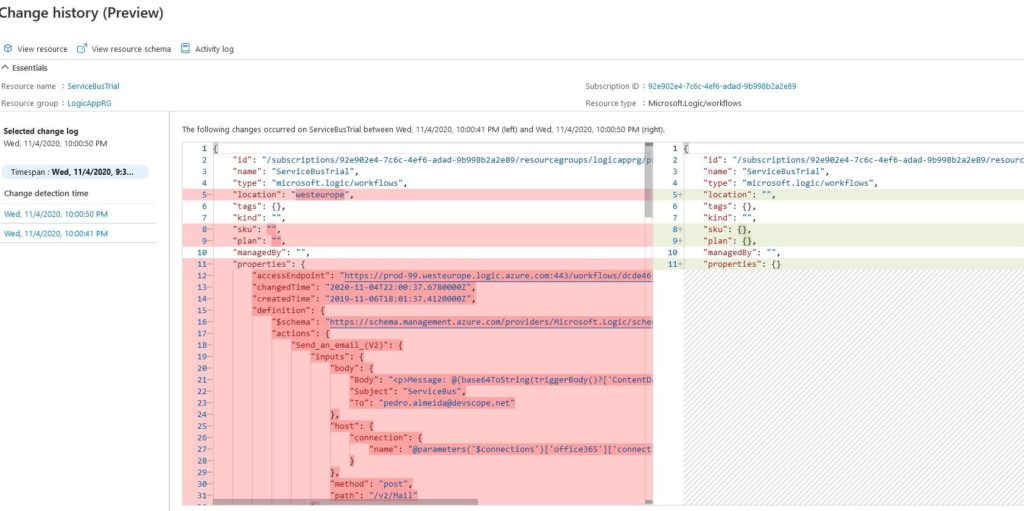
Once you find the correct deleted workflow AKA Logic App, you open it and check the Change History. This should in preview but it will be life boat.
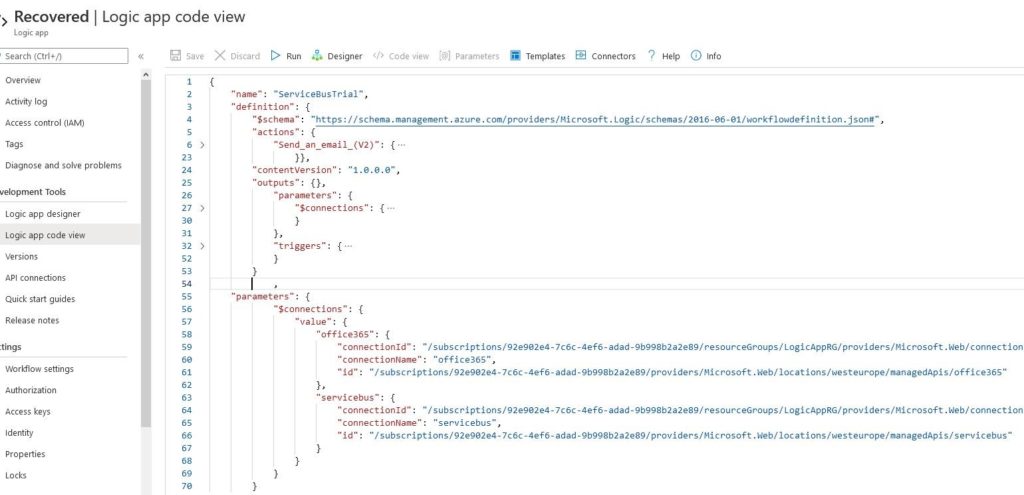
The “deleted resource” contains the JSON code and it is what we’re looking for. Although it requires a bit of magic dust to clean the data that’s in it, it does contain the most recent code you had. Migrating this to a new Logic App, either in Portal using Code View or in a VS solution, this is the best way to recover your little mistake.
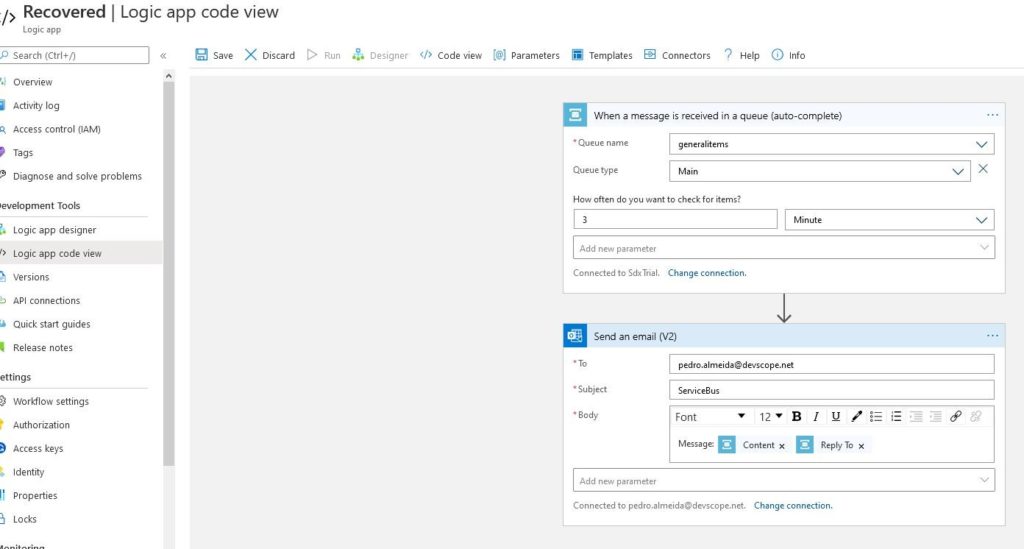
The end result, should look like this:
And your Logic App should be ready to run!
It may not be the best way to get this nor the fastest, but it works and there’s no proper documentation for this. Hopefully, Microsoft will release a more convenient way to get your deleted code.
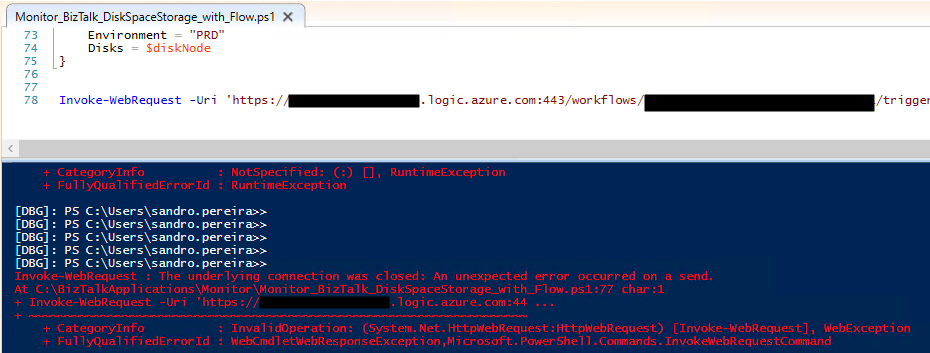
Invoke-WebRequest : The underlying connection was closed: An unexpected error occurred on a send. At C:BizTalkApplicationsMonitorMonitor_BizTalk_DiskSpaceStorage_with_Flow.ps1:77 char:1 + Invoke-WebRequest -Uri ‘https://{URI}.logic.azure.com:44 … + ~~~~~~~~~~~~~~~~~~~~~~~~~~~~~~~~~~~~~~~~~~~~~~~~~~~~~~~~~~~~~~ + CategoryInfo : InvalidOperation: (System.Net.HttpWebRequest:HttpWebRequest) [Invoke-WebRequest], WebException + FullyQualifiedErrorId : WebCmdletWebResponseException,Microsoft.PowerShell.Commands.InvokeWebRequestCommand
Cause
I had already experienced something similar when communicating with Logic Apps from the BizTalk Server Logic App adapter. However, I had already forgotten about it.
But in fact, the essence of this error and the one I got with the BizTalk adapter is the same.
The Logic App Request trigger supports only Transport Layer Security (TLS) 1.2 for incoming calls. Outgoing calls continue to support TLS 1.0, 1.1, and 1.2.
Solution
The solution was, and is, very simple, we just need to enforce PowerShell to use TLS 1.2. This can be done using this PowerShell one-liner:
Finally, the last chapter of this blog post series where we address:
What we need to install to begin developing our stateful and stateless workflows using Azure Logic Apps (Preview) – PART I;
The first approach to what you need to create a new Logic App (Preview) resource and new stateful or stateless workflows through VS Code – PART II;
Today, I will start to explain a different and more powerful way for you to create your Logic Apps (Preview) projects and workflows. Notice that, for this approach, you need to have all the prerequisites installed; otherwise, it will not work correctly or at least certain features like Logic App Designer, debug, or inline code.
If you are like me, a developer used to work with Visual Studio as his primary tool, then you need a little learning curve to start developer using VS Code. It is a different way to developer your solutions.
Create a local project
Before you can create your logic app, the first thing you need to do is to create a local project. This will allow you to manage and deploy your logic app from Visual Studio Code.
To do that, you need to:
In your development environment, create an empty local folder:
in my case, C:VSCODEMy-First-Logic-App-Preview
This folder will be used for our Logic App (Preview) project that you’ll later associate in the Visual Studio Code.
Note: Using the VS Code, there are multiple ways for you to:
Create the local project: you can do it at the Subscription level or the Logic App (Preview) resource level (n the Logic App (Preview) extension);
Create the Logic Apps (Preview) resource in Azure: Directly from the Subscription level on the Logic App (Preview) extension or during the local project deployment;
And even the deployment: once again in the Logic App (Preview) resource level (n the Logic App (Preview) extension) or at the Çocal project level;
I will approach and explain the way I prefer better and which I think is the most ideal.
I am assuming that you have already created the Logic App (Preview) resource in Azure. If not, check to Create a new Logic App (Preview) resource in PART II.
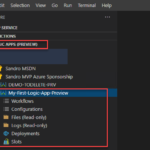
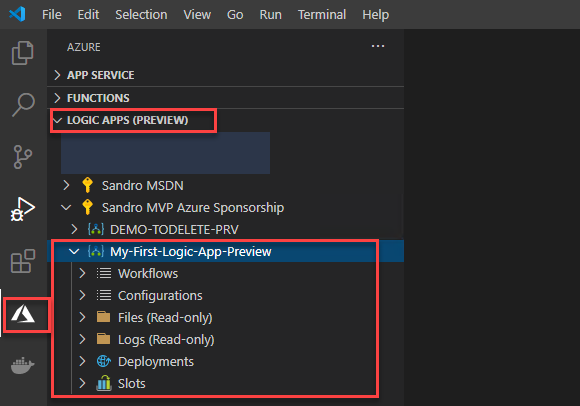
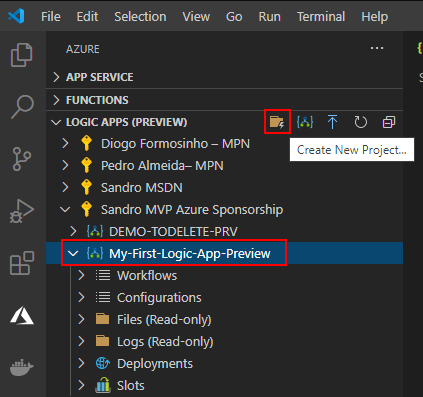
In the Azure pane, from the Logic Apps (Preview) extension, expand your Subscription, select the Logic App (Preview) resource, and click on Create New Project.
This will open the Browse Explorer, select the folder we have created.
C:VSCODEMy-First-Logic-App-Preview
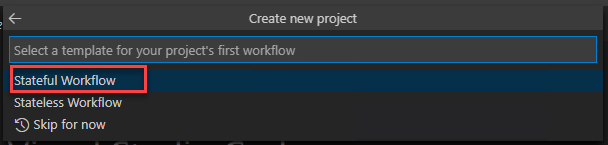
Centered at the top of the VS Code editor window, a wizard will appear asking to select a template for your project’s first workflow, select either Stateful Workflow or Stateless Workflow. We will be using Stateful Workflow.
Provide a workflow name for the workflow you are creating or leave the default nameType Stateful-workflow-example and press Enter
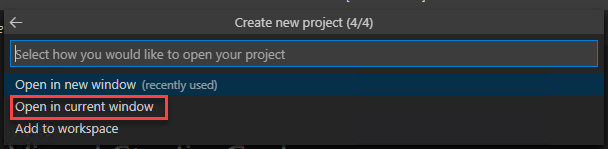
Next, the wizard will ask you if we would like to open your project in a new window or the current one; select Open in current window.
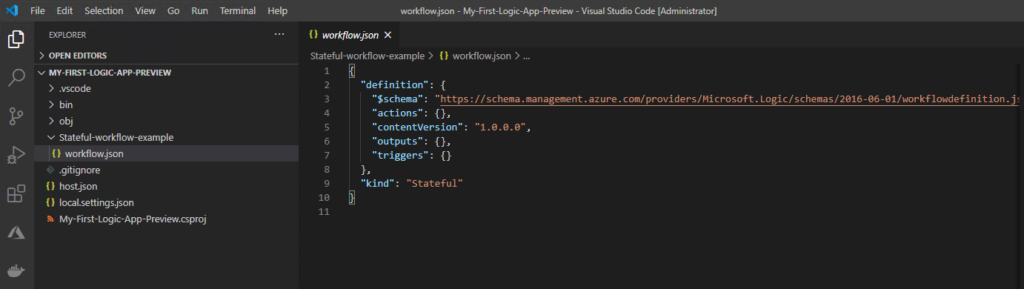
Visual Studio Code reloads and will switch to the Explorer pane, showing you the workflow definition and your new Logic App (Preview) local project, which will include several automatically generated project files. For example:
The project will have a folder with the name that you specify for your workflow – Stateful-workflow-example. Inside this folder, the workflow.json file contains your logic app workflow’s underlying JSON definition.
Also host.json and local.settings.json files;
and so on.
Developing your Logic Apps in VS Code
Now that we have everything we need already created, we can start developing our logic apps locally on VS Code.
To do that, you need to:
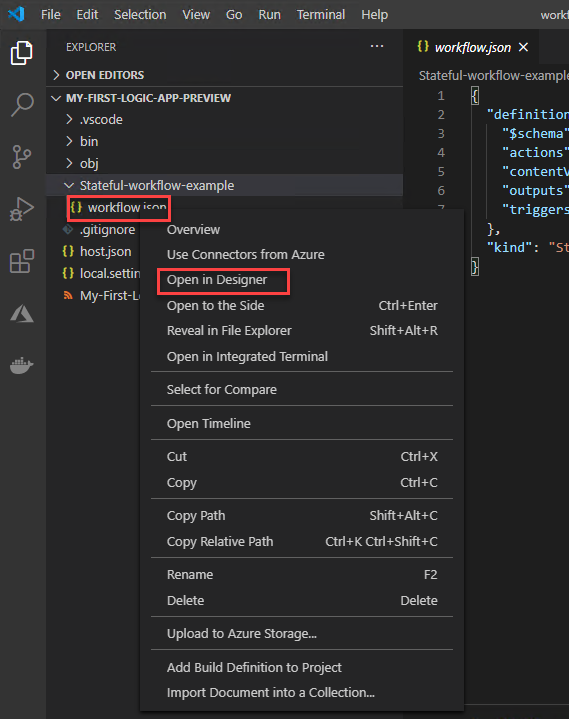
Expand the project folder, in my case MY-FIRST-LOGIC-APP-PREVIEW, and then expand your workflow folder, Stateful-workflow-example. Righ-click workflow.json file and select Open in Designer.
From the Enable connectors in Azure list, select Use connectors from Azure, which applies to all managed connectors that are available and deployed in Azure, not just connectors for Azure services.
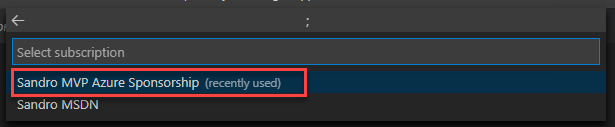
From the Select subscription list, select your subscription. This will be were the connectores will be created.
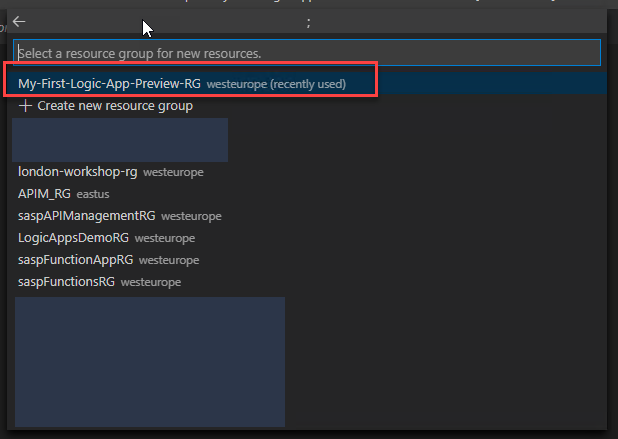
And finally, from the Select a resource group for new resources list, select the resource that you created for this project.
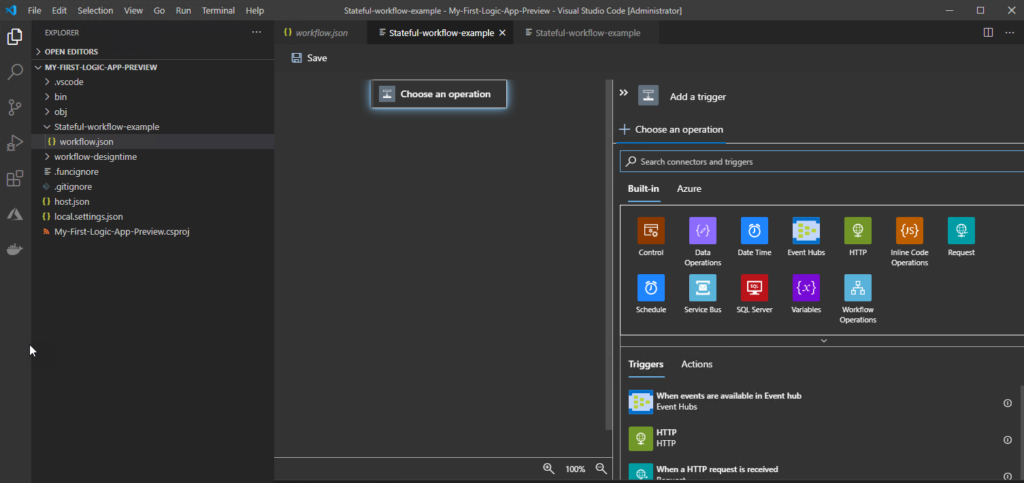
After that, the Logic App Designer appears, the Choose an operation prompt appears on the designer and is selected by default, which shows the Add a trigger pane.
Note: If you have .NET Core SDK 5.x, this version might prevent you from opening the logic app’s underlying workflow definition in the designer. Rather than uninstall this version, in your project’s root location, create a global.json file that references the .NET Core runtime 3.x version that you have that’s later than 3.1.201, for example:
Make sure that you explicitly add that global.json file to your project at the root location from inside Visual Studio Code. Otherwise, the designer won’t open.
To check the versions that are installed on your computer, run the following command:
..Users{yourUserName}dotnet --list-sdks
And the rest is basically the same that we are already used to doing it in our “original” Logic Apps, or using the Azure Portal or inside Visual Studio. We need to add a trigger and actions.
On the designer, select the Choose an operation an in the Add a trigger pane, under the Choose an operation search box, make sure that Built-in is selected so that you can select a trigger that runs natively.
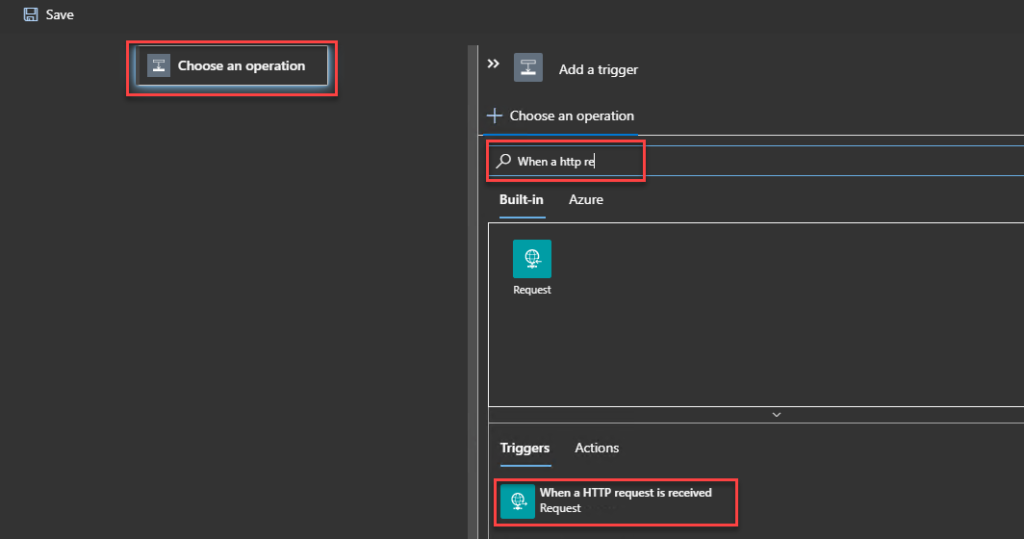
In the Choose an operation search box, enter when a http request, and select the built-in Request trigger that’s named When a HTTP request is received.
When the trigger appears on the designer, the trigger’s details pane opens to show the trigger’s properties, settings, and other actions.
This means that you can now define the JSON Schema, method, and all the other properties of this trigger.
Let’s leave the default for now.
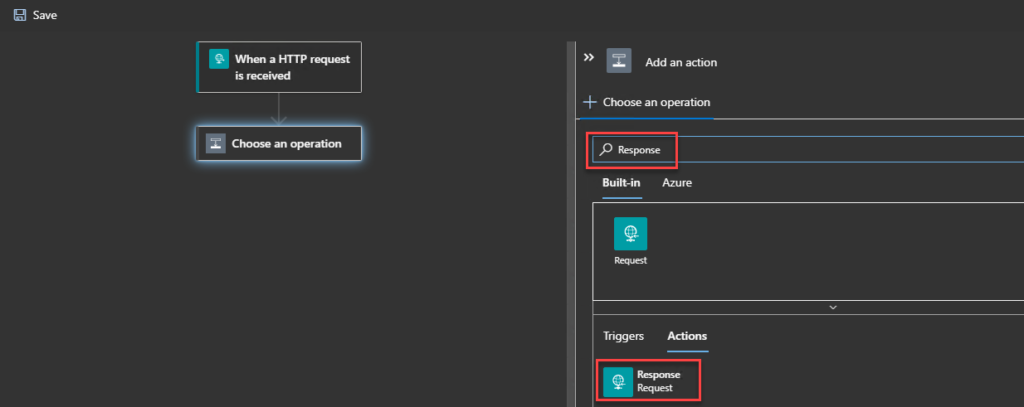
Because this is a simple sample, let’s add an HTTP Response to our logic. On the designer, under the trigger that you added, select New step.
On the Add an action pane, under the Choose an operation search box, enter Response, and select the built-in Request action that’s named Response.
To have a more friendly response, set the body property of the Response action to be:
{
     "Message": "Welcome to your first Stateful Workflow"
}
Finally, on the designer, select Save.
Now what we need before deploying this is to run and test this workflow locally.
Testing locally our Logic Apps
To do that, we need to:
On the Visual Studio Code toolbar, open the Run menu, and select Start Debugging (F5).
A Terminal window will open so that we can review the debugging session.
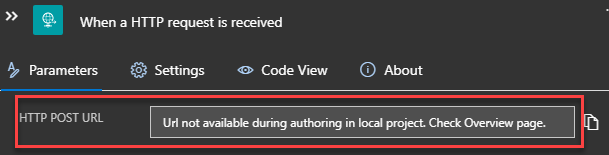
Because this workflow is trigger by an HTTP request, we need to find the callback URL for the endpoint on the Request trigger. Usually, we go to the When a HTTP request is received trigger, after we save our Logic App, and on the HTTP POST URL, we would find the callback URL. However, we will not find it locally. Instead, we will find a message saying, “Url not available during authoring in local project. Check the Overview page.”
As the message describes, for us to now the callback URL for the endpoint on the Request trigger we need to:
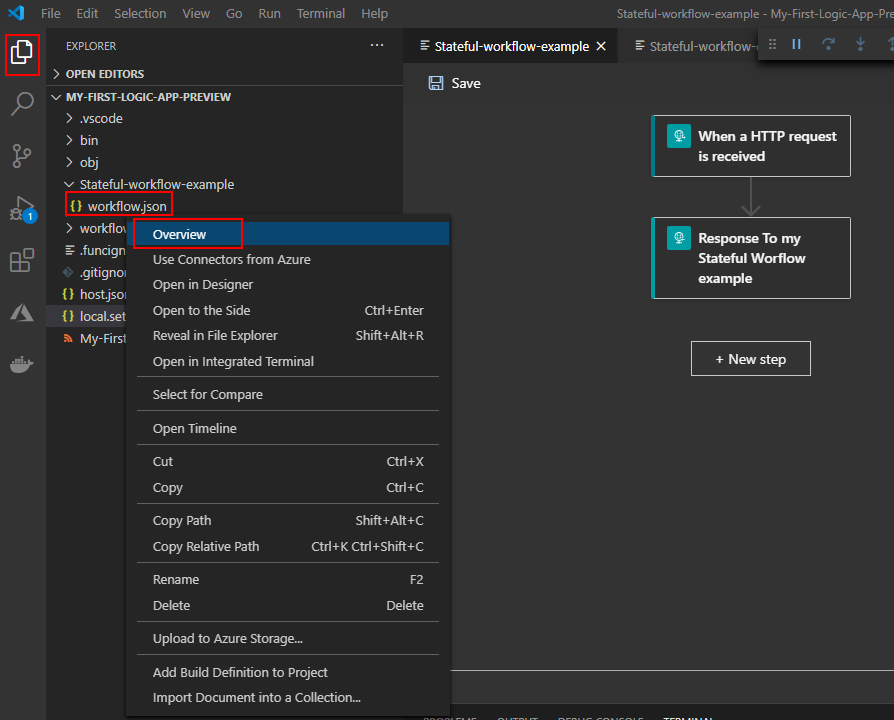
Reopen the Explorer pane so that you can view your project.
And from the workflow.json file’s inside the workflow folder – Stateful-workflow-example – right-click and select Overview.
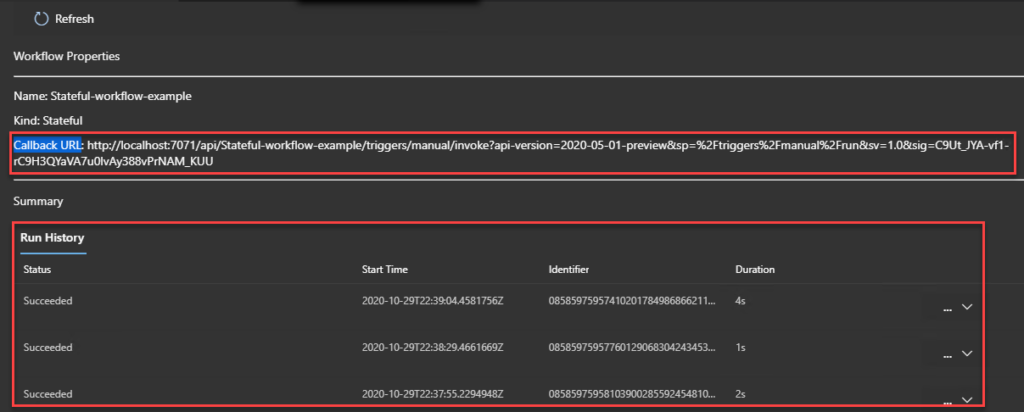
There you will find the Workflow Properties like the Callback URL but also the local Run History of that workflow
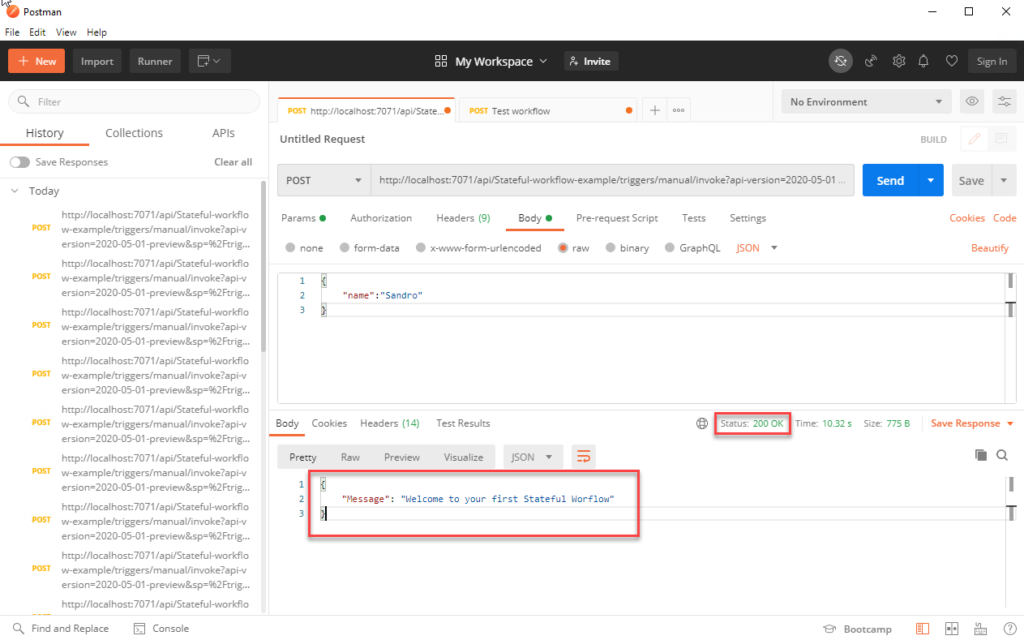
Copy that URL to Postman or any other tool, and test sending a request to see if you get the desired outcome.
On the Overview page, you will get another entry on the Run History.
How can I add more workflows to my project?
Can I add more workflows to my local project? If so, how can I do it?
Yes, you can. And to do that, you need to:
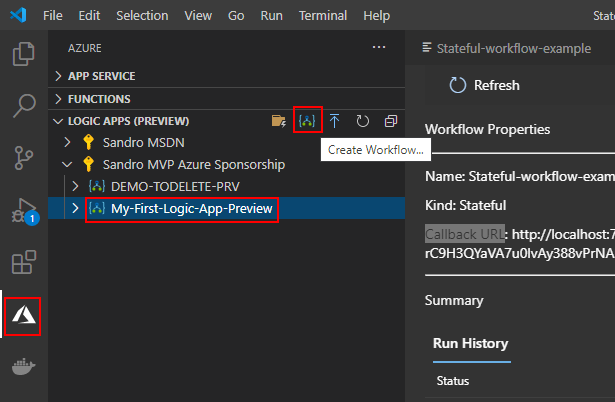
Switch back to Azure pane and under Logic App (Preview), select your Logic App resource, and select Create Workflow.
A wizard will appear asking to select a template for your workflow, select either Stateful Workflow or Stateless Workflow. We will be using Stateful Workflow.
Provide a workflow name for the workflow you are creating or leave the default name, Type Another-Stateful-workflow-example, and press Enter.
Now, if we switch back again to the Explorer pane, we will notice that we have another workflow added to our local project.
Publish (deploy) to Azure Logic App (Preview) resource
Everything we created above is not created/publish on Azure, they were developed and created locally. Nevertheless, from Visual Studio Code, you can deploy your project and with it all your workflows directly to Azure. If the Logic App (Preview) resource type is not yet created, you can create in Azure during the deployment.
To do that, you need to:
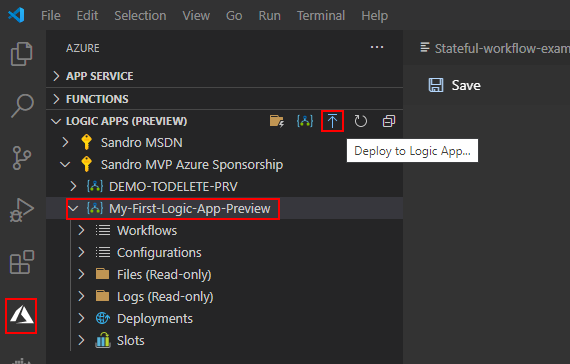
On the Visual Studio Code toolbar, select the Azure icon.
On the Azure: Logic Apps (Preview) pane toolbar, select your Logic App (Preview) resource type, in our case, My-First-Logic-App-Preview, and then select Deploy to Logic App.
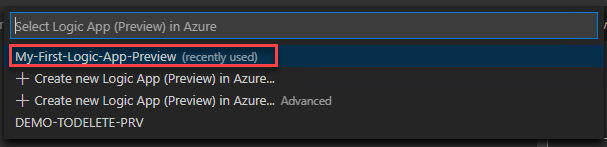
The deploy wizard will appear asking to Select subscription from the list.
And then to Select Logic App (Preview) in Azure. We will be selecting the one that we craete previously
If a message appear asking you if you want to continue with the deployment and overwrite any previou depoyment, select Deploy.
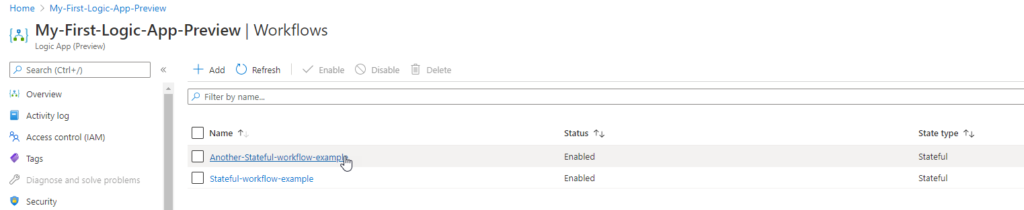
This will trigger the deployment process to Azure. Once the deployment is finished, you will be able to see your stateful workflows live in Azure and enabled by default.