HO HO HO, yes, it is that magical time of the year again!… More than other years, this year Christmas is about spending time with close family, the small number possible and family members that you are in contact with every day to due this COVID 19 pandemic. It’s about creating happy memories that will last a lifetime, and we need it more than ever!
This was without a doubt a challenging year for everyone, a year not to forget but to learn and remember, and hoping to start 2021 with a blank page for us to write a better story.
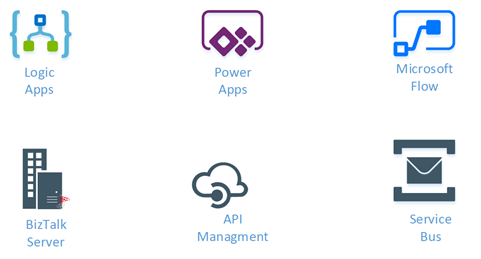
To all my readers, friends, coworkers, customer, partners, to all Microsoft Integration and Azure Community (BizTalk Server, Logic Apps, API Management, Service Bus, and so on), MSFT Product Groups, all the Portuguese Communities, my MVP “family” and of course to my family, my sincere wishes for a Merry Christmas and a Happy New Year!
Thanks in advance for all the support and encouragement given throughout this year. I hope that the next will be a year filled with new distinct contributions. I promise that I will continue to share knowledge, hoping that they can help someone.
This year I had the privilege of receiving a surprise Christmas gift from good friends that intentionally or unintentionally (I believe it was intentional) combine two of my passions/hobbies:
Wine enthusiasm and the passion for exploring and taste new wines (you can find more in my Instagram account)
And my blog.
So I got this fantastic Blog (Black Label) 2016 Red Wine. Thanks for this amazing gift! No need to mention names. You know who you are
All the best for the coming year, and most importantly, stay safe!
Most developers start working with Logic Apps through Azure Portal, because it’s fast and direct. You just open the Portal, create your resource and start working. This is fine but it comes with a cost. There are several limitations to what you can do, specially when it comes to CI/CD (Continuous Integration/Continuous Delivery).
To handle this, there is the need to move to Visual Studio and start working from there. For this to happen, you need tools to help you and there’s a few available. In this post, I will approach a very good one and how to use it.
This tool is a collection of powershell scripts that will download to file your Logic App code and it also can create a parameters file.
The creator of this collection is Jeff Hollan, PM Lead for Microsoft. You can check his work at his GitHub repo. https://github.com/jeffhollan
The project that we’re going to use is LogicAppTemplateCreator. It’s a C# project that creates a DLL and that we will import and use.
I dropped into a Shared folder, because I’ve referenced it in a Repo for other people to consume in our projects, but this is not necessary, although I recommend it so that it becomes easier for future developers in your company.
After executing this, you’ll be ready to download your ARM template. So, get your Resource Group ID, you Subscription ID and prepare an output folder. You will also need to enter your credentials to login by powershell.
The script should be changed according to your IDs. Do note that it should not be case sensitive. If you don’t set the Out-File, the output will be set in the powershell console, you’ll still be able to copy it and paste in a file, but it’s an unnecessary step.
You will now have both files you need to manage your Logic App, so just copy them to your VS Azure Resource Group project, with Logic Apps Template and you’re almost ready to go.
You will need to address the path links in the JSON code to make them CI/CD-able and fix the parameters in some connectors, but there’s not a lot of work to be done.
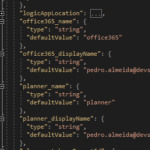
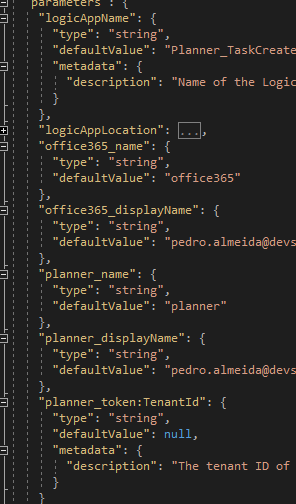
As you can see, the ARM template already provides all connection parameters and connections variables. I do recommend you changed them to a more appropriate naming convention like “arm_O365”, “arm_SQL” or “arm_ServiceBus”. This way you will know what it’s referring to with a very understandable pattern.
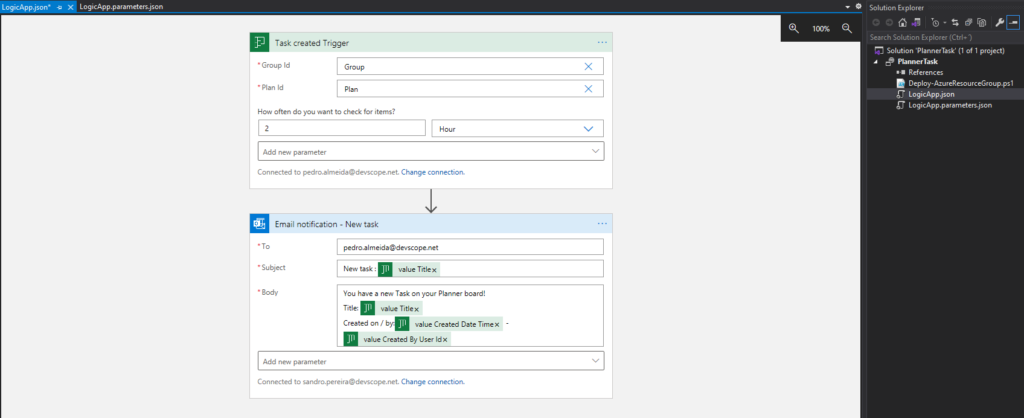
At the end of the day, your Logic App should be ready for deployment in your subscriptions and look something like this:
Do you feel difficult to keep up to date on all the frequent updates and announcements in the Microsoft Integration platform and Azure iPaaS?
Integration weekly updates can be your solution. It’s a weekly update on the topics related to Integration – enterprise integration, robust & scalable messaging capabilities and Citizen Integration capabilities empowered by Microsoft platform to deliver value to the business.
When migrating your BizTalk Server environment or deploy to a new or different environment, there are many different resources or configurations that you need to take into considerations like:
local queue creations
cloud queue creations
folder creations
and so on.
One of the common resources that we use on our integration solutions is local folders, whether for archiving or routing messages. I do not mean that it is a good practice or not. That you should do it or not, this is not the goal, only that this is common to happen.
In a first analysis, we could think that the quickest and most effective solution would be to copy and paste the folder structure from one environment to another. Still, it may not be the best solution in many cases since it may contain thousands of documents, which are unnecessary to copy/migrate.
This blog post will address how we can easily recreate a folder structure in a different environment/server using PowerShell.
PowerShell script to recreate a local folder structure
With this PowerShell sample, we will be able to recreate an existing local folder structure on a different BizTalk Server environment.
The output of this PowerShell script will be a creation of a different PS script containing the instructions that you can use to recreate all the folder structures in different environments.
When migrating your BizTalk Server environment or deploy to a new or different environment, there are many different resources or configurations that you need to take into considerations like:
local queue creations
cloud queue creations
folder creations
and so on.
In this blog post, I will address how we can easily “export” a list of existing local private Message Queues (MSMQ) and recreate them, and set proper permissions in a different environment/server.
PowerShell script to extract a list of all private Message Queues (MSMQ) names
With this PowerShell sample, we will be able to extract a list of all private Message Queues (MSMQ) names to a CSV file to be used on a different script to deployed these resources on a different BizTalk Server environment.
set or update the URI (address) or part of the URI on a list of BizTalk Server Receive Locations deployed in your BizTalk Server environment.
PowerShell script to create private Message Queues (MSMQ)
With this PowerShell sample, we will be able to create local Private Message Queues (MSMQ) and set proper permissions on a different BizTalk Server environment.
Starting with BizTalk Server 2020 and newer, administrators can configure BizTalk Server to generate an audit trail for management operation on application artifacts, such as to send ports, receive ports, receive locations, orchestrations, and resources. Auditing of suspend/resume/terminate operations on service instances is also possible.
This feature may not be perfect yet, and it has space to grow in the future, but it is a good start, and I hope the BizTalk product team will improve these capabilities in the future.
How to configure the Audit Logs?
The auditing feature isn’t enabled by default. To enable auditing you need to:
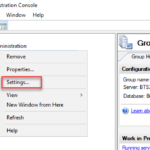
Open BizTalk Server Administration console, right-click the BizTalk Group, and select Settings
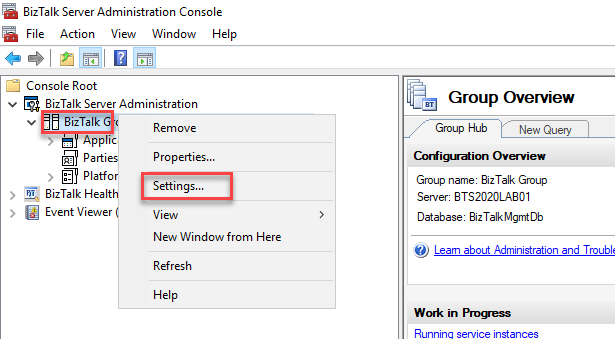
On the Group panel, under the Tracking and Reporting section:
Enable the Audit management operations option.
And set a Maximum number of audit entries property according to your needs. By default, BizTalk stores 10000 most recent entries.
Select OK to save your changes.
Now every time you make the following operations:
On Ports (Receive or Send): Create, Update and Delete
On Service Instances: Suspend, Resume and Terminate
On Application resource: Add, Update and Remove
On Bindings: Import bindings files
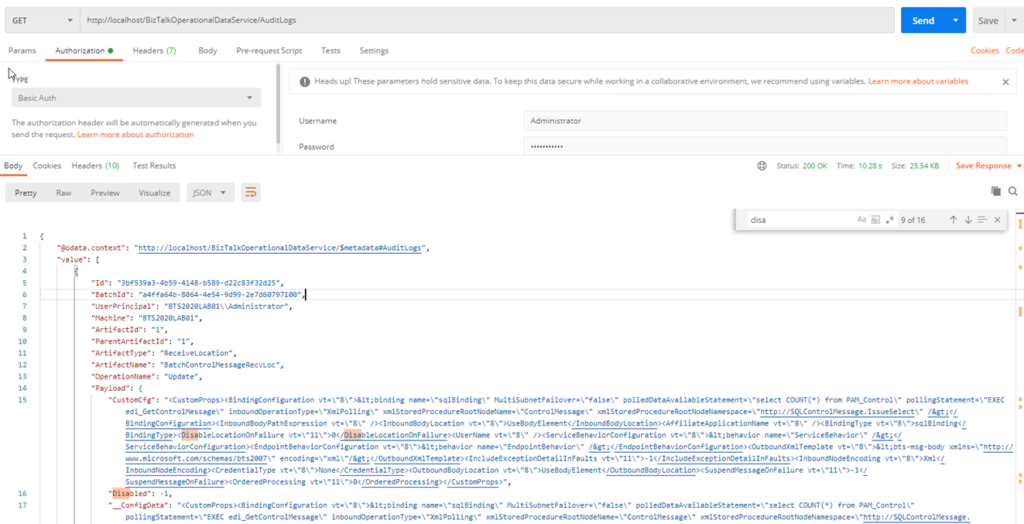
One or more audit entries are logged. All these correlation entries have the same BatchId. The audit log has the following information:
Property
Description
ID
Id of type Guid, unique per entry. Example: 3bf539a3-4b59-4148-b589-d22c83f32d25
BatchId
Same for all audited operations performed in a single SQL transaction. Insightful in correlating user operations with lower level details Example: a4ffa64b-8064-4e54-9d99-2e7d60797100
UserPrincipal
User who performed the operation. Example: BTS2020LAB01Administrator
Machine
Machine name from which operation was performed. Example: BTS2020LAB01
ArtifactId
Unique id of the artifact. Example: 1
ParentArtifactId
If an artifact is child of another artifact, then this field will have artifact id of the parent. Example: 1
ArtifactType
Type of artifact on which operation was performed. Example: SendPort, ReceiveLocation, etc.
ArtifactName
User configured name of the artifact. Example: BatchControlMessageRecvLoc
OperationName
Action performed on the artifact. Example: Ports: Create/Update/DeleteService Instances: Suspend/Resume/TerminateApplication resources: Add/Update/RemoveBinding file: Import
Payload
Contains information about what is changed in JSON structure. Example: { “Disabled”: 0 }
CreatedDate
Timestamp when the operation was performed Example: 2020-11-27T09:21:48.55Z
How to view the audit logs?
The easier way to access the BizTalk Server Audit logs is to access the Audit Logs REST service using your browser by using the following URL:
GET http://localhost/BizTalkOperationalDataService/AuditLogs
This will provide a JSON response containing all the latest logs.
For a better user experience, you could use a tool like postman to interact with this service:
You can also define a date range to retrieve the desire logs. For that you should use the following query parameters:
fromDate: beginning date, for example, 2020-12-01T01:00:00
toDate: end date, for example, 2020-12-03T01:00:00
GET request example:
GET http://localhost/BizTalkOperationalDataService/AuditLogs?fromDate=2020-12-01T01:00:00&toDate=2020-12-03T01:00:00
Supported date formats are: yyyy-MM-dd or yyyy-MM-ddThh:mm:ss.
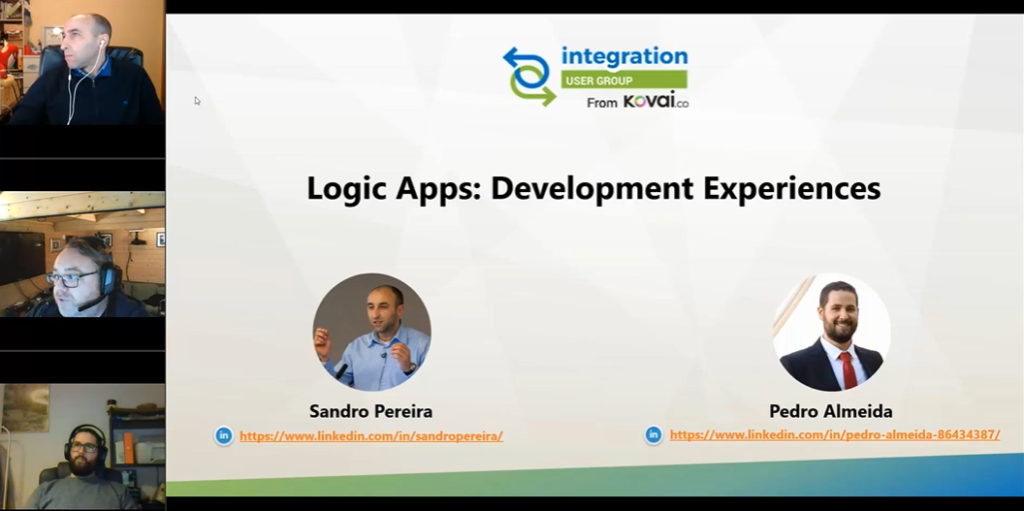
It was with great pleasure that I presented on December 7, 2020, another session in the Integration Monday series, this time about Logic Apps: Development Experiences. I had the pleasure to be accompanied as a co-presenter for the first time by my team member, Pedro Almeida.
Logic Apps: Development Experiences
How can I start developing Logic Apps? What are the different tools I can use? What are the advantages and drawbacks of each developer approach? What are the deployment options that I have? These are some of the questions that we will answer in this session, along with several tips that will improve your Logic Apps development experience.
I hope you enjoy it and find it an interesting session. Also, I advise you to visit and view the history of sessions that have taken place every Monday in the Integration User Group – Integration Monday series.
My other talks at Integration Monday – Integration User Group
Do you feel difficult to keep up to date on all the frequent updates and announcements in the Microsoft Integration platform and Azure iPaaS?
Integration weekly update can be your solution. It’s a weekly update on the topics related to Integration – enterprise integration, robust & scalable messaging capabilities and Citizen Integration capabilities empowered by Microsoft platform to deliver value to the business.
Azure Logic Apps adapter is used by BizTalk Server to communicate with the Azure Logic Apps. This could also be possible using the HTTP adapter, but the Logic App adapter provides a better and straightforwardly experience.
You may be thinking that I’m out of my mind. Logic App Adapter was already available in BizTalk Server 2016. Indeed you are right. However, the Logic App adapter was an optional feature and a separate download in BizTalk Server 2016. You can know more about how to install it on this white paper I wrote some time ago: Step-by-Step Logic App Adapter Installation Guide. But it is now installed with the BizTalk Server 2020 default installation process, so you do not need to install it and configure it manually. Everything or almost everything will be already configured for you automatically.
The Logic App Adapter is one of the adapters that support two-way communications:
The Logic App Receive Adapter that is responsible for receiving messages from Logic Apps and delivering them to BizTalk is, in fact, a WCF Service that runs inside Internet Information Services (IIS).
Install and Configure an On-premises Data Gateway;
Click the Test Settings button to verify the application pool identity and pass the authentication and authorization tests.
Click the OK button to save the changes.
Open BizTalk Server Administration, expand BizTalk Server Administration à BizTalk Group > Applications, and expand our application.
Right-select Receive Ports, select New, and select One-way Receive Port.
In the Receive Port properties window, enter the following configurations:
Name: Enter a name for the receive port.
Select Receive Locations, and select New
In the Receive Location properties window, enter the following configurations:
Enter a Name for the receive location
For the Type, select LogicApp from the list, and select the Configure button.
In the General tab, configure the endpoint address for your logic app:
Address: Required. Enter the BizTalk ReceiveService IIS application URL. In our case: /LogicAppTestService/Service1.svc
Public Address: Required. This is the public full URL of the service. In our case: http:///LogicAppTestService/Service1.svc
In the Binding tab, you can configure any timeout and encoding-related properties of the underlying WCF-WebHttp binding. These properties are helpful when dealing with large messages.
In the Security tab, configure any security properties.
Click the OK button, to save your configurations.
For the Receive handler, select PassThruReceive from the list and select OK to save your configurations.
And finally, create our Logic App to send messages to BizTalk Server
Sign in to the Azure portal. Create a blank logic app.
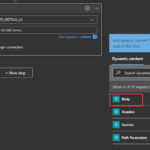
After Logic App Designer opens, in the search box, enter Request as your filter, and from the triggers list, select the When a HTTP request is received trigger
Select + New step
In the search box, enter BizTalk Server as your filter
From the connector list, select the Send message action form the BizTalk Server connector
Once the action is added to your logic app, you need to setup the connections, perform the following actions:
Select the option Connect via on-premises data gateway and on the gateway properties, select the Subscription and the desired Connection Gateway.
On the Connection Name property, provide a proper name for your connector
On the BizTalk Server URL property, provide a public UTL for the Management Application on the BizTalk Server IIS
On the Authentication Type property, set Windows and provide a proper Username and Password to access the above service (BizTalkManagementService)
Select Create
Once you create the connector, the Send message action will appear on the Logic App designer
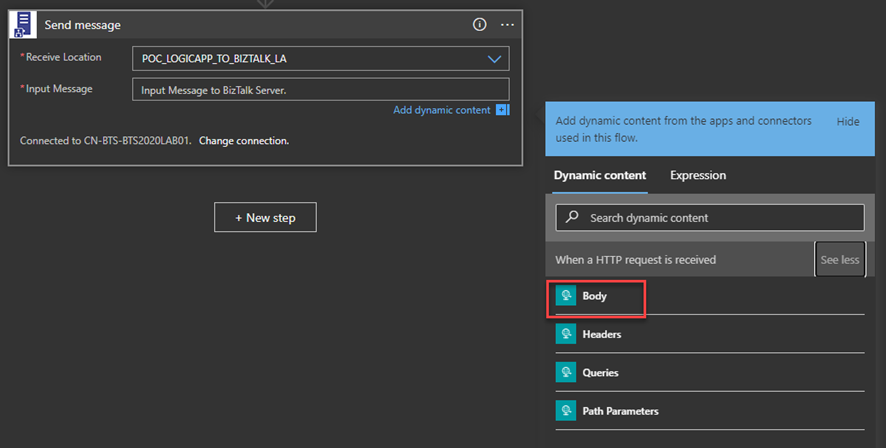
From the Receive Location list, select the receive location we just create above
On the Input Message, specify the Body token of the When a HTTP request is received trigger
The Logic App Send Adapter is responsible for sending messages from BizTalk Server to Logic Apps.
We need to first create a Logic App in our Azure Subscription has as a trigger the When a HTTP request is received present in the Request built-in Connector.
Note: The Logic App adapter doesn’t support the new Logic App (preview) that are hosted on Azure Function runtime.
We need to configure TLS 1.2 as the default security protocol on BizTalk Server.
And finally, create a BizTalk Server Application to send message to Logic App
Right-select Send Ports, select New, and select Static One-way Send Port
In the Send Port properties, enter the following:
Name for the send port. For example, enter POC_SEND_MSG_LOGIC_APP.
For the Type, select LogicApp from the list, and select the Configure button
In the General tab, configure the Callback URI of your logic app trigger by selecting Configure…
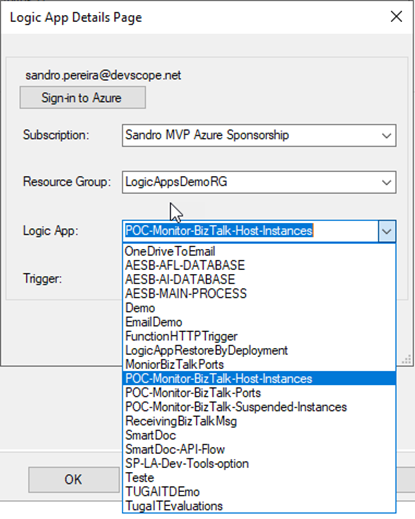
On the Logic App Details Page, select Sign-in to Azure and authenticate with an Azure account
After you authenticate, you can be able to access your Azure and select the Subscription, the Resource Group that contains the Logic Apps, and finally the Logic App and the Trigger
The Trigger will be always manual
Select OK to save your configurations.
In the Messages tab, set the content-type header as:
Content-Type:application/json
Setting up the BizTalk Server 2020 Logic App adapter
I told above that almost everything will be already configured. However, there is a critical bug in the default installation of the Logic App adapter that will affect the process of receiving messages from Logic Apps using the BizTalk Server Connector.
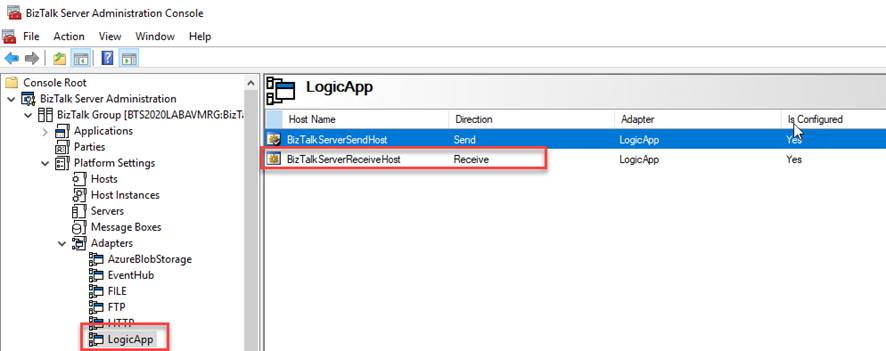
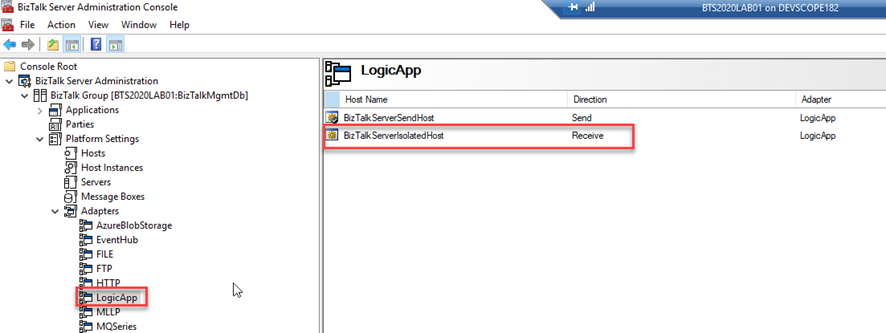
The Logic App Receive handler, or what we normally call the Logic App Receive adapter is by default configured to use the default In-Process Host, normally the BizTalkServerApplication, in this case as you saw in the picture bellow BizTalkServerReceiveHost.
If you leave this configuration, you will end up having errors when trying to activate a Receive Location that uses the Logic App adapter:
The receive location “Receive Location name” with URL “/iis-application-name/Service1.svc” is shutting down. Details
This happens assigned because the Receive handler is associated with the In-process Host and it should be bound to the Isolated Host.
To fix this bug we need to:
Remove the adapter from all assigned send ports and receive locations in my applications
Therefore, is important to do this immediately after the installation and configuration of your BizTalk Server environment. Otherwise, it will affect your existing application that uses the Logic App adapter to send messages to Logic Apps.
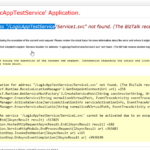
Until now, I usually have used the Logic App adapter to send messages to Azure Logic Apps and extend the BizTalk Server capabilities with the Azure Services. Yesterday, once I was trying the inverse capabilities, i.e., receiving a message from Logic App into BizTalk Server using the Logic App Adapter and, of course, the BizTalk Server Connector available on Logic App. I was surprised with the following error while I was trying to access the exposed service to receive messages from Logic App:
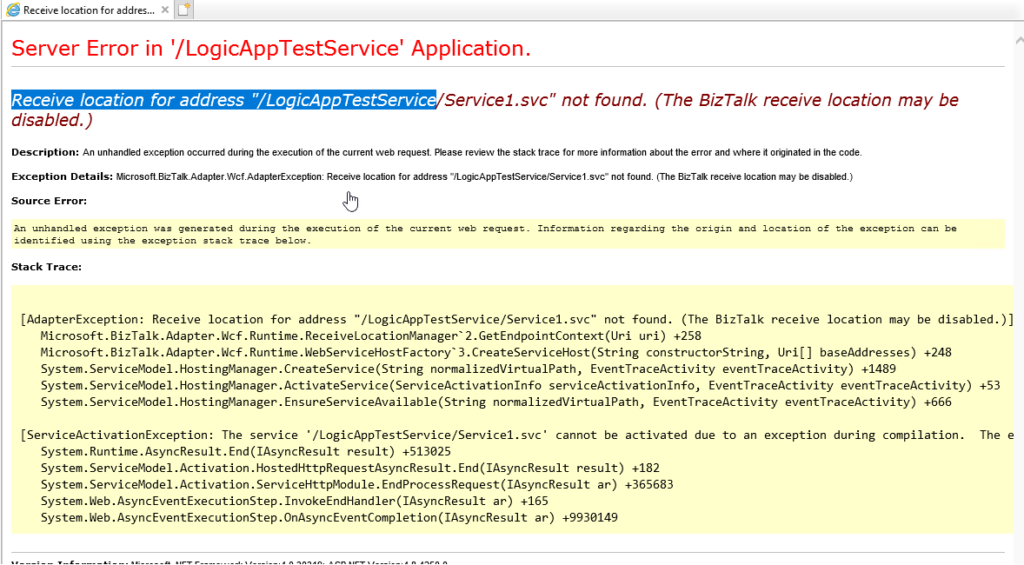
Receive location for address “/LogicAppTestServoce/Service1.svc” not found. (The BizTalk receive location may be disabled.)
This is a common error. It means that the Receive Location doesn’t exist or it is disabled. So I went to the BizTalk Server Administration Console and Enabled the Receive Location, but it automatically disabled again.
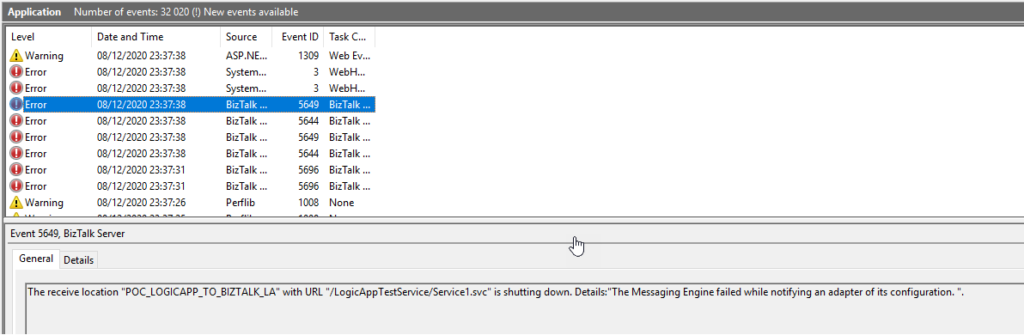
Once I check the Event Viewer for errors I found the 3 following errors:
The Messaging Engine encountered an error when creating the receive adapter “LogicApp”. The Assembly is: “Microsoft.BizTalk.Adapter.LogicApp.Runtime.LogicAppReceiver, Microsoft.BizTalk.Adapter.LogicApp.Runtime”. The error occurred because the component does not implement the mandatory interface “IBTTransportControl”.
The Messaging Engine failed to add a receive location “POC_LOGICAPP_TO_BIZTALK_LA” with URL “/LogicAppTestService/Service1.svc” to the adapter “LogicApp”. Reason: “80070057”.
The receive location “POC_LOGICAPP_TO_BIZTALK_LA” with URL “/LogicAppTestService/Service1.svc” is shutting down. Details:”The Messaging Engine failed while notifying an adapter of its configuration. “.
Cause
There is a critical bug in the default installation of the Logic App adapter that will affect the process of receiving messages from Logic Apps using the BizTalk Server Connector.
The Logic App Receive handler, or what we usually call the Logic App Receive adapter, is, by default, configured to use the default In-Process Host, normally the BizTalkServerApplication, in this case, as you saw in the picture bellow BizTalkServerReceiveHost.
Like what happens with the HTTP adapter, the Logic App Adapter is one of the adapters that support two-way communications. Still, unlike other adapters, this adapter has two characteristics that define it:
The Logic App Receive Adapter that is responsible for delivering messages to BizTalk is, in fact, a WCF Service that runs inside Internet Information Services (IIS).
And for that reason, it must be configured in IIS – it is not there out-of-the-box.
This means that when we create and configure a receive location that uses the Logic App adapter inside the BizTalk Server Administration Console, this receive location uses an application within IIS.
So, if you leave this Logic App Adapter default configuration, you will end up having the above errors when trying to activate a Receive Location. This happens assigned because the Receive handler is associated with the In-process Host and it should be bound to the Isolated Host.
Solution
To fix this bug we need to:
Remove the adapter from all assigned send ports and receive locations in my applications
Therefore, it is essential to do this immediately after the installation and configuration of your BizTalk Server environment. Otherwise, it will affect your existing application that uses the Logic App adapter to send messages to Logic Apps.