by Eldert Grootenboer | Feb 24, 2016 | BizTalk Community Blogs via Syndication
This is the third post in my series on Integration of Things. In my previous post I explained how you could send and receive data on a Raspberry Pi 2 to Azure. Today I will explain how you can use an Azure cloud service as a worker role for retrieving the data from Event Hubs using the Event Processor Host library. We will save the retrieved data in an Azure Table Storage, which is a great service for working with large amounts of structured, non-relational data. Azure Table Storage is very fast, and cost efficient especially when working with lots of data, which makes it ideal for our scenario. The code for this blogpost can be found here.
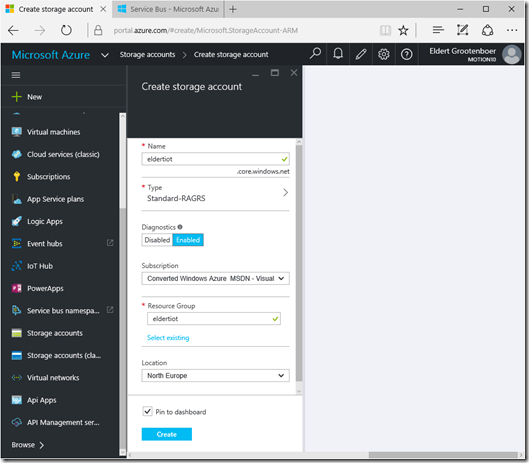
The Event Processor Host library will be used to retrieve the data from our event hub, and load it into Azure Table Storage. This library will distribute Event Hubs partitions accross our instances of the worker role, keeping track of leases and snapshots. This library really makes working with Event Hubs from .NET code a breeze to go through. We will need a blob storage for for the table and for the library to store its data, so let’s start by setting one up via the Azure Portal.
Our application will read from the event hub we created in the previous blogpost. To be able to access it, we need create a Shared Access Policy for this application with Listen permissions.
When working with Azure Table Storage, we need a class which represents the object which will be saved to the table. This class should derive from the TableEntity class, so it can be mapped into Table Storage. As we will be using this object in multiple project, we will create a new Class Library project for it.
We will need to add a reference to the WindowsAzure.Storage NuGet package in order to work with Azure Storage.
Add the class to the project which holds our object to be inserted into the table. We’ll use a method to set the partition and row key, which are used to shard the data and query the data. We use the same fields as we defined in the EngineInformation class used in the fieldhub project, so we can deserialize the objects we receive in the event hub directly into an object for the database. Unfortunatly it’s not possible to create a shared class library which can be used both by our worker role and the fieldhub UWP application, due to the incompatibility between Win32 and WinRT class libraries.
using System;

using Microsoft.WindowsAzure.Storage.Table;

namespace Eldert.IoT.Data.DataTypes
{
    /// <summary>
    /// Represents an engine information object for Azure Table Storage.
    /// </summary>
    public class EngineInformation : TableEntity
    {
        public Guid Identifier { get; set; }

        public string ShipName { get; set; }

        public string EngineName { get; set; }

        public double Temperature { get; set; }

        public double RPM { get; set; }

        public bool Warning { get; set; }

        public int EngineWarning { get; set; }

        public DateTime CreatedDateTime { get; set; }

        public void SetKeys()
        {
            PartitionKey = ShipName;
            RowKey = Identifier.ToString();
        }
    }
}
|
Next we are going to create a Cloud Service project containing a worker role, which we’re going to publish to Azure later on.
When the project is created, we will have two projects, one for the worker role, the other for the cloud service itself. Let’s start by setting up our worker role. As mentioned, we will implement the event processor library, for which we need to add the EventProcessorHost NuGet package to our project, as well as the WindowsAzure.Storage NuGet package for working with the table.
For this we will create a new class, which implements the IEventProcessor interface.
using System;
using System.Collections.Generic;
using System.Diagnostics;
using System.Text;
using System.Threading.Tasks;

using Eldert.IoT.Data.DataTypes;

using Microsoft.Azure;
using Microsoft.ServiceBus.Messaging;
using Microsoft.WindowsAzure.Storage;
using Microsoft.WindowsAzure.Storage.Table;

internal class ShipEventProcessor : IEventProcessor
{


}
|
This interface implements three methods. The first is OpenAsync, which gets called when the event processors are started for the partitions in our event hub. In this call we will also create the table to which we want to save our data in case it does not yet exist.
public Task OpenAsync(PartitionContext context)
{
        // Create the table if it doesn't exist yet
        if (_table.CreateIfNotExists())
        {
                Trace.TraceInformation("Table for EngineInformation has been created.");
        }

        Trace.TraceInformation($"EventProcessor started.  Partition: {context.Lease.PartitionId}, Current offset: {context.Lease.Offset}");

        return Task.FromResult<object>(null);
}
|
The second one is CloseAsync, which is called when the event processor is being shutdown. We will set a checkpoint here in case we are shutting down, so next time the event processor is started up for this partition, processing will resume from the last processed message.
public async Task CloseAsync(PartitionContext context, CloseReason reason)
{
    Trace.WriteLine($"EventProcessor is shutting down: Partition: {context.Lease.PartitionId} Reason: {reason}");

    // Place a checkpoint in case the event processor is shutting down
    if (reason == CloseReason.Shutdown)
    {
        await context.CheckpointAsync();
    }
}
|
The last method is ProcessEventsAsync, which is where the processing of the messages that are being received is done. As the messages were UTF8 serialized JSON strings, we will use the JSON library from Newtonsoft to deserialize the messages. To do so, we first need to install its NuGet package.
Now we will loop through the messages we received from our event hub, get the message string, and deserialize it to an EngineInformation object. Because event hubs works in a streaming manner, where we set checkpoints every x messages, we could receive messages more then once. To handle this, we will have to have some idempotency in place. I choose to just replace the existing object in the database, but for different scenarios this is something to think about. The reason we don’t place a checkpoint every message is due to performance reasons. Event Hubs are meant for large loads of messages, so it would be unwise to checkpoint every message. The storage account used for checkpointing probably wouldn’t handle this load, but more importantly checkpointing every single event indicates of a queued messaging pattern for which a Queue may be a better option than an Event Hub. The idea behind Event Hubs is that you will get at least once delivery at great scale. We therefor make our application idempotent so we can easily recover from failures or restarts that result in the same events being received multiple times.
/// <summary>
/// Processing of the messages received on the event hub.
/// </summary>
public async Task ProcessEventsAsync(PartitionContext context, IEnumerable<EventData> messages)
{
        try
        {
                // Gather the table operations to be performed
                var tableOperations = new TableBatchOperation();

                // Loop through received messages
                foreach (var eventData in messages)
                {
                        // Get the message received as a JSON string
                        var message = Encoding.UTF8.GetString(eventData.GetBytes());
                        Trace.TraceInformation($"Message received - Partition: {context.Lease.PartitionId} - Machine: {Environment.MachineName} Message: {message}");

                        try
                        {
                                // Deserialize the JSON message to an engine information object
                                var engineInformation = JsonConvert.DeserializeObject<EngineInformation>(message);
                                engineInformation.SetKeys();

                                // We have to take care of idempotency ourself, as we might get the same message multiple times
                                // To do so, we will insert new items, and replace existing items (which will replace the item with the same item)
                                // For extra performance we gather the table operations here, and will apply them later on in a batch
                                Trace.TraceInformation($"Adding {engineInformation.Identifier} to table");
                                tableOperations.Add(TableOperation.InsertOrReplace(engineInformation));
                        }
                        catch (Exception)
                        {
                                Trace.TraceWarning("Could not deserialize as EngineInformation object");
                        }
                }

                // Apply table operations if needed
                if (tableOperations.Count > 0)
                {
                        await _table.ExecuteBatchAsync(tableOperations);
                        Trace.TraceInformation("Saved data to database");
                }

                // Keep track of number of received messages, place a checkpoint after having processed 50 messages.
                // Make sure the messages are persisted in the table before placing the checkpoint
                if (++_messageCounter > 50)
                {
                        Trace.TraceInformation("Checkpoint placed");
                        await context.CheckpointAsync();
                        _messageCounter = 0;
                }
        }
        catch (Exception exception)
        {
                Trace.TraceError(exception.ToString());
                throw;
        }
}
|
We are now done with implementing the interface, the next step is to hook it into our WorkerRole class. Start by adding a reference to the ServiceBus Messaging namespace, which is used to work with the Event Processor Host, and adding a field for its instance. We will also need a reference to the Azure library, which will be used to retrieve our settings from the configuration we specify on our cloud service.
using System;
using System.Diagnostics;
using System.Net;
using System.Threading;
using System.Threading.Tasks;

using Microsoft.Azure;
using Microsoft.WindowsAzure.ServiceRuntime;

using Microsoft.ServiceBus.Messaging;

namespace Eldert.IoT.Azure.EventHubsProcessor.WorkerRole
{
    public class WorkerRole : RoleEntryPoint
    {
        private EventProcessorHost _eventProcessorHost;
        .
        .
        .
    }
}
|
Now we are going to add the settings we need to connect to our event hub and storage. We will store these in the settings of our cloud service, so that once it’s deployed, we can change these settings from the Azure Portal. Open the Cloud Service project, expand the Roles and double-click on the WorkerRole. Go to the settings tab, and add settings for the consumer group name, event hub name, storage connection string and event hubs connection string. Note that the settings only allow you to specify storage connection string as a connection string type, so for the event hubs connection string just use type string.
Back to our worker role project, when the worker role starts, we want the Event Processor Host to be initialized, so we will add this to the OnStart method. We need to set an identifier for the host, which will be used by the library to keep track which host is handling each partition. This will be used in loadbalancing the processing of the partitions, as each partition can be handled by a different host. We also need to specify the connection settings, which we just stored in the settings of the cloud service. Using CloudConfigurationManager.GetSetting() we can retrieve the settings to create an instance of the event processor host.
public override bool OnStart()
{
        // Create the event processor host
        // Create a unique identifier, which will be used to determine which partitions this processor is handling
        _eventProcessorHost = new EventProcessorHost(Guid.NewGuid().ToString(), CloudConfigurationManager.GetSetting("EventHub"), CloudConfigurationManager.GetSetting("ConsumerGroup"),
                CloudConfigurationManager.GetSetting("EventHubsConnectionString"), CloudConfigurationManager.GetSetting("IoTStorageConnectionString"));

        // Set the maximum number of concurrent connections
        ServicePointManager.DefaultConnectionLimit = 12;
        var result = base.OnStart();
        Trace.TraceInformation("Eldert.IoT.Azure.EventHubsProcessor.WorkerRole has been started");
        return result;
}
|
When the application starts running, we have to register the ShipEventProcessor we created earlier with the Event Processor Host, so it knows what actions to take on the messages. We’ll add this to the Run method.
public override void Run()
{
    Trace.TraceInformation("Eldert.IoT.Azure.EventHubsProcessor.WorkerRole is running");

    try
    {
        // Register the processor, at this point one or more partitions will be registered with the client, and it will start processing
        _eventProcessorHost.RegisterEventProcessorAsync<shipeventprocessor>().Wait();

        RunAsync(_cancellationTokenSource.Token).Wait();
    }
    finally
    {
        _runCompleteEvent.Set();
    }
}
|
And finally, when the application is being stopped, we have to unregister the event processor, to let it clean up and make the necesarry checkpoints. This should be added in the OnStop method.
public override void OnStop()
{
    Trace.TraceInformation("Eldert.IoT.Azure.EventHubsProcessor.WorkerRole is stopping");
    _cancellationTokenSource.Cancel();
    _runCompleteEvent.WaitOne();

    // Unregister the processor
    _eventProcessorHost.UnregisterEventProcessorAsync().Wait();

    base.OnStop();
    Trace.TraceInformation("Eldert.IoT.Azure.EventHubsProcessor.WorkerRole has stopped");
}
|
Now that all is in place, we can setup the application for publishing. As you have noticed, we use Trace to log information about our progress. As this application will be running in Azure, we will want to make this information accessible. Luckily this can be done easily by opening the worker role in our cloud service project, opening Configure for the diagnostics and setting the Log level to All in the Application logs tab, or a different setting if we would like less information to be logged, f.e. just errors.
We will also need to set a storage account where we want to log to. The logging will be stored in an Azure Table called in this WADLogsTable under this storage account. Currently this just the classic storage accounts, so create a new storage account for this.
Finally make sure to set the number of instances and VM size you will want to use.
Now we can go and publish our cloud service with the worker role to Azure. Right click on your cloud service project, and select Publish. Select the subscription to which you want to deploy.
Set the name of your service, along with the properties for it’s region and replication.
Next choose the storage account you just created for your logging.
And finally review your settings, and if all is ok, publish your service.
The Azure activity log will now open, where you can check on the progress of your deployment, and also will see if anything is not going right.
Once the deployment is done, you can use the Cloud Explorer from Visual Studio to check the logging in the WADLogsTable.
And the same can be used to check our data in the Azure Storage Table, remember to switch to the correct storage account. As you will see, the table was automatically created, and data is filled according to the format we set in our EngineInformation object.
We have now finished our worker role which retrieves the data from the event hub, and stores it in the database. In my next blogpost I will show how you can use Entity Framework to setup a Azure SQL database.
Code
by Daniel probert | Feb 23, 2016 | BizTalk Community Blogs via Syndication
Updated 2016-02-25: I’ve clarified the section on setting access to your API App to Public Anonymous – you can still use Zumo tokens, but it’s better to use AD Auth to restrict access to your v1 API Apps – see this link for more info: http://aka.ms/logicapps-customapi.
Jeff Hollan (Microsoft) has also expanded on my blog post about using BizTalk/v1 connectors in the new designer, and has included details on how to add the Swagger/Swashbuckle details to your API App so that the new designer will be able to list any BizTalk/v1 API Apps you have defined in your Resource Group – you can read Jeff’s post here: http://blogs.msdn.com/b/logicapps/archive/2016/02/25/accessing-v1-apis-and-biztalk-apis-from-logic-apps.aspx.
Microsoft today released the Logic Apps preview refresh – which means a new designer and new connectors.
However, those BizTalky people amongst you might notice that there’s no mention of the BizTalk connectors in the list of actions you see in the new designer:
There’s an apparent reason for that: with the new refresh, Microsoft have migrated to managed connectors – and so the only connectors you see in the list are the new v2 managed connectors. And none of the BizTalk connectors have (yet) been migrated – they’re still v1 connectors.
However, fear not – you can still use them – you just have to manually add them (this applies to all v1 connectors and API apps).
This is a 3 step process:
1) Create the BizTalk Connector/v1 API App
This is really easy – just find the API App in the marketplace (you have to select the See All option), create an instance of it, and upload any resources it requires e.g. transforms for the Transform Service.
2) Enable CORS policies, get Swagger URL, and set authentication
a) Once the API app is created, open it, and click on the Host option:
This opens the API Host blade (which is the web site that hosts your API App).
b) Take a copy of the URL to your API App Host:
We’ll need that URL in a moment.
c) Now click on the All Settings option, and in the settings blade, scroll down till you come to the API section – click on the CORS link.
d) In the CORS blade, under Allowed Origins, type “*” (without the quotes!) press Save.
The blade should look like this:
e) Now we create the Swagger URL – the correct way to do this is to add /swagger/ui to the end of the Host URL you copied in step b) above and navigating to the Swagger UI page, but you can also do it by taking that URL, changing it to https, and adding :443/swagger/docs/1.0 to the end.
So for example, this URL:
http://flatfileencoderaab3a9a1a4d94e3d9b7d0b398a3e2744.azurewebsites.net
becomes
https://flatfileencoderaab3a9a1a4d94e3d9b7d0b398a3e2744.azurewebsites.net:443/swagger/docs/1.0
That’s the Swagger URL that you need.
f) One last step needed : we need to change the Access Level to be Public Anonymous, and setup authentication via Active Directory – see here for more details: http://aka.ms/logicapps-customapi. Previously we would get the logic app to use Zumo tokens to access the API app – you can still do this, but it means you’d be going through the old, deprecated Gateway server technology. For the purposes of this post, we’ll use Public Anonymous with no AD authentication, as it’s the easiest way to get this working. In your main API App blade, click All Settings then Application settings, and choose Public (Anonymous) and click save:
3) Create a new Logic App and reference your API App
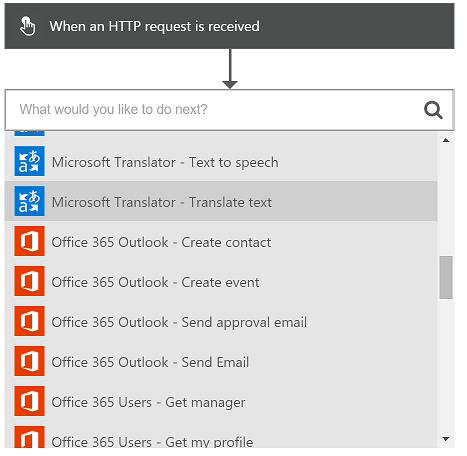
In your new Logic App (using the new designer), whenever you add an action you can choose “HTTP + Swagger” and provide a URL to the Swagger that describes the API.
So that’s all we do – in our case, as we’re using a connector that is not a trigger (i.e. the Flat File Encoder) then we need to add a trigger (HTTP in our case) and then we can add an HTTP + Swagger action and specify the URL from step 2):
Once we click Next, then we get a list of the operations available on this API App:
And when we select one, we see the usual parameters for the API App, which we can populate from previous steps/actions/variables in our Logic App:
I’ll do a full demo video showing how you could use this method to use a number of BizTalk connectors in your Logic App in a later post.

by Tomasso Groenendijk | Feb 22, 2016 | BizTalk Community Blogs via Syndication
I’d like to build tools for other developers and in the past I created some small tools for BizTalk 2010 and BizTalk 2013 to test your maps. This time I wanted to create something else because nowadays I’m focusing more and more on functionality in Azure. Therefore I created an XSLT API that you can use to transform XML messages with XSLT. The API can also be used to execute BizTalk maps as long you don’t have Custom Functoids.
Prerequisites
The only thing what you have to do is to create account on Apigize.com. Then you get secure and optimized cloud storage for free that is only accessible by yourself. You can upload up to 10 XSLT files without any costs!
| On the Register page enter your details and then click on the Register button. |
|
| |
| Copy the Primary key value from Your subscription details. |
|
Note:
Every API request you make to the Web API must be authenticated by including an Authorization Header with your API Key. |
| |
| Click on Files API in the Documentation menu to see the operations of the Files API. |
|
| |
How to upload a XSLT map?
You can create a XSLT map by using the Visual Studio Enterprise Integration SDK or for example another XSLT tool like MapForce and XMLSpy from Altova. When you are finished creating the XSLT transformation, you upload the XSLT file into your integration account.
Use a tool like Postman to call the Files API.
Select POST and enter: https://free.apigize.io/v1/files in the Request URL.
In the Header enter “Ocp-Apim-Subscription-Key” as the key name and your Primary key as the value. |
|
| |
In the Body select the form-data radio button and then select the file that you want to upload.
Click on the Send button to upload the file. |
|
| |
How to create a XSLT transform?
With the XSLT API you can transform an .XML message.
Select POST and enter: https://free.apigize.io/v1/xslt/{XSLT filename} in the Request URL.
In the Header enter “Ocp-Apim-Subscription-Key” as the key name and your Primary key as the value. Also specify the Content-Type and what you want to Accept. |
|
| |
In the Body select the raw radio button and then enter the XML message that you want to transform.
Click on the Send button to transform the message. |
|
| |
Conclusion
In this blog post I only showed how to upload a file with the Files API and how to use the XSLT API. Of course there are more operations available on the API’s but these work similar. I want to add even more functionality to the API’s so stay tuned!

by community-syndication | Feb 20, 2016 | BizTalk Community Blogs via Syndication
This post attempts to summarise what happens when some BizTalk Adapters picks up a zero byte file. I am using BizTalk Server 2013 R2 with CU2 for these tests First let’s make it clear what zero byte file I used for my testing. I created my test file by opening notepad and saving as an […]
Blog Post by: mbrimble

by community-syndication | Feb 16, 2016 | BizTalk Community Blogs via Syndication
In the sequence of my last two posts, welcome back, once again (probably the last one for now), to this serial of articles about Monitor your BizTalk environment using PowerShell. Today we will talk about a topic that a new topic, “How to monitor Host Instance in BizTalk Server using PowerShell”, and once again, we […]
Blog Post by: Sandro Pereira

by community-syndication | Feb 15, 2016 | BizTalk Community Blogs via Syndication
In the sequence of my last post, welcome back, once again, to this serial of articles about Monitor your BizTalk environment using PowerShell. Today we will talk about a topic that was also previously covered by Jeroen, ” Monitor your BizTalk environment using PowerShell – Port monitoring”, but this time, I will also add Auto […]
Blog Post by: Sandro Pereira
by community-syndication | Feb 15, 2016 | BizTalk Community Blogs via Syndication
Want tojump straight to the new website? Here you go –http://www.biztalk360.com One of the things that get overlooked often times in a business is the company website. It always takes a back seat.You burn your entire team energy up until the last minute focused on releasing the product and pay very little attention to the […]
The post Story behind our brand new website appeared first on BizTalk360 Blog.
Blog Post by: Saravana Kumar

by community-syndication | Feb 14, 2016 | BizTalk Community Blogs via Syndication
Welcome back to this serial of articles about Monitor your BizTalk environment using PowerShell that already have several previous editions: Monitor your BizTalk environment using PowerShell – Disk Space Monitoring Monitor your BizTalk environment using PowerShell – SQL Agent Jobs Monitoring BizTalk DevOps: Monitor your BizTalk environment using PowerShell – SQL Agent Jobs Monitoring (Part […]
Blog Post by: Sandro Pereira

by shadabanwer | Feb 10, 2016 | BizTalk Community Blogs via Syndication
This post is to simply describe how to pull out all messages from the suspended instances in Production.
I’ve been recently involve in remediation work for my client, where they have 50000+ suspended messages due to target system failure and timeouts. Since the design initially do not cater to re-submit these suspended instances, I need to look for other alternative. We took a back up of the Message box and copied re-stored to other similar environment. The task was to pull out one specific schema message to re-play these suspended again in the production.
I’ve came up with a small VB script to actually pull out all messages for the particular schema from suspended instances in message box.
‘ save_messages.vbs
‘ Enter cscript save_messages.vbs with no arguments from a command prompt for usage
‘ This script needs to be run under a user account that is a member of the BizTalk Administrators
‘ group. This script needs to be run on a machine that is configured with BizTalk administration
‘ tools.
dim objBtsWmiNS, objMsg, svcinsts, inst, msg, ndx, size
Dim aryHostNames()
Dim aryObjQueues()
Dim aryHostBatchSize()
Dim strKey2Instance
Dim strQuery2Msg
Dim strServiceName
Dim strMsgType
Dim strSavePath
On Error Resume Next
Dim objArgs: Set objArgs = WScript.Arguments
If ( objArgs.Count = 0 OR objArgs.Count > 4) Then
PrintUsage()
wscript.quit 0
End If
wmiQuery = “”
‘ServiceStatus = 16 – ‘Completed With Discarded Messages’ in BizTalk Server 2004
‘ServiceStatus = 32 – ‘Suspended (not resumable)’
‘ServiceStatus = 4 – ‘Suspended (resumable)’
‘ServiceClass = 64 – ‘Routing Failure Report’
‘ErrorId = “0xC0C01B4C” – is how ‘Completed With Discarded Messages’ are exposed in BizTalk Server 2006
If (objArgs(0) = “-Z” OR objArgs(0) = “-z”) Then
wmiQuery = “select * from MSBTS_serviceinstance where ServiceStatus=16 OR ErrorId=’0xC0C01B4C’”
End If
If (objArgs(0) = “-A” or objArgs(0) = “-a”) Then
wmiQuery = “select * from MSBTS_serviceinstance where ServiceStatus=4 OR ServiceStatus=32 OR ServiceStatus=16 OR ErrorId=’0xC0C01B4C’ OR ServiceClass=64”
End If
If (objArgs(0) = “-SR” or objArgs(0) = “-sr”) Then
wmiQuery = “select * from MSBTS_serviceinstance where ServiceStatus=4 and ErrorDescription like ‘%ExceptionInformation%’”
End If
If (objArgs(0) = “-SNR” or objArgs(0) = “-snr”) Then
wmiQuery = “select * from MSBTS_serviceinstance where ServiceStatus=32”
End If
If (objArgs(0) = “-DIS” or objArgs(0) = “-dis”) Then
wmiQuery = “select * from MSBTS_serviceinstance where ServiceClass=32 AND ServiceStatus=8”
‘ServiceClass = 32 ‘Isolated Adapter
‘ServiceStatus = 8 ‘Dehydrated
End If
saveMessagesBeforeTermination = True
If ( objArgs.Count > 1) Then
strSavePath = objArgs(1)
End If
If ( objArgs.Count > 2) Then
strServiceName = objArgs(2)
End If
If ( objArgs.Count > 3) Then
strMsgType = objArgs(3)
End If
If(wmiQuery = “”) Then
PrintUsage()
wscript.quit 0
End If
wscript.echo “->Connecting to BizTalk WMI namespace”
Set objBtsWmiNS = GetObject(“WinMgmts:{impersonationLevel=impersonate, (security)}.rootMicrosoftBizTalkServer”)
If Err <> 0 Then
CheckWMIError
wscript.quit 0
End If
wscript.echo “->Getting BizTalk host collection”
Set hosts = objBtsWmiNS.ExecQuery(“select * from MSBTS_HostSetting”)
If Err <> 0 Then
CheckWMIError
wscript.quit 0
End If
hostCount = hosts.count
ReDim aryHostNames(hostCount – 1)
ReDim aryObjQueues(hostCount – 1)
ReDim aryHostBatchSize(hostCount – 1)
wscript.echo “->Retrieve BizTalk host names and loading host queues”
ndx = 0
For Each host in hosts
wscript.echo “Found host ” & host.Properties_(“Name”)
aryHostNames(ndx) = host.Properties_(“Name”)
Set aryObjQueues(ndx) = objBtsWmiNS.Get(“MSBTS_HostQueue.HostName=””” & aryHostNames(ndx) & “”””)
If Err <> 0 Then
CheckWMIError
wscript.quit 0
End If
ndx = ndx + 1
Next
wscript.echo “->Getting collection of service instances”
Set svcinsts = objBtsWmiNS.ExecQuery(wmiQuery)
‘Iterate through instances and save them in host-specific arrays.
wscript.echo “->Start iterating service instances”
totalCount = 0
For Each inst in svcinsts
If (objArgs.Count = 1 Or (objArgs.Count > 1 And strServiceName = inst.Properties_(“ServiceName”) ) ) Then
wscript.echo “Found suspended instance “”” & inst.Properties_(“ServiceName”) & “”” on host ” & inst.Properties_(“HostName”)
‘Resolve host index
For hostIdx = 0 To hostCount-1
If aryHostNames(hostIdx) = inst.Properties_(“HostName”) Then
Exit For
End If
Next
’16 is an internal service class that cannot be terminated
If 16 = inst.Properties_(“ServiceClass”) Then
wscript.echo “Skipping BizTalk internal service instances (they cannot be terminated anyway)”
Else
’64 is a routing failure report and doesn’t have messages that can be saved
If 64 = inst.Properties_(“ServiceClass”) Or 16 = inst.Properties_(“ServiceClass”) Then
saveMessagesBeforeTermination = False
End If
errorCountSavingMessages = 0
If saveMessagesBeforeTermination Then
‘wscript.echo “Build Query”
If strMsgType > “” Then
strQuery2Msg = “select * from MSBTS_MessageInstance where ServiceInstanceID=””” & inst.Properties_(“InstanceId”) & “”” and MessageType = “”” & strMsgType & “”””
Else
strQuery2Msg = “select * from MSBTS_MessageInstance where ServiceInstanceID=””” & inst.Properties_(“InstanceId”) & “”””
End if
‘wscript.echo “Query is:” & strQuery2Msg
Set msgInsts = objBtsWmiNS.ExecQuery(strQuery2Msg)
For Each msg in msgInsts
msg.SaveToFile strSavePath
If Err <> 0 Then
CheckWMIError
wscript.echo “Failed to save MSBTS_MessageInstance”
wscript.echo Err.Description & Err.Number
errorCountSavingMessages = errorCountSavingMessages + 1
Else
wscript.echo “Saved message ” & msg.Properties_(“MessageInstanceID”)
End If
Next
End If
totalCount = totalCount + 1
End If
End If
Next
‘ Delete whatever is left
For hostIdx = 0 To hostCount-1
If aryHostBatchSize(hostIdx) > 0 Then
TerminateAccumulatedInstacesForHost hostIdx
End If
Next
wscript.echo “SUCCESS> ” & totalCount & ” instances were found and attempted to be saved”
‘This subroutine deals with all errors using the WbemScripting object.
‘Error descriptions are returned to the user by printing to the console.
Sub CheckWMIError()
If Err <> 0 Then
On Error Resume Next
Dim strErrDesc: strErrDesc = Err.Description
Dim ErrNum: ErrNum = Err.Number
Dim WMIError : Set WMIError = CreateObject(“WbemScripting.SwbemLastError”)
If (TypeName(WMIError) = “Empty” ) Then
wscript.echo strErrDesc & ” (HRESULT: ” & Hex(ErrNum) & “).”
Else
wscript.echo WMIError.Description & “(HRESULT: ” & Hex(ErrNum) & “).”
Set WMIError = nothing
End If
‘wscript.quit 0
End If
End Sub
Sub PrintUsage()
wscript.echo “Usage:”
wscript.echo “cscript save_messages.vbs < -Z | -A | -DIS | -SR | -SNR > SavePath [Port/Orchestration name] [MessageType]”
wscript.echo
wscript.echo ” -Z saves all “”Zombie”” instances (e.g. completed with discarded messages)”
wscript.echo ” -A saves all suspended and zombie instances as well as all routing failure reports”
wscript.echo ” -SR saves suspended resumable instances only”
wscript.echo ” -SNR saves suspended non-resumable instances only”
wscript.echo ” -DIS saves all dehydrated ‘isolated adapter’ instances”
wscript.echo ” optionally supply the name of the orchestration or port name to filter on specific instances”
wscript.echo
wscript.echo ” Ensure that the SavePath folder exists before running as that is where it saves the instances”
wscript.echo
wscript.echo ” Example: cscript save_messages.vbs -SR D:tempSuspended PublishInvoicePaymentStatusChange http://xyz/Channel/DynamicsAX/PaymentManagement/PublishInvoicePaymentStatusChange/v1#PublishInvoicePaymentStatusChange”
wscript.echo
End Sub
This Script can be called from the below batch file
cscript save_messages-CustomCluckHA.vbs -SR “C:tempProcessor-SaveHASub_20151027” “Orchestration-TypName” “http://xyz/Assistance/Home/v1#HomeAssistAgreementChangedEvent”
After pulling out all the messages, we simply do the file drop in the production system. Our orchestrations cater for both one-way and two-way messaging patterns, so at the end it was easy.

by community-syndication | Feb 10, 2016 | BizTalk Community Blogs via Syndication
Sometimes I ask myself: Why is so hard to make a simple If-Then-Else Functoid, or even so painful to do an If-Then-Else operation, using BizTalk mapper? I don’t mean to say that it is complicated, quite the opposite, is quite easy to make IfThenElse statements using the Mapper. You can use If…Then…Else statements, to be […]
Blog Post by: Sandro Pereira