Updated 2016-02-25: I’ve clarified the section on setting access to your API App to Public Anonymous – you can still use Zumo tokens, but it’s better to use AD Auth to restrict access to your v1 API Apps – see this link for more info: http://aka.ms/logicapps-customapi.
Jeff Hollan (Microsoft) has also expanded on my blog post about using BizTalk/v1 connectors in the new designer, and has included details on how to add the Swagger/Swashbuckle details to your API App so that the new designer will be able to list any BizTalk/v1 API Apps you have defined in your Resource Group – you can read Jeff’s post here: http://blogs.msdn.com/b/logicapps/archive/2016/02/25/accessing-v1-apis-and-biztalk-apis-from-logic-apps.aspx.
Microsoft today released the Logic Apps preview refresh – which means a new designer and new connectors.
However, those BizTalky people amongst you might notice that there’s no mention of the BizTalk connectors in the list of actions you see in the new designer:
There’s an apparent reason for that: with the new refresh, Microsoft have migrated to managed connectors – and so the only connectors you see in the list are the new v2 managed connectors. And none of the BizTalk connectors have (yet) been migrated – they’re still v1 connectors.
However, fear not – you can still use them – you just have to manually add them (this applies to all v1 connectors and API apps).
This is a 3 step process:
1) Create the BizTalk Connector/v1 API App
This is really easy – just find the API App in the marketplace (you have to select the See All option), create an instance of it, and upload any resources it requires e.g. transforms for the Transform Service.
2) Enable CORS policies, get Swagger URL, and set authentication
a) Once the API app is created, open it, and click on the Host option:
This opens the API Host blade (which is the web site that hosts your API App).
b) Take a copy of the URL to your API App Host:
We’ll need that URL in a moment.
c) Now click on the All Settings option, and in the settings blade, scroll down till you come to the API section – click on the CORS link.
d) In the CORS blade, under Allowed Origins, type “*” (without the quotes!) press Save.
The blade should look like this:
e) Now we create the Swagger URL – the correct way to do this is to add /swagger/ui to the end of the Host URL you copied in step b) above and navigating to the Swagger UI page, but you can also do it by taking that URL, changing it to https, and adding :443/swagger/docs/1.0 to the end.
So for example, this URL:
http://flatfileencoderaab3a9a1a4d94e3d9b7d0b398a3e2744.azurewebsites.net
becomes
https://flatfileencoderaab3a9a1a4d94e3d9b7d0b398a3e2744.azurewebsites.net:443/swagger/docs/1.0
That’s the Swagger URL that you need.
f) One last step needed : we need to change the Access Level to be Public Anonymous, and setup authentication via Active Directory – see here for more details: http://aka.ms/logicapps-customapi. Previously we would get the logic app to use Zumo tokens to access the API app – you can still do this, but it means you’d be going through the old, deprecated Gateway server technology. For the purposes of this post, we’ll use Public Anonymous with no AD authentication, as it’s the easiest way to get this working. In your main API App blade, click All Settings then Application settings, and choose Public (Anonymous) and click save:
3) Create a new Logic App and reference your API App
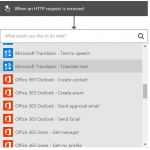
In your new Logic App (using the new designer), whenever you add an action you can choose “HTTP + Swagger” and provide a URL to the Swagger that describes the API.
So that’s all we do – in our case, as we’re using a connector that is not a trigger (i.e. the Flat File Encoder) then we need to add a trigger (HTTP in our case) and then we can add an HTTP + Swagger action and specify the URL from step 2):
Once we click Next, then we get a list of the operations available on this API App:
And when we select one, we see the usual parameters for the API App, which we can populate from previous steps/actions/variables in our Logic App:
I’ll do a full demo video showing how you could use this method to use a number of BizTalk connectors in your Logic App in a later post.