
by Tomasso Groenendijk | Mar 18, 2017 | BizTalk Community Blogs via Syndication
When you create a Web API or API App it’s essential to monitor it while it is running. Most importantly, you want to detect failures before most of your customers do. You also want to discover and fix performance issues and want to know what the users are doing with your Web API like are they using the latest features for example.
Application Insights is an extensible Application Performance Management (APM) service for web developers that monitors your running Web API. It tells you about failures and performance issues, and helps you analyze how customers use your app.
Perform the following steps to use the Application map and Alerts in Application Insights:
1. Add the Application Insights SDK to the API App
2. Use the Application Insights API in the API App for custom events and metrics
3. Use the Application Map in Application Insights to drill down errors
4. Set Alerts in Application Insights
Step 1: Add the Application Insights SDK to the API App
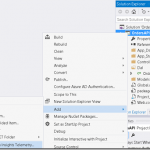
Right-click your API app project in Solution Explorer, and choose Add, Application Insights Telemetry. |
 |
Note
In Visual Studio 2015, there’s also an option to add Application Insights in the New Project dialog.) |
| |
|
Continue to the Application Insights configuration page:
| – |
Select the account and subscription that you use to access Azure. |
| – |
Select the resource in Azure where you want to see the data from your app. Usually you create a separate resource for each app. |
| – |
Click Register to go ahead and configure Application Insights for your web app. Telemetry will be sent to the Azure portal, both during debugging and after you have published your app. |
|
 |
| |
| |
Step 2: Use the Application Insights API in the API App for custom events and metrics
In Application Insights, a custom event is a data point that you can use to find out what users are doing with the API App, or to help diagnose issues. The Application Insights API for custom events and metrics is the same API that the standard Application Insights data collectors use. |
| |
| Use the following lines of code in your application to send an event whenever a document is not found: |
|
using Microsoft.ApplicationInsights;
private TelemetryClient telemetry = new TelemetryClient();
telemetry.TrackEvent(“[OrderManager.GetOrderById] Document not found”);
|
| |
 |
| |
| |
Step 3: Use the Application Map in Application Insights to drill down errors
There are plenty of ways to explore your telemetry data in Application Insights. One option is to use the Application Map in the Azure Portal. An Application Map is a visual layout of the dependency relationships of your application components. Each component shows KPIs such as load, performance, failures, and alerts, to help you discover any component causing a performance issue or failure. |
| |
|
To open the Application Map go to the Azure portal and then navigate to the API App that you created.
| – |
In the App Service blade, click Application settings. |
| – |
In the overview panel click on VIEW MORE IN APPLICATION INSIGHTS |
|
 |
| |
| Click on App map from the Application Insights blade to open the Application map. |
 |
| |
| Click on the error or warning to further investigate. |
 |
| |
| When you click on the error a new blade opens with an overview of the Failed Requests. |
 |
| |
| Click on the error to see the properties of the failed HTTP request. |
 |
| |
| Click on the link “All available telemetry for this operation” to see the telemetry and custom events. |
 |
| |
| |
Step 4: Set Alerts in Application Insights
Application Insights can also alert you to changes in performance or usage metrics in your API App. You can use the Metric alerts tell you when any metric crosses a threshold value for some period – such as response times, exception counts, CPU usage, or page views. |
| |
| Click on Alerts to open the Alert rules blade, and then click on the Add alert button. |
 |
| |
Use the Failed request metric to set an alert if a HTTP request to the API App fails and returns an error to the client.
If you check the box “Email owners…”, alerts will be sent by email to an administrator for example. |
 |
| |
| You then get a Failed Request Alert email when an alert changes state between inactive and active. |
 |
| |
| The current state of each alert is also shown in the Alert rules blade. |
 |
Conclusion
Application Insights is really a very good way to monitor your API App. It’s easy to add to your code and it has many great features like for example Alerts and the Application map. It’s also very mature and with the Basic pricing option, you pay based on the volume of telemetry your application sends, with a 1 GB free allowance per month. This free data allowance gives you a great way to try out Application Insights as you get started!

by Tomasso Groenendijk | Jan 22, 2017 | BizTalk Community Blogs via Syndication
I’d like to build tools for other developers and in the past I created some small tools for BizTalk 2010 and BizTalk 2013 to test your maps. This time I wanted to create something else because nowadays I’m focusing more and more on functionality in Azure. Therefore I created an XSLT API that you can use to transform XML messages with XSLT. The API can also be used to execute BizTalk maps as long you don’t have Custom Functoids.
Prerequisites
The only thing what you have to do is to create account on Apigize.com. Then you get secure and optimized cloud storage for free that is only accessible by yourself. You can upload up to 10 XSLT files without any costs!
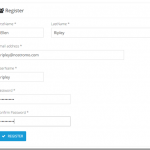
| On the Register page enter your details and then click on the Register button. |
|
| |
| Copy the Primary key value from Your subscription details. |
|
Note:
Every API request you make to the Web API must be authenticated by including an Authorization Header with your API Key. |
| |
| Click on Files API in the Documentation menu to see the operations of the Files API. |
|
| |
How to upload a XSLT map?
You can create a XSLT map by using the Visual Studio Enterprise Integration SDK or for example another XSLT tool like MapForce and XMLSpy from Altova. When you are finished creating the XSLT transformation, you upload the XSLT file into your integration account.
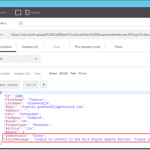
Use a tool like Postman to call the Files API.
Select POST and enter: https://free.apigize.io/v1/files in the Request URL.
In the Header enter “Ocp-Apim-Subscription-Key” as the key name and your Primary key as the value. |
|
| |
In the Body select the form-data radio button and then select the file that you want to upload.
Click on the Send button to upload the file. |
|
| |
How to create a XSLT transform?
With the XSLT API you can transform an .XML message.
Select POST and enter: https://free.apigize.io/v1/xslt/{XSLT filename} in the Request URL.
In the Header enter “Ocp-Apim-Subscription-Key” as the key name and your Primary key as the value. Also specify the Content-Type and what you want to Accept. |
|
| |
In the Body select the raw radio button and then enter the XML message that you want to transform.
Click on the Send button to transform the message. |
|
| |
Conclusion
In this blog post I only showed how to upload a file with the Files API and how to use the XSLT API. Of course there are more operations available on the API’s but these work similar. I want to add even more functionality to the API’s so stay tuned!

by Tomasso Groenendijk | Dec 21, 2016 | BizTalk Community Blogs via Syndication
I’d like to build tools for other developers and in the past I created some small tools for BizTalk 2010 and BizTalk 2013 to test your maps. This time I wanted to create something else because nowadays I’m focusing more and more on functionality in Azure. Therefore I created an XSLT API that you can use to transform XML messages with XSLT. The API can also be used to execute BizTalk maps as long you don’t have Custom Functoids.
Prerequisites
The only thing what you have to do is to create account on Apigize.com. Then you get secure and optimized cloud storage for free that is only accessible by yourself. You can upload up to 10 XSLT files without any costs!
| On the Register page enter your details and then click on the Register button. |
|
| |
| Copy the Primary key value from Your subscription details. |
|
Note:
Every API request you make to the Web API must be authenticated by including an Authorization Header with your API Key. |
| |
| Click on Files API in the Documentation menu to see the operations of the Files API. |
|
| |
How to upload a XSLT map?
You can create a XSLT map by using the Visual Studio Enterprise Integration SDK or for example another XSLT tool like MapForce and XMLSpy from Altova. When you are finished creating the XSLT transformation, you upload the XSLT file into your integration account.
Use a tool like Postman to call the Files API.
Select POST and enter: https://free.apigize.io/v1/files in the Request URL.
In the Header enter “Ocp-Apim-Subscription-Key” as the key name and your Primary key as the value. |
|
| |
In the Body select the form-data radio button and then select the file that you want to upload.
Click on the Send button to upload the file. |
|
| |
How to create a XSLT transform?
With the XSLT API you can transform an .XML message.
Select POST and enter: https://free.apigize.io/v1/xslt/{XSLT filename} in the Request URL.
In the Header enter “Ocp-Apim-Subscription-Key” as the key name and your Primary key as the value. Also specify the Content-Type and what you want to Accept. |
|
| |
In the Body select the raw radio button and then enter the XML message that you want to transform.
Click on the Send button to transform the message. |
|
| |
Conclusion
In this blog post I only showed how to upload a file with the Files API and how to use the XSLT API. Of course there are more operations available on the API’s but these work similar. I want to add even more functionality to the API’s so stay tuned!
by Tomasso Groenendijk | May 17, 2016 | BizTalk Community Blogs via Syndication
I’d like to build tools for other developers and in the past I created some small tools for BizTalk 2010 and BizTalk 2013 to test your maps. This time I wanted to create something else because nowadays I’m focusing more and more on functionality in Azure. Therefore I created an XSLT API that you can use to transform XML messages with XSLT. The API can also be used to execute BizTalk maps as long you don’t have Custom Functoids.
Prerequisites
The only thing what you have to do is to create account on Apigize.com. Then you get secure and optimized cloud storage for free that is only accessible by yourself. You can upload up to 10 XSLT files without any costs!
| On the Register page enter your details and then click on the Register button. |
|
| |
| Copy the Primary key value from Your subscription details. |
|
Note:
Every API request you make to the Web API must be authenticated by including an Authorization Header with your API Key. |
| |
| Click on Files API in the Documentation menu to see the operations of the Files API. |
|
| |
How to upload a XSLT map?
You can create a XSLT map by using the Visual Studio Enterprise Integration SDK or for example another XSLT tool like MapForce and XMLSpy from Altova. When you are finished creating the XSLT transformation, you upload the XSLT file into your integration account.
Use a tool like Postman to call the Files API.
Select POST and enter: https://free.apigize.io/v1/files in the Request URL.
In the Header enter “Ocp-Apim-Subscription-Key” as the key name and your Primary key as the value. |
|
| |
In the Body select the form-data radio button and then select the file that you want to upload.
Click on the Send button to upload the file. |
|
| |
How to create a XSLT transform?
With the XSLT API you can transform an .XML message.
Select POST and enter: https://free.apigize.io/v1/xslt/{XSLT filename} in the Request URL.
In the Header enter “Ocp-Apim-Subscription-Key” as the key name and your Primary key as the value. Also specify the Content-Type and what you want to Accept. |
|
| |
In the Body select the raw radio button and then enter the XML message that you want to transform.
Click on the Send button to transform the message. |
|
| |
Conclusion
In this blog post I only showed how to upload a file with the Files API and how to use the XSLT API. Of course there are more operations available on the API’s but these work similar. I want to add even more functionality to the API’s so stay tuned!
by Tomasso Groenendijk | Apr 9, 2016 | BizTalk Community Blogs via Syndication
When you create a Web API or API App it’s essential to monitor it while it is running. Most importantly, you want to detect failures before most of your customers do. You also want to discover and fix performance issues and want to know what the users are doing with your Web API like are they using the latest features for example.
Application Insights is an extensible Application Performance Management (APM) service for web developers that monitors your running Web API. It tells you about failures and performance issues, and helps you analyze how customers use your app.
Perform the following steps to use the Application map and Alerts in Application Insights:
1. Add the Application Insights SDK to the API App
2. Use the Application Insights API in the API App for custom events and metrics
3. Use the Application Map in Application Insights to drill down errors
4. Set Alerts in Application Insights
Step 1: Add the Application Insights SDK to the API App
Right-click your API app project in Solution Explorer, and choose Add, Application Insights Telemetry. |
 |
Note
In Visual Studio 2015, there’s also an option to add Application Insights in the New Project dialog.) |
| |
|
Continue to the Application Insights configuration page:
| – |
Select the account and subscription that you use to access Azure. |
| – |
Select the resource in Azure where you want to see the data from your app. Usually you create a separate resource for each app. |
| – |
Click Register to go ahead and configure Application Insights for your web app. Telemetry will be sent to the Azure portal, both during debugging and after you have published your app. |
|
 |
| |
| |
Step 2: Use the Application Insights API in the API App for custom events and metrics
In Application Insights, a custom event is a data point that you can use to find out what users are doing with the API App, or to help diagnose issues. The Application Insights API for custom events and metrics is the same API that the standard Application Insights data collectors use. |
| |
| Use the following lines of code in your application to send an event whenever a document is not found: |
|
using Microsoft.ApplicationInsights;
private TelemetryClient telemetry = new TelemetryClient();
telemetry.TrackEvent(“[OrderManager.GetOrderById] Document not found”);
|
| |
 |
| |
| |
Step 3: Use the Application Map in Application Insights to drill down errors
There are plenty of ways to explore your telemetry data in Application Insights. One option is to use the Application Map in the Azure Portal. An Application Map is a visual layout of the dependency relationships of your application components. Each component shows KPIs such as load, performance, failures, and alerts, to help you discover any component causing a performance issue or failure. |
| |
|
To open the Application Map go to the Azure portal and then navigate to the API App that you created.
| – |
In the App Service blade, click Application settings. |
| – |
In the overview panel click on VIEW MORE IN APPLICATION INSIGHTS |
|
 |
| |
| Click on App map from the Application Insights blade to open the Application map. |
 |
| |
| Click on the error or warning to further investigate. |
 |
| |
| When you click on the error a new blade opens with an overview of the Failed Requests. |
 |
| |
| Click on the error to see the properties of the failed HTTP request. |
 |
| |
| Click on the link “All available telemetry for this operation” to see the telemetry and custom events. |
 |
| |
| |
Step 4: Set Alerts in Application Insights
Application Insights can also alert you to changes in performance or usage metrics in your API App. You can use the Metric alerts tell you when any metric crosses a threshold value for some period – such as response times, exception counts, CPU usage, or page views. |
| |
| Click on Alerts to open the Alert rules blade, and then click on the Add alert button. |
 |
| |
Use the Failed request metric to set an alert if a HTTP request to the API App fails and returns an error to the client.
If you check the box “Email owners…”, alerts will be sent by email to an administrator for example. |
 |
| |
| You then get a Failed Request Alert email when an alert changes state between inactive and active. |
 |
| |
| The current state of each alert is also shown in the Alert rules blade. |
 |
Application Insights is really a very good way to monitor your API App. It’s easy to add to your code and it has many great features like for example Alerts and the Application map. It’s also very mature and with the Basic pricing option, you pay based on the volume of telemetry your application sends, with a 1 GB free allowance per month. This free data allowance gives you a great way to try out Application Insights as you get started!

by Tomasso Groenendijk | Feb 22, 2016 | BizTalk Community Blogs via Syndication
I’d like to build tools for other developers and in the past I created some small tools for BizTalk 2010 and BizTalk 2013 to test your maps. This time I wanted to create something else because nowadays I’m focusing more and more on functionality in Azure. Therefore I created an XSLT API that you can use to transform XML messages with XSLT. The API can also be used to execute BizTalk maps as long you don’t have Custom Functoids.
Prerequisites
The only thing what you have to do is to create account on Apigize.com. Then you get secure and optimized cloud storage for free that is only accessible by yourself. You can upload up to 10 XSLT files without any costs!
| On the Register page enter your details and then click on the Register button. |
|
| |
| Copy the Primary key value from Your subscription details. |
|
Note:
Every API request you make to the Web API must be authenticated by including an Authorization Header with your API Key. |
| |
| Click on Files API in the Documentation menu to see the operations of the Files API. |
|
| |
How to upload a XSLT map?
You can create a XSLT map by using the Visual Studio Enterprise Integration SDK or for example another XSLT tool like MapForce and XMLSpy from Altova. When you are finished creating the XSLT transformation, you upload the XSLT file into your integration account.
Use a tool like Postman to call the Files API.
Select POST and enter: https://free.apigize.io/v1/files in the Request URL.
In the Header enter “Ocp-Apim-Subscription-Key” as the key name and your Primary key as the value. |
|
| |
In the Body select the form-data radio button and then select the file that you want to upload.
Click on the Send button to upload the file. |
|
| |
How to create a XSLT transform?
With the XSLT API you can transform an .XML message.
Select POST and enter: https://free.apigize.io/v1/xslt/{XSLT filename} in the Request URL.
In the Header enter “Ocp-Apim-Subscription-Key” as the key name and your Primary key as the value. Also specify the Content-Type and what you want to Accept. |
|
| |
In the Body select the raw radio button and then enter the XML message that you want to transform.
Click on the Send button to transform the message. |
|
| |
Conclusion
In this blog post I only showed how to upload a file with the Files API and how to use the XSLT API. Of course there are more operations available on the API’s but these work similar. I want to add even more functionality to the API’s so stay tuned!

by Tomasso Groenendijk | Feb 8, 2016 | BizTalk Community Blogs via Syndication
When you create a Web API you can use it for your own applications but maybe you also want to expose it to the outside world. In that case you probably want to change the behavior of the Web API. For example add security or hide properties. You can use BizTalk to create a virtual service in front of your Web API to modify the behavior but is that the smartest choice? Because BizTalk writes every message that it receives a couple of times to the MessageBox database. This increases heavily the execution time and especially with Web APIs it’s important to have a really low execution time!
Another option is to use Sentinet from Nevatech to create a virtual service in front of your Web API.
The virtual service runtime in Sentinet can also be extended with custom messages processing. Sentinet provides a number of build-in message processing components but it is also possible to create custom message processing components.
Let’s have a look at the following example where an Order Web API is used inside an organization to process orders. This Web API must also be exposed to external customers to show the status of an order but if an error occurs in the Web API or in a background process, the OrderStatus property must be modified that the order is still in progress and the ErrorMessage property with the error must not be shown to the customers. Furthermore the output of the Web API must be in XML instead of JSON.
The following steps in Sentinet are necessary to make it work:
- Add the REST service (or API) to the the Sentinet Repository
- Create a Virtual Service
- Add custom Pipeline Processing
- Test the Virtual REST Service
Sentinet makes it really easy to modify the response of a Web API. You only have to create a Virtual Service in front of it and add custom Pipeline Processing! Especially if you are already familiar with XPATH and XSLT, the example above doesn’t take long to implement.
Download:
Sentinet version 4.5

by Tomasso Groenendijk | Jan 11, 2016 | BizTalk Community Blogs via Syndication
When you create a Web API you can use it for your own applications but maybe you also want to expose it to the outside world. In that case you probably want to change the behavior of the Web API. For example add security or hide properties. You can use BizTalk to create a virtual service in front of your Web API to modify the behavior but is that the smartest choice? Because BizTalk writes every message that it receives a couple of times to the MessageBox database. This increases heavily the execution time and especially with Web APIs it’s important to have a really low execution time!
Another option is to use Sentinet from Nevatech to create a virtual service in front of your Web API.
The virtual service runtime in Sentinet can also be extended with custom messages processing. Sentinet provides a number of build-in message processing components but it is also possible to create custom message processing components.
Let’s have a look at the following example where an Order Web API is used inside an organization to process orders. This Web API must also be exposed to external customers to show the status of an order but if an error occurs in the Web API or in a background process, the OrderStatus property must be modified that the order is still in progress and the ErrorMessage property with the error must not be shown to the customers. Furthermore the output of the Web API must be in XML instead of JSON.
The following steps in Sentinet are necessary to make it work:
- Add the REST service (or API) to the the Sentinet Repository
- Create a Virtual Service
- Add custom Pipeline Processing
- Test the Virtual REST Service
Sentinet makes it really easy to modify the response of a Web API. You only have to create a Virtual Service in front of it and add custom Pipeline Processing! Especially if you are already familiar with XPATH and XSLT, the example above doesn’t take long to implement.
Download:
Sentinet version 4.5

by Tomasso Groenendijk | Oct 23, 2015 | BizTalk Community Blogs via Syndication
When you create a Web API you can use it for your own applications but maybe you also want to expose it to the outside world. In that case you probably want to change the behavior of the Web API. For example add security or hide properties. You can use BizTalk to create a virtual service in front of your Web API to modify the behavior but is that the smartest choice? Because BizTalk writes every message that it receives a couple of times to the MessageBox database. This increases heavily the execution time and especially with Web APIs it’s important to have a really low execution time!
Another option is to use Sentinet from Nevatech to create a virtual service in front of your Web API.
The virtual service runtime in Sentinet can also be extended with custom messages processing. Sentinet provides a number of build-in message processing components but it is also possible to create custom message processing components.
Let’s have a look at the following example where an Order Web API is used inside an organization to process orders. This Web API must also be exposed to external customers to show the status of an order but if an error occurs in the Web API or in a background process, the OrderStatus property must be modified that the order is still in progress and the ErrorMessage property with the error must not be shown to the customers. Furthermore the output of the Web API must be in XML instead of JSON.

The following steps in Sentinet are necessary to make it work:
- Add the REST service (or API) to the the Sentinet Repository
- Create a Virtual Service
- Add custom Pipeline Processing
- Test the Virtual REST Service
Sentinet makes it really easy to modify the response of a Web API. You only have to create a Virtual Service in front of it and add custom Pipeline Processing! Especially if you are already familiar with XPATH and XSLT, the example above doesn’t take long to implement.
Download:
Sentinet version 4.5
by Tomasso Groenendijk | Sep 6, 2015 | BizTalk Community Blogs via Syndication
When you create a Web API you can use it for your own applications but maybe you also want to expose it to the outside world. In that case you probably want to change the behavior of the Web API. For example add security or hide properties. You can use BizTalk to create a virtual service in front of your Web API to modify the behavior but is that the smartest choice? Because BizTalk writes every message that it receives a couple of times to the MessageBox database. This increases heavily the execution time and especially with Web APIs it’s important to have a really low execution time!
Another option is to use Sentinet from Nevatech to create a virtual service in front of your Web API.
The virtual service runtime in Sentinet can also be extended with custom messages processing. Sentinet provides a number of build-in message processing components but it is also possible to create custom message processing components.
Let’s have a look at the following example where an Order Web API is used inside an organization to process orders. This Web API must also be exposed to external customers to show the status of an order but if an error occurs in the Web API or in a background process, the OrderStatus property must be modified that the order is still in progress and the ErrorMessage property with the error must not be shown to the customers. Furthermore the output of the Web API must be in XML instead of JSON.
The following steps in Sentinet are necessary to make it work:
- Add the REST service (or API) to the the Sentinet Repository
- Create a Virtual Service
- Add custom Pipeline Processing
- Test the Virtual REST Service
Sentinet makes it really easy to modify the response of a Web API. You only have to create a Virtual Service in front of it and add custom Pipeline Processing! Especially if you are already familiar with XPATH and XSLT, the example above doesn’t take long to implement.
Download:
Sentinet version 4.5