by Eldert Grootenboer | Jun 4, 2018 | BizTalk Community Blogs via Syndication
This is the fifth and final post in my series around setting up CI/CD for Azure API Management using Azure Resource Manager templates. We already created our API Management instance, added products, users and groups to the instance, and created unversioned and versioned APIs. In this final post, we will see how we can use linked ARM templates in combination with VSTS to deploy our solution all at once, and how this allows us to re-use existing templates to build up our API Management.

The posts in this series are the following, this list will be updated as the posts are being published.
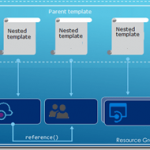
So far we did each of these steps from their own repositories, which is great when you want to have different developers only working on their own parts of the total solution. However if you don’t need this type of granular security on your repositories, it probably makes more sense to have you entire API Management solution in a single repository. When working with ARM templates, they can quickly become quite large and cumbersome to maintain. To avoid this, we can split up the template into smaller templates, which each does it’s own piece of work, and link these together from a master template. This allows for re-use of templates and breaking them down into smaller pieces of functionality. For this post we will be creating a API Management instance, create products, users and groups for Contoso, and deploy a versioned API. We will be re-using the templates we created in the previous blogposts from this series for our content.
We will start by creating a new GIT repository in our VSTS project called Linked Template. This repository will hold the master and nested templates which will be used to roll out our API Management solution.

Create Linked Template repository
Once the repository has been created, we will clone it to our local machine, and add a folder called templates in the repository. In the templates folder, create a new file called instance.json, which will hold the following nested ARM template for the API Management instance. All the ARM templates in this post should be placed in the templates folder unless otherwise specified.
{
    "$schema": "https://schema.management.azure.com/schemas/2015-01-01/deploymentTemplate.json#",
    "contentVersion": "1.0.0.0",
    "parameters": {
      "APIManagementSku": {
        "type": "string",
        "defaultValue": "Developer"
      },
      "APIManagementSkuCapacity": {
        "type": "string",
        "defaultValue": "1"
      },
      "APIManagementInstanceName": {
        "type": "string",
        "defaultValue": "MyAPIManagementInstance"
      },
      "PublisherName": {
        "type": "string",
        "defaultValue": "Eldert Grootenboer"
      },
      "PublisherEmail": {
        "type": "string",
        "defaultValue": "[email protected]"
      }
    },
    "resources": [
      {
        "type": "Microsoft.ApiManagement/service",
        "name": "[parameters('APIManagementInstanceName')]",
        "apiVersion": "2017-03-01",
        "properties": {
          "publisherEmail": "[parameters('PublisherEmail')]",
          "publisherName": "[parameters('PublisherName')]",
          "notificationSenderEmail": "[email protected]",
          "hostnameConfigurations": [],
          "additionalLocations": null,
          "virtualNetworkConfiguration": null,
          "customProperties": {
            "Microsoft.WindowsAzure.ApiManagement.Gateway.Security.Protocols.Tls10": "False",
            "Microsoft.WindowsAzure.ApiManagement.Gateway.Security.Protocols.Tls11": "False",
            "Microsoft.WindowsAzure.ApiManagement.Gateway.Security.Protocols.Ssl30": "False",
            "Microsoft.WindowsAzure.ApiManagement.Gateway.Security.Ciphers.TripleDes168": "False",
            "Microsoft.WindowsAzure.ApiManagement.Gateway.Security.Backend.Protocols.Tls10": "False",
            "Microsoft.WindowsAzure.ApiManagement.Gateway.Security.Backend.Protocols.Tls11": "False",
            "Microsoft.WindowsAzure.ApiManagement.Gateway.Security.Backend.Protocols.Ssl30": "False"
          },
          "virtualNetworkType": "None"
        },
        "resources": [],
        "sku": {
          "name": "[parameters('APIManagementSku')]",
          "capacity": "[parameters('APIManagementSkuCapacity')]"
        },
        "location": "[resourceGroup().location]",
        "tags": {},
        "scale": null
      }
    ]
  }
|
The next ARM template will hold the users of Contoso, add a users.json file to the same local repository and add the following template.
{
    "$schema": "https://schema.management.azure.com/schemas/2015-01-01/deploymentTemplate.json#",
    "contentVersion": "1.0.0.0",
    "parameters": {
        "APIManagementInstanceName": {
          "type": "string",
          "defaultValue": "MyAPIManagementInstance"
        }
    },
    "resources": [
        {
            "type": "Microsoft.ApiManagement/service/users",
            "name": "[concat(parameters('APIManagementInstanceName'), '/john-smith-contoso-com')]",
            "apiVersion": "2017-03-01",
            "scale": null,
            "properties": {
                "firstName": "John",
                "lastName": "Smith",
                "email": "[email protected]",
                "state": "active",
                "note": "Developer working for Contoso, one of the consumers of our APIs",
                "confirmation": "invite"
            }
        }
    ]
  }
|
Now add a groups.json file to the repository containing the following ARM template, this will add the groups for Contoso.
{
    "$schema": "https://schema.management.azure.com/schemas/2015-01-01/deploymentTemplate.json#",
    "contentVersion": "1.0.0.0",
    "parameters": {
        "APIManagementInstanceName": {
          "type": "string",
          "defaultValue": "MyAPIManagementInstance"
        }
    },
    "resources": [
        {
            "type": "Microsoft.ApiManagement/service/groups",
            "name": "[concat(parameters('APIManagementInstanceName'), '/contosogroup')]",
            "apiVersion": "2017-03-01",
            "scale": null,
            "properties": {
                "displayName": "ContosoGroup",
                "description": "Group containing all developers and services from Contoso who will be consuming our APIs",
                "type": "custom",
                "externalId": null
            }
        }
    ]
  }
|
The following ARM template will be used to add the product for Contoso, for this we are going to add products.json to the repository.
{
    "$schema": "https://schema.management.azure.com/schemas/2015-01-01/deploymentTemplate.json#",
    "contentVersion": "1.0.0.0",
    "parameters": {
        "APIManagementInstanceName": {
          "type": "string",
          "defaultValue": "MyAPIManagementInstance"
        }
    },
    "resources": [
        {
            "type": "Microsoft.ApiManagement/service/products",
            "name": "[concat(parameters('APIManagementInstanceName'), '/contosoproduct')]",
            "apiVersion": "2017-03-01",
            "scale": null,
            "properties": {
                "displayName": "ContosoProduct",
                "description": "Product which will apply the high-over policies for developers and services of Contoso.",
                "terms": null,
                "subscriptionRequired": true,
                "approvalRequired": true,
                "subscriptionsLimit": null,
                "state": "published"
            }
        }
    ]
  }
|
We have created our templates for the products and groups, so the next template, which will be called products-groups.json, will link the Contoso group to the Contoso product.
{
    "$schema": "https://schema.management.azure.com/schemas/2015-01-01/deploymentTemplate.json#",
    "contentVersion": "1.0.0.0",
    "parameters": {
        "APIManagementInstanceName": {
          "type": "string",
          "defaultValue": "MyAPIManagementInstance"
        }
    },
    "resources": [
        {
            "type": "Microsoft.ApiManagement/service/products/groups",
            "name": "[concat(parameters('APIManagementInstanceName'), '/contosoproduct/contosogroup')]",
            "apiVersion": "2017-03-01",
            "scale": null,
            "properties": {}
        }
    ]
  }
|
Likewise we will also link the Contoso users to the Contoso group using the following ARM template in a file called groups-users.json.
{
    "$schema": "https://schema.management.azure.com/schemas/2015-01-01/deploymentTemplate.json#",
    "contentVersion": "1.0.0.0",
    "parameters": {
        "APIManagementInstanceName": {
          "type": "string",
          "defaultValue": "MyAPIManagementInstance"
        }
    },
    "resources": [
        {
            "type": "Microsoft.ApiManagement/service/groups/users",
            "name": "[concat(parameters('APIManagementInstanceName'), '/contosogroup/john-smith-contoso-com')]",
            "apiVersion": "2017-03-01",
            "scale": null,
            "properties": {}
        }
    ]
  }
|
Next up are the policies for the product, for this add a file called policies.json to the repository.
{
    "$schema": "https://schema.management.azure.com/schemas/2015-01-01/deploymentTemplate.json#",
    "contentVersion": "1.0.0.0",
    "parameters": {
      "APIManagementInstanceName": {
        "type": "string",
        "defaultValue": "MyAPIManagementInstance"
      }
    },
    "resources": [
        {
            "type": "Microsoft.ApiManagement/service/products/policies",
            "name": "[concat(parameters('APIManagementInstanceName'), '/contosoproduct/policy')]",
            "apiVersion": "2017-03-01",
            "scale": null,
            "properties": {
                "policyContent": "<policies>rn  <inbound>rn    <base />rn    <rate-limit calls="20" renewal-period="60" />rn  </inbound>rn  <backend>rn    <base />rn  </backend>rn  <outbound>rn    <base />rn  </outbound>rn  <on-error>rn    <base />rn  </on-error>rn</policies>"
            }
        }
    ]
  }
|
Now lets add the subcription for the Contoso user, which contains the Contoso product, by adding a file called subscriptions.json.
{
    "$schema": "https://schema.management.azure.com/schemas/2015-01-01/deploymentTemplate.json#",
    "contentVersion": "1.0.0.0",
    "parameters": {
      "APIManagementInstanceName": {
        "type": "string",
        "defaultValue": "MyAPIManagementInstance"
      }
    },
    "resources": [
        {
            "type": "Microsoft.ApiManagement/service/subscriptions",
            "name": "[concat(parameters('APIManagementInstanceName'), '/5ae6ed2358c2795ab5aaba68')]",
            "apiVersion": "2017-03-01",
            "scale": null,
            "properties": {
                "userId": "[resourceId('Microsoft.ApiManagement/service/users', parameters('APIManagementInstanceName'), 'john-smith-contoso-com')]",
                "productId": "[resourceId('Microsoft.ApiManagement/service/products', parameters('APIManagementInstanceName'), 'contosoproduct')]",
                "displayName": "ContosoProduct subscription",
                "state": "active"
            }
        }
    ]
  }
|
Next we will create the version set which will hold the different versions of our versioned API. Add a file to the repository called versionedAPIVersionSet.json and add the following template to it.
{
    "$schema": "https://schema.management.azure.com/schemas/2015-01-01/deploymentTemplate.json#",
    "contentVersion": "1.0.0.0",
    "parameters": {
        "APIManagementInstanceName": {
          "type": "string",
          "defaultValue": "MyAPIManagementInstance"
        }
    },
    "resources": [
        {
            "name": "[concat(parameters('APIManagementInstanceName'), '/versionsetversionedapi')]",
            "type": "Microsoft.ApiManagement/service/api-version-sets",
            "apiVersion": "2017-03-01",
            "properties": {
                "description": "Version set for versioned API blog post ",
                "versionQueryName": "api-version",
                "displayName": "Versioned API",
                "versioningScheme": "query"
            }
        }
    ]
}
|
We will now add the template for the first version of the versioned API, by creating a file in the repository called versionedAPIv1.json.
{
    "$schema": "https://schema.management.azure.com/schemas/2015-01-01/deploymentTemplate.json#",
    "contentVersion": "1.0.0.0",
    "parameters": {
        "APIManagementInstanceName": {
          "type": "string",
          "defaultValue": "MyAPIManagementInstance"
        }
    },
    "resources": [
        {
            "type": "Microsoft.ApiManagement/service/apis",
            "name": "[concat(parameters('APIManagementInstanceName'), '/versioned-api')]",
            "apiVersion": "2017-03-01",
            "scale": null,
            "properties": {
                "displayName": "Versioned API",
                "apiRevision": "1",
                "description": "Wikipedia for Web APIs. Repository of API specs in OpenAPI(fka Swagger) 2.0 format.nn**Warning**: If you want to be notified about changes in advance please subscribe to our [Gitter channel](https://gitter.im/APIs-guru/api-models).nnClient sample: [[Demo]](https://apis.guru/simple-ui) [[Repo]](https://github.com/APIs-guru/simple-ui)n",
                "serviceUrl": "https://api.apis.guru/v2/",
                "path": "versioned-api",
                "protocols": [
                    "https"
                ],
                "authenticationSettings": null,
                "subscriptionKeyParameterNames": null,
                "apiVersion": "v1",
                "apiVersionSetId": "[concat(resourceId('Microsoft.ApiManagement/service', parameters('APIManagementInstanceName')), '/api-version-sets/versionsetversionedapi')]"
            }
        }
    ]
}
|
Operations
For the first version of the API we will now add a file called versionedAPIv1Operations.json which will hold the various operations of this API.
{
    "$schema": "https://schema.management.azure.com/schemas/2015-01-01/deploymentTemplate.json#",
    "contentVersion": "1.0.0.0",
    "parameters": {
        "APIManagementInstanceName": {
          "type": "string",
          "defaultValue": "MyAPIManagementInstance"
        }
    },
    "resources": [
        {
            "type": "Microsoft.ApiManagement/service/apis/operations",
            "name": "[concat(parameters('APIManagementInstanceName'), '/versioned-api/getMetrics')]",
            "apiVersion": "2017-03-01",
            "scale": null,
            "properties": {
                "displayName": "Get basic metrics",
                "method": "GET",
                "urlTemplate": "/metrics",
                "templateParameters": [],
                "description": "Some basic metrics for the entire directory.nJust stunning numbers to put on a front page and are intended purely for WoW effect :)n",
                "responses": [
                    {
                        "statusCode": 200,
                        "description": "OK",
                        "headers": []
                    }
                ],
                "policies": null
            }
        },
        {
            "type": "Microsoft.ApiManagement/service/apis/operations",
            "name": "[concat(parameters('APIManagementInstanceName'), '/versioned-api/listAPIs')]",
            "apiVersion": "2017-03-01",
            "scale": null,
            "properties": {
                "displayName": "List all APIs",
                "method": "GET",
                "urlTemplate": "/list",
                "templateParameters": [],
                "description": "List all APIs in the directory.nReturns links to OpenAPI specification for each API in the directory.nIf API exist in multiple versions `preferred` one is explicitly marked.nnSome basic info from OpenAPI spec is cached inside each object.nThis allows to generate some simple views without need to fetch OpenAPI spec for each API.n",
                "responses": [
                    {
                        "statusCode": 200,
                        "description": "OK",
                        "headers": []
                    }
                ],
                "policies": null
            }
        }
    ]
}
|
Policies
The policies for the first version of our API are next, lets add the versionedAPIv1Policies.json file for this.
{
    "$schema": "https://schema.management.azure.com/schemas/2015-01-01/deploymentTemplate.json#",
    "contentVersion": "1.0.0.0",
    "parameters": {
        "APIManagementInstanceName": {
          "type": "string",
          "defaultValue": "MyAPIManagementInstance"
        }
    },
    "resources": [
        {
            "type": "Microsoft.ApiManagement/service/apis/operations/policies",
            "name": "[concat(parameters('APIManagementInstanceName'), '/versioned-api/getMetrics/policy')]",
            "apiVersion": "2017-03-01",
            "scale": null,
            "properties": {
                "policyContent": "[concat('<!--rn    IMPORTANT:rn    - Policy elements can appear only within the <inbound>, <outbound>, <backend> section elements.rn    - Only the <forward-request> policy element can appear within the <backend> section element.rn    - To apply a policy to the incoming request (before it is forwarded to the backend service), place a corresponding policy element within the <inbound> section element.rn    - To apply a policy to the outgoing response (before it is sent back to the caller), place a corresponding policy element within the <outbound> section element.rn    - To add a policy position the cursor at the desired insertion point and click on the round button associated with the policy.rn    - To remove a policy, delete the corresponding policy statement from the policy document.rn    - Position the <base> element within a section element to inherit all policies from the corresponding section element in the enclosing scope.rn    - Remove the <base> element to prevent inheriting policies from the corresponding section element in the enclosing scope.rn    - Policies are applied in the order of their appearance, from the top down.rn-->rn<policies>rn  <inbound>rn    <base />rn    <set-backend-service base-url="https://api.apis.guru/v2/" />rn    <rewrite-uri template="/metrics.json" />rn  </inbound>rn  <backend>rn    <base />rn  </backend>rn  <outbound>rn    <base />rn  </outbound>rn  <on-error>rn    <base />rn  </on-error>rn</policies>')]"
            }
        },
        {
            "type": "Microsoft.ApiManagement/service/apis/operations/policies",
            "name": "[concat(parameters('APIManagementInstanceName'), '/versioned-api/listAPIs/policy')]",
            "apiVersion": "2017-03-01",
            "scale": null,
            "properties": {
                "policyContent": "[concat('<!--rn    IMPORTANT:rn    - Policy elements can appear only within the <inbound>, <outbound>, <backend> section elements.rn    - Only the <forward-request> policy element can appear within the <backend> section element.rn    - To apply a policy to the incoming request (before it is forwarded to the backend service), place a corresponding policy element within the <inbound> section element.rn    - To apply a policy to the outgoing response (before it is sent back to the caller), place a corresponding policy element within the <outbound> section element.rn    - To add a policy position the cursor at the desired insertion point and click on the round button associated with the policy.rn    - To remove a policy, delete the corresponding policy statement from the policy document.rn    - Position the <base> element within a section element to inherit all policies from the corresponding section element in the enclosing scope.rn    - Remove the <base> element to prevent inheriting policies from the corresponding section element in the enclosing scope.rn    - Policies are applied in the order of their appearance, from the top down.rn-->rn<policies>rn  <inbound>rn    <base />rn    <set-backend-service base-url="https://api.apis.guru/v2" />rn    <rewrite-uri template="/list.json" />rn  </inbound>rn  <backend>rn    <base />rn  </backend>rn  <outbound>rn    <base />rn  </outbound>rn  <on-error>rn    <base />rn  </on-error>rn</policies>')]"
            }
        }
    ]
}
|
And now we will add the second version of our versioned API as well, in a file called versionedAPIv2.json.
{
    "$schema": "https://schema.management.azure.com/schemas/2015-01-01/deploymentTemplate.json#",
    "contentVersion": "1.0.0.0",
    "parameters": {
        "APIManagementInstanceName": {
          "type": "string",
          "defaultValue": "MyAPIManagementInstance"
        }
    },
    "resources": [
        {
            "type": "Microsoft.ApiManagement/service/apis",
            "name": "[concat(parameters('APIManagementInstanceName'), '/versioned-api-v2')]",
            "apiVersion": "2017-03-01",
            "scale": null,
            "properties": {
                "displayName": "Versioned API",
                "apiRevision": "1",
                "description": "Wikipedia for Web APIs. Repository of API specs in OpenAPI(fka Swagger) 2.0 format.nn**Warning**: If you want to be notified about changes in advance please subscribe to our [Gitter channel](https://gitter.im/APIs-guru/api-models).nnClient sample: [[Demo]](https://apis.guru/simple-ui) [[Repo]](https://github.com/APIs-guru/simple-ui)n",
                "serviceUrl": "https://api.apis.guru/v2/",
                "path": "versioned-api",
                "protocols": [
                    "https"
                ],
                "authenticationSettings": null,
                "subscriptionKeyParameterNames": null,
                "apiVersion": "v2",
                "apiVersionSetId": "[concat(resourceId('Microsoft.ApiManagement/service', parameters('APIManagementInstanceName')), '/api-version-sets/versionsetversionedapi')]"
            }
        }
    ]
}
|
Operations
Add the operations for the second version of our API in a file called versionedAPIv2Operations.json.
{
    "$schema": "https://schema.management.azure.com/schemas/2015-01-01/deploymentTemplate.json#",
    "contentVersion": "1.0.0.0",
    "parameters": {
        "APIManagementInstanceName": {
          "type": "string",
          "defaultValue": "MyAPIManagementInstance"
        }
    },
    "resources": [
        {
            "type": "Microsoft.ApiManagement/service/apis/operations",
            "name": "[concat(parameters('APIManagementInstanceName'), '/versioned-api-v2/listAPIs')]",
            "apiVersion": "2017-03-01",
            "scale": null,
            "properties": {
                "displayName": "List all APIs",
                "method": "GET",
                "urlTemplate": "/list",
                "templateParameters": [],
                "description": "List all APIs in the directory.nReturns links to OpenAPI specification for each API in the directory.nIf API exist in multiple versions `preferred` one is explicitly marked.nnSome basic info from OpenAPI spec is cached inside each object.nThis allows to generate some simple views without need to fetch OpenAPI spec for each API.n",
                "responses": [
                    {
                        "statusCode": 200,
                        "description": "OK",
                        "headers": []
                    }
                ],
                "policies": null
            }
        }
    ]
}
|
Policies
And add a file called versionedAPIv2Policies.json which will hold the policies for the second version of our versioned API.
{
    "$schema": "https://schema.management.azure.com/schemas/2015-01-01/deploymentTemplate.json#",
    "contentVersion": "1.0.0.0",
    "parameters": {
        "APIManagementInstanceName": {
          "type": "string",
          "defaultValue": "MyAPIManagementInstance"
        }
    },
    "resources": [
        {
            "type": "Microsoft.ApiManagement/service/apis/operations/policies",
            "name": "[concat(parameters('APIManagementInstanceName'), '/versioned-api-v2/listAPIs/policy')]",
            "apiVersion": "2017-03-01",
            "scale": null,
            "properties": {
                "policyContent": "[concat('<!--rn    IMPORTANT:rn    - Policy elements can appear only within the <inbound>, <outbound>, <backend> section elements.rn    - Only the <forward-request> policy element can appear within the <backend> section element.rn    - To apply a policy to the incoming request (before it is forwarded to the backend service), place a corresponding policy element within the <inbound> section element.rn    - To apply a policy to the outgoing response (before it is sent back to the caller), place a corresponding policy element within the <outbound> section element.rn    - To add a policy position the cursor at the desired insertion point and click on the round button associated with the policy.rn    - To remove a policy, delete the corresponding policy statement from the policy document.rn    - Position the <base> element within a section element to inherit all policies from the corresponding section element in the enclosing scope.rn    - Remove the <base> element to prevent inheriting policies from the corresponding section element in the enclosing scope.rn    - Policies are applied in the order of their appearance, from the top down.rn-->rn<policies>rn  <inbound>rn    <base />rn    <set-backend-service base-url="https://api.apis.guru/v2" />rn    <rewrite-uri template="/list.json" />rn  </inbound>rn  <backend>rn    <base />rn  </backend>rn  <outbound>rn    <base />rn  </outbound>rn  <on-error>rn    <base />rn  </on-error>rn</policies>')]"
            }
        }
    ]
}
|
And finally we will add the products-apis.json file, which will link the versions of our versioned API to the Contoso product.
{
    "$schema": "https://schema.management.azure.com/schemas/2015-01-01/deploymentTemplate.json#",
    "contentVersion": "1.0.0.0",
    "parameters": {
        "APIManagementInstanceName": {
          "type": "string",
          "defaultValue": "MyAPIManagementInstance"
        }
    },
    "resources": [
        {
            "type": "Microsoft.ApiManagement/service/products/apis",
            "name": "[concat(parameters('APIManagementInstanceName'), '/contosoproduct/versioned-api')]",
            "apiVersion": "2017-03-01",
            "scale": null,
            "properties": {}
        },
        {
            "type": "Microsoft.ApiManagement/service/products/apis",
            "name": "[concat(parameters('APIManagementInstanceName'), '/contosoproduct/versioned-api-v2')]",
            "apiVersion": "2017-03-01",
            "scale": null,
            "properties": {}
        }
    ]
}
|
We have now created all of our linked templates, so lets create the master template in a file called master.json. Don’t place this file in the templates folder, but instead place it in the root directory of the repository. This template will call all our other templates, passing in parameters as required. This is also where we handle our dependOn dependencies.
{
    "$schema": "https://schema.management.azure.com/schemas/2015-01-01/deploymentTemplate.json#",
    "contentVersion": "1.0.0.0",
    "parameters": {
      "TemplatesStorageAccount": {
        "type": "string",
        "defaultValue": "https://mystorageaccount.blob.core.windows.net/templates/"
      },
      "TemplatesStorageAccountSASToken": {
        "type": "string",
        "defaultValue": ""
      },
      "APIManagementSku": {
        "type": "string",
        "defaultValue": "Developer"
      },
      "APIManagementSkuCapacity": {
        "type": "string",
        "defaultValue": "1"
      },
      "APIManagementInstanceName": {
        "type": "string",
        "defaultValue": "MyAPIManagementInstance"
      },
      "PublisherName": {
        "type": "string",
        "defaultValue": "Eldert Grootenboer"
      },
      "PublisherEmail": {
        "type": "string",
        "defaultValue": "[email protected]"
      }
    },
    "resources": [
        {
           "apiVersion": "2017-05-10",
           "name": "instanceTemplate",
           "type": "Microsoft.Resources/deployments",
           "properties": {
             "mode": "Incremental",
             "templateLink": {
                "uri":"[concat(parameters('TemplatesStorageAccount'), '/instance.json', parameters('TemplatesStorageAccountSASToken'))]",
                "contentVersion":"1.0.0.0"
             },
             "parameters": {
                "APIManagementSku": {"value": "[parameters('APIManagementSku')]" },
                "APIManagementSkuCapacity": {"value": "[parameters('APIManagementSkuCapacity')]" },
                "APIManagementInstanceName": {"value": "[parameters('APIManagementInstanceName')]" },
                "PublisherName": {"value": "[parameters('PublisherName')]" },
                "PublisherEmail": {"value": "[parameters('PublisherEmail')]" }
              }
           }
        },
        {
           "apiVersion": "2017-05-10",
           "name": "usersTemplate",
           "type": "Microsoft.Resources/deployments",
           "properties": {
             "mode": "Incremental",
             "templateLink": {
                "uri":"[concat(parameters('TemplatesStorageAccount'), '/users.json', parameters('TemplatesStorageAccountSASToken'))]",
                "contentVersion":"1.0.0.0"
             },
             "parameters": {
                "APIManagementInstanceName": {"value": "[parameters('APIManagementInstanceName')]" }
              }
           },
           "dependsOn": [
            "[resourceId('Microsoft.Resources/deployments', 'instanceTemplate')]"
           ]
        },
        {
           "apiVersion": "2017-05-10",
           "name": "groupsTemplate",
           "type": "Microsoft.Resources/deployments",
           "properties": {
             "mode": "Incremental",
             "templateLink": {
                "uri":"[concat(parameters('TemplatesStorageAccount'), '/groups.json', parameters('TemplatesStorageAccountSASToken'))]",
                "contentVersion":"1.0.0.0"
             },
             "parameters": {
                "APIManagementInstanceName": {"value": "[parameters('APIManagementInstanceName')]" }
              }
           },
           "dependsOn": [
            "[resourceId('Microsoft.Resources/deployments', 'instanceTemplate')]"
           ]
        },
        {
           "apiVersion": "2017-05-10",
           "name": "productsTemplate",
           "type": "Microsoft.Resources/deployments",
           "properties": {
             "mode": "Incremental",
             "templateLink": {
                "uri":"[concat(parameters('TemplatesStorageAccount'), '/products.json', parameters('TemplatesStorageAccountSASToken'))]",
                "contentVersion":"1.0.0.0"
             },
             "parameters": {
                "APIManagementInstanceName": {"value": "[parameters('APIManagementInstanceName')]" }
              }
           },
           "dependsOn": [
            "[resourceId('Microsoft.Resources/deployments', 'instanceTemplate')]"
           ]
        },
        {
           "apiVersion": "2017-05-10",
           "name": "groupsUsersTemplate",
           "type": "Microsoft.Resources/deployments",
           "properties": {
             "mode": "Incremental",
             "templateLink": {
                "uri":"[concat(parameters('TemplatesStorageAccount'), '/groups-users.json', parameters('TemplatesStorageAccountSASToken'))]",
                "contentVersion":"1.0.0.0"
             },
             "parameters": {
                "APIManagementInstanceName": {"value": "[parameters('APIManagementInstanceName')]" }
              }
           },
           "dependsOn": [
            "[resourceId('Microsoft.Resources/deployments', 'groupsTemplate')]",
            "[resourceId('Microsoft.Resources/deployments', 'usersTemplate')]"
           ]
        },
        {
           "apiVersion": "2017-05-10",
           "name": "productsGroupsTemplate",
           "type": "Microsoft.Resources/deployments",
           "properties": {
             "mode": "Incremental",
             "templateLink": {
                "uri":"[concat(parameters('TemplatesStorageAccount'), '/products-groups.json', parameters('TemplatesStorageAccountSASToken'))]",
                "contentVersion":"1.0.0.0"
             },
             "parameters": {
                "APIManagementInstanceName": {"value": "[parameters('APIManagementInstanceName')]" }
              }
           },
           "dependsOn": [
            "[resourceId('Microsoft.Resources/deployments', 'productsTemplate')]",
            "[resourceId('Microsoft.Resources/deployments', 'groupsTemplate')]"
           ]
        },
        {
           "apiVersion": "2017-05-10",
           "name": "subscriptionsTemplate",
           "type": "Microsoft.Resources/deployments",
           "properties": {
             "mode": "Incremental",
             "templateLink": {
                "uri":"[concat(parameters('TemplatesStorageAccount'), '/subscriptions.json', parameters('TemplatesStorageAccountSASToken'))]",
                "contentVersion":"1.0.0.0"
             },
             "parameters": {
                "APIManagementInstanceName": {"value": "[parameters('APIManagementInstanceName')]" }
              }
           },
           "dependsOn": [
            "[resourceId('Microsoft.Resources/deployments', 'productsTemplate')]",
            "[resourceId('Microsoft.Resources/deployments', 'usersTemplate')]"
           ]
        },
        {
           "apiVersion": "2017-05-10",
           "name": "policiesTemplate",
           "type": "Microsoft.Resources/deployments",
           "properties": {
             "mode": "Incremental",
             "templateLink": {
                "uri":"[concat(parameters('TemplatesStorageAccount'), '/policies.json', parameters('TemplatesStorageAccountSASToken'))]",
                "contentVersion":"1.0.0.0"
             },
             "parameters": {
                "APIManagementInstanceName": {"value": "[parameters('APIManagementInstanceName')]" }
              }
           },
           "dependsOn": [
            "[resourceId('Microsoft.Resources/deployments', 'productsTemplate')]"
           ]
        },
        {
           "apiVersion": "2017-05-10",
           "name": "versionedAPIVersionSetTemplate",
           "type": "Microsoft.Resources/deployments",
           "properties": {
             "mode": "Incremental",
             "templateLink": {
                "uri":"[concat(parameters('TemplatesStorageAccount'), '/versionedAPIVersionSet.json', parameters('TemplatesStorageAccountSASToken'))]",
                "contentVersion":"1.0.0.0"
             },
             "parameters": {
                "APIManagementInstanceName": {"value": "[parameters('APIManagementInstanceName')]" }
              }
           },
           "dependsOn": [
            "[resourceId('Microsoft.Resources/deployments', 'instanceTemplate')]"
           ]
        },
        {
           "apiVersion": "2017-05-10",
           "name": "versionedAPIv1Template",
           "type": "Microsoft.Resources/deployments",
           "properties": {
             "mode": "Incremental",
             "templateLink": {
                "uri":"[concat(parameters('TemplatesStorageAccount'), '/versionedAPIv1.json', parameters('TemplatesStorageAccountSASToken'))]",
                "contentVersion":"1.0.0.0"
             },
             "parameters": {
                "APIManagementInstanceName": {"value": "[parameters('APIManagementInstanceName')]" }
              }
           },
           "dependsOn": [
            "[resourceId('Microsoft.Resources/deployments', 'versionedAPIVersionSetTemplate')]"
           ]
        },
        {
           "apiVersion": "2017-05-10",
           "name": "versionedAPIv1OperationsTemplate",
           "type": "Microsoft.Resources/deployments",
           "properties": {
             "mode": "Incremental",
             "templateLink": {
                "uri":"[concat(parameters('TemplatesStorageAccount'), '/versionedAPIv1Operations.json', parameters('TemplatesStorageAccountSASToken'))]",
                "contentVersion":"1.0.0.0"
             },
             "parameters": {
                "APIManagementInstanceName": {"value": "[parameters('APIManagementInstanceName')]" }
              }
           },
           "dependsOn": [
            "[resourceId('Microsoft.Resources/deployments', 'versionedAPIv1Template')]"
           ]
        },
        {
           "apiVersion": "2017-05-10",
           "name": "versionedAPIv1PoliciesTemplate",
           "type": "Microsoft.Resources/deployments",
           "properties": {
             "mode": "Incremental",
             "templateLink": {
                "uri":"[concat(parameters('TemplatesStorageAccount'), '/versionedAPIv1Policies.json', parameters('TemplatesStorageAccountSASToken'))]",
                "contentVersion":"1.0.0.0"
             },
             "parameters": {
                "APIManagementInstanceName": {"value": "[parameters('APIManagementInstanceName')]" }
              }
           },
           "dependsOn": [
            "[resourceId('Microsoft.Resources/deployments', 'versionedAPIv1Template')]",
            "[resourceId('Microsoft.Resources/deployments', 'versionedAPIv1OperationsTemplate')]"
           ]
        },
        {
           "apiVersion": "2017-05-10",
           "name": "versionedAPIv2Template",
           "type": "Microsoft.Resources/deployments",
           "properties": {
             "mode": "Incremental",
             "templateLink": {
                "uri":"[concat(parameters('TemplatesStorageAccount'), '/versionedAPIv2.json', parameters('TemplatesStorageAccountSASToken'))]",
                "contentVersion":"1.0.0.0"
             },
             "parameters": {
                "APIManagementInstanceName": {"value": "[parameters('APIManagementInstanceName')]" }
              }
           },
           "dependsOn": [
            "[resourceId('Microsoft.Resources/deployments', 'versionedAPIVersionSetTemplate')]"
           ]
        },
        {
           "apiVersion": "2017-05-10",
           "name": "versionedAPIv2OperationsTemplate",
           "type": "Microsoft.Resources/deployments",
           "properties": {
             "mode": "Incremental",
             "templateLink": {
                "uri":"[concat(parameters('TemplatesStorageAccount'), '/versionedAPIv2Operations.json', parameters('TemplatesStorageAccountSASToken'))]",
                "contentVersion":"1.0.0.0"
             },
             "parameters": {
                "APIManagementInstanceName": {"value": "[parameters('APIManagementInstanceName')]" }
              }
           },
           "dependsOn": [
            "[resourceId('Microsoft.Resources/deployments', 'versionedAPIv2Template')]"
           ]
        },
        {
           "apiVersion": "2017-05-10",
           "name": "versionedAPIv2PoliciesTemplate",
           "type": "Microsoft.Resources/deployments",
           "properties": {
             "mode": "Incremental",
             "templateLink": {
                "uri":"[concat(parameters('TemplatesStorageAccount'), '/versionedAPIv2Policies.json', parameters('TemplatesStorageAccountSASToken'))]",
                "contentVersion":"1.0.0.0"
             },
             "parameters": {
                "APIManagementInstanceName": {"value": "[parameters('APIManagementInstanceName')]" }
              }
           },
           "dependsOn": [
            "[resourceId('Microsoft.Resources/deployments', 'versionedAPIv2Template')]",
            "[resourceId('Microsoft.Resources/deployments', 'versionedAPIv2OperationsTemplate')]"
           ]
        },
        {
           "apiVersion": "2017-05-10",
           "name": "productsAPIsTemplate",
           "type": "Microsoft.Resources/deployments",
           "properties": {
             "mode": "Incremental",
             "templateLink": {
                "uri":"[concat(parameters('TemplatesStorageAccount'), '/products-apis.json', parameters('TemplatesStorageAccountSASToken'))]",
                "contentVersion":"1.0.0.0"
             },
             "parameters": {
                "APIManagementInstanceName": {"value": "[parameters('APIManagementInstanceName')]" }
              }
           },
           "dependsOn": [
            "[resourceId('Microsoft.Resources/deployments', 'productsTemplate')]",
            "[resourceId('Microsoft.Resources/deployments', 'versionedAPIv1Template')]",
            "[resourceId('Microsoft.Resources/deployments', 'versionedAPIv2Template')]"
           ]
        }
    ]
  }
|
As you will notice, the first parameter is a path to a container in a storage account, so be sure to create this container. You could even do this from the build pipeline, but for this blog post we will do it manually.

Create storage account

Create container
We should now have a repository filled with ARM templates, so commit and push these to the remote repository.

Overview of ARM template files
Switch to our project in VSTS, and create a build pipeline called API Management CI-CD ARM-CI – Linked Template to validate the ARM template. Remember to enable the continous integration trigger, so our build runs every time we do a push to our repository.

Create build template for Linked Template repository
In the build definition, we will add a Azure File Copy step, which will copy our linked templates to the blob container we just created, so update the settings of the step accordingly.

Set Azure File Copy steps properties
In the output of this step we will get back the URI and SAS token for our container which we will need in our ARM template, so make sure to update the variables here.
Set output names so we can use these in our ARM template
The other steps in the build pipeline are just as described in the first post in this series, except that we now use the variables from the Azure Copy File step in our Azure Resource Group Deployment step to update the location and SAS token of the storage account, and we include an extra Publish Built Artifacts step.

The complete build pipeline for validation
Note that in first the Publish Built Artifacts step we just publish the master.json files.

Only publish master template in first Publish Build Artifacts step
While in the second Publish Built Artifacts step we publish the linked templates.

Publish templates folder in second Publish Build Artifacts step
Once done, make sure to save and queue the build definition.
We will now create the deployment pipeline using a new release definition called API Management Linked Template, which again is almost the same as described in the first post of this series, except we will now include the Azure Copy File step just like in the build pipeline to copy our linked templates to the templates container.

Use output from build pipeline as artifact
Do not forget to enable the Continuous deployment trigger so this deployment is triggered each time the build runs successfully. In the Test environment, add a Azure File Copy step to copy the linked template files to our templates container, and set variables containing the URI and SAS token.

Set properties for Azure Copy Files step
In the Azure Resource Group Deployment step use the variables from the Azure File Copy step to set the location and SAS token of the container.

Use URI and SAS token from previous step
Clone the test environment and set the cloned environment up as production environment, do remember to include an approval step.
Approval should be given before deploying to production
We have now finished our complete CI/CD pipeline, if we make push any changes to our repository it will trigger the build which does validation of the ARM templates, and then uses them to deploy or update our complete API Management instance including all users, groups, products and APIs which we defined in our templates.
API Management instance created including users, groups, products and APIs
by Eldert Grootenboer | May 28, 2018 | BizTalk Community Blogs via Syndication
This is the fourth post in my series around setting up CI/CD for Azure API Management using Azure Resource Manager templates. So far we have created our API Management instance, added the products, users and groups for Contoso, and created an unversioned API. In this post we will create an versioned API, allowing us to run multiple versions of an API side by side.

The posts in this series are the following, this list will be updated as the posts are being published.
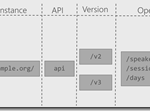
When working with APIs we will sometimes have to implement breaking changes to our solution. Whenever possible, we should give the consumers of our API the chance to migrate to the new implementation at their own pace, which can be done by exposing multiple versions of an API. In this post we will again be exposing the APIs.guru service through API Management, with two versions, where we remove an operation in the second version.
Use the guidance from the first post of this series to set up a repository and clone this to our local machine. The name of the repository we will be creating should be Versioned API, and will hold the ARM template for this post.

Create Versioned API repository
Once the GIT repository has been created and cloned to your local machine, add a file called versioned-api.json and add the following ARM template to it.
{
  "$schema": "https://schema.management.azure.com/schemas/2015-01-01/deploymentTemplate.json#",
  "contentVersion": "1.0.0.0",
  "parameters": {
      "APIManagementInstanceName": {
        "type": "string",
        "defaultValue": "MyAPIManagementInstance"
      }
  },
  "variables": {},
  "resources": [
      {
          "name": "[concat(parameters('APIManagementInstanceName'), '/versionsetversionedapi')]",
          "type": "Microsoft.ApiManagement/service/api-version-sets",
          "apiVersion": "2017-03-01",
          "properties": {
              "description": "Version set for versioned API blog post",
              "versionQueryName": "api-version",
              "displayName": "Versioned API",
              "versioningScheme": "query"
          }
      }
    ]
}
|
This will create the version set which is needed to create versioned APIs. In this case we will be using a query string as the versioning scheme.
Next we will implement the two versions of the API.
{
    "$schema": "https://schema.management.azure.com/schemas/2015-01-01/deploymentTemplate.json#",
    "contentVersion": "1.0.0.0",
    "parameters": {
        "APIManagementInstanceName": {
          "type": "string",
          "defaultValue": "MyAPIManagementInstance"
        }
    },
    "variables": {},
    "resources": [
        {
            "name": "[concat(parameters('APIManagementInstanceName'), '/versionsetversionedapi')]",
            "type": "Microsoft.ApiManagement/service/api-version-sets",
            "apiVersion": "2017-03-01",
            "properties": {
                "description": "Version set for versioned API blog post",
                "versionQueryName": "api-version",
                "displayName": "Versioned API",
                "versioningScheme": "query"
            }
        },
        {
            "type": "Microsoft.ApiManagement/service/apis",
            "name": "[concat(parameters('APIManagementInstanceName'), '/versioned-api')]",
            "apiVersion": "2017-03-01",
            "scale": null,
            "properties": {
                "displayName": "Versioned API",
                "apiRevision": "1",
                "description": "Wikipedia for Web APIs. Repository of API specs in OpenAPI(fka Swagger) 2.0 format.nn**Warning**: If you want to be notified about changes in advance please subscribe to our [Gitter channel](https://gitter.im/APIs-guru/api-models).nnClient sample: [[Demo]](https://apis.guru/simple-ui) [[Repo]](https://github.com/APIs-guru/simple-ui)n",
                "serviceUrl": "https://api.apis.guru/v2/",
                "path": "versioned-api",
                "protocols": [
                    "https"
                ],
                "authenticationSettings": null,
                "subscriptionKeyParameterNames": null,
                "apiVersion": "v1",
                "apiVersionSetId": "[concat(resourceId('Microsoft.ApiManagement/service', parameters('APIManagementInstanceName')), '/api-version-sets/versionsetversionedapi')]"
            },
            "dependsOn": [
                "[concat(resourceId('Microsoft.ApiManagement/service', parameters('APIManagementInstanceName')), '/api-version-sets/versionsetversionedapi')]"
            ]
        },
        {
            "type": "Microsoft.ApiManagement/service/apis",
            "name": "[concat(parameters('APIManagementInstanceName'), '/versioned-api-v2')]",
            "apiVersion": "2017-03-01",
            "scale": null,
            "properties": {
                "displayName": "Versioned API",
                "apiRevision": "1",
                "description": "Wikipedia for Web APIs. Repository of API specs in OpenAPI(fka Swagger) 2.0 format.nn**Warning**: If you want to be notified about changes in advance please subscribe to our [Gitter channel](https://gitter.im/APIs-guru/api-models).nnClient sample: [[Demo]](https://apis.guru/simple-ui) [[Repo]](https://github.com/APIs-guru/simple-ui)n",
                "serviceUrl": "https://api.apis.guru/v2/",
                "path": "versioned-api",
                "protocols": [
                    "https"
                ],
                "authenticationSettings": null,
                "subscriptionKeyParameterNames": null,
                "apiVersion": "v2",
                "apiVersionSetId": "[concat(resourceId('Microsoft.ApiManagement/service', parameters('APIManagementInstanceName')), '/api-version-sets/versionsetversionedapi')]"
            },
            "dependsOn": [
                "[concat(resourceId('Microsoft.ApiManagement/service', parameters('APIManagementInstanceName')), '/api-version-sets/versionsetversionedapi')]"
            ]
        },
        {
            "type": "Microsoft.ApiManagement/service/products/apis",
            "name": "[concat(parameters('APIManagementInstanceName'), '/contosoproduct/versioned-api')]",
            "apiVersion": "2017-03-01",
            "scale": null,
            "properties": {},
            "dependsOn": [
                "[resourceId('Microsoft.ApiManagement/service/apis', parameters('APIManagementInstanceName'), 'versioned-api')]"
            ]
        },
        {
            "type": "Microsoft.ApiManagement/service/products/apis",
            "name": "[concat(parameters('APIManagementInstanceName'), '/contosoproduct/versioned-api-v2')]",
            "apiVersion": "2017-03-01",
            "scale": null,
            "properties": {},
            "dependsOn": [
                "[resourceId('Microsoft.ApiManagement/service/apis', parameters('APIManagementInstanceName'), 'versioned-api-v2')]"
            ]
        },
        {
            "type": "Microsoft.ApiManagement/service/apis/operations",
            "name": "[concat(parameters('APIManagementInstanceName'), '/versioned-api/getMetrics')]",
            "apiVersion": "2017-03-01",
            "scale": null,
            "properties": {
                "displayName": "Get basic metrics",
                "method": "GET",
                "urlTemplate": "/metrics",
                "templateParameters": [],
                "description": "Some basic metrics for the entire directory.nJust stunning numbers to put on a front page and are intended purely for WoW effect :)n",
                "responses": [
                    {
                        "statusCode": 200,
                        "description": "OK",
                        "headers": []
                    }
                ],
                "policies": null
            },
            "dependsOn": [
                "[resourceId('Microsoft.ApiManagement/service/apis', parameters('APIManagementInstanceName'), 'versioned-api')]"
            ]
        },
        {
            "type": "Microsoft.ApiManagement/service/apis/operations",
            "name": "[concat(parameters('APIManagementInstanceName'), '/versioned-api/listAPIs')]",
            "apiVersion": "2017-03-01",
            "scale": null,
            "properties": {
                "displayName": "List all APIs",
                "method": "GET",
                "urlTemplate": "/list",
                "templateParameters": [],
                "description": "List all APIs in the directory.nReturns links to OpenAPI specification for each API in the directory.nIf API exist in multiple versions `preferred` one is explicitly marked.nnSome basic info from OpenAPI spec is cached inside each object.nThis allows to generate some simple views without need to fetch OpenAPI spec for each API.n",
                "responses": [
                    {
                        "statusCode": 200,
                        "description": "OK",
                        "headers": []
                    }
                ],
                "policies": null
            },
            "dependsOn": [
                "[resourceId('Microsoft.ApiManagement/service/apis', parameters('APIManagementInstanceName'), 'versioned-api')]"
            ]
        },
        {
            "type": "Microsoft.ApiManagement/service/apis/operations",
            "name": "[concat(parameters('APIManagementInstanceName'), '/versioned-api-v2/listAPIs')]",
            "apiVersion": "2017-03-01",
            "scale": null,
            "properties": {
                "displayName": "List all APIs",
                "method": "GET",
                "urlTemplate": "/list",
                "templateParameters": [],
                "description": "List all APIs in the directory.nReturns links to OpenAPI specification for each API in the directory.nIf API exist in multiple versions `preferred` one is explicitly marked.nnSome basic info from OpenAPI spec is cached inside each object.nThis allows to generate some simple views without need to fetch OpenAPI spec for each API.n",
                "responses": [
                    {
                        "statusCode": 200,
                        "description": "OK",
                        "headers": []
                    }
                ],
                "policies": null
            },
            "dependsOn": [
                "[resourceId('Microsoft.ApiManagement/service/apis', parameters('APIManagementInstanceName'), 'versioned-api-v2')]"
            ]
        },
        {
            "type": "Microsoft.ApiManagement/service/apis/operations/policies",
            "name": "[concat(parameters('APIManagementInstanceName'), '/versioned-api/getMetrics/policy')]",
            "apiVersion": "2017-03-01",
            "scale": null,
            "properties": {
                "policyContent": "[concat('<!--rn    IMPORTANT:rn    - Policy elements can appear only within the <inbound>, <outbound>, <backend> section elements.rn    - Only the <forward-request> policy element can appear within the <backend> section element.rn    - To apply a policy to the incoming request (before it is forwarded to the backend service), place a corresponding policy element within the <inbound> section element.rn    - To apply a policy to the outgoing response (before it is sent back to the caller), place a corresponding policy element within the <outbound> section element.rn    - To add a policy position the cursor at the desired insertion point and click on the round button associated with the policy.rn    - To remove a policy, delete the corresponding policy statement from the policy document.rn    - Position the <base> element within a section element to inherit all policies from the corresponding section element in the enclosing scope.rn    - Remove the <base> element to prevent inheriting policies from the corresponding section element in the enclosing scope.rn    - Policies are applied in the order of their appearance, from the top down.rn-->rn<policies>rn  <inbound>rn    <base />rn    <set-backend-service base-url="https://api.apis.guru/v2/" />rn    <rewrite-uri template="/metrics.json" />rn  </inbound>rn  <backend>rn    <base />rn  </backend>rn  <outbound>rn    <base />rn  </outbound>rn  <on-error>rn    <base />rn  </on-error>rn</policies>')]"
            },
            "dependsOn": [
                "[resourceId('Microsoft.ApiManagement/service/apis', parameters('APIManagementInstanceName'), 'versioned-api')]",
                "[resourceId('Microsoft.ApiManagement/service/apis/operations', parameters('APIManagementInstanceName'), 'versioned-api', 'getMetrics')]"
            ]
        },
        {
            "type": "Microsoft.ApiManagement/service/apis/operations/policies",
            "name": "[concat(parameters('APIManagementInstanceName'), '/versioned-api/listAPIs/policy')]",
            "apiVersion": "2017-03-01",
            "scale": null,
            "properties": {
                "policyContent": "[concat('<!--rn    IMPORTANT:rn    - Policy elements can appear only within the <inbound>, <outbound>, <backend> section elements.rn    - Only the <forward-request> policy element can appear within the <backend> section element.rn    - To apply a policy to the incoming request (before it is forwarded to the backend service), place a corresponding policy element within the <inbound> section element.rn    - To apply a policy to the outgoing response (before it is sent back to the caller), place a corresponding policy element within the <outbound> section element.rn    - To add a policy position the cursor at the desired insertion point and click on the round button associated with the policy.rn    - To remove a policy, delete the corresponding policy statement from the policy document.rn    - Position the <base> element within a section element to inherit all policies from the corresponding section element in the enclosing scope.rn    - Remove the <base> element to prevent inheriting policies from the corresponding section element in the enclosing scope.rn    - Policies are applied in the order of their appearance, from the top down.rn-->rn<policies>rn  <inbound>rn    <base />rn    <set-backend-service base-url="https://api.apis.guru/v2" />rn    <rewrite-uri template="/list.json" />rn  </inbound>rn  <backend>rn    <base />rn  </backend>rn  <outbound>rn    <base />rn  </outbound>rn  <on-error>rn    <base />rn  </on-error>rn</policies>')]"
            },
            "dependsOn": [
                "[resourceId('Microsoft.ApiManagement/service/apis', parameters('APIManagementInstanceName'), 'versioned-api')]",
                "[resourceId('Microsoft.ApiManagement/service/apis/operations', parameters('APIManagementInstanceName'), 'versioned-api', 'listAPIs')]"
            ]
        },
        {
            "type": "Microsoft.ApiManagement/service/apis/operations/policies",
            "name": "[concat(parameters('APIManagementInstanceName'), '/versioned-api-v2/listAPIs/policy')]",
            "apiVersion": "2017-03-01",
            "scale": null,
            "properties": {
                "policyContent": "[concat('<!--rn    IMPORTANT:rn    - Policy elements can appear only within the <inbound>, <outbound>, <backend> section elements.rn    - Only the <forward-request> policy element can appear within the <backend> section element.rn    - To apply a policy to the incoming request (before it is forwarded to the backend service), place a corresponding policy element within the <inbound> section element.rn    - To apply a policy to the outgoing response (before it is sent back to the caller), place a corresponding policy element within the <outbound> section element.rn    - To add a policy position the cursor at the desired insertion point and click on the round button associated with the policy.rn    - To remove a policy, delete the corresponding policy statement from the policy document.rn    - Position the <base> element within a section element to inherit all policies from the corresponding section element in the enclosing scope.rn    - Remove the <base> element to prevent inheriting policies from the corresponding section element in the enclosing scope.rn    - Policies are applied in the order of their appearance, from the top down.rn-->rn<policies>rn  <inbound>rn    <base />rn    <set-backend-service base-url="https://api.apis.guru/v2" />rn    <rewrite-uri template="/list.json" />rn  </inbound>rn  <backend>rn    <base />rn  </backend>rn  <outbound>rn    <base />rn  </outbound>rn  <on-error>rn    <base />rn  </on-error>rn</policies>')]"
            },
            "dependsOn": [
                "[resourceId('Microsoft.ApiManagement/service/apis', parameters('APIManagementInstanceName'), 'versioned-api-v2')]",
                "[resourceId('Microsoft.ApiManagement/service/apis/operations', parameters('APIManagementInstanceName'), 'versioned-api-v2', 'listAPIs')]"
            ]
        }
    ]
}
|
What we did here, was add two versions of the API, set their operations and policies, add them to the product for Contoso, and link them to the version set by setting the apiVersionSetId property on the APIs. We now have finished our ARM template, so commit it and push it to our repository.
Build pipeline
Now switch back to VSTS and create a build template called API Management CI-CD ARM-CI – Versioned API. Once again make sure to select the correct GIT repository.

Create build template for Versioned API
Once the build template has been created, make sure to set enable the continuous integration trigger, and create a validation pipeline just like in the first post of this series.

Create validation build pipeline
Once finished, save and queue the build definition.
Now create a new release definition called API Management Versioned API with a continious deployment trigger on the artifact deployed by our build pipeline we just created. Set up the test environment to deploy as soon as a new artifact is available.

Set up test environment
And finally clone the Test environment, and set the cloned environment up for the production environment. Remember to provide a approval step before deploying in this environment.
Set up deployment pipeline including approvals
We now have completed our CI/CD process for the versioned API, if we want to test this we’ll just make a change in the ARM template on our local machine and check this in, which will start the build pipeline, which in turn will trigger the deployment pipeline updating our API Management instance.

Versioned API has been deployed
by Eldert Grootenboer | May 21, 2018 | BizTalk Community Blogs via Syndication
This is the thirth post in my series around setting up CI/CD for Azure API Management using Azure Resource Manager templates. In the first post we created our API Management instance, and have set up our build and release pipelines, … Continue reading →
by Eldert Grootenboer | May 14, 2018 | BizTalk Community Blogs via Syndication
This is the second post in my series around setting up CI/CD for Azure API Management using Azure Resource Manager templates. In the previous post we created our API Management instance, and have set up our build and release pipelines. In this post we will add custom products, users and groups to our API Management instance, which will be used to set up our policies and access to our APIs.

The posts in this series are the following, this list will be updated as the posts are being published.
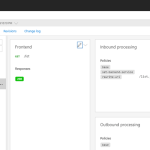
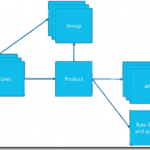
For this post, we will be adding a new user to the API Management instance we created in the previous blog post in this series. This user will represent a client developer from the Contoso company, who will be using the APIs which we will define later on. In this scenario, Contoso consumes our APIs in their own processes. The user will be placed into a group, which represents the Contoso company. In a real life scenario, this group would contain users for all the developers and services of this particular client. And finally we will create a product for the Contoso company as well, and link the group to the product. The product is where we will be setting up policies and quotas, so we can limit the usage our services.
As explained in the first post in this series, we will be using different repositories for the various parts of our API Management setup. In that post, we already showed how we can set up a repository and clone this to our local machine. For this post, we will be creating a new repository, in which we will create the ARM template for our products, users and groups. Create the API Management products, users and groups repository and clone it to you machine.

Create new repository

API Management products, users and groups repository
Now we will start by creating the ARM template for adding a user for Contoso, who will be consuming our APIs. In your cloned repository, create a new file and name it products-users-groups.json, and add the following ARM template contents to the file.
{
    "$schema": "https://schema.management.azure.com/schemas/2015-01-01/deploymentTemplate.json#",
    "contentVersion": "1.0.0.0",
    "parameters": {
        "APIManagementInstanceName": {
          "type": "string",
          "defaultValue": "MyAPIManagementInstance"
        }
    },
    "variables": {},
    "resources": [
        {
            "type": "Microsoft.ApiManagement/service/users",
            "name": "[concat(parameters('APIManagementInstanceName'), '/john-smith-contoso-com')]",
            "apiVersion": "2017-03-01",
            "scale": null,
            "properties": {
                "firstName": "John",
                "lastName": "Smith",
                "email": "[email protected]",
                "state": "active",
                "note": "Developer working for Contoso, one of the consumers of our APIs",
                "confirmation": "invite"
            },
            "dependsOn": []
        }
    ]
}
|
What we do here, is creating a new user (John Smith), and add it to our API Management instance. We have the name of the instance as a parameter, so we could override this from our deployment pipeline. As you will notice, we don’t set anything in our dependsOn, as the API Management instance has been created from another template. Also note the “confirmation”: “invite” line, which makes sure that the user will receive an email on the specified address to finish his registration by setting his own password.
Next we will expand our ARM template to also create the group, so let’s update the ARM template to the following.
{
    "$schema": "https://schema.management.azure.com/schemas/2015-01-01/deploymentTemplate.json#",
    "contentVersion": "1.0.0.0",
    "parameters": {
        "APIManagementInstanceName": {
          "type": "string",
          "defaultValue": "MyAPIManagementInstance"
        }
    },
    "variables": {},
    "resources": [
        {
            "type": "Microsoft.ApiManagement/service/users",
            "name": "[concat(parameters('APIManagementInstanceName'), '/john-smith-contoso-com')]",
            "apiVersion": "2017-03-01",
            "scale": null,
            "properties": {
                "firstName": "John",
                "lastName": "Smith",
                "email": "[email protected]",
                "state": "active",
                "note": "Developer working for Contoso, one of the consumers of our APIs",
                "confirmation": "invite"
            },
            "dependsOn": []
        },
        {
            "type": "Microsoft.ApiManagement/service/groups",
            "name": "[concat(parameters('APIManagementInstanceName'), '/contosogroup')]",
            "apiVersion": "2017-03-01",
            "scale": null,
            "properties": {
                "displayName": "ContosoGroup",
                "description": "Group containing all developers and services from Contoso who will be consuming our APIs",
                "type": "custom",
                "externalId": null
            },
            "dependsOn": []
        },
        {
            "type": "Microsoft.ApiManagement/service/groups/users",
            "name": "[concat(parameters('APIManagementInstanceName'), '/contosogroup/john-smith-contoso-com')]",
            "apiVersion": "2017-03-01",
            "scale": null,
            "properties": {},
            "dependsOn": [
                "[resourceId('Microsoft.ApiManagement/service/groups', parameters('APIManagementInstanceName'), 'contosogroup')]"
            ]
        }
    ]
}
|
What we did here, was add two additional resources, one for the ContosoGroup group, and one to link the user to the group.
And finally, we will add a product for the Contoso consumers. On this product we will set a throttling policy, so these consumers are limited in the number of calls they can make to our APIs. Update the ARM template as following, this will also be the final version of this ARM template.
{
    "$schema": "https://schema.management.azure.com/schemas/2015-01-01/deploymentTemplate.json#",
    "contentVersion": "1.0.0.0",
    "parameters": {
        "APIManagementInstanceName": {
          "type": "string",
          "defaultValue": "MyAPIManagementInstance"
        }
    },
    "variables": {},
    "resources": [
        {
            "type": "Microsoft.ApiManagement/service/users",
            "name": "[concat(parameters('APIManagementInstanceName'), '/john-smith-contoso-com')]",
            "apiVersion": "2017-03-01",
            "scale": null,
            "properties": {
                "firstName": "John",
                "lastName": "Smith",
                "email": "[email protected]",
                "state": "active",
                "note": "Developer working for Contoso, one of the consumers of our APIs",
                "confirmation": "invite"
            },
            "dependsOn": []
        },
        {
            "type": "Microsoft.ApiManagement/service/groups",
            "name": "[concat(parameters('APIManagementInstanceName'), '/contosogroup')]",
            "apiVersion": "2017-03-01",
            "scale": null,
            "properties": {
                "displayName": "ContosoGroup",
                "description": "Group containing all developers and services from Contoso who will be consuming our APIs",
                "type": "custom",
                "externalId": null
            },
            "dependsOn": []
        },
        {
            "type": "Microsoft.ApiManagement/service/groups/users",
            "name": "[concat(parameters('APIManagementInstanceName'), '/contosogroup/john-smith-contoso-com')]",
            "apiVersion": "2017-03-01",
            "scale": null,
            "properties": {},
            "dependsOn": [
                "[resourceId('Microsoft.ApiManagement/service/groups', parameters('APIManagementInstanceName'), 'contosogroup')]"
            ]
        },
        {
            "type": "Microsoft.ApiManagement/service/products",
            "name": "[concat(parameters('APIManagementInstanceName'), '/contosoproduct')]",
            "apiVersion": "2017-03-01",
            "scale": null,
            "properties": {
                "displayName": "ContosoProduct",
                "description": "Product which will apply the high-over policies for developers and services of Contoso.",
                "subscriptionRequired": true,
                "approvalRequired": true,
                "state": "published"
            },
            "dependsOn": []
        },
        {
            "type": "Microsoft.ApiManagement/service/products/groups",
            "name": "[concat(parameters('APIManagementInstanceName'), '/contosoproduct/contosogroup')]",
            "apiVersion": "2017-03-01",
            "scale": null,
            "properties": {},
            "dependsOn": [
                "[resourceId('Microsoft.ApiManagement/service/products', parameters('APIManagementInstanceName'), 'contosoproduct')]",
                "[resourceId('Microsoft.ApiManagement/service/groups', parameters('APIManagementInstanceName'), 'contosogroup')]"
            ]
        },
        {
            "type": "Microsoft.ApiManagement/service/subscriptions",
            "name": "[concat(parameters('APIManagementInstanceName'), '/5ae6ed2358c2795ab5aaba68')]",
            "apiVersion": "2017-03-01",
            "scale": null,
            "properties": {
                "userId": "[resourceId('Microsoft.ApiManagement/service/users', parameters('APIManagementInstanceName'), 'john-smith-contoso-com')]",
                "productId": "[resourceId('Microsoft.ApiManagement/service/products', parameters('APIManagementInstanceName'), 'contosoproduct')]",
                "displayName": "ContosoProduct subscription",
                "state": "active"
            },
            "dependsOn": [
                "[resourceId('Microsoft.ApiManagement/service/users', parameters('APIManagementInstanceName'), 'john-smith-contoso-com')]",
                "[resourceId('Microsoft.ApiManagement/service/products', parameters('APIManagementInstanceName'), 'contosoproduct')]"
            ]
        },
        {
            "type": "Microsoft.ApiManagement/service/products/policies",
            "name": "[concat(parameters('APIManagementInstanceName'), '/contosoproduct/policy')]",
            "apiVersion": "2017-03-01",
            "scale": null,
            "properties": {
                "policyContent": "<policies>rn  <inbound>rn    <base />rn    <rate-limit calls="20" renewal-period="60" />rn  </inbound>rn  <backend>rn    <base />rn  </backend>rn  <outbound>rn    <base />rn  </outbound>rn  <on-error>rn    <base />rn  </on-error>rn</policies>"
            },
            "dependsOn": [
                "[resourceId('Microsoft.ApiManagement/service/products', parameters('APIManagementInstanceName'), 'contosoproduct')]"
            ]
        }
    ]
}
|
The steps we added in this template were to create the ContosoProduct product, add ContosoGroup to the product, create a subscription for the Contoso user John Smith and link it to the product, and finally create a policy which implements throttling on the product level. Commit and push this final ARM template to your repository.
Now that we have finished our template, we will create new build definition called API Management CI-CD ARM-CI – Products, users and groups. The exact steps for creating a build pipeline have already been described in the previous blogpost. Make sure to select the correct GIT repository.

Select correct GIT repository
Set up the build pipeline to validate the ARM template using a continuous integration tirgger and publish if the template is correct, just like in the previous post. Once done make sure to save and queue the build definition.

Set up build pipeline for validation
The next step will be to set up the deployment pipeline, which has also been thoroughly described in the previous post. Create a new continous deployment triggered release definition called API Management products, users and groups and use the artifact we just published from our build pipeline.

Create release pipeline with artifact published from build pipeline
Set up the test environment to be triggered as soon as the artifact is available, and deploy to your test environment.

Deploy to test environment
Clone the Test environment and update it to deploy to your production environment. Make sure to include an approval before deployment is being done.
Deploy to production environment after approval
We now have completed our CI/CD process for the products, users and groups, so to test this we just need to make a change in the ARM template on our local machine and check this in, after which our build and deployment pipelines will kick off and update our API Management instance.
API Management instance has been updated

by Eldert Grootenboer | May 7, 2018 | BizTalk Community Blogs via Syndication
Recently Microsoft announced Azure Event Grid, a highly scalable serverless event driven offering allowing us to implement publish and subscribe patterns. Event driven scenarios are becoming more common by the day, which means that we see these type of integrations increasing a lot as well. A lot of times applications will define their own message formats for their events, however, with the recent announcement of native support in Azure Event Grid for CloudEvents our lives should be made a lot easier. CloudEvents is a standard for working with events accross platforms, and gives us a specification for describing event data in a common way. This will allow any platform or application which is working with events, to implement a common format, allowing easy integration and interoperability, for example between Azure, AWS and Oracle. The specification is still under active development, and Microsoft is one of the big contributors, especially Clemens Vasters, Lead Architect on Azure Messaging Services.

In this blog post we will be looking into Event Grid’s support for CloudEvents, and how to set this up. The specifications for the CloudEvents message format can be found on GitHub, and how this maps to Event Grid’s own schema can be found on Microsoft Docs. For this post we will use the application created in this bogpost, which will generate events when an order has been placed, as well as when a repair has been requested. These events will be handled by a Logic App, which will send out an email. In a real life scenario we could, for example, use this Logic App to create place the order at the ship’s supplier. And because we are using the CloudEvents format, the application can easily integrate with any system which supports this new specification, so they are not just bound to Azure.

Send event from custom application to Logic Apps
Currently support for Cloud Events in Event Grid is still in preview only available in a select group of regions (West Central US, Central US and North Europe), and to use it we need to enable an extension in Azure CLI by giving the following command.
az extension add --name eventgrid
|

Enable Event Grid extension
We can now create our Event Grid topic, where we will receive the events. Currently this is not yet supported in the portal, so we will stay in our Azure CLI, and give the following commands.
az group create -l northeurope -n cloudEventsResourceGroup
az eventgrid topic create --name cloudevents -l northeurope -g cloudEventsResourceGroup --input-schema cloudeventv01schema
|
The first command creates the resource group, while the second command creates the Event Grid topic. Note the input-schema switch, which allows us to set the CloudEvents format.
When the topic has been created, go to the Event Grid Topics blade in the portal, open the topic we just created, and grab the Topic Endpoint, we will need this later on.

Save the topic endpoint for later use
Switch to the Access keys for the topic, and grab one of the keys, we will need this later as well.
Also save on of the keys for later use
Next we will create the application which will send the events to our custom topic which we just created. For ease of this demo, this will just be a simple console application, but in a real life solution this could be any type of system. Start by creating a new solution in Visual Studio for our application.

Create console app solution
Data Classes
Add the following data classes, which describe the orders and repairs, as explained in this blog post.
/// <summary>
/// Event sent for a specific ship.
/// </summary>
public class ShipEvent
{
    /// <summary>
    /// Name of the ship.
    /// </summary>
    public string Ship { get; set; }

    /// <summary>
    /// Type of event.
    /// </summary>
    public string Type { get; set; }
}
|
/// <summary>
/// Used to place an order.
/// </summary>
public class Order : ShipEvent
{
    /// <summary>
    /// Name of the product.
    /// </summary>
    public string Product { get; set; }

    /// <summary>
    /// Number of items to be ordered.
    /// </summary>
    public int Amount { get; set; }

    /// <summary>
    /// Constructor.
    /// </summary>
    public Order()
    {
        Type = "Order";
    }
}
|
/// <summary>
/// Used to request a repair.
/// </summary>
public class Repair : ShipEvent
{
    /// <summary>
    /// Device which needs to be repaired.
    /// </summary>
    public string Device { get; set; }

    /// <summary>
    /// Description of the defect.
    /// </summary>
    public string Description { get; set; }

    /// <summary>
    /// Constructor.
    /// </summary>
    public Repair()
    {
        Type = "Repair";
    }
}
|
CloudEvents class
Add the CloudEvents class, which will be used to create a CloudEvents message which we will send to our Azure Event Grid. The schema for a CloudEvents message can be found here.
/// <summary>
/// Representation of the CloudEvents specification, to be sent to Event Grid Topic.
/// </summary>
class CloudEvents
{
        /// <summary>
        /// This will be used to update the Source and Data properties.
        /// </summary>
        public ShipEvent UpdateProperties
        {
                set
                {
                        Source = $"{Program.TOPIC}#{value.Ship}/{value.Type}";
                        Data = value;
                }
        }

        /// <summary>
        /// Gets the version number of the CloudEvents specification which has been used.
        /// </summary>
        public string CloudEventsVersion { get; }

        /// <summary>
        /// Gets the registered event type for this event source.
        /// </summary>
        public string EventType { get; }

        /// <summary>
        /// Gets the The version of the eventType.
        /// </summary>
        public string EventTypeVersion { get; }

        /// <summary>
        /// Gets the event producer properties.
        /// </summary>
        public string Source { get; set; }

        /// <summary>
        /// Gets the unique identifier for the event.
        /// </summary>
        public string EventID { get; }

        /// <summary>
        /// Gets the time the event is generated based on the provider's UTC time.
        /// </summary>
        public string EventTime { get; }

        /// <summary>
        /// Gets or sets the event data specific to the resource provider.
        /// </summary>
        public ShipEvent Data { get; set; }

        /// <summary>
        /// Constructor.
        /// </summary>
        public CloudEvents()
        {
                CloudEventsVersion = "0.1";
                EventID = Guid.NewGuid().ToString();
                EventType = "shipevent";
                EventTime = DateTime.UtcNow.ToString("o");
        }
}
|
.Program Class
And finally we will update the Program class. Here we will get the input from the user, and create a CloudEvents message which will be sent to Event Grid. Make sure to update the topic endpoint and access key with the entries we retrieved from the portal in the previous step. Also update the topic property with your subscription id, and the resource group and topic name you used when creating the topic. One more thing to notice, is how we only send a single message, instead of a List of messages as we did in this blog post. Currently CloudEvents does not support batching of events, which is why we can only send a single event.
/// <summary>
/// Send CloudEvents messages to an Event Grid Topic.
/// </summary>
class Program
{
        /// <summary>
        /// Endpoint of the Event Grid Topic.
        /// Update this with your own endpoint from the Azure Portal.
        /// </summary>
        private const string TOPIC_ENDPOINT = "<your-topic-endpoint>";

        /// <summary>
        /// Key of the Event Grid Topic.
        /// Update this with your own key from the Azure Portal.
        /// </summary>
        private const string KEY = "<your-access-key>";

        /// <summary>
        /// Topic to which we will be publishing.
        /// Update the subscription id, resource group and topic name here.
        /// </summary>
        public const string TOPIC = "/subscriptions/<your-subscription-id>/resourceGroups/<your-resource-group>/providers/Microsoft.EventGrid/topics/<your-topic-name>";

        /// <summary>
        /// Main method.
        /// </summary>
        public static void Main(string[] args)
        {
                // Set default values
                var entry = string.Empty;

                // Loop until user exits
                while (entry != "e" && entry != "exit")
                {
                        // Get entry from user
                        Console.WriteLine("Do you want to send an (o)rder, request a (r)epair or (e)xit the application?");
                        entry = Console.ReadLine()?.ToLowerInvariant();

                        // Get name of the ship
                        Console.WriteLine("What is the name of the ship?");
                        var shipName = Console.ReadLine();

                        CloudEvents cloudEvents;
                        switch (entry)
                        {
                                case "e":
                                case "exit":
                                        continue;
                                case "o":
                                case "order":
                                        // Get user input
                                        Console.WriteLine("What would you like to order?");
                                        var product = Console.ReadLine();
                                        Console.WriteLine("How many would you like to order?");
                                        var amount = Convert.ToInt32(Console.ReadLine());

                                        // Create order event
                                        // Event Grid expects a list of events, even when only one event is sent
                                        cloudEvents = new CloudEvents { UpdateProperties = new Order { Ship = shipName, Product = product, Amount = amount } };
                                        break;
                                case "r":
                                case "repair":
                                        // Get user input
                                        Console.WriteLine("Which device would you like to get repaired?");
                                        var device = Console.ReadLine();
                                        Console.WriteLine("Please provide a description of the issue.");
                                        var description = Console.ReadLine();

                                        // Create repair event
                                        // Event Grid expects a list of events, even when only one event is sent
                                        cloudEvents = new CloudEvents { UpdateProperties = new Repair { Ship = shipName, Device = device, Description = description } };
                                        break;
                                default:
                                        Console.Error.WriteLine("Invalid entry received.");
                                        continue;
                        }

                        // Send to Event Grid Topic
                        SendEventsToTopic(cloudEvents).Wait();
                }
        }

        /// <summary>
        /// Send events to Event Grid Topic.
        /// </summary>
        private static async Task SendEventsToTopic(CloudEvents cloudEvents)
        {
                // Create a HTTP client which we will use to post to the Event Grid Topic
                var httpClient = new HttpClient();

                // Add key in the request headers
                httpClient.DefaultRequestHeaders.Add("aeg-sas-key", KEY);

                // Event grid expects event data as JSON
                var json = JsonConvert.SerializeObject(cloudEvents);

                // Create request which will be sent to the topic
                var content = new StringContent(json, Encoding.UTF8, "application/json");

                // Send request
                Console.WriteLine("Sending event to Event Grid...");
                var result = await httpClient.PostAsync(TOPIC_ENDPOINT, content);

                // Show result
                Console.WriteLine($"Event sent with result: {result.ReasonPhrase}");
                Console.WriteLine();
        }
}
|
The complete code for the Event Publisher application can also be found here on GitHub.
Our next step is to create the Logic App which will handle the events sent by our events publisher application.

Create Logic App for processing events
Once the Logic App has been created, open the designer and create a HTTP Request trigger template.

Use HTTP Request trigger
Set the Request JSON Schema to the following, which is a representation of the CloudEvents schema including the ship events.
{
    "type": "object",
    "properties": {
        "CloudEventsVersion": {
            "type": "string"
        },
        "EventType": {
            "type": "string"
        },
        "EventTypeVersion": {},
        "Source": {
            "type": "string"
        },
        "EventID": {
            "type": "string"
        },
        "EventTime": {
            "type": "string"
        },
        "Data": {
            "type": "object",
            "properties": {
                "Ship": {
                    "type": "string"
                },
                "Type": {
                    "type": "string"
                }
            }
        }
    }
}
|

Set JSON schema for parsing the request
Add a step to send out an email, and authenticate using your Office365 account. If you don’t have an Office365 account you can also use one of the other connectors to send out an email.

Add the Office365 Outlook connector
Set the options for the email and save the Logic App. When you save the Logic App make sure to grab the HTTP POST URL of the HTTP Request trigger, as we will need this in the next step to set up the subscription.

Set email properties with body to the data element
We are now going to create the Event Grid subscription, which will catch the events from our events publisher, and route them to our Logic App. We will have to do this once again from the Azure CLI, as the portal UI does not yet support the use of the CloudEvents schema. Give the following command in the Azure CLI to create the subscription which will route messages to our Logic Apps HTTP endpoint. Remember the Event Grid extension should be enabled for this.
az eventgrid event-subscription create --name shipEventsToProcessingLogicApp --topic-name cloudevents -g cloudEventsResouceGroup --endpoint '"<endpoint-for-logic-app-http-trigger>"' --event-delivery-schema cloudeventv01schema
|

Run Azure CLI command to create subscription
Now go to the Event Grid Subscriptions blade, make sure the filters are set right, and you will find your newly created subscription.
Subscription has been created
Testing
Open the event publisher application, and send in some events.

Send events from event publisher application
These events will now be received in the Event Grid topic, and routed to the subscription, which will then deliver it at the Logic App.
Logic App run shows we receive CloudEvents message
An email will then be sent, indicating the type of event.

Receive email with event information
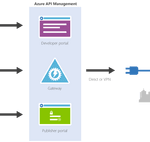
by Eldert Grootenboer | May 7, 2018 | BizTalk Community Blogs via Syndication
This is the first in a series of blogposts around setting up CI/CD for Azure API Management using Azure Resource Manager templates. We will be using Visual Studio Team Services to host our repositories and set up our build and release pipeline. By using CI/CD our API Management will be updated any time we check in changes made in our ARM templates.
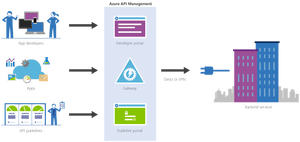
The posts in this series are the following, this list will be updated as the posts are being published.
We will have several developers who are working in API Management creating and updating API definitions. The developers can either do this directly in the ARM template files, or by creating the API definition in the portal first and exporting it with a tool like the API Management ARM Template Creator. They will then check in their changes to a GIT repository hosted in VSTS.
In this first post we will create an instance of API Management, without any custom APIs defined, just the Echo API which comes out of the box. We will start by creating a account in VSTS.

Create VSTS account
Once your account has been created, add a new project under which we will host our repositories. Select GIT as the version control provider.

Browse projects

Create new project

Set up project properties
Once our project has been created, let’s create a new GIT repository which will be used to hold the ARM template used to deploy our API Management instance. By creating a repository we can easily detect changes to trigger a specific deployment, like the instance or a specific API definition. This also allows us to limit developers to specific repositories, for example we might only want our lead developers to work on the instance, but have all developers work on APIs within the instance.

Create new repository

Set repository properties
Once created, switch to your new repository.

Switch to API Management instance repository
Clone the repository to your local machine. When working with ARM template I like using Visual Studio Code in combination with the Azure Resource Manager Tools extension, but you can use any tool you like.
Once you have cloned your repository, create a new file called instance.json, and use the following code to make it an ARM template.
Notice that we use a couple of parameters, these can be overridden at deployment time according to the environment we are deploying to, for example we will want to use the Developer sku in our test environment, but use the Standard sku in the production environment. The other thing to notice is we use [resourceGroup().location] for our location, this will make sure our API Management instance lands in the same region as the resource group to which we deploy from our deployment pipeline.
{
    "$schema": "https://schema.management.azure.com/schemas/2015-01-01/deploymentTemplate.json#",
    "contentVersion": "1.0.0.0",
    "parameters": {
      "APIManagementSku": {
        "type": "string",
        "defaultValue": "Developer"
      },
      "APIManagementSkuCapacity": {
        "type": "string",
        "defaultValue": "1"
      },
      "APIManagementInstanceName": {
        "type": "string",
        "defaultValue": "MyAPIManagementInstance"
      },
      "PublisherName": {
        "type": "string",
        "defaultValue": "Eldert Grootenboer"
      },
      "PublisherEmail": {
        "type": "string",
        "defaultValue": "[email protected]"
      }
    },
    "variables": {},
    "resources": [
      {
        "type": "Microsoft.ApiManagement/service",
        "name": "[parameters('APIManagementInstanceName')]",
        "apiVersion": "2017-03-01",
        "properties": {
          "publisherEmail": "[parameters('PublisherEmail')]",
          "publisherName": "[parameters('PublisherName')]",
          "notificationSenderEmail": "[email protected]",
          "hostnameConfigurations": [],
          "additionalLocations": null,
          "virtualNetworkConfiguration": null,
          "customProperties": {
            "Microsoft.WindowsAzure.ApiManagement.Gateway.Security.Protocols.Tls10": "False",
            "Microsoft.WindowsAzure.ApiManagement.Gateway.Security.Protocols.Tls11": "False",
            "Microsoft.WindowsAzure.ApiManagement.Gateway.Security.Protocols.Ssl30": "False",
            "Microsoft.WindowsAzure.ApiManagement.Gateway.Security.Ciphers.TripleDes168": "False",
            "Microsoft.WindowsAzure.ApiManagement.Gateway.Security.Backend.Protocols.Tls10": "False",
            "Microsoft.WindowsAzure.ApiManagement.Gateway.Security.Backend.Protocols.Tls11": "False",
            "Microsoft.WindowsAzure.ApiManagement.Gateway.Security.Backend.Protocols.Ssl30": "False"
          },
          "virtualNetworkType": "None"
        },
        "resources": [],
        "sku": {
          "name": "[parameters('APIManagementSku')]",
          "capacity": "[parameters('APIManagementSkuCapacity')]"
        },
        "location": "[resourceGroup().location]",
        "tags": {},
        "scale": null
      }
    ],
    "outputs": {}
  }
|
Now commit and push these changes changes to the repository, so we can use it in our build and deployment pipeline.

Commit and push changes to repository
Go back to VSTS, and create a new build definition for our project.

Create new definition
Make sure you have selected the repository for the API Management instance, and create an empty process definition.

Select API Management instance repository

Create empty process definition
We will start by setting the trigger to enable continous integration. This will kick of the build each time we check in a change to our repository.

Enable continous integration trigger
Next go to the tasks, and add a Azure Resource Group Deployment task to your build Phase. The name of the task is somewhat misleading, as it does not just do resource group deployments, but actually deploys complete ARM templates.
Add Azure Resource Group Deployment task
Click on the task we just added, set the name of the task, and select the subscription to be used. If needed, authorize your connection. In this build pipeline we will only validate the template, so nothing will be deployed yet.
Select subscription and authorize if needed
Fill in the rest of the Azure details of the task. Keep in mind that the resource group will only be used for validation, you can use either an existing or a new resource group for this.

Set Azure details
Now fill in the template details of the task. For the Template reference, select the ARM template we created earlier on by clicking on the three dots next to the textbox. Set the deployment mode to Validation only, this will allow us to validate the ARM template without deploying it. Leave all other sections of the build task to their default values.

Set template and deployment mode
Now add a Delete an Azure Resource Group if it is empty task to the build phase. This custom task has first to be added to your VSTS account (you will need to refresh your VSTS browser screen after you added it), and will be used to clean up the resource group if it was created during the validation if it is empty. This is done, because if you created a new resource group in the previous task, it will leave an empty resource group behind.
Add Delete an Azure Resource Group if it is empty task
Open the new task, and set the Azure details. Make sure to use the same subscription and resource group as was used during the validation. You could use VSTS variables here instead as well, but for this blogpost I will just set the names manually.

Set Azure details
And now add a Publish Build Artifacts task to our build stage. This task will publish the ARM template so we can use it in our deployment pipeline.
Publish Build Artifacts task
Open the task, and select the ARM template file for Path to publish. Give a name for the artifact which will be published, and set the publish location to VSTS.

Set publish settings
We now have completed our build pipeline, so save and queue the definition. This will publish the artifact which we can then use to set up our deployment pipeline.

Save and queue the build definition

Select location to save the definition

Queue the build definition
We have finished our build pipeline, so the next step is to set up a deployment definition. Go to Releases and create a new definition.

Create new release definition
Start with an empty process, as we will set up our definition ourselves.
In this definition, two environments will be used, Test and Production. But first we will link our artifacts from our build pipeline, by clicking on the Add artifact field.

Add artifact
Select the build definition we created before, this will read the ARM template which we validated in our build pipeline.

Select build definition
And now click on the button to set a continuous deployment trigger, and enable this trigger. This will make sure our deployment process runs each time our build pipeline completes successfully.

Open continous deployment trigger

Enable continuous deployment trigger
Now that we have set up our artifacts to be published, click on the environment and set the environment name to Test.
Next click on the Tasks dropdown and select the Test environment.

Open Test environment tasks
Add an Azure Resource Group Deployment task to your phase, this will deploy the ARM template to our Azure environment.
Add Azure Resource Group Deployment task
Open the task, and edit the Azure details. Remember, this is for your test environment, so set the subscription and / or resource group accordingly.

Set Azure details for test environment
For the template, select the output from our build pipeline. If you want, you can override your template parameters here as well, but as our defaults are already prepared for the test environment, we will not do this at this time.

Use template from build pipeline
Go back to your pipeline, and click on the Clone button under the Test environment.

Clone the test environment
Rename this new environment to Production, and open the pre-deployment conditions.
Open pre-deployment conditions
As this is our production environment, we don’t want to release here until a release manager has approved the deployment. To do this, enable the Pre-deployment approvals option and select someone who is allowed to approve the deployments. Normally this will probably be a release manager.

Enable pre-deployment approvals
Open your Production tasks, click on the Azure Resource Group Deployment task, and update the subscription and / or resource group for your production environment.

Update subscription and resource group
As this is our production instance, we will want to run on the Standard tier of API Management instead of the Developer tier, so override the APIManagementSku property we had set in our ARM template.

Override sku to use Standard tier
And finally name and save your deployment definition.
To test our CI/CD process, we can now make a change to the ARM template and check it in to our repository. This will then start the build pipeline validating our template, and once it is done, kick off the deployment pipeline automatically, deploying it to Azure.

Build pipeline gets triggered automatically after check in
The first time this is done, it will take a while to create the API Management instance, and if you are on VSTS free build tier, it might show as failed on the deployment, because it will exceed the maximum of 30 minutes.

Deployment succeeded
From now on after making changes to your ARM template your API Management instance will automatically be updated through the CI/CD pipeline. And as we choose for incremental updates in our deployment process, it will only update the parts which have actually been changed, without redeploying the entire instance.
API Management instance has been created
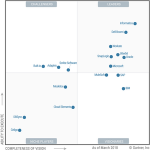
by Eldert Grootenboer | Apr 25, 2018 | BizTalk Community Blogs via Syndication
Last week the new Gartner Magic Quadrant for Enterprise Integration Platform as a Service (EiPaaS) was published, listing Microsoft in the coveted leader space. Having worked with Azure’s iPaaS products for a long time now, I wholeheartedly agree with this decision, and congratulate all the teams within Microsoft who have been working so hard to get to where we are today. The complete report, with all requirements and results can be found in this report.
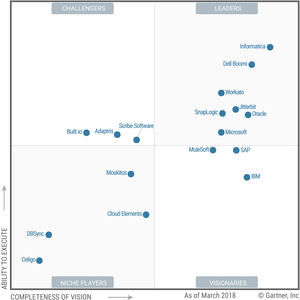
Source: Gartner (April 2018)
Looking at the definition of an integration platform as a service, we can see how important this space is in the modern world, where data and system integration is more important than ever.
An integration platform as a service (iPaaS) solution provides capabilities to enable subscribers (aka “tenants”) to implement data, application, API and process integration projects involving any combination of cloud-resident and on-premises endpoints. This is achieved by developing, deploying, executing, managing and monitoring integration processes/flows that connect multiple endpoints so that they can work together.
Microsoft provides various services which we can use to build a true iPaaS platform, each catering to its own strengths, which can be combined to fit any scenario, like Logic Apps, Service Bus, API Management and more. And in 2018, these services will branded together under the new name Azure Integration Services.
From 2018, Azure Integration Services will be the collective name for a number of integration-related components, including Logic Apps, API Management, Service Bus and Event Grid. Data Factory rounds off the EiPaaS offerings for extraction, transformation and loading (ETL)-type workloads. Microsoft Flow, built on top of Logic Apps, enables citizen integrators.
In my opinion, this is a good move to help customers understand how important it is to have these components working together. Before Azure, integration solutions were often build with only one or two products, like BizTalk or WCF, but nowadays it’s much more important to break down our problem, and check how to solve this using all those services we have access to.
Making it to the leader space wouldn’t have been possible without the great efforts from the Program Managers and their teams, like Dan Rosanova, Jon Fancey, Kevin Lam, Kent Weare, Vlad Vinogradsky, Matt Farmer and all others. These are the true driving forces behind these services, who keep adding new features, bring out new services and keep making the offering ever more awesome.
The other driving force behind the success of Azure and especially the iPaaS offering, I think is the community. By sharing knowledge, giving feedback to the product teams and engaging with new and existing customers, we can and do make a difference. Events like Integrate, the Global Integration Bootcamp, Integration Monday, Middleware Friday and the many user groups and meetups really help in carrying out the message around these great services.
Microsoft has been going forward steady, bringing new services like Event Grid and expanding and improving on existing ones like Logic Apps. Looking at where we were two years ago and one year ago, we can see how fast progress is being made, giving us some amazing tools in our daily work. Our customers agree with this as well, as pretty much any new project I do these days is being done with Azure iPaaS, showing how much trust they have in Azure and its services. And bringing together the different services under the Azure Integration Services name will help new customers find their way around more easily. And with that my prediction is, next year Microsoft will have climbed even further in the leader space on the quadrant.

by Eldert Grootenboer | Mar 26, 2018 | BizTalk Community Blogs via Syndication
Last Saturday was the second edition of the Global Integration Bootcamp, and we can certainly say it was another big hit! In total we had 15 locations in 12 countries running the Bootcamp, and about 600 participants including the speakers.

Locations all over the world
This is an amazing achievement, and I would like to thank all the local organizers, and of course my fellow global organizers.

The global organizers
We started preparations for the bootcamp shortly after finishing last year’s, taking the lessons learned to make this year’s edition even better. This meant a lot of Skype calls, even more communication on Slack and WhatsApp, and coming together whenever we could meet, like during Integrate and the MVP Summit.

Meeting with the organizers
One of the lessons we learned from last year, was to set up the labs differently. Where we had a continuous series of labs last year, where the output of one lab was the input for the next, we found this was not optimal. Some people indicated they got stuck on one of the labs, which meant they could not continue with the other labs as well. That’s why we decided to create stand-alone labs this year, so people could decide for themselves which labs they wanted to do, and could continue on another lab if they got stuck. Creating labs is a lot of work, which means we can only create a limited amount of labs, which is why we also decided to link to labs and tutorials already created by MS and the community, making sure everyone could find something they like. We also decided to put all the labs up on GitHub, where they will remain, so anyone can use them and adjust them. This helped a lot with reviews of the labs as well, as the reviewers could now easily fix any mistakes they found.

Hard work on preparing the labs paid off
While we were creating the labs, we also started getting the word out there, first for onboarding new locations and after that for promoting the locations as well. During this time we coordinating with locations, helping out where we could, and making sure everyone knew what was expected from them. It’s always great to see how active this community is, and how people are always willing to help each other, whether it be by sharing content, bringing speakers and locations in contact with each other, or gathering ideas around sponsoring and locations.

Already a lot of buzz going on before the event started
And then it was March 24th, the day of the Global Integration Bootcamp! Once again it started in Auckland, and went around the world until it finished in Chicago.

Auckland kicking of Global Integration Bootcamp 2018
It was great how to see Twitter full of pictures, showing all these locations where people are learning all about integration and Azure, and people having fun following the sessions and working on the labs.

Full house in Helsinki

Rotterdam in full swing
If you want to have a full immersion of the day, check this Twitter Moments set up by Wagner Silveira, or these blogposts by Gijs in ‘t Veld and Bill Chesnut. Also remember, if you attended the Global Integration Bootcamp, there are several offers available from our sponsors!

https://www.servicebus360.com/global-integration-bootcamp-offer/

https://www.biztalk360.com/global-integration-bootcamp-offer/

https://www.atomicscope.com/global-integration-bootcamp-offer/
Thanks to everyone who filled out the survey, we also have some clear insights in what people liked, and how we can improve. In general, people are very happy with the Global Integration Bootcamp, so that is amazing!

Looking at what people told us they liked best, I’m glad to see people seem to be really happy about the content, the speakers and the labs, as well as the possibilities Azure is giving us.
We already decided we will keep this going, so expect another Global Integration Bootcamp next year! It will be on a Saturday again, as we see this still is the favorite day for most people. Thanks again to everyone who helped us make this possible once again, whether you were an organizer, a speaker or an attendee, we can’t do this without all of you!


by Eldert Grootenboer | Jan 2, 2018 | BizTalk Community Blogs via Syndication
Another year has gone by, and looking back, it has been an amazing year for me. The year started with becoming a MVP, for which I am thankful and honored. I want to once again thank everyone who has helped me reaching this astounding accomplishment, with special thanks going out to my buddy Steef-Jan, who has been like a mentor to me.

Became a MVP
Looking back on 2017, it was also a year of lots of traveling, including trips either for speaking or for attending conferences. Most of these trips have been together with some great friends, like Steef-Jan, Tomasso, Sandro, Nino and many more. Last year I have visited Gold Coast, Brisbane, Sydney, Melbourne, Gothenborg, Stockholm, Ghent, Lisbon, London, Oslo, Mechelen, Seattle, Bellevue and Dutch Harbor.

Lisbon

Oslo

Dutch Harbor
I love to speak, and in 2017 I got the chance to speak at a lot of different locations and events. This includes speaking at conferences, user groups and webcasts, which allowed me to spread knowledge, meet old friends, make new friends, and interact with people from all around the world. With the rise of Azure, I have spoken on various subjects around its great technologies and services, for example IoT, Logic Apps, Event Grid, Bot Framework and many more.
IoT
Bot Framework
Last year we did the first Global Integration Bootcamp, for which I am one of the founders and board members. With a total of 12 countries, 16 locations, 55 speakers and over 650 attendees, it was a great success!

Global Integration Bootcamp
Over the past year I have once again written several blog posts, both on my own blog as well as a guest writer for BizTalk360. I love sharing this way, and have gotten a lot of great feedback from all of you, so you can certainly expect more to come.
Blog Posts
Not only have I been blogging, but I also wrote another ebook together with Steef-Jan, Tomasso and Rob, covering modern integration, as an addition to the Global Integration Bootcamp.

Modern Integration eBook
Of course, becoming a MVP was the most amazing reward I have gotten last year, but I am also very honored to have received the BizTalk360 Product Specialist award for the third time in a row.

BizTalk360 Product Specialist
I also have gotten my TOGAF certification, continuing my path into architecture.

TOGAF 9 Certified
As I said, 2017 has been a great year, having spent time with old friends, made many new friends, traveled all over the world, and accomplishing many personal goals. For 2018, I intend to continue doing this, and keep doing all these things I enjoy most. The year 2018 is already starting great, with ny first trip will be coming up in two weeks, as I honored to be speaking in Helsinki at IglooConf.

IglooConf
We are also working hard on another Global Integration Bootcamp, so make sure to attend as well! I am in the works of planning more sessions and trips at the moment as well, so if you ever see me around, come and say hello. You are the ones who give me the motivation and opportunities to do everything I get to do, thank you!

by Eldert Grootenboer | Oct 30, 2017 | BizTalk Community Blogs via Syndication
This is a new post in the IoT Hub series. Previously we have seen how to administrate our devices, send messages from the device and from the cloud. Now that we have all this data flowing through our systems, it is time to help our users to actually work with this data.
Going back to the scenario we set in the first post of the series, we are receiving the telemetry readings from our ships, and getting alerts in case of high temperature. In the samples we have been using console apps for our communications between the systems, but in a real-life scenario you will probably want a better and easier interface. In the shipping business, Dynamics CRM is already widely used, and so it would benefit the business if they can use this product for their IoT solutions as well. Luckily they can, by using Microsoft Dynamics 365 for Field Service in combination with the Connected Field Service solution.

Setting Up Connected Field Service
To start working with the connected field service solution, first we will set up a 30 day trial for Dynamics 365 for Field Service. Just remember you will need an organizational Microsoft account to sign up for Dynamics 365. If you do not have one, you can create a <your-tenant>.onmicrosoft.com account in your Azure Active Directory for this purpose. If you already have your own Dynamics 365 environment, you can skip to installing the connected field service.
Create Dynamics 365 Environment
We will start by setting up Dynamics 365. In this post, we will be using a trial account, but if you already have an account you could of course also use that one. Go to the Dynamics 365 trial registration site, and click on Sign in to use an organizational account to login.
 Sign in to Dynamics 365
  Use an organizational account to sign in
Once signed in, confirm that you want to sign up for the free trial.
 Confirm the free trial
  Your trial has been accepted
Now that we have created our free trial, we will have to assign licenses to our users. Open the Subscriptions blade under Billing and choose to assign licenses to your users.
 Assign licenses to users
You will get an overview of all your users. Select the users for which you want to assign the licenses, and click Edit product licenses.
 Choose users to assign licenses
Add the licenses to the users we just selected.
 Add licenses to users
Choose the trial license we just created. This will also add the connected Office 365 licenses.
 Assign Dynamics 365 trial licenses
Now that we have assigned the Dynamics 365 licenses, we can finish our setup. Go to Admin Centers in the menu, and select Dynamics 365.
Go to Dynamics 365 admin center
As we are interested in the field service, select this scenario, and complete the setup. The field service scenario will customize our Dynamics 365 instance, to include components like scheduling of technicians, inventory management, work orders and more, which in a shipping company would be used to keep track of repairs, maintenance, etc.
 Select Field service
Once we have completed our Dynamics 365 setup, it will be shown in the browser. The address of the page will be in the format <yourtenant>.crm4.dynamics.com. You can also change this endpoint in your Dynamics 365 admin center.
 Your Dynamics 365 environment
Security
To allow us to install the Connected Field Service solution, we will need to add ourselves to the CRM admins. To do this, within your Dynamics 365 portal (in my case https://eldertiotcrmdemoeldert.crm4.dynamics.com/) go to the Settings Tab and open security.
 Open Dynamics 365 Security
Now open the users, select your user account, and click on Promote To Admin.
 Promote your user to local admin
Install Connected Field Service Solution
Now that we have Dynamics 365 set up, it’s time to add the Connected Field Service solution, which we will use to manage and interact with our devices from Dynamics 365. Start by going to Dynamics 365 in the menu bar.
 Open Dynamics 365
This will lead us to our Dynamics home, where we can install new apps. Click on Find more apps to open the app store.
 Open the app store
Search for Connected Field Service, and click on Get it now to add it to our environment.
 Add Connected Field Service solution
Agree with the permissions, and make sure you are signed in with the correct user. The user must have a license, and permissions to install this solution.
 Accept permissions
Follow the wizard for the solution and make sure you install it into the correct environment.
 Select your Dynamics 365 environment
  Accept deployment
On the next pages accept the service agreement and the privacy statement. Make sure you deploy to the correct Dynamics 365 Organization.
Select correct organization
Now we will have to specify the Azure resources where we want to deploy our artefacts like IoT Hub, Stream Analytics etc. If you do not see a subscription, make sure your user has the correct permissions in your Azure environment to create and retrieve artefacts and subscriptions.
 Select Azure subscription and resources
The wizard will now start deploying all the Azure artefacts, and will update CRM with new screens and components. You can follow this by refreshing the screen, or coming back to the website. Once this is finished, you will need to click the Authorize button, which will set up the connection between your Azure and Dynamics 365.
 After deployment click on Authorize
This will open the Azure portal on the API connection, click on the message This connection is not authenticated to authorize the connection.
Click to authenticate  Authorize the connection
The Azure Solution
Now let’s go to the Azure portal, and see what has been installed. Open the resource group which we created in the wizard.
 Resource group for our connected field service solution
As you can see, we have a lot of new resources. I will explain the most important ones here, and their purpose in the Connected Field Service solution. After the solution has been deployed, all resources will have been setup for the data from the sample application which has been deployed with it. If you want to use your own devices, you will need to update these. This is also the place to start building your own solution, as your requirements might differ from what you get out of the box. As all these resources can be modified from the portal (except for the API Apps), customizing this solution to your own needs is very easy
IoT Hub
The IoT Hub which has been created is used for the device management and communication. It uses device to cloud messaging to receive telemetry from our devices, and cloud to device messaging to send commands to our devices. When working with your own devices, you should update them to connect with this IoT Hub.
Service Bus
Four Service Bus queues have been created, which are used for holding messages between systems.
Stream Analytics
There are several Stream Analytics jobs, which are used to process the data coming in from IoT Hub. When working with your own devices, you should update these jobs to process your own data.
- Alerts; This job reads data from IoT Hub, and references it against device rules in a blob. If the job detects it needs to send an alert to Dynamics 365, in this case a high temperature, it will write this into a Service Bus queue.
- PowerBI; This job reads all incoming telemetry data, and sends the maximum temperature per minute to PowerBI.
API Apps
Custom API Apps have been created, which will be used to translate between messages from IoT Hub and Dynamics 365.
Logic Apps
There are two Logic Apps, which serve as a communications channel between Dynamics 365 and IoT Hub. The Logic Apps use queues, API Apps and the Dynamics 365 connector to send and receive messages between these systems.
Setting Up PowerBI
PowerBI will be used to generate charts from the telemetry readings. To use this, we first need to import the reports. Start by downloading the reports, and make sure you have a PowerBI account, it is recommended to use the same user for this which you use for Dynamics 365. Open the downloaded reports file using PowerBI Desktop. The Power BI report will open with errors because it was created with a sample SQL database and user. Update the query with your SQL database and user, and then publish the report to Power BI.
 Open the downloaded report
Once opened, click on Edit Queries to change the connection to your database.
 Select Edit Queries Open Advanced Editor
Replace the source SQL server and database with the resources provisioned in your Azure resource group. The database server and database name can be found through the Azure portal.
 Update Azure SQL Server and database names
Enter the credentials of your database user when requested.
 Enter login credentials
If you get an error saying your client IP is not allowed to connect, use the Azure portal to add your client IP to the firewall on your Azure SQL Server.
Not allowed to connect  Add client IP to firewall settings
Once done, click on Close & Apply to update the report file.
Close and apply changes
Now we will publish the report to PowerBI, so we can use it from Dynamics 365. Click on the Publish button to start, and make sure to save your changes.
 Publish report to PowerBI
Sign in to your PowerBI account and wait for you report to be published.
 Sign in to PowerBI
Once published, open the link to provide your credentials.
 Publishing succeeded
Follow the link to edit your credentials, and update the credentials with your database user login.
 Sign in with database user
Now pin the tiles to a dashboard, creating one if it does not yet exist.
 Pin tiles to dashboard
Managing Devices
In this post we will be using the simulator which has been deployed along with the solution. If you want to use your own (simulated) devices, be sure to update the connections and data for the deployed services. Go to your Dynamics 365 environment, open the Field Service menu, and select Customer Assets.
Open Customer Assets
To add a new device, we will create a new asset. This asset will then be linked to a device in IoT Hub.
Create new asset
Fill in the details of the asset. Important to note here, is we need to set a Device ID. This will be the ID with which the device is registered in IoT Hub. When done, click on Save.
 Set asset details
Once the asset has been saved, you will note a new command in the command bar called Register Devices. This will register the new device in IoT Hub, and link it with our asset in Dynamics 365. Click this now.
 Register the device in IoT Hub
The device will now be registered in IoT Hub. Once this is done, the registration status will be updated to Registered. We can now start interacting with our device.
Device has been registered in IoT Hub
Receive Telemetry
Open the thermostat simulator, which was part of the deployment of the Connected Field Service solution. You can do this by going back to the deployment website and clicking Open Simulator.
 Open the simulator
This will open a new website where we can simulate a thermostat. Start by selecting the device we just created from Dynamics 365.
 Select device
Once the device has been selected, we will start seeing messages being sent. These will be sent to IoT Hub, and be placed into PowerBI, and alerts will be created if the temperature gets too high. Increase the temperature to trigger some alerts.
 Generate high temperature
Now go back to Dynamics 365, and open the Field Service dashboard.
 Open Field Service dashboard
On the dashboard we will now see a new IoT Alert. You can open this alert to see it’s details, and for example create a work order for this. In our scenario with the shipping company, this would allow us to recognize anomalies on the ships engines in near real time, and immediately take action for this, like arranging for repairs.
 Alerts are shown in Dynamics 365
Connect PowerBI
Now let’s set up Dynamics 365 to include the PowerBI graph in our assets, so we have an overview of our telemetry at all times as well. Go back to the asset we created earlier, and click the PowerBI button in the Connected Device Readings area.
 Add PowerBI tile to asset
Choose one of the tiles we previously added to the PowerBI dashboard and click save.
 Add PowerBI tile
We will now see the recent device readings in our Dynamics 365 asset. This will show up with every asset with the readings for its registered device, allowing us to keep track of all our device’s readings.
 Device readings are now integrated in Dynamics 365
Send Commands
So for the final part, we will have a look how we can send messages from Dynamics 365 to our device. Go back to the asset we created, and click on Create Command.
 Click Create Command
Give the command a name, and provide the command. This should be in JSON format, so it can be parsed by the device. As we will be using the simulator, we will just send a demo command, but for your own device this should be a command your device can understand. You can send this command to a particular device or to all your devices. Once you have filled in the fields, click on Send & Close to send the command. The command which we will be sending is as follows.
{"CommandName":"Notification","Parameters":{"Message":"Technician has been dispatched"}}
 Create and send your command
Now when we switch over to our simulator, we will see the command coming in.
 Commands are coming in
Conclusion
By using Dynamics 365 in combination with the Connected Field Service solution, we allow our users to use an environment which they are well known with, to administrate and communicate with their IoT devices. It allows them to handle alerts, dispatching technicians as soon as needed. By integrating the readings, they are always informed on the status of the devices, and by sending commands back to the device they can remotely work with the devices.
IoT Hub Blog Series
In case you missed the other articles from this IoT Hub series, take a look here.
Blog 1: Device Administration Using Azure IoT Hub
Blog 2: Implementing Device To Cloud Messaging Using IoT Hub
Blog 3: Using IoT Hub for Cloud to Device Messaging
Author: Eldert Grootenboer
Eldert is a Microsoft Integration Architect and Azure MVP from the Netherlands, currently working at Motion10, mainly focused on IoT and BizTalk Server and Azure integration. He comes from a .NET background, and has been in the IT since 2006. He has been working with BizTalk since 2010 and since then has expanded into Azure and surrounding technologies as well. Eldert loves working in integration projects, as each project brings new challenges and there is always something new to learn. In his spare time Eldert likes to be active in the integration community and get his hands dirty on new technologies. He can be found on Twitter at @egrootenboer and has a blog at http://blog.eldert.net/. View all posts by Eldert Grootenboer