
by shadabanwer | Jun 23, 2020 | BizTalk Community Blogs via Syndication
I was working on one of the API which needed using certificate (SSL) connectivity to the external API exposed by third-party. We stored this certificate in Key Vault and reference it to azure app services (Web API). I used arm template to add Certificate (.pfx) from Azure KeyVault in the TLS/SSL settings of Web APP Service.
Below is the Arm Template to get the Certificate from Key Vault and deploy the Web APP in the Application Services Environment (ASE).
{
  "$schema": "https://schema.management.azure.com/schemas/2015-01-01/deploymentTemplate.json#",
  "contentVersion": "1.0.0.0",
  "parameters": {
    "appServiceName": {
      "type": "string"
    },
    "storageAccountName": {
      "type": "string",
      "metadata": {
        "description": "Storage Account name"
      }
    },
    "appServicePlanResourceGroup": {
      "type": "string",
      "metadata": {
        "description": "Azure service plan resource group"
      }
    },
    "appServicePlanName": {
      "type": "string",
      "metadata": {
        "description": "Azure Service Plan name"
      }
    },
    "applicationInsightsName": {
      "type": "string",
      "metadata": {
        "description": "The name of the app insights instance for the workload"
      }
    },
    "keyVaultName": {
      "type": "string"
    },
    "keyVaultResourceGroup": {
      "type": "string"
    },
    "BaseUrl": {
      "type": "string"
    },
    "CertkeyVaultSecretName": {
      "type": "string"
    }
  },
  "variables": {
    "applicationInsights": {
      "apiVersion": "2015-05-01",
      "name": "[parameters('applicationInsightsName')]"
    },
    "keyVault": {
      "apiVersion": "2015-06-01",
      "name": "[parameters('keyVaultName')]",
      "resourceId": "[resourceId(parameters('keyVaultResourceGroup'), 'Microsoft.KeyVault/vaults', parameters('keyVaultName'))]"
    }
  },
  "resources": [
    {
      "apiVersion": "2015-08-01",
      "name": "[parameters('appServiceName')]",
      "type": "Microsoft.Web/sites",
      "location": "[resourceGroup().location]",
      "tags": {
        "displayName": "Website"
      },
      "identity": {
        "type": "SystemAssigned"
      },
      "dependsOn": [
        "Microsoft.Web/certificates/CertificateName"
      ],
      "properties": {
        "name": "[parameters('appServiceName')]",
        "serverFarmId": "[resourceId(parameters('appServicePlanResourceGroup'), 'Microsoft.Web/serverfarms', parameters('appServicePlanName'))]",
        "siteConfig": {
          "use32BitWorkerProcess": false,
          "alwaysOn": true,
          "ftpsState": "FtpsOnly"
        },
        "httpsOnly": true
      },
      "resources": [
        {
          "name": "appsettings",
          "type": "config",
          "apiVersion": "2015-08-01",
          "dependsOn": [
            "[resourceId('Microsoft.Web/sites', parameters('appServiceName'))]"
          ],
          "properties": {
            "ApplicationInsights:InstrumentationKey": "[reference(resourceId(resourceGroup().Name, 'Microsoft.Insights/components', variables('applicationInsights').name), variables('applicationInsights').apiVersion).InstrumentationKey]",
            "Web:BaseAddress": "[parameters('BaseUrl')]",
            "Web:ClientCertificateThumbprint": "[reference(resourceId(resourceGroup().Name, 'Microsoft.Web/certificates','CertificateName'), '2016-03-01').thumbprint]",
            "WEBSITE_LOAD_CERTIFICATES": "*"

          }
        }
      ]
    },
    {
      "type": "Microsoft.Web/certificates",
      "name": "CertificateName",
      "apiVersion": "2016-03-01",
      "location": "[resourceGroup().location]",
      "properties": {
        "keyVaultId": "[variables('keyVault').resourceId]",
        "keyVaultSecretName": "[parameters('CertkeyVaultSecretName')]",
        "serverFarmId": "[resourceId(parameters('appServicePlanResourceGroup'), 'Microsoft.Web/serverfarms', parameters('appServicePlanName'))]"
      }
    },
    {
      "apiVersion": "2014-04-01",
      "name": "[parameters('applicationInsightsName')]",
      "type": "Microsoft.Insights/components",
      "location": "[resourceGroup().location]",
      "dependsOn": [
        "[resourceId('Microsoft.Web/sites/', parameters('appServiceName'))]"
      ],
      "tags": {
        "[concat('hidden-link:', resourceGroup().id, '/providers/Microsoft.Web/sites/', parameters('appServiceName'))]": "Resource",
        "displayName": "AppInsightsComponent"
      },
      "properties": {
        "applicationId": "[parameters('appServiceName')]"
      }
    }
  ]
}
When this deployment run on Azure Portal, it error out with the following error message.
Status Message: {“Code”:”Conflict”,”Message”:”Another certificate exists with same thumbprint xxxxxxxxxxxxxxxxxxxxxxxxxxxx at location Australia East in the Resource Group RG-AE-Dev.”,”Target”:null,”Details”:[{“Message”:”Another certificate exists with same thumbprint xxxxxxxxxxxxxxxxxxxxxxxxxxxx at location Australia East in the Resource Group RG-AE-Dev.”},{“Code”:”Conflict”},{“ErrorEntity”:{“ExtendedCode”:”53008″,”MessageTemplate”:”Another certificate exists with same thumbprint {0} at location {1} in the Resource Group {2}.”,”Parameters”:[“xxxxxxxxxxxxxxxxxxxxxxxxxxxx”,”Australia East”,”RG-AE-Dev”],”Code”:”Conflict”,”Message”:”Another certificate exists with same thumbprint xxxxxxxxxxxxxxxxxxxxxxxxxxxx at location Australia East in the Resource Group RG-AE-Dev.”}}],”Innererror”:null}
I couldn’t find any other certificate in the key vault with the same thumb print, Then I ran the below Powershell command to find all the certificate included in the Resource Group.
# Change these to your appropriave values
$SubscriptionId = "xxxxxxxxxxxxxxxxxxxxxxxxxxxx"
$ResourceLocation = "Australia East"
$ResourceGroupName = "RG-AE-Dev"
$ResourceName = "CertificateName"
$KeyVaultName = "AZ-KeyVault"
$KeyVaultId = "/subscriptions/xxxxxxxxxxxxxxxxxxxxxxxxxxxx/resourceGroups/RG-AE-ICC-Dev/providers/Microsoft.KeyVault/vaults/AZ-KeyVault"
$KeyVaultSecretName = "certificatesecret"
$ServerFarmId = "/subscriptions/xxxxxxxxxxxxxxxxxxxxxxxxxxxx/resourceGroups/RG-AE-Dev/providers/Microsoft.Web/serverfarms/AustraliaEastPlan"
# Log in and select the correct subscription
Login-AzureRmAccount
Set-AzureRmContext -SubscriptionId $SubscriptionId
$ResourceLocation -PropertyObject $PropertiesObject -ResourceGroupName $ResourceGroupName -ResourceType Microsoft.Web/certificates -ApiVersion 2018-02-01 -Force
# List certificates
 Get-AzureRmResource -ResourceGroupName $ResourceGroupName -ResourceType Microsoft.Web/certificates -IsCollection -ApiVersion 2018-02-01
This Powershell command list down all the certificates, and I found that the same certificate is installed with the different name, thus the same Thumb Print.
Then I navigated to the Resources.Azure.com -> Subscriptions -> resourceGroups->providers->Microsoft.Web->certificates
I found this certificate with the different name, I needed to remove it using actions (DELETE) . Re-run the deployment and yes all success now.
Thanks

by shadabanwer | May 21, 2020 | BizTalk Community Blogs via Syndication
In this post I will talk about how we can access function app from APIM using url & function key. There was a requirement were we don’t want to add function app as an Azure Resource into the APIM, instead access via URL and function key, storing and retrieving the key from Key Vault.
So what I did.
Created a Resource Deploy project to create and store function key in Key Vault.
azuredeploy.parameters.json
{
"$schema": "https://schema.management.azure.com/schemas/2015-01-01/deploymentParameters.json#",
"contentVersion": "1.0.0.0",
"parameters": {
"keyVaultName": {
"value": "#{KeyVaultName}"
},
"functionAppName": {
"value": "fapp-#{EnvironmentPrefix}-product-reference"
},
"functionAppResourceGroup": {
"value": "#{AzureDeploymentResourceGroup}"
}
}
}
azuredeploy.json
{
  "$schema": "https://schema.management.azure.com/schemas/2015-01-01/deploymentTemplate.json#",
  "contentVersion": "1.0.0.0",
  "parameters": {
    "keyVaultName": {
      "type": "string"
    },
    "functionAppName": {
      "type": "string"
    },
    "functionAppResourceGroup": {
      "type": "string"
    }
  },
  "variables": {
    "functionAppId": "[concat('/subscriptions/', subscription().subscriptionId, '/resourceGroups/', parameters('functionAppResourceGroup'), '/providers/Microsoft.Web/sites/', parameters('functionAppName'))]",
    "KeyName": "[concat(parameters('functionAppName'),'-functionkey')]"
  },
  "resources": [
    {
      "type": "Microsoft.KeyVault/vaults/secrets",
      "name": "[concat(parameters('keyVaultName'),'/', variables('KeyName'))]",
      "apiVersion": "2015-06-01",
      "properties": {
        "contentType": "text/plain",
        "value": "[listkeys(concat(variables('functionAppId'), '/host/default/'),'2016-08-01').functionKeys.default]"
      },
      "dependsOn": []
    }

  ],
  "outputs": {
    "functionAppId": {
      "type": "string",
      "value": "[variables('functionAppId')]"
    }
  }
}
Now created Resource deploy Project for APIM .
azuredeploy.parameters.json
"FunctionKey": {
  "reference": {
    "keyVault": {
      "id": "#{AzureKeyVaultID}"
    },
    "secretName": "fapp-#{EnvironmentPrefix}-product-paymentreference-functionkey"
  }
},
"FunctionKeyDR": {
  "reference": {
    "keyVault": {
      "id": "#{AzureKeyVaultID}"
    },
    "secretName": "fapp-#{SecondaryEnvironmentPrefixFapp}-product-paymentreference-functionkey"
  }
Below is what we need to add as a back-end service in the azuredeploy.json
 {
      "type": "Microsoft.ApiManagement/service/backends",
      "apiVersion": "2019-01-01",
      "name": "[concat(parameters('ApimServiceName'), '/', variables('nVKeyPrimaryHostnameCreate'))]",
      "dependsOn": [
        "[resourceId('Microsoft.ApiManagement/service/apis', parameters('ApimServiceName'), parameters('apiname'))]"
      ],
      "properties": {
        "url": "[variables('nVValuePrimaryHostnameCreate')]",
        "protocol": "http",
        "resourceId": "[concat('https://management.azure.com/subscriptions/', subscription().subscriptionId, '/resourceGroups/', resourceGroup().name, '/providers/Microsoft.Web/sites/', parameters('backendid'))]",
        "credentials": {
          "header": {
            "x-functions-key": [
              "[parameters('FunctionKey')]"
            ]
          }
        }
      }
    },
{
      "type": "Microsoft.ApiManagement/service/backends",
      "apiVersion": "2019-01-01",
      "name": "[concat(parameters('ApimServiceName'), '/', variables('nVKeySecondaryHostnameValidatePRN'))]",
      "dependsOn": [
        "[resourceId('Microsoft.ApiManagement/service/apis', parameters('ApimServiceName'), parameters('apiname'))]"
      ],
      "properties": {
        "url": "[variables('nVValueSecondaryHostnameCreate')]",
        "protocol": "http",
        "resourceId": "[concat('https://management.azure.com/subscriptions/', subscription().subscriptionId, '/resourceGroups/', resourceGroup().name, '/providers/Microsoft.Web/sites/', parameters('backendid'))]",
        "credentials": {
          "header": {
            "x-functions-key": [
              "[parameters('FunctionKeyDR')]"
            ]
          }
        }
      }
    },
by shadabanwer | Apr 3, 2020 | BizTalk Community Blogs via Syndication
Hi All,
This post is to describe and take through the steps to set up App Registrations for App Services and API Management using OAuth 2.0 with Azure Active Directroy.
-
App Registration in AAD for securing App Services (WebApps and FunctionApps) using OAuth 2.0 with Azure active directory
This App registration is for securing the App Services, and should be used by the consumers (registered on AAD) to access the respective WebAPIs and Functions.
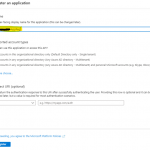
- Sign into Azure Portal.
- Select App registration
- Select New Registration.
- Name the Application as “nonprod-<team>-appsvc-appreg” , where <team> will be organisational domain etc.
- Click Register.
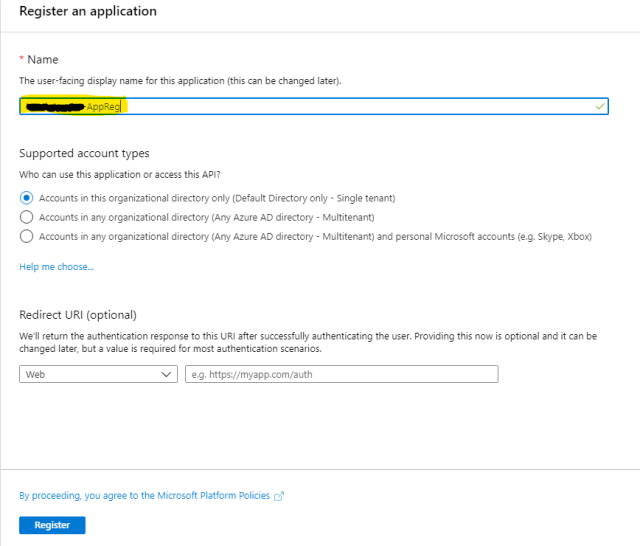
6. In the newly created App Registration, select “Manifest” property.
7. In that section set the following oAuth2 permission in the manifest modifying “oauth2Permissions” element of JSON representation.
“oauth2Permissions”: [
{
“adminConsentDescription”: “Allows another AAD registered application to access the App services”,
“adminConsentDisplayName”: “Access App Services”,
“id”: “8jca6c61-0762-7b99-a1e1-e4bdf7e6e165”,
“isEnabled”: true,
“lang”: null,
“origin”: “Application”,
“type”: “User”,
“userConsentDescription”: “Allows another AAD registered application to access the App services”,
“userConsentDisplayName”: “Access App Services”,
“value”: “user_impersonation”
}
],
8. “Save” the App Registration changes. This also creates a scope associated to the App Registration.
9. Similarly follow the same for Staging and Production as per shown tabular column.
| App Service App Registration Name
Note:- This App Registration Client ID can be used when consuming any of the Web Apps and Function Apps in HIP
|
nonprod-<team>-appsvc-appreg |
stage-<team>-appsvc-appreg |
prod-<team>-appsvc-appreg |
| oauth2Permissions |
Use the above snippet as it is.
Id as given above.
|
Use the above snippet as it is.
Replaced Id with correct Id
|
Use the above snippet as it is. |
10. Add user accounts as “App Owner” to this App Registration
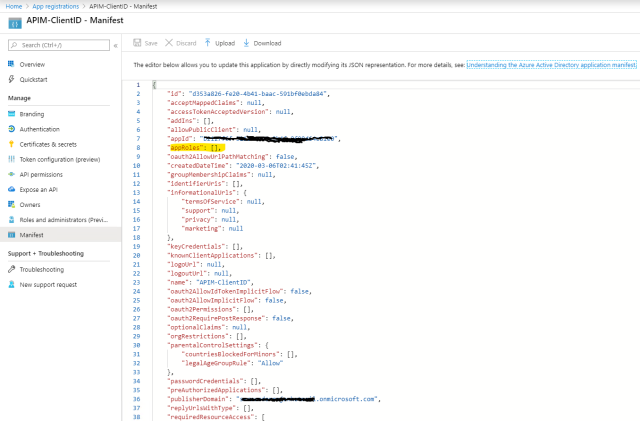
2) App Registration in AAD for API Manager (APIM) to secure APIs using OAuth 2.0 with Azure active directory
This App registration is for the APIM which creates the necessary roles that should be used by the consumers to access the APIs.
- Select App registration
- Select New Registration.
- Name the Application as “nonprod–<companyname>-apim-appreg“
- Click Register.
- Select “Expose an API” and set “Application ID URI”
6. Select Manifest.
7. In that section set the following oAuth2 permission in the manifest modifying “appRoles” element of JSON representation as shown below.
“appRoles”: [
{
“allowedMemberTypes”: [
“Application”
],
“description”: “Allow client apps to perform read and write operations on <name>.v1 API.”,
“displayName”: “<name>.v1.ReadAndWrite”,
“id”: “da9a6ab2-bc67-4213-102c-07d5749ea2s3,
“isEnabled”: true,
“lang”: null,
“origin”: “Application”,
“value”: “<name>.v1.ReadAndWrite”
},
{
“allowedMemberTypes”: [
“Application”
],
“description”: “Allow client apps to perform read operation on <name>.v1 API.”,
“displayName”: “<name>.v1.Read”,
“id”: “8ceee182-dcd0-48b3-af69-1a7924dc9d15”,
“isEnabled”: true,
“lang”: null,
“origin”: “Application”,
“value”: “<name>.v1.Read”
}
]
}
8. Similarly follow the same for Staging and Production as per shown tabular column.
| Non – Production |
Staging |
Production |
APIM – API Roles |
| APIM App Registration Name |
nonprod-<companyname>-apim-appreg |
stage-<companyname>-apim-appreg |
prod-<companyname>-apim-appreg |
<name>.v1.ReadAndWrite
<name>.v1.Read
<name>.v1.ReadAndWrite
|
9. Add user accounts as “App Owner” to this App Registration.
by shadabanwer | Dec 12, 2019 | BizTalk Community Blogs via Syndication
Hi All,
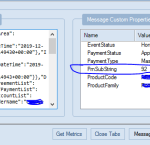
Recently I found that there is an issue with the Service Bus connector sending custom message header to the topics/subscription. The issue is the connector treat the text as string in spite of providing numeric or boolean values.
According to the below link
If the content is true or false (case-sensitive!), then the broker treats it as a System.Boolean with the corresponding value.
If the content can be parsed as an integer, then the broker treats it as a System.Int64.
https://docs.microsoft.com/en-us/rest/api/servicebus/message-headers-and-properties#message-properties
I’ve raised this with Microsoft.
I have got an update from the Microsoft Logic App product group acknowledging it as a bug fix of Service Bus connector treating all properties key value pairs as strings and they are actively working on it. The fix might be available in next year Jan.
Thanks.
Shadab
by shadabanwer | Sep 18, 2017 | BizTalk Community Blogs via Syndication
Hi All,
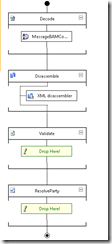
In this post we will show how we can validate Json schema against the message in Logic Apps. I and Krishna Pochanapeddi working on building an interface service in Logic Apps. We need to send a request message to Logic Apps request connector. We need to validate the same message against the Json schema. There is no capability within Logic Apps to validate the names of the fields in the Json message. We can do this easily using Azure Function by passing the Schema and request message using Azure Function connector. However, we do not want to use Azure function to validate schema. We want to use Logic Apps as a complete solution for these validation issues. It is easy to validate XML Schema using Integration Account but Json message cannot be validated.
After wondering for few hours; reading Json best practices; we found the basic and powerful Json capability which is the object option “required”. Now we can mentioned the required fields (field names) in the schema itself.
We created below mentioned Json schema
{
“$schema”: “http://json-schema.org/draft-04/schema#”,
“definitions”: {},
“id”: “http://example.com/example.json”,
“properties”: {
“ChangePasswordRequest”: {
“id”: “/properties/ChangePasswordRequest”,
“properties”: {
“CurrentPassword”: {
“default”: “currenthashedpassword”,
“description”: “An explanation about the purpose of this instance.”,
“id”: “/properties/ChangePasswordRequest/properties/CurrentPassword”,
“title”: “The currentpassword schema”,
“type”: “string”
},
“Identifier”: {
“default”: “126”,
“description”: “An explanation about the purpose of this instance.”,
“id”: “/properties/ChangePasswordRequest/properties/Identifier”,
“title”: “The identifier schema”,
“type”: “string”
},
“IdentifierScheme”: {
“default”: “test”,
“description”: “An explanation about the purpose of this instance.”,
“id”: “/properties/ChangePasswordRequest/properties/IdentifierScheme”,
“title”: “The identifierscheme schema”,
“type”: “string”
},
“MessageIdentifier”: {
“default”: “f7b351fb-ade4-4361-bfc3-9bb7df783880”,
“description”: “An explanation about the purpose of this instance.”,
“id”: “/properties/ChangePasswordRequest/properties/MessageIdentifiers”,
“title”: “The messageidentifiers schema”,
“type”: “string”
},
“MessageTimeStamp”: {
“default”: “2016-04-04T14:15:02.6476354+10:00”,
“description”: “An explanation about the purpose of this instance.”,
“id”: “/properties/ChangePasswordRequest/properties/MessageTimeStamp”,
“title”: “The messagetimestamp schema”,
“type”: “string”
},
“NewPassword”: {
“default”: “Pass126”,
“description”: “An explanation about the purpose of this instance.”,
“id”: “/properties/ChangePasswordRequest/properties/NewPassword”,
“title”: “The newpassword schema”,
“type”: “string”
},
“NotificationAddress”: {
“default”: “[email protected]”,
“description”: “An explanation about the purpose of this instance.”,
“id”: “/properties/ChangePasswordRequest/properties/NotificationAddress”,
“title”: “The notificationaddress schema”,
“type”: “string”
},
“NotificationPreference”: {
“default”: “Email”,
“description”: “An explanation about the purpose of this instance.”,
“id”: “/properties/ChangePasswordRequest/properties/NotificationPreference”,
“title”: “The notificationpreference schema”,
“type”: “string”
},
“OriginatingSystem”: {
“default”: “test”,
“description”: “An explanation about the purpose of this instance.”,
“id”: “/properties/ChangePasswordRequest/properties/OriginatingSystem”,
“title”: “The originatingsystem schema”,
“type”: “string”
}
},
“required”: [
“MessageIdentifier”,
“NotificationAddress”,
“CurrentPassword”,
“Identifier”,
“OriginatingSystem”,
“NotificationPreference”,
“NewPassword”,
“IdentifierScheme”,
“MessageTimeStamp”
],
“type”: “object”
}
},
“required”: [
“ChangePasswordRequest”
],
“type”: “object”
}
Added this schema in the Logic app request connector and Parse Json connector.

If we send a invalid message as per below:
{
“ChangePasswordRequest”: {
“MessageIdentifier”: “f7b351fb-ade4-4361-bfc3-9bb7df783880”,
“OriginatingSystem”: “test”,
“MessageTimeStamp”: “2016-04-04T14:15:02.6476354+10:00”,
“Identifie”: “125”, <Invalid field name; valid is Identifier>
“IdentifierScheme”: “test”,
“CurrentPassword”: “currenthashedpassword”,
“NewPassword”: “YGU0PCPEM”,
“NotificationPreference”: “Email”,
“NotificationAddress”: “[email protected]”
}
}
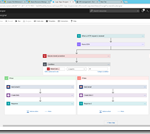
The above message fails in the parse Json with the message “Requred properties are missing from object…” as per the below screen:
Now this can be handled in Logic Apps using “Add a Parallel branch->Add an Action” as per below screen.

Click on eclipses on action “Execute stored procedure” and “Response 4” and click on configure run after to configure the appropriate action.

Yay!!! Well Done Krishna .
Regards
Shadab
by shadabanwer | Jul 24, 2017 | BizTalk Community Blogs via Syndication
In this post I will showing how to use Bamboo to create Azure Virtual machine from existing disk image and to do deployment of the projects/artefacts on the newly created virtual machine. The Idea was to create a Dev/Test environment in the cloud with all the application installed.
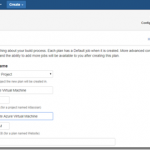
- Create New Plan in Bamboo.

2. Click on Configure Plan.
Add Task – Choose Script. Enter the PowerShell script as per the below. The script will ask for Azure Login details, enter your azure subscription login details. The below script will create a txt file VirtualMachine.txt with the value “BizTalkIpAddress=<IPAddress>” of the newly created Virtual machine

Login-AzureRmAccount
Get-AzureRmSubscription
Select-AzureRmSubscription -SubscriptionId “<your subscription id>”
Set-AzureSubscription -SubscriptionId “<your subscription id”
$resourceGroupName = “Dev-BizTalk-VM-ResourceGroup”
$sourceUri = “https://<storage Name>.blob.core.windows.net/vhds/bt2013R2Lab01btOSDisk.vhd” #Link to your existing disk image vhd file.
$location = “australiasoutheast”
$snapshotName = “bt2013R2Lab01btOSDisk_snapshot”
$StorageName = “btdevstorage”
$StorageType = “StandardLRS”
## Network
$InterfaceName = “btNetworkInterface0” + ${bamboo.buildNumber}
Write-Host “Inteface:”,${bamboo.buildNumber}
$Subnet1Name = “btSubnet01”
$VNetName = “btVNet01”
$VNetAddressPrefix = “10.0.0.0/16”
$VNetSubnetAddressPrefix = “10.0.0.0/24”
## Compute
$VMName = “bt2013R2Lab0” + ${bamboo.buildNumber}
$ComputerName = “bt2013R2Lab0” + ${bamboo.buildNumber}
$VMSize = “Standard_DS2_v2”
$OSDiskName = $VMName + “btOSDisk”
$disk = Get-AzureRmDisk -ResourceGroupName $resourceGroupName -DiskName $dataDiskName
$osDiskName = “bt2013R2Lab0” + ${bamboo.buildNumber} + “btOSDisk”
Write-Host “OSDiskName:”,$osDiskName
$osDisk = New-AzureRmDisk -DiskName $osDiskName -Disk `
(New-AzureRmDiskConfig -AccountType StandardLRS -Location $location -CreateOption Import `
-SourceUri $sourceUri) `
-ResourceGroupName $resourceGroupName
$storageacc = Get-AzureRmStorageAccount -ResourceGroupName $ResourceGroupName
# Network
$vnet = Get-AzureRMVirtualNetwork -Name $VNetName -ResourceGroupName $ResourceGroupName
$pip = New-AzureRmPublicIpAddress -Name $InterfaceName -ResourceGroupName $ResourceGroupName -Location $Location `
-AllocationMethod Dynamic
$nic = New-AzureRmNetworkInterface -Name $InterfaceName -ResourceGroupName $ResourceGroupName `
-Location $location -SubnetId $vnet.Subnets[0].Id -PublicIpAddressId $pip.Id -NetworkSecurityGroupId $nsg.Id
$user = “admin”
$password = ”
$securePassword = ConvertTo-SecureString $password -AsPlainText -Force
$Credential = New-Object System.Management.Automation.PSCredential ($user, $securePassword)
$vmConfig = New-AzureRmVMConfig -VMName $vmName -VMSize “Standard_A2”
$vm = Add-AzureRmVMNetworkInterface -VM $vmConfig -Id $nic.Id
# Create the VM in Azure
$vm = Set-AzureRmVMOSDisk -VM $vm -ManagedDiskId $osDisk.Id -StorageAccountType $StorageType `
-DiskSizeInGB 128 -CreateOption Attach -Windows
New-AzureRmVM -ResourceGroupName $ResourceGroupName -Location $location -VM $vm
Set-AzureRmVMAccessExtension -ResourceGroupName $resourceGroupName -VMName $VMName `
-Name $ComputerName -Location $location -UserName $Credential.GetNetworkCredential().Username `
-Password $Credential.GetNetworkCredential().Password -typeHandlerVersion “2.0”
$net=Get-AzureRmPublicIpAddress -ResourceGroupName $resourceGroupName -Name $InterfaceName
$ipAddress = $net.IpAddress
$Content = “BizTalkIpAddress=$ipAddress”
Write-Host $Content
write-output $Content | add-content ${bamboo.build.working.directory}PackagesVirtualMachine.txt
3. Create Deployment Steps.

- Inject Bamboo Variables. This is used to get the IP Address of the newly created virtual machine.

- Copy Package to the Azure VM. This is used to copy the downloaded packages to the newly created virtual machine.
$biztalkmachineIP = ${bamboo.Azure.BizTalkIpAddress}
Write-Host “BizTalkIpAddress:”,${bamboo.Azure.BizTalkIpAddress}
$user = “admin”
$password = ”
$securePassword = ConvertTo-SecureString $password -AsPlainText -Force
$Credential = New-Object System.Management.Automation.PSCredential ($user, $securePassword)
$InstallerFile = “C:SRCSTT.Common.IaaS.TestSTT.Common.IaaS.TestMSISTT.Common.IaaS.msi”
New-PSDrive -Name Y -PSProvider filesystem -Root “${bamboo.Azure.BizTalkIpAddress}C$” -Credential $Credential
Copy-Item $InstallerFile -destination Y: -recurse
Remove-PSDrive Y
#$session = New-PSSession -ComputerName ${bamboo.Azure.BizTalkIpAddress} -Credential $Credential -ConfigurationName Microsoft.Powershell32
#$LASTEXITCODE = Invoke-Command -Session $session -ScriptBlock {msiexec.exe /i “C:STT.Common.IaaS.msi” /passive /log “c:log.txt”}

- Install Application : This script will execute the installer package. This is just to prove that the packages are getting installed on the new machine.
Write-Host “BizTalkIpAddress:”,${bamboo.Azure.BizTalkIpAddress}
$user = “admin”
$password = ”
$securePassword = ConvertTo-SecureString $password -AsPlainText -Force
$Credential = New-Object System.Management.Automation.PSCredential ($user, $securePassword)
$session = New-PSSession -ComputerName ${bamboo.Azure.BizTalkIpAddress} -Credential $Credential -ConfigurationName Microsoft.Powershell32
$LASTEXITCODE = Invoke-Command -Session $session -ScriptBlock {msiexec.exe /i “C:STT.Common.IaaS.msi” /passive /log “c:log.txt”}
$exit_status = $LASTEXITCODE
exit $exit_status

The whole idea is to how create instant environment in the Cloud. Once the environment is created we can download/build the packages from any repository and deploy to the new machine. I’ve just used bamboo because to give visual touch and use as an continuous Integration and deployment.
Note: This is not the BizTalk environment, with BizTalk there is still few things to be done on the machine.
Thanks.
by shadabanwer | Jun 20, 2017 | BizTalk Community Blogs via Syndication
Hi,
I’m writing this post to demonstrate how we can create multiple remote agent on a single server to do the parallel deployment to the BizTalk/WCF servers. Bamboo comes with the concept of local agents and remote agents. Remote agents are installed on the individual servers for the artefact/solution deployment. Remote agent runs on a windows wrapper service, whenever there is a new server, the project team need to install Remote Agent and run the services. This is trouble with large organisation, and Remote agents are not free.
Follow the below steps to create multiple Remote Agent on one/two/three particular dedicate machine for Bamboo.
| Sr No. |
Task |
Description |
| 1. |
Download Remote Agent |
Download bamboo-agent-installer-5.14.1.jar from bamboo agent page
|
| 2. |
Copy jar file
|
Copy .jar file to a folder.
|
| 3. |
Create Remote Agent 1 – <ServerName>.<Env>.<Domain>.lan
|
Follow the below steps to install Remote Agent 1.
1 – Open CMD prompt, CD into the folder where .Jar file exists.
2- Run the below command.
java -Dbamboo.home=d:bamboo-1 -jar atlassian-bamboo-agent-installer-5.14.1.jar http://<AgentServer>/agentServer/
The process will stop and ask to approve the remote agent. Login to the Bamboo portal, navigate to Agents, click on Agent Authentication under Remote Agents. Approve the operations. Process will resume.
3- After the completion of the above, navigate to the folder D:bamboo-1Conf.
4- Open the file wrapper.conf
5- Edit the file with the below information:
wrapper.console.title=Bamboo Remote Agent 1
wrapper.ntservice.name=bamboo-remote-agent-1
wrapper.ntservice.displayname=Bamboo Remote Agent 1
6. Navigate to d:bamboo-1bin. Run the following .bat file in order as per below:
InstallBambooAgent-NT
StartBambooAgent-NT
7. A Service name “Bamboo Remote Agent 1” will get installed and started. Use bamboo user to login to the service.
|
| 4. |
Remote Agent 1 – <ServerName>.<Env>.<Domain>.lan
|
This remote agent will appear on the online remote agents tab under Remote Agents.
|
| 5. |
Create Remote Agent 2 – <ServerName>.<Env>.<Domain>.lan (2) |
Follow the below steps to install Remote Agent 1.
1 – Open CMD prompt, CD into the folder where .Jar file exists.
2- Run the below command.
java -Dbamboo.home=d:bamboo-2 -jar atlassian-bamboo-agent-installer-5.14.1.jar http://<AgentServer>/agentServer/
The process will stop and ask to approve the remote agent. Login to the Bamboo portal, navigate to Agents, click on Agent Authentication under Remote Agents. Approve the operations. Process will resume.
3- After the completion of the above, navigate to the folder D:bamboo-2Conf.
4- Open the file wrapper.conf
5- Edit the file with the below information:
wrapper.console.title=Bamboo Remote Agent 2
wrapper.ntservice.name=bamboo-remote-agent-2
wrapper.ntservice.displayname=Bamboo Remote Agent 2
6. Navigate to d:bamboo-2bin. Run the following .bat file in order as per below:
InstallBambooAgent-NT
StartBambooAgent-NT
7. A Service name “Bamboo Remote Agent 2” will get installed and started. Use bamboo user to login to the service.
|
| 6. |
Create Remote Agent 3 – <ServerName>.<Env>.<Domain>.lan (3)
|
Follow the below steps to install Remote Agent 1.
1 – Open CMD prompt, CD into the folder where .Jar file exists.
2- Run the below command.
java -Dbamboo.home=d:bamboo-3 -jar atlassian-bamboo-agent-installer-5.14.1.jar http://<AgentServer>/agentServer/
The process will stop and ask to approve the remote agent. Login to the Bamboo portal, navigate to Agents, click on Agent Authentication under Remote Agents. Approve the operations. Process will resume.
3- After the completion of the above, navigate to the folder D:bamboo-3Conf.
4- Open the file wrapper.conf
5- Edit the file with the below information:
wrapper.console.title=Bamboo Remote Agent 3
wrapper.ntservice.name=bamboo-remote-agent-3
wrapper.ntservice.displayname=Bamboo Remote Agent 3
6. Navigate to d:bamboo-2bin. Run the following .bat file in order as per below:
InstallBambooAgent-NT
StartBambooAgent-NT
7. A Service name “Bamboo Remote Agent 3” will get installed and started. Use bamboo user to login to the service.
|
| 7. |
Three Remote Agents available.
|
 |
Once the remote agent is created you need to create PowerShell script using New-PSSession and Remote connection, something like :
$LocalDir= "${bamboo.biztalk.server}C$Users${bamboo.remote_username}Documents"
$session = New-PSSession  -ComputerName $biztalk_server  -ConfigurationName Microsoft.PowerShell32
$LastExitCode = Invoke-Command -Session $session -File "${LocalDir}US_Controller_BizTalk_Database.ps1"  -ArgumentList "undeploy","$list","$biztalk_sql_instance","$log_dir"
Some people might disagree with this approach, but if we can create multiple local agents on the same server then why not remote agents?
Many Thanks.
Regards,
Shadab
by shadabanwer | Oct 10, 2016 | BizTalk Community Blogs via Syndication
Hi All,
I just came across an issue/bug with the pipeline unit test in BizTalk 2013/r2. In my case, I’ve multiple document specification present in the XML disassembler stage. When we write Unit test for this custom pipeline it fails with the error “System.InvalidOperationException: None of the disassembler components could recognize a data”. The error basically means that I do not have a Schema Document Specification added to the XML Disassembler for the message, but that’s not correct. I’ve the doc spec available along with the other schema doc specs in the collection.
I’ve written unit test using Spec Flow and Winterdom BizTalk Pipeline Testing tool. The Unit test is mentioned below:
Feature: Pipelines
Scenario Outline: Test Inbound Request Pipeline
Given the pipeline has been configured with the “<TypeName>” and “<SubscriberName>”
When the inbound request pipeline is executed with the “<InputMessage>”
Then the following Context Properties should be promoted “<MessageType>”, “<SubscriberName>”
Examples:
| InputMessage | TypeName | MessageType | SubscriberName |
| ManageAlertResponse.xml | SQLProviderResponse | http://schemas.microsoft.com/Sql/2008/05/TypedProcedures/dbo#ManageAlertsResponse | |
using System;
using System.IO;
using System.Linq;
using Microsoft.BizTalk.Message.Interop;
using Microsoft.VisualStudio.TestTools.UnitTesting;
using TechTalk.SpecFlow;
using Common.Patterns.PipelineComponent;
using Common.Utilities.BAM.Message.V1;
using Common.Utilities.Helper.Component;
using DB.Common.Pipelines;
using DB.Common.Schemas;
using Winterdom.BizTalk.PipelineTesting;
namespace DB.Common.Test.Bindings.Pipelines
{
[Binding]
public sealed class InboundRequestPipeline : BasePipelineBinding
{
[Given(@”the pipeline has been configured with the “”(.*)”” and “”(.*)”””)]
public void GivenThePipelineHasBeenConfiguredWithTheAnd(string typeName, string subscriberName)
{
ReceivePipelineWrapper pipeline = PipelineFactory.CreateReceivePipeline(typeof(RcvDBResponseMsg));
pipeline.AddDocSpec(typeof(TypedProcedure_dbo));
ScenarioContext.Current.Add(“Pipeline”, pipeline);
}
[When(@”the inbound request pipeline is executed with the “”(.*)”””)]
public void WhenTheInboundRequestPipelineIsExecutedWithThe(string inputMessageName)
{
var pipeline = (ReceivePipelineWrapper)ScenarioContext.Current[“Pipeline”];
string inputMessagePath = String.Format(“{0}.{1}”, MESSAGE_RESOURCE_PATH, “Input”);
using (Stream inputMessageStream = GetResourceStream(inputMessagePath, inputMessageName))
{
IBaseMessage inputMessage = MessageHelper.CreateFromStream(inputMessageStream);
inputMessage.Context.Promote(“InterchangeID”, “http://schemas.microsoft.com/BizTalk/2003/system-properties”, Guid.NewGuid().ToString());
inputMessage.Context.Promote(“CorrelationToken”, “http://schemas.microsoft.com/BizTalk/2003/system-properties”, Guid.NewGuid().ToString());
MessageCollection outputMessageCollection = pipeline.Execute(inputMessage);
IBaseMessage outputMessage = outputMessageCollection.FirstOrDefault();
ScenarioContext.Current.Add(“OutputMessage”, outputMessage);
}
}
[Then(@”the following Context Properties should be promoted “”(.*)””, “”(.*)”””)]
public void ThenTheFollowingContextPropertiesShouldBePromoted(string targetMessageType, string targetSubscriberName)
{
var outputMessage = (IBaseMessage)ScenarioContext.Current[“OutputMessage”];
string messageType = outputMessage.Context.Read(“MessageType”, “http://schemas.microsoft.com/BizTalk/2003/system-properties”).ToString();
Assert.AreEqual(targetMessageType, messageType);
}
#region PrivateHelper
#endregion
}
}
The test fail on the highlighted step above with the below exception :
Test Name: TestInboundRequestPipeline_ManageAlertResponse_Xml
Test FullName: DB.Common.Test.Features.PipelinesFeature.TestInboundRequestPipeline_ManageAlertResponse_Xml
Test Source: : line 2147483647
Test Outcome: Failed
Test Duration: 0:00:00.1399699
Result Message:
Test method DB.Common.Test.Features.PipelinesFeature.TestInboundRequestPipeline_ManageAlertResponse_Xml threw exception:
System.InvalidOperationException: None of the disassembler components could recognize a data
Result StackTrace:
at Microsoft.Test.BizTalk.PipelineObjects.Stage.Execute(IPipelineContext pipelineContext, IBaseMessage inputMessage)
at Microsoft.Test.BizTalk.PipelineObjects.GenericPipeline.ExecuteSubPipeline(IPipelineContext pipelineContext, IBaseMessage inputMessage, Int32 startStageIndex, Int32 endStageIndex)
at Microsoft.Test.BizTalk.PipelineObjects.ReceivePipeline.Execute(IPipelineContext pipelineContext)
at Winterdom.BizTalk.PipelineTesting.ReceivePipelineWrapper.Execute(IBaseMessage inputMessage)
at .DB.Common.Test.Bindings.Pipelines.InboundRequestPipeline.WhenTheInboundRequestPipelineIsExecutedWithThe(String inputMessageName) in c:ShadabWSDevelopmentIntegrationDBCommon2.0DB.Common.TestBindingsPipelinesInboundRequestPipeline.cs:line 46
at lambda_method(Closure , IContextManager , String )
at TechTalk.SpecFlow.Bindings.BindingInvoker.InvokeBinding(IBinding binding, IContextManager contextManager, Object[] arguments, ITestTracer testTracer, TimeSpan& duration)
at TechTalk.SpecFlow.Infrastructure.TestExecutionEngine.ExecuteStepMatch(BindingMatch match, Object[] arguments)
at TechTalk.SpecFlow.Infrastructure.TestExecutionEngine.ExecuteStep(StepInstance stepInstance)
at TechTalk.SpecFlow.Infrastructure.TestExecutionEngine.OnAfterLastStep()
at TechTalk.SpecFlow.TestRunner.CollectScenarioErrors()
at .DB.Common.Test.Features.PipelinesFeature.ScenarioCleanup() in c:ShadabWSDevelopmentIntegrationDBCommon2.0DB.Common.TestFeaturesPipelines.feature.cs:line 0
at .DB.Common.Test.Features.PipelinesFeature.TestInboundRequestPipeline(String inputMessage, String typeName, String messageType, String subscriberName, String[] exampleTags) in c:ShadabWSDevelopmentIntegrationDBCommon2.0.DB.Common.TestFeaturesPipelines.feature:line 7
at .DB.Common.Test.Features.PipelinesFeature.TestInboundRequestPipeline_ManageAlertResponse_Xml() in c:ShadabWSDevelopmentIntegrationDBCommon2.0..Common.TestFeaturesPipelines.feature.cs:line 0
After doing some investigation, We found that if there is other Schemas Doc Specification present first in the order to the doc spec which is passed from the unit test, the unit test component did not recognize the schema spec and fails the unit test.
For example: I’ve passed schema type “TypedProcedure_dbo“ from my unit test to the pipeline which is second in the list.
The unit test fails, because the first Schema type in the list is “EmployerSecurity”.
As soon as I move the “TypedProcedure_Dbo” up in the order, compile, Gac and run the unit test, all looks good and success.
It looks like the Pipeline Unit test only validate schema with the first spec, my question is why does the order matter in the Unit test while it does not matter at the run time? Just wondering if anyone have already experience similar issue and have a better solution?
Regards,
Shadab
by shadabanwer | May 1, 2016 | BizTalk Community Blogs via Syndication
Hi All,
I just came across connectivity issue with the Azure Service Bus topics with SB-Messaging Adapter in BizTalk. The detail about the error is below. It took us sometime to figure out or resolve this connectivity issue. That is why wanted to document it so that we know the resolution.
“A message sent to adapter “SB-Messaging” on send port “Send__MEL_Topic” with URI “sb://m-dev-integration-.servicebus.windows.net/test” is suspended. Error details: System.ServiceModel.CommunicationException: Unable to connect to Service Bus using HTTP connectivity mode. —> System.ServiceModel.CommunicationException: Unable to connect upstream. “
In this post I’ll demonstrate how to create Topics in Azure Service Bus and using SB-Messaging adapter to connect.
1- Create Service Bus Topic in Azure.
a- Go to Service Bus Menu
b- Create Namespace .
c- Navigate to Newly created Namespace, in my case “m-dev-integration-”.
d- Click New – Click “Topic” – Click Custom Create.
e- Add name to the new topic.
f- Click Next and Next.
g- Click on Newly created topic “Test”
h- Create Subscription.
i- Configure Topic “Test”. Click on configure, you need to add shared access policies.
Test- will be used to Send messaged to the Topic, and BizTalk is used to listen/receive messages from the Topic.
j- You need connection string and SAS information for BizTalk connectivity. Please copy the Access connection string for both Test and BizTalk.
2- Go to BizTalk Admin Console.
a- Create One-way send port to send out messages to Service Bus Topic “Test”.
b- Go to authenticate tab. Enter shared access key name – “Test” and access key from the connection string on the Topics configure page.
c- Create properties, add label to identify messages in the Service Bus/ BizTalk.
d- Send any Json message to the send port.
If you get the below error the follow the steps mention below:
“A message sent to adapter “SB-Messaging” on send port “Send_MEL_Topic” with URI “sb://m-dev-integration.servicebus.windows.net/test” is suspended. Error details: System.ServiceModel.CommunicationException: Unable to connect to Service Bus using HTTP connectivity mode. —> System.ServiceModel.CommunicationException: Unable to connect upstream. – “
Resolution to the above error is very simple. This might be issue with your Proxy settings if you are within the firewall. Check your internet explorer Lan Settings, you should be using proper proxy address and port number (please make sure you use correct port number).
or you can edit your BTS config file to include proxy setting, this setting will be used for all the users accessing the machine, otherwise in DEV vm each user need to edit the internet explorer settings.

by shadabanwer | Mar 3, 2016 | BizTalk Community Blogs via Syndication
An issue reported by our BizTalk Application Support team about the orchestrations in Active state but does nothing and hang around for ages. These orchestrations was generated by the de-batching of XML node to insert individual records into the SQL Database using WCF-SQL Adapter. Initially there were 2000 odd nodes in the XML which spun 2000 orchestrations. Around 1500 got processed and inserted into the SQL Server correctly but 500 looks like they become passive instead of active status in the group hub. Luckily we can replicate this issue in out Pre-Prod environment. When we debug the orchestration found that each orchestration is waiting to receive Ack response from WCF-SQL, and these 500 wasn’t inserted into the tables.
We thought may be this issue is due to the worker/thread combination ran out, but we were wrong. I decided to change the Send port host handler to use 32-bit host instance instead of 64-bit. Luckily that did the trick and all the orchestration went to completion state.
I’m still not sure why 64-bit host instance behave abnormally? If anyone have a best solution for this issue please feel free to write back.
Note: The design of de-batching XML and spinning 1000 orchestrations to only insert records into Database is useless, we should not design such process, it will impact the performance of the BizTalk Server, instead we should use Single orchestration with Composite Operation on WCF-SQL Send port, which is mentioned in my below post.
https://shadabanwer.wordpress.com/2013/03/26/bulk-insert-using-compositeoperation-in-wcf-sql-biztalk-adapter/
Thanks


