by Eldert Grootenboer | Mar 8, 2016 | BizTalk Community Blogs via Syndication
A while ago I created a post on using the BizTalk Deployment Framework for automated build and deployment. Since then I have worked this out to be more easy and maintainable using PowerShell, which I will show in this post. BizTalk Deployment Framework is one of those pearls for BizTalk developers, allowing complex BizTalk solutions to be deployed easily, having all our artifacts and dependencies together in one MSI. The code with this post can be downloaded from here.
Using PowerShell we will make scripts which will handle all steps of the build and deployment process for us. This will make sure our applications are always deployed in the correct order, using the right versions, and with minimal effort. We have some general helper functions, which will help us clear log files, wait for user input, iterate through directories, etc. We assume you have are using some of the BTDF best practices for these scripts, where it comes to naming conventions and folder structure. Of course, in case anything differs in your environment, you can easily adjust the scripts to meet your requirements.
We will first create the PowerShell scripts which will help us build our applications. To be able to share these scripts along your different developers, where there might be some differences in the environments in how directories are set up, we will make use of a small csv file to hold our build environment settings.
Name;Value
projectsBaseDirectory;F:tfs
installersOutputDirectory;F:Deployment
visualStudioDirectory;F:Program Files (x86)Microsoft Visual Studio 11.0
|
We will load these settings in our script and assign them to specific parameters.
$settings = Import-Csv Settings_BuildEnvironment.csv
foreach($setting in $settings)
{
    # The directory where the BizTalk projects are stored
    if($setting.'Name;Value'.Split(";")[0].Trim() -eq "projectsBaseDirectory") { $projectsBaseDirectory = $setting.'Name;Value'.Split(";")[1].Trim() }

    # The directory where the MSI's should be saved to
    if($setting.'Name;Value'.Split(";")[0].Trim() -eq "installersOutputDirectory") { $installersOutputDirectory = $setting.'Name;Value'.Split(";")[1].Trim() }

    # Directory where Visual Studio resides
    if($setting.'Name;Value'.Split(";")[0].Trim() -eq "visualStudioDirectory") { $visualStudioDirectory = $setting.'Name;Value'.Split(";")[1].Trim() }
}
|
Now that we have our environment specific parameters set, we can create a function which will build our BizTalk application. We will assume you have several projects, which are in folders under a common directory ($projectsBaseDirectory), which is probably your source control root directory. Your application’s directories should be under these project’s directories. We will building the application by calling Visual Studio, and using the log to check if the build was successful.
function BuildBizTalkApplication([string]$application, [string]$project)
{
    # Set directory where the BizTalk projects for the current project are stored
    $projectsDirectory = "$projectsBaseDirectory$project"

    # Clear log files and old installers
    ClearLogFiles $application

    # Build application
    Write-Host "Building $application" -ForegroundColor Cyan
    $exitCode = (Start-Process -FilePath "$visualStudioDirectoryCommon7IDEdevenv.exe" -ArgumentList """$projectsDirectory$application$application.sln"" /Build Release /Out $application.log" -PassThru -Wait).ExitCode

    # Check result
    if($exitCode -eq 0 -and (Select-String -Path "$application.log" -Pattern "0 failed" -Quiet) -eq "true")
    {
        Write-Host "$application built succesfully" -ForegroundColor Green
    }
    else
    {
        Write-Host "$application not built succesfully" -ForegroundColor Red
        WaitForKeyPress
    }
}
|
Once the applications are built, we will also need to create MSI’s for them, which is where the BTDF comes in. This can be done by calling MSBuild, and passing in the .btdfproj file. Finally we copy the MSI to a folder, so all our MSI’s are together in one location and from there can be copied to the BizTalk server.
function BuildBizTalkMsi([string]$application, [string]$project)
{
    # Set directory where the BizTalk projects for the current project are stored
    $projectsDirectory = "$projectsBaseDirectory$project"

    # Build installer
    $exitCode = (Start-Process -FilePath """$env:windirMicrosoft.NETFrameworkv4.0.30319MSBuild.exe""" -ArgumentList "/t:Installer /p:Configuration=Release ""$projectsDirectory$applicationDeploymentDeployment.btdfproj"" /l:FileLogger,Microsoft.Build.Engine;logfile=$application.msi.log" -PassThru -Wait).ExitCode

    # Check result
    if($exitCode -eq 0)
    {
        Write-Host "MSI for $application built succesfully" -ForegroundColor Green
    }
    else
    {
        Write-Host "MSI for $application not built succesfully" -ForegroundColor Red
        WaitForKeyPress
    }

    # Copy installer
    copy "$projectsDirectory$applicationDeploymentbinRelease*.msi" "$installersOutputDirectory"
}
|
Once the MSI’s have been created we can copy them to our BizTalk server, and start the deployment process. This process consists of 4 steps, starting with undeploying the old applications, uninstalling the old MSI’s, installing the new MSI’s and deploying the new applications. If your applications have dependencies on other applications, it’s also important to undeploy and deploy them in the correct order. We will want to use one set of scripts for all our OTAP environments, so we will be using another csv file here to keep track of the environment specific settings, like directories and config files to use.
Undeploy
We will start by loading the environment specific parameters.
$settings = Import-Csv Settings_DeploymentEnvironment.csv
foreach($setting in $settings)
{
    # Program Files directory where application should be installed
    if($setting.'Name;Value'.Split(";")[0].Trim() -eq "programFilesDirectory") { $programFilesDirectory = $setting.'Name;Value'.Split(";")[1].Trim() }

    # Suffix as set in in the ProductName section of the BTDF project file. By default this is " for BizTalk".
    if($setting.'Name;Value'.Split(";")[0].Trim() -eq "productNameSuffix") { $productNameSuffix = $setting.'Name;Value'.Split(";")[1].TrimEnd() }

    # Indicator if we should deploy to the BizTalkMgmtDB database from this server. In multi-server environments this should be true on 1 server, and false on the others
    if($setting.'Name;Value'.Split(";")[0].Trim() -eq "deployBizTalkMgmtDB") { $deployBizTalkMgmtDB = $setting.'Name;Value'.Split(";")[1].Trim() }
}
|
Now we can write our function for undeploying. We will also be using MSBuild in conjuntion with BTDF here, by passing in the .btdfproj file location with the Undeploy switch. To do so, we will call the following function for each application to be undeployed. Remember to do the undeployment in the correct order.
function UndeployBizTalkApplication([string]$application, [string]$version)
{
    # Execute undeployment
    $exitCode = (Start-Process -FilePath "$env:windirMicrosoft.NETFrameworkv4.0.30319MSBuild.exe" -ArgumentList """$programFilesDirectory$application$productNameSuffix$versionDeploymentDeployment.btdfproj"" /t:Undeploy /p:DeployBizTalkMgmtDB=$deployBizTalkMgmtDB /p:Configuration=Server" -Wait -Passthru).ExitCode

    if($exitCode -eq 0)
    {
        Write-Host "$application undeployed successfully" -ForegroundColor Green
    }
    else
    {
        Write-Host "$application not undeployed successfully" -ForegroundColor Red
    }
}
|
Uninstall
Once all the applications for our project have been undeployed, we will uninstall the old MSI’s. To do this, we will iterate through the MSI’s in the specified directory, where we will pass in the directory with the last used installers.
function UninstallBizTalkApplications($msiDirectory)
{
    # Get MSI's to be installed
    $files = GetMsiFiles $msiDirectory

    # Loop through MSI files
    foreach($file in $files)
    {
        UninstallBizTalkApplication $file
    }
}
|
This will call the uninstall command. We will assume our MSI’s are named according to BTDF defaults, which is applicationname-version, so for example MyApplication-1.0.0.msi.
function UninstallBizTalkApplication([System.IO.FileInfo]$fileInfo)
{
    # Get application name
    $applicationName = $fileInfo.BaseName.Split("-")[0]

    # Set installer path
    $msiPath = $fileInfo.FullName

    # Uninstall application
    $exitCode = (Start-Process -FilePath "msiexec.exe" -ArgumentList "/x ""$msiPath"" /qn" -Wait -Passthru).ExitCode

    # Check if uninstalling was successful
    if($exitCode -eq 0)
    {
        Write-Host "$applicationName uninstalled successfully" -ForegroundColor Green
    }
    else
    {
        Write-Host "$applicationName not uninstalled successfully" -ForegroundColor Red
    }
}
|
Install
The next step will be to install all the new MSI’s we have just built. Here we will once again iterate through the specified directory, where we will now pass in the directory with the new installers.
function InstallBizTalkApplications([string]$msiDirectory)
{
    # Clear log files
    ClearLogFiles $msiDirectory

    # Get MSI's to be installed
    $files = GetMsiFiles $msiDirectory

    # Loop through MSI files
    foreach($file in $files)
    {
        # Install application
        InstallBizTalkApplication $file
    }
}
|
We will also have to load the environment specific parameters here.
$settings = Import-Csv Settings_DeploymentEnvironment.csv
foreach($setting in $settings)
{
    # Program Files directory where application should be installed
    if($setting.'Name;Value'.Split(";")[0].Trim() -eq "programFilesDirectory") { $programFilesDirectory = $setting.'Name;Value'.Split(";")[1].Trim() }

    # Suffix as set in in the ProductName section of the BTDF project file. By default this is " for BizTalk".
    if($setting.'Name;Value'.Split(";")[0].Trim() -eq "productNameSuffix") { $productNameSuffix = $setting.'Name;Value'.Split(";")[1].TrimEnd() }
}
|
And now we can install the MSI. As mentioned before, we will assume our MSI’s are named according to BTDF defaults (applicationname-version.msi).
function InstallBizTalkApplication([System.IO.FileInfo]$fileInfo)
{
    # Get application name and version
    # We assume msi file name is in the format ApplicationName-Version
    $application = $fileInfo.BaseName.Split("-")[0]
    $version = $fileInfo.BaseName.Split("-")[1]

    # Directory where MSI resides
    $msiDirectory = $fileInfo.Directory

    # Set log name
    $logFileName = "$msiDirectory$application.log"

    # Set installer path
    $msiPath = $fileInfo.FullName

    # Install application
    Start-Process -FilePath "msiexec.exe" -ArgumentList "/i ""$msiPath"" /passive /log ""$logFileName"" INSTALLDIR=""$programFilesDirectory$application$productNameSuffix$version""" -Wait -Passthru | Out-Null

    # Check if installation was successful
    if((Select-String -Path $logFileName -Pattern "success or error status: 0" -Quiet) -eq "true")
    {
        Write-Host "$application installed successfully" -ForegroundColor Green
    }
    else
    {
        Write-Host "$application not installed successfully" -ForegroundColor Red
    }
}
|
Deploy
The last step is to deploy the applications we just installed. First we again have to load the environment specific parameters.
$settings = Import-Csv Settings_DeploymentEnvironment.csv
foreach($setting in $settings)
{
    # Program Files directory where application should be installed
    if($setting.'Name;Value'.Split(";")[0].Trim() -eq "programFilesDirectory") { $programFilesDirectory = $setting.'Name;Value'.Split(";")[1].Trim() }

    # Suffix as set in in the ProductName section of the BTDF project file. By default this is " for BizTalk".
    if($setting.'Name;Value'.Split(";")[0].Trim() -eq "productNameSuffix") { $productNameSuffix = $setting.'Name;Value'.Split(";")[1].TrimEnd() }

    # Indicator if we should deploy to the BizTalkMgmtDB database from this server. In multi-server environments this should be true on 1 server, and false on the others
    if($setting.'Name;Value'.Split(";")[0].Trim() -eq "deployBizTalkMgmtDB") { $deployBizTalkMgmtDB = $setting.'Name;Value'.Split(";")[1].Trim() }

    # Name of the BTDF environment settings file for this environment.
    if($setting.'Name;Value'.Split(";")[0].Trim() -eq "environmentSettingsFileName") { $environmentSettingsFileName = $setting.'Name;Value'.Split(";")[1].Trim() }
}
|
Deploying is also done by using MSBuild with BTDF, by specifying the Deploy flag. For this we will be calling the following function for each application to be deployed, which of course should be done in the correct order.
function DeployBizTalkApplication([string]$application, [string]$version)
{
    # Set log file
    $logFileName = "$programFilesDirectory$application$productNameSuffix$versionDeployResultsDeployResults.txt"

    # Execute deployment
    $exitCode = (Start-Process -FilePath "$env:windirMicrosoft.NETFrameworkv4.0.30319MSBuild.exe" -ArgumentList "/p:DeployBizTalkMgmtDB=$deployBizTalkMgmtDB;Configuration=Server;SkipUndeploy=true /target:Deploy /l:FileLogger,Microsoft.Build.Engine;logfile=""$programFilesDirectory$application$productNameSuffix$versionDeployResultsDeployResults.txt"" ""$programFilesDirectory$application$productNameSuffix$versionDeploymentDeployment.btdfproj"" /p:ENV_SETTINGS=""$programFilesDirectory$application$productNameSuffix$versionDeploymentEnvironmentSettings$environmentSettingsFileName.xml""" -Wait -Passthru).ExitCode

    # Check if deployment was successful
    if($exitCode -eq 0 -and (Select-String -Path $logFileName -Pattern "0 Error(s)" -Quiet) -eq "true")
    {
        Write-Host "$application deployed successfully" -ForegroundColor Green
    }
    else
    {
        Write-Host "$application not deployed successfully" -ForegroundColor Red
    }
}
|
From the same location where we call this function, we will also do some additional checks. Sometimes you will want to import some registry files or execute a SQL script, which you might not want to include in your BTDF MSI for any reason. Also, once everything has been deployed, you might want to restart your host instances and IIS, which can also be handled here.
function DeployBizTalkApplications([string[]]$applicationsInOrderOfDeployment, [string[]]$versions, [string]$scriptsDirectory)
{
    # Check which restarts should be done
    $resetIIS = CheckIfIISShouldBeReset
    $restartHostInstances = CheckIfHostinstancesShouldBeRestarted

    # Loop through applications to be deployed
    for($index = 0; $index -lt $applicationsInOrderOfDeployment.Length; $index++)
    {
        # Deploy application
        DeployBizTalkApplication $applicationsInOrderOfDeployment[$index] $versions[$index]
    }

    # Get SQL files to be executed
    $sqlFiles = GetSQLFiles $scriptsDirectory

    # Loop through SQL files
    foreach($sqlFile in $sqlFiles)
    {
        # Execute SQL file
        ExecuteSqlFile $sqlFile
    }

    # Get registry files to be imported
    $registryFiles = GetRegistryFiles $scriptsDirectory

    # Loop through registry files
    foreach($registryFile in $registryFiles)
    {
        # Import registry file
        ImportRegistryFile $registryFile
    }

    # Do restarts
    if($resetIIS)
    {
        DoIISReset
    }
    if($restartHostInstances)
    {
        DoHostInstancesRestart
    }
}
|
Finally, we have to stitch it all together. When you have downloaded the complete set of functions from this article, you can specify your build scripts as following, where you will only have to change the project name and applications to be built.
# Project specific settings
$projectName = "OrderSystem"
$applications = @("Contoso.OrderSystem.Orders", "Contoso.OrderSystem.Invoices", "Contoso.OrderSystem.Payments")

# Import custom functions
. .Functions_Build.ps1

# Build the applications
BuildAndCreateBizTalkInstallers $applications $projectName

# Wait for user to exit
WaitForKeyPress
|
As for deployment, all those steps can also be called from one single script as following. Once again, the only thing to change is the project specific settings.
# Project specific settings
$oldInstallersDirectory = "F:tmpR9"
$newInstallersDirectory = "F:tmpR10"
$newApplications = @("Contoso.OrderSystem.Orders", "Contoso.OrderSystem.Invoices", "Contoso.OrderSystem.Payments")
$oldApplications = @("Contoso.OrderSystem.Payments", "Contoso.OrderSystem.Invoices", "Contoso.OrderSystem.Orders")
$oldVersions = @("1.0.0", "1.0.0", "1.0.0")
$newVersions = @("1.0.0", "1.0.1", "1.0.0")

# Import custom functions
. .Functions_Deploy.ps1
. .Functions_Undeploy.ps1
. .Functions_Install.ps1
. .Functions_Uninstall.ps1

# Undeploy the applications
UndeployBizTalkApplications $oldApplications $oldVersions

# Wait for user to continue
WaitForKeyPress

# Uninstall the applications
UninstallBizTalkApplications $oldInstallersDirectory

# Wait for user to continue
WaitForKeyPress

# Install the applications
InstallBizTalkApplications $newInstallersDirectory

# Wait for user to continue
WaitForKeyPress

# Deploy the applications
DeployBizTalkApplications $newApplications $newVersions $newInstallersDirectory

# Wait for user to exit
WaitForKeyPress
|
As you can see, using these PowerShell scripts you can setup scripts for your build and deployment processes very quickly. And by automating all these steps, we will have to spend much less time on builds and deployments, as we will only have to start our scripts, and the rest just goes automatically.
Code

by community-syndication | Mar 8, 2016 | BizTalk Community Blogs via Syndication
What does this setting do? In this post I describe why I found this setting useful and ask what are the disadvantages are of turning this setting to on. I have a BizTalk Server 2013 R2 that uses eight WCF-WebHTTP request response adapters with service bus relays that are hosted in the same isolated […]
Blog Post by: mbrimble

by community-syndication | Mar 7, 2016 | BizTalk Community Blogs via Syndication
Today while doing a BAM POC to one of my clients, I found a number of problems/errors, some of them unexpected and uncommon, while trying to deploy my BAM definition file. In order to contextualize the problem, for this POC we are using only one BizTalk Server machine with BAM Portal, one dedicated SQL Server […]
Blog Post by: Sandro Pereira

by Dan Toomey | Mar 7, 2016 | BizTalk Community Blogs via Syndication
Today I encountered an unusual error when executing a pipeline component that utilises the EventStream API to write to BAM. The failure that showed up in the event log looked something like this:
A message received by adapter “WCF-SQL” on receive location “MyReceivePort” with URI “mssql://MyDatabaseInstance/MyDatabase?InboundId=Employee” is suspended.
Error details: There was a failure executing the receive pipeline: “MyReceivePipeline, MyAssembly, Version=1.0.0.0, Culture=neutral, PublicKeyToken=1a2b345c67d89e0f” Source: “Log Message To BAM Receive” Receive Port: “MyReceivePort” URI: “mssql://MyDatabaseInstance/MyDatabase?InboundId=Employee” Reason: Flush failed to run.
A quick Google search pulled up this helpful post by Yossi Dahan, which pointed me in the right direction. I knew that the connection string was all right, and I was using the BufferedEventStream rather than the DirectEventStream that Yossi referred to. (Incidentally, when using the BufferedEventStream your connection string actually points to the BizTalkMsgBoxDb database rather than the BAMPrimaryImport database.)
However, the clue was really in the second part of Yossi’s suggestion (and also in an anonymous comment), “…and related permissions…”. I could see that the BizTalk Application Users domain group had been assigned all of the appropriate roles in SQL Server, and I knew that all the host accounts had been dutifully added to this group when BizTalk was installed.
Er… hang on a moment. I double checked and found that the SQL Adapter was running under a new dedicated host account that had been created specifically for the data warehouse. A simple check on the account using the “net user /domain” command prompt unveiled the culprit. This account had not be granted membership in the BizTalk Application Users domain group.
Once that was accomplished, everything worked smoothly.
It would be nice to actually see an error that hinted towards permission issues. Perhaps the detail was buried somewhere in an inner exception, but the logging does not go past the first level.

by shadabanwer | Mar 3, 2016 | BizTalk Community Blogs via Syndication
An issue reported by our BizTalk Application Support team about the orchestrations in Active state but does nothing and hang around for ages. These orchestrations was generated by the de-batching of XML node to insert individual records into the SQL Database using WCF-SQL Adapter. Initially there were 2000 odd nodes in the XML which spun 2000 orchestrations. Around 1500 got processed and inserted into the SQL Server correctly but 500 looks like they become passive instead of active status in the group hub. Luckily we can replicate this issue in out Pre-Prod environment. When we debug the orchestration found that each orchestration is waiting to receive Ack response from WCF-SQL, and these 500 wasn’t inserted into the tables.
We thought may be this issue is due to the worker/thread combination ran out, but we were wrong. I decided to change the Send port host handler to use 32-bit host instance instead of 64-bit. Luckily that did the trick and all the orchestration went to completion state.
I’m still not sure why 64-bit host instance behave abnormally? If anyone have a best solution for this issue please feel free to write back.
Note: The design of de-batching XML and spinning 1000 orchestrations to only insert records into Database is useless, we should not design such process, it will impact the performance of the BizTalk Server, instead we should use Single orchestration with Composite Operation on WCF-SQL Send port, which is mentioned in my below post.
https://shadabanwer.wordpress.com/2013/03/26/bulk-insert-using-compositeoperation-in-wcf-sql-biztalk-adapter/
Thanks

by [email protected] Steef-Jan Wiggers | Mar 3, 2016 | BizTalk Community Blogs via Syndication
A new BizTalk Server eBook is available for the 2013 R2 version with the focus on extensibility.
Together with Johann Cooper and Eldert Grootenboer I have written on various aspects of extensibility with BizTalk Server. The .NET framework adds tremendous value in extending BizTalk Server solutions to create more versatile, robust solutions. We discuss the extensibility for BizTalk Server from a holistic view around the following topics:
– Ports
– Orchestrations
– BRE
– BAM
– Deployment
– Operations
– Tooling
The eBook is available through the BizTalk360 website.
The journey started after my first webcast BizTalk Extensibility for the Integration Monday a year ago in February 2015. At first I did not have any plans to pursue anything after that talk. However, a few months later I got in touch with Johann Cooper, who I interviewed for my blog and met in person in 2014 during my visit to Australia.
We discussed opportunities of writing a book for a well-known publisher. Unfortunately a deal never materialized and we started to think about other options. Our initial thought was to create a white paper on BizTalk Server Extensibility as this didn’t have the attention we though it should have. We felt the .NET framework empowers BizTalk Server in a very valuable way, if applied with thought.
Johann and I started writing the paper at the end of September 2015. And soon it turned out that we had many topics around extensibility and predicted that the amount of material would validate making an eBook out of it rather than a paper.
Our prediction was right. After a few months we had close to 100 pages, yet some topics still required attention. Therefore, we involved Eldert as an extra co-author to end of the book in time with his expertise on some of the topics like BAM and the BTDF. His help and our motivation helped us to finish what we started in September.
We were not alone in this, as Sandro Pereira, Mark Brimble and James Corbould put in numerous hours to review our eBook. These guys are superb reviewers and helped us a great deal to evolve the eBook to a very valuable resource for you as readers to benefit from. Therefore, Sandro, Mark and James, thank you so much for your efforts and support!
I also like to extend my gratitude to BizTalk360 and Saravana Kumar, who has publish the eBook through his site. Saravana is a great support towards the BizTalk community, thank you my dear friend.
Working on this eBook demanded a lot of time for us and it was worth every second of it. I enjoyed working on it and collaborating with both co-authors and like to thank both Johann and Eldert for realizing this eBook. A year ago I never thought this end result was in the making.
Enjoy reading it,
Steef-Jan
by community-syndication | Mar 3, 2016 | BizTalk Community Blogs via Syndication
A new BizTalk Server eBook is available for the 2013 R2 version with the focus on extensibility.
Together with Johann Cooper and Eldert Grootenboer I have written on various aspects of extensibility with BizTalk Server. The .NET framework adds tremendous value in extending BizTalk Server solutions to create more versatile, robust solutions. We discuss the extensibility for BizTalk Server from a
by community-syndication | Mar 3, 2016 | BizTalk Community Blogs via Syndication
The Azure logic apps team conducted their eighth monthly Google Hangout session on February 25, 2016. The session kicked off with the latest improvements that have happened over the last month. Designer Improvements The Logic Apps team rolled out a refreshed version of the Azure Logic Apps Preview with improvements to the designer. The improved […]
The post Azure Logic Apps Monthly Update – February 2016 appeared first on BizTalk360 Blog.
Blog Post by: Sriram Hariharan
by stephen-w-thomas | Mar 2, 2016 | BizTalk Community Blogs via Syndication
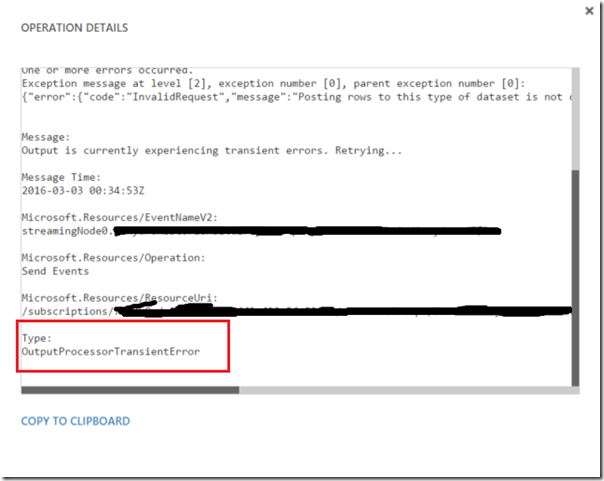
Ran into an interesting situation today. I have some real time Azure Stream Analytics (ASA) streams that feed a couple Power BI dashboards. I also took the plunge with getting enabled with Azure Multi Factor Authentication (MFA). The MFA setup was fine but I logged back into the Azure Portal later to notice that my ASA job had stopped. When I looked in the ASA Monitoring Logs I found the following Send Error:
Followed by a User authentication error:
I was able to put 2 and 2 together and the timelines aligned to when my MFA was turned on but I was still perplexed. I mean this wasn’t a Windows service that had an out of date password. My credentials were never associated to the ASA job. I did use MFA when logging into the portal so that wasn’t it. I tried to restard the ASA job multiplie times as the portal was giving me a “this is a transient error message”….it wasn’t.
It wasn’t until it clued in on me that when you set Power Bi Outputs for Stream Analytics that you need to also authenticate using your credentials. As soon as MFA was enabled, my credentials had expired and I needed to log back in which did result in an MFA challenge. I got through that and could start my job and outstanding events streamed through.
Conclusion
This isn’t a production workload so the damage was minimal. It does beg the question thought that if you are publishing events from ASA to PowerBI, what is the right way to authenticate with Power BI? Should you be creating a “system” account with no MFA and no password being reset? I am open to recommendations if you have them.