Developing solutions on Azure is sometimes an effortless operation. Administrate all your Azure resources that may be a different story. And this PowerShell script focuses on simplifying one of these processes.
One of the painful processes, not only when we are developing our Logic App, but mainly when we are administrating them, is finding what API Connections and no longer being used by your Logic Apps. What we call Orphaned API Connections.
What is the importance of this script? Over time, our Logic Apps can change to fit new requirements or fix some issues that can occur. And we can quickly end up with unused Azure API Connections. In addition, it is not easy to work out which API Connections are being used by our Logic Apps directly thru the Azure Portal! Neither to see if a specific API connector is orphaned.
This PowerShell script will look at all of the API Connections in your resource group and then inspect every Logic App in your resource group to check if the API Connections are being used or not. This script will help you to identify orphaned API Connections quickly.
This script was initially created by Mike Stephenson, which I took as a reference and improved or modified according to what I thought fit better to this task:
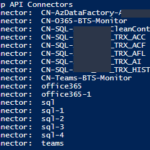
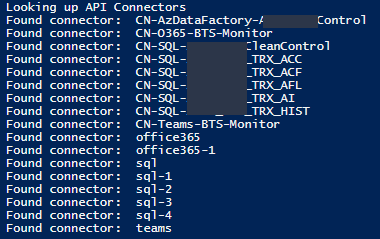
List the output of existing API Connectors in a specific resource group to print only the API Connector name instead of the full ID to be simple to read;
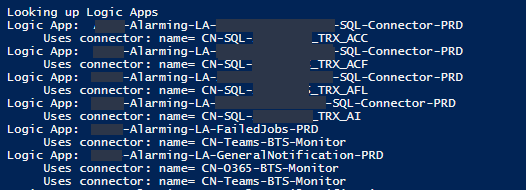
List the output of API Connectors bind to a Logic App group by each Logic App to be simple to read;
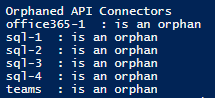
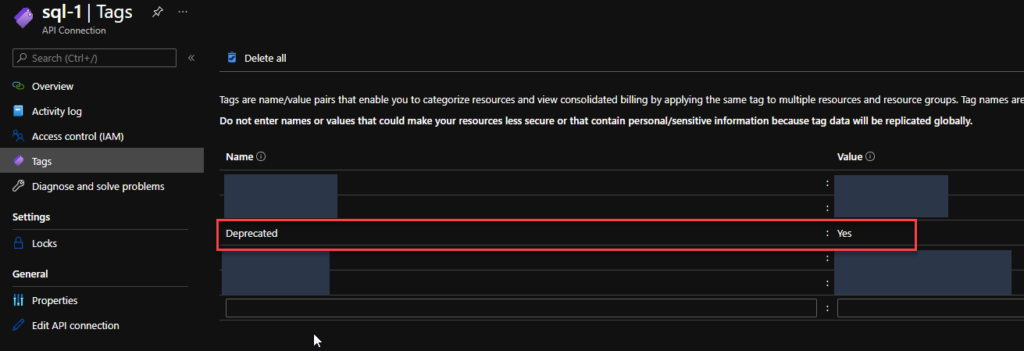
List the output of deprecated API Connector to include only connectors are deprecated to be simple to read – this is the main point of the script. give the list of deprecated/orphaned connectors;
Add a Deprecated tag on all the API Connectors. The reason to add this tag is that sometimes I just want to reference them and make manually double-check on the subscription, talk with the development team or make these changes (remove these API Connectors on the next intervention window, if companies have kind of this policy) :
If it is orphaned then the value of this tag will be true;
Otherwise, the value of this tag will be false;
The output CSV format now includes the option for you to specify what CSV character you want to use as a separator or delimiters like comma or semicolon.
Download
You can download Find Orphaned API Connectors from GitHub here:
There was a big buzz this weekend regarding the release of a new Azure Logo by Microsoft. The new Azure icon represents the unity of Azure within the larger Microsoft family of product icons. It’s part of Microsoft’s Fluent Design System, carefully crafted to produce icons that look familiar to what customers know and love, while representing the agile future of our business.
I usually don’t update my stencils only because of a new icon. Still, this time I made an exception, and I updated my package with this new Azure icon (thanks, Tiago Costa, for providing me the resource). I also toked this opportunity to add also a previous request: the new Dataverse icon.
What’s new in this version?
These are the list of changes and additions present in this major release:
New shapes: There are new shapes on the following Visio Stencils files (.vssx):
MIS Power Platform Stencils: the new logo of Dataverse was added.
MIS Azure Stencils: the new logo of Azure was added.
SVG files: new SVG files added.
Microsoft Integration, Azure, Power Platform, Office 365 and much more Stencils Pack
Microsoft Integration, Azure, Power Platform, Office 365 and much more Stencils Pack it’s a Visio package that contains fully resizable Visio shapes (symbols/icons) that will help you to visually represent On-premise, Cloud or Hybrid Integration and Enterprise architectures scenarios (BizTalk Server, API Management, Logic Apps, Service Bus, Event Hub…), solutions diagrams and features or systems that use Microsoft Azure and related cloud and on-premises technologies in Visio 2016/2013:
BizTalk Server
Microsoft Azure
Integration
Integration Service Environments (ISE)
Logic Apps and Azure App Service in general (API Apps, Web Apps, and Mobile Apps)
Azure API Management
Messaging: Event Hubs, Event Grid, Service Bus, …
Azure IoT and Docker
AI, Machine Learning, Stream Analytics, Data Factory, Data Pipelines
SQL Server, DocumentDB, CosmosDB, MySQL, …
and so on
Microsoft Power Platform
Microsoft Flow
PowerApps
Power BI
Office365, SharePoint,…
DevOps and PowerShell
Security and Governance
And much more…
… and now non-related Microsoft technologies like:
SAP Stencils
The Microsoft Integration Stencils Pack is composed of 27 files:
Microsoft Integration Stencils
MIS Additional or Support Stencils
MIS AI and Machine Learning Stencils
MIS Apps and Systems Logo Stencils
MIS Azure Additional or Support Stencils
MIS Azure Black and Gray
MIS Azure Old Versions
MIS Azure Stencils
MIS Black and Cyan
MIS Buildings Stencils
MIS Databases and Analytics Stencils
MIS Deprecated Stencils
MIS Developer Stencils
MIS Devices Stencils
MIS Files and Message Types Stencils
MIS Generic Stencils
MIS Infrastructure and Networking Stencils
MIS Integration Fun
MIS Integration Patterns Stencils
MIS IoT Stencils
MIS Office, Office 365 and Dynamics 365
MIS Power BI Stencils
MIS Power Platform Stencils
MIS SAP Stencils
MIS Security and Governance
MIS Servers (Hexagonal) Stencils
MIS Users and Roles Stencils
Organisational Stencils
That you can use and resize without losing quality, in particular, the new shapes.
Continuous Integration/Continuous Delivery is a development practice that enables you to accelerate your deployments and delivery time to the customer, by reliably releasing software at any time and without manual intervention.
For this post series, I will explain how to enable this practice, oriented to Logic Apps and Azure Pipelines.
We will start by Building the Logic App, using Visual Studio. I will not approach Logic Apps Preview, because since it’s still a preview feature, many changes can happen and render all this useless.
As you may know, to create Logic Apps in Visual Studio, there are a few requirements, such as:
Visual Studio 2015, 2017, 2019 or greater, if available
Azure SDK
Azure Logic Apps Tools for Visual Studio Extension (if using VS)
An active Azure subscription
Time, will and patience.
After you have all this installed, you can begin to create and let your creativity flow!
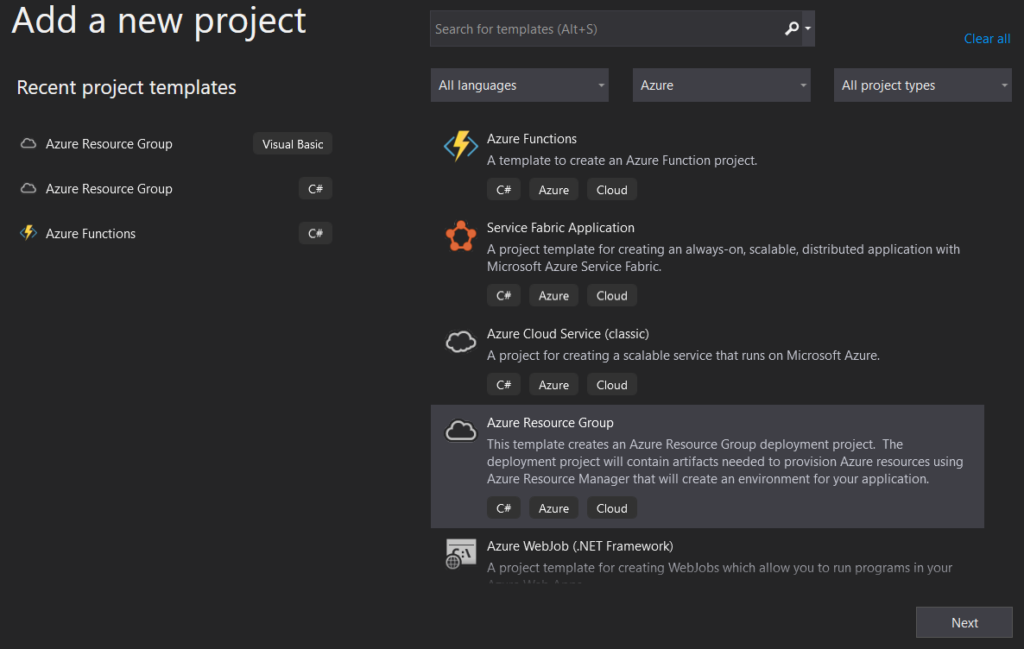
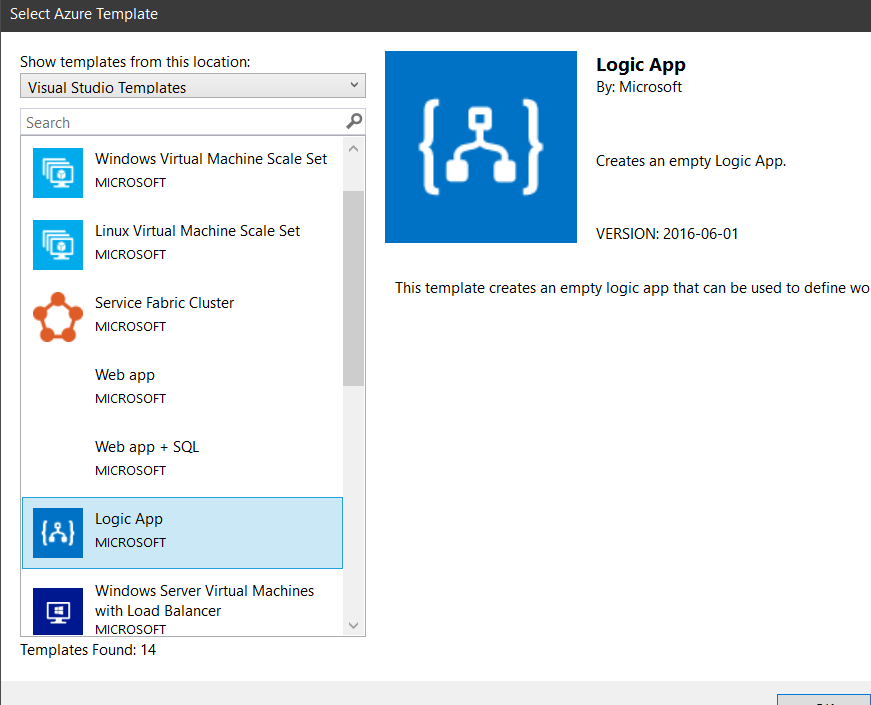
We’ll start from scratch. Open you VS and start a new Project, by selecting the Azure Resource Group C# template and the Logic App template after that.
You will end with a new Project, and Solution if it’s the case, with 3 files. The PowerShell file is the deployment script that VS uses to automate the ARM deployment. Only in a special case do you need to fiddle with this file.
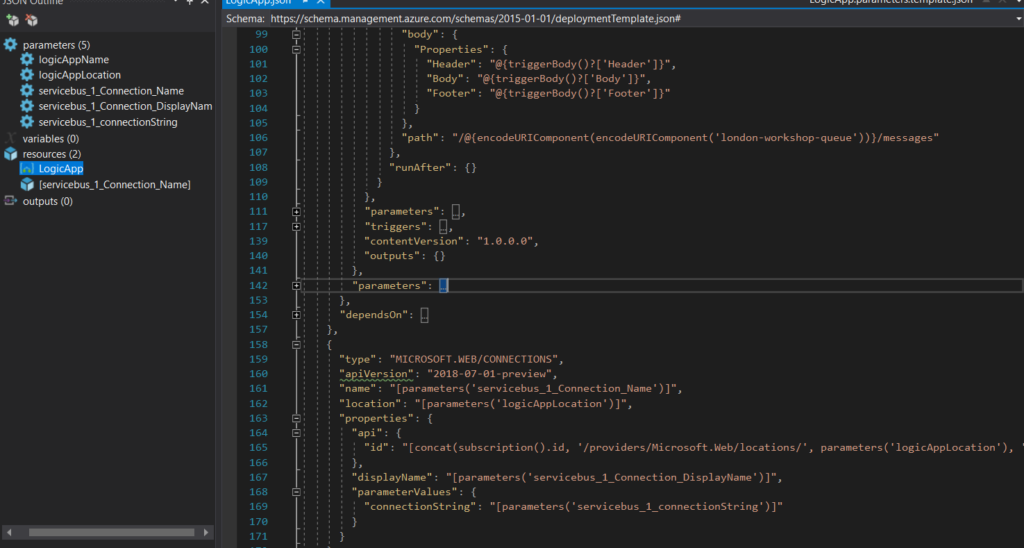
The other two files are the Logic App code and the Parameters file. You will need to create a new one, to be used as a Template for the Azure Pipeline. So go ahead and copy the Parameters file and change the name to LogicApp.parameters.template.json .
You should end with something like this.
This Parameters Template file will contain our Tokens, which will be replaced in the Pipeline using the “Replace Tokens” Task. In the coming posts, I will explain how it works and why we’re using it.
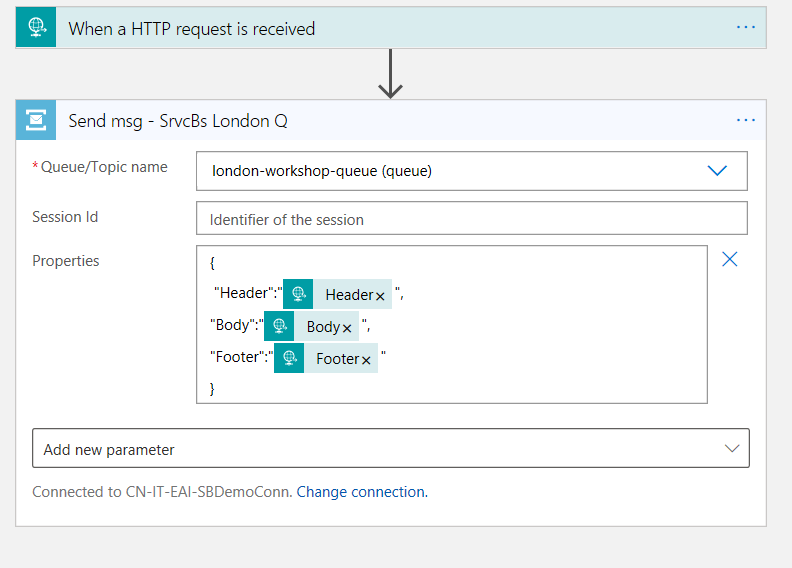
For the sake of simplicity, I’ll just use the Service Bus connector, where depending on the input, I’ll send a message to the Queue with the provided information.
After creating the connection, you will see that, in the back code, several parameters and a Resource node were created as well, that contain the link and inputs for this connection.
Even when working in a single Resource Group, it is a good practice to prepare this for CI CD, because even though it’s static, connections change and instead of having to re-do all of it, you just need to re-deploy the pipeline with the new configurations.
We will not be making any changes to the Resource node, but to the action path and parameters. This will define that instead of having a fixed value, it will point to the parameter itselft, making it possible to have an ARM parameter configurable in the Pipeline.
While dwelling in my thoughts, a memory came to my mind. In my college time, I was present a challenge to make a recursive Fibonacci algorithm, in LISP without using Loops.
This was a challenge, because as you may know…
(these are probably my favorite programming comics)
But this gave me the idea of testing this concept in Logic Apps.
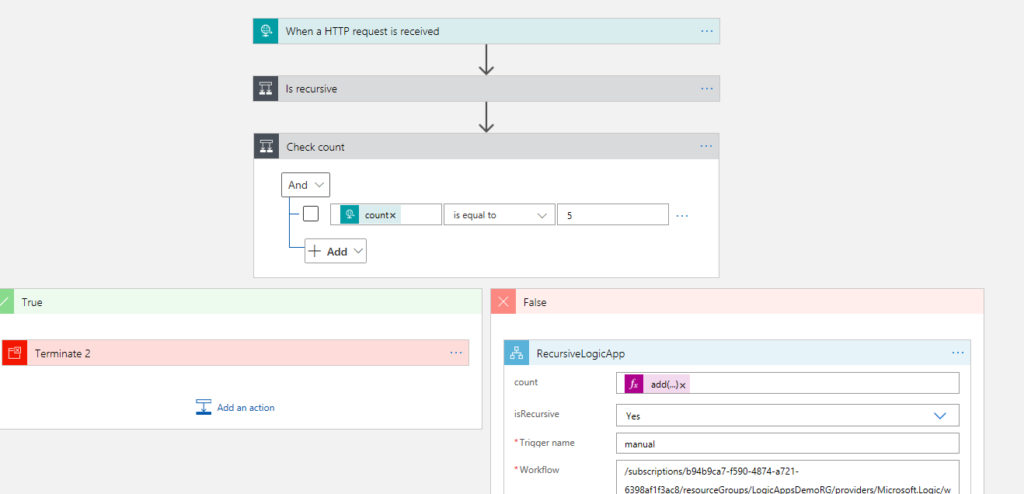
I’ve built a fairly simple LA just to test and with minimal inputs.
Before I could add the recursive connection to the Logic App, I had to deploy it first, because you can only call a LA or a Function if it’s already provisioned.
So, I’ve added the action after deployment, saved and tried to deploy again, and this came up:
This means that Logic Apps, by default, do not support recursive calls.
But I’m stubborn and I don’t give up easily. So, what would be the best way to call a LA knowing that I’d have to treat it like an external API?…
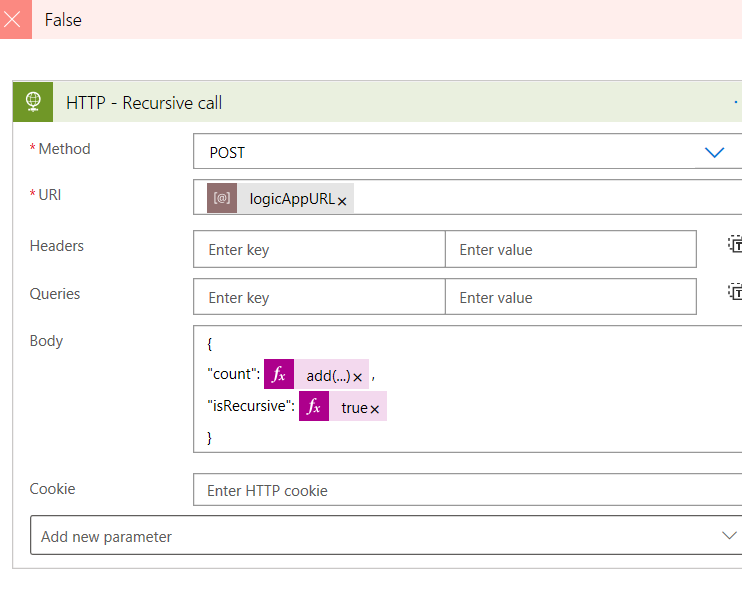
The answer is super simple. HTTP action!
We already have the URL, because we deployed it before, so there’s nothing stopping us from doing this.
No objections this time, so let’s test!
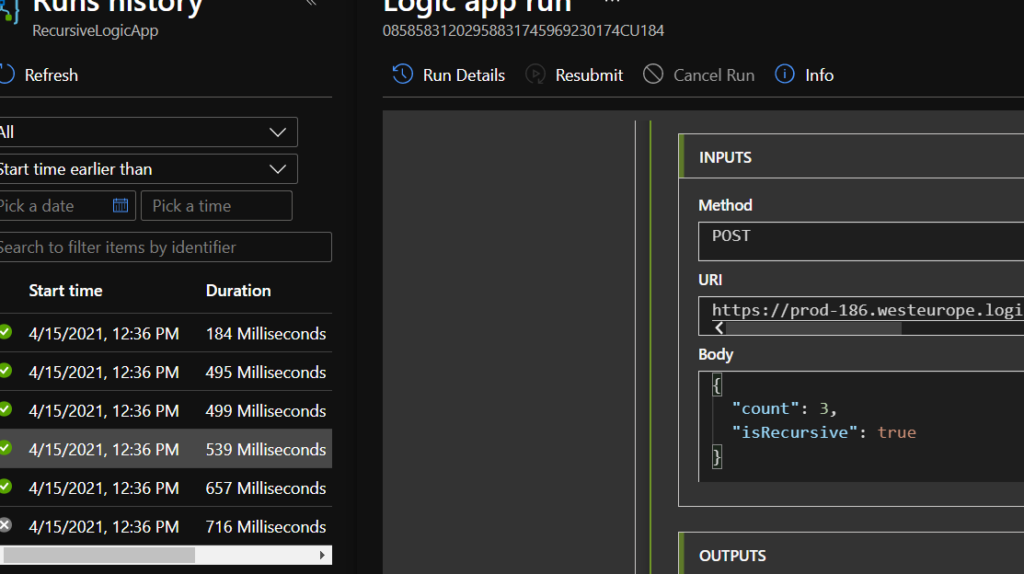
TA-DAAA! How easy was that? In my case, I’ve used a simple counter to add and loop, but you can use any other condition to recursively loop through your logic, for example until a SQL record is updated.
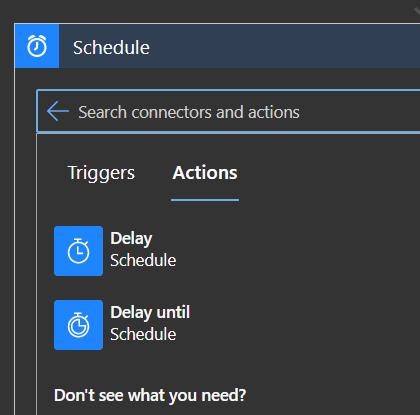
You can add delays to ensure that you won’t be making calls every second, or delay until a specific time. The possibilities are endless.
Sometimes we have the need to perform a kind of “fire and forget” pattern in Logic Apps. Todays post is a short one, but very useful one.
Usually, a Logic App will have a synchronous pattern, meaning you call it and you will have to wait for it to finish processing.
But how do we configure our LA to receive a request and continue processing without us having to wait for it?
It’s quite simple actually, although not a very pretty thing to do.
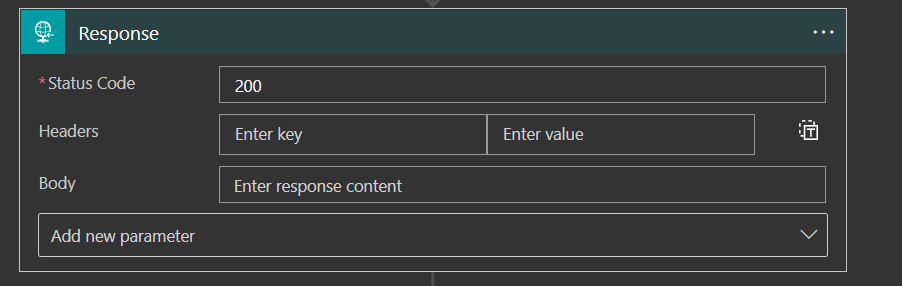
The way to achieve this is to set a Response action right after the trigger action and in the settings, set the “Asynchronous Response” to true. It’s not pretty as I’ve said, but it will set the path for the async pattern we’re looking for.
There should be a flag that you could set in the Trigger to automate this and send back a response like this, but so far, this feature is not available yet.
The response will be sent to the calling system, whatever it is, with the status code 202 Accepted.
You can also set custom headers and a body, but it might not help much.
As you can see, the Response will automatically set a location header for you to “ping” to check the status. By default, the engine will refresh every 20 seconds.
So that’s all there is to it, it’s a simple way to achieve an asynchronous pattern with Logic Apps, although not very pretty, but it works!
As part of development guides, it’s always a good idea to have a fallback plan and handle errors.
You can be 99.999% confident that your code won’t fail, but that 0.001% chance happens. “Anything that can go wrong will go wrong” – Murphy’s Law
And so, we resort to our very dear friend, Try-Catch.
In Logic Apps, it’s not exactly an out-of-the-box functionality, but it’s actually quite simple to achieve this and with a few steps. Also, there are multiple ways to catch your errors.
In this post, we will try two approaches:
Using a For-Each loop
and a Filter Array action.
Since I’ve started developing LAs, I’ve used the For-each loop approach but it had some flaws. It involved using a Parse Json to catch only the error message, but not all actions have the same schema.
So, the idea of the Filter array came to play. It’s actually quite easy as well and easy to maintain. You’ll find the same issue with the schemas, but it’s a faster approach.
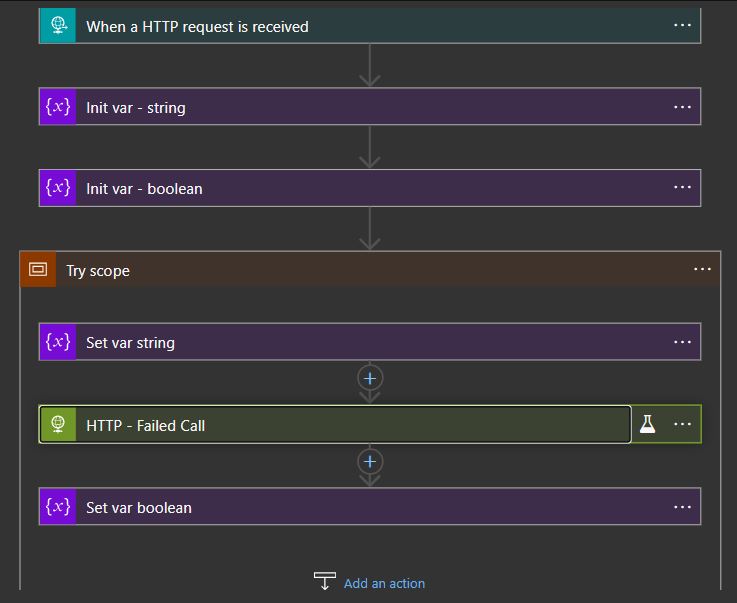
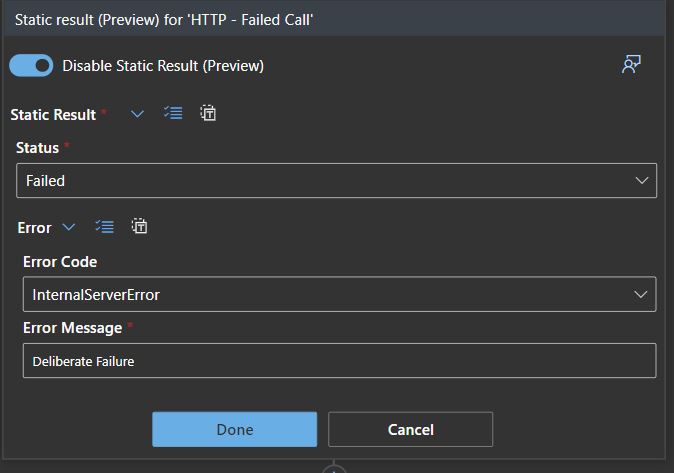
Let’s dig in. I started to build a simple Logic App, just creating a couple of variables and an HTTP call that I know that will fail. I mocked the results to ensure the outcome is what I needed.
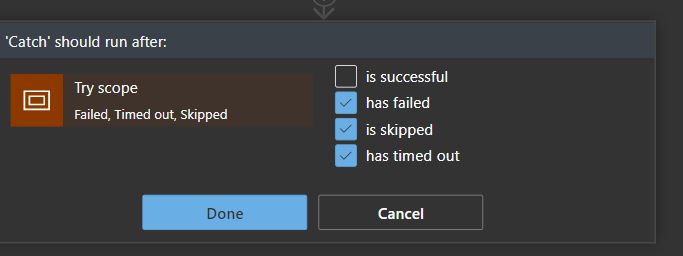
I’ve also built a scope, creating the Try block and a second scope to handle the Catch block. You’ll have to set the “Run after” properties to only trigger on errors, skips or timeouts, if not, it will run on success.
It will always relate to the previous scope.
The For-Each loop approach
Now we start to build our Error handler. I’ve chosen the For Each loop first because it was faster to create since I’m used to it and even have some templates for it as well.
The For Each action requires an array action to iterate on, which means we need to find one. The Scope isn’t a loop, so what will we relate it to?
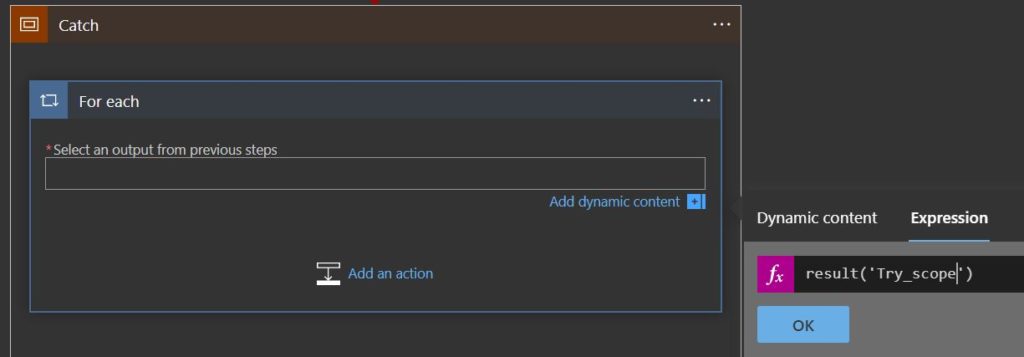
Well, the scope might not be, but there are N actions inside it, so if you search in the expressions box or the documentation, you’ll find the “result” expression, which records every result of the contained actions within a given scope.
Now, remember, this will need to point to the action you want, but you will not have it in the Dynamic Content, you need to write it using the _ for spaces, because this expression handles the JSON node name like if you’re working in the back code.
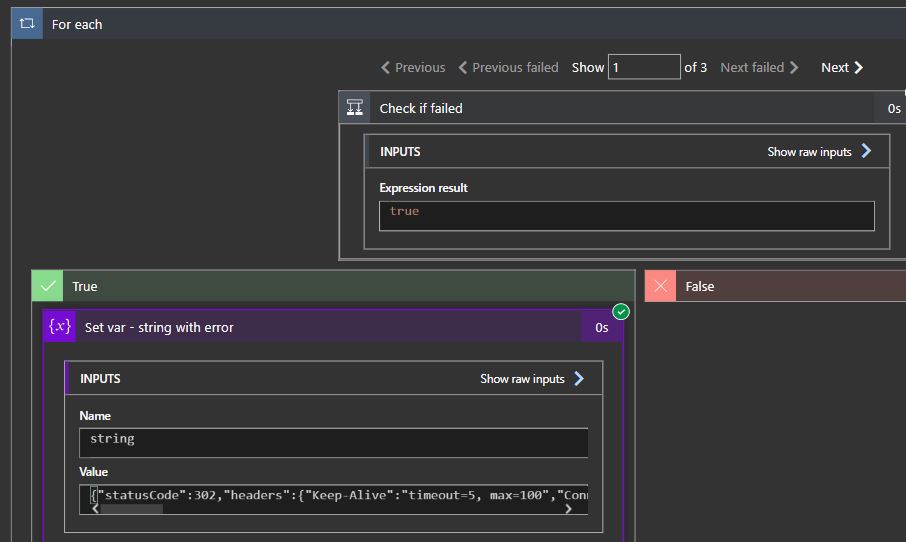
Once you have this set, you just need to create a condition to check if the status of the action was “Failed“. Pretty simple.
If you test the execution, you’ll see that the loop is working and iterating the actions batch that the “result” expression returns.
I’m just returning the action outputs in the error string, which will contain the StatusCode, Headers and Body. It should help to diagnose a possible error.
Let’s try the Filter array now.
The Filter Array action approach
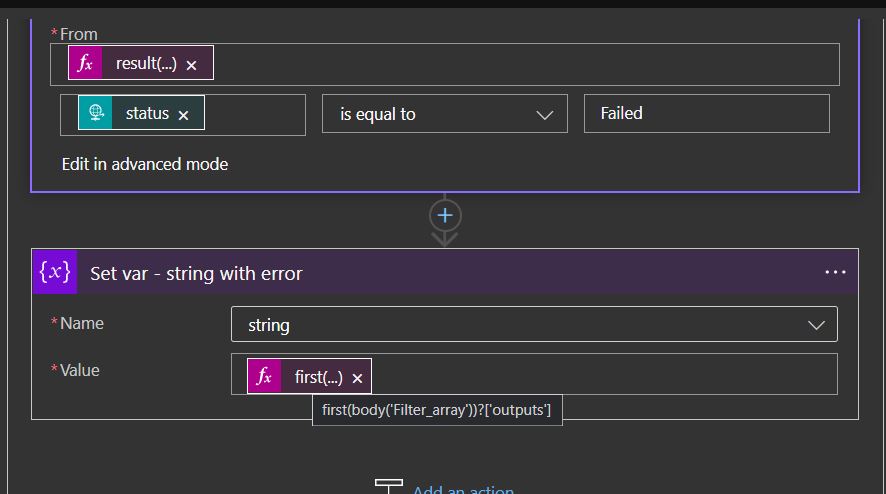
Similar to the For Each, we need to iterate through an action that contains child actions. We use the same “result” expression pointing to the same scope as the “From” property and choose “item()?[‘status’]” as the node to search for. Also, we only want the failed actions, so the node should be equal to “Failed“.
As for the error message, it’s a bit different from the For Each type. We’re still picking up the Outputs but we need to get the first action from the Filter array action.
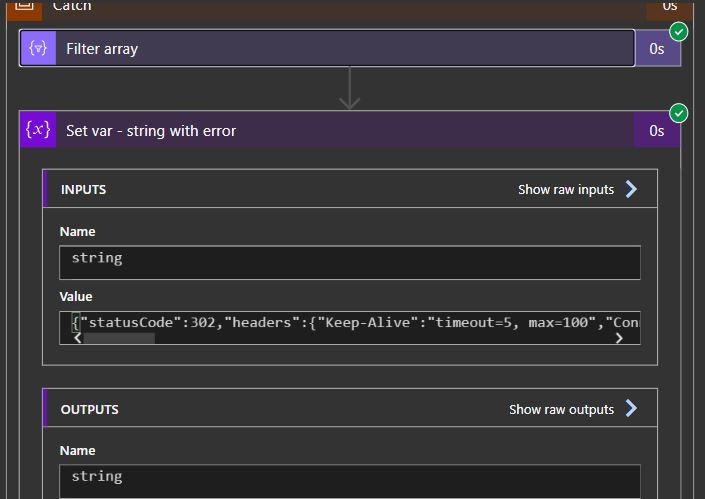
The end result should be the same, as we’re picking up the same info as with the For Each loop.
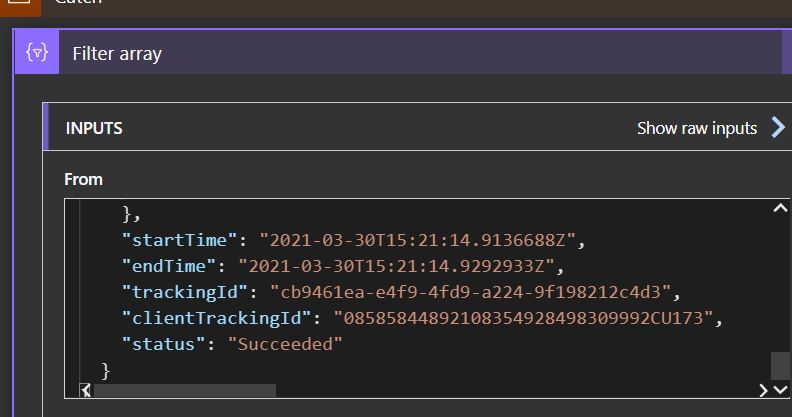
Usually, an action will return a JSON record as the result of its execution. There are some fields that will always be present, like “Status” and “Tracking ID”. There’s no easy way to find this info, so you have to deconstruct one or more actions to find it. With the information you have now, you can get it from anywhere, you just have to use the “Result” expression.
Here you can see some fields in the Set var action I created and how the status is recorded. For tracking purposes, the execution engine records the begining and end timestamps as well as other useful data.
Now that you know how, it’s time to get working and make your Logic Apps sturdier and with a proper error handling.
I usually use the series A fish out of water when I want to write something that goes a little bit off-topic on my main blog topic: Enterprise Integration. But this time is different. This was kind of the first thing I thought when I saw this error happen since that didn’t make sense at all.
To contextualize better this reason and blog post, I have been testing the new Logic Apps (Preview) for a while, and if you already try it before, you will know that this new type of Logic Apps runs on top of Azure Function Runtime. This means that now you can run Logic Apps anywhere: in the cloud, on-premises, locally on your laptop, or wherever you need to.
One of the requirements necessary to have the full Logic Apps designer support in VS Code is the Microsoft Azure Storage Emulator 5.10 tool
Microsoft Azure Storage Emulator 5.10 tool – This tool is necessary to have the full Logic Apps designer support in VS Code. This tool will use a local Microsoft SQL Server Express LocalDB instance (you can also use a SQL Server instead) to emulate Azure storage services.
Everything was working properly for the last four months or more, however for no plausible reason today while I was trying to start the Microsoft Azure Storage Emulator I got this error:
Probing SQL Instance: ‘(localdb)MSSQLLocalDB’. Caught exception while probing for SQL endpoint. A network-related or instance-specific error occurred while discovering a connection to SQL Server. The server was not found or was not accessible. Verify that the instance name is correct and that SQL Server is configured to allow remote connections. (provider: SQL Network Interfaces, error: 50 – Local Database Runtime error occurred. Error occurred during LocalDB instance startup: SQL Server process failed to start. ) Number of SqlErrors Reported: 1 SqlError: System.Data.SqlClient.SqlError: A network-related or instance-specific error occurred while establishing a connection to SQL Server. The server was not found or was not accessible. Verify that the instance name is correct and that SQL Server is configured to allow remote connections. (provider: SQL Network Interfaces, error: 50 – Local Database Runtime error occurred. Error occurred during LocalDB instance startup: SQL Server process failed to start. ) Could not find a LocalDB Installation. Probing SQL Instance: ‘localhostSQLExpress’. Caught exception while probing for SQL endpoint. A network-related or instance-specific error occurred while establishing a connection to SQL Server. The server was not found or was not accessible. Verify that the instance name is correct and that SQL Server is configured to allow remote connections. (provider: SQL Network Interfaces, error: 26 – Error Locating Server/Instance Specified) Number of SqlErrors Reported: 1 SqlError: System.Data.SqlClient.SqlError: A network-related or instance-specific error occurred while establishing a connection to SQL Server. The server was not found or was not accessible. Verify that the instance name is correct and that SQL Server is configured to allow remote connections. (provider: SQL Network Interfaces, error: 26 – Error Locating Server/Instance Specified) No available SQL Instance was found. One or more initialization actions have failed. Resolve these errors before attempting to run the storage emulator again.
Cause
Again, I can’t find any plausible reason for this to start happend, except the fact that my machine installed some system updates.
Solution
I don’t know if all these steps are necessary or not, I was just simple frustrated about this situation because I need to present this topic in my upcoming sessions this week, so I didn’t test all the hypotheses available properly. Nevertheless, I managed to solve this issue by simply recreating my LocalDb instances and allowing the emulator to recreate his db files.
Here is the steps necessary to perform these tasks:
Get your current LocalDB instance name
<pre class="wp-block-preformatted">
sqllocaldb i

</pre>
Delete the existing LocalDB instance
If you feel more comfortable you can choose to stop the LocalDB instance before you delete
<pre class="wp-block-preformatted">
sqllocaldb d &lt;LocalDB instance>
</pre>
Create your new LocalDB instance with the same name or a different one.
<pre class="wp-block-preformatted">
sqllocaldb c &lt;LocalDB instance>
</pre>
and finally, you need to delete the following Azure Storage Emulator database files to allow the emulator to recreate db files on the first start.
Everyday we learn new things and when it comes to Logic Apps, we tend to learn even more, because it’s always shifting and new components are added. If we’re using ARM templates, the deployment brings out some challenges and with it, new things to learn (and lots of cute little things that make you want to bang your head against a brick wall).
Usually when we work with a CSV file we tend to keep the sorting according to the specification. It isn’t always alphabetical nor descending/ascending.
Sometimes, it’s just a real mess but it makes sense to the client and to the application that is consuming it.
A few days ago, whilst working on a client project and after dozens of tests, we started to see errors in our CSV file, where the headers and columns were arranged in a alphabetical sorting. This was not my intent, when I built the CSV array I wanted it to be in a certain order.
So why was this array now being sorted, who gave that command and how could I correct it?
Why and who:
As we dig in the Logic App code, we see that the Logic App is JSON in its core (my god, shocking development!). As such, it will follow JSON rules on sorting. If we set / append our variable with an array, even though that array won’t show up ordered in our code, it will when we deploy it to our Resource Group.
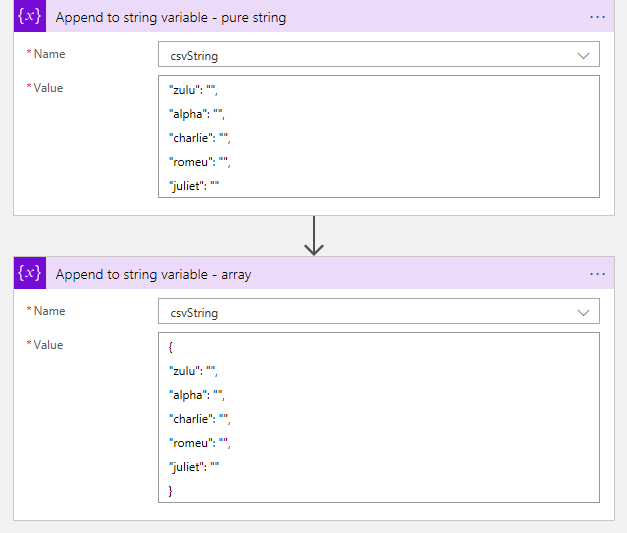
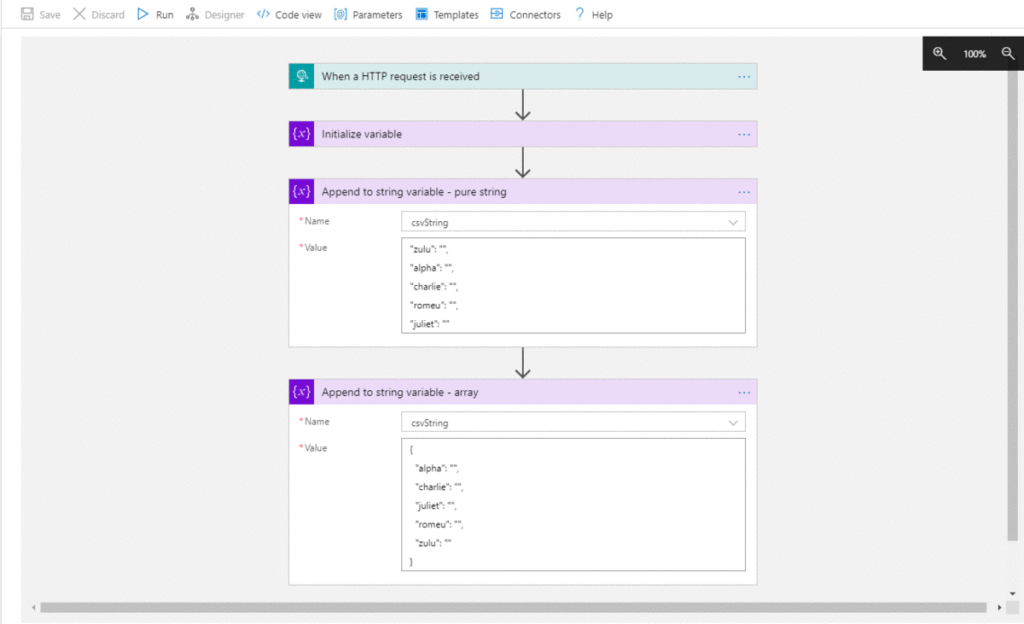
Lets prove this.
First, we set our LA in Visual Studio and initialize a string. Then we set two values to it ( “Append to string variable”) . One as a string and the other as an array.
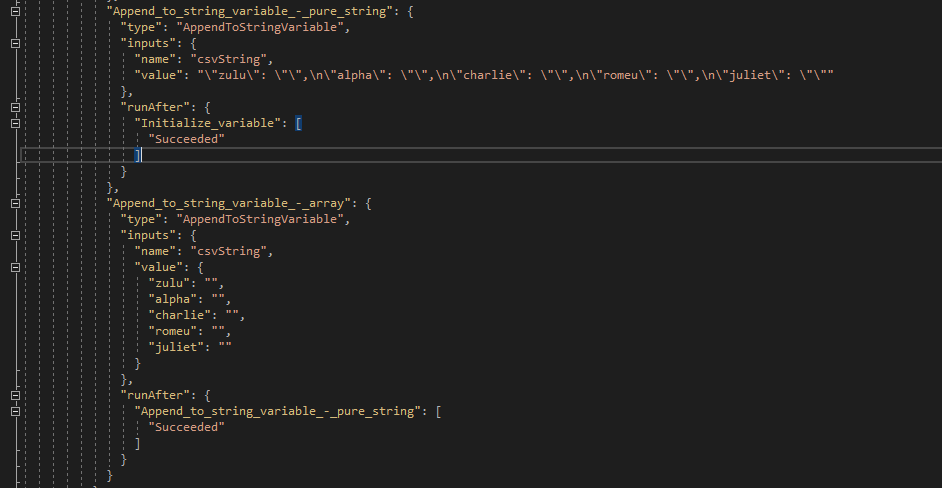
Let’s look at the back code.
Looking good so far. Our strings are set and it’s in the order we want.
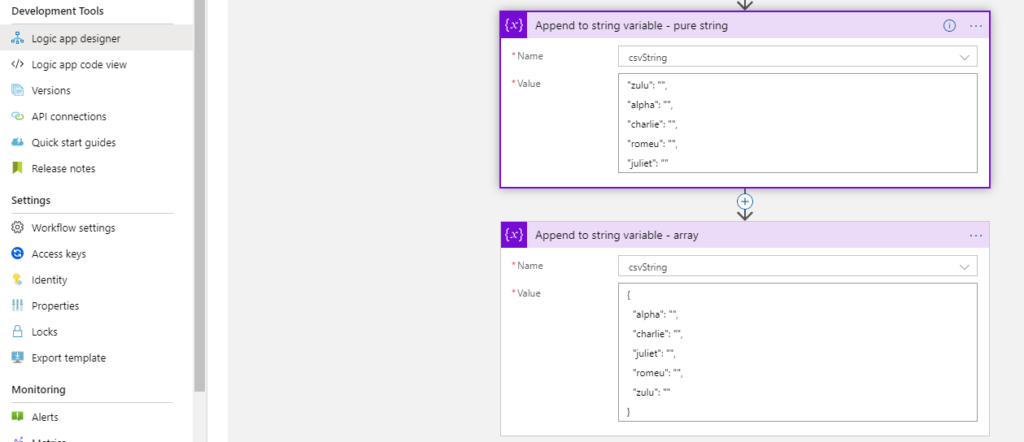
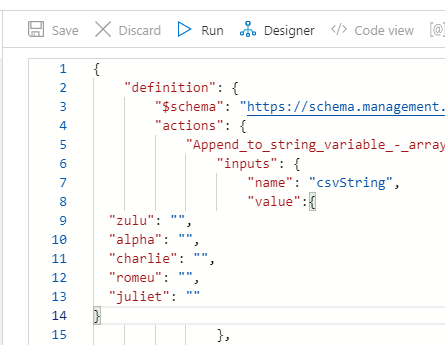
Lets deploy it to our RG and check again.
Well, there it is. In ARM deployment, if we write a JSON object, on deployment it gets sorted and will appear like this in the designer tool in Portal.
Funny thing is that if we change our object to the string we want, the designer will not recognize this as a change and doesn’t let you save.
Even in Code View the changes are not recognized.
But if we add other text to it, the changes are now recognized and Portal allows to save.
But still, it won’t show you the changes and will still sort out your CSV array, once again because it’s JSON.
A few weeks ago, this behavior wasn’t noticeable I had a few Logic Apps in place with the string array in a specific order and when deploying it didn’t get sorted.
I searched in Azure updates to see if anything was mentioned but nothing came up.
How to bypass this issue?
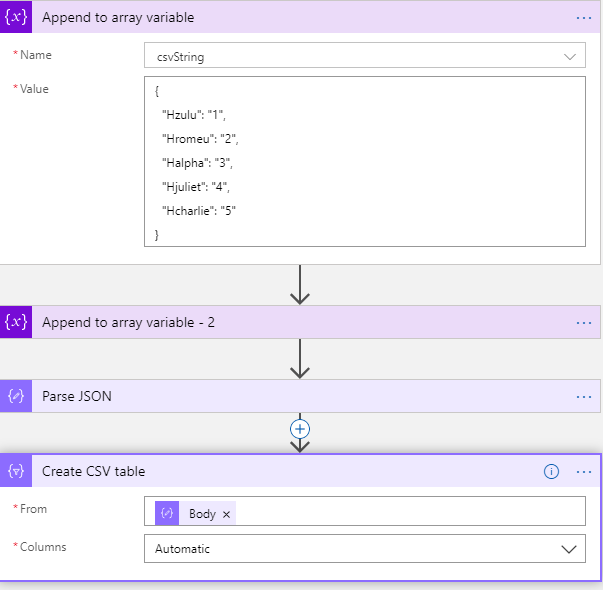
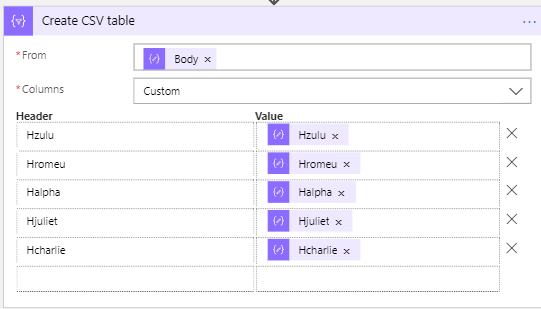
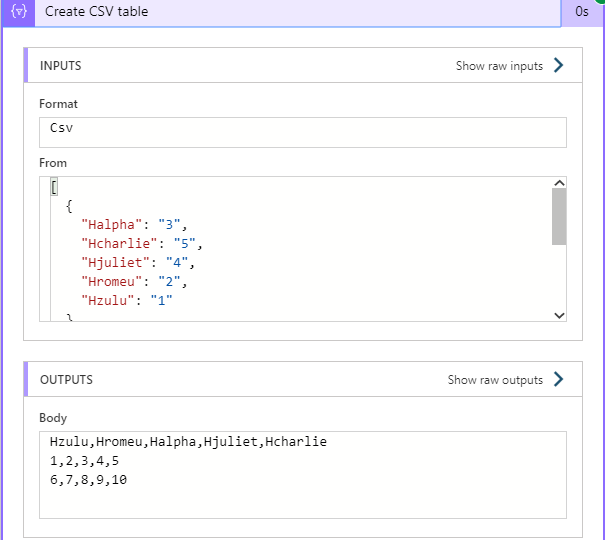
If you’re working with a CSV file like I was, after you build your array, you’ll need to build a CSV table.
The action “Create CSV table” will take care of this from you, but as we know, it will not be in the same format we need.
(notice I’ve switched to array variable because I can’t parse the string in JSON)
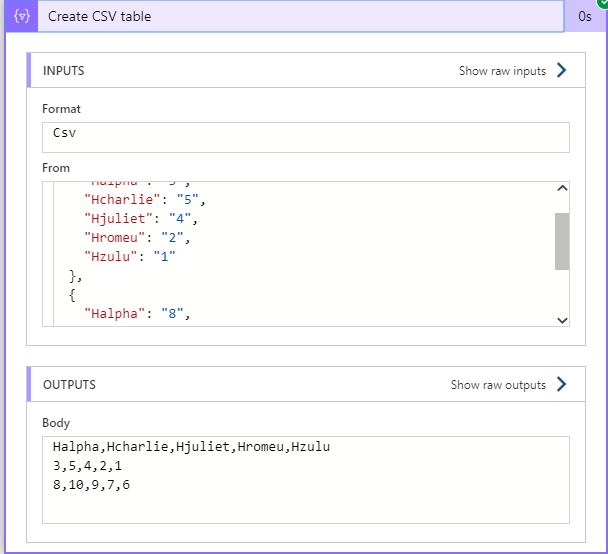
So, leaving the Columns in automatic mode will mess up your integration as you can see. The output will be sorted and it won’t be what you want / need.
What a mess!! This is nothing like we wanted.
We will need to manually define the columns headers and the value they’re going to have.
If you don’t have many fields, it’s quick to do this, but when you have lots of fields… well, let’s just say I hope you have plenty of time and don’t lose focus.
And there we have it. Fields are now displayed correctly, the data is in the right place and we’ve managed to get around this annoying problem.
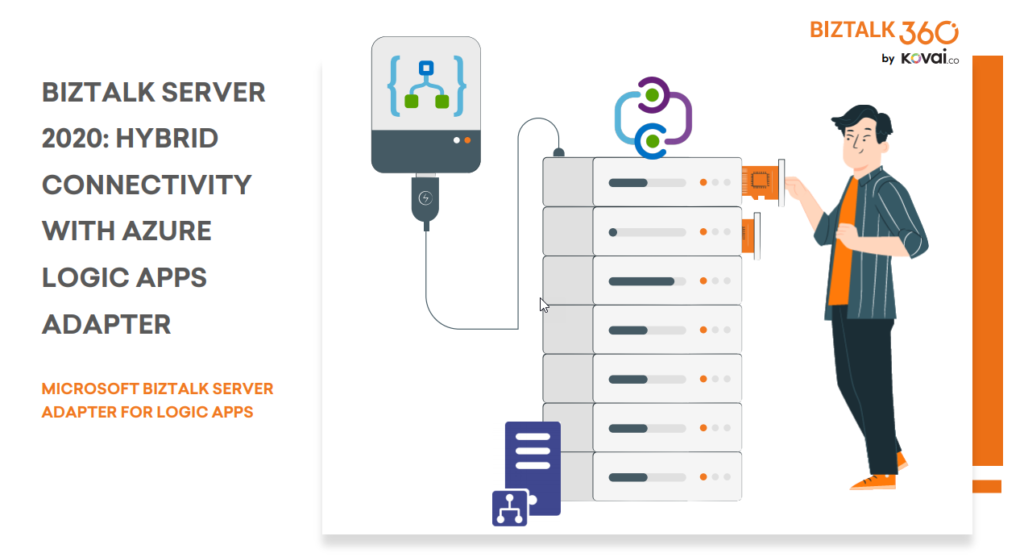
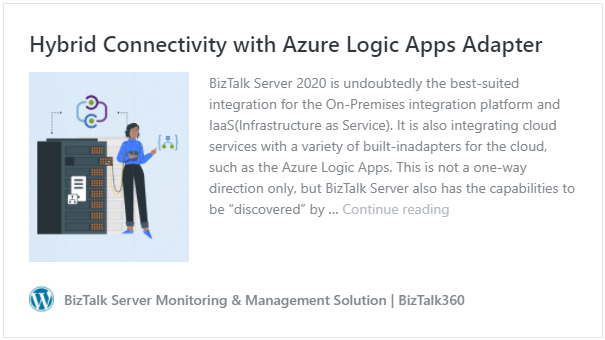
BizTalk Server 2020 is undoubtedly the best-suited integration for the On-Premises integration platform and IaaS (Infrastructure as Service). It is also integrating cloud services with a variety of built-in adapters for the cloud, such as the Azure Logic Apps.
The Azure Logic Apps adapter is used by BizTalk Server to communicate with Azure Logic Apps. This could also be possible using the HTTP adapter, but the Logic App adapter provides a better and straightforward experience.
This whitepaper will show you how BizTalk Server 2020 can interact with Logic Apps:
How BizTalk Server can send messages to Logic Apps using the Logic App adapter
How Logic Apps can send messages through BizTalk Server using the BizTalk Connector
Where I can download it
You can download the whitepaper here:
You can also find, download and enjoy several other free whitepapers of my own here:
Happy to announce that I will be present and deliver a session at Global Integration Bootcamp 2021. This year we will have a single virtual event instead of several local virtual events. My talk will be about Logic App (Preview)
Logic App (Preview): The new kid on the block
Session Name: Logic App (Preview): The new kid on the block
Abstract: In this session, we will dive into the Public Preview for the new Logic Apps powered by the Azure Functions containerized runtime, letting you run Logic Apps locally, on-premises, or wherever you need to. Showing some of the most important features and explain the differences between the new and the existing Logic App.
My session will be Saturday, February 27 at 1:00 PM UTC+1. Join us and reserve your presence at the Global Integration Bootcamp 2021 virtual event, it is free!