Azure Logic Apps adapter is used by BizTalk Server to communicate with the Azure Logic Apps. This could also be possible using the HTTP adapter, but the Logic App adapter provides a better and straightforwardly experience.
You may be thinking that I’m out of my mind. Logic App Adapter was already available in BizTalk Server 2016. Indeed you are right. However, the Logic App adapter was an optional feature and a separate download in BizTalk Server 2016. You can know more about how to install it on this white paper I wrote some time ago: Step-by-Step Logic App Adapter Installation Guide. But it is now installed with the BizTalk Server 2020 default installation process, so you do not need to install it and configure it manually. Everything or almost everything will be already configured for you automatically.
The Logic App Adapter is one of the adapters that support two-way communications:
The Logic App Receive Adapter that is responsible for receiving messages from Logic Apps and delivering them to BizTalk is, in fact, a WCF Service that runs inside Internet Information Services (IIS).
Install and Configure an On-premises Data Gateway;
Click the Test Settings button to verify the application pool identity and pass the authentication and authorization tests.
Click the OK button to save the changes.
Open BizTalk Server Administration, expand BizTalk Server Administration à BizTalk Group > Applications, and expand our application.
Right-select Receive Ports, select New, and select One-way Receive Port.
In the Receive Port properties window, enter the following configurations:
Name: Enter a name for the receive port.
Select Receive Locations, and select New
In the Receive Location properties window, enter the following configurations:
Enter a Name for the receive location
For the Type, select LogicApp from the list, and select the Configure button.
In the General tab, configure the endpoint address for your logic app:
Address: Required. Enter the BizTalk ReceiveService IIS application URL. In our case: /LogicAppTestService/Service1.svc
Public Address: Required. This is the public full URL of the service. In our case: http:///LogicAppTestService/Service1.svc
In the Binding tab, you can configure any timeout and encoding-related properties of the underlying WCF-WebHttp binding. These properties are helpful when dealing with large messages.
In the Security tab, configure any security properties.
Click the OK button, to save your configurations.
For the Receive handler, select PassThruReceive from the list and select OK to save your configurations.
And finally, create our Logic App to send messages to BizTalk Server
Sign in to the Azure portal. Create a blank logic app.
After Logic App Designer opens, in the search box, enter Request as your filter, and from the triggers list, select the When a HTTP request is received trigger
Select + New step
In the search box, enter BizTalk Server as your filter
From the connector list, select the Send message action form the BizTalk Server connector
Once the action is added to your logic app, you need to setup the connections, perform the following actions:
Select the option Connect via on-premises data gateway and on the gateway properties, select the Subscription and the desired Connection Gateway.
On the Connection Name property, provide a proper name for your connector
On the BizTalk Server URL property, provide a public UTL for the Management Application on the BizTalk Server IIS
On the Authentication Type property, set Windows and provide a proper Username and Password to access the above service (BizTalkManagementService)
Select Create
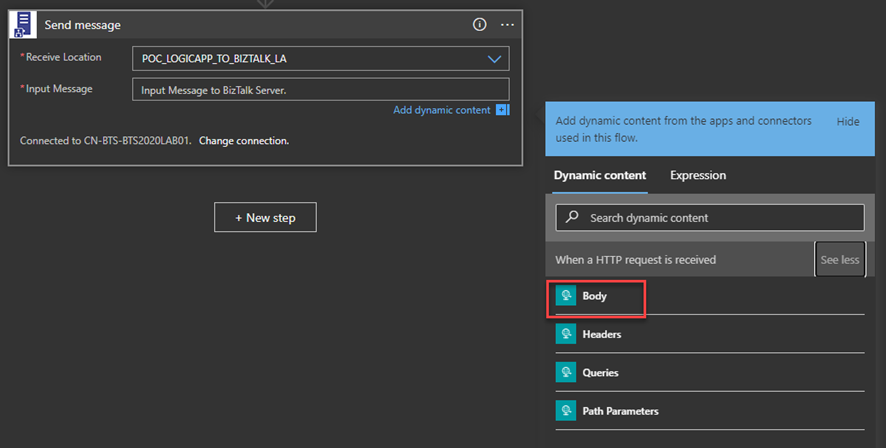
Once you create the connector, the Send message action will appear on the Logic App designer
From the Receive Location list, select the receive location we just create above
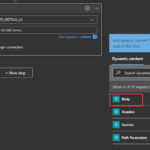
On the Input Message, specify the Body token of the When a HTTP request is received trigger
The Logic App Send Adapter is responsible for sending messages from BizTalk Server to Logic Apps.
We need to first create a Logic App in our Azure Subscription has as a trigger the When a HTTP request is received present in the Request built-in Connector.
Note: The Logic App adapter doesn’t support the new Logic App (preview) that are hosted on Azure Function runtime.
We need to configure TLS 1.2 as the default security protocol on BizTalk Server.
And finally, create a BizTalk Server Application to send message to Logic App
Right-select Send Ports, select New, and select Static One-way Send Port
In the Send Port properties, enter the following:
Name for the send port. For example, enter POC_SEND_MSG_LOGIC_APP.
For the Type, select LogicApp from the list, and select the Configure button
In the General tab, configure the Callback URI of your logic app trigger by selecting Configure…
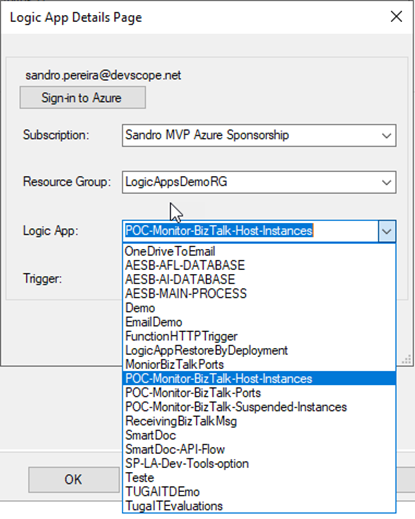
On the Logic App Details Page, select Sign-in to Azure and authenticate with an Azure account
After you authenticate, you can be able to access your Azure and select the Subscription, the Resource Group that contains the Logic Apps, and finally the Logic App and the Trigger
The Trigger will be always manual
Select OK to save your configurations.
In the Messages tab, set the content-type header as:
Content-Type:application/json
Setting up the BizTalk Server 2020 Logic App adapter
I told above that almost everything will be already configured. However, there is a critical bug in the default installation of the Logic App adapter that will affect the process of receiving messages from Logic Apps using the BizTalk Server Connector.
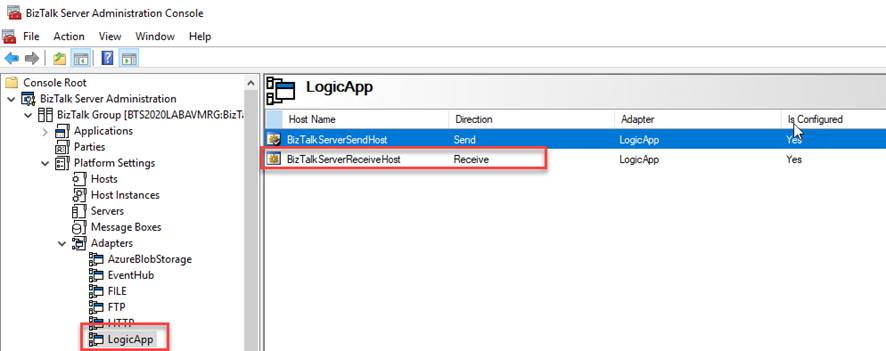
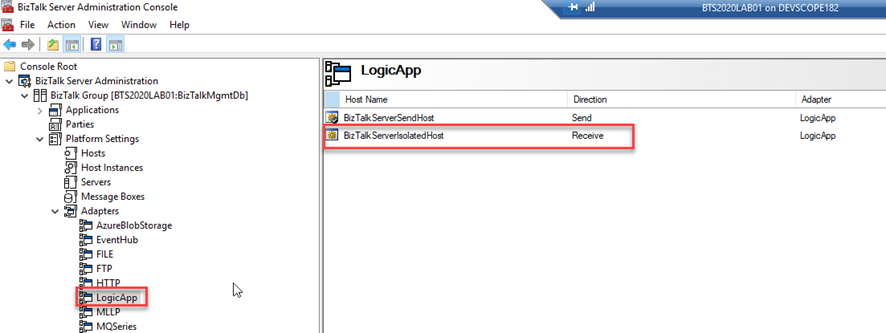
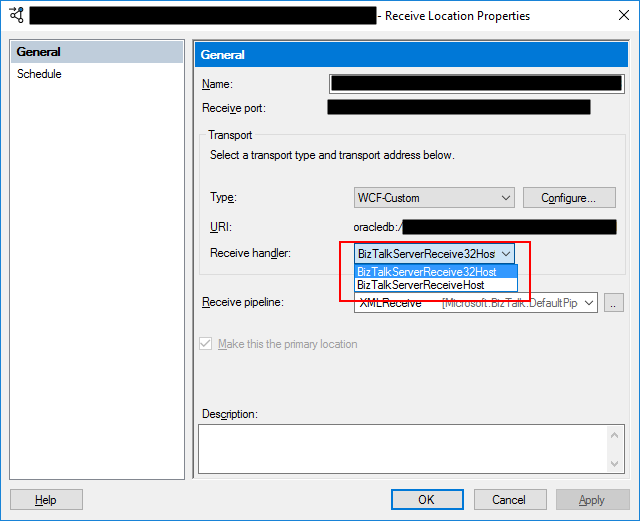
The Logic App Receive handler, or what we normally call the Logic App Receive adapter is by default configured to use the default In-Process Host, normally the BizTalkServerApplication, in this case as you saw in the picture bellow BizTalkServerReceiveHost.
If you leave this configuration, you will end up having errors when trying to activate a Receive Location that uses the Logic App adapter:
The receive location “Receive Location name” with URL “/iis-application-name/Service1.svc” is shutting down. Details
This happens assigned because the Receive handler is associated with the In-process Host and it should be bound to the Isolated Host.
To fix this bug we need to:
Remove the adapter from all assigned send ports and receive locations in my applications
Therefore, is important to do this immediately after the installation and configuration of your BizTalk Server environment. Otherwise, it will affect your existing application that uses the Logic App adapter to send messages to Logic Apps.
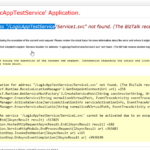
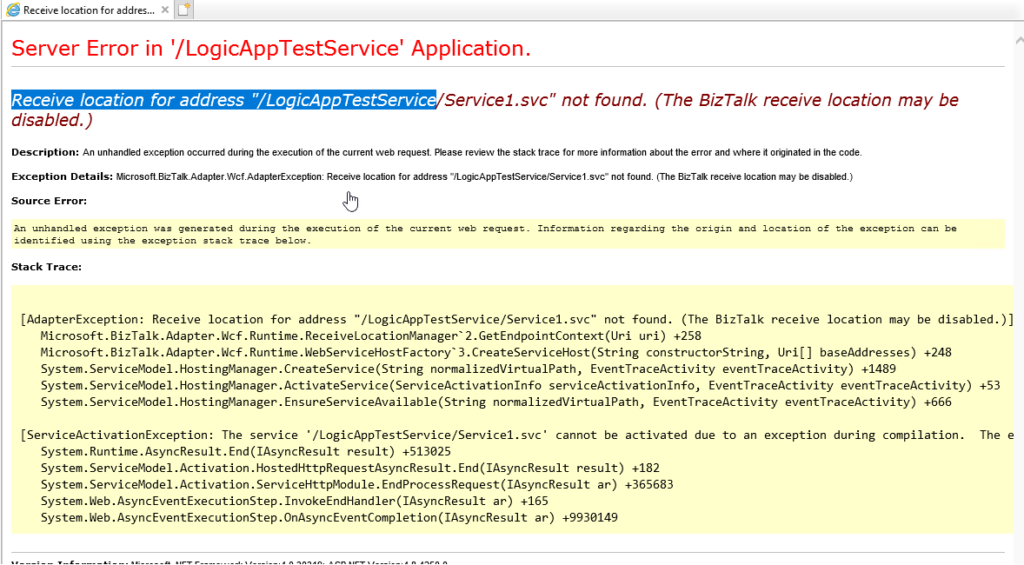
Until now, I usually have used the Logic App adapter to send messages to Azure Logic Apps and extend the BizTalk Server capabilities with the Azure Services. Yesterday, once I was trying the inverse capabilities, i.e., receiving a message from Logic App into BizTalk Server using the Logic App Adapter and, of course, the BizTalk Server Connector available on Logic App. I was surprised with the following error while I was trying to access the exposed service to receive messages from Logic App:
Receive location for address “/LogicAppTestServoce/Service1.svc” not found. (The BizTalk receive location may be disabled.)
This is a common error. It means that the Receive Location doesn’t exist or it is disabled. So I went to the BizTalk Server Administration Console and Enabled the Receive Location, but it automatically disabled again.
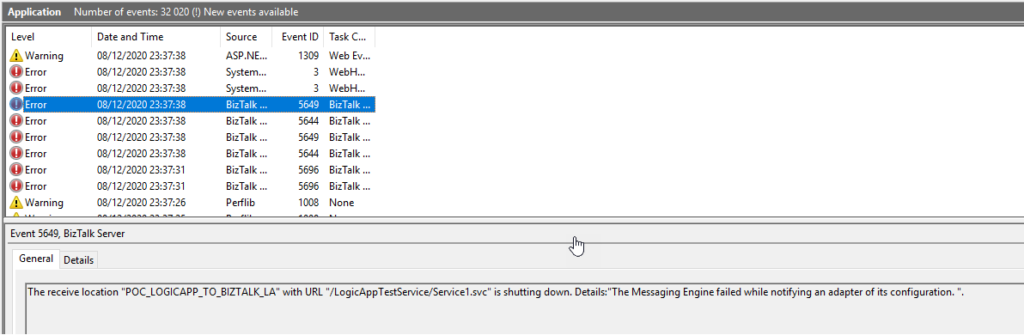
Once I check the Event Viewer for errors I found the 3 following errors:
The Messaging Engine encountered an error when creating the receive adapter “LogicApp”. The Assembly is: “Microsoft.BizTalk.Adapter.LogicApp.Runtime.LogicAppReceiver, Microsoft.BizTalk.Adapter.LogicApp.Runtime”. The error occurred because the component does not implement the mandatory interface “IBTTransportControl”.
The Messaging Engine failed to add a receive location “POC_LOGICAPP_TO_BIZTALK_LA” with URL “/LogicAppTestService/Service1.svc” to the adapter “LogicApp”. Reason: “80070057”.
The receive location “POC_LOGICAPP_TO_BIZTALK_LA” with URL “/LogicAppTestService/Service1.svc” is shutting down. Details:”The Messaging Engine failed while notifying an adapter of its configuration. “.
Cause
There is a critical bug in the default installation of the Logic App adapter that will affect the process of receiving messages from Logic Apps using the BizTalk Server Connector.
The Logic App Receive handler, or what we usually call the Logic App Receive adapter, is, by default, configured to use the default In-Process Host, normally the BizTalkServerApplication, in this case, as you saw in the picture bellow BizTalkServerReceiveHost.
Like what happens with the HTTP adapter, the Logic App Adapter is one of the adapters that support two-way communications. Still, unlike other adapters, this adapter has two characteristics that define it:
The Logic App Receive Adapter that is responsible for delivering messages to BizTalk is, in fact, a WCF Service that runs inside Internet Information Services (IIS).
And for that reason, it must be configured in IIS – it is not there out-of-the-box.
This means that when we create and configure a receive location that uses the Logic App adapter inside the BizTalk Server Administration Console, this receive location uses an application within IIS.
So, if you leave this Logic App Adapter default configuration, you will end up having the above errors when trying to activate a Receive Location. This happens assigned because the Receive handler is associated with the In-process Host and it should be bound to the Isolated Host.
Solution
To fix this bug we need to:
Remove the adapter from all assigned send ports and receive locations in my applications
Therefore, it is essential to do this immediately after the installation and configuration of your BizTalk Server environment. Otherwise, it will affect your existing application that uses the Logic App adapter to send messages to Logic Apps.
Last weekend I delivered a session about BizTalk Server 2020 in action on Global Integration Bootcamp 2020 Madrid, where I spoke about the new features available in the most recent version of the product.
Today I will start this series of blog posts about what’s new in BizTalk Server 2020 by beginning to speak about one of the most expected and log time requested features: XSLT 3.0 Support.
XSLT 3.0 represents a significant upgrade of the XSLT 1.0 (and even XSLT 2.0) standards to become a general-purpose transformation language for the most common data storage and messaging formats.
There are a lot of advantages to using XSLT 3.0 compare with the XSLT 1.0 or, in fact, XSLT 2.0, and the goal here is not to address every single of them, but we can highlight the following one:
Extended Function Set, Sequences, Arrays, and Maps: The initial function set for XSLT1.0 was the same as XPath 1.0 functions and was very limited. Minimal math support, no regular expression support, minimal string manipulation capabilities, no support for set (sequence) operations, no support for dates.
Grouping:
xsl:for-each-group: a set of items can be selected and arranged into groups based on specific criteria (for example, common values); then each group can be processed in turn
special XPath functions within for-each-group: current-grouping-key(), currentgroup()
Variants of <xsl:for-each-group>:
group-adjacent: adjacent items are allocated to the same group if they have common values for the grouping key
group-starting-with: whenever an item matches the pattern, a new group is started with this item
group-by: whenever an item matches the pattern, a new group is started after this item
Sorting:
xsl:sort: can be used inside of <xsl:for-each>, <xsl:for-each-group>, <xsl:applytemplates> and <xsl:perform-sort>. It defines the order in which the data is processed by the instruction.
Several subsequent sort keys can be defined
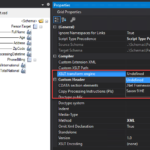
BizTalk’s default XSL transform engine implementation is based on .Net Framework XSLT Transformations. This support is limited to XSLT 1.0.
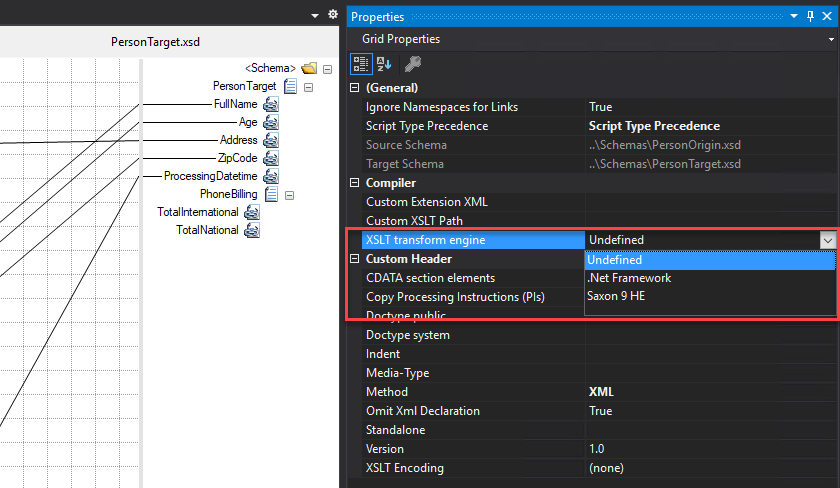
Starting with BizTalk Server 2020, users can choose Saxon:registered: 9 (Saxon 9 HE) as the XSLT transform engine. But most importantly, it will be possible to plug-in your own custom XSLT transform engine.
YYou can implement a custom XSLT transform engine by defining XSLT transform implementation derived from abstract class Microsoft.XLANGs.BaseTypes.ITransform2 in assembly Microsoft.XLANGs.BaseTypes.dll.
This makes it possible for BizTalk server maps to support newer versions of XSLT. Using Saxon 9 HE, we can readily use XSLT3.0.
Use XSLT Transform Engine property to specify the XSLT transform engine you wish to use:
This was one of the most expected features, but be careful, this can be a poisoned gift because Saxon 9 HE doesn’t support embedded scripting. As a result, functoids shipped as part of BizTalk may not function well. And for many cases, this can be a showstopper.
The advantages of using XSLT 3.0 with Saxon 9 HE:
Development: The XSLT file can be developed separately and hosted in a BizTalk map. It will simplify specific scenarios, especially scenarios that grouping and sorting are required. As we mentioned above, XSLT 3.0 provides an extended set of functions, which was very limited within XSLT 1.0.
Disadvantages when using XSLT 3.0 with Saxon 9 HD:
Level of effort: Not quite as intuitive, Functoids are easier to read visually on the map grid and therefore Requires “geeky” coding skills.
Overview: You lose the visual map representation. You can conjugate Saxon 9 HE with the BizTalk Mapper, but it is harder to do it.
BizTalk Mapper Editor limitations: except for a few built-in Functoids like Scripting Functoid (not all script types will work properly) or advance Functoids, BizTalk Functoids will not work while using the Saxon 9 HE XSLT Transformation Engine.
BizTalk Development Tool Integration: it is a brand new feature, and it seems that doesn’t have, at least for now, the same level of integration capabilities with the BizTalk Server development tools that we are usual to have and use if we compared with the default transformation engine
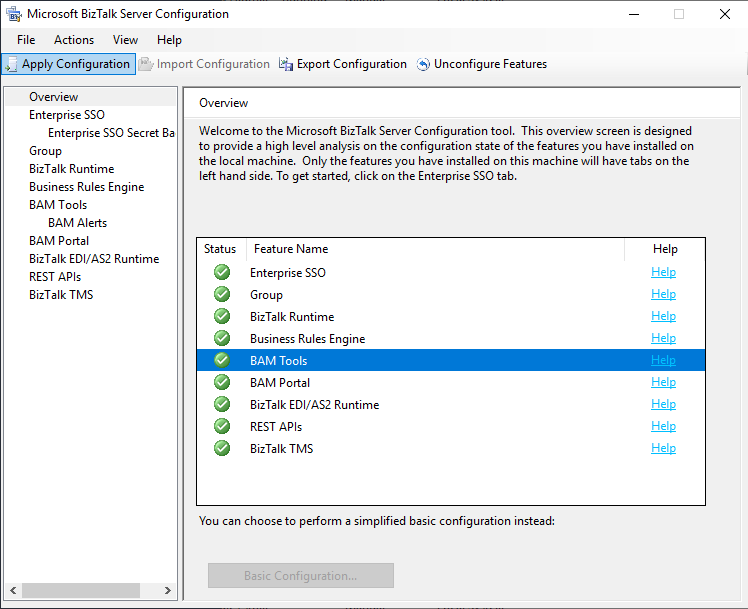
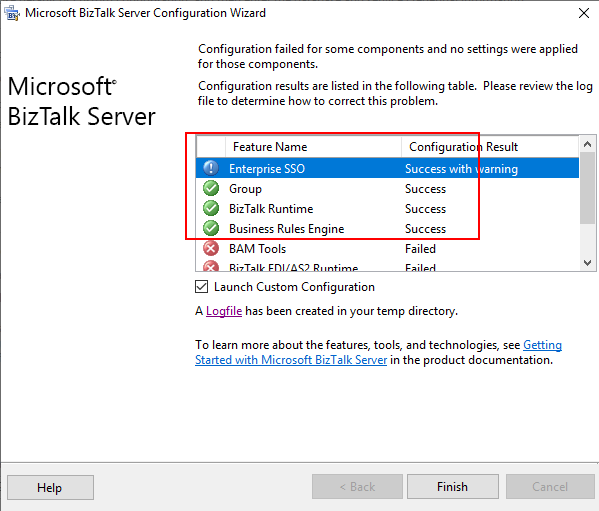
Following my last blog post and while I was trying to fix some issues regarding a BizTalk Server 2020 installation and configuration provided by my intern as is learning process. We end up solving some critical problems that allow us to install the platform’s most important components. Nevertheless, several components like BAM Tools, BAM Portal and BizTalk EDI/AS2 Runtime failed to configure:
Once, we inspect the logfile provide the the BizTalk Server Configurarion Wizard we found the following error message:
[2020-11-10 22:17:18:0674 Error Configuration Framework]Feature: [BAM Tools] Failed to configure with error message [Feature is skipped due to failed validation. Please go to Custom Configuration to fix the validation error.
Validation Error: <Exception Message=”Error validating the SSIS Catalog database. Please ensure SQL Server Integration Services is installed on the local machine and SSIS Catalog is created on target SQL Server.” Source=”BAMTools” HelpID=”idsErrorValidateSSISCatalogDatabase”><Exception Message=”SSIS Catalog (SSISDB) does not exist on server BTS2020LABAVMRG. Please create SSIS Catalog.” Source=”Microsoft.BizTalk.Bam.CfgExtHelper.ToolsHelper” HelpID=”error_SSISCatalogNotExists”/></Exception>]
[2020-11-10 22:17:18:0674 Error Configuration Framework]Feature: [BAM Portal] Failed to configure with error message [The Configuration of Feature ‘BAM Portal’ failed because the dependent Feature ‘BAM Tools’ was not configured. ]
[2020-11-10 22:17:18:0674 Error Configuration Framework]Feature: [BizTalk EDI/AS2 Runtime] Failed to configure with error message [Feature is skipped due to dependent feature (BAM Tools) failed to configure correctly.]
Three distinct errors but the last two are a sequence of the first one, all of them are related to the same cause.
Cause
SSISDB was automatically created during the BizTalk Server configuration process on previous versions if we enable BAM Portal. However, BAM Portal was deprecated in this new BizTalk Server version, and the configuration process no longer created the SSIS Catalog. Instead, we need to create the catalog manually.
If you don’t create the SSIS Catalog manually, you will not be able to configure BAM Portal. Nevertheless, you can always perform this operation whenever you think is required, and after that, configure BAM Portal.
Make sure you also configure SQL Server Database Mail feature if you wish to configure BAM Alerts on your BizTalk Server 2020 environment
Solution
The solution is very simple, we need to manually create the catalog by using the following instructions:
Open SQL Server Management Studio and connect to the SQL Server Database Engine.
In Object Explorer, expand the server node, right-click the Integration Services Catalogs node, and then click Create Catalog.
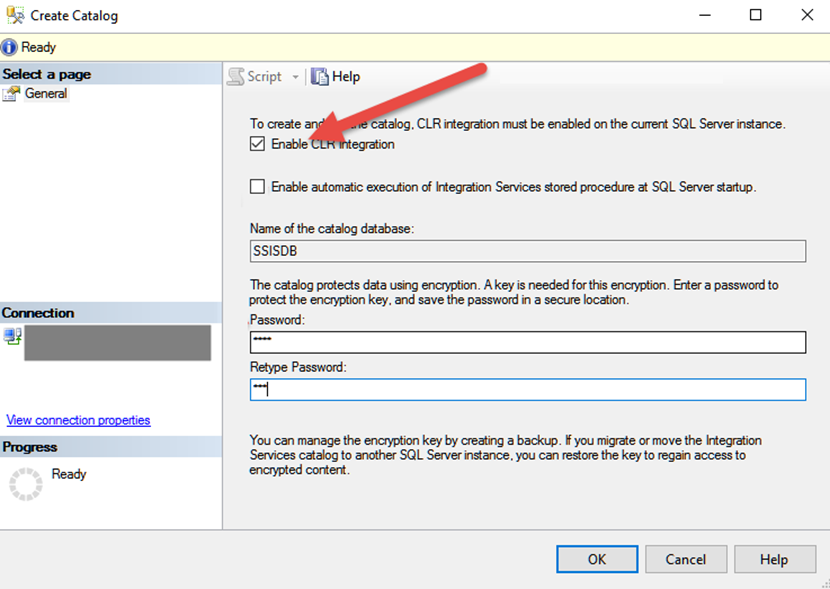
On the Create Catalog window, do the following configuration and click OK.
Select Enable CLR Integration option.
Enter a password to protect the encryption key.
And run the BizTalk Server Configuration again. At the end you will be able to configure all BizTalk Server components.
As the learning process’s path, all my interns or new team members, regardless of what technologies they will be using more, one of the first things they will do is create a BizTalk Server development environment from scratch. Yes, all my team members will have skills in all Integration technologies, BizTalk Server, Logic Apps, Service Bus, APIM, and the list goes on and on.
I don´t mind or care if you get it right the first time or not. Sometimes it is with failures that we learn best and more. And I find it curious that with these exercises, they will find problems that I would never imagine happening, so sometimes it is a learning process and continuous improvement for both or the team.
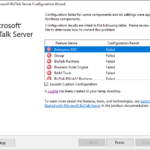
This is one of these cases. My recent team member, while he was trying to configure BizTalk Server using the BizTalk Server Configuration wizard, was getting a failure in all the components immediately:
As he did not understand why this problem was happening, he asked me for help. Once we analyze the log file generated by the configuration wizard, we saw this error:
[2020-11-10 22:08:14:0631 Error Configuration Framework]Feature: [Enterprise SSO] Failed to configure with error message [<Exception Message=”Failed to create the SQL database ‘SSODB’ on SQL Server ‘BTS2020LABAVMRG’ (with SSO Administrator account ‘SSO Administrators’).” Source=”SSO” HelpID=””><Exception Message=”(0xC0002A21) An error occurred while attempting to access the SSO database.
” Source=”SSO” HelpID=””><Exception Message=”An error occurred while attempting to access the SSO database. See the event log (on computer ‘BTS2020LABAVMRG’) for more details.
” Source=”SSO” HelpID=””/></Exception></Exception>]
Basically, this error message does not show any clue or cause as to why this problem is happening. Nevertheless, it will point to you a source to see more details about this issue: the event viewer.
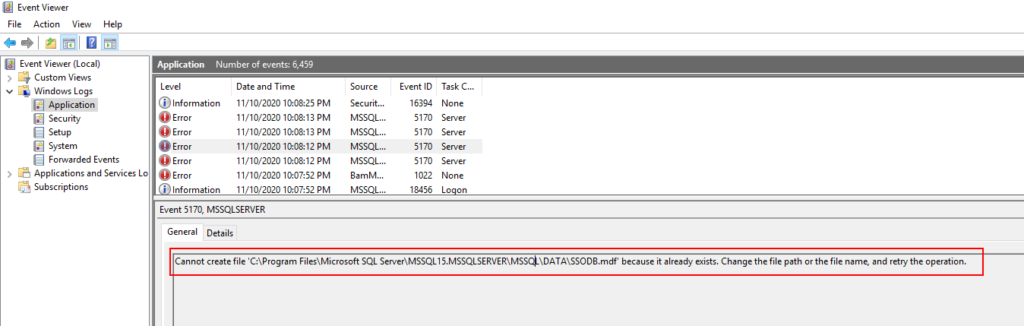
Once we chech the event viewer we got a very clear error message:
Cannot create file ‘C:Program FilesMicrosoft SQL ServerMSSQL15.MSSQLSERVERMSSQLDATASSODB.mdf’ because it already exists. Change the file path or the file name, and retry the operation.
Cause
The reason for this error to happen is clear. The BizTalk Server configuration wizard is trying to create the database files on the default SQL Server folders, but they already exist.
This error happened because my team member initially didn’t install all the required SQL Server components correctly. Once he was trying to add new features to an existing instance, he accidentally created another SQL Server instance.
After that, he uninstalled all the SQL Server instances and appropriately installed all the components, at least for now, let’s assume so. Nevertheless, while he was trying to do a Basic Configuration, he got that “strange” error.
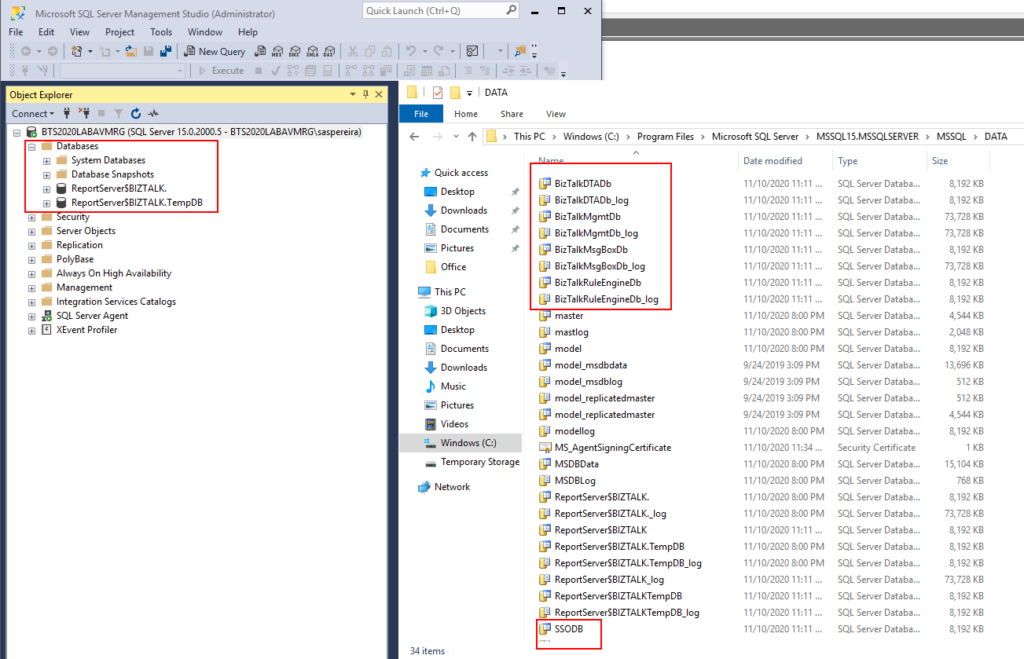
Thru the SQL Server Management Console, we couldn’t see these databases, not only SSO as the error description, but also with all other BizTalk Server databases. But once we saw that folder, we realize that the uninstalls did not delete BD files created before from the hard drive.
Solution
The solution is very simple, delete all the Unnecessary files from that folder, like:
SSO
SSO_log
BizTalkDTADb
BizTalkDTADb_log
BizTalkMgmtDb
BizTalkMgmtDb_log
BizTalkMsgBoxDb
BizTalkMsgBoxDb_log
BizTalkRuleEngineDb
BizTalkRuleEngineDb_log
And run the BizTalk Servr Configuration again. At the end you will be able to configure BizTalk Server.
Hey… but there still errors over there. Indeed, there are, but I will leave that to another post that will be published very soon. However, this blog post’s original error was solved, and we were able to configure the required and critical BizTalk Server components: SSO, Group, and BizTalk Runtime.
Recently a friend of mine, Howard S. Edidin, a truly T-Rex, passed away. He was a former BizTalk Server MVP and he dedicated most of his professional life to BizTalk Server and HL7, work that you can find perpetuated in this book: HL7 for BizTalk. I personally couldn’t find a better way to honor him than this way: How to install BizTalk Accelerator for HL7 in a standalone machine.
Install BizTalk Accelerator for HL7
Starting with BizTalk Server 2013 R2 and newer versions, the BTAHL7 installation includes a 32-bit installation package (BizTalk AcceleratorsA4HL7 on the BizTalk Server ISO) and a 64-bit installation package (BizTalk AcceleratorsA4HL7(64) on the BizTalk Server ISO).
On a 32-bit computer, install only the 32-bit package. On a 64-bit computer, install the 32-bit or 64-bit package. The 64-bit package enables the adapter and pipelines to run in both 32-bit and 64-bit mode.
Note: The user installing and configuring BTAHL7 must be a member of the BizTalk Administrators group, and a member of the Administrators group on the SQL Server where the BTAHL7 data is stored.
Note: BizTalk Server should have the basic components installed and configured, including a 32-bit BizTalkServerApplication host with standard out of the box adapters, Enterprise Single Sign-on (SSO), the Group, and Runtime.
To install BizTalk Accelerator for HL7 we need to:
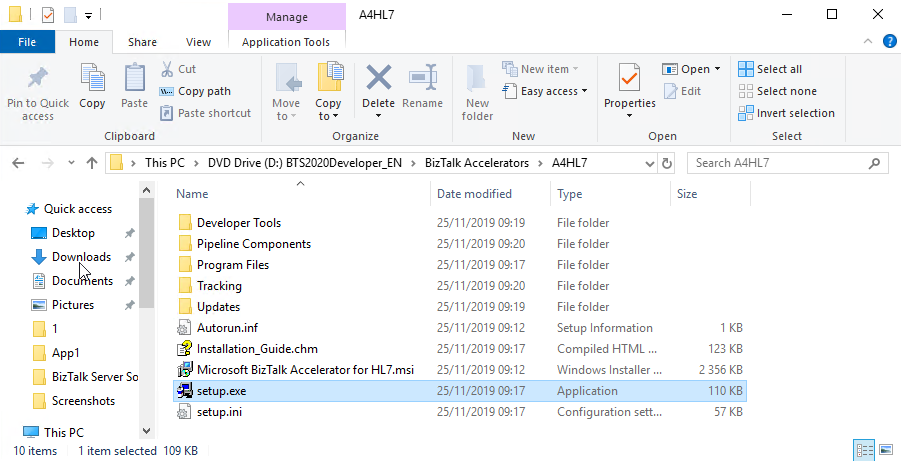
Run the BizTalk Accelerator for HL7 (A4HL7) setup.exe as Administrator.
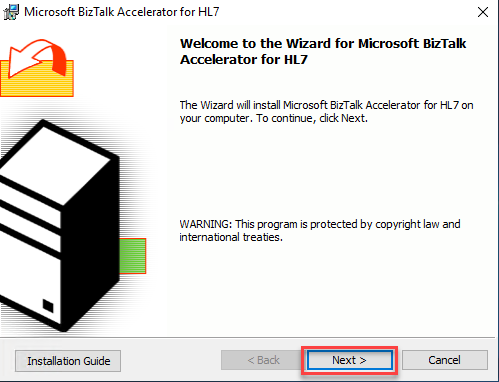
On the Welcome to the Wizard for Microsoft BizTalk Accelerator for HL7 page, select Next.
On the License Agreement page, accept the terms, and then select Next.
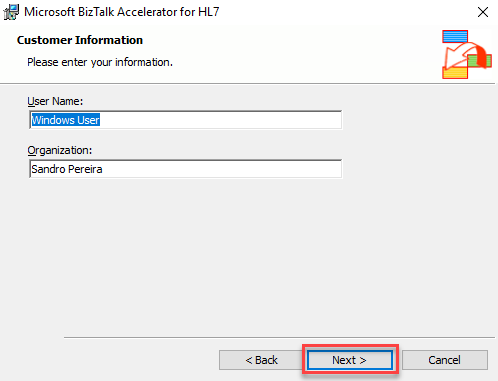
On the Customer Information page, enter your user name and organization, and then select Next.
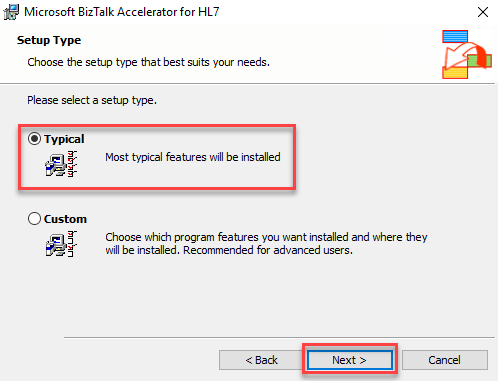
On the Setup Type page, select the Typical setup, and then select Next.
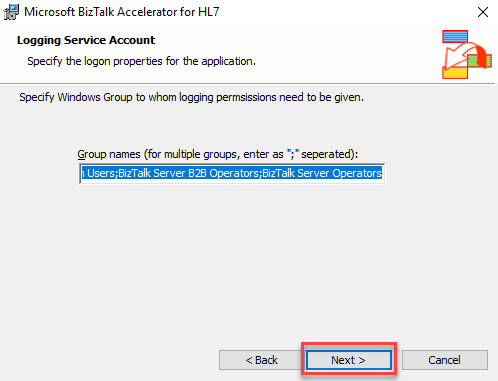
On the Logging Service Account page, leave the default group names and select Next.
The Logging Service Account page automatically gives the following groups the logging permissions:
BizTalk Server Administrators
BizTalk Application Users
BizTalk Server B2B Operators
BizTalk Server Operators
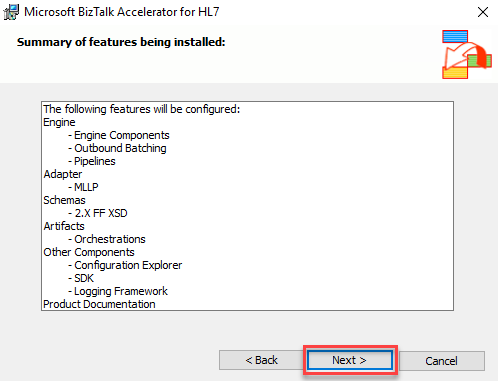
On the Summary of features being installed page, review the summary, and select Next.
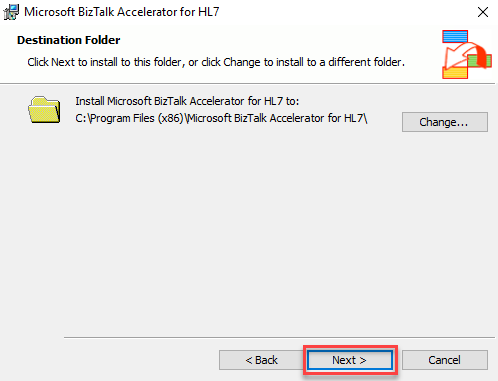
On the Destination Folder page, select Next to use the default folder. Or, select Change to choose a different installation folder.
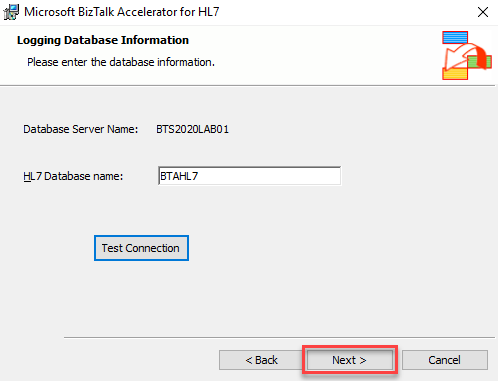
On the Logging Database Information page, leave the default configuration, and then select Next.
Database Server Name: The default value is the server name (name of the computer that the BizTalkMgmtDb database resides – you cannot change this value.).
HL7 Database name: Enter the name of the database that contains the data for your BTAHL7 solution, or accept the default setting, which is BTAHL7
You must use the ANSI-ASCII character set per database requirements; BTAHL7 does not support other character sets.
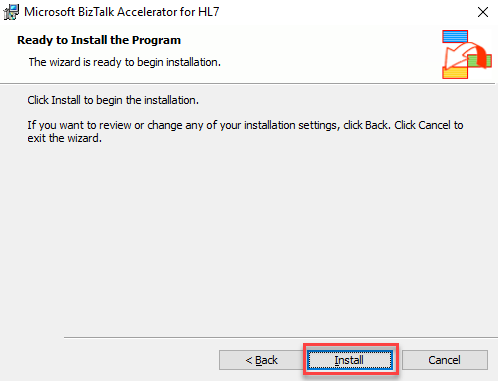
On the Ready to Install the Program page, select Install.
On the InstallShield Wizard Completed page, select Finish to complete.
In my infamous crusade to document any BizTalk Server error that I have already come across, here is another error, warnings, cause, and solutions blog post, this time joining another of my favorite topic: Maps.
While trying to deploy a BizTalk Server solution – MSI – into production. While trying to import the BizTalk Application from the .msi file into the BizTalk group by using the BizTalk Server Administration Console by:
Opening the BizTalk Server Administration Console for the instance of BizTalk Server into which you want to import the application. Click Start, click All Programs, click Microsoft BizTalk Server 20xx, and then click BizTalk Server Administration.
In the console tree, expand BizTalk Server Administration, and then expand BizTalk Group.
Right-click Applications, point to Import and then click MSI file.
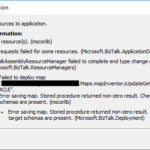
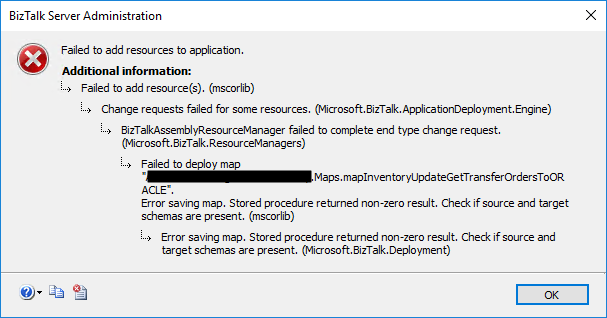
I came across this error during the progress phase:
Failed to add resource(s). (mscorlib) – Change requests failed for some resources. (Microsoft.BizTalk.ApplicationDeployment.Engine) – BizTalkAssemblyResourceManager failed to complete end type change request. (Microsoft.BizTalk.ResourceManagers) – Failed to deploy map “FULLY-QUALIFIED-MAP-NAME”. Error saving map. Stored procedure returned non-zero result. Check if source and target schemas are present. (mscorlib) – Error saving map. Stored procedure returned non-zero result. Check if source and target schemas are present. (Microsoft.BizTalk.Deployment)
Cause
In previous versions of BizTalk Server, mainly 2010 and 2009, a bug was reported related to this issue. That problem occurred because BizTalk was trying to deploy the mapper assembly before the schema assembly. The solution for that case was installing the cumulative update 4 (or above) for BizTalk Server 2010 or the cumulative update 7 for BizTalk Server 2010.
Nevertheless, I was using BizTalk Server 2016, so that wasn’t the case. Luckily for us, the error provides a piece of clear evidence where the error is happening: FULLY-QUALIFIED-MAP-NAME.
To understand this issue, I went to my dev environment and opened that solution to analyze that specific map, mainly to know which schemas were being used. I then realize that one of the schemas was from an external assembly, a common schema that could be used by several applications.
The cause of this error was precisely that. I used a reference schema (external DLL) inside my map outside the project I was trying to deploy. But that assembly – DLL containing the map’s schema – was not yet deployed in the environment.
Solution
Make sure to deploy all the reference assemblies, special the ones outside your visual studio solution, are deployed before you deploy your solution. And in this case, make sure that all schemas are deployed before installing the maps.
But once again, the critical point here is to make sure to deploy all schemas outside your solution that are being used. Because, even if we use specific projects for maps and schemas inside our solution, BizTalk Server is smart enough to see the dependencies and deploy it accordingly.
After installing the external assembly that contains the schema used by that map, I was able to deploy the BizTalk project into production successfully.
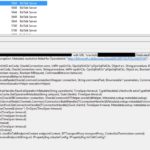
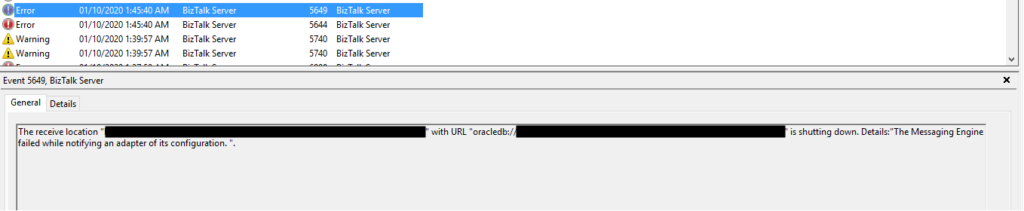
Following my previous blog post, Oracle.DataAccess.Client.OracleException: ORA-00942: table or view does not exist, and once I was able to solve that last issue, I was surprised by a brand new communication error between BizTalk Server and ORACLE, fortunately for me, this time with a more explicit error message: ORA-00942: table or view does not exist.
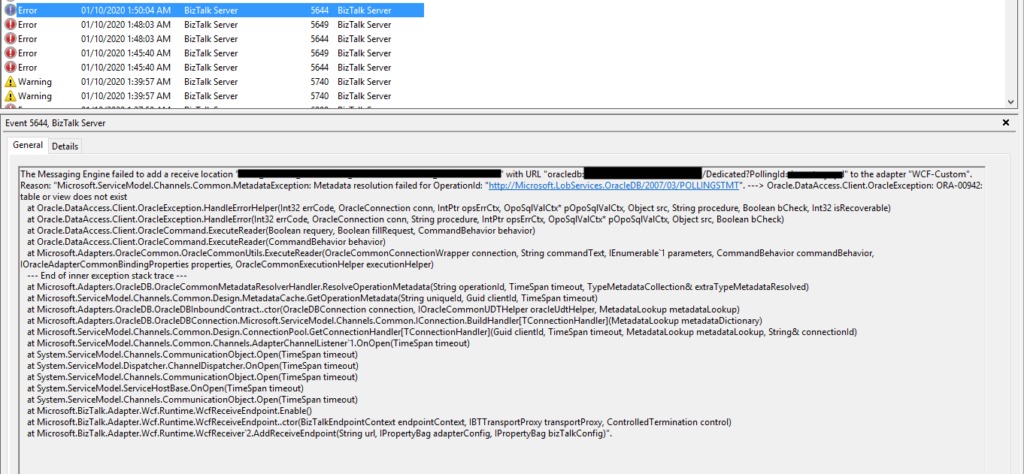
The Messaging Engine failed to add a receive location “ORACLE_RECEIVE_LOCATION_NAME” with URL “oracledb://SERVER_ADDRESS:PORT_NUMBER/SERVICE_NAME/Dedicated?PollingId=polling_id” to the adapter “WCF-Custom”. Reason: “Microsoft.ServiceModel.Channels.Common.MetadataException: Metadata resolution failed for OperationId: “http://Microsoft.LobServices.OracleDB/2007/03/POLLINGSTMT“. —> Oracle.DataAccess.Client.OracleException: ORA-00942: table or view does not exist at Oracle.DataAccess.Client.OracleException.HandleErrorHelper(Int32 errCode, OracleConnection conn, IntPtr opsErrCtx, OpoSqlValCtx* pOpoSqlValCtx, Object src, String procedure, Boolean bCheck, Int32 isRecoverable) at Oracle.DataAccess.Client.OracleException.HandleError(Int32 errCode, OracleConnection conn, String procedure, IntPtr opsErrCtx, OpoSqlValCtx* pOpoSqlValCtx, Object src, Boolean bCheck) at Oracle.DataAccess.Client.OracleCommand.ExecuteReader(Boolean requery, Boolean fillRequest, CommandBehavior behavior) at Oracle.DataAccess.Client.OracleCommand.ExecuteReader(CommandBehavior behavior) at Microsoft.Adapters.OracleCommon.OracleCommonUtils.ExecuteReader(OracleCommonConnectionWrapper connection, String commandText, IEnumerable`1 parameters, CommandBehavior commandBehavior, IOracleAdapterCommonBindingProperties properties, OracleCommonExecutionHelper executionHelper) — End of inner exception stack trace — at Microsoft.Adapters.OracleDB.OracleCommonMetadataResolverHandler.ResolveOperationMetadata(String operationId, TimeSpan timeout, TypeMetadataCollection& extraTypeMetadataResolved) at Microsoft.ServiceModel.Channels.Common.Design.MetadataCache.GetOperationMetadata(String uniqueId, Guid clientId, TimeSpan timeout) at Microsoft.Adapters.OracleDB.OracleDBInboundContract..ctor(OracleDBConnection connection, IOracleCommonUDTHelper oracleUdtHelper, MetadataLookup metadataLookup) at Microsoft.Adapters.OracleDB.OracleDBConnection.Microsoft.ServiceModel.Channels.Common.IConnection.BuildHandler[TConnectionHandler](MetadataLookup metadataDictionary) at Microsoft.ServiceModel.Channels.Common.Design.ConnectionPool.GetConnectionHandler[TConnectionHandler](Guid clientId, TimeSpan timeout, MetadataLookup metadataLookup, String& connectionId) at Microsoft.ServiceModel.Channels.Common.Channels.AdapterChannelListener`1.OnOpen(TimeSpan timeout) at System.ServiceModel.Channels.CommunicationObject.Open(TimeSpan timeout) at System.ServiceModel.Dispatcher.ChannelDispatcher.OnOpen(TimeSpan timeout) at System.ServiceModel.Channels.CommunicationObject.Open(TimeSpan timeout) at System.ServiceModel.ServiceHostBase.OnOpen(TimeSpan timeout) at System.ServiceModel.Channels.CommunicationObject.Open(TimeSpan timeout) at Microsoft.BizTalk.Adapter.Wcf.Runtime.WcfReceiveEndpoint.Enable() at Microsoft.BizTalk.Adapter.Wcf.Runtime.WcfReceiveEndpoint..ctor(BizTalkEndpointContext endpointContext, IBTTransportProxy transportProxy, ControlledTermination control) at Microsoft.BizTalk.Adapter.Wcf.Runtime.WcfReceiver`2.AddReceiveEndpoint(String url, IPropertyBag adapterConfig, IPropertyBag bizTalkConfig)”.
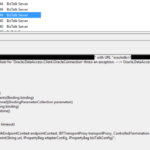
Once again, followed by the following error:
The receive location “ORACLE_RECEIVE_LOCATION_NAME” with URL “oracledb://SERVER_ADDRESS:PORT_NUMBER/SERVICE_NAME/Dedicated?PollingId=polling_id” is shutting down. Details:”The Messaging Engine failed while notifying an adapter of its configuration. “.
Of course, these two errors are related, but the first one is the one that has more precise information regarding what is happening.
Cause
As the error message describes, the table or the view you are trial to communicate doesn’t exist on the ORACLE database you are trying to communicate.
Solution
I wish all problems were that simple!
To solve this issue, you need to contact your ORACLE team and make sure that they properly deploy the missing databases, tables, or views.
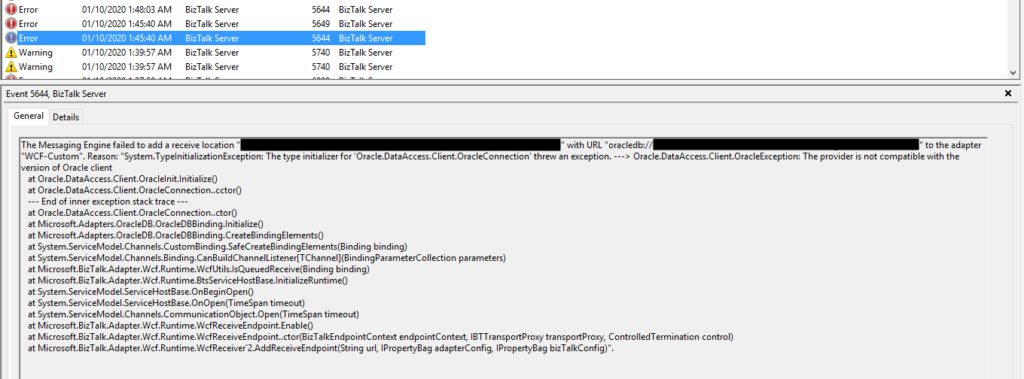
I’m back to one of my favorite topics, error, warnings, cause, and solutions blog post – still have plenty of them in my backlog to be published. I recently installed a new BizTalk Server solution in production in one of my clients that integrate with ORACLE. When I try to activate the Oracle Receive ports, I got the following error inside Event Viewer:
The Messaging Engine failed to add a receive location “ORACLE_RECEIVE_LOCATION_NAME” with URL “oracledb://SERVER_ADDRESS:PORT_NUMBER/SERVICE_NAME/Dedicated?PollingId=polling_id” to the adapter “WCF-Custom”. Reason: “System.TypeInitializationException: The type initializer for ‘Oracle.DataAccess.Client.OracleConnection’ threw an exception. —> Oracle.DataAccess.Client.OracleException: The provider is not compatible with the version of Oracle client at Oracle.DataAccess.Client.OracleInit.Initialize() at Oracle.DataAccess.Client.OracleConnection..cctor() — End of inner exception stack trace — at Oracle.DataAccess.Client.OracleConnection..ctor() at Microsoft.Adapters.OracleDB.OracleDBBinding.Initialize() at Microsoft.Adapters.OracleDB.OracleDBBinding.CreateBindingElements() at System.ServiceModel.Channels.CustomBinding.SafeCreateBindingElements(Binding binding) at System.ServiceModel.Channels.Binding.CanBuildChannelListener[TChannel](BindingParameterCollection parameters) at Microsoft.BizTalk.Adapter.Wcf.Runtime.WcfUtils.IsQueuedReceive(Binding binding) at Microsoft.BizTalk.Adapter.Wcf.Runtime.BtsServiceHostBase.InitializeRuntime() at System.ServiceModel.ServiceHostBase.OnBeginOpen() at System.ServiceModel.ServiceHostBase.OnOpen(TimeSpan timeout) at System.ServiceModel.Channels.CommunicationObject.Open(TimeSpan timeout) at Microsoft.BizTalk.Adapter.Wcf.Runtime.WcfReceiveEndpoint.Enable() at Microsoft.BizTalk.Adapter.Wcf.Runtime.WcfReceiveEndpoint..ctor(BizTalkEndpointContext endpointContext, IBTTransportProxy transportProxy, ControlledTermination control) at Microsoft.BizTalk.Adapter.Wcf.Runtime.WcfReceiver`2.AddReceiveEndpoint(String url, IPropertyBag adapterConfig, IPropertyBag bizTalkConfig)”.
Followed by the following error:
The receive location “ORACLE_RECEIVE_LOCATION_NAME” with URL “oracledb://SERVER_ADDRESS:PORT_NUMBER/SERVICE_NAME/Dedicated?PollingId=polling_id” is shutting down. Details:”The Messaging Engine failed while notifying an adapter of its configuration. “.
Of course, these two errors are related, but the first one is the one that has more precise information regarding what is happening.
Cause
Usually, these types of problems occur when you don’t have the correct versions of the Oracle Data Provider for .NET (ODP.NET) and the Oracle client, which are part of the Oracle Data Access Components (ODAC). Still, it may occur, or similar errors, for other several reasons like for example:
The Oracle Data Provider DLLs are not properly registered into GAC.
Mistmach installation versions between the components, for example between Oracle Client and ODP.NET.
Mistmach installation versions between 32bit or 64bit ODAC components.
Unfortunately, kind of, none of the above reasons were justifying my issues since I already had several ORACLE receive locations, running with success on the environment.
When I investigate the other running ports, I realized that all of them were running the 64-bit Host Instance. And this one that was getting problems was running in 32-bit Receive Host Instance. I then realize that ODAC 32-bit components were not properly installed in production.
Even if you don’t use it, it is essential to have always the 32, and 64-bit of each adapter installed correctly in your environment. If that’s not possible, make sure to associate the 32, and 64-bit Receive Handlers and Send Handlers for each adapter accordingly.
Solution
In my case, the solution was simple, since I had already several ORACLE receive location successfully running in the environment. I have to access the receive location and configure the Receive Handler to be the 64-bit Host Instance.
After this modification, the problem was gone, and I could pull data from the ORACLE database. Otherwise, make sure to install the necessary 32-bit or 64-bit ODAC components correctly.
When you deploy a new BizTalk Server solution to a different environment, and if for some reason, you don’t use or cannot use CI/CD (Continuous integration and continuous delivery):
Your environment is too small to justify using CI/CD;
The client doesn’t provide access to Visual Studio Team Services (VSTS);
Don’t like to use BTDF (Deployment Framework for BizTalk);
Not using custom tools like BizTalk Bindings Exporter tool;
Then one of the most common tasks you need to do is to change all the URI from all the ports, Receive Ports and Send Ports, from the binding files.
Of course, you can do it in many different ways, for example:
Before import to the new environment, open notepad or any other editor, and manually replace all the Inbound Transport URL and Outbound Transport URL;
Import AS IS and on the Administration Console, manually change these parameters;
Or script this process;
This is not always a quick and easy job. Luckily for us, these tasks can be automated, leading them to become simpler, faster, and avoid fewer errors.
This script that I will be showing you can be very useful, for example, in scenarios that during the lifecycle of existing applications, one system got updated or migrated to a different version or server (or both), and we need to update the URI or part of it on a range of the Receive Locations according to the new configuration/specification.
PowerShell script overview
With this PowerShell sample, we will be able to set or update the URI (address) or part of the URI on a list of BizTalk Server Receive Locations deployed in your BizTalk Server environment.
foreach($receivePort in $catalog.ReceivePorts)
{
# For each receive location in your environment
foreach($recLocation in $receivePort.ReceiveLocations)
{
# In this case ...
if($rcvLocations.Contains($recLocation.Name))
{
[string] $address = $recLocation.Address
$address = $address.Replace("DEV-SERVER-NAME","PRO_SERVER-NAME")
# Sample of additional custom changes
if($address.Contains("PREFIX"))
{
$address = $address.Replace("DATABASE","DATABASE-WITH-PREFIX-A")
}
else
{
$address = $address.Replace("DATABASE","DATABASE-WITH-PREFIX-B")
}
$recLocation.Address = $address
}
}
}
This script was tested in BizTalk Server 2016.
Download
THIS POWERSHELL SCRIPT IS PROVIDED “AS IS”, WITHOUT WARRANTY OF ANY KIND.