We are delighted to inform you that BizTalk360 Stop Alerts for maintenance capability is enhanced, and it is renamed as “Schedule Maintenance”. As we know BizTalk360 keeps up its standard by improvising the existing feature and implements new functionality into it in a way that eases the user experience to the next level.
At present in BizTalk360, the user can only set immediate maintenance schedules. In the upcoming release, users will be able to create immediate maintenance, one-time maintenance and recurrence maintenance associating the business holiday calendar. In recurrence maintenance, users can create daily, weekly and monthly recurrence.
Importance of Having Maintenance
Software maintenance is a part of the Software Development Life Cycle. Its main purpose is to modify and update software applications after delivery to correct faults and to improve the performance of the system. It is a very broad activity that takes place soon after the development completed. It optimizes the system’s performance by reducing errors, eliminating useless development and applying advanced development.
In the BizTalk Server, you may have regular maintenance implemented depending on resource availability/skill-set and organizational focus based on the following cases,
BizTalk Message Box Health Maintenance
BizTalk Performance Tuning
Management of BizTalk Server versioning, hotfixes, and service packs
Verification of source code location and management
BizTalk Security Lockdown
BizTalk Source Code Control
Configuration of BizTalk Test Environment
Establishment of rules for proper BizTalk Server Administration, Release Management, Operations Management, Development Management, and Database Management
Why Schedule Maintenance is Implemented in BizTalk360?
BizTalk360 allows you to set up monitoring on application artifacts and allows you to auto-correct artifacts that have hit an unexpected state. During day to day operations, it is very helpful to have this monitoring in place as it saves the BizTalk administrator(s) a lot of time because they don’t have to do that monitoring manually. However, there are also times that you don’t want this monitoring to be active. Thinking of the scenario during maintenance windows because of deployments or installation of security patches. In such cases you may need to temporarily stop monitoring, BizTalk360 provides a feature called ‘Stop Alerts for Maintenance’, which enabled the user to set up a single maintenance window.
Enriched Schedule Maintenance Functionality
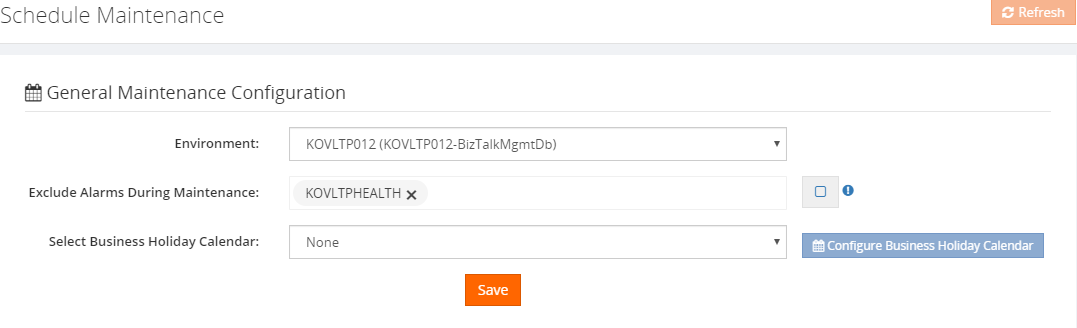
The latest BizTalk360 will hold the enriched form of stop alerts for maintenance that is nothing but the schedule maintenance. In which you can set the following maintenance,
Immediate maintenance
One-Time maintenance
Recurrence maintenance
Note: Even if the system is set for maintenance you may need to get alerts for any of the configured artifacts. In such case BizTalk360 ease you with the so-called field “Exclude alarm” in the general maintenance configuration part. Select the alarm for which you wanted to receive the alert even under maintenance.
Immediate Maintenance
Immediate maintenance is used to set the maintenance from the current time (by enabling the immediate toggle button) till the end date and end time which is set.
Let’s consider a couple of scenarios where the BizTalk Server need immediate maintenance,
The running BizTalk Server or services go down
The BizTalk application does not function as expected
In this case, if your infrastructure is unhealthy, then you need to undergo maintenance on a swift to bring the BizTalk environment up and healthy. At the same time, you (based on the business impact there is a customer, who holds 200 plus alarms under an environment) would have configured alarm for monitoring the artifacts in the corresponding environment. So that the alarm will keep triggering the alerts as per the configuration. Since the environment itself is down the alarms will meet the threshold condition and will start sending the violation alerts, as the same health alarm and data monitoring alarm will be sending the alert too.
In addition to it, if an alarm holds Autocorrect then the auto-correct functionality will try to push the artifacts to match the expected state, due to which the down alert will be sent, which may lead to full your inbox with BizTalk360 alerts.
To avoid such a situation, you can set the immediate maintenance just by enabling the toggle and based on the maintenance prominence you can set the end date & time. So that the BizTalk360 monitoring service will no longer perform the autocorrect and will not send. At this point in time, you can set the immediate maintenance which prevents the monitoring service from sending the alerts for the environment.
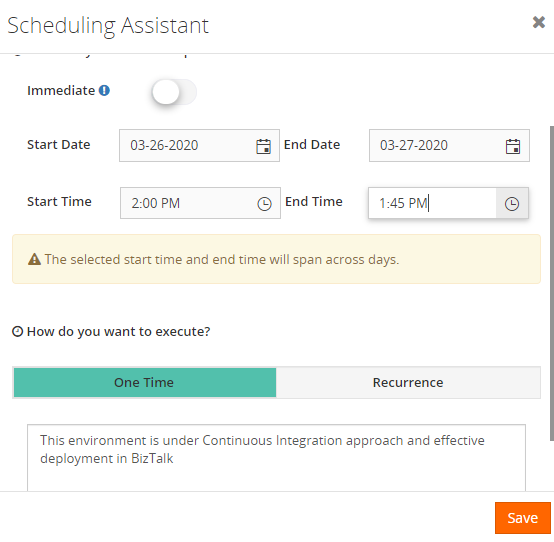
One-Time Maintenance
By using the One-Time maintenance, you can able to schedule/plan your future maintenance period in advance. For scheduling the One-Time maintenance click on the One-Time in the selection bar and set the Start date and start time when you wanted to get the maintenance enabled in BizTalk360 and set the end date and time when you wanted your maintenance to stop.
Say for instance, if your BizTalk server going to progress on a continuous integration approach and effective deployment then this process may take about a day or two based on the impact of the application going to get deployed and it will be a pre-planned approach which BizTalk Server undergoes. For which you can set the maintenance schedule in advance using our One-Time maintenance in BizTalk360.
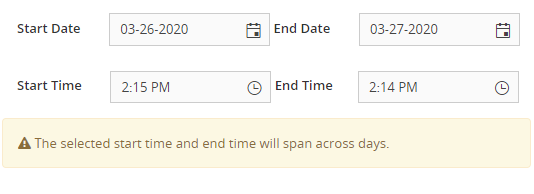
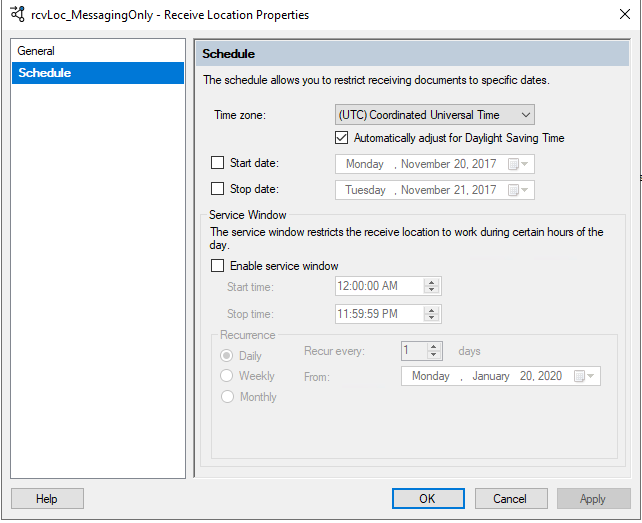
Note: BizTalk360 will allow you to set the span across days for One-Time and Recurrence maintenance as shown in the below figure.
Recurrence Maintenance
In general, you might be aware of Administrative Maintenance in BizTalk Server, which is maintenance checks should be performed on a BizTalk Server system on a routine basis as part of a preventive maintenance program. Performing the checks will help you determine whether there are reliability, administration, security, or performance issues with the system.
BizTalk suggest best practices for Administrative Maintenance as below,
For weekly maintenance checks –Reliability check, Administration check, Security check and Performance check (Click here for more details).
For monthly maintenance checks – Reliability check, Administration check, Integrity check, Security check and Performance check (Click here for more details).
Considering the Administrative Maintenance in BizTalk Server, Recurrence Maintenance has been implemented as an icing on the cake in Schedule Maintenance. Recurrence maintenance is a type of maintenance which allows you to create maintenance once, and then have it recreated automatically after a designated time interval. You can make any existing maintenance into recurring maintenance by simply using the recurrence button at the top of the task window. It will let the maintenance run in BizTalk360 between the Start Date -Start Time and End Date – End Time set, during which the monitoring service will stop sending the alert for the corresponding environment.
Recurrence maintenance comes with the following maintenance possibilities,
Daily
Weekly
Monthly- Date of the Month & Day of the Week
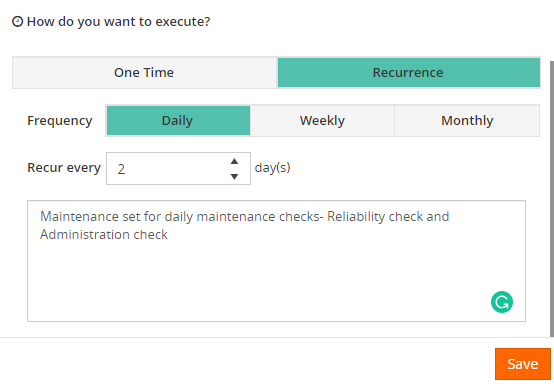
Recurrence Maintenance – Daily
Maintenance will be set daily on stipulated the start and end time and based on the recur value set, the maintenance will be running on an alternative day, i.e. if the recurring value is set as 2, the maintenance will run 2 days once and so on.
Let us consider that if BizTalk360 sends an alert message during the non-business hours, the message would get piled up in your inbox. So that you may tend to miss any important alert which may have a huge business impact. As a solution to it, you can set the Daily maintenance during the non-business hours which will relieve you from this great mess.
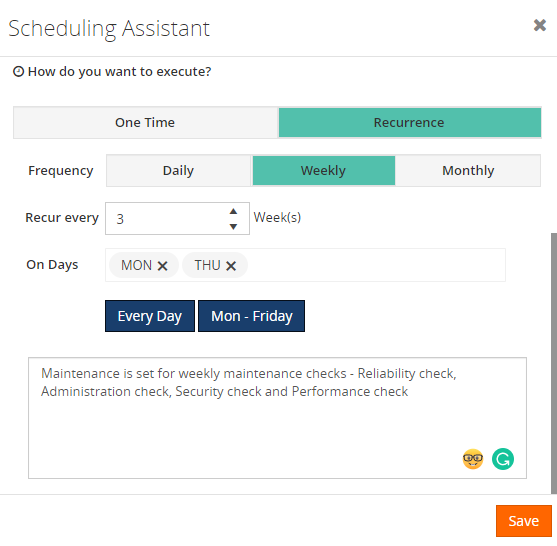
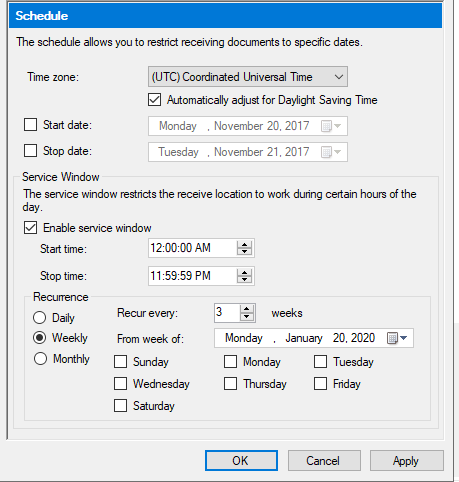
Recurrence Maintenance – Weekly
Maintenance will be set weekly on stipulated the start and end time and based on the recur value set, the maintenance will be running on the alternative selected week, i.e. if the recurring value is set as 3, the maintenance will run 3 weeks once and so on. Say, for instance, If the recurring value is set to 3 and on days is set to Monday and Thursday, then by calculating the start date checks for the next 3rd occurrence Monday and will set BizTalk360 into maintenance mode. As the same checks for 3rd occurrence Thursday and the next 3rd occurrence Monday from that day on and goes on and on till the end date set.
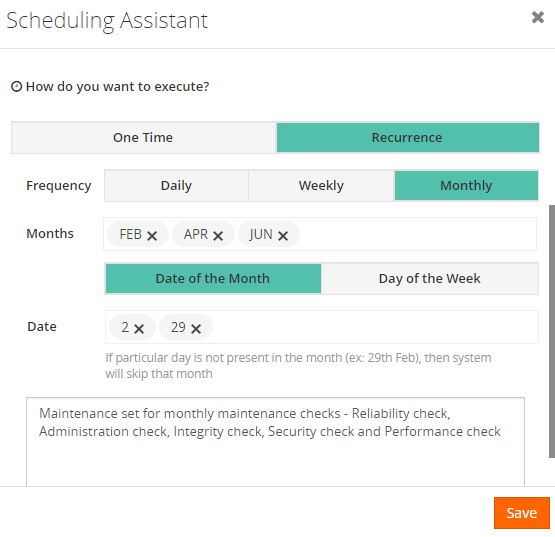
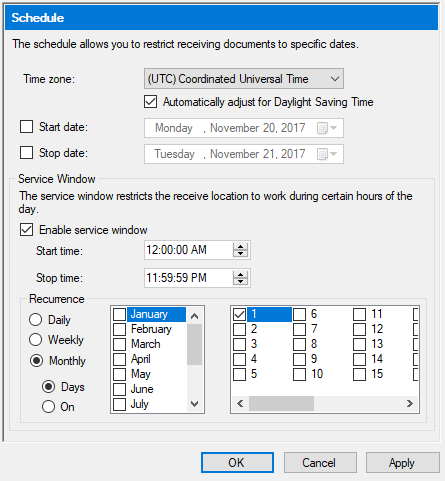
Recurrence maintenance – Monthly
Maintenance will be set monthly on the desired start and end time. By choosing the monthly recurrence you can set maintenance in the below two combination
Date of the Month
Day of the Week
Date of the Month: Maintenance will be running regularly on the corresponding date of month which is chosen in the Date and Months field. Say for instance, if the month field provided with February, April, June and date field is provided with 2, 29 then BizTak360 will calculate the current date (e.g. 25-02-2020) based on which the maintenance will run on February 29 (only for leap year if not it will consider next cycle on April 2) on the maintenance gets completed it will calculate the next cycle April 2 and so on.
Day of the Week: Maintenance will be running regularly on the week of the month that is chosen on the month’s field. Wherein day of the week recurrence, you can able to precisely set the weekly maintenance i.e. if you want to create recurring maintenance repeating on 1st and 3rd Wednesday of every month. However, you can select the month FEB, APR and days e.g. 1st & 3rd WED. So that the maintenance will run on every 1st and 3rd WED of the selected month.
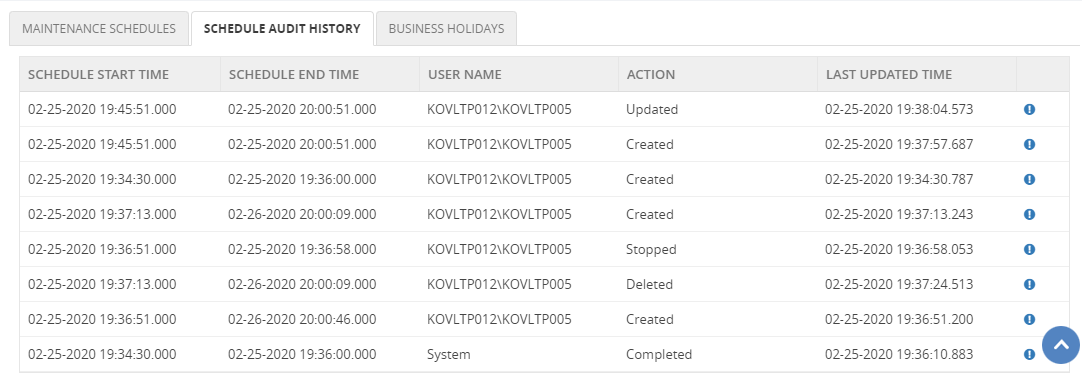
Schedule Audit History
Adding a feather to the crown, BizTalk360 provides you audit functionality for Schedule maintenance. Keeping the core impact of the maintenance in concern audit for the below action is provided,
Create
Update
Delete
Stop
Completed
As we know the importance of having maintenance in BizTalk360. It is always a good habit to keep the maintenance in a track so that you can able to know who had set/edited/stop/deleted the maintenance for what cause.
Note: Only the superuser is permitted to take control over the schedule maintenance
Note: When the maintenance is set, BizTalk360 will show the maintenance alert pop up in the operation and monitoring home dashboard and you can able to stop the maintenance from the home screen of operation and monitor section just by clicking on the “Stop Maintenance” button in which you can also provide the reason in the popup for stopping the maintenance same will be audited in the schedule audit history.
Conclusion
We can assure the new improvements in the schedule maintenance capability will give you smooth control over BizTalk360 monitoring during the infrastructure maintenance. Why not, give BizTalk360 a try! It takes about 10 minutes to install on your BizTalk environments and you can witness and check the security and productivity of your own BizTalk Environments.
As of today, there is still no BizTalk Server 2020 Developer VM image available in Azure.
So, what do we need to do to configure a developer environment in Azure?
Here are some easy steps to get you up to running in no time:
Disclaimer: an MSDN subscription is required to make use of developer licenses.
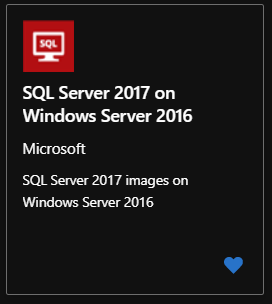
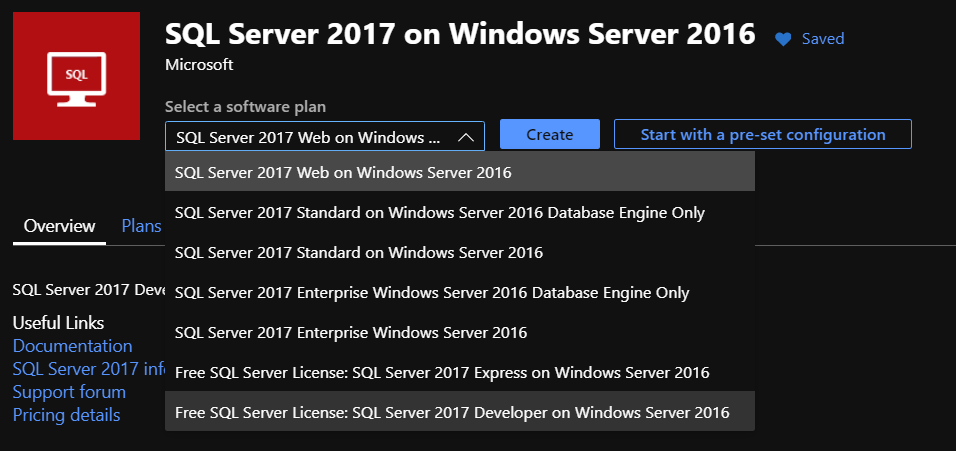
Step 1: Create a new VM based on the “SQL Server 2017 on Windows Server 2016 image”:
Why? It is possible to assign this image a “free developer license”. This image also comes with SQL Server 2017 (and Management Studio) installed and preconfigured.
Step 2: Download and install Visual Studio 2019 Professional
Step 3: Download, install and Configure BizTalk Server 2020 Developer Edition from MSDN.
Step 5: Install the BizTalk Server Developer tools (more info there)
NEW: With Visual Studio 2019 and BizTalk Server 2020, the Developer tools are now installed using a separate plugin.
Conclusion: In 5 easy steps, my development environment was ready in about 2 hours. The VM size used was a “Standard D4s v3 (4 vcpus, 16 GiB memory)”.
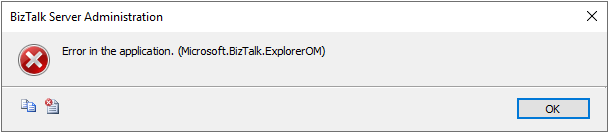
Back to one of my favorite topics: Errors and Warnings, Causes, and Solutions since I have several issues to report in my internal OneNote. But in fact, this one happened today while I was implementing a new RosettaNet PIP on a client… nevertheless, this is not specific to RosettaNet.
I
was making a small improvement to an existing process/project to allow specific
orchestrations to be activated based on some properties promoted from the
message by applying a filter on the activate Receive Message shape. Everything
was going peacefully well until I tried to redeploy the Visual Studio solution.
Once I try to redeploy the BizTalk Server Visual Studio solution from Visual
Studio, I got the following error:
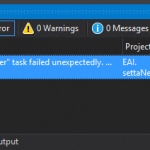
Error The “MapperCompiler” task failed unexpectedly.
System.UnauthorizedAccessException: Access to the path ‘C:……MapsmapNotifyOfShipmentReceipt_To_PIP4B2.btm.cs’ is denied.
at Microsoft.VisualStudio.BizTalkProject.BuildTasks.MapperCompiler.Execute()
at Microsoft.Build.BackEnd.TaskExecutionHost.Microsoft.Build.BackEnd.ITaskExecutionHost.Execute()
at Microsoft.Build.BackEnd.TaskBuilder.<ExecuteInstantiatedTask>d__26.MoveNext() EAI.RosettaNet.4B2.
The funny part was that this was a small change that I did in an existing solution that already was running fine in the environment… and the change was a small improvement in the orchestration, not on the map!
Cause
Well,
I don’t know why the compiler decided to pick the mapper to complain. But This
issue is not related to any kind of maps you may have in your solution.
And
yes, the user that I was using to open, and build the solution had full rights
to access the file in question, all full rights to deploy stuff to the BizTalk
Server environment.
There are several possible causes for you to get such Access Denied errors when deploying BizTalk solutions directly from Visual Studio. Most common is that you don’t have the right BizTalk privileges to deploy artifacts, or in other words, you are not a local Administrator.
But most of the time is simpler than that and indeed is related to additional securities setting present in recent Windows Server versions. For you to be able to successfully deploy a BizTalk Server solution directly from Visual Studio, you must run Visual Studio as an Administrator, or with elevated permissions, because BizTalk assemblies need to be deployed into the GAC. What normally happens, is that if you have User Account Control (UAC) activated, or sometimes even deactivated, there are some additional securities setting present in recent Windows Server versions that, by default, doesn’t run Visual Studio with elevated permissions.
This
was indeed one of these cases, Visual Studio was not open with elevated
permissions.
Solution
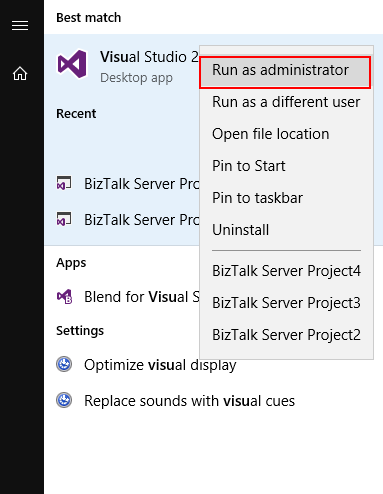
The quick solution is for you to run
Visual Studio as an Administrator by simply run below step:
Right-click
under Visual Studio and choose Run as administrator option.
The problem with this approach is that
you need to remember yourself to do it every time you want to run Visual Studio.
Otherwise, the next time you try to deploy the solution, it will fail again
with the same error.
If you try now to deploy your solution, you will see that this problem goes aways and you will be able to deploy it successfully (assuming that the solution does not actually have errors).
We are happy to announce that BizTalk360 extends its support to monitor Cluster NT services. Currently, you can monitor the cluster SQL server components like Disk, system resources, event logs.
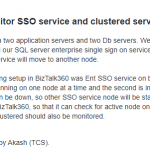
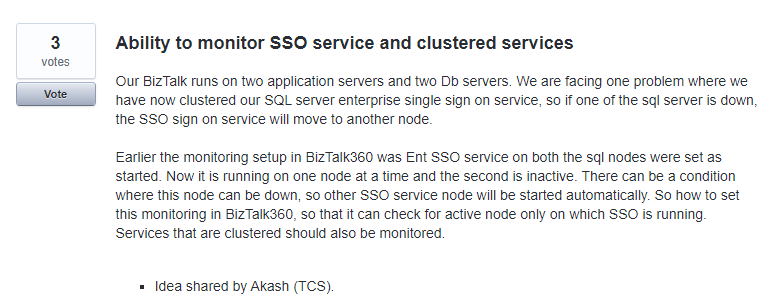
Consider this scenario, the Clustered SQL server is running under node 1 and the cluster NT service “Enterprise single sign-on” is running under node 2. Before, we cannot monitor clustered NT services through BizTalk360. As we are valuing each customer request, we brought this capability in BizTalk360 based on customer feedback.
Clustered NT Service in SQL Server
Through Failover Clustering, you can make almost anything highly available. This does not only include programs and applications, but you can make any windows service running on the cluster highly available – even if it is custom or from a 3rd party. These can be created, managed by and integrated with Failover Clustering using the Generic Service resource type. Generic Service resource type allows us to manage Windows Services as cluster resources.
Consider that, one service is identified as the active node which is running the production workload, and the other is a passive node. If the active node fails, the passive node becomes the active node and begins to run the operation with some minimal failover downtime and without any distraction. BizTalk Server admins/support people find this would be a cumbersome task to monitor the clustered NT services every time through RDP connection to all servers. To make their support life easy, we have implemented this feature in BizTalk360.
From now on, you can monitor those generic windows service in BizTalk360.
How to Configure Clustered Windows Services in BizTalk360?
In BizTalk360, you can monitor the Clustered Windows Services which is configured as a Generic type.
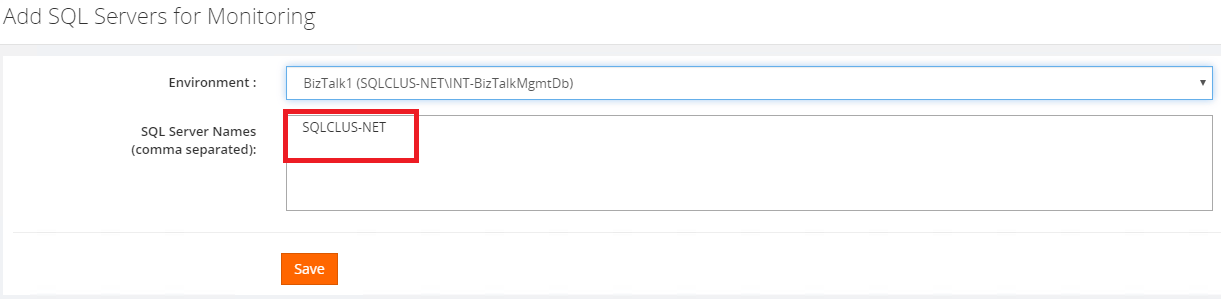
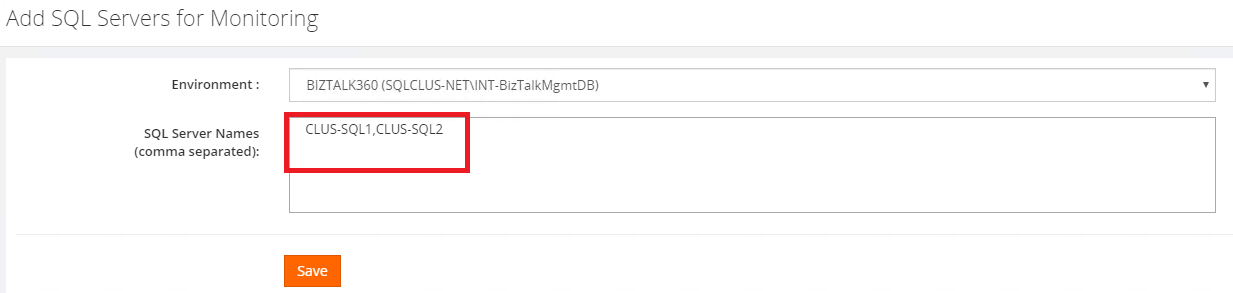
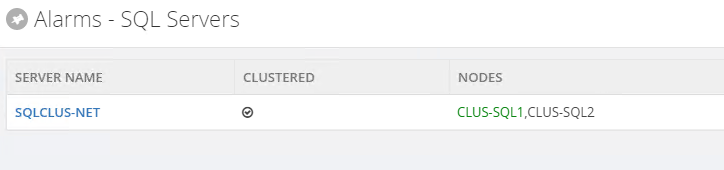
From this version, you can add SQL server Network Friendly Name or Physical Node separately in the monitoring and notification section. When you added the Network Friendly name then there is no need to add the physical cluster node. BizTalk360 will monitor both nodes under the Network Friendly name.
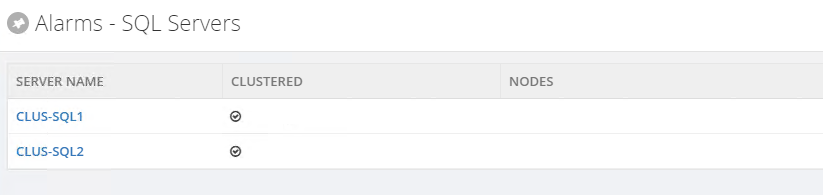
If you are monitoring Physical Node, where you can directly add a Physical Node for monitoring through which you can able to view the services which are available under the Physical Node.
Using Network Friendly Name
Using Physical Node
When the SQL server network Friendly Name is added (Settings->Monitoring and notification->SQL Servers for monitoring) for monitoring, then the active and passive nodes will get listed in the grid (nodes) column. BizTalk360 intelligently will pick up the active node and start monitoring. For easy reference to the user, the currently active node is highlighted in green color as per the below screenshot.
When you have added the network Friendly Name then there is no need to add the physical cluster node names. BizTalk360 will monitor both nodes under the network Friendly Name.
If you are monitoring Physical Node, where you can directly add a Physical Node for monitoring through which you can able to view the services which are available under the Physical Node.
Monitoring the Clustered Windows Services in BizTalk360
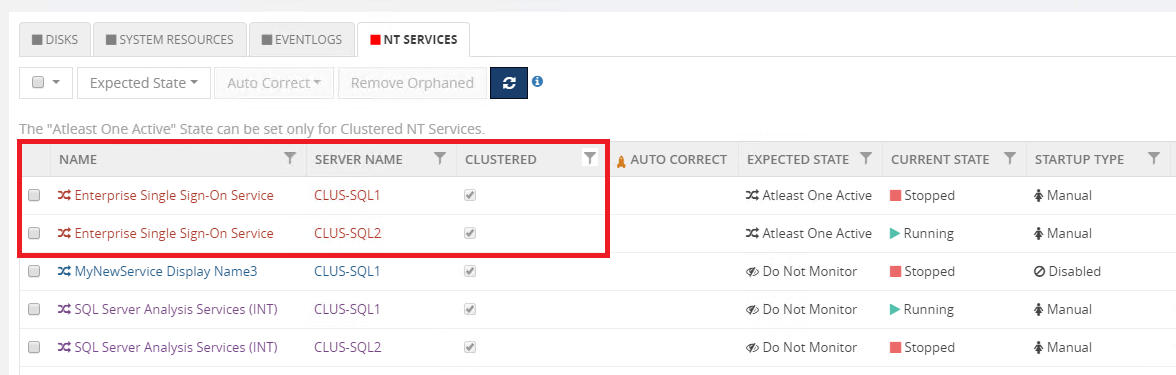
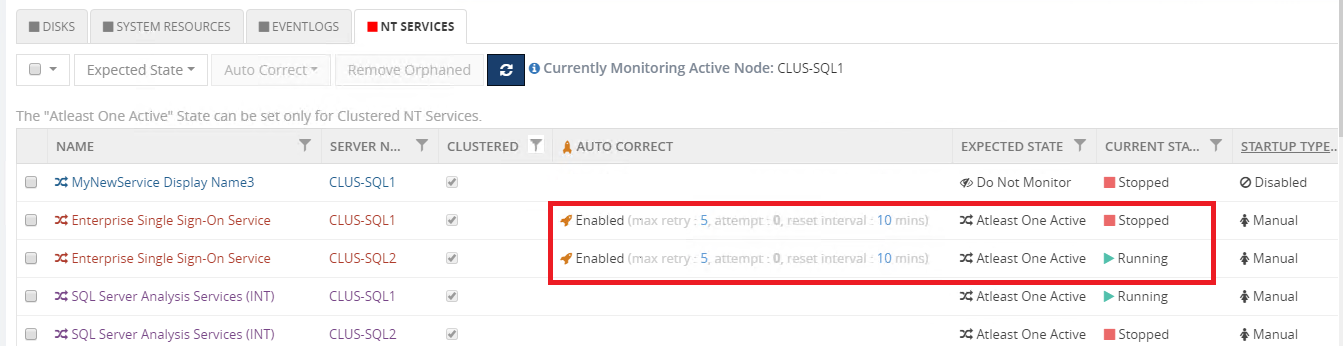
BizTalk360 allows users to monitor the Clustered NT service using the option “AtleastOneActive” state.
If this state is assigned as the Expected State, then the monitoring service will verify that at least one service is active, guaranteeing that the service is running in another node and no downtime happened.
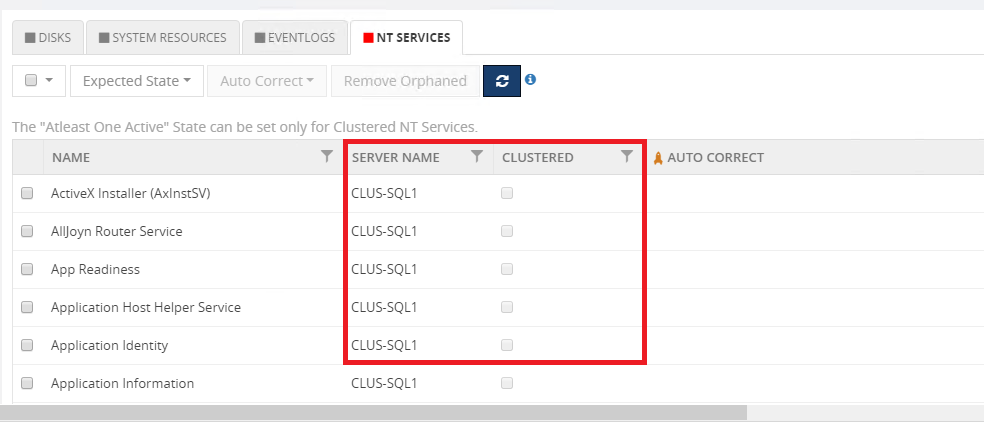
From this version, as additional information, we have added the Server name and Clustered option in the grid view. It is useful to easily filter the clustered and non-clustered services. So that, we can easily filter and identify the clustered and non-clustered services.
For Cluster NT Service
You can monitor both clustered and non- clustered services under network Friendly Names or Physical Nodes. Non clustered service in the same network Friendly name will appear as per the below screenshot.
Only for clustered SQL Server and BizTalk Server, the server name/ clustered column will visible.
Setting up the “AtleastOneActive” State in Clustered NT service
The user can set the “AtleastOneActive” state only for clustered NT service in a high availability environment. You must select both active and passive window services for setting the “AtleastOneActive” as it is clustered NT service.
The “AtleastOneActive” state will monitor the configured NT services and will check if anyone of the NT service is active. It will check for anyone of the NT service is up and running. In case if both the clustered NT service is down then it will send the exception alert as below :
Consider that, if you are configuring the AtleastOneActive state for Clustered NT service. When suddenly, one service’s expected state changed to Running or stopped state. Then BizTalk360 automatically updated the expected state as “Do not monitor”.
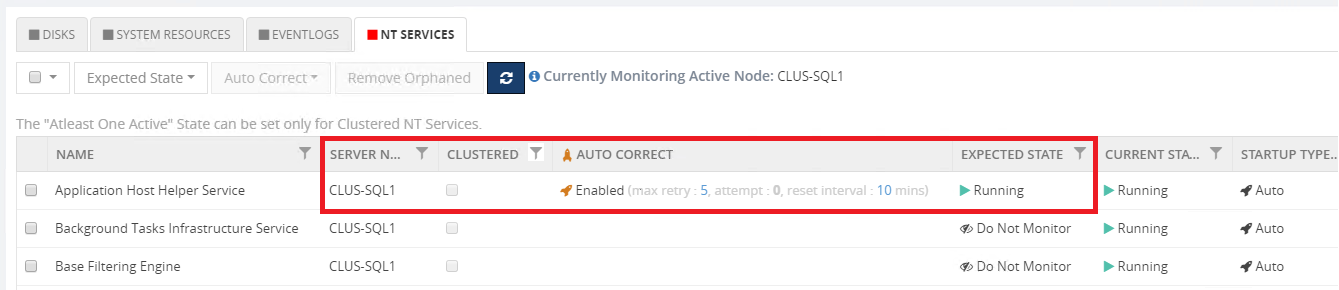
AutoCorrect Functionality in Clustered NT Service
AutoCorrect is one of the best features in BizTalk360. It helps you to get relief from a manual effort by auto-starting the services if it goes down.
For example, if you have 2 services under node 1 and node 2 respectively. From 2 services, any one of the services needs to be in the active state for performing the auto-correct operation. It’s a tedious taskfor the admin/support people to start the services manually if both of them go down. To overcome this problem, autocorrect functionality is the best solution.
In the case of clustered service, autocorrect needs to be enabled for all the services in different nodes. If all the services are down, from the next monitoring cycle BizTalk360 will try to auto-heal any one of the services. On the first attempt, it will try to start the service in node 1. If the service is started successfully then it skips autocorrecting in node 2. This happens vice versa if node 1 fails to start. BizTalk360 will try to start any one of the services until it reaches the maximum attempt count. You can also reset the auto-correct by setting the reset interval.
Autocorrect functionality can be set for both clustered and non-clustered services.
For AtleastOneActive, if we configure autocorrect for node 1. Then it automatically replicates to node 2.
Monitoring the Clustered NT Services in BizTalk Server
BizTalk Server as well has both clustered and non-clustered NT services. However, monitoring them doesn’t need any special configuration in BizTalk360.
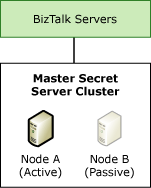
For example, enterprise SSO is a critical part of the overall Microsoft BizTalk Server infrastructure because BizTalk Server uses SSO to help secure information for the receive locations and provides services to store and transmit encrypted user credentials across local and network boundaries, including domain boundaries. SSO stores the credentials in the SSO database. Because SSO provides a generic single sign-on solution, middleware applications and custom adapters can leverage SSO to securely store and transmit user credentials across the environment.
if an SSO server fails, and if you have other BizTalk Server computers (and therefore SSO servers) running the same host instance, the other SSO servers continue doing their work. This means that the master secret server still functions correctly, and therefore the BizTalk Server processing continues.
Today’s dynamic business environment demands such flexibility because of workload fluctuations.
Consider a scenario if node A has an “Enterprise Single sign-on” service which is configured for monitoring. Let say, node A went down, then BizTalk360 will automatically pick up the currently active node B for monitoring the “Enterprise Single sign-on” service. BizTalk360 will help us in getting efficient work, flexibility and will not lose any information during Failover scenarios.
As like SQL Server Clustered NT Service monitoring. BizTalk360 extends its capability for BizTalk Servers NT services as well.
Conclusion
BizTalk360 will always work from the customer’s feedback. Clustered NT service is the best solution for many failover scenarios. The upcoming version of BizTalk360 will ease your way of monitoring the Clustered NT service in the SQL server and the BizTalk Server.
The post Monitoring Clustered NT Services with BizTalk360 appeared first on BizTalk360.
Nino Crudele just published another free whitepaper about Azure Reconnaissance and Scanning for Ethical Hackers and Special Ops Team. It is a 25 pages whitepaper that will provide you with a quick and practical guide full of tools and techniques for scanning and reconnaissance in Azure to Ethical Hackers and Special Ops Team that want to learn or know a little more. You shouldn’t miss this opportunity!
Once again, I would like to take this opportunity to say thanks to Nino Crudele for inviting me to be his technical reviewer for this whitepaper. I never learn to say no to him, it is always a crazy nightmare but a delightful one. And I’m already waiting to our next challenge.
Nino Crudele is a freelance living in the United Kingdom. He is Global Azure Lead and Cybersecurity expert in Hexagon Manufacturing Intelligence, a global manufacturing company. He is responsible for leading the Microsoft Azure Cloud area, supporting and advising the Company to select the most appropriate cloud strategies and solutions from high-level design to implementation and Security is one of my top priorities.
What to expect about Azure Reconnaissance and Scanning for Ethical Hackers and Special Ops Team whitepaper
This whitepaper will provide:
The final objective of a Penetration Testing project is to provide useful information to resolve the errors identified before they can be used for malicious purposes.
How to identify our attack surface by researching, collecting, and organizing as much information as possible about a potential attack target. Then it will seek ways that could be exploited to get into the systems.
And of course, like any good Penetration Testing project should be, how to provide useful information to resolve the errors identified before they can be used for malicious purposes.
Where you can download it
The whitepaper is completely free and you can download it here:
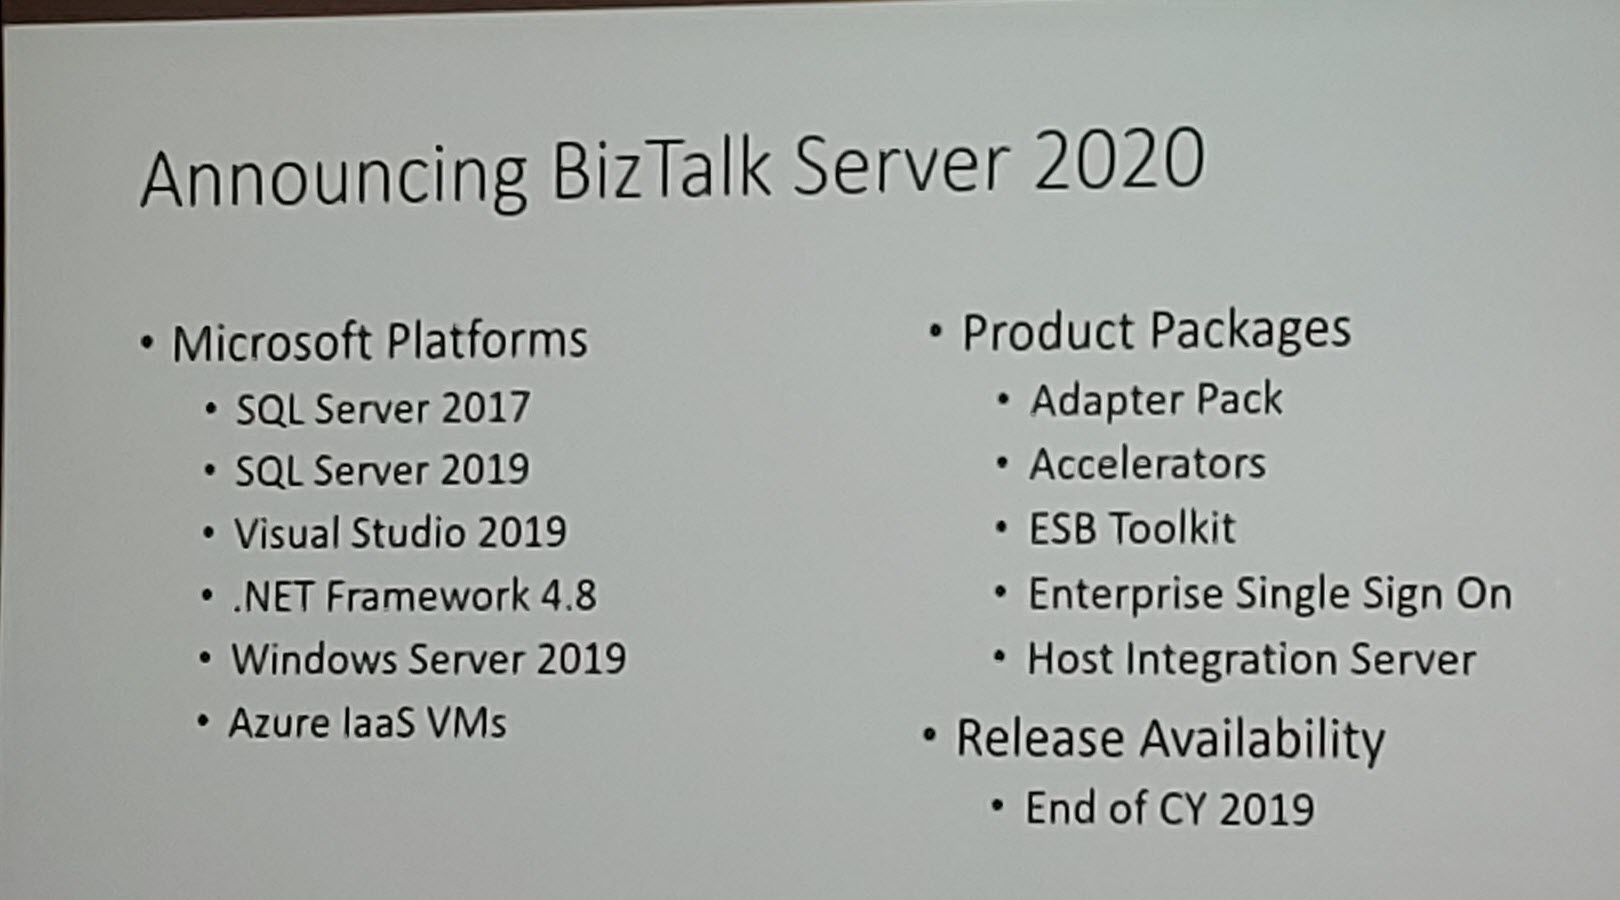
On January 15, 2020, Microsoft has announced the much-awaited release of BizTalk Server 2020 for public usage. Ever since Microsoft Product Team announced BizTalk Server 2020 in Integrate 2019 event, there has been a lot of expectations about the new release. BizTalk Server 2020 is an important update with key features and addresses some of the existing challenges. This version has support for newer platforms like Visual Studio 2019, Windows Server 2019, Windows SQL Server 2019. BizTalk Server 2020 requires the following Hardware and Software requirements.
New features that are shipped in this version are Analytical capabilities (Publish tracking data to Azure), Application Life Cycle Management with VSTS, Management APIs, Advanced Scheduling, TLS 1.2 Support, API Management, gMSA Account, Adapters (Event Hubs, Office 365, Blob) and more additional updates, like SSO Affiliate application support in SFTP Adapter. Partially disabled receive locations etc., Some of the features that are in the release have been updated with BizTalk Server 2016 feature packs (Automatic Deployment with VSTS in BizTalk Server and Manage API are part of Feature Pack 1 update)
These features are helpful to Administrators and BizTalk Developers/Deployment Team with common updates like Adapters support. In this blog, we are focusing on the features that Developers, Administrators /Deployment team can take advantage of.
XSLT 3.0 Support and Custom XSLT Transform
Automatic Deployment with VSTS in BizTalk Server
Manage API
Publish API Services to Azure API Management
Custom XSLT Transform
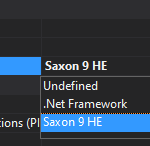
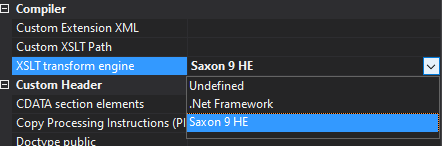
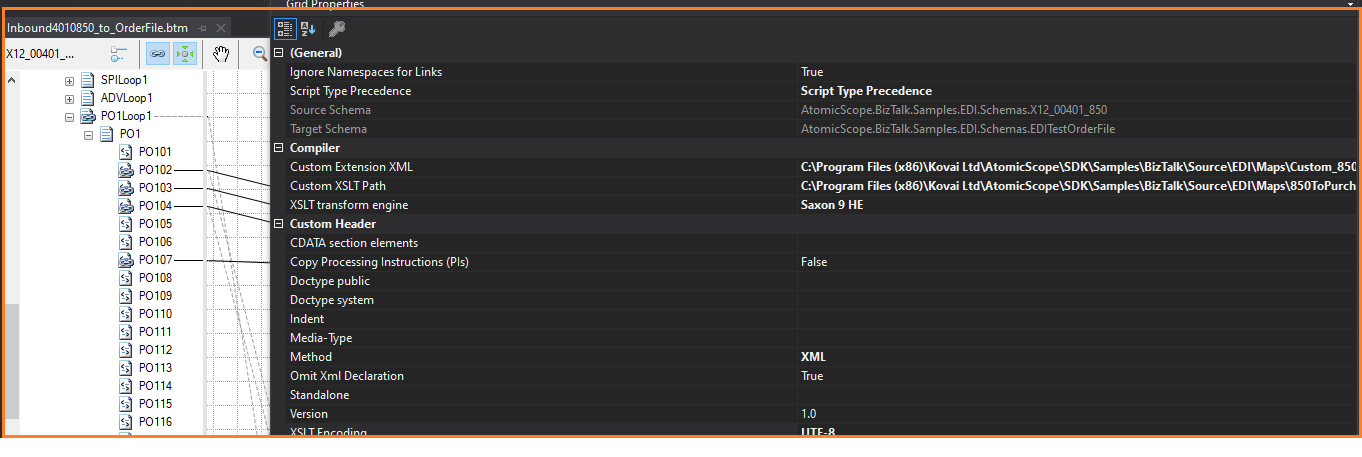
From this version of BizTalk Server on, the BizTalk Mapper has the ability to select the Custom XSLT Transform (Saxon 9 HE) or .Net Framework. BizTalk’s default XSLT engine implementation is based on .Net Framework, however, this support is limited to XSLT 1.0. By using this new property “XSLT transform engine”, other XSL transform engines can be configured at the map level.
XSLT 3.0
Support of XSLT 3.0 in BizTalk Server 2020 will help the developer to use any XSLT version in schema transformation in BizTalk Mapper. Developers can customize the XSLT based on their business requirements. XSL Functions can be defined, and it provides the option to choose the dynamic transform functionality.
What is Saxon-HE?
Saxon-HE is an open-source tool for processing XML documents using XSD schema and XSL Transform. Users can start using Saxon-HE 9 engines if they needed XSLT3.0 support during data transformation.
Let us take a business scenario in which EDI X12 850 data needs to be transformed into a purchase order. Saxon HE 9 XSLT will be used to transform the 850 by XSL Path and Custom extension XML to Purchase Order XML (XSLT3.0 will support the JSON Format in XPath Transform).
Note: Saxon 9 doesn’t support embedded scripting. As a result, functoids shipped as part of BizTalk may not function well with Saxon-HE 9.
Extend to other Custom XSLT Engines
Starting with BizTalk Server 2020, users can extend the custom XSLT transform engine in the BizTalk Mapper. Users can implement a custom XSLT transform engine by defining the XSLT transform implementation which is derived from abstract class Microsoft.XLANGs.BaseTypes.ITransform2 in assembly Microsoft.XLANGs.BaseTypes.dll.
Follow this article to know how to extend Custom XSLT with different Transform engines.
Automatic Deployment with VSTS in BizTalk Server
The deployment of BizTalk Applications can be a cumbersome process, as it can be hard to manage the artefacts binding information of different environments. Automatic Deployment of BizTalk Server with Visual Studio Team Services is released as part of the BizTalk Server 2016 Feature Pack1 update. Now, all the feature pack updates of BizTalk Server 2016 are clubbed into the BizTalk Server 2020 release. With Azure DevOps Service, users will be able to automate the deployment process through configuring a VSTS agent.
The VSTS Admin creates the build and releases definitions in Azure CI/CD pipelines. Developers will take advantage of the CI pipeline to build the BizTalk Applications and check-in the source code into Git or VSTS repositories. The CD pipeline will be used to deploy the BizTalk Applications into different environments (DEV, QA & Production).
You can follow the steps to create a deployment pipeline as mentioned in this article.
Manage API
BizTalk Server Developers can take advantage of REST APIs to customize their Business requirements through the exposed APIs covering the following areas in BizTalk Management Service. Management data APIs are endpoints that let you remotely update, add, and query the status of different Artifacts in your BizTalk Server environment.
Parties & Agreements
Applications
Batches
Business Profiles, Role Links
Fallback Settings
Hosts
Operational Data
Orchestrations, Receive Locations, Receive Ports, Send Ports and Send Port Groups
Policies
Protocol Types
Resources
Schemas and Transforms
Installation
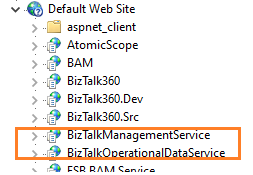
REST APIs are installed as part of the BizTalk Server 2020 Setup. It has been configured in IIS.
BizTalkManagementService
BizTalkOperationalDataService
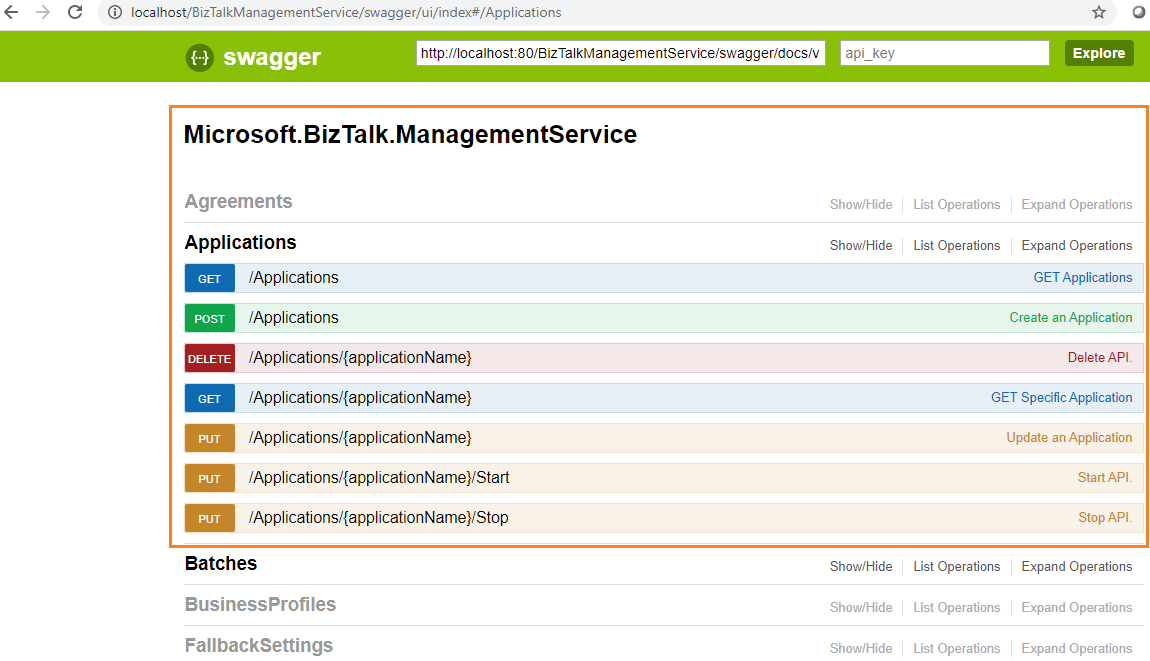
Swagger Definitions
The endpoints are added using REST and come with a swagger definition. Users can access the Swagger definitions of the installed Management Service APIs. With the swagger definitions, developers can benefit from knowing the input and output parameters of each API method. Users can try out/test API methods through Swagger definitions.
http://localhost/BizTalkManagementService/swagger
Publish WCF-Basic HTTP methods to Azure API Management
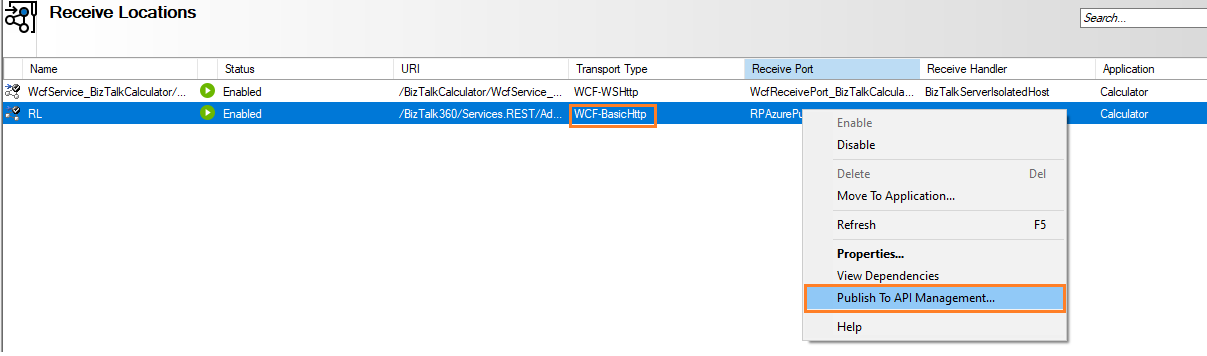
Starting from BizTalk Server 2020, WCF-Basic HTTP API endpoints can be published to Azure API Management. It will provide the option to monitor and manage the API methods from the Azure Portal.
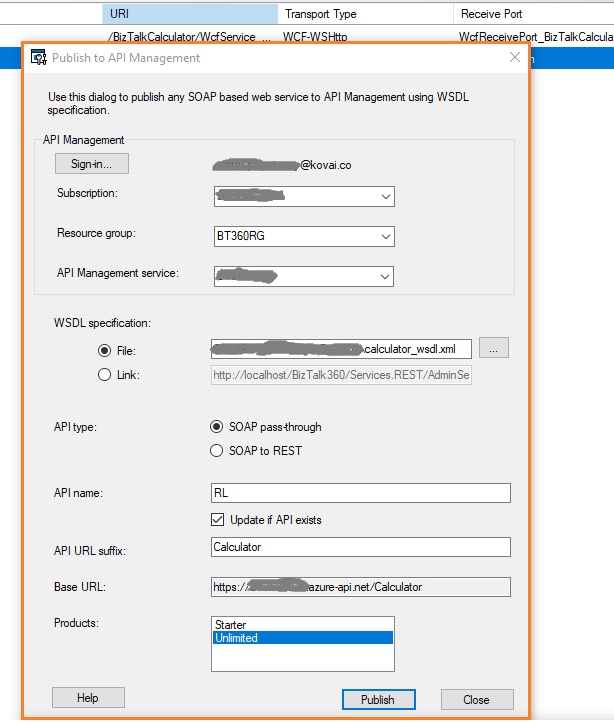
The option to publish to API Management is only available for the Receive Locations of WCF-Basic Http Adapter type. Prior to publishing API methods, create the API Management Service in the Azure Portal.
Users can publish the API methods to the Azure API Management Service:
Right-click the WCF-Basic HTTP Adapters and select the “Publish to API Management “option
In the Publishing Dialogue, sign in to the Azure Portal
Select the Azure Subscriptions, Resource Group, and API Management Service
WSDL Specifications can be published by choosing either WSDL file or Http URL with single WSDL
Mention the API Name
Then click on the Publish button
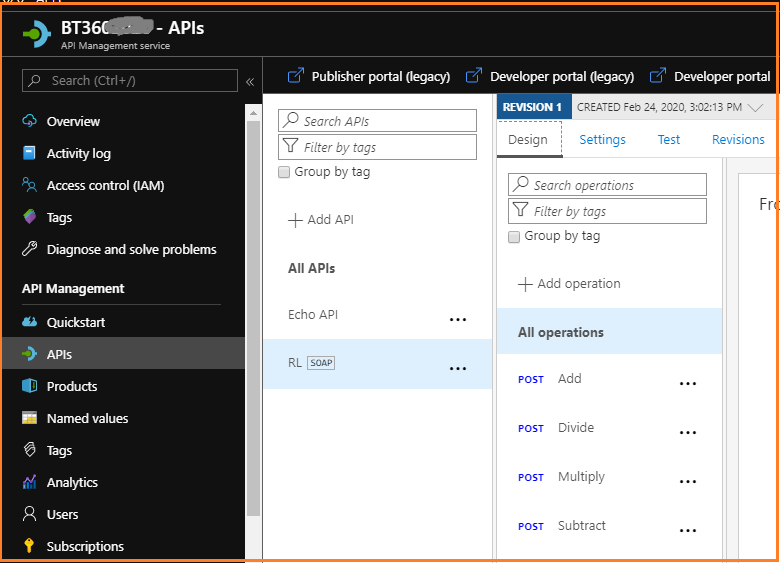
Once the WCF HTTP APIs are published successfully, you can view the published APIs under the selected API Management Service. Now the user has the facility to test or push the API methods to higher environments.
Conclusion
As integration solution has started to focus on Azure Serverless technologies, Microsoft has started to provide Hybrid integration capabilities. It will provide the options for the users to choose the solution that suits their business case. With the release of BizTalk Server 2020, more Azure Service offerings like Backup the BizTalk databases, API Management Service are introduced. Along with Logic Apps Adapter, these new features will help you build flexible integration solutions. Happy Integration!
During our last premier event, INTEGRATE 2019, the Microsoft product group announced the new version release of BizTalk Server 2020. This version has been released in mid-January 2020. A most awaited moment comes into real; BizTalk 2020 is public now! To know more about the exciting new features, take a look at our Founder Saravana Kumar blog “BizTalk Server 2020 – Why it’s a Game-Changer?”.
In this blog post, I will be covering the new features shipped in BizTalk Server 2020, in terms of Operation and Administration. Yes, this version brought in quite a number of new capabilities to make the life of admin/support people easier. Let’s take a look at the features one by one in detail in the coming sections.
Scheduling
In BizTalk Server, there is an option available to schedule receiving or transmitting the messages on certain days and hours. However, there is no scheduling available to specify the preferred time zones and at a specific time on a daily, weekly or monthly basis. Therefore, the administrator relayed on other tricks to achieve this business scenario as below:
Windows Task Scheduler – To drop a file to the specified Receive Location
SQL Adapter – Implementing a simple stored procedure that creates a “dummy” message that initiates the process
BizTalk Scheduled Task Adapter – An in-process receive adapter that executes a prescribed task on a daily, weekly or monthly schedule.
Advanced Scheduling
Now with BizTalk Server 2020, the new advanced scheduling comprises all the options which administrators wanted for scheduling.
New Options:
The preferred time zone can be set based on the business scenario
Automatically adjust for daylight saving time
Recurrence options like daily, weekly, and monthly
Local time can be confusing, as all the places on earth use their own local time for the smooth functioning of the large-scale business spread across the world. (Ex: companies with abroad partners, railways, ). Until the previous versions, there won’t be any option available to set the preferred time zone for message processing. With this new option, the time zone can be set according to the business needs along with the automatic setting daylight-saving.
Another exciting capability is recurrence. To achieve this formerly, Admins used various tricks to process the messages. With this new capability, they can set daily, weekly and monthly schedules as per the needs.
Daily – Configure the number of recurring days and from which date the recurrence will be active
Weekly – Configure the number of recurring days, from when the recurrence will be active and on which weekdays the recurrence must be active
Monthly – Configure which months and which days the recurrence should take place
Backup to Azure Blob Storage
To align with the latest trend, BizTalk Server 2020 has this exciting capability to extend its support in hybrid solutions. With this feature, you can configure the BizTalk Server job to back up your BizTalk databases and log files into the Azure Blob storage account.
To configure this job, you will need to:
Create a general-purpose Azure Storage account
Create a container within your Blob Storage account
Create stored access policy and shared access storage
Create SQL Credential using the SAS
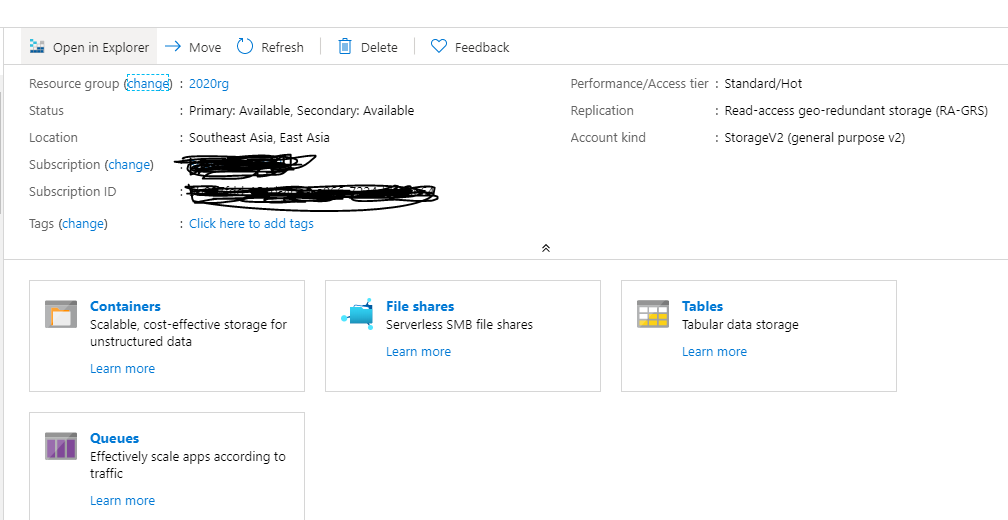
Create a general-purpose Azure Storage account
An Azure Storage account contains all your Azure Storage data where all the saved data is highly available, secure, and scalable at any point in time. Then the storage account is ready to create the container.
Creating a Container
All the database backup files are stored in the Blobs. For that, you must first create a container.
Once the container is created, click on the ellipsis button at the end of the row and look for the property “Container properties”.
In the opened window, copy the URL value as highlighted in the below screenshot. This URL will be used to create the credentials in the SQL Server and as well as configure the backup jobs.
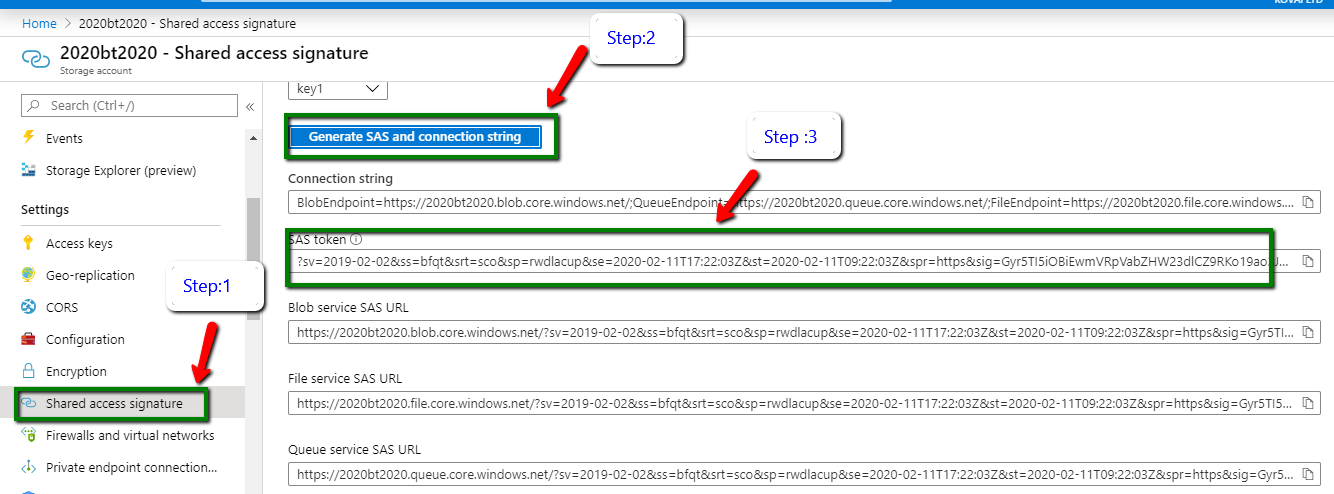
Shared Access Signature
A shared access signature is a URI that grants restricted access rights to the container in the Azure Storage account. A stored access policy provides an additional level of control over shared access signatures. When using this, you need to create a policy on a container with at least read, write and list rights.
In the Azure Storage account you have created, look for the menu “Shared access signature” and click on the “Generate SAS and connection string”, as shown in the below screenshot.
All the connection strings and URLs will be generated and listed in the below section. There you require the SAS token to create the credentials.
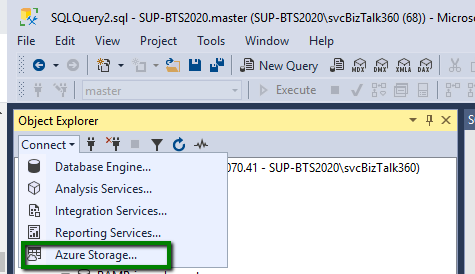
Create SQL Credential
This is the final step, where you need to create a credential in SQL Server in order to connect with the blob storage. As mentioned in the screenshot, Open the new query and click on the menu “Azure Storage”.
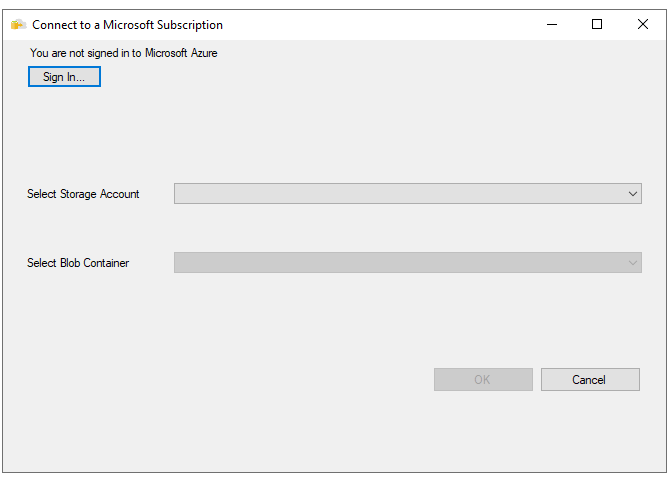
In the next wizard, you are prompted to sign in the respective Azure account where the container is created. Once after the sign-in, select the respective storage account and the container and click ok.
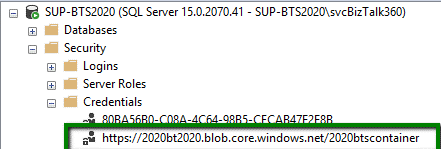
After the successful sign-in, execute the below query with the correct parameters.
Once the query is successfully executed just navigate to Security -> Credentials. You can see the new shared access signature in the credential folder. Now everything is set for the database backup to Azure Blob.
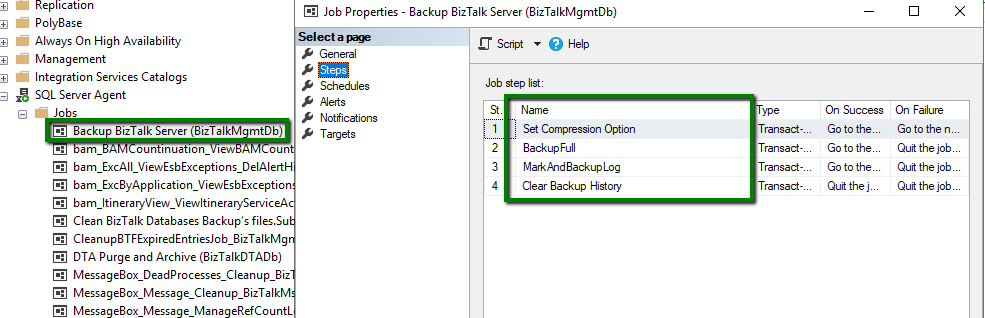
Once the credentials are created, you need to configure the BizTalk Server backup job as mentioned in this article.
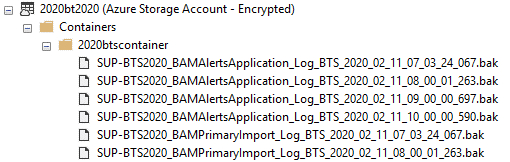
After the successful configuration, you need to run the backup job. Once the execution is completed, all the BizTalk Server database backups are available in the Blobs as you see in the below screenshot.
Audit Log
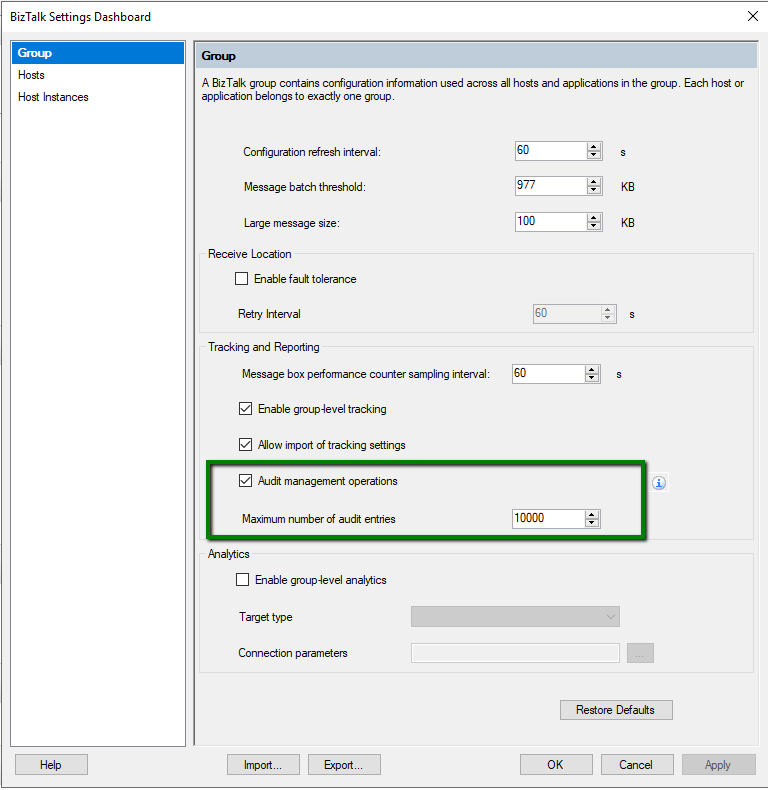
Until the previous versions of BizTalk Server, it is a completely black box for the administrators where they are not sure about who does what in the environment since all support persons have elevated access to the BizTalk and SQL Servers and no auditing is taking place.
BizTalk Server 2020 can audit the application and its artifact activities performed by the users. All the auditing activities are stored in the BizTalk Management DB -> bts_auditlog table.
Admins can get an insight about,
Who has done the action?
In which Server with the Artifact id, artifact name, and the corresponding operation
Payload information
At which specific date and time the particular action took place
The new audit API lists all the auditing activities performed by the users. The result will be returned in the JSON format.
After installing and configuring the BizTalk Environment, the next is to enable the Global level Audit Management operations, as shown in the picture.
The following are the detailed list of the activities audited by the BizTalk Server,
Applications
Receive Ports
Receive Locations
Orchestrations
Send Port Groups
Service Instances
Binding file importing activity is audited as well.
Artifacts which don’t have auditing capabilities:
Policy
No Auditing
Resources
No Auditing
Schemas
No Auditing
Party
No Auditing
Host Instance
No Auditing
Note: Only the admin users can view the auditing activities performed by other users.
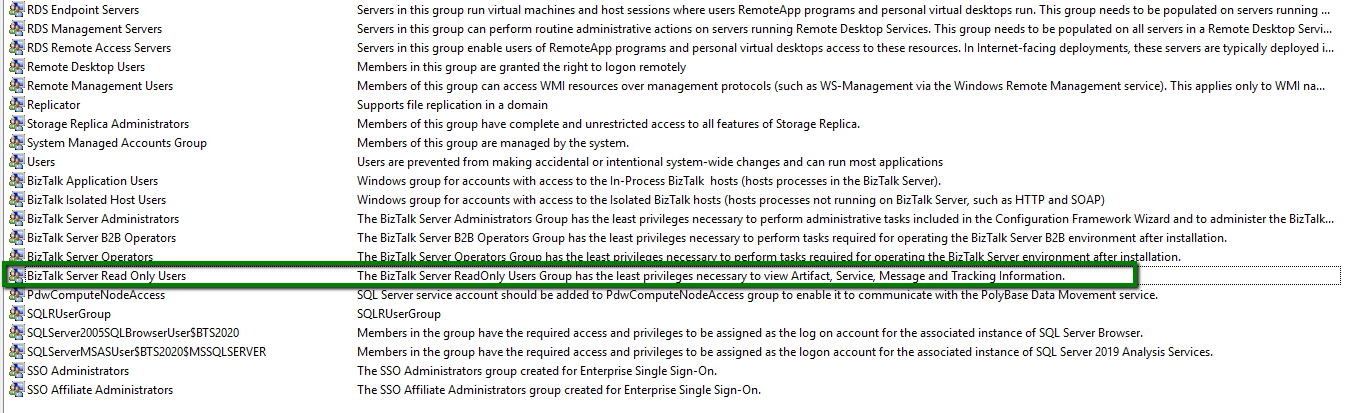
New Read-Only Operator Role
The new role “BizTalk Server Read-Only Users”, is completely providing read-only access to the users. This role will be useful to facilitate the dev-ops scenario.
With this new role, users are restricted to perform actions against,
Application and Artifacts
Service Instances
Changing port configuration
If a user, who is in the Read-only Operator role, tries to do any actions, these actions will be restricted by BizTalk Server and the user will get an error message like below.
When the user tries to change the host instance status, the error message will be different, as shown below.
Group Managed Service Accounts
Group managed service provides automatic password management. The main reason behind this is to delegate the management of passwords to other administrators. When this option is enabled, users don’t need to provide the passwords to handle the services. This specific option will be shown when you run the BizTalk Server custom configuration. The features support gMSA have a “Is gMSA account” setting. Once this setting is enabled, the password property disables.
gMSA is supported for the features,
BizTalk Runtime
Business Rules Engine
BAM Tool
Rest API
BizTalk TMS
Note: gMSA is not available when BizTalk is configured with a Basic Configuration.
You can find more information about gMSA in this article.
Conclusion
Microsoft released many useful features to ease the Operation and Administration capability for support/admin people. BizTalk Server 2020 promises the on-going commitment of Microsoft in this platform. We are in the process of creating some great guides and materials related to BizTalk Server 2020. (Ex: Detailed upgrade guide from previous versions). If you are interested, comment below with your answers for the following two questions along with your mail id, we will keep you in the loop.
What version of BizTalk Server are you using?
Is BizTalk Server 2020 migration in your scope?
Here are a few detailed blogs on BizTalk Server 2020, hope you will find them useful.
Are you an Integration expert? Want to get up to speed on the Microsoft Integration technologies and stay updated on their vision and road map? Then, INTEGRATE 2020 is the answer to all these questions. The 3-day event, with speakers from the Microsoft Product Group and from the Global Integration Community, to listen to the leading Integration Specialists and learn what is coming next in integration and to network with your peers.
Any Microsoft events like the Ignite, Inspire, Build, etc will have sessions covering a wide range of technologies, which is overwhelming to some extent, whereas INTEGRATE 2020 focuses on a niche category of people interested in Microsoft Integration space.
Last year INTEGRATE edition was by far the most successful one which means the conference is only getting better year after year. This is undoubtedly the premier event focusing on the Microsoft integration space. Therefore, it is key for everyone in the integration space to attend this event to know the interesting things that are happening and learn what’s coming next from the Microsoft Product Group.
Here I wish to express why attending Integrate 2020 in-person is so important:
What’s Microsoft Integration Roadmap?
Here is a list of important announcements made at INTEGRATE by the Microsoft Product team. It would be more valuable for you to connect with the product team over networking to discuss more on the benefits, challenges, and considerations to be followed for these important announcements.
INTEGRATE 2019 – Paul Larsen, Principal Program Manager at Microsoft made the big announcement “BizTalk Server 2020” and he also announced it will be released at the end of 2019. BizTalk Server 2020 is not just a simple software update it’s a game-changer and beginning of a new era. BizTalk Server 2020 is Microsoft’s commitment to existing customers who invested in BizTalk Server. The new BizTalk Server version will be supported until 2030
Also, the Logic Apps team announced the public preview for Rosetta Net and a few real use cases of Rosetta Net.
INTEGRATE 2018 – Jon Fancey, Principal Program Manager at Microsoft in his Keynote mentioned the need to embrace change towards cloud adoption. The whole of the conference in 2018 was about what’s the future with hybrid and cloud integrations. There were a lot of announcements from Microsoft on introduction towards Azure Integration Services, Logic Apps, Function, etc.
Paul Larsen announced BizTalk Server 2016 Cumulative Update (CU) 5. He also showed the traditional BizTalk Server life cycle diagram that showed that just a month is left ahead for support to end for BizTalk Server 2013 and BizTalk Server 2013 R2.
Clemens Vasters – Principal Architect announced Event Hubs for the Kafka Ecosystem.
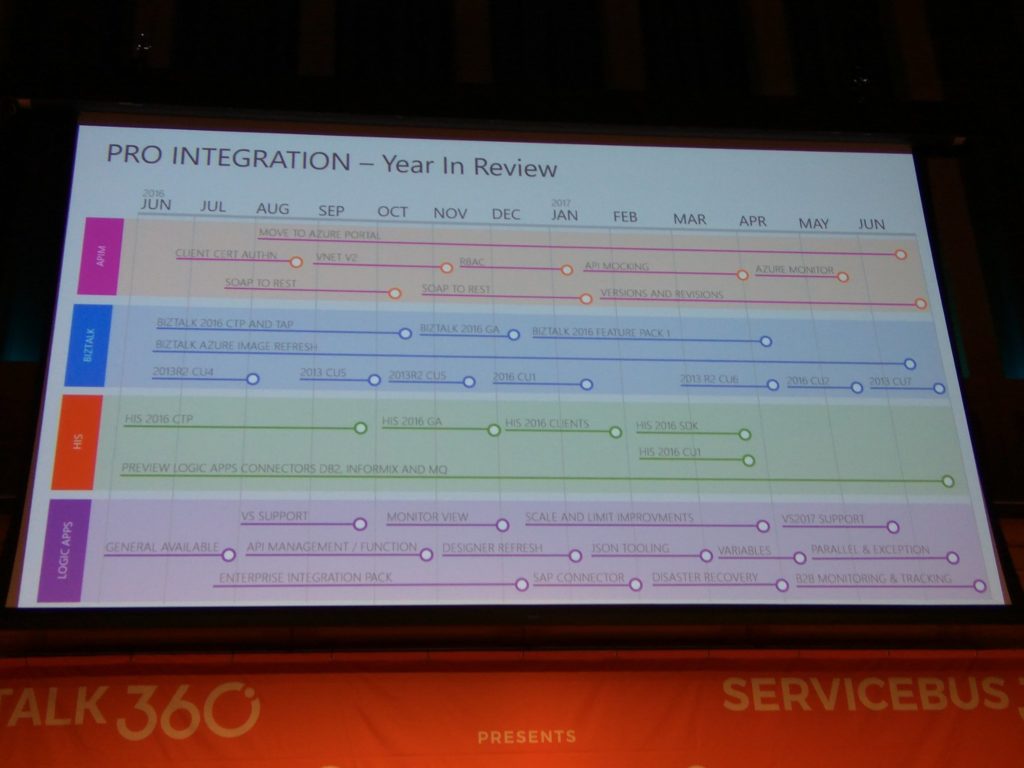
INTEGRATE 2017 – Jim Harrer, Principal Group Program Manager at Microsoft Pro Integration team emphasized how Microsoft brings intelligence to its Hybrid Integration Platform. Jim showed the Pro Integration team’s year in review showing how they have progressed as a team in the 4 main departments – Logic Apps, BizTalk, Host Integration Server, and API Management.
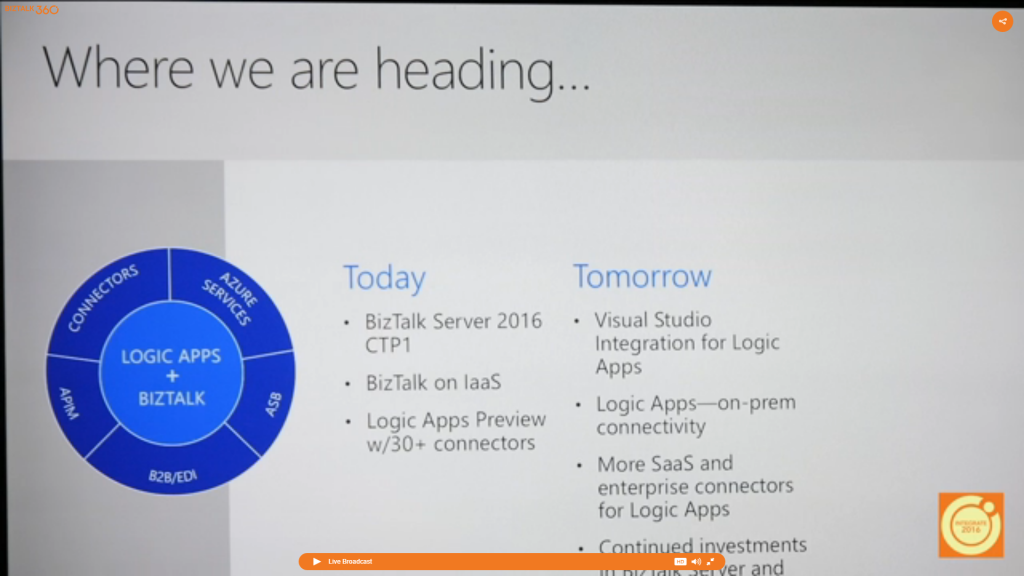
INTEGRATE 2016 – Jim Harrer, Program Manager of the Pro-Integration group at Microsoft announced Microsoft’s integration vision and road map to provide a unified integration experience across on-premises and cloud.
Now, are you excited about the important Microsoft updates at INTEGRATE 2020? We are excited as much as you are!
Network and Explore an Opportunity for Partnerships
INTEGRATE is the biggest and best opportunity to build a strong network and explore the opportunities to build a strong business. You certainly not want to miss out on the best possible opportunity to grow your company and network with the community.
Pricing
We already opened registrations for INTEGRATE 2020. The early bird registrations for tickets closes on March 31st. Also, given the Public Holiday on June 1st in parts of Europe and our wish to accommodate attendees enjoying a long weekend, all the Microsoft Speaker sessions will take place on Day 2 and Day 3. We have now made available a 2 Day Pass Option for June 2nd and June 3rd only.
If you are planning to attend INTEGRATE 2020, then go ahead and register as this will be the best ticket sale of the year. Be quick as when they’re gone, they’re gone.
Sponsorship
We are also opening sponsorship opportunities for this event. There are sponsorship packages available at different levels. If you are interested to sponsor this event, please contact us at [email protected].
Join with other leading consulting and ISV companies as sponsors:
Are you still not convinced? Don’t miss out, register today and take the early bird offer.
Don’t miss out on the conference which is highly focused on Microsoft Integration space. We look forward to planning your trip to London and joining the community in June.
Another error
and warnings, cause and solutions blog post. This time on a small issue that I got
during an application configuration in a developing environment.
Well, I
think I will not tell you anything new, but when you are generating Schemas
from a SQL database, regardless of whether they are actions directly on tables
or invoking stored procedures, a binding file is automatically created on your
BizTalk Server Visual Studio solution. And you can use it to easily create the
necessary ports to communicate with your SQL database. You don’t need to create
them manually.
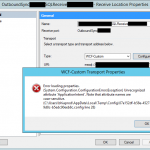
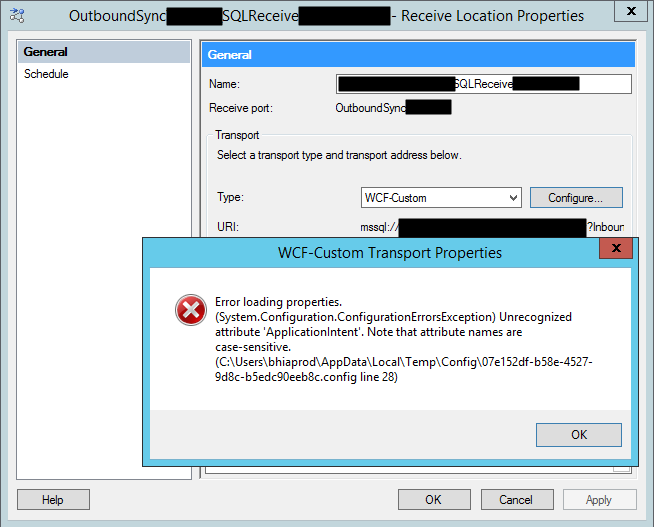
On one of these occasions, as I did thousands of times before, I successfully import my binding file containing the receive ports for my SQL database. But to my surprise every time I was trying to open the port configuration to change the attributes, I was getting the following error:
Error loading properties. (System.Configuration.ConfigurationErrorsException) Unrecognized attribute ‘Attribute-Name’. Note that attribute names are case-sensitive.
For a better context, why this error was happening, I was working with the BizTalk Server 2013 R2 version.
Cause
Although I didn’t initially understand why it
happened, the error is quite clear. The attribute name, in my case ApplicationIntent
was invalid.
Only thing I was sure:
It
wasn’t a case-sensitive issue I was sure about that because this was an auto-generated
binding file and the only thing I did was to change the receive port and
receive location names
To demystify the problem, I ended up:
Manually
creating the receive port;
Export
the bindings;
And
compare the bindings;
And what I noticed was that the bindings were different, this last one, that was working, didn’t contain the ApplicationIntent attribute and two other additional attributes like MultiSubnetFailover attribute.
I end up realizing that, because I didn’t have access to the client and I was with limit access to my dev machines, I end up creating the Schemas and the transformations using a different version: BizTalk Server 2016.
The schemas and almost artifacts, even if you
developer in a higher version, it will work well on BizTalk Server 2013 R2, you
just need to compile with a different network. Nevertheless, I will not advise doing
that. However, the binding files are different and not compatible between these
two versions for this adapter.
Solution
The solution is easy and you have three options:
Manually remove, fixing the binding file, for example, open in notepad and remove the ApplicationIntent=”ReadWrite”;
I will not recommend that approach;
You will find other issues that you need to solve;
Regenerate the schemas and bindings in your correct Visual Studio solution;
It may give you additional work on redeploying the solution;
But it is the most consistent option, everything will be updated and you sure that you have all the correct resources.
Manually create the ports on the BizTalk Server Administration Console;
Make sure to generate the binding files and update them in our Visual Studio solution;
Do you feel difficult to keep up to date on all the frequent updates and announcements in the Microsoft Integration platform and Azure iPaaS?
Integration weekly update can be your solution. It’s a weekly update on the topics related to Integration – enterprise integration, robust & scalable messaging capabilities and Citizen Integration capabilities empowered by Microsoft platform to deliver value to the business.


![Azure Reconnaissance and Scanning for Ethical Hackers and Special Ops Team [free whitepaper] By Nino Crudele](https://www.biztalkgurus.com/wp-content/uploads/2020/02/Azure-Reconnaissance-and-Scanning-for-Ethical-Hackers-and-Special-Ops-Team-1-150x150.png)


 Don’t miss out,