by Senthil Kumar Palanisamy | Oct 25, 2018 | BizTalk Community Blogs via Syndication
Introduction
Custom widgets are powerful feature in BizTalk360, that allow the users to bring third-party integrations into BizTalk360. It will be useful to bring the custom solutions into the BizTalk environment as it allows to view integrated solutions in one single tool.
Custom widgets can be used for various purposes, below list constitute few important scenarios;
- Embed third-party portals like Power BI or internal portals
- Monitor BizTalk Artifact Statuses
- Display query results using Secure SQL Queries
In this article, we can see important best practices while creating Custom widgets.
Best Practices
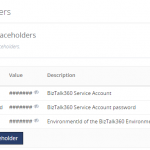
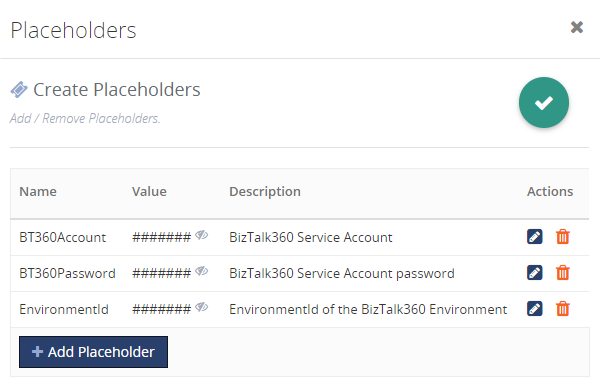
1. Hiding confidential information in Custom Widgets with Placeholders
Custom Widgets are created using API’s (e.g.: BizTalk360 or BizTalk Integration API), which might contain confidential information like the credentials of your BizTalk360 Service Account or API Authenticated credentials. Of course, you don’t want this information to be revealed in plain text in your widgets. To hide such confidential information, you can use Placeholders.
Beside using Placeholders to hide confidential information, you can also use them for providing frequently used data to your Custom Widgets. Think of for example the BizTalk360 “EnvironmentId”, which is a value which often needs to be provided to Custom Widgets. By creating a Placeholder for the “EnvironmentId”, you can easily re-use it and you don’t need to search for such values, each time you are creating a Custom Widget which needs such a value.
Read this article to know more about creating the place holders and how it can be used in widget.
2. Knockout JS Functions
Frequently, utility functions are used while binding the data to view. In these situations, the user can utilize the BizTalk360 referenced utility functions.
BizTalk Integration API methods returns its responses in XML format. To represent the data in client script(JavaScript/jQuery),it needs to be in JSON format.
x2js = new X2JS({ attributePrefix: '' });
bizTalkHostsList = function ()
{
  var _this = this;
 _this.getBizTalkHosts(function (data)
  {
   _this.bizTalkHosts(x2js.xml_str2json(data.queryResult));
  });
};
When a view expects the API method to return the result as an array, occasionally a single record is produced. In this situation,the API result needs to be converted to an array.
x2js = new X2JS({attributePrefix: '', arrayAccessForm:"property",
arrayAccessFormPaths : ["root.records.record"]});
bizTalkSendPortsList = function () {
      var _this = this;
      _this.getbizTalkSendPorts(function (data)
{
      var results = x2js.xml_str2json(data.queryResult);
      if (Array.isArray(results.root.records.record))
         _this.bizTalkSendPorts(results.root.records.record);
      else {
         _this.bizTalkSendPorts([results.root.records.record]);
         }
      });
   };
3. BizTalk360 Styles and Icons
The styles of BizTalk360 can be used in custom widgets by inspecting the element in the BizTalk360 Application. You can take advantage of the listed styles and controls while creating the custom widgets.
CSS Styles
Utilize BizTalk360 in-built CSS in custom widget creation
- List the data in Table: table table-lists
- Scroll Bar: WidgetScroll
<div id=”WidgetScroll” style=”top:30px;” data-bind=”addScrollBar: WidgetScroll, scrollCallback: ‘false'”>
  <table class=”table table-lists”>
  </table>
</div>
- Success/Info Tag: Use the Success or Information tag based the data to be presented in the list
 <span data-bind="text: HostType == 1 ? 'InProcess' : 'Isolated', css: HostType == 1 ? 'success-tag' : 'info-tag'">
 </span>
Boot Strap
Boot Strap styles and tags could be used during widget creation. BizTalk360 uses Boot Strap styles to design the base layouts.
- Container Fluid
- row
- col-md-*
<div class="container-fluid">
  <div class="row">
    <div class="col-md-8"></div>
    <div class="col-md-4"></div>
  </div>
</div>
Font Awesome Icons
Users can represent status or any information in graphical way, you can use Font Awesome Icons.
- Success – fa fa-check-circle
- Error – fa fa-power-off
- Warning – fa fa-times-circle
KendoUI Controls
BizTalk360 uses KendoUI controls, users can utilize those controls in widget script
- Drop Down
- Grid
- Switch Box
- DateTime Picker
- Numeric Text Box
- Calendar
// View
<div class="form-group margin-t"> //Boot Strap Form Group
  <div class="col-md-10"> // Boot Strap Column
    <div class="col-md-offset-2">
      <div class="alert alert-info" role="alert"> //Boot Strap Information
        <b>Note :</b> Choose the environment and enable the servers for Event Log data to be collected.
      </div>
      <div class="form-horizontal">
        <div class="form-group" data-bind="validationElement: selectedEnvironment">
          <label class="col-md-3 control-label">Select Environment</label>
          <div class="cus-select" style="text-align: left;">
            <label>
              <select data-bind="options: configuredEnvironments, optionsText: 'name', value: selectedEnvironment"
               class="form-control" style="min-width:300px;"></select> // Kendo Dropdown
             </label>
           </div>
         </div>
       </div>
     </div>
   </div>
</div>

//ViewModel
 selectedEnvironment.subscribe(onEnvironmentChanges, this); // change event to the environment
4. Embedding Third-Party Scripts
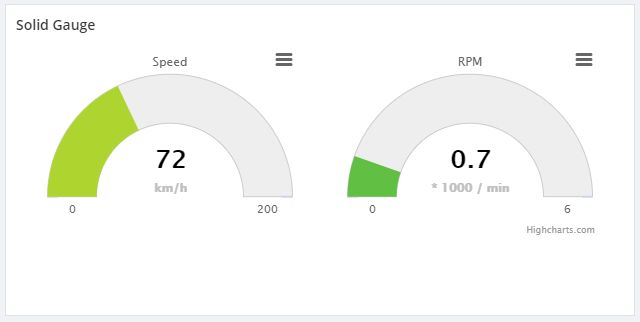
BizTalk360 uses a component called High Charts to represent data in graphical way. Also, some of our customers are using the custom widgets to represent their BizTalk Integration in graphical chart. BizTalk360 supports High Charts (Basic Widgets) with High Chart JS. To reference the third-party scripts, use the following JavaScript to reference the external libraries.
function injectScript(src) {
    return new Promise((resolve, reject) => {
                for (var i = 0; i < src.length; i++) {
    var script = document.createElement('script');
    script.src = src[i];
    script.async = false; // This is required for synchronous execution
    document.head.appendChild(script);
  }
        script.addEventListener('load', resolve);
        script.addEventListener('error', () => reject('Error loading script.'));
        script.addEventListener('abort', () => reject('Script loading aborted.'));
        document.head.appendChild(script);
    });
}
injectScript(['https://cdnjs.cloudflare.com/ajax/libs/highcharts/5.0.14/highcharts-more.js','https://cdnjs.cloudflare.com/ajax/libs/highcharts/5.0.14/js/modules/solid-gauge.js'])
Customer scenarios
Through our support channel, customers are explaining their scenarios which they require in their day to day activities. Here, we pick few common scenarios that will be useful in BizTalk Integration space.
Monitor Artifacts of a BizTalk application
BizTalk360 has the capability to monitor multiple application artifacts in a single alarm configuration. For instance, a specific group of users wants to monitor the status of specific application artifacts. To achieve this requirement, custom widget creation is one of the possible solutions. Create the custom widget to monitor an application artifacts status and associate the widget to dashboard. You can download the custom widget of monitoring the application artifacts.
Secure SQL Queries
Secure SQL query is an important feature to fetch data based on the user’s business demand. However, it is hard to create all the possible transaction results out of box from predefined widgets. Custom Widgets will help the BizTalk360 users to address this gap in BizTalk360.
Please follow the article how to create custom widgets using Secure SQL Queries.
Represent the data using Cross Domain API and High Charts
A user wants to represent BizTalk Integration Transaction details in the graphical chart. The Integration API is hosted cross domain. To access the cross-domain API Methods through client script, you need to use the XMLHTTPRequest method
function createCORSRequest(method, url) {
var xhr = new XMLHttpRequest();
 if ("withCredentials" in xhr) {
 // XHR for Chrome/Firefox/Opera/Safari.
 xhr.open(method, url, true);
 } else if (typeof XDomainRequest != "undefined") {
 // XDomainRequest for IE.
 xhr = new XDomainRequest();
 xhr.open(method, url);
 } else {
 // CORS not supported
 xhr = null;
 return xhr;
}
//Make the actual CORS request
function makeCorsRequest(url,method) {
var xhr = createCORSRequest(method, url);
if (!xhr) {
 alert('CORS not supported');
return;
 }
// Response handlers
xhr.onload = function() {
var resultData = xhr.responseText;
expectedResults(x2js.xml_str2json( JSON.parse(resultData).MonitorQueryResult).root.records.record);
 }
 xhr.onerror = function() {
 alert('Woops, there was an error making the request.')
}
 xhr.send();
}
makeCorsRequest(‘https://YOURCROSSDOMAIN/SERVICENAME’,'GET');
In this case, the user wants to represent the data in High Charts solid-gauge pattern . For that, you can use the above mentioned suggestion “Embed Third-Party Script”.
Conclusion
Custom widget is a useful feature to bring the customized solution in a dashboard. Hope this article will be helpful to get start the custom widgets creation. Get started with the free 30 days trial. For any queries/feedback please write to us [email protected].
Author: Senthil Kumar Palanisamy
Senthil Kumar Palanisamy is the Technical Lead at BizTalk360 having 14 years of experience in Microsoft Technologies. Worked various products across domains like Health Care, Energy and Retail. View all posts by Senthil Kumar Palanisamy
by Sandro Pereira | Oct 23, 2018 | BizTalk Community Blogs via Syndication
Welcome back to my blog post series “BizTalk Server Tips and Tricks” for developers, administrators or business users.
There are several ways we can create an XML Schema in BizTalk Server:
- Manually from scratch
- From XDR Schema instance
- From a DTD instance
- From a well-formed XML instance
- Import them from a WCF Service or Web Service
- Automatically generated them from LOB systems (from the adapters)
Today, we will be talking about automatically generating XML Schemas from a well-formed XML instance. To accomplish this we need to perform the following steps:
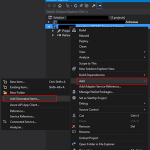
- In Solution Explorer, right-click a BizTalk project, point to Add, and then click Add Generated Items…

- In the Add Generated Items – <BizTalk ProjectName> dialog box, in the Templates section, click Generate Schemas, and then click Add

- In the Generate Schemas dialog box, in the Document type drop-down list, select Well-Formed XML

- One of the problems, especially in brand new installations, is that sometimes this feature was not installed, and you will see Well-Formed XML (Not Loaded) in the drop-down list. To install and use this feature you need to:
- Start a Windows Explorer and navigate to the “SDKUtilitiesSchema Generator” folder present in the BizTalk Server installation folder;
- Normally it will be “C:Program Files (x86)Microsoft BizTalk Server <version>SDKUtilitiesSchema Generator”
- Execute the InstallWFX.vbs script by double-clicking. This will install the “Microsoft.BizTalk.WFXToXSDGenerator.dll” DLL on the correct place
- That basically means, it will copy this DLL to the “Developer ToolsSchema Editor Extensions” folder present in the BizTalk Server installation folder
- Or manually copy “Microsoft.BizTalk.WFXToXSDGenerator.dll” DLL to the “Developer ToolsSchema Editor Extensions” folder, present in the BizTalk Server installation folder
- Normally, it will be “C:Program Files (x86)Microsoft BizTalk Server <version>Developer ToolsSchema Editor Extensions
- Close the Generate Schemas dialog box and do the previous steps again, and now you will be able to see that you already can use the option Well-Formed XML in the drop-down list.

- In the Generate Schemas dialog box, click Browse, locate the file you want to import, click Open and then click OK

- A new schema, or sometimes at least two schemas are generated from the specified file, using the same name as that file with the .xsd extension, and opened in BizTalk Editor
TIP: Before you generate the schemas, rename the XML instance file that you will be using to the proper name you want to give to the Schemas, this will save you time because the Generator Wizard will:
- Give the same name of the specified file with the .xsd extension
- Or will add a sequence to the same name of the specified file with the .xsd extension
In the end, as a best practice, you should rectify or rename the schemas generated to something with context and that will be easy to identify:
If you want it to be perfect, then for each schema, you should change not only the name of the file, but also the Type Name property of each schema.

Initially, this value was set as “myfilename_0”.
The problem of renaming the filename and/or the Type Name property is that once you try to compile it will give you errors because some schemas will be referring files that no longer exist (were renamed):
To solve this, we need to:
- Open the Schema and select the Schema node at the top of the schema tree view
- In the Properties window, in the Advanced category, in the value portion of the Imports property, click the ellipsis (…) button
- In the Imports dialog box, in the Import Schema list, delete the XSD Import line, import the correct one and then click OK

- Alternatively, open the schema file in Notepad (Notepad ++ or other text editors) and rectify the path and filename
Quick, simple and practical!
Stay tuned for new tips and tricks!
Author: Sandro Pereira
Sandro Pereira is an Azure MVP and works as an Integration consultant at DevScope. In the past years, he has been working on implementing Integration scenarios both on-premises and cloud for various clients, each with different scenarios from a technical point of view, size, and criticality, using Microsoft Azure, Microsoft BizTalk Server and different technologies like AS2, EDI, RosettaNet, SAP, TIBCO etc. View all posts by Sandro Pereira

by Gautam | Oct 21, 2018 | BizTalk Community Blogs via Syndication
Do you feel difficult to keep up to date on all the frequent updates and announcements in the Microsoft Integration platform?

Integration weekly update can be your solution. It’s a weekly update on the topics related to Integration – enterprise integration, robust & scalable messaging capabilities and Citizen Integration capabilities empowered by Microsoft platform to deliver value to the business.
If you want to receive these updates weekly, then don’t forget to Subscribe!
Feedback
Hope this would be helpful. Please feel free to reach out to me with your feedback and questions.
by Ahmed Taha | Oct 18, 2018 | BizTalk Community Blogs via Syndication
In our series of Guest Bloggers, we are pleased to announce Ahmed Taha, from LinkDev, Egypt! Ahmed is not new to the community as he has already hosted some Integration Monday sessions and loves to visit real-world events as well. We thought that his last Integration Monday session would make a good read, so he converted that session to this blog post. You can view this Integration Monday session from the Integration user Group web site. A warm welcome to Ahmed!
Introduction
A few years ago, I had an extremely challenging requirement in a BizTalk project that was integrating the customer’s system with several web services from disparate external backend systems. These systems had different communication protocols, message formats, and throughput limits.
The latter requirement was extremely challenging to implement, and it is actually not a very common one. However, it is worth noting that lately, I have been seeing this requirement, stated more often in new customers’ request for proposal (RFP) documents.
Landscape
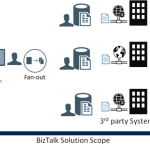
First, let me paint a complete picture for you, with the overall landscape.

As a first stage, the flow starts with an upstream system that has multiple input channels for entering and storing user entities into a staging data store.
In the second stage, the integration scope starts by polling user entity batches from the staging data store. Next, a fan-out approach is conducted, to scatter each single user entity into multiple requests, one for each web service, from a wide range of external web services.
Afterwards, the response data from each web service is stored separately in a dedicated table entity inside the same database, in a fragmented manner.
At the third and final stage, a mission-critical downstream system is continuously analysing these fragmented data for all the users, to perform critical data processing needed for decision making, as well as provide near real-time reporting from the aggregation of the response data.
Customer Requirements
The following are some of the key generic requirements:
- The entire process will be performed continuously, governed by a set of pre-defined business rules that determines if already fetched data fragment is stale, and needs to be refreshed
- The upstream staging data store will usually contain a large volume of user entities, and the upstream system input is expected to be of high throughput
- There are also some business rules that govern the routing logic, to decide which external systems need to be invoked, based on selected user criteria
So far, these above-mentioned requirements could easily be implemented as a BizTalk messaging solution, along with Business Rules Engine (BRE) policies to apply the governing business rules. For a robust messaging solution, I would highly recommend that you leverage the powerful BRE pipeline framework. Check my article on BRE pipeline framework.
Now, here comes the more challenging set of requirements, and if you are like me, you would be excited for having a good challenge, every now and then:
- Each of these back-end web services allowed for a maximum throughput (i.e. transactions per minute) which must not be exceeded, subsequent requests beyond that limit will fail
- At the same time, the integration solution must not invoke the services at rates that are way below the defined throughput limit, to maintain the overall efficiency of the solution

- These throughput limits should be configurable and could be variable based on specified time ranges, days of the week, date ranges, or a combination from all these options. BRE DB-facts were used for this requirement, coupled with a web-based control panel for the configurable DB values. The DB prefixes shown below denotes the BRE DB-facts.
 To come up with the right solution, some research was necessary. During that research, few different approaches were tried:
- Throttling Aggregator Orchestration
- Throttling Pipeline Component
Both approaches are described below.
First Approach – Throttling Aggregator Orchestration
Using an orchestration might be the first thing to come to your mind, in order to control and throttle the incoming messages in a stateful manner using the orchestration canvas.
This is a straight-forward implementation of an aggregator orchestration, which will run as a singleton orchestration instance for each defined back-end system.
To implement the actual throttling effect, the orchestration will simply include a delay shape that introduces the required latency in-between the incoming requests, in order to achieve the required throughput for a given back-end system.
For instance, a back-end system with a throughput limit of (6) requests per minute, will require the delay shape to induce a (10) second delay before every request in its corresponding orchestration instance.

Let’s have a look at the overall message flow. It starts with a polling receive location, where a pipeline component applies the required business rules and enriches the message context with throttling-related & routing-related information, before scattering the polled request into multiple requests, one for each designated back-end service.
A singleton orchestration for each system will apply the required throttling. You will notice that the orchestration is leveraging BRE & DB-facts to get the DB configured throttling information for the given back-end system. Memory cache is used to enhance the performance by minimizing the overhead impact of the BRE DB-facts during the BRE policy call.
While the orchestration approach works well, there are some caveats you should be aware of:
- Orchestration Delay shape is not very accurate when it comes to high precision, small delay values
- Orchestration persistence points will add extra latency which, in turn, lower the overall throughput outcome even further than intended
- Zombie messages are an inevitable byproduct of aggregator orchestrations, this will happen if the orchestration is designed to terminate after an idle time, or gracefully terminates after encountering errors
- Generally, production-grade orchestrations tend to be very complex and large in size, which will consequently affect its readability and maintainability
Second Approach – Throttling Pipeline Component
In order to avoid the above-mentioned caveats of using an aggregator orchestration, instead, you can leverage a pipeline component at the back-end system’s send port that will introduce the necessary latency, right before sending away the message to the designated service. This way you can achieve the required throughput outcome for a given back-end system.
The induced latency could be implemented using the Thread.Sleep() method, or as an infinite While loop that breaks after the required delay period has elapsed. I tried them both, with similar results, although I would personally be very much hesitant to use a while(true) loop in production.
The pipeline component approach is what I actually used for my final solution, as it has the flexibility and control I needed, without any additional latency, affecting the throughput outcome, coming from platform overheads that is beyond my control. After all, it’s my code and it can be optimized as much as possible.

Throttling Pipeline Component Send Port Settings
Another important part of this approach is to apply the following configurations that will disable concurrent processing of messages for the throttled send ports. This way, messages are processed sequentially, one message at a time, under the full control of your throttling pipeline component. This requirement could be achieved by configuring the throttled send ports.
- Retry must be disabled on the throttled send ports
- Ordered Delivery must be enabled on the throttled send ports
- Cluster Hosts for the throttled send ports in a highly available BizTalk solution

BizTalk Throttling General Tips
1. Efficient Throttling solutions should minimize or completely avoid message box hops. It should be applied at the edges of the solution. This is because message box hops itself will cause additional latency, which will impact the reached throughput outcome. In fact, the optimum position for the throttling component is at send port edge, right before sending the message to the back-end system. It could also be applied in receive end, but again, you will be at the mercy of the message box hops latency and performance.
 2. Applying the throttling component directly on a back-end system (2-way) send port will include the service response time as an additional overhead in-between the throttled requests. This will slow down the message frequency and impact the reached throughput outcome. Check the below diagram, where a back-end system takes (10) seconds to process a single request, because of the enforced ordered delivery of messages. Message (2) request will not be processed by the send port until Message (1) response is returned back by the system.
 3. As mentioned earlier in the requirements section, the solution had to be efficient, that is, it needed to leverage the maximum allowed throughput limits by the back-end systems, without any additional latency. Therefore, I had to go against my first tip for avoiding message box hops, as I had to apply the throttling component and port settings on another send port with a loop-back adapter, right before eventually routing the message to the actual back-end service send port.

4. It is very important that you make sure that the BizTalk built-in throttling does not kick-in and impact the overall solution throughout. Interestingly, this will initially slow down your system, and after the root cause has been alleviated and the built-in throttling subsides, some of the remaining messages could bombard the back-end systems at higher rates. The root cause for BizTalk throttling will be different for each solution, so you will need to conduct a comprehensive end-to-end load testing under realistic loads to identify and fine-tune BizTalk throttling thresholds in the BizTalk Host settings.
5. Following the previous tip, load testing will also allow you to find & fix the weak points in your BizTalk artifacts, for instance, it could be an unoptimized code snippet in a pipeline component, or in a map. In my case it was the performance of the loop back adapter I used, which I had to replace.
6. HTTP performance optimization in BizTalk Host configuration settings (BTSNTSvc.exe.config), will only control the maximum concurrent connections for HTTP-based adapters. However, it will not work for achieving specific throughput. That is, the number of requests allowed per time unit. Don’t forget the “per time unit” part. In other words, (5) requests per (1) minute, is not the same as, (5) requests per (1) second, is not the same as, (5) concurrent requests, within any given time window.
Lessons Learned
- BizTalk built-in throttling is a cleverly designed feature that is used to protect the platform from being overwhelmed under large loads. However, it is not designed to achieve exact throughput values
- Achieving controlled, accurate throttling is extremely challenging, especially when the latency is required to be at a minimum, it will also require intensive testing and fine tuning that might vary for each solution
- The throttling solution will introduce an inevitable latency to the solution, which could be minimized to negligible values. If you leverage the pipeline component approach with an optimized code, and conducted the necessary fine-tuning for BizTalk Server, the overhead for each request can be as low as 5 -10 milliseconds
- For guaranteed upper limit throughput only, you could apply the throttling component directly on the back-end system’s send port. This will completely avoid the extra message box hop, and you will not need the loop-back send port to apply the throttling, like I did.
Final Thoughts
The proliferation of API management
Nowadays, there is an awareness of API management tools. More and more organizations are leveraging API management to shield their back-end systems from huge loads, to apply the organization’s internal policies or to gain financial value from their data assets – API economy.

If the BizTalk published services and its underlying operations are as granular as the back-end ones, you could alternatively use an API management platform, in front of BizTalk, to apply the required throttling.
Are we bending the platform?
Is this controlled throttling implementation bending the platform into doing something that it is not supposed to be doing? – To answer this question, we need to have a closer look into the BizTalk platform design.
On the one hand, precise throttling is simply not baked into the platform, this is what most BizTalk experts and the Microsoft Product Group will acknowledge, which is true!
On the other hand, it is important not to forget that the BizTalk message box is an implementation of a Message Queue, supporting the store and forward messaging pattern.

Moreover, the send port service window feature incarnates message delayed delivery capability, by keeping the messages queued in the message box until the predefined time window is reached, before delivering the message.
 If you have an even closer look into the message box database, specifically into the BizTalk host queue table, you will see that our Throttled Send Ports are simply work-in-progress messages and they are treated the same way as the scheduled messages using the built-in service window feature, albeit the start Window time is set the past; so far so good!
 Moreover, the difference between the service window scheduling in the receive location and the send port shows another important hint. As seen below, unlike the receive location with its advanced scheduling options, the scheduling option for the send port only supports a time window range within a single day.
 This intended limitation in the user interface hints that scheduled messages are not designed to stay in BizTalk message box for longer periods of time, in order not to overwhelm the message box.
This perfectly resonates with how Dan Rosanova eloquently described Message box work-in-progress items: “This aspect of BizTalk is critical, as it is not designed to hold too much information for too long, but to pass the information on and move it out of the message box.” – Dan Rosanova – Microsoft BizTalk Server 2010 Patterns, Packt Publishing (October 28, 2011).
Consequently, if the back-end systems throughput limits will be high enough, to the point where it won’t let work-in-progress messages stay put in the message box for longer periods of time, then you will be achieving controlled throttling within the platform design boundaries.
Finally, controlled throttling in BizTalk Server should not be taken lightly., If you take into consideration all the previous guidelines, caveats, and conduct proper testing, you can achieve controlled throttling in BizTalk Server with confidence, and most importantly, without bending the platform.
Author: Ahmed Taha
Technical Architect with 10 years of hands-on experience in Microsoft Stack; .Net windows applications, web applications, BizTalk Server, SharePoint, SQL Server, SSIS, SSRS, and Integration with Azure Service Bus, and Logic Apps. BizTalk Server SME, conducting Integration POCs and demos for customers, provide consultancy and support for existing Integration projects in the Gulf, and Africa regions. View all posts by Ahmed Taha
by Sandro Pereira | Oct 17, 2018 | BizTalk Community Blogs via Syndication
Happy to announce that today I decided to publish another release on my Mapper Extensions UtilityPack project. This time I decided to release 2 new BizTalk Database Functoids:
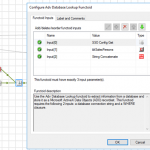
- Adv Database Lookup Functoid: Use the Adv Database Lookup functoid to extract information from a database and store it as a Microsoft ActiveX Data Objects (ADO) recordset. This functoid requires the following 3 inputs: a database connection string, table name and a WHERE clause.
- Adv Value Extractor: Use the Adv Value Extrator functoid to extract the appropriate column value from a recordset returned by the Adv Database Lookup functoid. This functoid requires two inputs parameters: a link to the Database Lookup functoid and a column name.
Basically, they have the same functionality as the default Database Lookup Functoid and Value Extractor Functoid but they have a slightly different implementation.
Unlike the default Database Lookup Functoid that have 4 input parameters
- A lookup value
- A database connection string
- A table name
- A column name for the lookup value.
The limitation of this Functoid is that you cannot have multiple conditions, like WHERE SalesPersonID = “A” and System = “B” because of the nature of how this functoid was created
The Adv Database Lookup Functoid have the goal to suppress this limitation, it will allow 3 inputs:
- A database connection string
- A table name
- A WHERE clause.
In the where condition you will be able to set all the conditions you want, including a combination of AND’s and OR’s.
The Adv Value Extractor Functoid has the exact same functionality that the default Value Extractor Functoid but prepared and optimized to work with the Adv Database Lookup Functoid.
Adv Database Lookup Functoid
Use the Adv Database Lookup functoid to extract information from a database and store it as a Microsoft ActiveX Data Objects (ADO) recordset.
Parameters
The functoid takes three mandatory input parameters:
- Parameter 1: An ActiveX Data Objects .NET (ADO.NET) connection string for a compliant data source in which to search. ODBC data sources (including DSN sources) are not supported.
- Provider=SQLOLEDB.1;Integrated Security=SSPI;Persist Security Info=False;Initial Catalog=DatabaseName;Data Source=SQLServerName
- Parameter 2: The name of the table in the database in which to search;
- Parameter 3: WHERE clause (without the WHERE)
- SourceSystemID like ‘A’ AND SSSalesPersonID = 1
The output of the functoid will be an ADO recordset.

Adv Value Extractor Functoid
Use the Adv Value Extrator functoid to extract the appropriate column value from a recordset returned by the Adv Database Lookup functoid. This functoid requires two inputs parameters: a link to the Database Lookup functoid and a column name.
Parameters
The functoid takes two mandatory input parameters:
- Parameter 1: An ADO recordset, which is the output of the Database Lookup functoid. This recordset never contains more than one database row.
- Parameter 2: The name of a column from which to extract a value for output.
The output of the functoid will be the value of that column on the database table.

BizTalk Mapper Extensions UtilityPack: Project Description
BizTalk Mapper Extensions UtilityPack is a set of libraries with several useful functoids to include and use it in a map, which will provide an extension of BizTalk Mapper capabilities.
Where to download?
You can download this functoid along with all the existing one on the BizTalk Mapper Extensions UtilityPack here:
 BizTalk Mapper Extensions UtilityPack
GitHub
Author: Sandro Pereira
Sandro Pereira lives in Portugal and works as a consultant at DevScope. In the past years, he has been working on implementing Integration scenarios both on-premises and cloud for various clients, each with different scenarios from a technical point of view, size, and criticality, using Microsoft Azure, Microsoft BizTalk Server and different technologies like AS2, EDI, RosettaNet, SAP, TIBCO etc. He is a regular blogger, international speaker, and technical reviewer of several BizTalk books all focused on Integration. He is also the author of the book “BizTalk Mapping Patterns & Best Practices”. He has been awarded MVP since 2011 for his contributions to the integration community. View all posts by Sandro Pereira
by Rochelle Saldanha | Oct 16, 2018 | BizTalk Community Blogs via Syndication
Notifications are an established concept for alerting users. By default, a number of external notification channels are inbuilt into BizTalk360. The only step you need to do, is to configure these notification channels with the appropriate URL, Access Token value (for Slack) and Authentication settings (for ServiceNow and WebHook), and Teams WebHook Connector (for Microsoft Teams). What this means for you, is that if you are already using either of these channels in your organization, it becomes easier to receive alerts from BizTalk360 right into these channels.
Since previous versions of BizTalk360, the notifications from BizTalk360 can be sent through various channels like:
Besides the above mentioned channels, BizTalk360 also provides an easy to use API, to enable you to create notification channels for connecting to your own systems. Read more about creating your own custom notification channels in our Documentation portal.
Now, integration with PowerShell allows you to execute a PowerShell script, each time an alarm is triggered when the threshold is crossed.
This was one of the features most requested by customers, as a nice to have requirement, as it would enable them to perform some tasks via a PowerShell script, each time the alarm was triggered.
Steps to implement the PowerShell Notification Channel
It only takes a few steps to use the PowerShell Notification Channel:
- Create the PowerShell script
- Configuring the PowerShell Notification Channel in BizTalk360
Both steps are explained below.
Create the PowerShell script
- Create the script in the PowerShell ISE or a plain text editor such as Notepad and save it with a .PS1 file extension (for example, myscript.ps1)
- Run the script by entering the full path to the script (c:/scripts/myscript.ps1), or if it’s in the current directory, prefix it with a period followed by a slash ( ./myscript.ps1 )
Configuring the PowerShell Notification Channel in BizTalk360
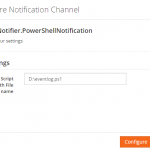
- You can find the Powershell Notification Channel under Settings > Monitoring and Notification > Manage Notification Channels. Select Notifier.PowerShellNotification
- Click “Configure” to open the configuration panel

During the configuration, provide the path along with the file name where the PowerShell script is present.
- In the Alarm section (Monitoring -> Manage Alarms), when you edit the alarm, enable the PowerShell notifications channel using the slider.
Note: Unless you wish to override the script provided in the settings page, there is no need to provide the path once again

Whenever a violation appears for the given alarm, this will trigger the notification channel and it will hit the PowerShell script.
Here, in the sample PowerShell script(Restart.ps1), we have included some basic code to restart the BizTalk360 Analytics service, but you can include more complex code to perform any actions via a Powershell script.
Customer Scenarios
- Use case 1: Automatically disable a receive location, such as when suspended instances hit a certain threshold
Consider the following setup – Microsoft CRM plugins, connected to a Receive Location are failing periodically. When they are down, the customer gets flooded with suspended instances. To prevent this from happening, the user wants to Disable the Receive Location.
This is how we can implement this using BizTalk360.
- Configure the PowerShell notification Channel
- First, create a Threshold alarm and setup the notification channel to be PowerShell, providing the script name if you wish to override the default Powershell script provided
- Then, in Manage Mapping, select the alarm and the artifact – Suspended Instances and put our threshold which causes the alarm to trigger

Now when the alarm triggers, along with the default email notification, the PowerShell script which disables the receive location mentioned in the script, will be run. Any errors will be logged in the PowerShell notification channel log (External.log).
- Use case 2: Stopping Host Instances, in case of too many running instances
A customer uses Data Monitoring for monitoring running instances of a particular orchestration in BizTalk. Sometimes it occurs that the application generates more messages than the downstream system can handle. To prevent damage, the Host Instances which serve the BizTalk application, need to be stopped to be able to identify the root cause.
The PowerShell notification channel not just works with Threshold alarms, but also based on Data Monitors. In above scenario, a Message Box Data Monitor has been setup, but you could also trigger PowerShell scripts based on the other categories of Data Monitoring. This could make the PowerShell notification channel to a strong extension of your tool set.
- Use case 3: We could fire a PowerShell script to restart IIS
We can implement these scenarios using BizTalk360 using similar steps as scenario1 but now the Alarm will be a Threshold alarm, not on Application artifacts but in BizTalk Environment -> Web Endpoint Monitoring.
Like scenario1 the alarm will have PowerShell notification enabled and when the Web end-point is triggered when the response is not fast enough, the Powershell script will run and restart the windows service (This should be programmed in the .ps1 file)
So, I hope these scenarios gave you a good idea of how the PowerShell notification channel can help you. This can also be considered as an action to be carried out if the alarms are triggered.
Author: Rochelle Saldanha
Rochelle Saldanha is currently working in the Customer Support & Client Relationship Teams at BizTalk360. She loves travelling and watching movies. View all posts by Rochelle Saldanha
by Gautam | Oct 14, 2018 | BizTalk Community Blogs via Syndication
Do you feel difficult to keep up to date on all the frequent updates and announcements in the Microsoft Integration platform?
Integration weekly update can be your solution. It’s a weekly update on the topics related to Integration – enterprise integration, robust & scalable messaging capabilities and Citizen Integration capabilities empowered by Microsoft platform to deliver value to the business.
If you want to receive these updates weekly, then don’t forget to Subscribe!
Feedback
Hope this would be helpful. Please feel free to reach out to me with your feedback and questions.
by Raja Sreenivasan | Oct 11, 2018 | BizTalk Community Blogs via Syndication
Introduction
SFTP (SSH File Transfer Protocol also known as Secure File Transfer Protocol) is a secure file transferring protocol between two remote systems, which runs over Secure Shell protocol (SSH). It provides strong authentication and secure encrypted data communication between two computers, which are connecting over an insecure network. It was designed by the Internet Engineering Task Force (IETF) as a secure extension. SSH provides the secure file transfer capabilities.
In this article, we will explain how to configure SFTP, how to use it with BizTalk Server and how you can set up monitoring SFTP using BizTalk360.
Contents
- How to Configure SFTP
- Types of authentication available in SFTP
- Using SFTP in BizTalk Server
- Monitoring SFTP using BizTalk360 Application
How to Configure SFTP
SFTP has replaced legacy FTP (File Transfer Protocol) and FTP/S and it provides all the functionality offered by these protocols, but the protocol is more secure and reliable. Also, configuration is easier.
Following are the steps to configure SFTP:
- Download the OpenSSH for server using OpenSSH for Windows binaries (Packages OpenSSH-Win64.zip or OpenSSH-Win32.zip)
Link: https://github.com/PowerShell/Win32-OpenSSH/releases
- Extract the package in folder location ‘C:Program Files’ as an administrator and install the SSH and SSHD services using the following command:
exe -Execution Policy Bypass -File install-sshd.psl
- Once you have run the above command, the SSH server and server agent will install the system and start the service in the services.msc
The SFTP port number for the SSH port is 22, basically just an SSH Server. Once the user has logged in to the server using SSH, the SFTP protocol can be initiated. There is no separate SFTP port exposed on the servers. There is also no need to configure another rule into the firewalls.
Once the command is executed in PowerShell, the rule is created in the firewall section.
Using Public Keys for SSH Authentication
One effective way of securing SSH access to the server, is to use a Public/Private Key pair. This means that the generated key pair, consists of a public key (allowed to know) and a private key (keep secret and don’t give to anybody). The private key can generate a Signature and cannot be forged for anybody who doesn’t have that key. But using the public key, anybody can verify that a signature is genuine. The public key is placed on the server and a private key is placed on local workstation. Using a key pair, it becomes impossible for someone to log in by using just a password, in case you have set up SSH to deny password-based authentication.
Create the .ssh directory in a local folder and create a file named as “authorized_keys”, where we store the public key for authentication.
Generating Keys
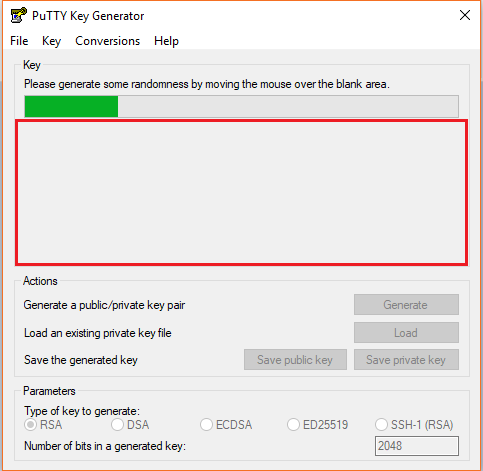
PuTTYgen is a key generator. It generates pairs of public and private keys. When you run the PuTTYgen, you will see a window where you have two choices:
- Generate – to generate a new Public/Private key pair
- Load – to load an existing private key
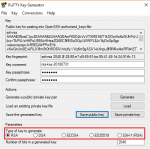
Before generating a key pair, using PuTTYgen, you need to select which type of key you need.
PuTTYgen currently supports the following type of keys:
- An RSA key for use with the SSH-1 protocol
- An RSA key for use with the SSH-2 protocol
- A DSA key for use with the SSH-2 protocol
- An ECDSA (Elliptic Curve DSA) key for use with the SSH-2 protocol
- An Ed25519 key (another elliptic curve algorithm) for use with the SSH-2 protocol
Here, we will generate a RSA key, for use with the SSH-1 Protocol.
- Download the PuTTYgen from the web site
- Launch the program and click “Generate” button. The program generates the keys for you
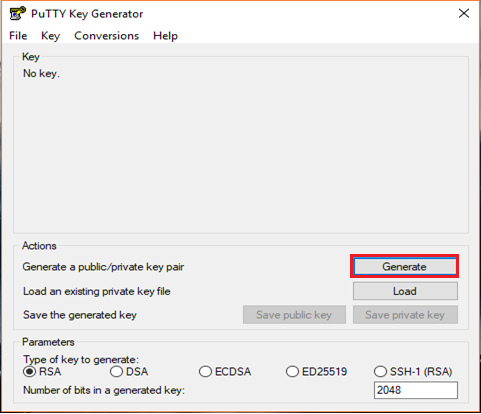
- Once you click the Generate button, you must generate some randomness, by moving the mouse over the blank area
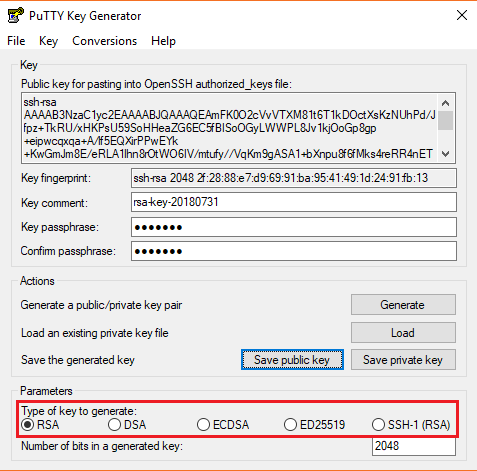
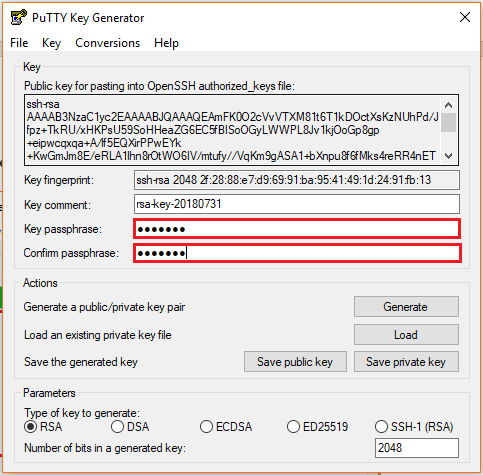
- Enter the unique Key passphrase and Confirm passphrase fields
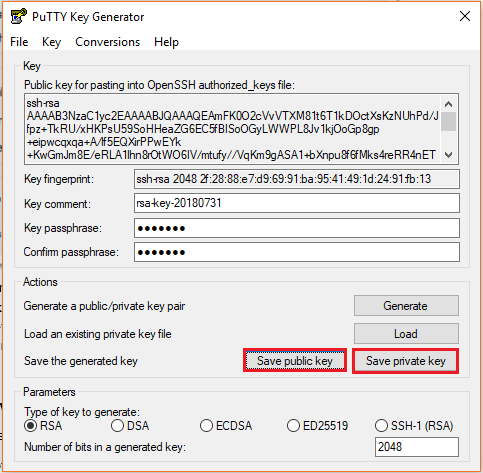
- Save the public and private keys, by clicking Save Public Key and Save Private Key buttons
- From the Public Key, for pasting it into the OpenSSH authorized_keys file field at the top of the window, copy all the text (starting with ssh-rsa). The copied key must be pasted either into the public key tool, in the Control Panel, or directly into the authorized keys file on your server.
Using SFTP Adapter in BizTalk Server
BizTalk Server provides the SFTP adapter to send and receive a file from a secure FTP server using the SSH file transfer protocol. Let’s see how can configure the SFTP adapter for receiving and sending a file from the secure server.
- In the BizTalk Admin Console, create a SFTP Receive Port in the BizTalk application where you want to have it
- Create a Receive Location within that Receive Port
- Select the Transport Type as SFTP from the drop-down list
In the Properties section, configure the following steps:

Others
- Connection Limit – Specify the maximum number of concurrent connections that can be opened to the server
Polling
- Polling Interval – Specify the interval at which the adapter polls the server. To poll continuously, set this value to zero
Default Value: 5
- Unit – Specifies the unit in which the polling interval is specified. For example: Seconds, Minutes, Hours or Days
Security
- Accept Any SSH Server Host key – When the option is set as True, SSH will accept the connection from the host server; when it is set as False, the Receive Location uses the fingerprint of the server for authentication. For the authentication, you need to provide the finger print in the SSHServerHostKeyFingerPrint field.
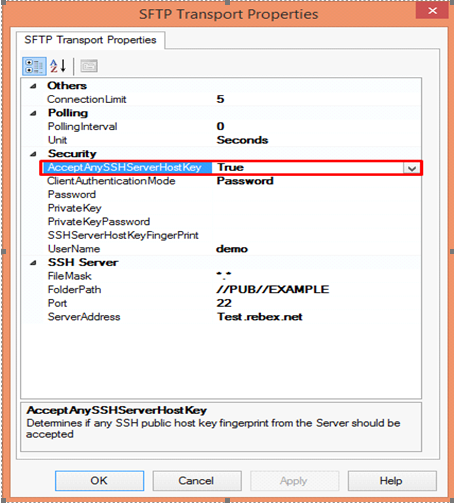
There are three client authentication methods:
- Password
- PublicKeyAuthentication
- MultiFactorAuthentication
Password authentication mode is simply providing the password in the console for authenticating the client. For the PublicKeyAuthentication, you must provide the private key file in the PrivateKey field and provide the passphrase in the PrivateKeyPassword for authenticating.
For MultiFactorAuthentication, the user must provide the user name, password and Privatekey. If the private key is protected by a passphrase, you also need to provide that in the privatekeyPassword field.
- Password – Specify the password, if you have set the ClientAuthentication mode to password
- Private Key – Specify the private key for the SFTP user, if you have set the ClientAuthenticationMode to Publickeyauthentication
- Private Key Password – Specify the passphrase key to validate the private key
- SSH Server Host Key Fingerprint – It specifies the fingerprint of the public host key for the SSH server
- Username – Specifies a username to log on to the SFTP server
SSH Server
- File Mask – Specifies the file mask to use when retrieving files from a secure SFTP server
- Folder path – Specifies the folder path on the secure SFTP server from where the Receive Location can retrieve files
- Port – Specifies the port address for the secure SFTP server on which the file transfer takes place
- Server Address – Specifies the server name or IP address of the secure SFTP server
Configuring the Send Port
For Configuring the Send Port, create a Send Port or double click an existing send port to modify it in an application in the BizTalk Administration Console.
- On the General Tab, Choose the type of SFTP artifact in the transport section and click the configuration button.
- In the SFTP Transport Properties window configure the following options based on requirement
Others
- Connection Limit – Maximum number of concurrent connections that can be opened to the server
- Log – Creating client-side log file to trouble shoot any errors. Enter the full path for creating the log file and its available from BizTalk Server 2016
- Temporary Folder – A temporary folder on the SFTP server to upload large files before automatically moved to the required location on the same server and its available from BizTalk server 2013 R2
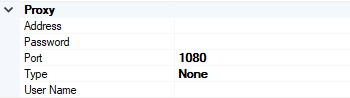
Proxy
- Address –Specifies either DNS or IP Address of the Proxy server
- Password –Specifies the Password of the proxy server
- Port – Specifies the port of the Proxy Server
- Type – Specifies the protocol used by the proxy server
- User Name – Specifies the User Name of the Proxy server
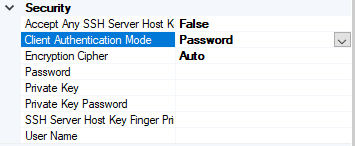
Security
- Access Any SSH Server Host Key – When True, the send port accept any SSH Public host key from the server and if set as false, the port matches the host key with the key specified in the SSHServerHostKey
- Client Authentication Mode – Specifies the authentication method that the send port uses for authenticating the client to the SSH Server.
Three modes of authentication
- Password – If set as Password , you must provide the password in the Password Property
- PublicKeyAuthentication – if set as PublicKeyAuthentication, you must provide the private key of the user in the PrivateKey
- MultiFactorAuthentication – if set as MultiFactorAuthentication, you must provide UserName with its Password. If the private key is protected by a password, provide the password in the PrivateKeyPassword as well
- EncryptionCipher – Provide the kind of encryption cipher and available from BizTalk Server 2013 R2. Options are Auto, AES and TripleDES in the BizTalk Server 2013 R2 and for the BizTalk Server 2016 Auto, AES, Arcfour, Blowfish, TripleDES, and
- Password – Specify the SFTP user password if you set the ClientAuthenticationMode to Password
- Private Key – Specify the private key for the SFTP user if you set the ClientAuthenticationMode to PublicKeyAuthentication
- Private Key Password – Specify a private key password, if required for the key specified in the PrivateKey
- SSH Server Host Key Finger Print – Specifies the fingerprint of the server used by the adapter to authenticate the server if the AccessAnySSHServerHostKey property is set to False. If the fingerprints do not match, the connection fails.
- User Name – Specifies the username for the secure FTP Server
SSH Server
- Append If Exist – if the file being transferred to the secure FTP server already exists at the destination, this property specifies whether the data from the file being transferred should be appended to the existing file. If set to True, the data is appended. If set to False, the file at the destination server is overwritten
- Folder Path – Specifies the folder path on the secure FTP server where the file is copied
- Port – Specifies the port address for the secure FTP server on which the file transfer takes place
- Server Address – Specifies the server name or IP address of the secure FTP server
- Target File Name – Specifies the name with which the file is transferred to the secure FTP server. You can also use macros for the target file name
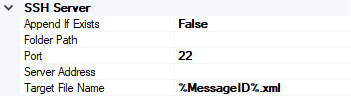
- Click Apply and OK again to save settings
Monitor the SFTP Location using BizTalk360
From the v8.4, under File Location in the Monitoring section, BizTalk360 has the capability to monitor SFTP servers. File Location Monitoring will list all the locations configured in the BizTalk artifacts (Send Ports and Receive Locations) for the SFTP Transport type. This helps users to easily monitor all the SFTP locations mapped within the Receive Locations/Send Ports.
It contains four sections:
- SSH Server Section has the details about the SFTP Location
- The Proxy Details Section is optional to connect to a SFTP Server behind a firewall
Note: In BizTalk, Proxy details are available from BizTalk 2013 R2
- Security Details Section has the authentication details
- In the SFTP Monitoring Config Section, you can configure the monitor with threshold conditions for the metric File Count
Based on the need, you can monitor the location with threshold conditions. If the specific condition is met, the user gets notified through an email, a SMS or another communication channel.
For monitoring the SFTP server, BizTalk360 uses the third-party tool nSoftware. Using the nSoftware IPWorks SSH product, BizTalk360 connects to the secure server with Private Keys and password for monitoring the location.
For monitoring the SFTP in BizTalk360 you can refer the knowledge base in this link.
See below, some code snippets for connecting to the secure server using nSoftware.
Password Authentication
sftp.SSHUser = “test”;
sftp.SSHPassword = “password”;
sftp.SSHPort = 22;
sftp.SSHHost = “SSHHost”;
sftp.Config(“SSHAcceptServerHostKeyFingerPrint=6a:d3:65:96:d1:9f:9d:f9:57:4e:6b:3b:11:57:5a:15”);
sftp.SSHLogon(sftp.SSHHost, sftp.SSHPort);
Console.WriteLine(“Authenticated”);
sftp.SSHLogoff();
Public key Authentication
sftp.SSHUser = "test";
sftp.SSHCert = new Certificate(CertStoreTypes.cstPPKKeyFile, "....filesserver_cert.pem", "test", "*");
sftp.SSHAuthMode = SftpSSHAuthModes.amPublicKey;
sftp.SSHPort = 22;
sftp.SSHHost = "SSHHost";
sftp.Config("SSHAcceptServerHostKeyFingerPrint=6a:d3:65:96:d1:9f:9d:f9:57:4e:6b:3b:11:57:5a:15");
sftp.SSHLogon(sftp.SSHHost, sftp.SSHPort);
Console.WriteLine("Authenticated");
sftp.SSHLogoff()
Conclusion
This article demonstrates the creation of a SFTP Server. Using the SFTP server in BizTalk Receive Locations and Send Ports, you can send files securely  and monitor the SFTP server using BizTalk360.

If you have any feedback or suggestions, please write to us at [email protected].
by Sandro Pereira | Oct 9, 2018 | BizTalk Community Blogs via Syndication
And yes, this is just another “Login failed for user” SQL Server WCF-Adapter related error. In the past I wrote about a similar topic BizTalk WCF-SQL Error:
This time the error message, the cause, and the solution are slightly different. This time while trying to communicate to a brand-new SQL Server server/database to insert date on a table thru BizTalk WCF-SQL adapter I got the following error:
Microsoft.ServiceModel.Channels.Common.ConnectionException: Login failed for user ‘BTSHostSrvc’. —> System.Data.SqlClient.SqlException: Login failed for user ‘BTSHostSrvc’.
at System.Data.SqlClient.SqlInternalConnectionTds..ctor(DbConnectionPoolIdentity identity, SqlConnectionString connectionOptions, SqlCredential credential, Object providerInfo, String newPassword, SecureString newSecurePassword, Boolean redirectedUserInstance, SqlConnectionString userConnectionOptions, SessionData reconnectSessionData, DbConnectionPool pool, String accessToken, Boolean applyTransientFaultHandling, SqlAuthenticationProviderManager sqlAuthProviderManager)
at System.Data.SqlClient.SqlConnectionFactory.CreateConnection(DbConnectionOptions options, DbConnectionPoolKey poolKey, Object poolGroupProviderInfo, DbConnectionPool pool, DbConnection owningConnection, DbConnectionOptions userOptions)
at System.Data.ProviderBase.DbConnectionFactory.CreatePooledConnection(DbConnectionPool pool, DbConnection.

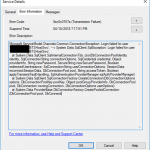
In the event viewer the message is pretty much the same:
A message sent to adapter “WCF-Custom” on send port “STAGING_BULK_SQL_WCf_SEND” with URI “mssql://SQLSRV/ /ESBAsync” is suspended.
Error details: Microsoft.ServiceModel.Channels.Common.ConnectionException: Login failed for user ‘DOMAIN BTSHostSrvc’. —> System.Data.SqlClient.SqlException: Login failed for user DOMAIN BTSHostSrvc’.
at System.Data.SqlClient.SqlInternalConnectionTds..ctor(DbConnectionPoolIdentity identity, SqlConnectionString connectionOptions, SqlCredential credential, Object providerInfo, String newPassword, SecureString newSecurePassword, Boolean redirectedUserInstance, SqlConnectionString userConnectionOptions, SessionData reconnectSessionData, DbConnectionPool pool, String accessToken, Boolean applyTransientFaultHandling, SqlAuthenticationProviderManager sqlAuthProviderManager)
at System.Data.SqlClient.SqlConnectionFactory.CreateConnection(DbConnectionOptions options, DbConnectionPoolKey poolKey, Object poolGroupProviderInfo, DbConnectionPool pool, DbConnection owningConnection, DbConnectionOptions userOptions)
at System.Data.ProviderBase.DbConnectionFactory.CreatePooledConnection(DbConnectionPool pool, DbConnection owningObject, DbConnectionOptions options, DbConnectionPoolKey poolKey, DbConnectionOptions userOptions)
at System.Data.ProviderBase.DbConnectionPool.CreateObject(DbConnection owningObject, DbConnectionOptions userOptions, DbConnectionInternal oldConnection)
at System.Data.ProviderBase.DbConnectionPool.UserCreateRequest(DbConnection owningObject, DbConnectionOptions userOptions, DbConnectionInternal oldConnection)
at System.Data.ProviderBase.DbConnectionPool.TryGetConnection(DbConnection owningObject, UInt32 waitForMultipleObjectsTimeout, Boolean allowCreate, Boolean onlyOneCheckConnection, DbConnectionOptions userOptions, DbConnectionInternal& connection)
at System.Data.ProviderBase.DbConnectionPool.TryGetConnection(DbConnection owningObject, TaskCompletionSource`1 retry, DbConnectionOptions userOptions, DbConnectionInternal& connection)
at System.Data.ProviderBase.DbConnectionFactory.TryGetConnection(DbConnection owningConnection, TaskCompletionSource`1 retry, DbConnectionOptions userOptions, DbConnectionInternal oldConnection, DbConnectionInternal& connection)
at System.Data.ProviderBase.DbConnectionInternal.TryOpenConnectionInternal(DbConnection outerConnection, DbConnectionFactory connectionFactory, TaskCompletionSource`1 retry, DbConnectionOptions userOptions)
at System.Data.ProviderBase.DbConnectionClosed.TryOpenConnection(DbConnection outerConnection, DbConnectionFactory connectionFactory, TaskCompletionSource`1 retry, DbConnectionOptions userOptions)
at System.Data.SqlClient.SqlConnection.TryOpenInner(TaskCompletionSource`1 retry)
at System.Data.SqlClient.SqlConnection.TryOpen(TaskCompletionSource`1 retry)
at System.Data.SqlClient.SqlConnection.Open()
at Microsoft.Adapters.Sql.SqlAdapterConnection.OpenConnection()
— End of inner exception stack trace —
Server stack trace:
at Microsoft.Adapters.Sql.SqlAdapterConnection.OpenConnection()
at Microsoft.Adapters.Sql.ASDKConnection.Open(TimeSpan timeout)
at Microsoft.ServiceModel.Channels.Common.Design.ConnectionPool.GetConnection(Guid clientId, TimeSpan timeout)
at Microsoft.ServiceModel.Channels.Common.Design.ConnectionPool.GetConnectionHandler[TConnectionHandler](Guid clientId, TimeSpan timeout, MetadataLookup metadataLookup, String& connectionId)
at Microsoft.ServiceModel.Channels.Common.Channels.AdapterRequestChannel.OnOpen(TimeSpan timeout)
at System.ServiceModel.Channels.CommunicationObject.Open(TimeSpan timeout)
at Microsoft.BizTalk.Adapter.Wcf.Runtime.OneWayOperationSendPortRequestChannel`1.OnOpen(TimeSpan timeout)
at System.ServiceModel.Channels.CommunicationObject.Open(TimeSpan timeout)
at System.ServiceModel.Channels.ServiceChannel.OnOpen(TimeSpan timeout)
at System.ServiceModel.Channels.CommunicationObject.Open(TimeSpan timeout)
at System.ServiceModel.Channels.CommunicationObject.Open()
Exception rethrown at [0]:
at System.Runtime.Remoting.Proxies.RealProxy.HandleReturnMessage(IMessage reqMsg, IMessage retMsg)
at System.Runtime.Remoting.Proxies.RealProxy.PrivateInvoke(MessageData& msgData, Int32 type)
at System.ServiceModel.ICommunicationObject.Open()
at Microsoft.BizTalk.Adapter.Wcf.Runtime.WcfClient`2.GetChannel[TChannel](IBaseMessage bizTalkMessage, ChannelFactory`1& cachedFactory)
at Microsoft.BizTalk.Adapter.Wcf.Runtime.WcfClient`2.SendMessage(IBaseMessage bizTalkMessage)
MessageId: {84B22A22-13F7-47C7-91B5-A863E64E268E}

Cause
Once again, sometimes is not quite true, the cause of the problem is simple to diagnose, and the error message gives a very good intel in the cause of the problem.
This problem occurs because the user account that you used to access the database, in my case the BizTalk Host Instance Account, don’t have permissions to connect… the SQL Server or SQL Server instance.
Just to be clear, this is not having permission to insert, read or event full permission to do operation on a specific database, that is completely different – I check all of that and the user have the correct access/permission. What I forget was to give access to connect to the SQL Server/SQL Server Instance.
Solution
To solve this issue, you must give access to the user, in my case BizTalk Host Instance Account to connect to the SQL Server and for that, you must:
- Open SQL Server Management Studio and connect to your server.
- In the Object Explorer, expand the “Security” folder under the server.
- Right click on the “Logins” folder and choose “New Login…”
- Add the username or group in the format “DomainUserNameOrGroup”

- Choose the “Securables” tab and make sure that you grant “Connect SQL” permission to the SQL Server/SQL Server instance

- Click “OK” and your user will be created and have access to connect to your SQL Server.
Author: Sandro Pereira
Sandro Pereira lives in Portugal and works as a consultant at DevScope. In the past years, he has been working on implementing Integration scenarios both on-premises and cloud for various clients, each with different scenarios from a technical point of view, size, and criticality, using Microsoft Azure, Microsoft BizTalk Server and different technologies like AS2, EDI, RosettaNet, SAP, TIBCO etc. He is a regular blogger, international speaker, and technical reviewer of several BizTalk books all focused on Integration. He is also the author of the book “BizTalk Mapping Patterns & Best Practices”. He has been awarded MVP since 2011 for his contributions to the integration community. View all posts by Sandro Pereira
by Praveena Jayanarayanan | Oct 9, 2018 | BizTalk Community Blogs via Syndication
Hi there! It’s time to upgrade your BizTalk360 installation! We are here with our next release of BizTalk360, v8.9. As promised, this release also comes up with a bunch of exciting new features, enhancements and of course some bug fixes.
The series of blogs, explaining the different features coming up in v8.9, have already been released. But, to make it easy for our customers, we thought it would be nice to give a brief description of all these features in a single place. This way it would be easy to get the real big picture of this new release.
As per the below quotes,
“The key is to set realistic customer expectations, and then not to just meet them, but to exceed them- preferably in unexpected and helpful ways”
– Richard Branson
The features are added to the product based on the customer feedback and suggestions. We understand the customer needs and add them to the product to make the product as suitable as possible for the user.
Come on, let’s jump in to get the list!
User Access Policy enhancements
In the User Access Policy section, the Application access section has new capabilities. Initially, it was a list of applications which needed to be checked for providing access to the Normal Users/Groups. But then, what about the newly deployed applications? Every time when a new application was deployed, the Admin would need to scroll down the entire list to check for the new applications and then provide access. This was very time-consuming.
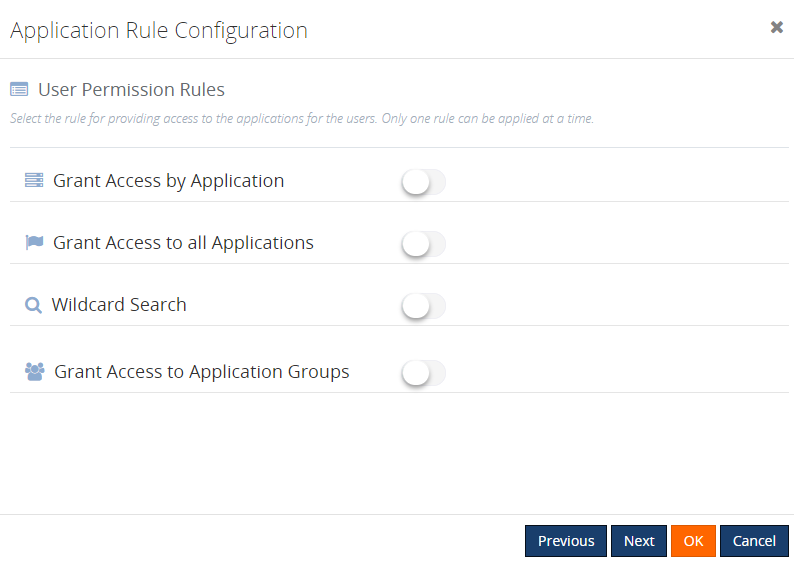
Now, to ease the process, we have provided different rules for configuring the access. But then, only one rule can be applied at a time. The different rules include:
- Grant Access by Applications
- Grant Access to All Applications
- Wildcard Search
- Grant Access to Application groups
Grant Access to All Applications
As the name denotes, enabling this rule will provide access to all the available applications for the Normal Users/Groups. The user will automatically be granted access to all the newly deployed applications.
Wildcard Search
This enables users to select the options from the wildcard operator drop down. Once this rule is configured, the user will have access to all the applications matching this wildcard. The user will automatically be given access to the newly created applications that match the wildcard.
Grant Access to Application Groups
With this new capability, you can create Application Groups and map the applications to that group. Once the user is given access to the Application group, he/she can access all the applications which are mapped to that group.
Grant Access by Applications
For persisting the existing configuration data, we have another rule available: ‘Grant Access by Application’. Once the upgrade is completed, this will be the default rule which is selected for existing users. The only difference between this configuration and the other new rules, is that when Grant Access by Applications is configured, newly applications created will not automatically be given access as in the other rules.
Stop Alerts for Maintenance during business holidays
If a user sets up multiple maintenance windows, they need to configure the business holidays individually. It will take much of your time, to configure them for every single environment in BizTalk360. To reduce the time and ease the maintenance configuration for the users, the capability to add business holiday calendars has been introduced.
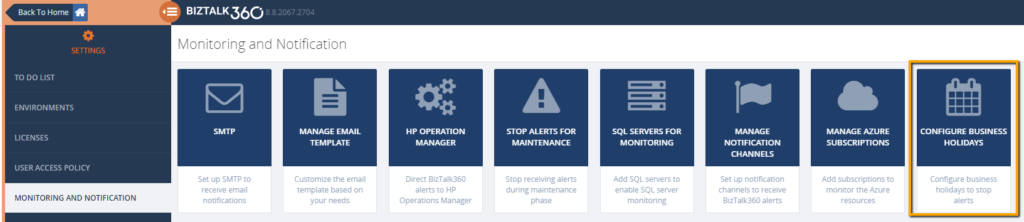
These business holiday calendars can be mapped during maintenance window setup. This new configuration section is introduced in the Monitoring Notification settings section as “Configure Business Holidays”.
In the Stop Alerts for Maintenance settings page, a new section is introduced to configure the business holiday calendars. All the configured calendars with Status enabled will be displayed in the “Select Business Holiday Calendar” drop down list. A user can select the desired calendar and use it for a maintenance window. During the business holiday, a maintenance window will be active.
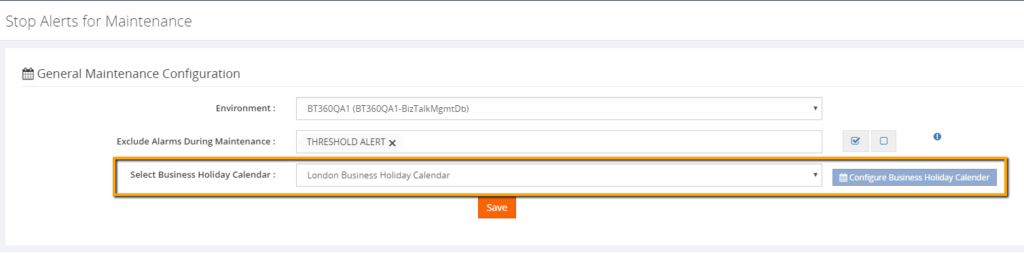
The users can also exclude certain alarms during the maintenance. This means, that, except the selected alarms, other alarms will undergo maintenance. This capability is very useful in situations where administrators don’t want to receive alerts during the weekends except for few specific alarms.
 Web Endpoint monitoring improvements
From 8.9 version on, BizTalk360 Web Endpoint authentication is extended to support:
Let’s have a look at the improvements in these areas.
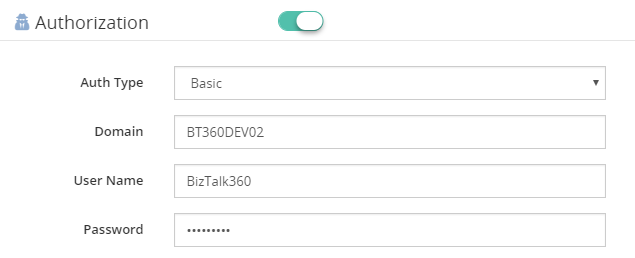
Basic Access Authentication
This is a method for an HTTP user agent to provide a user name and password when making a request. To unauthenticated requests, the server should return a response whose header contains a HTTP 401 Unauthorized status and a WWW-Authenticate field. In the BizTalk Admin Console, an HTTP endpoint can provision Basic authentication with a username and password
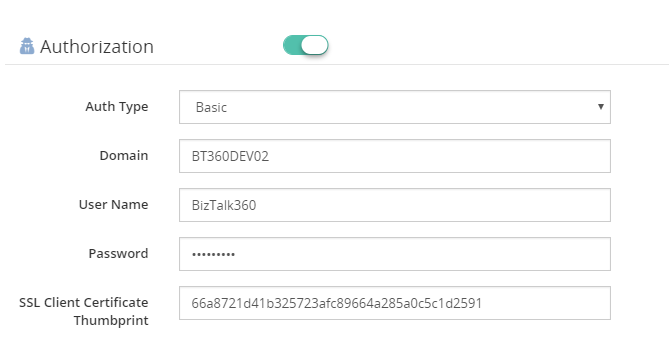
Certificate Authentication
In BizTalk360, the authentication type of Basic or Windows, along with the client certificate thumbprint, is configured in the Authorization section of Web Endpoint monitoring.
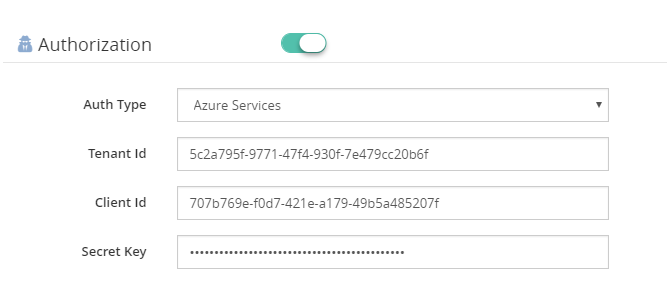
Azure Services Authentication
To be able to use Azure Services Authentication, a Service Principal must be configured in Azure. A Service Principal is an application within Azure Active Directory whose authentication tokens can be used as the client Id, client secret, and tenant fields (the subscription can be independently recovered from your Azure account details).
Additional content types
BizTalk360 8.9 extends the support to additional content types in request and response objects:
- SOAP (1.2) Content Type – “application/soap+XML” is a SOAP 1.2 content type which is added to the list. With this additional content type, SOAP V1.2 protocol is supported in web endpoint monitoring. The user can configure the XPath conditions to monitor the SOAP 1.2 endpoints, based on the results of the execution.
- Custom Content Type – When Endpoint Request/Response content types are not supported by BizTalk360, the Web Endpoint throws a HTTP 415 Unsupported Media Type. To prevent this from happening, you can configure Custom Content types.
Extended Import/Export Configuration
In version 8.9, we added support for import and export of the following sections:
- Knowledge Base
- Service Instances
- ESB Exceptions
- Event Logs
- Throttling Data
- BizTalk Reports
- Dashboards
- Operation (Default & Custom Dashboards)
- Analytics (Default & Custom Dashboards)
- EDI Dashboards
- ESB Dashboards
- Custom Widgets
The details of this feature can be found here.
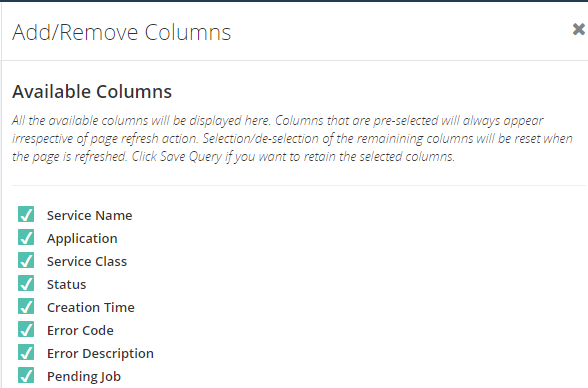
Additional columns filter capability
Grid columns in BizTalk360 are getting a fresh look. You can customize the column headers which are most important to your business scenario.
Grid columns can be dynamically removed or added based on the user preference. As per the settings in the configuration section, columns will be aligned and displayed in the grid view. These customized column settings can be saved for future reference as well. We are sure, this capability will add more value when the administrator is looking for the instances/messages based on various conditions.
As an initial phase, this implementation has been done in the following areas in BizTalk360:
- Message Box Queries
- Graphical Flow (Tracking)
- Electronic Data Interchange

BizTalk360 allows saving as many patterns as the user wants. To search the messages based on different scenarios, admins prefer different filter conditions to validate. In those situations, BizTalk360 allows to save different query filters and keeps them for future use. You can also download the customized column data using the Export to Excel capability.
Centralized Advanced Event Log viewer performance improvement
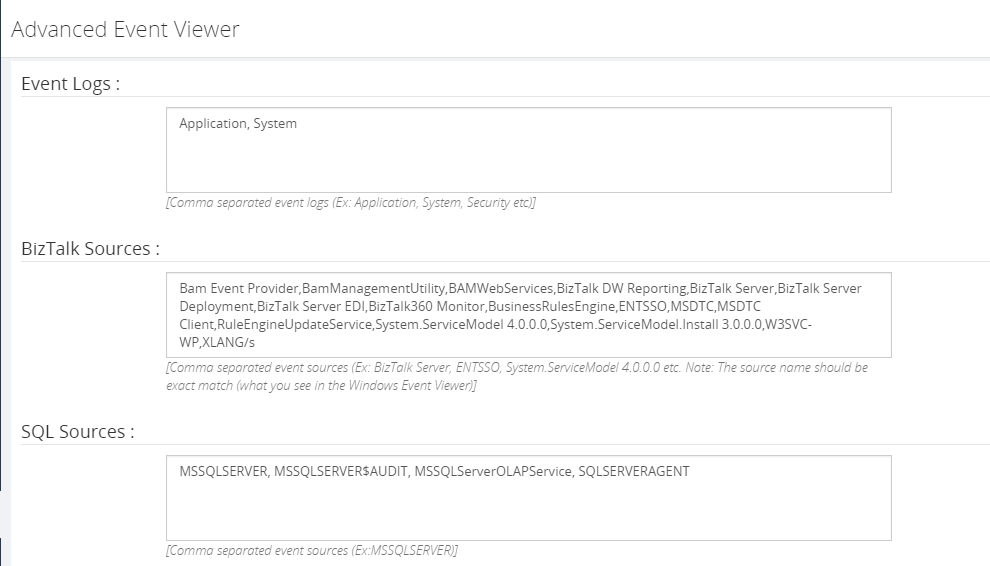
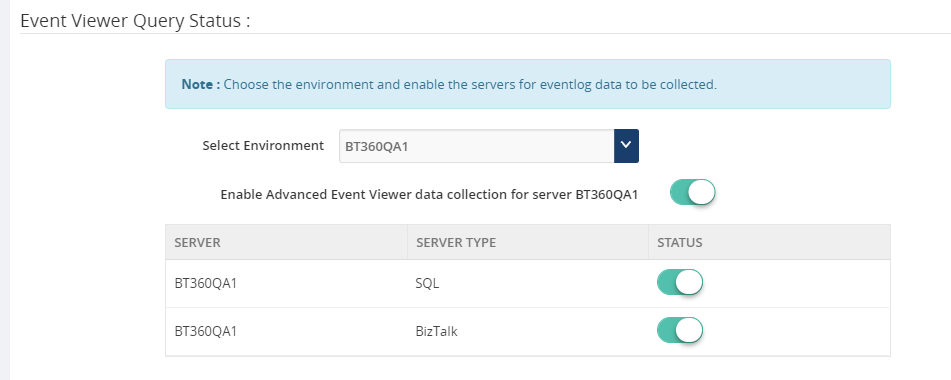
In our previous versions, up to v8.8, Event Log collection logic is not segregated based per server. To enable the Event Log collection, it is bound to the BizTalk environment and not on an individual server level. However, the user has control on configuring the sources based on the need.
In the new version of BizTalk360, users can control the Event Log collection according to individual servers. As an administrator, you know the value of each source which needs most considerations. So, there is an option as well in BizTalk360 to configure the BizTalk & SQL server sources separately.
Using these settings, you can customize and narrow down your Event Log search.
PowerShell Notification Channel
In our earlier versions, the users were already able to send notifications to specific notification channels (E.g.: Slack, ServiceNow, Webhook, Teams). Now the user can configure PowerShell scripts in the Notification Channel while configuring an alarm.
More Enhancements in BizTalk360 v8.9
Besides the above mentioned features, we have also brought a number of enhancements to existing features.
Monitor queues for message age – We have enhanced the option to monitor the queues with message ages (time of message till it exists in the queue) for IBM MQ and Service Bus Queues.
Notifications grouped by Error Description – Previously, Service instances were grouped by Error Code in the alert emails. Now, there is a new setting “Enable Group by Description” introduced to group the service instances based on the Error Description to get full insight about your errored service instances.
New filter option in ESB Exception portal – There is a new filter option “Service Name” introduced in the ESB Exception Data query builder. This will enable users to perform extensive search and get the desired results.
Restore XSLT templates – Whenever we make any improvements to the default email template there is no option for the users to restore the changes from the GUI. This makes them to manually copy/paste the XSLT from the database to utilize the new changes. To avoid the manual intervention, a new option has been provided “Restore System XSLT” to restore the changes from GUI.
PDF download available in more areas – PDF download capability is not new in BizTalk360. We have provided this option in few other areas of the application, to download the reports, dashboards and message flows from the GUI. This option is provided in Operation, Monitoring & Analytics Dashboards, Graphical Flow (Tracking) and Messaging Patterns.
Group your Logic Apps by and monitor on Resource Groups – In the earlier versions, Logic Apps are not grouped by Resource Group name. There was an issue to display the Logic Apps which are created in different Resource Groups with the same name. With the introduction of “Resource Group” column, Logic Apps are grouped by Resource Group in every single configured Azure subscription.
Multiple installer improvements – We have enhanced the BizTalk360 installer in v8.9 in few areas:
- Single credentials during upgrade – Only one set of credentials (User Name, Password) will be asked during the upgrade process, in case the same credentials have been used for all the installed components
- SQL Authentication – BizTalk360 will now support SQL Authentication for upgrade
Finally, of course, they are a number of bug fixes as well. Kindly refer the Release Notes for the complete details.
Conclusion
We always monitor the feedback portal and take up the suggestions and feedback. Now we would like to request you, our customers, to please take the time to fill this questionnaire to help us prioritize the next upcoming feature tasks, to let us know what are your main pain points and help us to further improve the product.
Why not give BizTalk360 a try! It takes about 10 minutes to install on your BizTalk environments and you can witness and check the security and productivity of your own BizTalk Environments. Get started with the free 30 days trial. Happy monitoring with BizTalk360!
Author: Praveena Jayanarayanan
I am working as Senior Support Engineer at BizTalk360. I always believe in team work leading to success because “We all cannot do everything or solve every issue. ‘It’s impossible’. However, if we each simply do our part, make our own contribution, regardless of how small we may think it is…. together it adds up and great things get accomplished.” View all posts by Praveena Jayanarayanan


