by Gautam | May 13, 2018 | BizTalk Community Blogs via Syndication
Do you feel difficult to keep up to date on all the frequent updates and announcements in the Microsoft Integration platform?

Integration weekly update can be your solution. It’s a weekly update on the topics related to Integration – enterprise integration, robust & scalable messaging capabilities and Citizen Integration capabilities empowered by Microsoft platform to deliver value to the business.
If you want to receive these updates weekly, then don’t forget to Subscribe!
Feedback
Hope this would be helpful. Please feel free to reach out and let me know your feedback on this Integration weekly series.
by BizTalk Team | May 10, 2018 | BizTalk Community Blogs via Syndication
Microsoft has a lot of great partners, and one of our missions is to highlight these, if you want to do a partner post on our team blog reach out to us either over email or through comments on this post.
This post is written by Microsoft Gold Partner Enkay Tech (www.enkaytech.com) to highlight a new product to help with monitoring BizTalk solutions.
When your BizTalk environment is running well and within capacity, your total cost of ownership (TCO) is low. However, without proper monitoring, failures could occur that could significantly increase TCO. For example, when you receive unusually large message payloads from a customer or when new applications are deployed that cause a significant increase in load, or when SQL jobs have stopped/failed, BizTalk could exceed optimal utilization of available resources. If these failures are not resolved in a timely fashion, BizTalk messaging throughput could decrease, integration durations could increase, and timeouts could occur. To recover, one may need to do some of the following tasks, all of which result in an increase in TCO:
- Suspended messages may need to be resumed or messages routed to the exceptions database may need to be recovered and resubmitted.
- If BizTalk services are down, external applications cannot communicate with BizTalk, and these applications will need to recover and replay their requests once BizTalk services are back online.
- Perform cleanup of data (e.g. roll back transactions).
Watch our Enkay Tech webcast (https://www.youtube.com/watch?v=EUQa7gCeatg) on May 22nd at 1:30 pm Central Standard Time to see how Enkay PRO can help reduce TCO. For example, you will see how your operations team can view graphs that continuously display application activity including message counts, message sizes, throughput and durations. By using these graphs, the team can get visibility into performance issues that could impact business service level agreements (SLA). They can perform deep analysis by viewing historical data to quickly identify issues that caused the failure. They can search for details on EDI transactions that are being sent to and being received from trading partners. With proactive monitoring and alerting, Enkay PRO can help customers see the value BizTalk is delivering and verify that business SLAs are being met.
No license fees are required to install and use Enkay PRO for qualified customers. You can download and use Enkay PRO for any number of users, any number of servers, and any number of environments. Free support for ninety (90) days is provided, which includes installation and training. Additional paid support for Enkay PRO software is available and includes customization and consulting services. For more information visit: http://www.enkaytech.com/enkaypro
by Sandro Pereira | May 9, 2018 | BizTalk Community Blogs via Syndication
In my last post, I described how can you fix the issue regarding:
Executed as user: BIZDEMOsaspereira. Could not find server ‘BIZDEMO’ in sys.servers. Verify that the correct server name was specified. If necessary, execute the stored procedure sp_addlinkedserver to add the server to sys.servers. [SQLSTATE 42000] (Error 7202). The step failed.).
See more about this error here: https://blog.sandro-pereira.com/2018/05/08/backup-biztalk-server-job-failed-could-not-find-server-in-sys-servers/
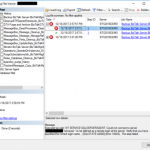
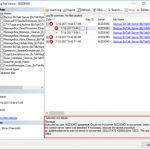
And I told that this was not the only issue that you will find. The truth is that if you try to execute the Backup BizTalk Server job after you fix this last problem, the job will fail again this time with the following error:
Executed as user: NT SERVICESQLSERVERAGENT. Could not connect to server ‘BIZDEMO’ because ” is not defined as a remote login at the server. Verify that you have specified the correct login name. . [SQLSTATE 42000] (Error 18483). The step failed.

Cause
This error can be related to several possible problems and a common solution you will find in SQL Server forums and post is that you should Drop and re-create the linked server will resolved this problem.
However, and forgive me in advance for my SQL ignorance, I don’t have any linked Server configured, my BizTalk Server Virtual Machine is a simple standalone machine with BizTalk and SQL installed… so, it couldn’t be that problem!

So, after several tests, I started to think as a truly genuine old-school technical guy:
- It doesn’t work? did you try to restart it?
Or as a true BizTalk developer guy:
- Did you restart the host after your solution deployment?
And I thought that it might be necessary to restart the SQL services so that all the settings of the previous command execution have the correct effect – execution of the commands: sp_dropserver and sp_addserver necessary to fix the issue reported in the previous post.
And it was!
Solution
To fix this issue, we need to restart the SQL services
After you restart the SQL Server Services you will be able to run the Backup BizTalk Server job successfully.
Author: Sandro Pereira
Sandro Pereira lives in Portugal and works as a consultant at DevScope. In the past years, he has been working on implementing Integration scenarios both on-premises and cloud for various clients, each with different scenarios from a technical point of view, size, and criticality, using Microsoft Azure, Microsoft BizTalk Server and different technologies like AS2, EDI, RosettaNet, SAP, TIBCO etc. He is a regular blogger, international speaker, and technical reviewer of several BizTalk books all focused on Integration. He is also the author of the book “BizTalk Mapping Patterns & Best Practices”. He has been awarded MVP since 2011 for his contributions to the integration community. View all posts by Sandro Pereira
by Lex Hegt | May 9, 2018 | BizTalk Community Blogs via Syndication
Why do we need this feature?
The BizTalk Health Monitor (BHM) and its predecessor MessageBox Viewer (MBV) are important tools to learn about the overall health of BizTalk environments.
The tools are developed and maintained by Microsoft and firstly used by their Premier Field Engineers, to help them identify problems with BizTalk environments. Later, the tool became publicly available, enabling BizTalk administrators to run the tool themselves as well. Since that time, we have seen many updates of the tools, although MBV is deprecated for few years now.
The BizTalk Health Monitor can be downloaded here:
https://www.microsoft.com/en-us/download/details.aspx?id=43716
The best practice is to run BHM frequently, say once per day at a quiet time, to be aware of overall health and check for any critical issues.
MBV did not offer a built-in scheduler, so you had to schedule it yourself with Windows Scheduler. With the introduction of BHM, the tool came with a plugin, to use it from the BizTalk Server Administration console and it also came with scheduling features.
Once scheduled, you’ll receive the output in the configured mailbox. So you have the fully detailed report easily at hand.
What are the current challenges?
Although it’s good to have the output of MBV/BHM runs in your mailbox, we think that the overall experience still can be improved.
In your day to day activities as a BizTalk administrator, you might receive many notifications in your mailbox. If not setup properly, the amount of notifications might be overwhelming, which might result in starting to ignore the notifications, thereby risking to miss important notifications.
So, you will want to focus on just the notifications which indicate something needs to be taken care of. In case of the MBV/BHM output, you will only be interested in critical and non-critical errors on which some actions must be taken. In other words, if all is healthy, you might not be interested to receive that output at all.
With BHM you will always receive the output, regardless if all is healthy or some (non-)critical issues exist. No clear notification can be received, in case something serious is going on.
Besides that, MBV/BHM is another tool/console you need to be aware of to consider the overall health of a BizTalk environment. As we want to apply our One Platform philosophy as much as possible, we brought integration with MBV/BHM to BizTalk360.
In the next section of this article, we’ll show you how BizTalk360 helps you to improve the experience of BHM and how you can have monitoring on the output of MBV/BHM runs.
How BizTalk360 solves this problem?
BizTalk360 has integration with MBV/BHM for many years. This integration enables the BizTalk360 user to schedule MBV/BHM and view the output of the different runs of the tool directly from within BizTalk360.

This makes it easy to run MBV/BHM and view its output in BizTalk360, instead of delivering the output of each run to the mailbox of the user.
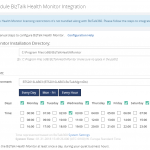
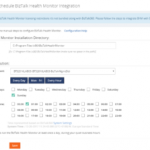
However, this does not yet solve the problem of just being notified in case of critical errors. To achieve that, you can simply add the BizTalk Health Monitor to a BizTalk360 alarm. In BizTalk360, you can do this by navigating to Monitoring => Manage mapping => BizTalk Environment => BizTalk Health Monitor. Here you can configure how many critical or non-critical may occur in the output of BHM, before a notification is being sent.

As you can see from above screenshot, under Error Threshold, you can configure how many critical/non-critical errors may exist, before a notification is being sent. From the Current Configuration of the screen, you can see that in the last report there were 2 critical and 20 non-critical errors. So, in above scenario, the error thresholds have been met and a notification will be send.
If you want more fine-grained monitoring of the BHM output, BHM offers you the option to store the output of the BHM runs in a database. Say, you want to monitor on specific categories like Tracking or the BizTalk jobs, you could achieve that with Database query monitoring.
When you would like to know more on how to set this up, feel free to contact us ([email protected]) and we are happy to work with you on the scenario at hand.
Conclusion
The integration of MBV/BHM with BizTalk360 adds to the One platform philosophy. By also bringing monitoring of the output of MBV/BHM, we remove some of the clutter which appears in the mailbox of the user, providing good focus on the topics which really matter. With some customization, you could have even more fine-grained monitoring on the output of BHM.
There are some more articles on MBV/BHM integration. Check them out here:
Get started with a Free Trial today!
If you would like to try BizTalk360, why not give it a try. It takes about 10 minutes to install on your BizTalk environments and you can witness and check the security and productivity on your own BizTalk Environments. Get started with the free 30 days trial.
Author: Lex Hegt
Lex Hegt works in the IT sector for more than 25 years, mainly in roles as developer and administrator. He works with BizTalk since BizTalk Server 2004. Currently he is a Technical Lead at BizTalk360. View all posts by Lex Hegt
by Sandro Pereira | May 8, 2018 | BizTalk Community Blogs via Syndication
After you install and configure a BizTalk Server Azure Virtual Machine, the first time you try to run the main BizTalk Server job: Backup BizTalk Server (BizTalkMgmtDb) – of course after you properly configure it – it will fail every time with the following error:
Executed as user: BIZDEMOsaspereira. Could not find server ‘BIZDEMO’ in sys.servers. Verify that the correct server name was specified. If necessary, execute the stored procedure sp_addlinkedserver to add the server to sys.servers. [SQLSTATE 42000] (Error 7202). The step failed.).

Note: will not be the only one that you will find but let’s will go step by step and we will address other errors in different blog posts
Cause
Well, I guess (I’m sure) that this error happens because we are using a default Microsoft BizTalk Server image with all the components already installed: Visual Studio, BizTalk Server and especially SQL Server.
This problem happens because of the SQL Server name present in sys.servers table – maybe that was specified during setup of this image – is defined as “localhost” and not the actual VM name that you created on the Azure Portal and for the job work properly:
- The SQL server name specified during setup of the Azure Virtual Machine must match the Name in sys.servers of the SQL server
To check the Name present in sys.servers table please run the following SQL Script:
SELECT name FROM sys.servers
GO

Solution
To fix this issue, we need to remove the old server name and add the new server name in SQL. You can do that by:
- Login on to SQL Server and open SSMS.
- Connect to the instance and run below query, which will remove the old server name.
sp_dropserver 'localhost'
GO
- And then run below query to add the new server name, that in my case was “BIZDEMO”:
sp_addserver 'BIZDEMO', local
GO
After you execute these scripts this particular problem will be solved.
Author: Sandro Pereira
Sandro Pereira lives in Portugal and works as a consultant at DevScope. In the past years, he has been working on implementing Integration scenarios both on-premises and cloud for various clients, each with different scenarios from a technical point of view, size, and criticality, using Microsoft Azure, Microsoft BizTalk Server and different technologies like AS2, EDI, RosettaNet, SAP, TIBCO etc. He is a regular blogger, international speaker, and technical reviewer of several BizTalk books all focused on Integration. He is also the author of the book “BizTalk Mapping Patterns & Best Practices”. He has been awarded MVP since 2011 for his contributions to the integration community. View all posts by Sandro Pereira

by Eldert Grootenboer | May 7, 2018 | BizTalk Community Blogs via Syndication
Recently Microsoft announced Azure Event Grid, a highly scalable serverless event driven offering allowing us to implement publish and subscribe patterns. Event driven scenarios are becoming more common by the day, which means that we see these type of integrations increasing a lot as well. A lot of times applications will define their own message formats for their events, however, with the recent announcement of native support in Azure Event Grid for CloudEvents our lives should be made a lot easier. CloudEvents is a standard for working with events accross platforms, and gives us a specification for describing event data in a common way. This will allow any platform or application which is working with events, to implement a common format, allowing easy integration and interoperability, for example between Azure, AWS and Oracle. The specification is still under active development, and Microsoft is one of the big contributors, especially Clemens Vasters, Lead Architect on Azure Messaging Services.

In this blog post we will be looking into Event Grid’s support for CloudEvents, and how to set this up. The specifications for the CloudEvents message format can be found on GitHub, and how this maps to Event Grid’s own schema can be found on Microsoft Docs. For this post we will use the application created in this bogpost, which will generate events when an order has been placed, as well as when a repair has been requested. These events will be handled by a Logic App, which will send out an email. In a real life scenario we could, for example, use this Logic App to create place the order at the ship’s supplier. And because we are using the CloudEvents format, the application can easily integrate with any system which supports this new specification, so they are not just bound to Azure.

Send event from custom application to Logic Apps
Currently support for Cloud Events in Event Grid is still in preview only available in a select group of regions (West Central US, Central US and North Europe), and to use it we need to enable an extension in Azure CLI by giving the following command.
az extension add --name eventgrid
|

Enable Event Grid extension
We can now create our Event Grid topic, where we will receive the events. Currently this is not yet supported in the portal, so we will stay in our Azure CLI, and give the following commands.
az group create -l northeurope -n cloudEventsResourceGroup
az eventgrid topic create --name cloudevents -l northeurope -g cloudEventsResourceGroup --input-schema cloudeventv01schema
|
The first command creates the resource group, while the second command creates the Event Grid topic. Note the input-schema switch, which allows us to set the CloudEvents format.
When the topic has been created, go to the Event Grid Topics blade in the portal, open the topic we just created, and grab the Topic Endpoint, we will need this later on.

Save the topic endpoint for later use
Switch to the Access keys for the topic, and grab one of the keys, we will need this later as well.
Also save on of the keys for later use
Next we will create the application which will send the events to our custom topic which we just created. For ease of this demo, this will just be a simple console application, but in a real life solution this could be any type of system. Start by creating a new solution in Visual Studio for our application.

Create console app solution
Data Classes
Add the following data classes, which describe the orders and repairs, as explained in this blog post.
/// <summary>
/// Event sent for a specific ship.
/// </summary>
public class ShipEvent
{
    /// <summary>
    /// Name of the ship.
    /// </summary>
    public string Ship { get; set; }

    /// <summary>
    /// Type of event.
    /// </summary>
    public string Type { get; set; }
}
|
/// <summary>
/// Used to place an order.
/// </summary>
public class Order : ShipEvent
{
    /// <summary>
    /// Name of the product.
    /// </summary>
    public string Product { get; set; }

    /// <summary>
    /// Number of items to be ordered.
    /// </summary>
    public int Amount { get; set; }

    /// <summary>
    /// Constructor.
    /// </summary>
    public Order()
    {
        Type = "Order";
    }
}
|
/// <summary>
/// Used to request a repair.
/// </summary>
public class Repair : ShipEvent
{
    /// <summary>
    /// Device which needs to be repaired.
    /// </summary>
    public string Device { get; set; }

    /// <summary>
    /// Description of the defect.
    /// </summary>
    public string Description { get; set; }

    /// <summary>
    /// Constructor.
    /// </summary>
    public Repair()
    {
        Type = "Repair";
    }
}
|
CloudEvents class
Add the CloudEvents class, which will be used to create a CloudEvents message which we will send to our Azure Event Grid. The schema for a CloudEvents message can be found here.
/// <summary>
/// Representation of the CloudEvents specification, to be sent to Event Grid Topic.
/// </summary>
class CloudEvents
{
        /// <summary>
        /// This will be used to update the Source and Data properties.
        /// </summary>
        public ShipEvent UpdateProperties
        {
                set
                {
                        Source = $"{Program.TOPIC}#{value.Ship}/{value.Type}";
                        Data = value;
                }
        }

        /// <summary>
        /// Gets the version number of the CloudEvents specification which has been used.
        /// </summary>
        public string CloudEventsVersion { get; }

        /// <summary>
        /// Gets the registered event type for this event source.
        /// </summary>
        public string EventType { get; }

        /// <summary>
        /// Gets the The version of the eventType.
        /// </summary>
        public string EventTypeVersion { get; }

        /// <summary>
        /// Gets the event producer properties.
        /// </summary>
        public string Source { get; set; }

        /// <summary>
        /// Gets the unique identifier for the event.
        /// </summary>
        public string EventID { get; }

        /// <summary>
        /// Gets the time the event is generated based on the provider's UTC time.
        /// </summary>
        public string EventTime { get; }

        /// <summary>
        /// Gets or sets the event data specific to the resource provider.
        /// </summary>
        public ShipEvent Data { get; set; }

        /// <summary>
        /// Constructor.
        /// </summary>
        public CloudEvents()
        {
                CloudEventsVersion = "0.1";
                EventID = Guid.NewGuid().ToString();
                EventType = "shipevent";
                EventTime = DateTime.UtcNow.ToString("o");
        }
}
|
.Program Class
And finally we will update the Program class. Here we will get the input from the user, and create a CloudEvents message which will be sent to Event Grid. Make sure to update the topic endpoint and access key with the entries we retrieved from the portal in the previous step. Also update the topic property with your subscription id, and the resource group and topic name you used when creating the topic. One more thing to notice, is how we only send a single message, instead of a List of messages as we did in this blog post. Currently CloudEvents does not support batching of events, which is why we can only send a single event.
/// <summary>
/// Send CloudEvents messages to an Event Grid Topic.
/// </summary>
class Program
{
        /// <summary>
        /// Endpoint of the Event Grid Topic.
        /// Update this with your own endpoint from the Azure Portal.
        /// </summary>
        private const string TOPIC_ENDPOINT = "<your-topic-endpoint>";

        /// <summary>
        /// Key of the Event Grid Topic.
        /// Update this with your own key from the Azure Portal.
        /// </summary>
        private const string KEY = "<your-access-key>";

        /// <summary>
        /// Topic to which we will be publishing.
        /// Update the subscription id, resource group and topic name here.
        /// </summary>
        public const string TOPIC = "/subscriptions/<your-subscription-id>/resourceGroups/<your-resource-group>/providers/Microsoft.EventGrid/topics/<your-topic-name>";

        /// <summary>
        /// Main method.
        /// </summary>
        public static void Main(string[] args)
        {
                // Set default values
                var entry = string.Empty;

                // Loop until user exits
                while (entry != "e" && entry != "exit")
                {
                        // Get entry from user
                        Console.WriteLine("Do you want to send an (o)rder, request a (r)epair or (e)xit the application?");
                        entry = Console.ReadLine()?.ToLowerInvariant();

                        // Get name of the ship
                        Console.WriteLine("What is the name of the ship?");
                        var shipName = Console.ReadLine();

                        CloudEvents cloudEvents;
                        switch (entry)
                        {
                                case "e":
                                case "exit":
                                        continue;
                                case "o":
                                case "order":
                                        // Get user input
                                        Console.WriteLine("What would you like to order?");
                                        var product = Console.ReadLine();
                                        Console.WriteLine("How many would you like to order?");
                                        var amount = Convert.ToInt32(Console.ReadLine());

                                        // Create order event
                                        // Event Grid expects a list of events, even when only one event is sent
                                        cloudEvents = new CloudEvents { UpdateProperties = new Order { Ship = shipName, Product = product, Amount = amount } };
                                        break;
                                case "r":
                                case "repair":
                                        // Get user input
                                        Console.WriteLine("Which device would you like to get repaired?");
                                        var device = Console.ReadLine();
                                        Console.WriteLine("Please provide a description of the issue.");
                                        var description = Console.ReadLine();

                                        // Create repair event
                                        // Event Grid expects a list of events, even when only one event is sent
                                        cloudEvents = new CloudEvents { UpdateProperties = new Repair { Ship = shipName, Device = device, Description = description } };
                                        break;
                                default:
                                        Console.Error.WriteLine("Invalid entry received.");
                                        continue;
                        }

                        // Send to Event Grid Topic
                        SendEventsToTopic(cloudEvents).Wait();
                }
        }

        /// <summary>
        /// Send events to Event Grid Topic.
        /// </summary>
        private static async Task SendEventsToTopic(CloudEvents cloudEvents)
        {
                // Create a HTTP client which we will use to post to the Event Grid Topic
                var httpClient = new HttpClient();

                // Add key in the request headers
                httpClient.DefaultRequestHeaders.Add("aeg-sas-key", KEY);

                // Event grid expects event data as JSON
                var json = JsonConvert.SerializeObject(cloudEvents);

                // Create request which will be sent to the topic
                var content = new StringContent(json, Encoding.UTF8, "application/json");

                // Send request
                Console.WriteLine("Sending event to Event Grid...");
                var result = await httpClient.PostAsync(TOPIC_ENDPOINT, content);

                // Show result
                Console.WriteLine($"Event sent with result: {result.ReasonPhrase}");
                Console.WriteLine();
        }
}
|
The complete code for the Event Publisher application can also be found here on GitHub.
Our next step is to create the Logic App which will handle the events sent by our events publisher application.

Create Logic App for processing events
Once the Logic App has been created, open the designer and create a HTTP Request trigger template.

Use HTTP Request trigger
Set the Request JSON Schema to the following, which is a representation of the CloudEvents schema including the ship events.
{
    "type": "object",
    "properties": {
        "CloudEventsVersion": {
            "type": "string"
        },
        "EventType": {
            "type": "string"
        },
        "EventTypeVersion": {},
        "Source": {
            "type": "string"
        },
        "EventID": {
            "type": "string"
        },
        "EventTime": {
            "type": "string"
        },
        "Data": {
            "type": "object",
            "properties": {
                "Ship": {
                    "type": "string"
                },
                "Type": {
                    "type": "string"
                }
            }
        }
    }
}
|

Set JSON schema for parsing the request
Add a step to send out an email, and authenticate using your Office365 account. If you don’t have an Office365 account you can also use one of the other connectors to send out an email.

Add the Office365 Outlook connector
Set the options for the email and save the Logic App. When you save the Logic App make sure to grab the HTTP POST URL of the HTTP Request trigger, as we will need this in the next step to set up the subscription.

Set email properties with body to the data element
We are now going to create the Event Grid subscription, which will catch the events from our events publisher, and route them to our Logic App. We will have to do this once again from the Azure CLI, as the portal UI does not yet support the use of the CloudEvents schema. Give the following command in the Azure CLI to create the subscription which will route messages to our Logic Apps HTTP endpoint. Remember the Event Grid extension should be enabled for this.
az eventgrid event-subscription create --name shipEventsToProcessingLogicApp --topic-name cloudevents -g cloudEventsResouceGroup --endpoint '"<endpoint-for-logic-app-http-trigger>"' --event-delivery-schema cloudeventv01schema
|

Run Azure CLI command to create subscription
Now go to the Event Grid Subscriptions blade, make sure the filters are set right, and you will find your newly created subscription.
Subscription has been created
Testing
Open the event publisher application, and send in some events.

Send events from event publisher application
These events will now be received in the Event Grid topic, and routed to the subscription, which will then deliver it at the Logic App.
Logic App run shows we receive CloudEvents message
An email will then be sent, indicating the type of event.

Receive email with event information
by Eldert Grootenboer | May 7, 2018 | BizTalk Community Blogs via Syndication
This is the first in a series of blogposts around setting up CI/CD for Azure API Management using Azure Resource Manager templates. We will be using Visual Studio Team Services to host our repositories and set up our build and release pipeline. By using CI/CD our API Management will be updated any time we check in changes made in our ARM templates.
The posts in this series are the following, this list will be updated as the posts are being published.
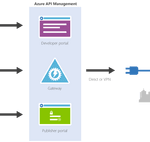
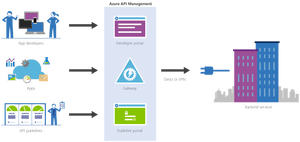
We will have several developers who are working in API Management creating and updating API definitions. The developers can either do this directly in the ARM template files, or by creating the API definition in the portal first and exporting it with a tool like the API Management ARM Template Creator. They will then check in their changes to a GIT repository hosted in VSTS.
In this first post we will create an instance of API Management, without any custom APIs defined, just the Echo API which comes out of the box. We will start by creating a account in VSTS.

Create VSTS account
Once your account has been created, add a new project under which we will host our repositories. Select GIT as the version control provider.

Browse projects

Create new project

Set up project properties
Once our project has been created, let’s create a new GIT repository which will be used to hold the ARM template used to deploy our API Management instance. By creating a repository we can easily detect changes to trigger a specific deployment, like the instance or a specific API definition. This also allows us to limit developers to specific repositories, for example we might only want our lead developers to work on the instance, but have all developers work on APIs within the instance.

Create new repository

Set repository properties
Once created, switch to your new repository.

Switch to API Management instance repository
Clone the repository to your local machine. When working with ARM template I like using Visual Studio Code in combination with the Azure Resource Manager Tools extension, but you can use any tool you like.
Once you have cloned your repository, create a new file called instance.json, and use the following code to make it an ARM template.
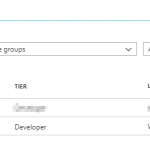
Notice that we use a couple of parameters, these can be overridden at deployment time according to the environment we are deploying to, for example we will want to use the Developer sku in our test environment, but use the Standard sku in the production environment. The other thing to notice is we use [resourceGroup().location] for our location, this will make sure our API Management instance lands in the same region as the resource group to which we deploy from our deployment pipeline.
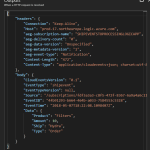
{
    "$schema": "https://schema.management.azure.com/schemas/2015-01-01/deploymentTemplate.json#",
    "contentVersion": "1.0.0.0",
    "parameters": {
      "APIManagementSku": {
        "type": "string",
        "defaultValue": "Developer"
      },
      "APIManagementSkuCapacity": {
        "type": "string",
        "defaultValue": "1"
      },
      "APIManagementInstanceName": {
        "type": "string",
        "defaultValue": "MyAPIManagementInstance"
      },
      "PublisherName": {
        "type": "string",
        "defaultValue": "Eldert Grootenboer"
      },
      "PublisherEmail": {
        "type": "string",
        "defaultValue": "[email protected]"
      }
    },
    "variables": {},
    "resources": [
      {
        "type": "Microsoft.ApiManagement/service",
        "name": "[parameters('APIManagementInstanceName')]",
        "apiVersion": "2017-03-01",
        "properties": {
          "publisherEmail": "[parameters('PublisherEmail')]",
          "publisherName": "[parameters('PublisherName')]",
          "notificationSenderEmail": "[email protected]",
          "hostnameConfigurations": [],
          "additionalLocations": null,
          "virtualNetworkConfiguration": null,
          "customProperties": {
            "Microsoft.WindowsAzure.ApiManagement.Gateway.Security.Protocols.Tls10": "False",
            "Microsoft.WindowsAzure.ApiManagement.Gateway.Security.Protocols.Tls11": "False",
            "Microsoft.WindowsAzure.ApiManagement.Gateway.Security.Protocols.Ssl30": "False",
            "Microsoft.WindowsAzure.ApiManagement.Gateway.Security.Ciphers.TripleDes168": "False",
            "Microsoft.WindowsAzure.ApiManagement.Gateway.Security.Backend.Protocols.Tls10": "False",
            "Microsoft.WindowsAzure.ApiManagement.Gateway.Security.Backend.Protocols.Tls11": "False",
            "Microsoft.WindowsAzure.ApiManagement.Gateway.Security.Backend.Protocols.Ssl30": "False"
          },
          "virtualNetworkType": "None"
        },
        "resources": [],
        "sku": {
          "name": "[parameters('APIManagementSku')]",
          "capacity": "[parameters('APIManagementSkuCapacity')]"
        },
        "location": "[resourceGroup().location]",
        "tags": {},
        "scale": null
      }
    ],
    "outputs": {}
  }
|
Now commit and push these changes changes to the repository, so we can use it in our build and deployment pipeline.

Commit and push changes to repository
Go back to VSTS, and create a new build definition for our project.

Create new definition
Make sure you have selected the repository for the API Management instance, and create an empty process definition.

Select API Management instance repository

Create empty process definition
We will start by setting the trigger to enable continous integration. This will kick of the build each time we check in a change to our repository.

Enable continous integration trigger
Next go to the tasks, and add a Azure Resource Group Deployment task to your build Phase. The name of the task is somewhat misleading, as it does not just do resource group deployments, but actually deploys complete ARM templates.
Add Azure Resource Group Deployment task
Click on the task we just added, set the name of the task, and select the subscription to be used. If needed, authorize your connection. In this build pipeline we will only validate the template, so nothing will be deployed yet.
Select subscription and authorize if needed
Fill in the rest of the Azure details of the task. Keep in mind that the resource group will only be used for validation, you can use either an existing or a new resource group for this.

Set Azure details
Now fill in the template details of the task. For the Template reference, select the ARM template we created earlier on by clicking on the three dots next to the textbox. Set the deployment mode to Validation only, this will allow us to validate the ARM template without deploying it. Leave all other sections of the build task to their default values.

Set template and deployment mode
Now add a Delete an Azure Resource Group if it is empty task to the build phase. This custom task has first to be added to your VSTS account (you will need to refresh your VSTS browser screen after you added it), and will be used to clean up the resource group if it was created during the validation if it is empty. This is done, because if you created a new resource group in the previous task, it will leave an empty resource group behind.
Add Delete an Azure Resource Group if it is empty task
Open the new task, and set the Azure details. Make sure to use the same subscription and resource group as was used during the validation. You could use VSTS variables here instead as well, but for this blogpost I will just set the names manually.

Set Azure details
And now add a Publish Build Artifacts task to our build stage. This task will publish the ARM template so we can use it in our deployment pipeline.
Publish Build Artifacts task
Open the task, and select the ARM template file for Path to publish. Give a name for the artifact which will be published, and set the publish location to VSTS.

Set publish settings
We now have completed our build pipeline, so save and queue the definition. This will publish the artifact which we can then use to set up our deployment pipeline.

Save and queue the build definition

Select location to save the definition

Queue the build definition
We have finished our build pipeline, so the next step is to set up a deployment definition. Go to Releases and create a new definition.

Create new release definition
Start with an empty process, as we will set up our definition ourselves.
In this definition, two environments will be used, Test and Production. But first we will link our artifacts from our build pipeline, by clicking on the Add artifact field.

Add artifact
Select the build definition we created before, this will read the ARM template which we validated in our build pipeline.

Select build definition
And now click on the button to set a continuous deployment trigger, and enable this trigger. This will make sure our deployment process runs each time our build pipeline completes successfully.

Open continous deployment trigger

Enable continuous deployment trigger
Now that we have set up our artifacts to be published, click on the environment and set the environment name to Test.
Next click on the Tasks dropdown and select the Test environment.

Open Test environment tasks
Add an Azure Resource Group Deployment task to your phase, this will deploy the ARM template to our Azure environment.
Add Azure Resource Group Deployment task
Open the task, and edit the Azure details. Remember, this is for your test environment, so set the subscription and / or resource group accordingly.

Set Azure details for test environment
For the template, select the output from our build pipeline. If you want, you can override your template parameters here as well, but as our defaults are already prepared for the test environment, we will not do this at this time.

Use template from build pipeline
Go back to your pipeline, and click on the Clone button under the Test environment.

Clone the test environment
Rename this new environment to Production, and open the pre-deployment conditions.
Open pre-deployment conditions
As this is our production environment, we don’t want to release here until a release manager has approved the deployment. To do this, enable the Pre-deployment approvals option and select someone who is allowed to approve the deployments. Normally this will probably be a release manager.

Enable pre-deployment approvals
Open your Production tasks, click on the Azure Resource Group Deployment task, and update the subscription and / or resource group for your production environment.

Update subscription and resource group
As this is our production instance, we will want to run on the Standard tier of API Management instead of the Developer tier, so override the APIManagementSku property we had set in our ARM template.

Override sku to use Standard tier
And finally name and save your deployment definition.
To test our CI/CD process, we can now make a change to the ARM template and check it in to our repository. This will then start the build pipeline validating our template, and once it is done, kick off the deployment pipeline automatically, deploying it to Azure.

Build pipeline gets triggered automatically after check in
The first time this is done, it will take a while to create the API Management instance, and if you are on VSTS free build tier, it might show as failed on the deployment, because it will exceed the maximum of 30 minutes.

Deployment succeeded
From now on after making changes to your ARM template your API Management instance will automatically be updated through the CI/CD pipeline. And as we choose for incremental updates in our deployment process, it will only update the parts which have actually been changed, without redeploying the entire instance.
API Management instance has been created

by Gautam | May 6, 2018 | BizTalk Community Blogs via Syndication
Do you feel difficult to keep up to date on all the frequent updates and announcements in the Microsoft Integration platform?

Integration weekly update can be your solution. It’s a weekly update on the topics related to Integration – enterprise integration, robust & scalable messaging capabilities and Citizen Integration capabilities empowered by Microsoft platform to deliver value to the business.
If you want to receive these updates weekly, then don’t forget to Subscribe!
Feedback
Hope this would be helpful. Please feel free to reach out and let me know your feedback on this Integration weekly series.
by Lex Hegt | May 2, 2018 | BizTalk Community Blogs via Syndication
This blog is a part of the series of blog articles we are publishing on the topic “Why we built XYZ feature in BizTalk360”. Read the main article here.
Why do we need this feature?
The BizTalk Health monitor (BHM) is the successor of the Message Box Viewer (MBV). Both tools have been developed by Microsoft for health analysis of BizTalk environments. Despite its (former) name Message Box Viewer, the tool checks many more parts of BizTalk Server than just the Message Box database(s).
For example, the tool checks whether:
- the latest Cumulative Updates are installed
- relevant hotfixes are installed
- all kind of configuration (Windows, BizTalk, SQL) is conform best practices, think of
- Correct Host Configuration
- Auto-growth settings of your BizTalk databases
- Unnecessary Tracking switched on
- your BizTalk databases are in good health
- the well-being of your BizTalk related SQL jobs
- there are (relevant) Event Log errors
After Microsoft deprecated the Message Box Viewer software few years ago, they introduced the BizTalk Health Monitor (or BHM). BHM uses the same engine as the Message Box Viewer, but also comes with some improvements. These improvements are mainly related to:
- Visibility – the BHM software comes with a MMC snap-in, which allows you to have both the BizTalk Server Administration console and the BizTalk Health Monitor software in a single MMC snap-in
- Scheduling – you can now setup runs of BHM directly in the tool itself. In the background BHM still uses the command line version of the tool and the Windows scheduler to perform the runs. By creating multiple profiles, you can even perform runs for different BizTalk Server environments, from the same instance of BHM.
Just like with the Message Box Viewer, it is advised to run BizTalk Health Monitor on a regular basis. The tool comes with most recent versions of BizTalk Server and needs to be installed on the BizTalk Server. The tool can also be downloaded here:
https://www.microsoft.com/en-us/download/details.aspx?id=43716
Once you have installed BHM, you can setup scheduling so you will automatically retrieve health reports in your mailbox.
What are the current challenges?
Although BHM contains important information on the health of your BizTalk environment, it is yet another console you must be aware of. Especially organizations with less knowledge of all the consoles needed to support BizTalk Server, this one can easily be overseen or forgotten, with potentially, catastrophic results.
To be able to access BHM, be it for configuration of the runs of BHM or viewing (historic) reports, you need Remote Desktop access to the BizTalk server on which the BizTalk Health Monitor software is installed. Logging in to the BizTalk server repeatedly is time-consuming and can prevented by using the MBV/BHM integration which is discussed in the next paragraph.
How BizTalk360 solves this problem?
As you probably know, the vision behind BizTalk360 is to provide One platform for BizTalk Server. By providing One platform, aka one user interface, we bring all the different consoles, a BizTalk administrator might need to be able to do his job, under one hood.
For that reason, we already brought integration with Message Box Viewer years ago and updated the integration to support the BizTalk Health Monitor. This integration exists of the following features:
- Schedule runs of BHM
- Run BHM profiles
- Manually run BHM
- View reports of BHM
- Monitor the results of BHM runs
Schedule runs of BHM
For many years, BizTalk360 already had integration with the predecessor of BizTalk Health Monitor, being Message Box Viewer. This integration included the scheduling capability, which was brought by BHM, when the tool became available, as well.
So, when we replaced MBV integration with BHM integration, of course we made sure that you would be able to setup BHM schedules from BizTalk360 as well.

Run BHM Monitoring profiles
BHM allows users to create specific so-called Monitoring profiles, which can be used to execute a subset of all the available queries and rules. This can be used, for example, to monitor just specific components or artifacts.
BizTalk360 allows you to run or monitor on such a profile, by creating such a profile in BHM and manually copying it to the BizTalk360 installation folder. If you want to read more about this capability, read below article:
Getting BizTalk360 to run a BHM Monitoring profile
Manually run BHM
Besides being able to run BHM based on a schedule, as shown in the previous paragraph, you can also run the tool immediately from BizTalk360. By clicking the ‘Run BHM Now’ button (see the picture below), BizTalk360 schedules a run immediately and the results can be checked after the run has been processed.
View reports of BHM
The reports of all the different runs of BHM can be viewed directly in BizTalk360. The screenshot below shows the dropdown from where you can select, which report you would like to see. The most recent report is shown on top.
Storing the output of BHM runs
The BHM reports are stored in the BizTalk360 database and can reside there for a configurable time frame. By default, this time frame is 5 days, but you can choose values between 1 day until any number of days/weeks/months you prefer. Of course, it is wise to not to keep the date for too much time, as this will affect the size of the BizTalk360 database.
After the time frame expired, BizTalk360 will automatically delete the expired reports.

Monitor the results of BHM runs
Besides running and viewing the output of BHM, you can also setup monitoring on the output. This way you can get notified easily of critical and non-critical errors which might be found by BHM.

In another article of the `Why we built XYZ feature in BizTalk360` series, we`ll explain monitoring of BHM output in more detail.
Conclusion
By executing BizTalk Health Monitor runs, the tool reports about important topics on all kind of health and best practice related stuff. Having MBV/BHM integration in BizTalk360, the product makes it easier to schedule runs of BHM and provides you with easy access to the output of the BHM.
Get started with a Free Trial today!
Do you prefer to setup your BHM schedules and view BHM output in BizTalk360, instead of setting up RDP connections to your BizTalk server? Why not give BizTalk360 a try! Installation takes about 10 minutes on your BizTalk environment. Get started with the free 30 days trial.
Author: Lex Hegt
Lex Hegt works in the IT sector for more than 25 years, mainly in roles as developer and administrator. He works with BizTalk since BizTalk Server 2004. Currently he is a Technical Lead at BizTalk360. View all posts by Lex Hegt


