
by Gowri Ramkumar | May 31, 2018 | BizTalk Community Blogs via Syndication
If you’re based in the European Union, your email inbox is probably jam-packed with Updated Privacy Policy emails at the moment. And for good reason.
Every business you subscribe to is currently coming into line with new laws based on the GDPR. The deadline for the GDPR is 25 May 2018, and stricter rules are being enforced with regards to handling data for citizens based in the European Union.
The result of non-compliance? Hefty fines.
In this post, we want to share with you how the GDPR is affecting the way we do business with you – our customers.
GDPR rundown
The GDPR (General Data Protection Regulation) is a new EU regulation which aims to give citizens control back over their personal data. The aim is to make companies more transparent and responsible in how they handle their customers’ personal data.
It applies to any data that can be used to personally identify you – such as date of birth, location or IP address.
It also seeks to simplify the regulatory environment for international businesses – by harmonizing the regulation that already exists for countries within the EU. It’s a big change now for future benefit.
That’s why even non-EU companies are coming into line with the GDPR.
Your privacy
Kovai Limited is relatively small in the grand scheme of things, and we’ve got a personal relationship with all of our customers. It’s a relationship we respect and cherish dearly.
We’re not an advertiser, and we don’t sell or share any of our data for profit. Your privacy has always been a big deal to us.
That’s why, even before the GDPR, we’ve always:
- Maintained a detailed privacy policy
- Protected your data, never sharing it in any way
- Stored your data securely
- Only handled customer data for administrative or product purposes
- Used “double opt-in” to make sure you want to get emails from us
- Included a clearly labeled unsubscribe link in all of our emails to you
Even if their policies have been pro-privacy in the past, all businesses still need to tighten their processes in light of the GDPR.
That’s why we’ve been working closely with our advisors Happiest Minds to ensure we are totally compliant with the new rules.
What we’ve changed
We considered a number of partners in our GDPR journey. We chose Happiest Minds because they align with our values, and specialize in the regulatory field.
Over the course of about three months, they audited our existing policies and procedures to ensure we are compliant with the GDPR. Based on their recommendations, we made a few small changes.
- Each product website we own has been updated with a new privacy policy.
- Every staff member undertook retraining on how to handle confidential customer data and how to collect information on “need” basis.
- Every data processing staff member has been made aware of the regulatory requirements and how to comply.
Our current products are BizTalk360, ServiceBus360, Document360 and Atomic Scope. Each product and service is compliant with the new rules.
Final remarks
Amassing a digital data footprint is an almost unavoidable part of modern life.
Collecting and processing data underpins nearly every aspect of the business and requires new laws that ensure citizens can retain control over their own data. The GDPR is not exactly brand new, but an update of previous privacy laws enshrined before the latest digital revolution.
It’s not just about privacy, but empowering citizens to take ownership of their data and how it is used. It’s about limiting some of the powers that some businesses have previously exercised over data without restraint – in the pursuit of profit.
We were happy to make the necessary changes to ensure compliance.
What we haven’t changed is how we always put our customers first. Everything we do with your data is in service of you.
by Sandro Pereira | May 29, 2018 | BizTalk Community Blogs via Syndication
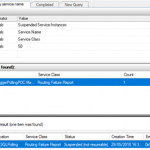
One of the annoying thing with working with Direct Bound Ports in Orchestrations, in especially, MessageBox direct bound ports that allow us to easily implement decouple publish-subscribe design patterns, is that you may get a situation in which you get a lot of Routing Failure Report Instances in the state Suspended (not resumable).
: BizTalk Group by Service name Routing Failure Report")
The error-handling properties facility allows us to automated handling of messaging failures as an alternative to the traditional (now default) behavior of placing failed messages in the Suspended queue. This automated handling routes an error message to any subscribing routing destination, such as a send port or orchestration. The error message is a clone of the original message with all previously promoted properties now demoted and with selected properties related to the specific messaging failure promoted to the message context.
Normally the easy way to implement this is to create a Send Port with the following filter:
- ErrorReport.ErrorType = “FailedMessage”
Nevertheless, because we are using an orchestration with Direct Bound Ports, the orchestration will receive a PersistenceException that you can handle inside our business flow, however, is also create a Routing Failure Report Instance in the state Suspended (not resumable) without any ErrorReport property promoted
: BizTalk Routing Failure Report Property Promotions")
So, we cannot easily automate this kind of instances.
An alternative solution to automate this task is, inside the Error Handler, invoke a helper class library that deletes all these instances once they occur in controlled fashion way:
...
using (PowerShell PowerShellInstance = PowerShell.Create())
{
    StringBuilder pscript = new StringBuilder();
    pscript.AppendLine(@"[STRING]$SQLInstance = get-wmiobject MSBTS_GroupSetting -namespace rootMicrosoftBizTalkServer | select-object -expand MgmtDbServerName");
    pscript.AppendLine(@"[STRING]$BizTalkManagementDb = get-wmiobject MSBTS_GroupSetting -namespace rootMicrosoftBizTalkServer | select-object -expand MgmtDbName");
    pscript.AppendLine(@"[STRING]$BizTalkGroup = ""$SQLInstance"" + "":"" + ""$BizTalkManagementDb""");
    pscript.AppendLine(@"[ARRAY]$suspendedMessages = get-wmiobject MSBTS_ServiceInstance -namespace 'rootMicrosoftBizTalkServer' -filter '(ServiceStatus=32 and ServiceClass=64 and ServiceName like ""<name_of_our_orchestration>"")'");
    pscript.AppendLine(@"foreach ($msgSuspended in $suspendedMessages){");
    pscript.AppendLine(@"$msgSuspended.InvokeMethod(""Terminate"",$null)}");

    PowerShellInstance.AddScript(pscript.ToString());
    PowerShellInstance.Invoke();
}
...
How to check terminate Suspended (not resumable) Routing Failure Report Instances with PowerShell
Using PowerShell is a good option to delete all of this kind of messages, you can send a report and delete or just simply delete it. Windows PowerShell is a Windows command-line shell designed especially for system administrators and can be used by BizTalk administrators to help them in automating repetitive tasks or tasks that are time-consuming to perform manually.
Because was controlling the error inside the main orchestration I don’t have the need of additional report, so this is a simple script will allow you to delete all Routing Failure Report Instances suspended with the state Suspended (not resumable) from your BizTalk Server environment:
#Get all Suspended (not resumable) Routing Failure Report Instances
[ARRAY]$suspendedMessages = get-wmiobject MSBTS_ServiceInstance -namespace 'rootMicrosoftBizTalkServer' -filter '(ServiceStatus=32 and ServiceClass=64)'

foreach ($msgSuspended in $suspendedMessages)
{
    $msgSuspended.InvokeMethod("Terminate",$null)
}
THIS POWERSHELL SCRIPT IS PROVIDED “AS IS”, WITHOUT WARRANTY OF ANY KIND.
 Terminate Suspended (not resumable) Routing Failure Report Instances PowerShell (2 KB)
Microsoft | TechNet Gallery
Author: Sandro Pereira
Sandro Pereira lives in Portugal and works as a consultant at DevScope. In the past years, he has been working on implementing Integration scenarios both on-premises and cloud for various clients, each with different scenarios from a technical point of view, size, and criticality, using Microsoft Azure, Microsoft BizTalk Server and different technologies like AS2, EDI, RosettaNet, SAP, TIBCO etc. He is a regular blogger, international speaker, and technical reviewer of several BizTalk books all focused on Integration. He is also the author of the book “BizTalk Mapping Patterns & Best Practices”. He has been awarded MVP since 2011 for his contributions to the integration community. View all posts by Sandro Pereira
by Eldert Grootenboer | May 28, 2018 | BizTalk Community Blogs via Syndication
This is the fourth post in my series around setting up CI/CD for Azure API Management using Azure Resource Manager templates. So far we have created our API Management instance, added the products, users and groups for Contoso, and created an unversioned API. In this post we will create an versioned API, allowing us to run multiple versions of an API side by side.

The posts in this series are the following, this list will be updated as the posts are being published.
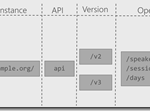
When working with APIs we will sometimes have to implement breaking changes to our solution. Whenever possible, we should give the consumers of our API the chance to migrate to the new implementation at their own pace, which can be done by exposing multiple versions of an API. In this post we will again be exposing the APIs.guru service through API Management, with two versions, where we remove an operation in the second version.
Use the guidance from the first post of this series to set up a repository and clone this to our local machine. The name of the repository we will be creating should be Versioned API, and will hold the ARM template for this post.

Create Versioned API repository
Once the GIT repository has been created and cloned to your local machine, add a file called versioned-api.json and add the following ARM template to it.
{
  "$schema": "https://schema.management.azure.com/schemas/2015-01-01/deploymentTemplate.json#",
  "contentVersion": "1.0.0.0",
  "parameters": {
      "APIManagementInstanceName": {
        "type": "string",
        "defaultValue": "MyAPIManagementInstance"
      }
  },
  "variables": {},
  "resources": [
      {
          "name": "[concat(parameters('APIManagementInstanceName'), '/versionsetversionedapi')]",
          "type": "Microsoft.ApiManagement/service/api-version-sets",
          "apiVersion": "2017-03-01",
          "properties": {
              "description": "Version set for versioned API blog post",
              "versionQueryName": "api-version",
              "displayName": "Versioned API",
              "versioningScheme": "query"
          }
      }
    ]
}
|
This will create the version set which is needed to create versioned APIs. In this case we will be using a query string as the versioning scheme.
Next we will implement the two versions of the API.
{
    "$schema": "https://schema.management.azure.com/schemas/2015-01-01/deploymentTemplate.json#",
    "contentVersion": "1.0.0.0",
    "parameters": {
        "APIManagementInstanceName": {
          "type": "string",
          "defaultValue": "MyAPIManagementInstance"
        }
    },
    "variables": {},
    "resources": [
        {
            "name": "[concat(parameters('APIManagementInstanceName'), '/versionsetversionedapi')]",
            "type": "Microsoft.ApiManagement/service/api-version-sets",
            "apiVersion": "2017-03-01",
            "properties": {
                "description": "Version set for versioned API blog post",
                "versionQueryName": "api-version",
                "displayName": "Versioned API",
                "versioningScheme": "query"
            }
        },
        {
            "type": "Microsoft.ApiManagement/service/apis",
            "name": "[concat(parameters('APIManagementInstanceName'), '/versioned-api')]",
            "apiVersion": "2017-03-01",
            "scale": null,
            "properties": {
                "displayName": "Versioned API",
                "apiRevision": "1",
                "description": "Wikipedia for Web APIs. Repository of API specs in OpenAPI(fka Swagger) 2.0 format.nn**Warning**: If you want to be notified about changes in advance please subscribe to our [Gitter channel](https://gitter.im/APIs-guru/api-models).nnClient sample: [[Demo]](https://apis.guru/simple-ui) [[Repo]](https://github.com/APIs-guru/simple-ui)n",
                "serviceUrl": "https://api.apis.guru/v2/",
                "path": "versioned-api",
                "protocols": [
                    "https"
                ],
                "authenticationSettings": null,
                "subscriptionKeyParameterNames": null,
                "apiVersion": "v1",
                "apiVersionSetId": "[concat(resourceId('Microsoft.ApiManagement/service', parameters('APIManagementInstanceName')), '/api-version-sets/versionsetversionedapi')]"
            },
            "dependsOn": [
                "[concat(resourceId('Microsoft.ApiManagement/service', parameters('APIManagementInstanceName')), '/api-version-sets/versionsetversionedapi')]"
            ]
        },
        {
            "type": "Microsoft.ApiManagement/service/apis",
            "name": "[concat(parameters('APIManagementInstanceName'), '/versioned-api-v2')]",
            "apiVersion": "2017-03-01",
            "scale": null,
            "properties": {
                "displayName": "Versioned API",
                "apiRevision": "1",
                "description": "Wikipedia for Web APIs. Repository of API specs in OpenAPI(fka Swagger) 2.0 format.nn**Warning**: If you want to be notified about changes in advance please subscribe to our [Gitter channel](https://gitter.im/APIs-guru/api-models).nnClient sample: [[Demo]](https://apis.guru/simple-ui) [[Repo]](https://github.com/APIs-guru/simple-ui)n",
                "serviceUrl": "https://api.apis.guru/v2/",
                "path": "versioned-api",
                "protocols": [
                    "https"
                ],
                "authenticationSettings": null,
                "subscriptionKeyParameterNames": null,
                "apiVersion": "v2",
                "apiVersionSetId": "[concat(resourceId('Microsoft.ApiManagement/service', parameters('APIManagementInstanceName')), '/api-version-sets/versionsetversionedapi')]"
            },
            "dependsOn": [
                "[concat(resourceId('Microsoft.ApiManagement/service', parameters('APIManagementInstanceName')), '/api-version-sets/versionsetversionedapi')]"
            ]
        },
        {
            "type": "Microsoft.ApiManagement/service/products/apis",
            "name": "[concat(parameters('APIManagementInstanceName'), '/contosoproduct/versioned-api')]",
            "apiVersion": "2017-03-01",
            "scale": null,
            "properties": {},
            "dependsOn": [
                "[resourceId('Microsoft.ApiManagement/service/apis', parameters('APIManagementInstanceName'), 'versioned-api')]"
            ]
        },
        {
            "type": "Microsoft.ApiManagement/service/products/apis",
            "name": "[concat(parameters('APIManagementInstanceName'), '/contosoproduct/versioned-api-v2')]",
            "apiVersion": "2017-03-01",
            "scale": null,
            "properties": {},
            "dependsOn": [
                "[resourceId('Microsoft.ApiManagement/service/apis', parameters('APIManagementInstanceName'), 'versioned-api-v2')]"
            ]
        },
        {
            "type": "Microsoft.ApiManagement/service/apis/operations",
            "name": "[concat(parameters('APIManagementInstanceName'), '/versioned-api/getMetrics')]",
            "apiVersion": "2017-03-01",
            "scale": null,
            "properties": {
                "displayName": "Get basic metrics",
                "method": "GET",
                "urlTemplate": "/metrics",
                "templateParameters": [],
                "description": "Some basic metrics for the entire directory.nJust stunning numbers to put on a front page and are intended purely for WoW effect :)n",
                "responses": [
                    {
                        "statusCode": 200,
                        "description": "OK",
                        "headers": []
                    }
                ],
                "policies": null
            },
            "dependsOn": [
                "[resourceId('Microsoft.ApiManagement/service/apis', parameters('APIManagementInstanceName'), 'versioned-api')]"
            ]
        },
        {
            "type": "Microsoft.ApiManagement/service/apis/operations",
            "name": "[concat(parameters('APIManagementInstanceName'), '/versioned-api/listAPIs')]",
            "apiVersion": "2017-03-01",
            "scale": null,
            "properties": {
                "displayName": "List all APIs",
                "method": "GET",
                "urlTemplate": "/list",
                "templateParameters": [],
                "description": "List all APIs in the directory.nReturns links to OpenAPI specification for each API in the directory.nIf API exist in multiple versions `preferred` one is explicitly marked.nnSome basic info from OpenAPI spec is cached inside each object.nThis allows to generate some simple views without need to fetch OpenAPI spec for each API.n",
                "responses": [
                    {
                        "statusCode": 200,
                        "description": "OK",
                        "headers": []
                    }
                ],
                "policies": null
            },
            "dependsOn": [
                "[resourceId('Microsoft.ApiManagement/service/apis', parameters('APIManagementInstanceName'), 'versioned-api')]"
            ]
        },
        {
            "type": "Microsoft.ApiManagement/service/apis/operations",
            "name": "[concat(parameters('APIManagementInstanceName'), '/versioned-api-v2/listAPIs')]",
            "apiVersion": "2017-03-01",
            "scale": null,
            "properties": {
                "displayName": "List all APIs",
                "method": "GET",
                "urlTemplate": "/list",
                "templateParameters": [],
                "description": "List all APIs in the directory.nReturns links to OpenAPI specification for each API in the directory.nIf API exist in multiple versions `preferred` one is explicitly marked.nnSome basic info from OpenAPI spec is cached inside each object.nThis allows to generate some simple views without need to fetch OpenAPI spec for each API.n",
                "responses": [
                    {
                        "statusCode": 200,
                        "description": "OK",
                        "headers": []
                    }
                ],
                "policies": null
            },
            "dependsOn": [
                "[resourceId('Microsoft.ApiManagement/service/apis', parameters('APIManagementInstanceName'), 'versioned-api-v2')]"
            ]
        },
        {
            "type": "Microsoft.ApiManagement/service/apis/operations/policies",
            "name": "[concat(parameters('APIManagementInstanceName'), '/versioned-api/getMetrics/policy')]",
            "apiVersion": "2017-03-01",
            "scale": null,
            "properties": {
                "policyContent": "[concat('<!--rn    IMPORTANT:rn    - Policy elements can appear only within the <inbound>, <outbound>, <backend> section elements.rn    - Only the <forward-request> policy element can appear within the <backend> section element.rn    - To apply a policy to the incoming request (before it is forwarded to the backend service), place a corresponding policy element within the <inbound> section element.rn    - To apply a policy to the outgoing response (before it is sent back to the caller), place a corresponding policy element within the <outbound> section element.rn    - To add a policy position the cursor at the desired insertion point and click on the round button associated with the policy.rn    - To remove a policy, delete the corresponding policy statement from the policy document.rn    - Position the <base> element within a section element to inherit all policies from the corresponding section element in the enclosing scope.rn    - Remove the <base> element to prevent inheriting policies from the corresponding section element in the enclosing scope.rn    - Policies are applied in the order of their appearance, from the top down.rn-->rn<policies>rn  <inbound>rn    <base />rn    <set-backend-service base-url="https://api.apis.guru/v2/" />rn    <rewrite-uri template="/metrics.json" />rn  </inbound>rn  <backend>rn    <base />rn  </backend>rn  <outbound>rn    <base />rn  </outbound>rn  <on-error>rn    <base />rn  </on-error>rn</policies>')]"
            },
            "dependsOn": [
                "[resourceId('Microsoft.ApiManagement/service/apis', parameters('APIManagementInstanceName'), 'versioned-api')]",
                "[resourceId('Microsoft.ApiManagement/service/apis/operations', parameters('APIManagementInstanceName'), 'versioned-api', 'getMetrics')]"
            ]
        },
        {
            "type": "Microsoft.ApiManagement/service/apis/operations/policies",
            "name": "[concat(parameters('APIManagementInstanceName'), '/versioned-api/listAPIs/policy')]",
            "apiVersion": "2017-03-01",
            "scale": null,
            "properties": {
                "policyContent": "[concat('<!--rn    IMPORTANT:rn    - Policy elements can appear only within the <inbound>, <outbound>, <backend> section elements.rn    - Only the <forward-request> policy element can appear within the <backend> section element.rn    - To apply a policy to the incoming request (before it is forwarded to the backend service), place a corresponding policy element within the <inbound> section element.rn    - To apply a policy to the outgoing response (before it is sent back to the caller), place a corresponding policy element within the <outbound> section element.rn    - To add a policy position the cursor at the desired insertion point and click on the round button associated with the policy.rn    - To remove a policy, delete the corresponding policy statement from the policy document.rn    - Position the <base> element within a section element to inherit all policies from the corresponding section element in the enclosing scope.rn    - Remove the <base> element to prevent inheriting policies from the corresponding section element in the enclosing scope.rn    - Policies are applied in the order of their appearance, from the top down.rn-->rn<policies>rn  <inbound>rn    <base />rn    <set-backend-service base-url="https://api.apis.guru/v2" />rn    <rewrite-uri template="/list.json" />rn  </inbound>rn  <backend>rn    <base />rn  </backend>rn  <outbound>rn    <base />rn  </outbound>rn  <on-error>rn    <base />rn  </on-error>rn</policies>')]"
            },
            "dependsOn": [
                "[resourceId('Microsoft.ApiManagement/service/apis', parameters('APIManagementInstanceName'), 'versioned-api')]",
                "[resourceId('Microsoft.ApiManagement/service/apis/operations', parameters('APIManagementInstanceName'), 'versioned-api', 'listAPIs')]"
            ]
        },
        {
            "type": "Microsoft.ApiManagement/service/apis/operations/policies",
            "name": "[concat(parameters('APIManagementInstanceName'), '/versioned-api-v2/listAPIs/policy')]",
            "apiVersion": "2017-03-01",
            "scale": null,
            "properties": {
                "policyContent": "[concat('<!--rn    IMPORTANT:rn    - Policy elements can appear only within the <inbound>, <outbound>, <backend> section elements.rn    - Only the <forward-request> policy element can appear within the <backend> section element.rn    - To apply a policy to the incoming request (before it is forwarded to the backend service), place a corresponding policy element within the <inbound> section element.rn    - To apply a policy to the outgoing response (before it is sent back to the caller), place a corresponding policy element within the <outbound> section element.rn    - To add a policy position the cursor at the desired insertion point and click on the round button associated with the policy.rn    - To remove a policy, delete the corresponding policy statement from the policy document.rn    - Position the <base> element within a section element to inherit all policies from the corresponding section element in the enclosing scope.rn    - Remove the <base> element to prevent inheriting policies from the corresponding section element in the enclosing scope.rn    - Policies are applied in the order of their appearance, from the top down.rn-->rn<policies>rn  <inbound>rn    <base />rn    <set-backend-service base-url="https://api.apis.guru/v2" />rn    <rewrite-uri template="/list.json" />rn  </inbound>rn  <backend>rn    <base />rn  </backend>rn  <outbound>rn    <base />rn  </outbound>rn  <on-error>rn    <base />rn  </on-error>rn</policies>')]"
            },
            "dependsOn": [
                "[resourceId('Microsoft.ApiManagement/service/apis', parameters('APIManagementInstanceName'), 'versioned-api-v2')]",
                "[resourceId('Microsoft.ApiManagement/service/apis/operations', parameters('APIManagementInstanceName'), 'versioned-api-v2', 'listAPIs')]"
            ]
        }
    ]
}
|
What we did here, was add two versions of the API, set their operations and policies, add them to the product for Contoso, and link them to the version set by setting the apiVersionSetId property on the APIs. We now have finished our ARM template, so commit it and push it to our repository.
Build pipeline
Now switch back to VSTS and create a build template called API Management CI-CD ARM-CI – Versioned API. Once again make sure to select the correct GIT repository.

Create build template for Versioned API
Once the build template has been created, make sure to set enable the continuous integration trigger, and create a validation pipeline just like in the first post of this series.

Create validation build pipeline
Once finished, save and queue the build definition.
Now create a new release definition called API Management Versioned API with a continious deployment trigger on the artifact deployed by our build pipeline we just created. Set up the test environment to deploy as soon as a new artifact is available.

Set up test environment
And finally clone the Test environment, and set the cloned environment up for the production environment. Remember to provide a approval step before deploying in this environment.
Set up deployment pipeline including approvals
We now have completed our CI/CD process for the versioned API, if we want to test this we’ll just make a change in the ARM template on our local machine and check this in, which will start the build pipeline, which in turn will trigger the deployment pipeline updating our API Management instance.

Versioned API has been deployed

by Gautam | May 27, 2018 | BizTalk Community Blogs via Syndication
Do you feel difficult to keep up to date on all the frequent updates and announcements in the Microsoft Integration platform?
Integration weekly update can be your solution. It’s a weekly update on the topics related to Integration – enterprise integration, robust & scalable messaging capabilities and Citizen Integration capabilities empowered by Microsoft platform to deliver value to the business.
If you want to receive these updates weekly, then don’t forget to Subscribe!
Feedback
Hope this would be helpful. Please feel free to reach out to me with your feedback and questions.

by Sandro Pereira | May 25, 2018 | BizTalk Community Blogs via Syndication
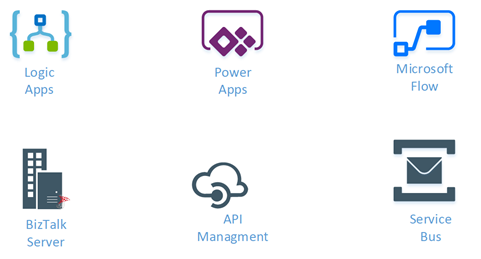
INTEGRATE (formerly known as BizTalk Summit) is the primary conference for professionals working in the Microsoft Integration Space and once again is back to London. From June 4 to 6, 25 speakers – 11 MVPs and 14 Microsoft PM – will address the entire Microsoft Integration Platform landscape on topics like BizTalk Server, Logic Apps, Service Bus, Event Grid, Event Hubs, Microsoft Flow, API Management, Azure Functions and many more.
And once again I will be there delivering a session – since the first BizTalk Summit event, I’m a constant presence as a speaker at these events – about BizTalk Server! And if you are wondering why I don’t speak about other integration topics the reasons are:
- The organization team specific ask me to talk about BizTalk Server…
- … and I really love to speak about BizTalk Server so I couldn’t refuse! I have plenty of other events to speak about other topics hehe

From June 4 to 6, and our MVP Sandro Pereira is one of the guest speakers for the sixth year in a row. Following the last event in Seattle, DevScope joins Integrate once again as a Silver Sponsor.
About my session
After receiving a huge amount of positive feedback regarding my previous talk last year: “BizTalk Server Fast & Loud” I fill a little pressure to continues to match the attendee expectations… almost! Because I’m confident that you will enjoy! Why wouldn’t you enjoy? In this session, I will address real cases that happen to all of us daily.
Session Name: BizTalk Server: Lessons from the Road

Abstract: The session will cover small pieces of stories with practical real examples from the field to address certain scenarios/requirements. See real techniques being used in some of the most important features of BizTalk Server, some of them are out-of-the-box capabilities others are custom extensions been made on the platform. Topics include BizTalk migration strategy, content-based routing techniques, Mapping, JSON support, BizTalk administration tips, extending BizTalk out-of-the-box capabilities and many more.
Content is not all you get from this event…
Content is hugely important, and as you read previously, this event will address the entire Microsoft Integration Platform landscape… but that’s not all!
This will also be an amazing opportunity to Network, Connect, and Reconnect with Colleagues. Meet some of the people you have been following on Twitter and blogs and network with them and others who are interested in the same things you are. To hang out with the smartest people you know – and I’m not talking about the speakers or Microsoft PM’s! I’m talking about you guys! – last year were 400 attendees from over 150 companies across 25+ countries attending the event, so imagine the experience that all of us have combined!

The knowledge and experience of all the attendees, speakers and product group members at these events is unreal!!! You will not find an opportunity like this every day.
So, this event is a huge opportunity for you to:
- Get insight and answers to your questions from these real-world experts: attendees, MVP’s and/or Microsoft PM’s;
- Know and became friends of people you are interested or that you follow for social media: again, maybe there are attendees, MVP’s and/or Microsoft PM’s
- I have to say that in this last 8 year I was able to meet and became good friends of several amazing people and all of that because of this type of events and all post-event activities like coffee breaks, dinner with speakers, …
- Build your personal Business Networking and it is also a good opportunity for Partnerships… and new opportunities
And finally: Refresh and recharge and have some fun!
DevScope is sponsoring INTEGRATE 2018 event
I’m extremely happy to announce that, for the second consecutive time, DevScope is also joining this event as a sponsor. The first time was in INTEGRATE 2017 USA and now it will be the first time in London event.
I’m extremely happy for that for several reasons:
- It is the only Portuguese company sponsoring the biggest Microsoft Integration focused event in the world.
- It shows the commitment that my company has in the Integration landscape.
- But we are also one of the unique partners that, not only can support you in the Integration landscape challenges but also in other Microsoft key areas like BI/Power BI, SharePoint, Dynamics and of course Azure.
- which show not only the diversity present in our team but also its quality that can be proven by the diverse certifications and distinctions attributed to our professionals

Fill free to contact DevScope at [email protected] if you want to know more about us, what we do and/or how can we help you and your business.
INTEGRATE 2018 Registration
You are still on time to register for the conference here.

Author: Sandro Pereira
Sandro Pereira lives in Portugal and works as a consultant at DevScope. In the past years, he has been working on implementing Integration scenarios both on-premises and cloud for various clients, each with different scenarios from a technical point of view, size, and criticality, using Microsoft Azure, Microsoft BizTalk Server and different technologies like AS2, EDI, RosettaNet, SAP, TIBCO etc. He is a regular blogger, international speaker, and technical reviewer of several BizTalk books all focused on Integration. He is also the author of the book “BizTalk Mapping Patterns & Best Practices”. He has been awarded MVP since 2011 for his contributions to the integration community. View all posts by Sandro Pereira

by Lex Hegt | May 23, 2018 | BizTalk Community Blogs via Syndication

This blog is a part of the series of blog articles we are publishing on the topic “Why we built XYZ feature in BizTalk360”. Read the main article here.
Why do we need this feature?
Although in our experience many BizTalk Server customers are using the BizTalk Rules Engine, many others are not using it. This is a pity because the BizTalk Rules Engine (BRE) can be very beneficial and can reduce the costs of BizTalk development.
The concept behind the BRE, is to empower business users to create and maintain business rules, which can be accessed by their BizTalk processes.
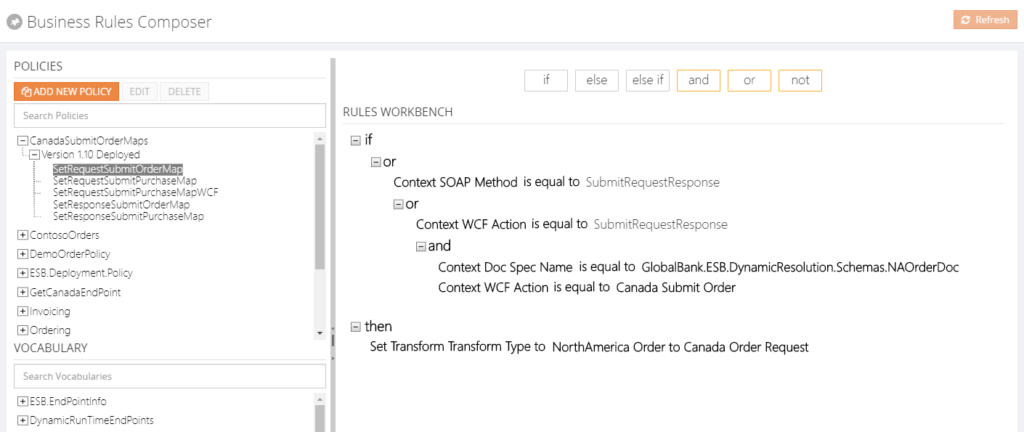
In case such business rules need to be changed, this can be done via the so-called Business Rules Composer, by the business user.
A simple example on how to use the power of the Business Rules Engine, is a business user who works in retail and would like to, temporarily, apply some discounts to certain product groups.
Without the BRE, the user would have to implement a change in his BizTalk solution, which can be time-consuming and rather costly. Especially, as the discounts will have to be reverted after some time.
With the BRE, the user can use the Business Rules Composer to make that change by himself.
The Business Rules Composer tool comes with BizTalk Server and as demonstrated, using this tool is far more cost efficient than having to line up a development team to make the needed change in the BizTalk process, while maybe having to revert the change after short period of time, like we have seen in case of temporarily discounts.
Besides being able to modify business rules with the Business Rules Composer, it is obvious that it is also possible to just view the business rules to gain insight how the business rules are set up.
What are the current challenges?
As mentioned, the BizTalk Server Business Rules Composer enables to view, modify and deploy business rules. There are however a few challenges with the Business Rules Composer:
- It is too technical
- It has no security and auditing
Business Rules Composer is too technical
In most cases the Business Rules Composer is just installed on the BizTalk server(s). Although, from a technical perspective, it is possible to install the Business Rules Composer on a normal desktop computer.
But, even when the business user does have access to the Business Rules Composer, we’ll explain that the Business Rules Composer is too technical in the hands of a business user.
Let’s briefly describe a bit about Business Rules. These rules consist of the following parts:
- Policies – a policy is a collection of one or more business rules. Policies can be created, edited, deleted, versioned, published and deployed. Once a policy is deployed, no more changes can be made to the policy. If changes are needed, a new version of the policy will have to be created.
- Business rules – a business rule can be constructed based on conditions, which will be evaluated by the Business Rules Engine. To construct these business rules, elements of the below mentioned vocabularies can be used.
- Vocabularies – vocabularies contain the components which can be used in the policies. These components can be elements/attributes in a XML schema, fields in a database table or elements in a .NET class. For ease of use, these components can be provided with a friendly (business) name. Just like policies, vocabularies can be versioned and published.
After vocabularies and policies have been created, they can be saved, published and deployed from the Business Rules Composer as well.
It must be quite clear now, that the Business Rules Composer is a powerful tool, but is quite complex at the same time. The tool is suited better for technical people who are well aware of the technical insides. As business users don’t have that knowledge, it will make it hard for business users to use the original Business Rules Composer.
Business Rules Composer has no security and auditing
In the Business Rules Composer which comes with BizTalk Server, there are no security and auditing features. So, once somebody has access to the tool, they have access to all the business rules of the BizTalk environment and can make any kind of changes, without leaving a trace. We think that this is an unacceptable situation.
How BizTalk360 solves this problem?
BizTalk360 offers a web-based counterpart of the Business Rules Composer. As BizTalk360 is web-based, the Business Rules Composer is easier to access than the software which comes with BizTalk Server, as it is quite often just installed on the BizTalk Server.
 From the BizTalk360 Rules Composer, users can for example:
- Add, edit and remove policies
- Add, edit, test and delete rules
- Publish, deploy and undeploy policies
Security
Once a user has access to BizTalk360, the user can have different authorizations for the Rules Composer of BizTalk360. These authorizations are:
- View rules only
- Create/Save rules
- Deploy/Publish rules
Besides security settings, there is also auditing of activity around business rules in BizTalk360.
By hiding irrelevant technical stuff in the BizTalk360 Business Rules Composer, this tool is better suited for business users than the one from BizTalk Server. Therefore, we only show the Policies and Vocabularies.
Additional features
We also brought some features to the BizTalk360 Business Rules Composer which do not exist in the original tool. Think of for example:
- a Where function – this can be used to query database tables and retrieve the information
- If, Else, Else If – these statements can be applied to the Actions part of the business rule, to be able to create more complex rules
- Date Time Picker – to minimize errors while creating rules, we provide a date time picker for any function that involves picking a date/time
- Download Test Result – besides testing of policies, you can also download XML files, which are modified as result of testing these policies
Conclusion
All in all, the BizTalk360 counterpart of the Business Rules Composer provides similar features as the one from BizTalk Server, while providing easier access, usage and security. By bringing few additional features, we make the feature even more powerful.
Do you want to know more about the Business Rules Composer in BizTalk360? You can read more on our documentation portal:
https://docs.biztalk360.com/docs/web-based-bre-composer-in-biztalk360
Get started with a Free Trial today!
Download and try BizTalk360 on your own environments free for 30 days. Installation will not take more than 5-10 minutes.

Author: Lex Hegt
Lex Hegt works in the IT sector for more than 25 years, mainly in roles as developer and administrator. He works with BizTalk since BizTalk Server 2004. Currently he is a Technical Lead at BizTalk360. View all posts by Lex Hegt
by Eldert Grootenboer | May 21, 2018 | BizTalk Community Blogs via Syndication
This is the thirth post in my series around setting up CI/CD for Azure API Management using Azure Resource Manager templates. In the first post we created our API Management instance, and have set up our build and release pipelines, … Continue reading →
by Gautam | May 20, 2018 | BizTalk Community Blogs via Syndication
Do you feel difficult to keep up to date on all the frequent updates and announcements in the Microsoft Integration platform?

Integration weekly update can be your solution. It’s a weekly update on the topics related to Integration – enterprise integration, robust & scalable messaging capabilities and Citizen Integration capabilities empowered by Microsoft platform to deliver value to the business.
If you want to receive these updates weekly, then don’t forget to Subscribe!
How get started with iPaaS design & development in Azure?
Feedback
Hope this would be helpful. Please feel free to reach out to me with your feedback and questions.
by Lex Hegt | May 16, 2018 | BizTalk Community Blogs via Syndication
Why do we need this feature?
The BizTalk and SQL servers are the heart and the bones of a BizTalk environment. Where the SQL Servers take care of all the database handling for BizTalk, the BizTalk servers take care of the actual message processing.
When something is wrong with one of these servers, changes are that this will affect the overall health of your BizTalk environment. So, it’s obvious that the well-being of the servers has to be considered for the overall well-being of the BizTalk environment. For that reason, administrators need to login to the servers to check the health of the distinct servers and come into action when needed.
What are the current challenges?
To be able to login to all the servers, the administrator needs to set up Remote Desktop connections to all these servers. Logging in, checking all the needed consoles and actioning when needed, can be time-consuming. Besides that, in highly secured environments, the administrator might not have access to the servers, from remote locations.
How BizTalk360 solves this problem?
Given the One platform philosophy after BizTalk360, we made access to the BizTalk and SQL servers from a BizTalk environment easy and secure. As the product retrieves the BizTalk servers of BizTalk environments from their Management database, it can provide easy access to these servers via the UI of BizTalk360. Also the SQL servers can be accessed and actioned from BizTalk360.


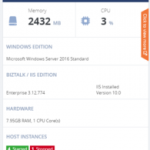
For each server, a number of the key components are shown, so you immediately have an idea on topics like CPU/Memory configuration and usage, installed server products and BizTalk Host configuration.
When you click on the orange strip, you get more detailed information of the server. In case of BizTalk servers you will have access to:
- CPU Usage
- Memory usage
- Server products
- Host Instances
- Event Viewer (Application Log)
- NT Services
You can Stop/Start and Enable/Disable Host Instances. NT Services can be stopped, started and restarted.
For the SQL servers you’ll have access to:
- CPU Usage
- Memory usage
- Server products
- NT Services
NT Services can be stopped, started and restarted.

By providing dedicated dashboards for the BizTalk and SQL servers of your BizTalk environment, you have easy access to important server aspects, without the hassle of having to use Remote Desktop connections.
Author: Lex Hegt
Lex Hegt works in the IT sector for more than 25 years, mainly in roles as developer and administrator. He works with BizTalk since BizTalk Server 2004. Currently he is a Technical Lead at BizTalk360. View all posts by Lex Hegt
by Eldert Grootenboer | May 14, 2018 | BizTalk Community Blogs via Syndication
This is the second post in my series around setting up CI/CD for Azure API Management using Azure Resource Manager templates. In the previous post we created our API Management instance, and have set up our build and release pipelines. In this post we will add custom products, users and groups to our API Management instance, which will be used to set up our policies and access to our APIs.

The posts in this series are the following, this list will be updated as the posts are being published.
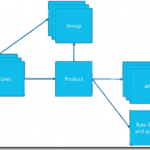
For this post, we will be adding a new user to the API Management instance we created in the previous blog post in this series. This user will represent a client developer from the Contoso company, who will be using the APIs which we will define later on. In this scenario, Contoso consumes our APIs in their own processes. The user will be placed into a group, which represents the Contoso company. In a real life scenario, this group would contain users for all the developers and services of this particular client. And finally we will create a product for the Contoso company as well, and link the group to the product. The product is where we will be setting up policies and quotas, so we can limit the usage our services.
As explained in the first post in this series, we will be using different repositories for the various parts of our API Management setup. In that post, we already showed how we can set up a repository and clone this to our local machine. For this post, we will be creating a new repository, in which we will create the ARM template for our products, users and groups. Create the API Management products, users and groups repository and clone it to you machine.

Create new repository

API Management products, users and groups repository
Now we will start by creating the ARM template for adding a user for Contoso, who will be consuming our APIs. In your cloned repository, create a new file and name it products-users-groups.json, and add the following ARM template contents to the file.
{
    "$schema": "https://schema.management.azure.com/schemas/2015-01-01/deploymentTemplate.json#",
    "contentVersion": "1.0.0.0",
    "parameters": {
        "APIManagementInstanceName": {
          "type": "string",
          "defaultValue": "MyAPIManagementInstance"
        }
    },
    "variables": {},
    "resources": [
        {
            "type": "Microsoft.ApiManagement/service/users",
            "name": "[concat(parameters('APIManagementInstanceName'), '/john-smith-contoso-com')]",
            "apiVersion": "2017-03-01",
            "scale": null,
            "properties": {
                "firstName": "John",
                "lastName": "Smith",
                "email": "[email protected]",
                "state": "active",
                "note": "Developer working for Contoso, one of the consumers of our APIs",
                "confirmation": "invite"
            },
            "dependsOn": []
        }
    ]
}
|
What we do here, is creating a new user (John Smith), and add it to our API Management instance. We have the name of the instance as a parameter, so we could override this from our deployment pipeline. As you will notice, we don’t set anything in our dependsOn, as the API Management instance has been created from another template. Also note the “confirmation”: “invite” line, which makes sure that the user will receive an email on the specified address to finish his registration by setting his own password.
Next we will expand our ARM template to also create the group, so let’s update the ARM template to the following.
{
    "$schema": "https://schema.management.azure.com/schemas/2015-01-01/deploymentTemplate.json#",
    "contentVersion": "1.0.0.0",
    "parameters": {
        "APIManagementInstanceName": {
          "type": "string",
          "defaultValue": "MyAPIManagementInstance"
        }
    },
    "variables": {},
    "resources": [
        {
            "type": "Microsoft.ApiManagement/service/users",
            "name": "[concat(parameters('APIManagementInstanceName'), '/john-smith-contoso-com')]",
            "apiVersion": "2017-03-01",
            "scale": null,
            "properties": {
                "firstName": "John",
                "lastName": "Smith",
                "email": "[email protected]",
                "state": "active",
                "note": "Developer working for Contoso, one of the consumers of our APIs",
                "confirmation": "invite"
            },
            "dependsOn": []
        },
        {
            "type": "Microsoft.ApiManagement/service/groups",
            "name": "[concat(parameters('APIManagementInstanceName'), '/contosogroup')]",
            "apiVersion": "2017-03-01",
            "scale": null,
            "properties": {
                "displayName": "ContosoGroup",
                "description": "Group containing all developers and services from Contoso who will be consuming our APIs",
                "type": "custom",
                "externalId": null
            },
            "dependsOn": []
        },
        {
            "type": "Microsoft.ApiManagement/service/groups/users",
            "name": "[concat(parameters('APIManagementInstanceName'), '/contosogroup/john-smith-contoso-com')]",
            "apiVersion": "2017-03-01",
            "scale": null,
            "properties": {},
            "dependsOn": [
                "[resourceId('Microsoft.ApiManagement/service/groups', parameters('APIManagementInstanceName'), 'contosogroup')]"
            ]
        }
    ]
}
|
What we did here, was add two additional resources, one for the ContosoGroup group, and one to link the user to the group.
And finally, we will add a product for the Contoso consumers. On this product we will set a throttling policy, so these consumers are limited in the number of calls they can make to our APIs. Update the ARM template as following, this will also be the final version of this ARM template.
{
    "$schema": "https://schema.management.azure.com/schemas/2015-01-01/deploymentTemplate.json#",
    "contentVersion": "1.0.0.0",
    "parameters": {
        "APIManagementInstanceName": {
          "type": "string",
          "defaultValue": "MyAPIManagementInstance"
        }
    },
    "variables": {},
    "resources": [
        {
            "type": "Microsoft.ApiManagement/service/users",
            "name": "[concat(parameters('APIManagementInstanceName'), '/john-smith-contoso-com')]",
            "apiVersion": "2017-03-01",
            "scale": null,
            "properties": {
                "firstName": "John",
                "lastName": "Smith",
                "email": "[email protected]",
                "state": "active",
                "note": "Developer working for Contoso, one of the consumers of our APIs",
                "confirmation": "invite"
            },
            "dependsOn": []
        },
        {
            "type": "Microsoft.ApiManagement/service/groups",
            "name": "[concat(parameters('APIManagementInstanceName'), '/contosogroup')]",
            "apiVersion": "2017-03-01",
            "scale": null,
            "properties": {
                "displayName": "ContosoGroup",
                "description": "Group containing all developers and services from Contoso who will be consuming our APIs",
                "type": "custom",
                "externalId": null
            },
            "dependsOn": []
        },
        {
            "type": "Microsoft.ApiManagement/service/groups/users",
            "name": "[concat(parameters('APIManagementInstanceName'), '/contosogroup/john-smith-contoso-com')]",
            "apiVersion": "2017-03-01",
            "scale": null,
            "properties": {},
            "dependsOn": [
                "[resourceId('Microsoft.ApiManagement/service/groups', parameters('APIManagementInstanceName'), 'contosogroup')]"
            ]
        },
        {
            "type": "Microsoft.ApiManagement/service/products",
            "name": "[concat(parameters('APIManagementInstanceName'), '/contosoproduct')]",
            "apiVersion": "2017-03-01",
            "scale": null,
            "properties": {
                "displayName": "ContosoProduct",
                "description": "Product which will apply the high-over policies for developers and services of Contoso.",
                "subscriptionRequired": true,
                "approvalRequired": true,
                "state": "published"
            },
            "dependsOn": []
        },
        {
            "type": "Microsoft.ApiManagement/service/products/groups",
            "name": "[concat(parameters('APIManagementInstanceName'), '/contosoproduct/contosogroup')]",
            "apiVersion": "2017-03-01",
            "scale": null,
            "properties": {},
            "dependsOn": [
                "[resourceId('Microsoft.ApiManagement/service/products', parameters('APIManagementInstanceName'), 'contosoproduct')]",
                "[resourceId('Microsoft.ApiManagement/service/groups', parameters('APIManagementInstanceName'), 'contosogroup')]"
            ]
        },
        {
            "type": "Microsoft.ApiManagement/service/subscriptions",
            "name": "[concat(parameters('APIManagementInstanceName'), '/5ae6ed2358c2795ab5aaba68')]",
            "apiVersion": "2017-03-01",
            "scale": null,
            "properties": {
                "userId": "[resourceId('Microsoft.ApiManagement/service/users', parameters('APIManagementInstanceName'), 'john-smith-contoso-com')]",
                "productId": "[resourceId('Microsoft.ApiManagement/service/products', parameters('APIManagementInstanceName'), 'contosoproduct')]",
                "displayName": "ContosoProduct subscription",
                "state": "active"
            },
            "dependsOn": [
                "[resourceId('Microsoft.ApiManagement/service/users', parameters('APIManagementInstanceName'), 'john-smith-contoso-com')]",
                "[resourceId('Microsoft.ApiManagement/service/products', parameters('APIManagementInstanceName'), 'contosoproduct')]"
            ]
        },
        {
            "type": "Microsoft.ApiManagement/service/products/policies",
            "name": "[concat(parameters('APIManagementInstanceName'), '/contosoproduct/policy')]",
            "apiVersion": "2017-03-01",
            "scale": null,
            "properties": {
                "policyContent": "<policies>rn  <inbound>rn    <base />rn    <rate-limit calls="20" renewal-period="60" />rn  </inbound>rn  <backend>rn    <base />rn  </backend>rn  <outbound>rn    <base />rn  </outbound>rn  <on-error>rn    <base />rn  </on-error>rn</policies>"
            },
            "dependsOn": [
                "[resourceId('Microsoft.ApiManagement/service/products', parameters('APIManagementInstanceName'), 'contosoproduct')]"
            ]
        }
    ]
}
|
The steps we added in this template were to create the ContosoProduct product, add ContosoGroup to the product, create a subscription for the Contoso user John Smith and link it to the product, and finally create a policy which implements throttling on the product level. Commit and push this final ARM template to your repository.
Now that we have finished our template, we will create new build definition called API Management CI-CD ARM-CI – Products, users and groups. The exact steps for creating a build pipeline have already been described in the previous blogpost. Make sure to select the correct GIT repository.

Select correct GIT repository
Set up the build pipeline to validate the ARM template using a continuous integration tirgger and publish if the template is correct, just like in the previous post. Once done make sure to save and queue the build definition.

Set up build pipeline for validation
The next step will be to set up the deployment pipeline, which has also been thoroughly described in the previous post. Create a new continous deployment triggered release definition called API Management products, users and groups and use the artifact we just published from our build pipeline.

Create release pipeline with artifact published from build pipeline
Set up the test environment to be triggered as soon as the artifact is available, and deploy to your test environment.

Deploy to test environment
Clone the Test environment and update it to deploy to your production environment. Make sure to include an approval before deployment is being done.
Deploy to production environment after approval
We now have completed our CI/CD process for the products, users and groups, so to test this we just need to make a change in the ARM template on our local machine and check this in, after which our build and deployment pipelines will kick off and update our API Management instance.
API Management instance has been updated

: BizTalk Group by Service name Routing Failure Report")
: BizTalk Routing Failure Report Property Promotions")


