
by community-syndication | Sep 26, 2015 | BizTalk Community Blogs via Syndication
Introduction In a series of articles I will describe how Azure can be used to power a back end for a front end application. My front end application is a simple Rss aggregator. I follow a number of blogs and I currently use a Windows forms application that I wrote to monitor for new content: […]
Blog Post by: James Corbould
by community-syndication | Sep 23, 2015 | BizTalk Community Blogs via Syndication
With Integration Monday gaining a wider audience reach, we thought it would be apt to get some sessions from the Product Group guys to let the community know what’s happening in the space of Azure and related technologies. The last two sessions (on September 14 & September 21) were on Service Bus and Azure API […]
The post Azure Service Bus Premium Messaging Capabilities appeared first on BizTalk360 Blog.
Blog Post by: Sriram Hariharan
by stephen-w-thomas | Sep 22, 2015 | Stephen's BizTalk and Integration Blog
With the introduction of Azure Resource Manager (ARM) the world of Infrastructure as a Service (IaaS) inside Azure changed – for the better.
ARM introduced a new way to organize and deploy resources across various aspects of Windows Azure. Now you can create configuration scripts for complex Azure scenarios that include storage, web apps, virtual machines, networks, SQL databases, and more.
With these changes introduced the AzureResourceManager PowerShell module. I could write many posts on this along, but not to get into to many details you now have two ways to do many things in Windows Azure using PowerShell. This gets a little more complex considering additional breaking changes are coming soon when Switch-AzureMode is deprecated and the introduction of both traditional and classic versions of some Azure Artifacts like storage and virtual machines. Going forward I would recommend using AzureResourceManager based PowerShell commands for all new scripts.
Never the less, the way to create a new Virtual Machine is a little more complex now using AzureResourceManager. This is due to the greatly enhanced feature set in Azure that we just did not have a few years ago. As part of these changes, you need to call out your base image disk differently than before. Lets take a look at the two options.
Using Azure Service Manager (ASM – default module in PowerShell right now)
$imageWindows = ‘bd507d3a70934695bc2128e3e5a255ba__RightImage-Windows-2012-x64-v13.5’
$MyDC = New-AzureVMConfig -name $vmnamePDC -InstanceSize $sizePDC –ImageName $imageWindows
Using Azure Resource Manager (ARM- will be the new default)
$VirtualMachine = Set-AzureVMSourceImage -VM $VirtualMachine –PublisherName 2012-R2-Datacenter –Offer BizTalk-Server –Skus 2013-R2-Developer –Version "latest"
With Azure Service Manger you only need to supply the operating system image name and this can easily be found doing a single PowerShell query.
With Azure Resource Manger you need to specify a Publisher Name, Offer, SKU, and Version of the Operating System Azure Image you want to use. It is not as easy or straight forward to get these values.
Below I have put together a quick reference list related to BizTalk Server, SQL Server, and Windows as well as the PowerShell scripts to get these values for any other operating system image.
|
Publisher |
Offer
|
SKU
|
|
MicrosoftBizTalkServer |
BizTalk-Server |
2013-Developer |
|
MicrosoftBizTalkServer |
BizTalk-Server |
2013-Standard |
|
MicrosoftBizTalkServer |
BizTalk-Server |
2013-Enterprise
|
|
MicrosoftBizTalkServer |
BizTalk-Server |
2013-R2-Developer
|
|
MicrosoftBizTalkServer |
BizTalk-Server |
2013-R2-Standard |
|
MicrosoftBizTalkServer |
BizTalk-Server |
2013-R2-Enterprise |
|
MicrosoftSQLServer |
SQL2008R2SP3-WS2008R2SP1 |
Enterprise, Standard, Web |
|
MicrosoftSQLServer |
SQL2012SP2-WS2012 |
Enterprise, Standard, Web * |
|
MicrosoftSQLServer |
SQL2012SP2-WS2012R2 |
Enterprise, Standard, Web *
|
|
MicrosoftSQLServer |
SQL2014-WS2012R2 |
Enterprise, Standard, Web *
|
|
MicrosoftSQLServer |
SQL2014SP1-WS2012R2 |
Enterprise, Standard, Web *
|
|
MicrosoftSQLServer |
SQL2016CTP2-WS2012R2 |
Enterprise
|
|
MicrosoftWindowsServer |
WindowsServer |
2008-R2-SP1 |
|
MicrosoftWindowsServer |
WindowsServer |
2012-Datacenter |
|
MicrosoftWindowsServer |
WindowsServer |
2012-R2-Datacenter |
|
MicrosoftWindowsServer |
WindowsServer |
2016-Technical-Preview-3-with-Containers |
|
MicrosoftWindowsServer |
WindowsServer |
Windows-Server-Technical-Preview |
* some of the SQL SKUs contain other types of optimized versions.
If you want to get the Publisher Name, Offer, and SKU for other Azure Images you can use these PowerShell commands.
# Gets all Publishers in a specific datacenter
$locName="West US"
Get-AzureVMImagePublisher -Location $locName | Select PublisherName | Select * | Out-Gridview -Passthru
# Gets all Offers for a given Publisher in one location
$locName="West US"
$pubName="MicrosoftWindowsServer"
Get-AzureVMImageOffer -Location $locName -Publisher $pubName | Select Offer | Select * | Out-Gridview -Passthru
# Gets all SKUS for a giving Offer for a given Publisher in one location
$locName="West US"
$pubName="MicrosoftWindowsServer"
$offerName="WindowsServer"
Get-AzureVMImageSku -Location $locName -Publisher $pubName -Offer $offerName | Select Skus
Enjoy.
by John Callaway | Sep 18, 2015 | BizTalk Community Blogs via Syndication
If you weren’t one of the students that attended the recent Cloud-Based Integration Using Azure App Service class offered by QuickLearn you really missed out. I was able to attend and found the experience very informative.
Some technologies lend themselves to simply picking up a book and reading about how it works. BizTalk Server has never been one of those products and it looks like for the foreseeable future at least Azure App Services and Logic Apps are going to fall into that same category. It’s a good thing that Rob Callaway and Nick Hauenstein are braving the front lines to create and deliver quality training for all of us that are too busy to keep up with the rapid changes in Azure.
This class was delivered by Rob Callaway, one of the best BizTalk and now Azure App Services instructors in the world! This three day class had an eclectic international audience with people traveling from Canada and Europe to attend the course.
As you can tell from the overview this class is jam-packed with everything that you need to prepare to build integration solutions using Microsoft’s newest addition to Azure App Service, Logic Apps. Since there is so much that goes into creating a logic app the class feels a bit like a snowball rolling down hill, it starts small but as it progresses the knowledge you gain becomes almost overwhelming. The labs ensure that you don’t get lost in the cloud (pun IS intended) by providing a rich hands on experience to match the excellent lecture.
As an integration specialist, I felt very comfortable with the early concepts. By the time we got into day two everything was new as we built first simple and then more complex logic apps.
For the uninitiated a logic app is comprised of triggers and actions which are themselves API Apps. These API Apps are in turn Web Apps that perform some simple function. This whole thing is hosted in Azure. When strung together a Logic App can be very powerful providing capabilities similar to BizTalk orchestrations.
We didn’t just explore Microsoft Azure App Services, but learned how to integrate with Microsoft Azure Service Bus as a reliable and persistent store for inbound and outbound data, and identified the role that Microsoft Azure BizTalk Services (MABS) plays in cloud-based integration. By the end of the course the participants were even able to build their own custom API Apps, no small feat!
The goal of the course, one that I think all the participants would agree was achieved, is to provide the best training possible on these evolving technologies. QuickLearn Training is able to deliver on this goal because we have spent the last two years digging through the sometimes scant documentation and Microsoft presentations to find the golden acorns of knowledge that we happily share with our customers.
Special Guests
One of the benefits of our close relationship with the product team and our proximity to the Microsoft campus is that from time to time we have special visitors. We appreciated Mark Mortimore and Jeff Hollan for taking time out of their busy schedules to drop by on Thursday evening for a meet and greet with the students. Students provided Jeff with some great feedback for features in Logic Apps, and they even convinced Jeff to take a BizTalk Server course. While we don’t always get our friends at Microsoft to visit when we do it’s exciting and fun.
To wrap up the class on Friday we had a special guest appearance by our own Nick Hauenstein where he previewed his Creating a Push Trigger API App to Process NFC Tag Reads demonstration that he will be delivering at the upcoming AzureCon2015 on September 29th.
What The Participants Are Saying
Rob did a great job helping the attendees navigate the mine field or maybe, given the mental challenge, that should read MIND field, of creating and configuring Microsoft Azure Logic Apps.
Some of the feedback that we received from the attendees of this class:
…the QuickLearn materials were flawless and perfectly adapted to the objective of the course…I think that the learning environment is close to perfect and I’m having a hard time thinking of anything that should be changed.
The pace of his speech is very easy and pleasant to follow. Important points are made and repeated, often with humor, which is yet another demonstration that Rob masters his topic and enjoys sharing his knowledge.
This class probably needs to be at least 4 days if not a week. Need more time to complete labs.
Announcement
With an evolving set of technologies such as this there were inevitable additions that were made between the initial deliveries of this course and the most recent one. With this new content the class will simply not fit into the three day time-box that we initially allotted. As a result of these additions, and the feedback that we got from the recent class, we are excited to announce that the Cloud-Based Integration Using Azure App Service class is being extended to five days!
Your first opportunity to attend this new expanded version of the class is November 30th. As with all QuickLearn Training classes it is offered for remote attendance if you prefer but of course you are all invited to attend at our state-of-the-art facilities in Kirkland Washington as well.
I predict that within one year, your customers will be asking you about cloud based integration. Wouldn’t you rather be the one that knows the answers already, and have several months experience under your belt?
If you are worried that new features will be added that you miss out on by being an early adopter, QuickLearn Training always offers the opportunity for students to retake any class within six months, thus future-proofing your learning. As new features are added to these technologies you can bet that we will do our best to stay on top of the changes so that we can share that knowledge with you.
So indeed if you weren’t one of the students that attended the recent Cloud-Based Integration Using Azure App Service class offered by QuickLearn you really missed out, but you have another chance to mend your ways and get an improved and lengthened version of the course. Don’t miss out on this great opportunity.
by community-syndication | Sep 18, 2015 | BizTalk Community Blogs via Syndication
If you weren’t one of the students that attended the recent Cloud-Based Integration Using Azure App Service class offered by QuickLearnyou really missed out. Some technologies lend themselves to simply picking up a book and reading about how it works. … Continue reading →
The post Azure App Services Training is Awesome! appeared first on QuickLearn Blog.
Blog Post by: John Callaway

by community-syndication | Sep 17, 2015 | BizTalk Community Blogs via Syndication
Private cloud is definitely still a “thing.” Survey after survey shows that companies are running apps in (on-premises) private clouds and cautiously embracing public cloud. But, it often seems that companies see this as a binary choice: wild-west public cloud,… Read More ›
Blog Post by: Richard Seroter
by community-syndication | Sep 17, 2015 | BizTalk Community Blogs via Syndication
I was recently asked to assist one of our customers with a problem they were experiencing with one of their BizTalk interfaces. They had created an orchestration that was sending a message using a logical port set to “Specify Later”, which was bound to a physical Send Port Group containing multiple Send Ports.
Blog Post by: AxonOlympus
by stephen-w-thomas | Sep 14, 2015 | Stephen's BizTalk and Integration Blog
While I usually only blog about BizTalk and Windows Azure, for this post I am going for something different. This post is talking about data synchronization between different computers systems; like between a laptop and desktop.
I am sure I am like most readers who have more than one computer at home. I specifically have one main desktop and one main laptop. I use the laptop when I travel and I like to have a lot of data from home with me just in case I need it. This includes about 1 TB of pictures, movies, client data, and other files.
Below I outline two options to help you keep data in sync between multiple systems.
Option 1: Synchronization via the Cloud
Cloud based storage is the new thing. In the past few years numerous services have launched such as Dropbox, Google Drive, and Microsoft OneDrive (just to name a few). They offer much more than just storage in the cloud. They offer a whole cloud-based content management system with the ability for collaboration with per user permissions, download links, sharing large files that could not be sent via email, and more.
I currently use Dropbox for syncing frequently used and smaller files. I also use Dropbox for sharing files with Pluralsight, the training company I contract with to create online training courses like “Intro to BizTalk Server 2013 Enterprise Service Bus (ESB) Toolkit“. With Dropbox, sharing large files with my editor is as easy as drag and drop into my Dropbox folder.
Pros of using Cloud-based Synchronization:
- Automatic, real-time synchronization when all systems are online
- Typically simple and easy to use interfaces
- Ability to share large files with others through a download link
- User permission management tools
Cons Include:
- Data is in the cloud
- Upload speed is dependent on the internet connection
- Limited amount space in most free accounts
- Usually a monthly or yearly charge for more space and additional features
Option 2: Software synchronization
Software synchronization typically runs on a schedule to either copy all the data from one system to another or do a compare to ensure only new & changed files are copied over.
When looking for the best software for me needs I evaluated several different options I found online. I selected SyncBackFree by 2BrightSparks over 5 years ago and have since upgraded to a paid version. The free version is really free with no ads and packed full of features. Since it is free, it is well worth everyone giving it a try.
They offer two paid versions: SyncBackSE and SyncBackPro. The SE version includes support and the ability to copy open and locked files. The Pro version includes support for syncing with popular cloud platforms and scripting support for custom integration into your workflows. See a complete feature comparison.
I use software synchronization as my primary source of keeping data desktop and laptop data in sync. This is due to the large volume of data I want to have access to both at home and on the road. Plus I would not want client files or code exposed on the internet in the event of a hack on one of the cloud providers. It is now part of my packing routine to run the synchronization program right before I pack up my laptop and first thing when I get home from a trip.
I also use SyncBackPro to sync data between my computer and my network attached storage (NAS) for nightly scheduled backups.
Pros of using Software-based Synchronization:
- Synchronization of unlimited amounts of data
- Fast synchronization using your home network
- Secure
- Free software options available
- Can be used for NAS storage backups
Cons Include:
- Data can be out of sync until the program runs
- If not scheduled, the user needs to remember to run the program before disconnecting a device like a laptop
- No ability to share large files with others
What type of data sync do you use between systems?
by shadabanwer | Sep 13, 2015 | BizTalk Community Blogs via Syndication
In this post, I will demonstrate BizTalk solution deployment using BTDF and OctopusDeploy. Octopus Deploy is a friendly deployment automation system mainly for .NET developers. This post mainly describe BizTalk solution deployment using Octopus deploy.
Some of the pre-requisites are:
- Octopus Tentacles been installed and configure on the BT server. A “bizTalk-app” (it can be any name) role is created.
- Octopus Tentacles service running under BT Service account.
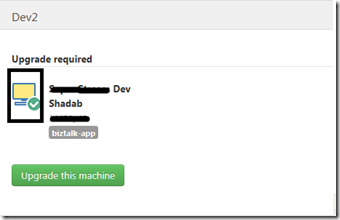
- Environments (BT Server configuration) is created and completed on the Octopus server using Octopus portal. The “green tick” confirm that octopus server can communicate with the BT Machine.
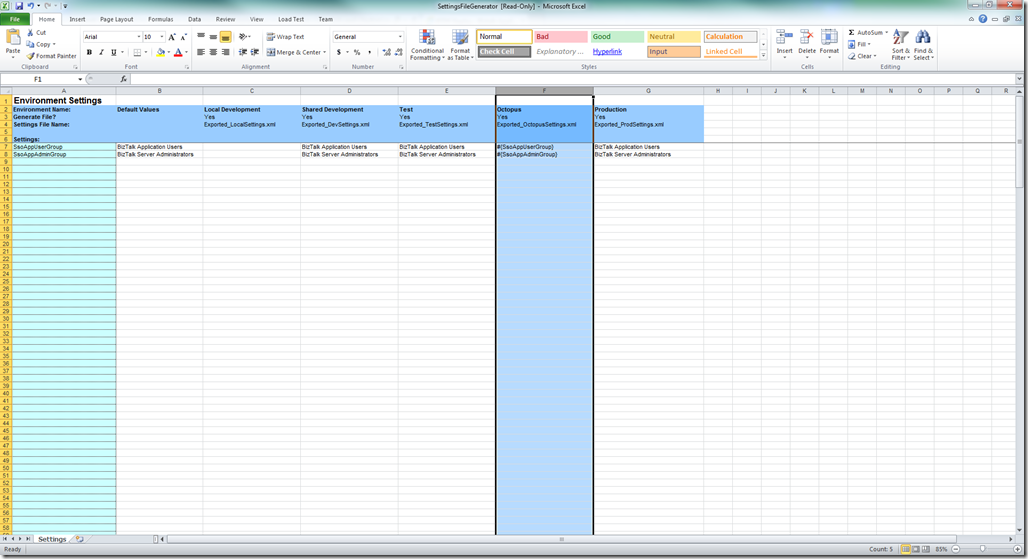
- In BTDF project Environment Settings file template, create a column named “Export_OctopusSettings.xml” before generating MSI as per below.
- Generate MSI using TFS Build. Normally the build server create incremented folders for the generated BTDF MSI. We need to copy the MSI from the drop TFS folder to the local folder on machine. To copying the MSI from the drop TFS folder to the local folder, I created the PS script following the below “Create Step Templates” step below. This script get the latest folder from the drop location and copy the MSI file to the local folder.
$TFSDropDir = $OctopusParameters[“TFSRootDir”]
$TargetFolder = $OctopusParameters[“DestinationFolder”]
if ([string]::IsNullOrEmpty($TFSDropDir)) {
Write-Host “No TFSDropDir has been specified”
Exit
}
if ([string]::IsNullOrEmpty($TargetFolder)) {
Write-Host “No TargetFolder has been specified”
Exit
}
if ( (Test-Path $TargetFolder) -eq $false) {
Write-Host “The target directory doesn’t exist. Unable to copy!”
Exit
}
if ( (Test-Path $TFSDropDir) -eq $false) {
Write-Host “The TFS Drop directory doesn’t exist. Unable to copy!”
Exit
}
$TFSCurrentBuildDir = Get-ChildItem -Path $TFSDropDir -name | Sort-Object LastAccessTime -Descending | Select-Object -First 1
$DeployMSICompletePath= “$TFSDropDir” + “$TFSCurrentBuildDir”
Write-Host “MSI Full path: $DeployMSICompletePath”
# Copy the items!
Write-Host “Copying items from $DeployMSICompletePath to $TargetFolder … please wait.”
robocopy $DeployMSICompletePath $TargetFolder
#Robocopy can success with multiple codes!
$exitcode = $LastExitCode
if($exitcode -in 0,1,2,3,4,5,6,7){
$LastExitCode = 0
}
return $LastExitCode
- “Run – Windows Installer” and “Variable – Substitute in files step” templates should be created in octopus (to create/import templates see below). You can download these templates from octopus library https://library.octopusdeploy.com/#!/listing
Steps to follow on Octopus Server.
- Create Step Templates for BTDF Deployment using the below script. You just need to Import the script using the Import button on the Step templates page. Copy the below script in the below window.
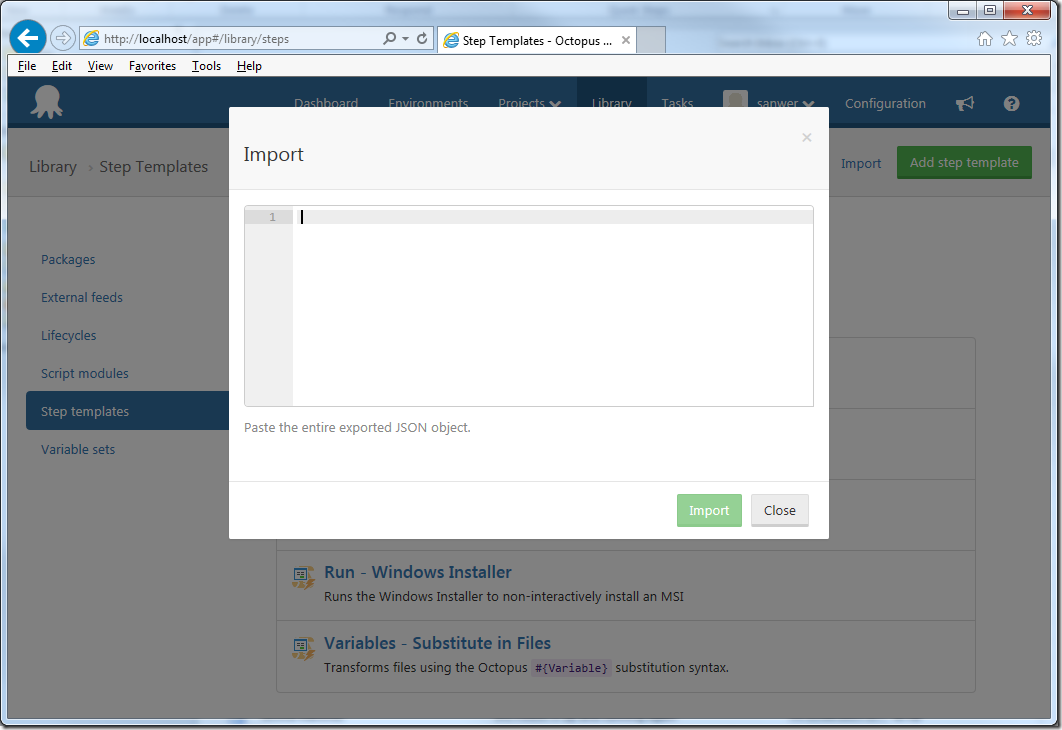
For Template please contact [email protected]
The above Json template will generate the below PS script.
For PS script please contact [email protected]
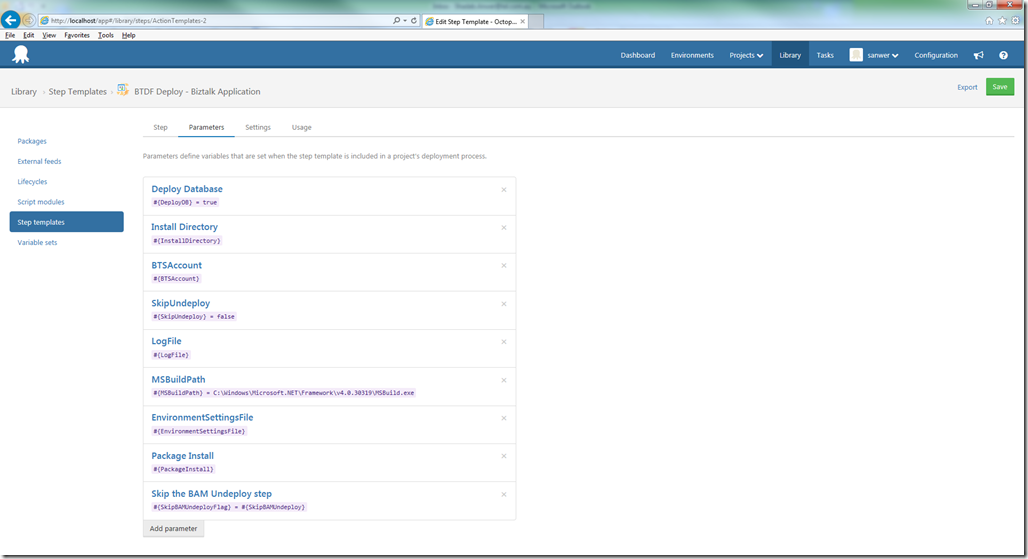
2. Save the templates and go to the Parameters tab on the same screen. All parameters can be viewed as per the below screen.
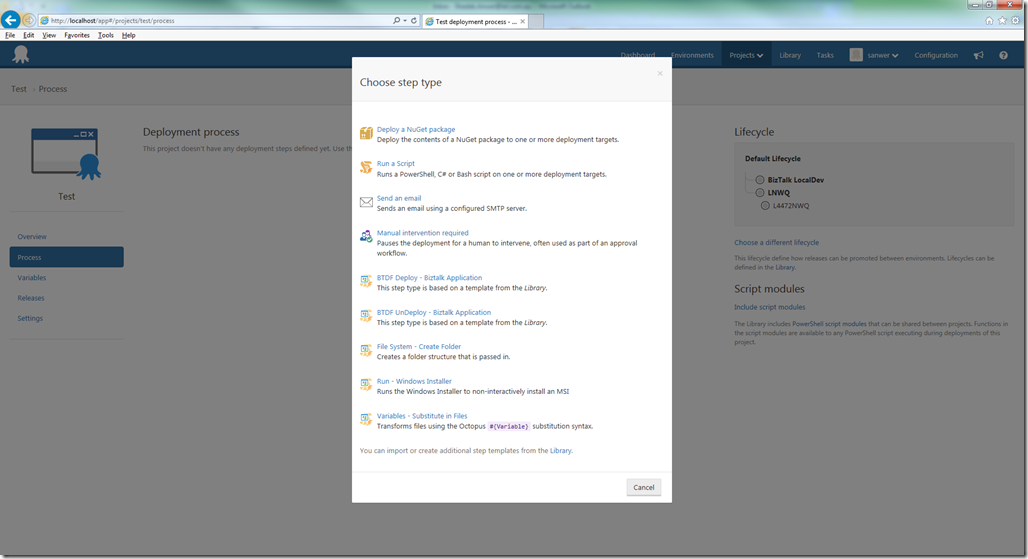
3. Navigate to created Project “Test”. Click “Process”, click “add Step”. Chose “Run – Windows Installer” from the step type.
4. Select target roles “(this is the role created during configuration of octopus tentacles”). MSI File Path “C:OctopusTest.MSI”. Click Save. If you using nuget package (.nuspec) step to extract MSI on Octopus tentacles folder, you can use the below to run the MSI.
#{Octopus.Action[Deploy Package].Output.Package.InstallationDirectoryPath}#{Octopus.Project.Name}-#{Octopus.Release.Number}.msi
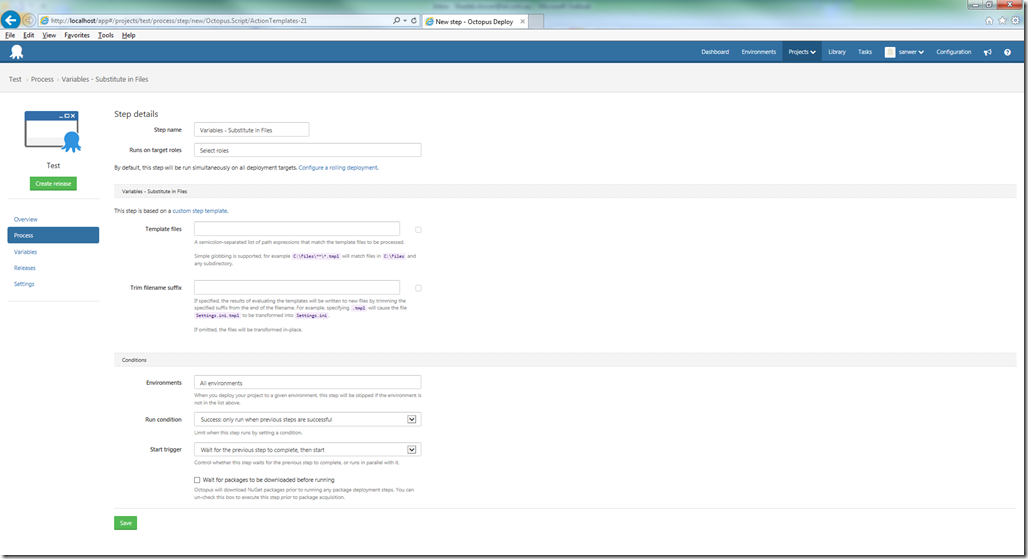
5. Click “Add Step” to replace variables in the setting file using Octopus variables (mentioned below). Chose “Variables – Substitute in Files” from the step type. Parameter template files should be “C:Program Files (x86)Test for BizTalk1.0DeploymentEnvironmentSettingsSettingsFileGenerator.xml”. Click Save.
6. Click “Add Step” to create BTDF deployment. Chose “Deploy – BizTalk Application” from the step type. Below is the configuration details.
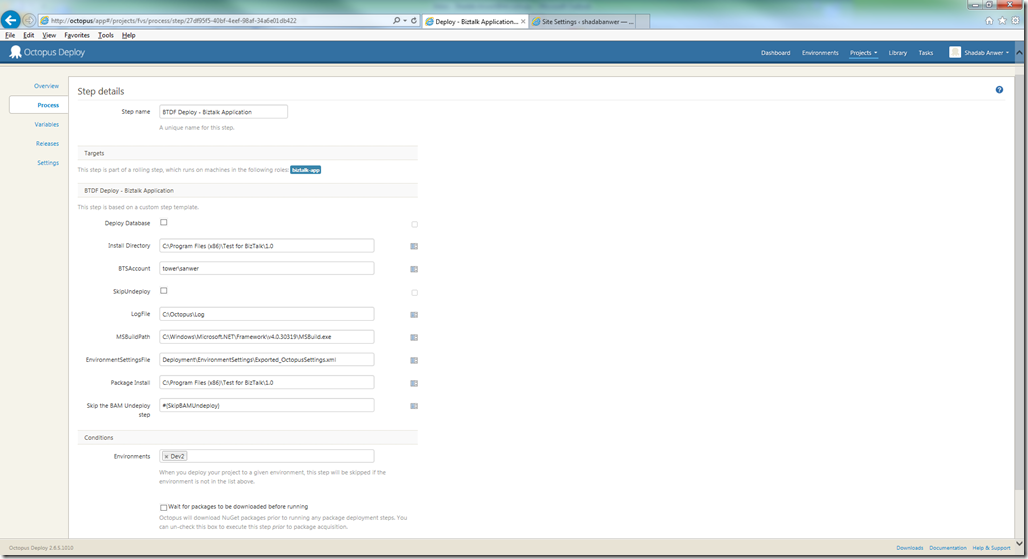
Install Directory – #{Octopus.Action[Run – Windows Installer].Output.InstallDirectory}
Package Install – #{Octopus.Action[Deploy Package].Output.Package.InstallationDirectoryPath}
Process page should look like the below.
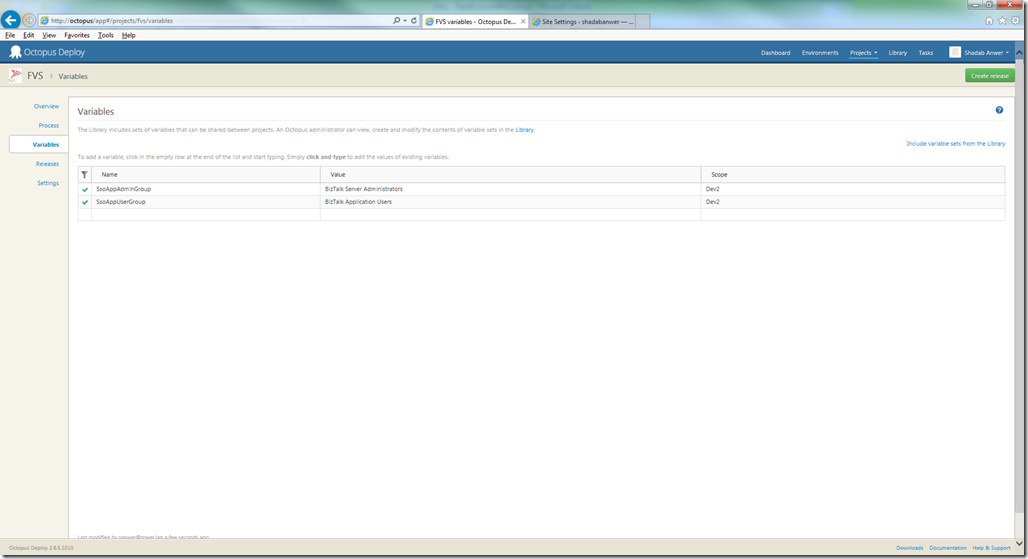
7. Navigate to Variables. Create Variables as mentioned in the below screen. These variables can be distinguished on basis of scope. You can create many variables with the same name for different scope (or environment like TEST, QA, Prod etc).
8. Next step is to create Release. Goto Release, click create release and save. Deploy this release to the specific server and can later promote this release to other servers.
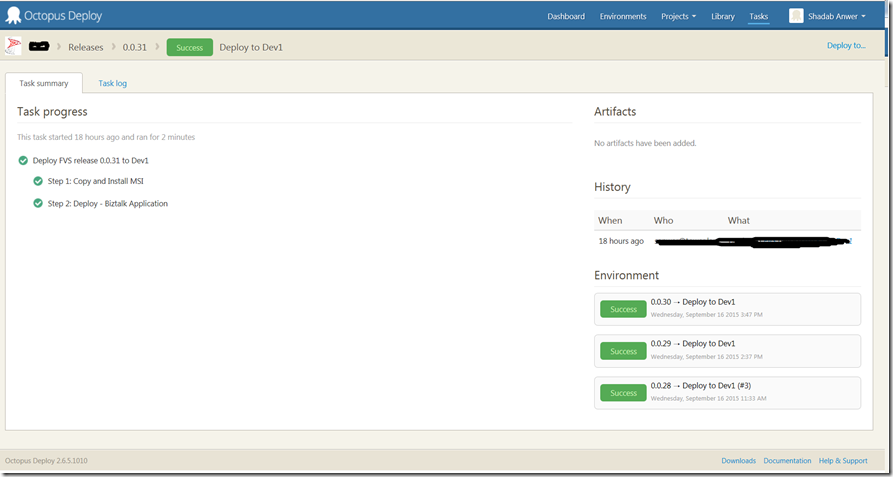
9. Click on Task Log – there is all the information including the logging of the deployment steps. The BTDF deployment logging is also in there.
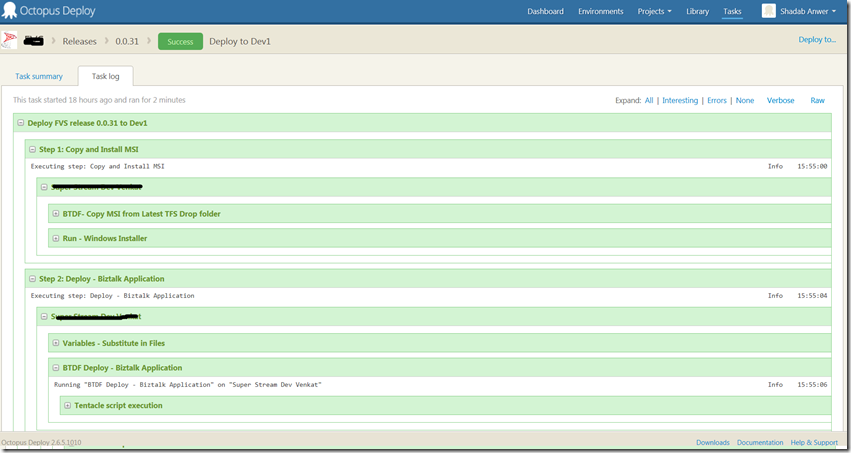
BizTalk Continuation Integration Build and Deployment can be fully automated using Teamcity and Octopus, you need to install octopack to do so. At the moment, I am working with automating CI with TFS and Octopus. If someone has already done this, would love to hear from them.
Thanks,
Shadab Anwer

by community-syndication | Sep 13, 2015 | BizTalk Community Blogs via Syndication
In this post, I will demonstrate BizTalk solution deployment using BTDF and OctopusDeploy. Octopus Deploy is a friendly deployment automation system mainly for .NET developers. This post mainly describe BizTalk solution deployment using Octopus deploy. Some of the pre-requisites are: Octopus Tentacles been installed and configure on the BT server. A “bizTalk-app” (it can be […]
Blog Post by: shadabanwer
