In this post, I will demonstrate BizTalk solution deployment using BTDF and OctopusDeploy. Octopus Deploy is a friendly deployment automation system mainly for .NET developers. This post mainly describe BizTalk solution deployment using Octopus deploy.
Some of the pre-requisites are:
- Octopus Tentacles been installed and configure on the BT server. A “bizTalk-app” (it can be any name) role is created.
- Octopus Tentacles service running under BT Service account.
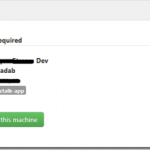
- Environments (BT Server configuration) is created and completed on the Octopus server using Octopus portal. The “green tick” confirm that octopus server can communicate with the BT Machine.

- In BTDF project Environment Settings file template, create a column named “Export_OctopusSettings.xml” before generating MSI as per below.

- Generate MSI using TFS Build. Normally the build server create incremented folders for the generated BTDF MSI. We need to copy the MSI from the drop TFS folder to the local folder on machine. To copying the MSI from the drop TFS folder to the local folder, I created the PS script following the below “Create Step Templates” step below. This script get the latest folder from the drop location and copy the MSI file to the local folder.
$TFSDropDir = $OctopusParameters[“TFSRootDir”]
$TargetFolder = $OctopusParameters[“DestinationFolder”]if ([string]::IsNullOrEmpty($TFSDropDir)) {
Write-Host “No TFSDropDir has been specified”
Exit
}if ([string]::IsNullOrEmpty($TargetFolder)) {
Write-Host “No TargetFolder has been specified”
Exit
}
if ( (Test-Path $TargetFolder) -eq $false) {
Write-Host “The target directory doesn’t exist. Unable to copy!”
Exit
}if ( (Test-Path $TFSDropDir) -eq $false) {
Write-Host “The TFS Drop directory doesn’t exist. Unable to copy!”
Exit
}$TFSCurrentBuildDir = Get-ChildItem -Path $TFSDropDir -name | Sort-Object LastAccessTime -Descending | Select-Object -First 1
$DeployMSICompletePath= “$TFSDropDir” + “$TFSCurrentBuildDir”
Write-Host “MSI Full path: $DeployMSICompletePath”
# Copy the items!
Write-Host “Copying items from $DeployMSICompletePath to $TargetFolder … please wait.”
robocopy $DeployMSICompletePath $TargetFolder#Robocopy can success with multiple codes!
$exitcode = $LastExitCodeif($exitcode -in 0,1,2,3,4,5,6,7){
$LastExitCode = 0
}return $LastExitCode
- “Run – Windows Installer” and “Variable – Substitute in files step” templates should be created in octopus (to create/import templates see below). You can download these templates from octopus library https://library.octopusdeploy.com/#!/listing
Steps to follow on Octopus Server.
- Create Step Templates for BTDF Deployment using the below script. You just need to Import the script using the Import button on the Step templates page. Copy the below script in the below window.

For Template please contact [email protected]
The above Json template will generate the below PS script.
For PS script please contact [email protected]
2. Save the templates and go to the Parameters tab on the same screen. All parameters can be viewed as per the below screen.

3. Navigate to created Project “Test”. Click “Process”, click “add Step”. Chose “Run – Windows Installer” from the step type.

4. Select target roles “(this is the role created during configuration of octopus tentacles”). MSI File Path “C:OctopusTest.MSI”. Click Save. If you using nuget package (.nuspec) step to extract MSI on Octopus tentacles folder, you can use the below to run the MSI.
#{Octopus.Action[Deploy Package].Output.Package.InstallationDirectoryPath}#{Octopus.Project.Name}-#{Octopus.Release.Number}.msi
5. Click “Add Step” to replace variables in the setting file using Octopus variables (mentioned below). Chose “Variables – Substitute in Files” from the step type. Parameter template files should be “C:Program Files (x86)Test for BizTalk1.0DeploymentEnvironmentSettingsSettingsFileGenerator.xml”. Click Save.

6. Click “Add Step” to create BTDF deployment. Chose “Deploy – BizTalk Application” from the step type. Below is the configuration details.

Install Directory – #{Octopus.Action[Run – Windows Installer].Output.InstallDirectory}
Package Install – #{Octopus.Action[Deploy Package].Output.Package.InstallationDirectoryPath}
Process page should look like the below.
7. Navigate to Variables. Create Variables as mentioned in the below screen. These variables can be distinguished on basis of scope. You can create many variables with the same name for different scope (or environment like TEST, QA, Prod etc).

8. Next step is to create Release. Goto Release, click create release and save. Deploy this release to the specific server and can later promote this release to other servers.

9. Click on Task Log – there is all the information including the logging of the deployment steps. The BTDF deployment logging is also in there.

BizTalk Continuation Integration Build and Deployment can be fully automated using Teamcity and Octopus, you need to install octopack to do so. At the moment, I am working with automating CI with TFS and Octopus. If someone has already done this, would love to hear from them.
Thanks,
Shadab Anwer