One of the most ancient and common standards for message representation is using text files (Flat Files) like CSV (Comma Separated Values) or TXT files, many of which are custom-made for their systems. And do not be fooled and think these messages are outdated and rarely used. Still today, many existing integrations and new integrations are made based on Flat Files.
No matter if you are working with Logic Apps Consumption or Logic Apps Standard, there are only two ways to generate a Flat File Schema:
Using a BizTalk Server Visual Studio Project (Visual Studio 2019 or older, depending on the BizTalk Server version you are using), this is a good option if you have a BizTalk Server environment and if you are migrating BizTalk Server solutions.
Or using the Azure Logic Apps Enterprise Integration Tools. This is an add-in for the Integration Account project to support XML Schema creation, XML transform designer, and Flat File Schema generation for Visual Studio 2019.
In this blog post, we will address how to create a flat file schema using the Azure Logic Apps Enterprise Integration Tools – in this case, a CSV file – and how to process it using the Logic Apps Consumption. The biggest difference between using Logic App Consumption or Standard is that to process a flat file using Consumption, it is required to have an Integration Account, which is not needed in Standard.
How to create a Flat File Schema for a CSV file
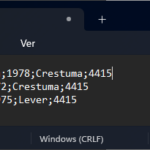
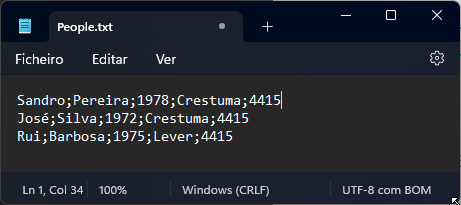
Normally, CSV files contain structured data so that a comma or semicolon separates individual items in the file, and each record is on a new line. In the image below, the CSV file contains five columns:
First name
Last name
Birth year
City
And Zip Code
and on each row, there is a person’s data.
We are going to use this sample as our example.
To create a flat file schema for this CSV file, we need to:
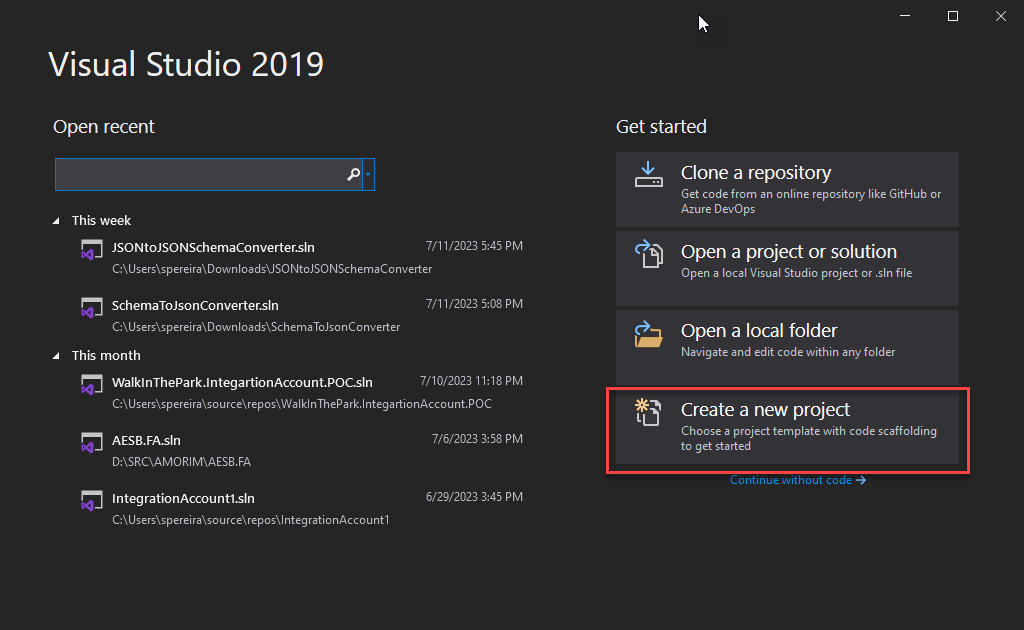
Open Visual Studio 2019 and create a new project by selecting Create a new project option.
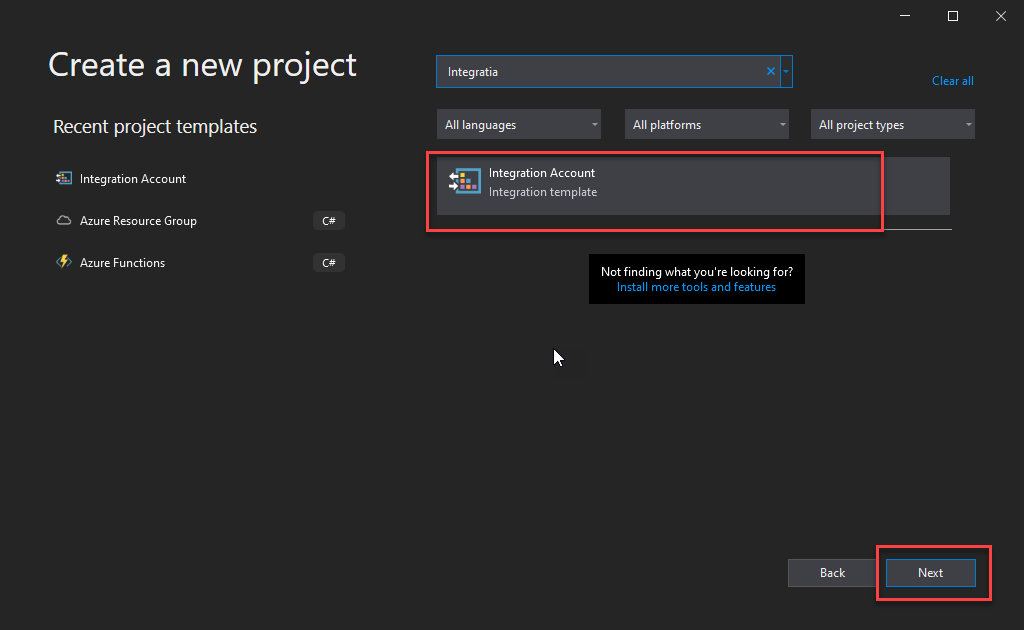
On the Create a new project window, search for the Integration Account template, select the Integration Account template, and click Next.
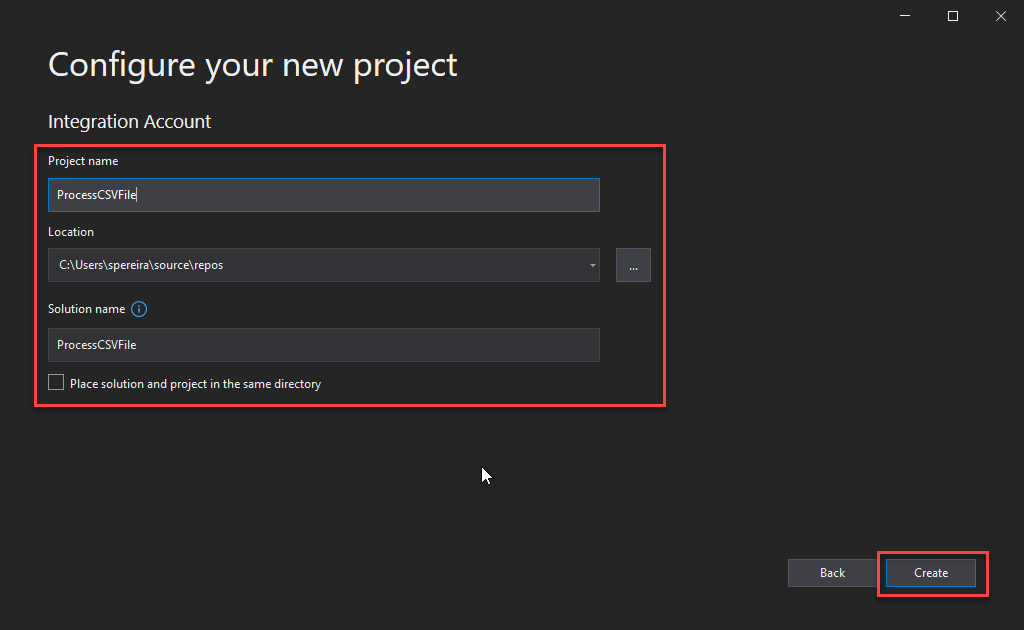
On the Configure your new project window, give a Project name and a Solution name and set the Location. Then click Create.
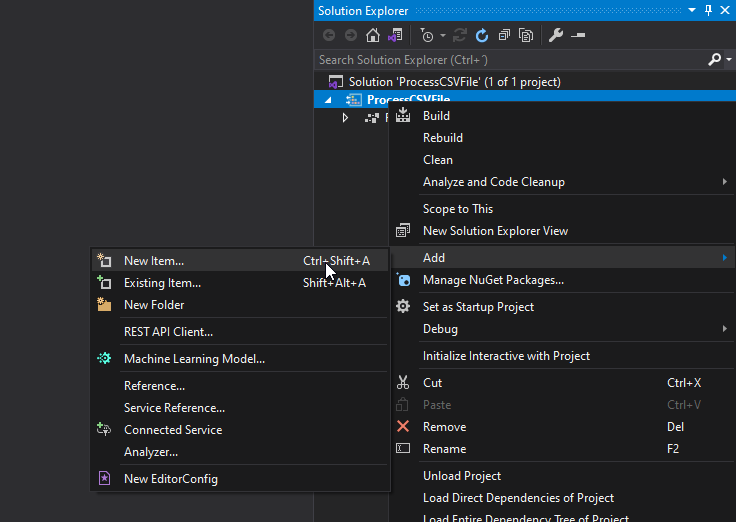
Once the Visual Studio project is created, right-click the project name and select the option Add > New Item…
On the Add New Item window, on the left tree, select Logic Apps and then select the Flat File Schema, give it a name, and click Add.
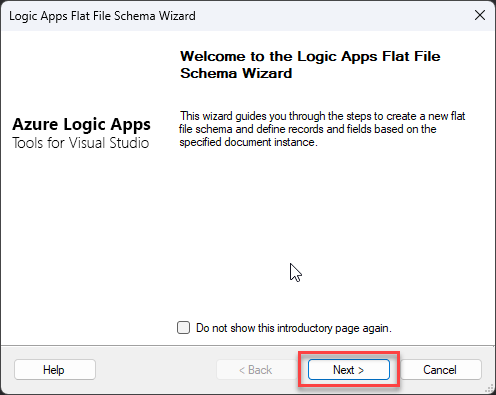
This will start the Logic Apps Flat File Schema Wizard. On the Welcome screen, click Next >.
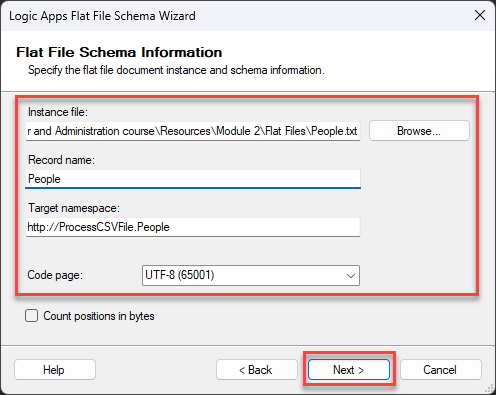
On the Flat File Schema Information screen, set the following configurations and then click Next >:
On the Instance file property, click the Browse button to locate the flat file from which the schema will be generated.
On the Record name property, give a name to define the root node name of your XML message—for example, People.
On the Target namespace property, set your desired namespace or leave the default.
On the Code page property, select UTF-8 (65001) from the drop-down selection list.
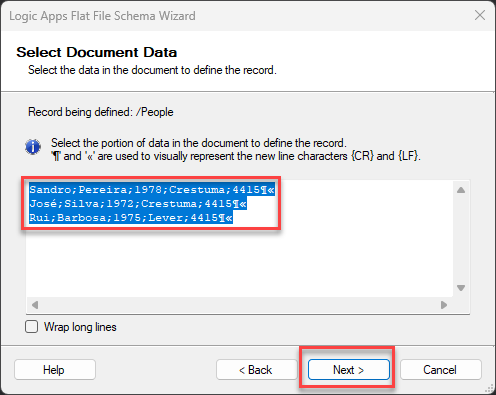
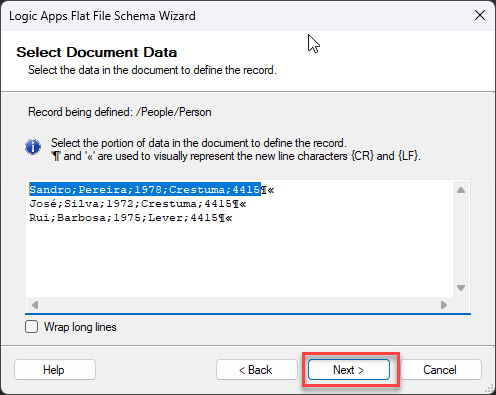
Because this is a small message on the Select Document Data screen, leave the default selected data and click Next >.
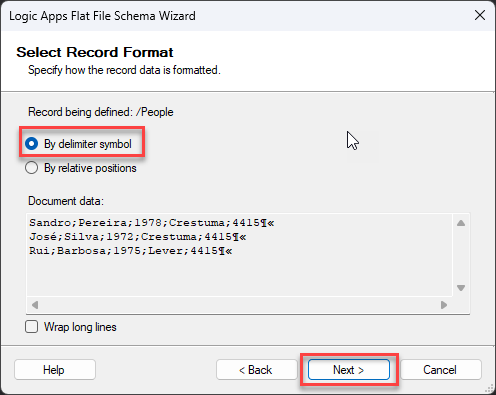
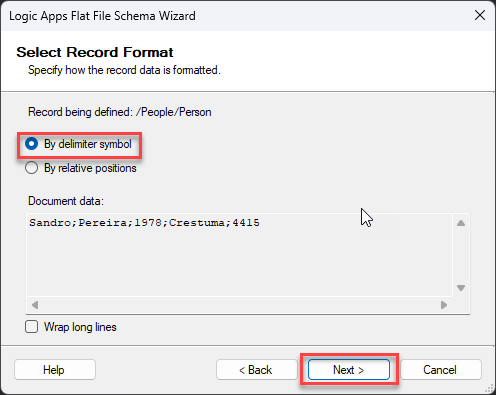
We will separate or define what separates a person on this first Select Record Format screen. And in this case, it is the new line. So, select the option By delimiter symbol and click Next >.
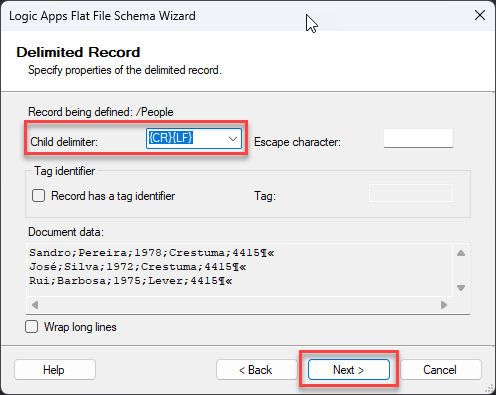
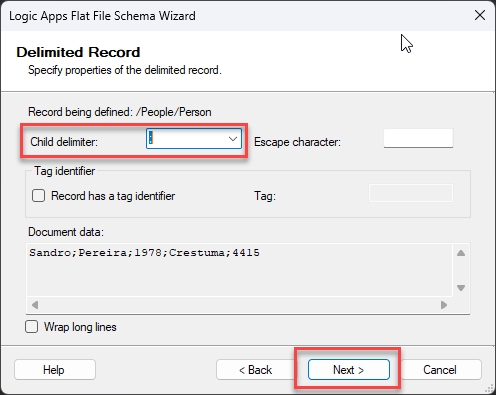
On the Delimiter Record screen, the child delimiter property is already defined to be the new line ({CR}{LF}), so leave the default configuration and click Next >.
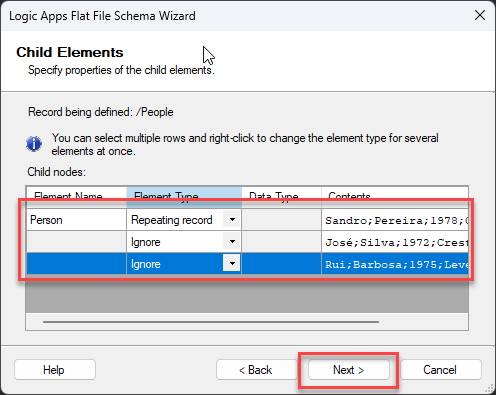
On the Child Elements screen, on the first line, set the following configuration:
Element Name: Person
Element Type: Repeating record
And on the rest of the lines, set the Element Type to Ignore since all lines represent the Person we will define on the first line. And then click Next >.
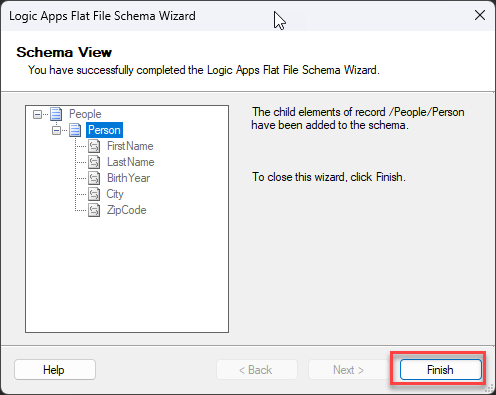
On the Schema View screen, you notice our Schema representation is being created. Click Next >.
Now, back to the Select Document Data screen, you notice that only the first line is automatically selected, excluding the new line character, and this is what we want. We will be defining the structure of the person object. Click Next >.
A semicolon separates this document, so in the Select Record Format screen, select the option By delimiter symbol and click Next >.
On the Delimiter Record screen, change the child delimiter property to a semicolon (;), and click Next >.
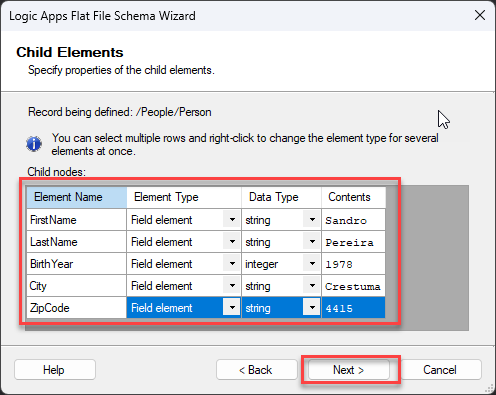
Now you notice that we have all fields separated in the Child Elements screen. Give the following configuration and click Next >.
FirstName (string)
LastName (string)
BirthYear (integer)
City (string)
ZipCode (string)
On the Schema View screen, you notice our Schema representation is finished. Click Finish.
And the Schema will open inside Visual Studio.
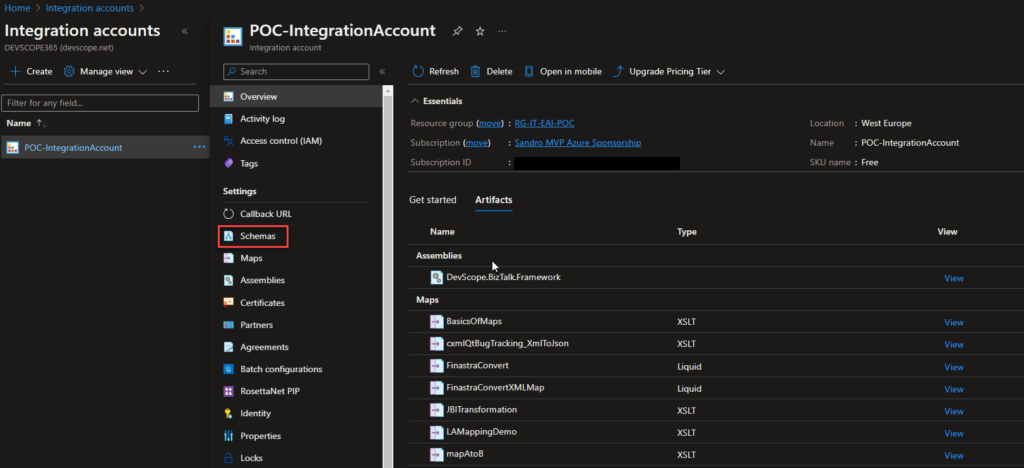
Now that we have our schema created, we need to upload it to our Integration Account – if you don’t have it, you need to create an Integration Account inside the Azure Portal. To do that:
In the Azure Portal, access your Integration Account and select the Schemas option under Settings.
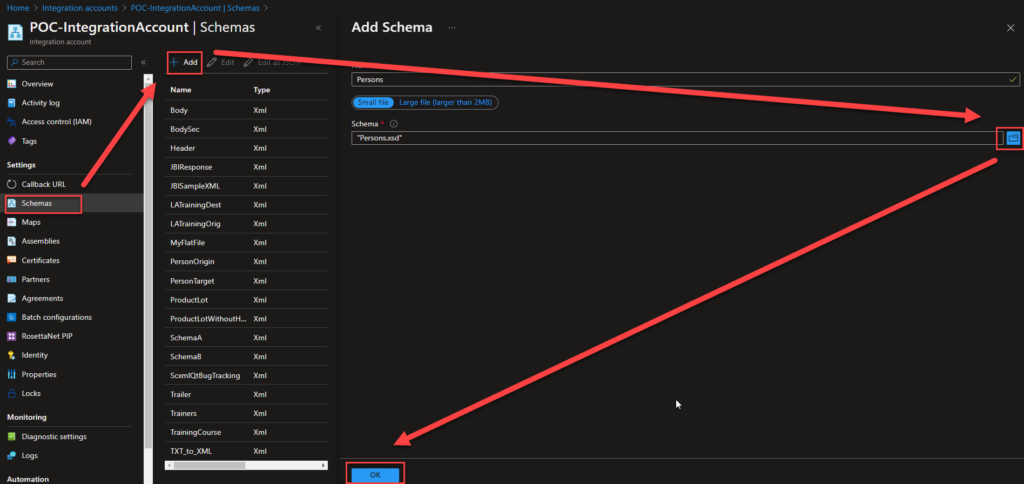
On the Schemas page, click in + Add and on the Add Schema panel on the Schema property, browse for the schema we just created and click Ok.
This will add the schema to your Integration Account, which can be used inside your Logic Apps.
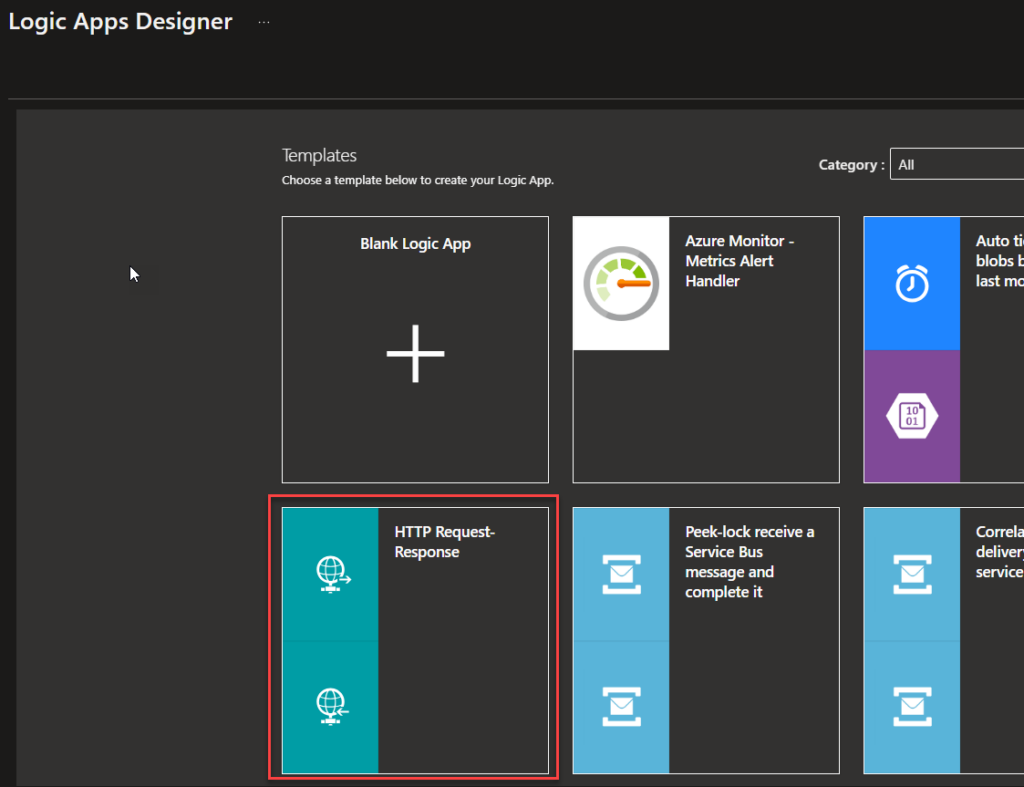
Now we need to create a Logic App to process this CSV. To do that, we need to:
Create a Logic App and use the HTTP Request-Response template – of course, this can be adapted to your requirements.
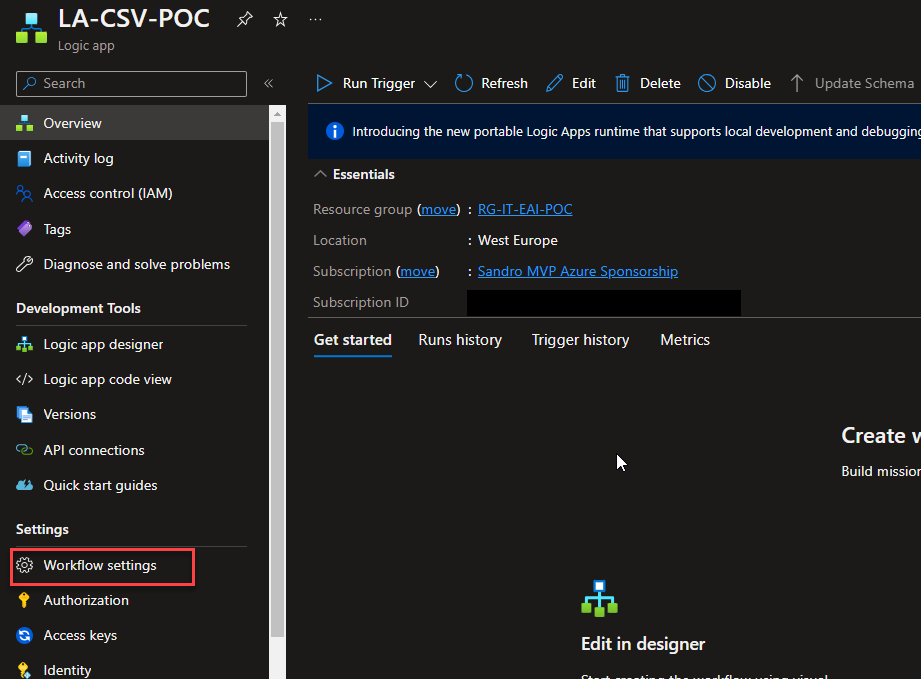
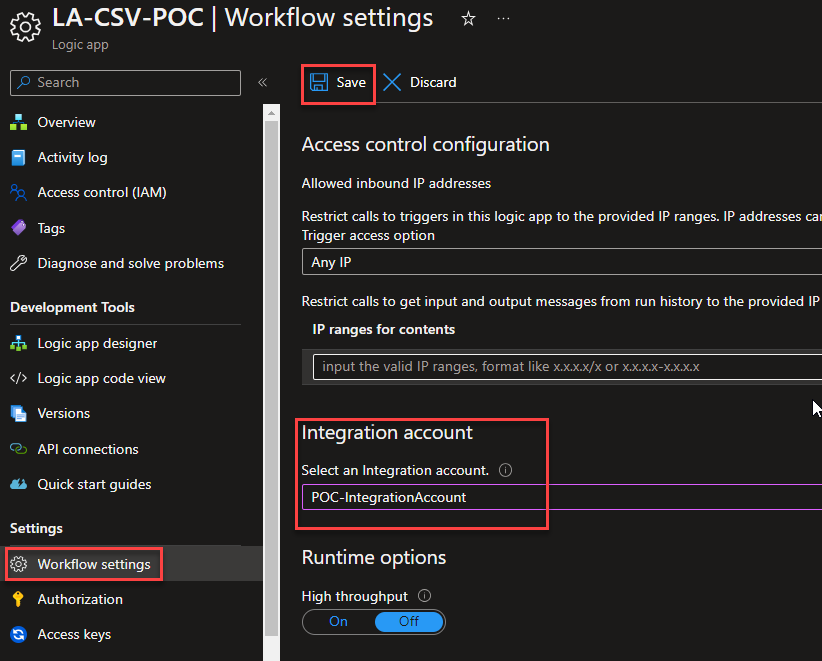
Once the Logic App design is loaded, click Save and return to your Logic App page. From there, click Workflow settings under Settings.
On the Workflow settings page, under the Integration account section, select the integration account in which we add our previous flat file schema on the Select an Integration account property. And click Save.
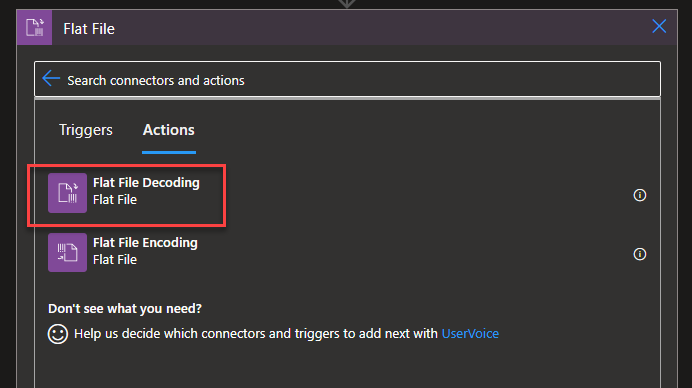
Now back to our Logic App designer. After the When a HTTP request is received trigger, select Add an Action.
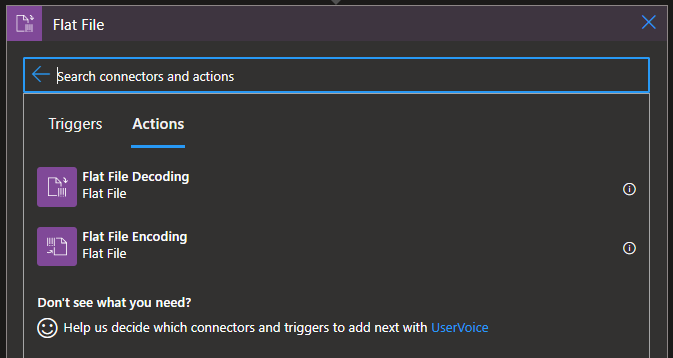
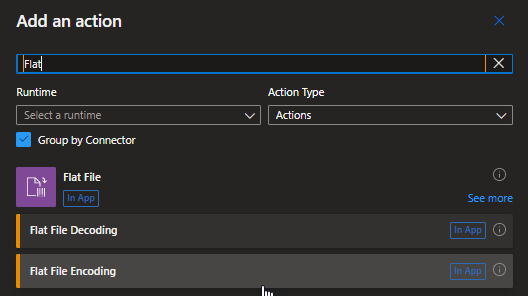
On the Choose an operation panel, search for Flat File and then choose the Flat File > Flat File Decoding action.
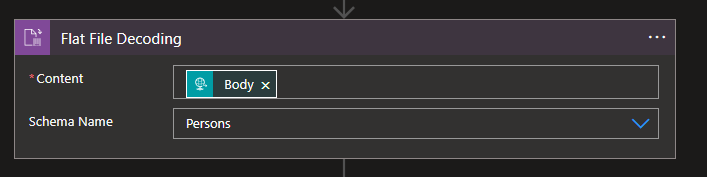
On the Flat File Decoding action, set the following configurations:
Content: Body from the When a HTTP request is received trigger.
Schema Name:Persons – the flat file we created earlier.
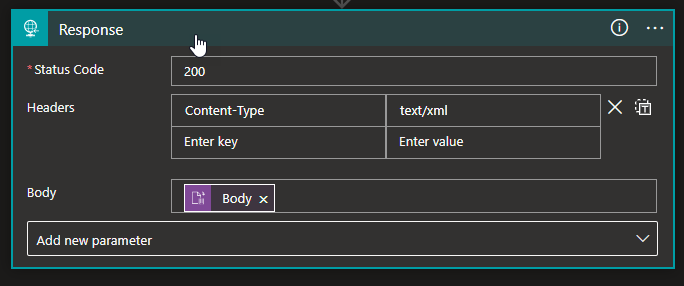
Now, select the Response action and set the following configurations:
Status Code: 200
Headers: Content-Type: text/xml
Body: Body from the Flat File Decoding action.
And finally, save the Logic App.
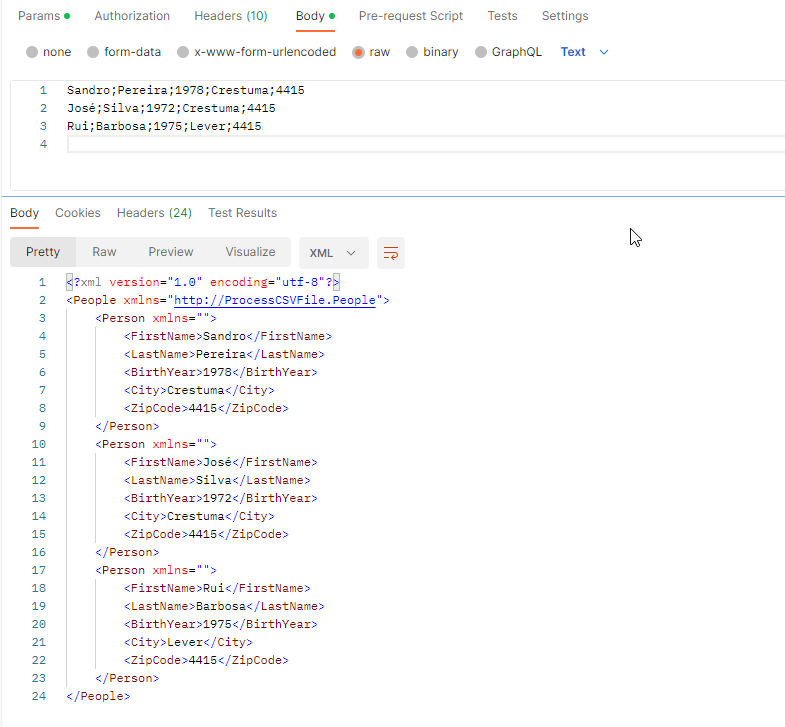
Now if we open Postman and send the following request, the expected response will be the same payload translated to XML, as you see in the picture below:
Hope you find this useful! So, if you liked the content or found it useful and want to help me write more content, you can buy (or help buy) my son a Star Wars Lego!
Author: Sandro Pereira
Sandro Pereira lives in Portugal and works as a consultant at DevScope. In the past years, he has been working on implementing Integration scenarios both on-premises and cloud for various clients, each with different scenarios from a technical point of view, size, and criticality, using Microsoft Azure, Microsoft BizTalk Server and different technologies like AS2, EDI, RosettaNet, SAP, TIBCO etc.
He is a regular blogger, international speaker, and technical reviewer of several BizTalk books all focused on Integration. He is also the author of the book “BizTalk Mapping Patterns & Best Practices”. He has been awarded MVP since 2011 for his contributions to the integration community.
View all posts by Sandro Pereira
We live in a REST era where JSON or XML is our text-based format default choice of text-based formats and widespread use by major corporations. However, one of the most ancient and common standards for message representation is using text files (Flat Files) like CSV (Comma Separated Values) or TXT files, many of which are custom-made for their systems. Do not be fooled and think these messages are outdated and rarely used. A good example is EDI messages, which are used extensively by large companies, so it is often necessary to transform text files into XML and vice versa.
Still today, many existing integrations and new integrations are made based on Flat Files.
What are Flat Files?
The standard definition states that a flat file is a collection of data stored in a two-dimensional database in which similar yet discrete strings of information are stored as records in a table. The table’s columns represent one database dimension, while each row is a separate record. Or in other words, it is a type of data storage file in which data is stored as plain text, often in a table-like structure with rows and columns. Each row represents a single record, while columns represent fields or attributes of the data. The information stored in a flat file is generally alphanumeric with little or no additional formatting. The structure of a flat file is based on a uniform format as defined by the type and character lengths described by the columns.
Flat files serve various purposes in software development, primarily for data storage, exchange, and processing tasks. They are widely used due to their simple structure, human readability, and ease of manipulation across different platforms and applications. For instance, flat files are commonly employed in data import and export operations, where applications or systems with diverse data storage mechanisms must communicate or transfer data.
A flat-file instance message is a text file that can contain three logical parts:
A header.
A body.
And a trailer.
In that order. Of course, both the header and the trailer are optional. The following example shows a flat-file instance message consisting of all three parts, with the body in bold type:
Sandro Pereira Porto, Portugal PO,1,BOOK,4415 TRANS-1
If you come from a Microsoft BizTalk Server background or if you are migrating a BizTalk Server project using these types of Flat-Files, you may know that the Flat file disassembler’s parsing allows you to specify:
The Header Schema in the Header schema design-time property of the flat file disassembler or the XMLNORM.HeaderSpecName message context property.
The Body Schema in the Document schema design-time property of the flat file disassembler or the XMLNORM.DocumentSpecName message context property.
And the Trailer Schema in the Trailer schema design-time property of the flat file disassembler or the XMLNORM.TrailerSpecName message context property.
However, Logic Apps only supports Body Schemas. You cannot have different schemas for Headers, Bodies, and Trailers. You can still process these types of flat-files messages but in a different approach with a single Schema dividing what is a header, body and trailer in different records (structures).
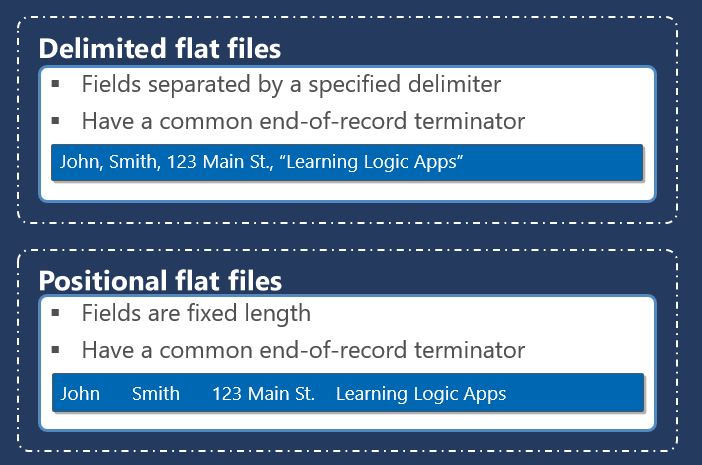
Flat-File Schema Types
Within a particular part of a flat-file instance message, different data items are grouped into records, which themselves can contain sub-records and, ultimately, individual data items known as fields. These records and fields are distinguished from each other using one of two different basic methodologies.
The first methodology, known as positional, defines each data item as a pre-established length, with pad characters being used to bring a shorter item of data up to its expected length.
The second methodology, known as delimited, uses one or more special characters to separate items of data from each other. This methodology avoids the need for otherwise superfluous pad characters. Still, it introduces some special considerations when the data itself contains the character or sequence of characters being used as a delimiter.
Positional Flat Files
Positional records within a flat-file instance message contain individual fields (items of data) that are each of a predefined length. The fields are parsed according to these lengths. For example, consider the following positional record from a flat-file instance message containing an id, country code, client name, and Country name:
01 PT Sandro Pereira Portugal
A reasonable definition for this record in a flat-file schema can be described as follows:
A positional record named Client contains the following fields:
An attribute named id that is left-aligned, three characters in length, with a zero character offset.
An element named countryCode that is left-aligned, three characters in length, with a zero character offset.
An element named name that is left-aligned, 37 characters in length, with a zero character offset.
An element named country that is left-aligned, and the length is until the end of the line.
Given these record and field definitions, the Flat file disassembler will produce the following XML equivalent of this record:
   PT
   Sandro Pereira
   Portugal
There are several considerations related to positional records that will affect how the record is parsed when received and constructed when sent, including:
The character used to fill the unused portion of each field, known as the pad character.
An optional tag within the record can be used to distinguish the record from other similar records. Tags usually occur at the beginning of the record but are allowable anywhere within it. Positional records can be defined to have a tag or not have a tag, but once defined, the tag must be present or not, based on the definition.
How data is justified within a fixed length field relative to the accompanying pad characters.
Positional records nested within other positional or delimited records.
Positional records with field lengths specified as a specific number of bytes rather than a specific number of characters.
Notes:
Suppose your flat file contains both delimited and positional records. In that case, you must set the Structure property of the root node to Delimited and the Structure property of subordinate record nodes to either Delimited or Positional as appropriate.
Fields in positional records have a limit of 50000000 characters.
Delimited Flat Files
Delimited records within a flat-file instance message contain nested records and/or individual fields (items of data) that are separated by a predefined character or set of characters. The fields are parsed according to these separating delimiters. For example, consider the following delimited records from a flat-file instance message, which contain three client lines to add to our internal system hypothetically:
A reasonable definition for this record in a flat-file schema can be described as follows:
A delimited repeating record named Client with child delimiter {CR}{LF}
And delimited elements with child delimiter ;
firstName
lastName
birthYear
city
zipCode
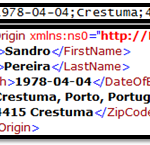
Given these record and field definitions, the Flat file disassembler produces the following XML equivalent of these records.
   Sandro
   Pereira
   1978
   Crestuma
   4415


...

...
There are several considerations related to delimited records that will affect how the record is parsed when received and constructed when sent, including:
The character or characters are used to override the interpretation of delimiters so that they are treated as part of the data.
An optional tag at the beginning of the record can be used to distinguish the record from other similar records.
How data is justified within fields with minimum lengths relative to the accompanying pad characters.
Positional records nested within other delimited records.
How data is justified within a fixed length field relative to its accompanying pad characters.
Preservation and suppression of delimiters when flat-file messages are received and sent.
Notes:
Suppose your flat file contains both delimited and positional records. In that case, you must set the Structure property of the root node to Delimited and the Structure property of subordinate record nodes to either Delimited or Positional as appropriate.
Delimited fields in flat files have a limit of 50000000 characters.
How do Logic Apps process the text files (Flat Files)?
When building a logic app workflow in Azure Logic Apps, you can encode and decode flat files using the Flat File built-in connector actions and a flat file schema for encoding and decoding. You can use Flat File actions in multi-tenant Consumption logic app workflows and single-tenant Standard logic app workflows.
Inside Logic Apps Consumption, Integration Account is required to store the flat-files schemas and use the Flat File built-in connector.
Inside Logic Apps Standard, there is no need for having an Integration Account since Schemas are supported built-in. However, if you desire, you can still use the Integration Account.
While no Flat File triggers are available, you can use any trigger or action to feed the flat-file content into your workflow. For example, you can use a built-in connector trigger, a managed or Azure-hosted connector trigger available for Azure Logic Apps, or even another app, like the Request built-in trigger or File System trigger.
Flat File Encoding action
The Flat File Encoding action allows you to convert an XML message into a flat file. Note that this action does not validate the incoming XML message. For that, you need to use the XML Validation action.
In Logic Apps Consumption, this action allows the following inputs:
The Content property, where you specify the XML message you want to encode to flat-file.
The Schema Name property is where you choose the flat-file body Schema or the Document schema.
If the schema list is empty, either your logic app resource isn’t linked to your integration account or doesn’t contain any schema files.
And then we have the following optional properties:
Mode of empty node generation, where we specify the mode to use for empty node generation with flat file encoding. Possible values are ForcedDisabled, HonorSchemaNodeProperty, or ForcedEnabled.
And XML Normalization allows you to enable or disable XML normalization in flat file encoding. Possible values are Yes or No.
In Logic Apps Standard, this action allows the following inputs:
The Content property, where you specify the XML message you want to encode to flat-file.
In the Source property, we select either LogicApp or IntegrationAccount as your schema source.
The Name property is where you choose the flat-file body Schema or the Document schema.
If the schema list is empty, either your logic app resource isn’t linked to your integration account, your integration account doesn’t contain any schema files, or your logic app resource doesn’t contain any schema files.
And then we have the following optional properties:
Mode of empty node generation, where we specify the mode to use for empty node generation with flat file encoding. Possible values are ForcedDisabled, HonorSchemaNodeProperty, or ForcedEnabled.
And XML Normalization allows you to enable or disable XML normalization in flat file encoding. Possible values are Yes or No.
Flat File Decoding action
The Flat File Decoding action allows you to convert a flat-file message into an XML message. Note that this action does not validate the outcome XML message. For that, you need to use the XML Validation action.
In Logic Apps Consumption, this action allows the following inputs:
The Content property, where you specify the flat-file message you want to decode to XML.
The Schema Name property is where you choose the flat-file body Schema or the Document schema.
If the schema list is empty, either your logic app resource isn’t linked to your integration account or doesn’t contain any schema files.
In Logic Apps Standard, this action allows the following inputs:
The Content property, where you specify the flat-file message you want to decode to XML.
In the Source property, we select either LogicApp or IntegrationAccount as your schema source.
The Name property is where you choose the flat-file body Schema or the Document schema.
If the schema list is empty, either your logic app resource isn’t linked to your integration account, your integration account doesn’t contain any schema files, or your logic app resource doesn’t contain any schema files.
Unlike BizTalk Server, where this Syntax Transformations or Data translation typically happens inside Receive or Send Pipelines. Inside Logic Apps, they happen inside our business process, aka Logic App using the Flat File connector.
Hope you find this useful! So, if you liked the content or found it useful and want to help me write more content, you can buy (or help buy) my son a Star Wars Lego!
Author: Sandro Pereira
Sandro Pereira lives in Portugal and works as a consultant at DevScope. In the past years, he has been working on implementing Integration scenarios both on-premises and cloud for various clients, each with different scenarios from a technical point of view, size, and criticality, using Microsoft Azure, Microsoft BizTalk Server and different technologies like AS2, EDI, RosettaNet, SAP, TIBCO etc.
He is a regular blogger, international speaker, and technical reviewer of several BizTalk books all focused on Integration. He is also the author of the book “BizTalk Mapping Patterns & Best Practices”. He has been awarded MVP since 2011 for his contributions to the integration community.
View all posts by Sandro Pereira
String functions are used to manipulate strings in standard ways, such as conversions to all uppercase or all lowercase, string concatenation, determination of string length, white space trimming, etc. If you come from the BizTalk Server background or are migrating BizTalk Server projects, they are the equivalent of String Functoids inside BizTalk Mapper Editor.
Available Functions
The Conversion functoids are:
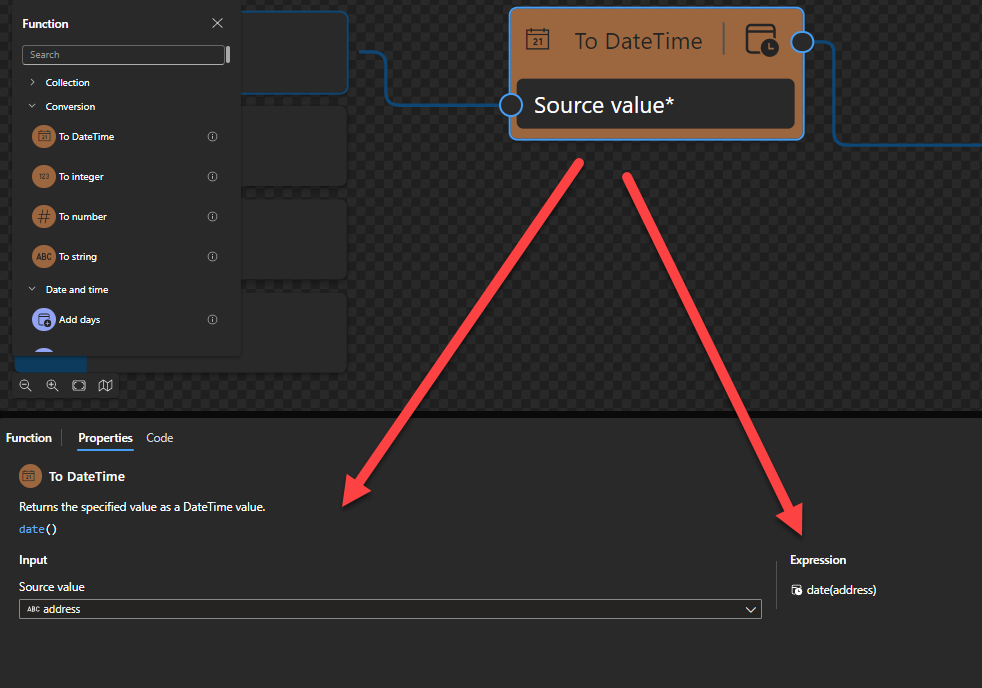
To DateTime: Returns the specified value as a DateTime value.
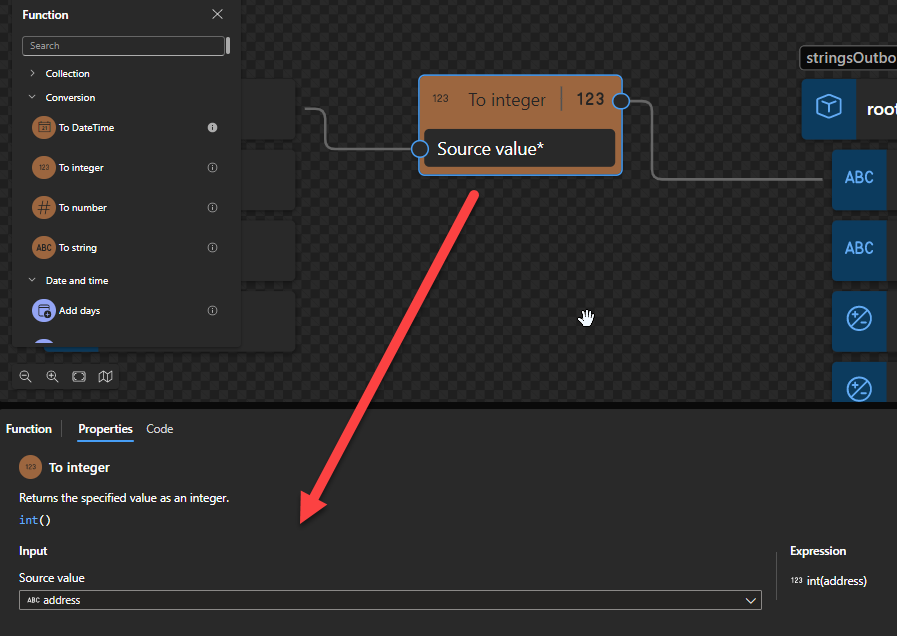
To integer: Returns the specified value as an integer.
To number: Returns the specified value as a number.
To string: Returns the specified value as a string.
To DateTime
This function states that it returns the specified value as a DateTime value.
Behind the scenes, this function is translated to a Type casting rule in XQuery: date()
date(string?)
Rules:
Castable values are restricted by the target types implementation restrictions. For example, you cannot cast a date string with a negative year to xs:date. Such casts will result in the empty sequence if the value is provided at run time (instead of raising a run-time error).
To integer
This function states that it returns the specified value as an integer.
Behind the scenes, this function is translated to the following XPath function: number()idiv 1
number($arg as xs:anyAtomicType?) as xs:doubleidiv 1
Note: idiv is an integer division operator. XPath supports two division operators named div and idiv. Each of these operators accepts two operands of any numeric type. $arg1 idiv $arg2 is equivalent to ($arg1 div $arg2) cast as xs:integer? except for error cases.
Rules:
If $arg is the empty sequence, or if $arg cannot be converted to an xs:double, the xs:double value NaN is returned.
Otherwise, $arg is converted to an xs:double following the rules of casting to xs:double. If the conversion to xs:double fails, the xs:double value NaN is returned.
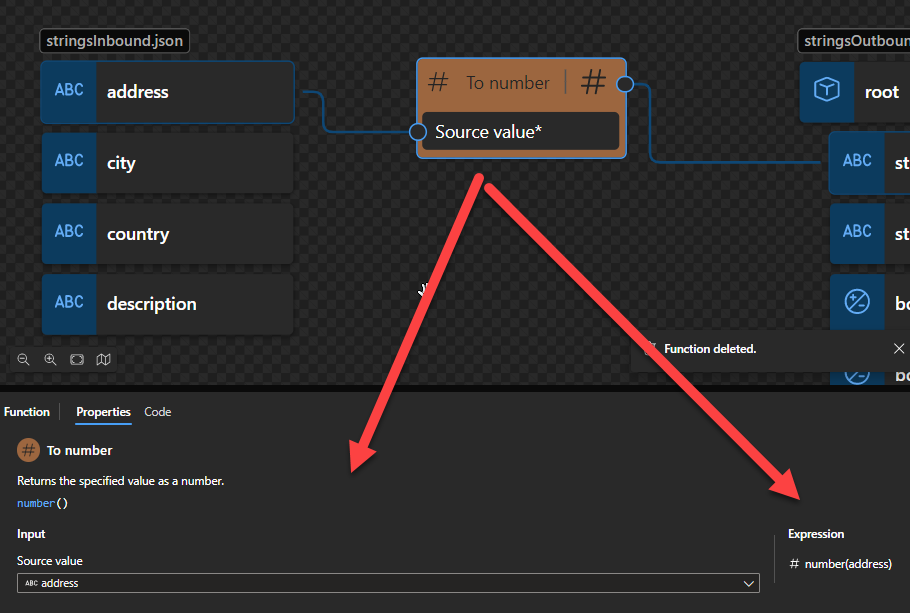
To number
This function states that it returns the specified value as a number.
Behind the scenes, this function is translated to the following XPath function:: number()
number($arg as xs:anyAtomicType?) as xs:double
Rules:
If $arg is the empty sequence, or if $arg cannot be converted to an xs:double, the xs:double value NaN is returned.
Otherwise, $arg is converted to an xs:double following the rules of casting to xs:double. If the conversion to xs:double fails, the xs:double value NaN is returned.
To string
This function states that it returns the specified value as a string.
Behind the scenes, this function is translated to a Type casting rule in XQuery: string()
string string(object?)
Rules:
A node-set is converted to a string by returning the string-value of the node in the node-set that is first in document order. If the node-set is empty, an empty string is returned.
A number is converted to a string as follows
NaN is converted to the string NaN
positive zero is converted to the string 0
negative zero is converted to the string 0
positive infinity is converted to the string Infinity
negative infinity is converted to the string -Infinity
if the number is an integer, the number is represented in decimal form as a Number with no decimal point and no leading zeros, preceded by a minus sign (-) if the number is negative
otherwise, the number is represented in decimal form as a Number including a decimal point with at least one digit before the decimal point and at least one digit after the decimal point, preceded by a minus sign (-) if the number is negative; there must be no leading zeros before the decimal point apart possibly from the one required digit immediately before the decimal point; beyond the one required digit after the decimal point there must be as many, but only as many, more digits as are needed to uniquely distinguish the number from all other IEEE 754 numeric values.
The boolean false value is converted to the string false. The boolean true value is converted to the string true.
An object of a type other than the four basic types is converted to a string in a way that is dependent on that type.
Hope you find this helpful! So, if you liked the content or found it useful and want to help me write more, you can buy (or help buy) my son a Star Wars Lego!
Author: Sandro Pereira
Sandro Pereira lives in Portugal and works as a consultant at DevScope. In the past years, he has been working on implementing Integration scenarios both on-premises and cloud for various clients, each with different scenarios from a technical point of view, size, and criticality, using Microsoft Azure, Microsoft BizTalk Server and different technologies like AS2, EDI, RosettaNet, SAP, TIBCO etc.
He is a regular blogger, international speaker, and technical reviewer of several BizTalk books all focused on Integration. He is also the author of the book “BizTalk Mapping Patterns & Best Practices”. He has been awarded MVP since 2011 for his contributions to the integration community.
View all posts by Sandro Pereira
In a general and abstract way, we can say that Data Mapper maps are graphical representations of XSLT 3.0 (Extensible Stylesheet Language Transformation) documents that allow us to perform simple and visual transformations between XML and JSON messages (more formats will be added in the future). But in reality, Data Mapper maps are composed of two files: a Map Definition file (.yml) that basically is an abstraction of the underlying implementation. And one XSLT file (.xslt) contains all the transformation rules – This is the file that in runtime will be executed by the Logic Apps (standard) engine.
What types of transformation can we apply in Logic Apps?
Similar to BizTalk Server, we can define two types of transformations:
Syntax Transformations: In BizTalk Server, this type of transformation occurs in receive or send pipelines and aims to transform a document into another representation, e.g., CSV to XML. In Logic Apps, that will occur inside the Logic Apps by using an Integration Account or certain actions and expressions depending on which syntax transformation we need to perform. Here the document maintains the same data (semantics) but changes the syntax that is represented. I.e., we translate the document, but typically we don’t modify the structure. Normally, this type of transformation is bidirectional, since we still have the same semantic content, we can apply the same transformation logic and obtain the document in its original format.
Semantic Transformations: In BizTalk Server, this type of transformation usually occurs only in BizTalk maps. Inside Logic Apps (Standard), they will take place in the Data Mapper. Here the document can maintain the same syntax that is represented (XML or JSON) – not mandatory since Data Mapper supports at the moment JSON Schemas and XML Schemas – but changes its semantics (data content). These types of transformations are typically one-way. Since we add and aggregate small parts of the information that compose the document into another document, we may miss important details for its reconstruction.
Introduction to the Data Mapper
The Data Mapper enables us to perform transformations of complex messages visually and effortlessly, graphically represented by links that define the relationships between the various elements of messages.
These relationships between elements are internally implemented as XSL Transformations (XSLT – Extensible Stylesheet Language Transformation), the standard Worldwide Web Consortium (W3C) recommended to perform message transformations.
Data Mapper is a Visual Code extension that allows you to perform mapping transformations. Currently, it has its own extension, but that will be merged with the main extension in the future.
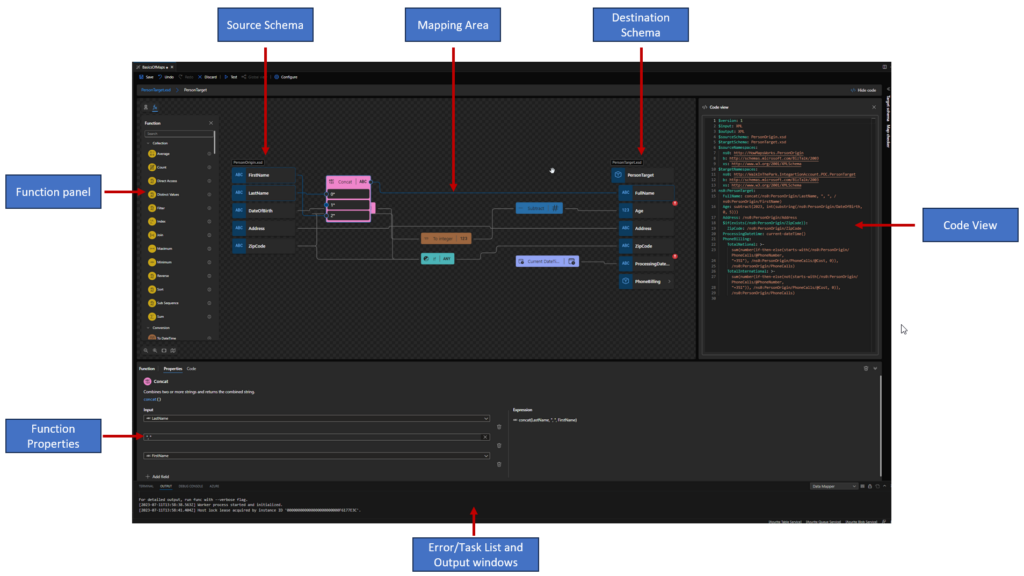
Essentially the editor consists of three main modules:
Source Schema view: this is the data structure of the source message and is on the left side of the main window;
Destination Schema view: this is the data structure of the target message and is on the right side of the main window; the links that define the mapping lead into the destination schema tree view from the grid view, and ultimately from the source schema tree view.
Mapping areaview: is in the middle of the main window, between the two data structures (source and target); This area plays a critical role in the definition of maps, containing the links and Functions that control how data in a source instance message is transformed into an instance message that conforms to the destination schema. The mapping area can have multiple layers, each of them associated with a specific record on the destination schema, allowing us this way to organize complex maps in a better way.
Apart from these three modules, there are other important windows for the developer:
Function panel: At the left side of the source schema, providing access to all Functions we can use in the Data Mapper.
Function properties panel: in this panel, we can see and modify the properties of a selected function inside the Data Mapper.
Task List and Output windows: much of the time hidden, we can and must use these windows to examine the results of saving and testing we do in our maps. These windows normally appear underneath the Mapping area or the Function properties panel.
Code view Panel: On this panel, you can view Map definitions rules (abstraction of the underlying implementation). It is a read-only panel.
Basic maps functionalities (Document mapping)
There are several mapping functionalities that you can perform inside maps, like Data normalization, Transform Injection (XLST injection), calculating values covering math and scientific functoids, and so on. Still, most of the time, transformations are quite simple, and when we perform a transformation in the message 5 basic functionalities typically arise:
Simple mapping of a given value (direct copy)
Concatenation of values
Conditional selection
Custom scripts
Add new values (data)
Here we will take a simple transformation problem that will address each one of these functionalities or operations, providing a simple example of how to accomplish this inside the Data Mapper. Of course, there are plenty of other operations or transformation rules that we could do that will not be addressed here.
Hope you find this helpful! So, if you liked the content or found it useful and want to help me write more content, you can buy (or help buy) my son a Star Wars Lego!
Author: Sandro Pereira
Sandro Pereira lives in Portugal and works as a consultant at DevScope. In the past years, he has been working on implementing Integration scenarios both on-premises and cloud for various clients, each with different scenarios from a technical point of view, size, and criticality, using Microsoft Azure, Microsoft BizTalk Server and different technologies like AS2, EDI, RosettaNet, SAP, TIBCO etc.
He is a regular blogger, international speaker, and technical reviewer of several BizTalk books all focused on Integration. He is also the author of the book “BizTalk Mapping Patterns & Best Practices”. He has been awarded MVP since 2011 for his contributions to the integration community.
View all posts by Sandro Pereira
Function Chain? What is a Function Chain? And how that works inside the Data Mapper?
When we use more than one cascading function to perform a transformation rule, we call it a Function Chain, or a chain of functions that are going to be executed in order. This way, we can apply more complex mapping rules inside the Logic Apps (Standard) Data Mapper. By the way, we had the same concept inside BizTalk Server Maps and Logic App Consumption Map (that is, the BizTalk Server Maps extracted and isolated)
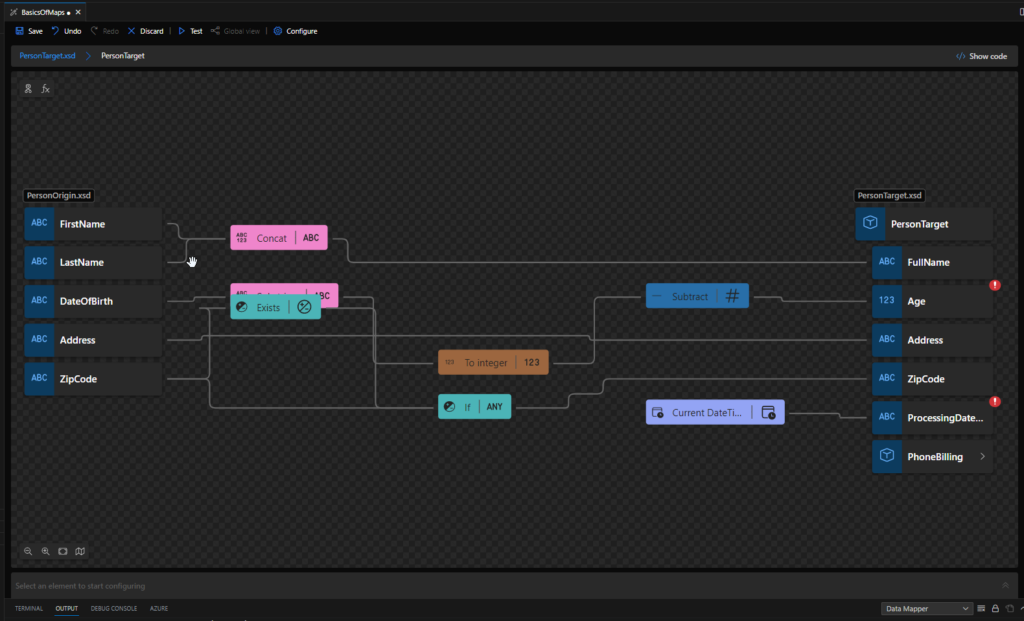
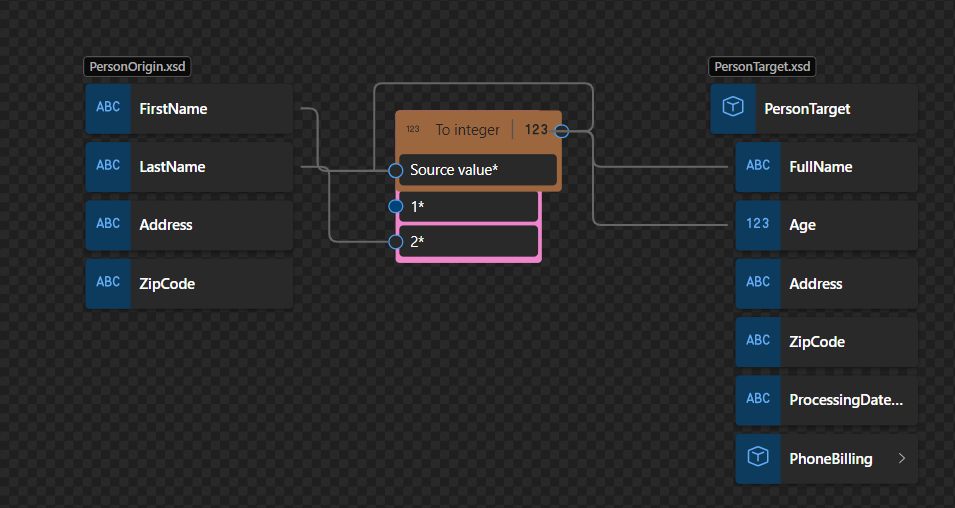
The picture below shows us a Function Chain inside the Data Mapper. In this case, we are calculating national and international calls based on the phone number:
In this video, we will learn t what a Function Chain is inside the Logic Apps (Standard) Data Mapper and how it works.
Hope you find this helpful! So, if you liked the content or found it useful and want to help me write more content, you can buy (or help buy) my son a Star Wars Lego!
Author: Sandro Pereira
Sandro Pereira lives in Portugal and works as a consultant at DevScope. In the past years, he has been working on implementing Integration scenarios both on-premises and cloud for various clients, each with different scenarios from a technical point of view, size, and criticality, using Microsoft Azure, Microsoft BizTalk Server and different technologies like AS2, EDI, RosettaNet, SAP, TIBCO etc.
He is a regular blogger, international speaker, and technical reviewer of several BizTalk books all focused on Integration. He is also the author of the book “BizTalk Mapping Patterns & Best Practices”. He has been awarded MVP since 2011 for his contributions to the integration community.
View all posts by Sandro Pereira
Time to start another series of blog posts about Logic Apps: Data Mapper Tricks and Tips! Where I will address simple tips and tricks, we can apply to our Data Mapper to be more productive, solve a problem, or help bypass some limitations or constraints.
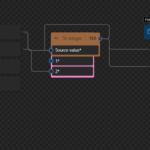
For this first blog post, I decided to explain a simple workaround that we can use today to help us organize our maps better in order for them to be more readable. Unfortunately, at the moment, I’m writing this post when we add a Function to our map we cannot drag and drop the function into another position in the data mapper area. That means that often when we are applying the mapping rules, they will get overlap as you see in the picture below:
In this case, the To Integer Function is on top of the Concat function, which makes it difficult to read and work inside the Data Mapper. In this sort video, we will see a very useful trick and Tip to organize our functions inside the Logic Apps (Standard) Data Mapper – it may not work in all scenarios but is the best option we have for now.
P.S: Microsoft is working on adding this drag and drop capability, so in the future, we will be able to move the shapes, aka functions, in the mapping area.
Hope you find this helpful! So, if you liked the content or found it helpful and want to help me write more content, you can buy (or help buy) my son a Star Wars Lego!
Author: Sandro Pereira
Sandro Pereira lives in Portugal and works as a consultant at DevScope. In the past years, he has been working on implementing Integration scenarios both on-premises and cloud for various clients, each with different scenarios from a technical point of view, size, and criticality, using Microsoft Azure, Microsoft BizTalk Server and different technologies like AS2, EDI, RosettaNet, SAP, TIBCO etc.
He is a regular blogger, international speaker, and technical reviewer of several BizTalk books all focused on Integration. He is also the author of the book “BizTalk Mapping Patterns & Best Practices”. He has been awarded MVP since 2011 for his contributions to the integration community.
View all posts by Sandro Pereira
Unfortunately, no Logic App connector can make the bridge to RabbitMQ, which makes this integration challenge a little bit more complicated. However, we have the ability to create an Azure Function by using the RabbitMQ trigger for Azure Functions to overpass this limitation.
And we saw and explained in our last blog post that Azure Functions integrates with RabbitMQ via triggers and bindings. The Azure Functions RabbitMQ extension allows you to send and receive messages using the RabbitMQ API with Functions.
The purpose of this video is to explain how you create a POC that allows you to receive a message in a RabbitMQ queue, and that event triggers the Azure Function that then will route the message to a Logic App.
This was a real problem presented by a client during one of our Logic Apps training courses, where they have RabbitMQ on-premises, and they did want to pull messages from a queue into a Logic App Consumption to integrate them with other systems.
Hope you find this helpful! So, if you liked the content or found it useful and want to help me write more content, you can buy (or help buy) my son a Star Wars Lego!
Big thanks to my team member Luís Rigueira for creating this video.
Author: Sandro Pereira
Sandro Pereira lives in Portugal and works as a consultant at DevScope. In the past years, he has been working on implementing Integration scenarios both on-premises and cloud for various clients, each with different scenarios from a technical point of view, size, and criticality, using Microsoft Azure, Microsoft BizTalk Server and different technologies like AS2, EDI, RosettaNet, SAP, TIBCO etc.
He is a regular blogger, international speaker, and technical reviewer of several BizTalk books all focused on Integration. He is also the author of the book “BizTalk Mapping Patterns & Best Practices”. He has been awarded MVP since 2011 for his contributions to the integration community.
View all posts by Sandro Pereira
Used to perform a variety of operations over collections, such as cumulative sum, short, or get distinct values.
Average, Count, Direct Access, Distinct Values, Filter, Index, Join, Maximum, Minimum, Reverse, Sort, Sub Sequence, Sum
Conversion
Used to convert values to specific times.
To DateTime, To integer, To number, To string
Date and TimeUsed to perform a variety of operations over Dates, such as retrieving the current date and time or adding dates.
Add days, Add DayTime to Date, Add DayTime to DateTime, Add DayTime to Time, Add YearMonth to DateTime, Adjust Date, Adjust DateTime, Adjust Time, Current date. Current DateTime value, Current time, DateTime, Day from DAte, Day from DateTime, Equal Date, Equal DateTime, Equal Day, Equal Month, Equal MonthDay, Equal Time, Equal Year, Equal YearMonth, Greater Date, Greater DateTime, Greater Time, Hours from DateTime, Hours from Time, Less Date, Less DateTime, Less Time, Minutes from DateTime, Minutes from Time, Month from Date, Month from DateTime, Seconds from DateTime, Seconds from Time, Subtract Dates, Subtract DateTimes, Subtract DateTime from Date, Subtract DateTime from DateTime, Subtract DateTime from Time, Subtract Times, Subtract YearMonth from Date, Subtract YearMonth from DateTime, Time zone from Date, Time zone from DateTime, Time zone from Time, Year from Date, Year from DateTime.
Logical comparisonUsed to perform a variety of logical operations, such as greater than and logical existence.
Equal, Exists, Greater, Greater or equal, if, if else, Is date, Is DateTime, Is nil, Is null, Is number, Is string, Less, Less or equal, Logical AND, Logical NOT, Logical OR, Not equal
MathematicalUsed to perform a variety of mathematical and scientific operations, such as addition and multiplication.
Used to perform a variety of string functions, such as trimming and concatenation.
Codepoints to string, Concat, Contains, Ends with, Length, Lowercase, Name, Regular expression matches, Regular expression replace, Replace, Start with, String to codepoints, Substring, Substring after, Substring before, Trim, Trim left, Trim right, Uppercase
Utility
Used to perform a variety of additional and distinct operations that don’t fit in the above Categories, such as stopping a transformation and returning the specified error code and description or format a number or a date.
Copy, Error, Format date, Format DateTime value, Format number, Format time
Unfortunately, no Logic App connector can make the bridge to RabbitMQ, which makes this integration challenge a little bit more complicated. However, we have the ability to create an Azure Function by using the RabbitMQ trigger for Azure Functions to overpass this limitation.
Azure Functions integrates with RabbitMQ via triggers and bindings. The Azure Functions RabbitMQ extension allows you to send and receive messages using the RabbitMQ API with Functions.
So we pretend here to have an Azure Function that triggers when a message enters the queue and then routes that message into a Logic App.
And what does this Azure Function do?
This Azure Function is triggered by a RabbitMQmessage in a specified queue. When a message arrives, the function is executed and performs the following steps:
Logs an information message indicating that the function has been triggered.
Prepares the payload for a request by creating an object with a “Message” property containing the content of the RabbitMQ message.
Serializes the payload object into a JSON string.
Creates an HTTPrequest with the JSONpayload as the content and sets the content type to “application/json“.
Defines the URL of a LogicApp that will receive the HTTPrequest.
Sends the HTTP request to the LogicApp using the URLand payload.
Check the response status of the request.
If the request is successful (status code in the 2xx range), logs an information message indicating that the request was sent to the Logic App successfully.
If the requestfails (status code outside the 2xx range), logs an error message indicating the failure and includes the response’s status code.
In summary, this AzureFunction acts as a bridge between a RabbitMQ queue and a LogicApp. It receives messages from RabbitMQ, sends them as JSONpayloads to a specified LogicApp endpoint via an HTTPrequest, and logs the success or failure of the request.
To create the AzureFunction, we need to:
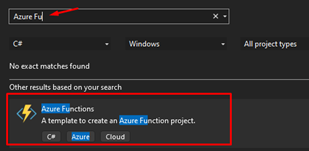
In Visual Studio 2022, click on Create a new project.
On the project template, choose Azure Functions.
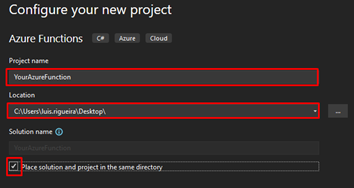
On the Configure your new project panel, give your Azure Function a name that makes sense to you and your coworkers, do not forget to start using proper names from day one! Choose the location of your Azure Function.
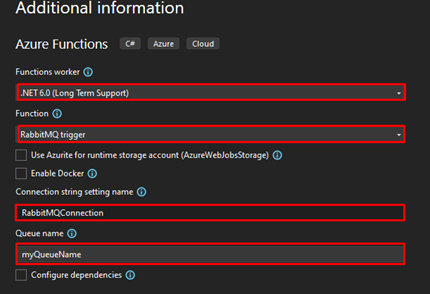
Click next, and now you need to configure some fields:
On the Function worker, choose .NET 6.0 (Long Term Support).
On Function, select the RabbitMQ trigger.
On the Connection string setting name, you can name the connection string as RabbitMQConnection.
On the Queue name, add the name of the queue you created previously.
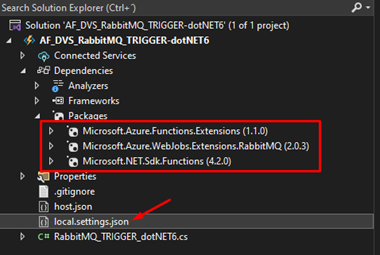
Click on Create. After the project is created, use the following code you can find on GitHub here:
Add these NuGet packages to the solution.
Next on the file local.settings.json is where you will store the connection string that will make it possible to connect with RabbitMQ and to do that, this is how the file should look like:
Notice that you need to apply the proper configuration to the RabbitMQConnection keyword.
amqp://user:[email protected]:5672/my-vhost-v2 is just an example, but only the password and IP are fictitious in this example because you should have your own.
Where can I download it?
You can download the complete Azure Functions source code here:
Hope you find this helpful! So, if you liked the content or found it helpful and want to help me write more content, you can buy (or help buy) my son a Star Wars Lego!
Big thanks to my team member Luís Rigueira for helping me realize and implement this idea.
Author: Sandro Pereira
Sandro Pereira lives in Portugal and works as a consultant at DevScope. In the past years, he has been working on implementing Integration scenarios both on-premises and cloud for various clients, each with different scenarios from a technical point of view, size, and criticality, using Microsoft Azure, Microsoft BizTalk Server and different technologies like AS2, EDI, RosettaNet, SAP, TIBCO etc.
He is a regular blogger, international speaker, and technical reviewer of several BizTalk books all focused on Integration. He is also the author of the book “BizTalk Mapping Patterns & Best Practices”. He has been awarded MVP since 2011 for his contributions to the integration community.
View all posts by Sandro Pereira
In my last blog post, I explain in detail the String functions available in the new Data Mapper, and I endup documenting each of them.
String functions are used to manipulate strings in standard ways, such as conversions to all uppercase or all lowercase, string concatenation, determination of string length, white space trimming, etc. If you come from the BizTalk Server background or are migrating BizTalk Server projects, they are the equivalent of String Functoids inside BizTalk Mapper Editor.
The String functoids are:
Codepoints to string: Converts the specified codepoints value to a string and returns the result.
Concat: Combines two or more strings and returns the combined string.
Contains: Returns true or false based on whether the string input contains the specified substring.
Ends with: Returns true or false based on whether the string input ends with the specified substring.
Length: Returns the number of items in the specified string or array.
Lowercase: Returns a string in lowercase format.
Name: Returns the local name of the selector node, which is useful when you want to retrieve the name of the incoming message component, not the value.
Regular expression matches: Returns true or false based on whether the string input matches the specified regular expression.
Regular expression replace: Returns a string created from the string input by using a given regular expression to find and replace matching substrings with the specified string.
Replace: Replaces a substring with the specified string and return the new complete string.
Starts with: Returns true if the given string starts with the specified substring.
String to codepoints: Converts the specified string to codepoints.
Substring: Returns characters from the specified string, starting from the specified position.
Substring after: Returns the characters that follow the specified substring in the source string.
Substring before: Returns the characters that precede the specified substring in the source string.
Trim: Returns the specified string with all the leading and trailing white space characters removed.
Trim left: Returns the specified string with all the leading white space characters removed.
Trim right: Returns the specified string with all the trailing white space characters removed.
Uppercase: Returns a string in uppercase format.
In this video, we will see each of these String Functions in action. For each one, we will provide simple input data, and we will see what the expected output is.
Hope you find this helpful! So, if you liked the content or found it useful and want to help me write more, you can buy (or help buy) my son a Star Wars Lego!
Author: Sandro Pereira
Sandro Pereira lives in Portugal and works as a consultant at DevScope. In the past years, he has been working on implementing Integration scenarios both on-premises and cloud for various clients, each with different scenarios from a technical point of view, size, and criticality, using Microsoft Azure, Microsoft BizTalk Server and different technologies like AS2, EDI, RosettaNet, SAP, TIBCO etc.
He is a regular blogger, international speaker, and technical reviewer of several BizTalk books all focused on Integration. He is also the author of the book “BizTalk Mapping Patterns & Best Practices”. He has been awarded MVP since 2011 for his contributions to the integration community.
View all posts by Sandro Pereira