Do you feel difficult to keep up to date on all the frequent updates and announcements in the Microsoft Integration platform and Azure iPaaS?
Integration weekly updates can be your solution. It’s a weekly update on the topics related to Integration – enterprise integration, robust & scalable messaging capabilities and Citizen Integration capabilities empowered by Microsoft platform to deliver value to the business.
A few months ago I was involved in an integration project that required sending files to a local file system, that resided in an Azure VM.
This was a bit of an issue, because we had to use the ISE connector and it was in Preview at the time, we had to do a Proof-of-concept and make sure it worked properly.
It all went well, the integration went live and the client was happy.
A couple weeks ago, Michael Stephenson asked for my help, to solve an issue that he was having. The problem was on how to send files to another system.
Now, in an operative system, you’d just move the file over by code or using the UI. But in the integration with Logic Apps, what came out was a JSON message.
Of course you can copy files over to another Azure storage, but in this particular case, we were pulling files with a webservice and dropping them into a local VM. The OOTB connectors help, but they don’t create the file object on their own.
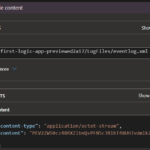
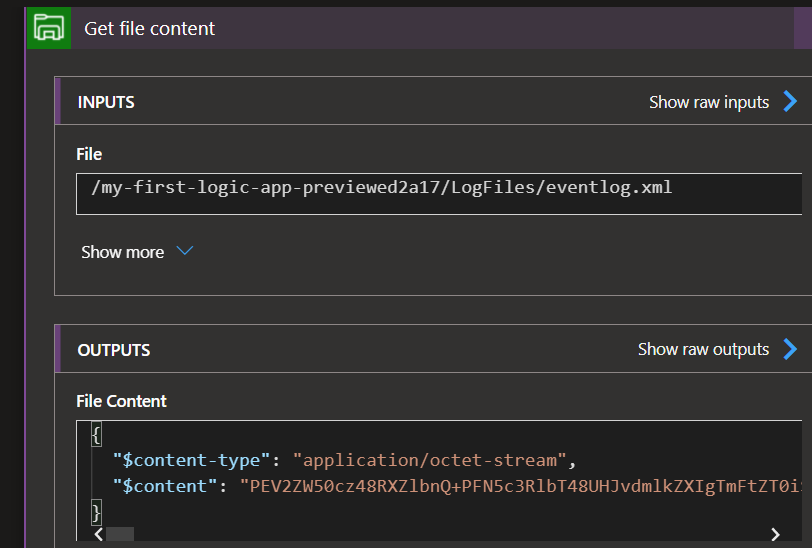
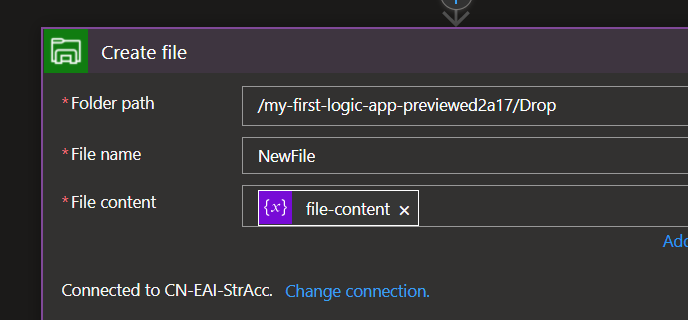
In my example, I’m using an Azure File Storage connector to get the file content. It mimics a Webservice where you’d get the same content. In this case, we’re also getting the content-type in the response.
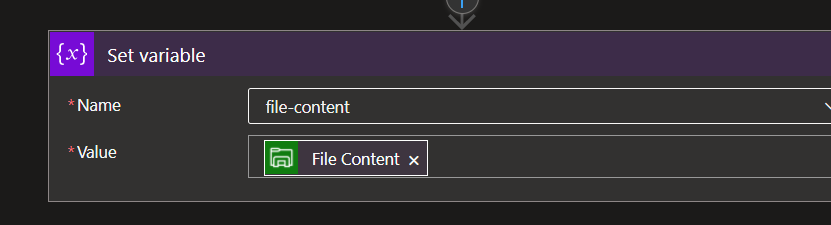
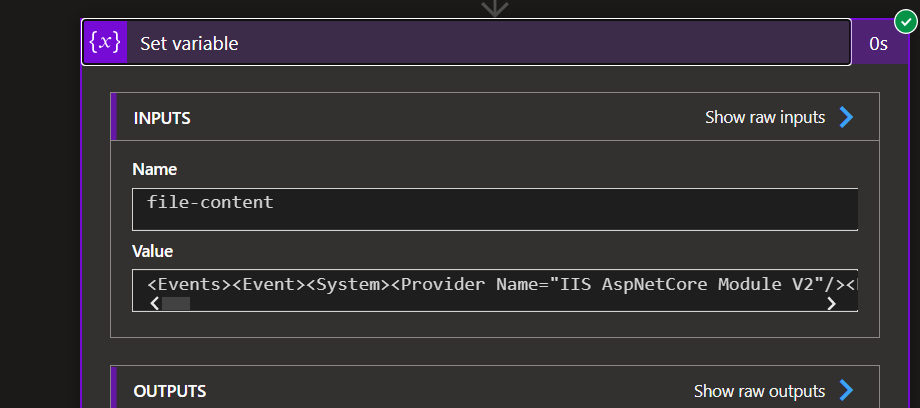
If we set the File content to a variable, it will just send, well, the content itself. In my example, it’s a XML log file, so it’s actually translating the Base64 into a XML string, which is interesting. It might not be properly formatted, but it’s a string at the end of the day, instead of its Base64 representation.
So, we pick up the file, assign the string to a String object and set it to create in the end system.
This works, but creates a string file but this is not what we wanted. We also need to keep the MIME type of the file.
I’ve searched for help in how to achieve this, but there’s no information about it. This is quite shocking, because it almost sounds like Microsoft doesn’t want you to know how to do this or they didn’t took the time to document this.
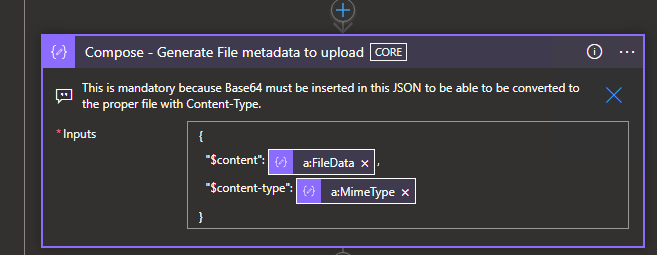
The good thing, is that it’s quite simple to do this. The JSON object we need to create is extremely simple and very easy to understand how it works.
Let’s get another example. In this case, we have a SOAP web service that returns an array of fields, one of them being the Base64 for the file and the MIME type. This is the perfect example of our issue. As I’ve said before, if I just set the FileData field to a variable, it will end up in sending the string to a file, not caring about what type of file it is.
So, grab those fields into a JSON Parse action, we’re about to jingle some files into your system.
Create a Compose action and…
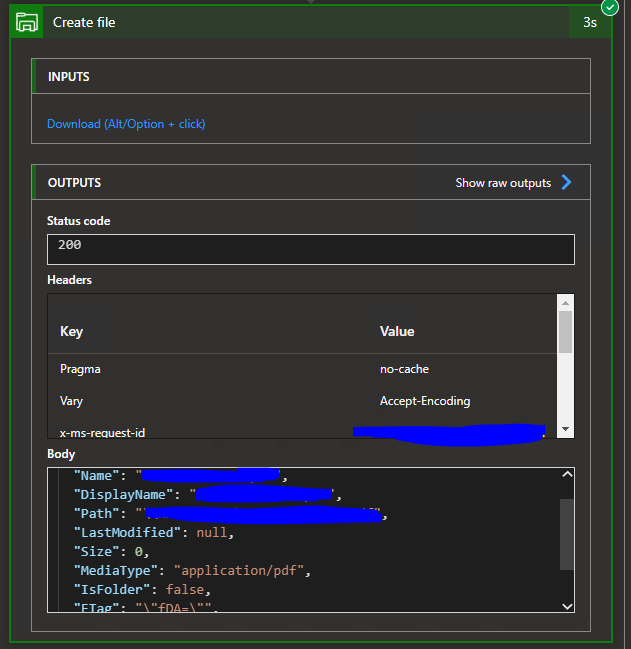
TA-Daaa! You just need to add a $content and $content-type fields in a JSON object and it will create your file.
It’s this easy!
It’s interesting that the GetFile connector provides the answer we needed, but as I’ve said, there’s no actual guide lines for this. There might be a few other metadata fields you can set for a file, I haven’t explored this yet, but it makes sense to be able to do it.
I hope this helps you and takes away one headache before Christmas.
Do you feel difficult to keep up to date on all the frequent updates and announcements in the Microsoft Integration platform and Azure iPaaS?
Integration weekly updates can be your solution. It’s a weekly update on the topics related to Integration – enterprise integration, robust & scalable messaging capabilities and Citizen Integration capabilities empowered by Microsoft platform to deliver value to the business.
Recently I developed a custom file adapter called FILE-Z adapter that I blogged on the BizTalk360 blog. This is an adapter created from the original idea of my dear friend Nino Crudele. It is a custom File adapter capable of reading empty files.
You can see his original blog post here: BizTalk and zero byte file. And you can download the FILE-Z adapter here: FILE-Z adapter GitHub page.
But while I was searching about this adapter, I found an interesting blog post from Yan (Pamela) Yang where she described a different scenario. Some systems can create empty files without locking them. Then, they grab the files again and write some data to them. However, this behavior may cause problems with the default BizTalk Server FILE adapter. For example, the adapter may grab the file AFTER the system creates the empty file, but BEFORE the system attempts to write to it, causing integration issues. Or, in other cases, we may not want to pick up that empty files.
You may also know that the native FILE adapter released with BizTalk grabs and deletes all zero-byte (empty) files without triggering any associated processes. Instead, it logs a warning or error saying that:
The FILE receive adapter deleted the empty file “dir:<folder><file-name>” without performing any processing.
This behavior, according to Microsoft, is by design. Though you can argue that it is not consistent how different adapters treat empty files, e.g., FTP adapter can transfer empty files with no problem.
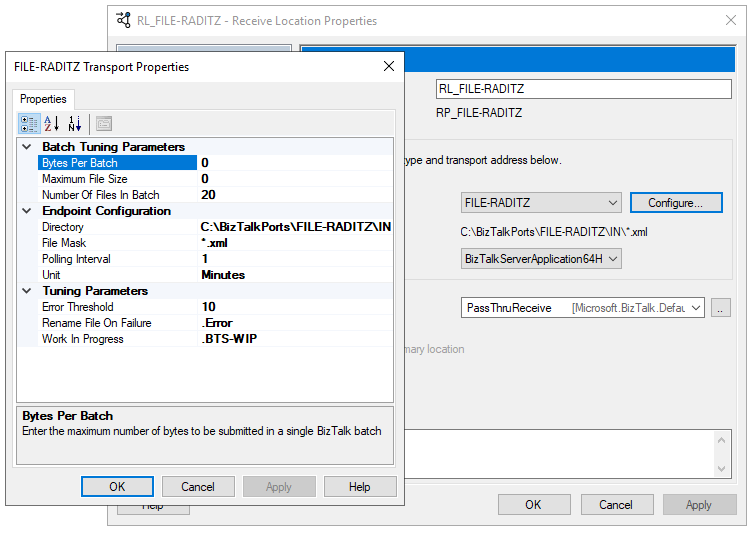
The File-RADITZ adapter is, kind of, the arch-enemy of the File-Z Adapter. This adapter doesn’t pick up or process empty (zero-byte) files. Instead, it leaves the empty files in the original folder.
I decided to create or recreate this adapter based on Yan Yang scenario just for fun and for mentoring how you can create your custom File adapter by making use of:
DotNet File Adapter sample source code that was available on previous versions of the BizTalk Server SDK
This adapter can be used as a Receive Adapter or as a Send Adapter.
Why the name File-RADITZ?
Well, I named the other adapter FILE-Z because it meant to mean File-Zero, but in reality, because I was a massive fan of Dragon Ball Z :). As I mentioned before, this adapter is, kind of, the arch-enemy of the File-Z Adapter. So, making the idea for a better name, I named it based on a memorable Dragon Ball villain: Raditz, that was one of the first enemy encounters in Dragon Ball Z.
How to install it?
If you want to install the BizTalk Server FILE-RADITZ Adapter, you need to:
Place the folder BizTalkFileRADITZAdapter on any location on your BizTalk Server box. I will recommend to put it in:
C:Program Files (x86)
Note: if you put in any other path you need to modify the StaticAdapterManagement.reg file
Access the folder and double-click on the StaticAdapterManagement.reg file
This will register the adapter to run under 32-bit host instances. To make it available also for 64-bits, you need to:
Click Start
Type %windir%SysWoW64cmd.exe in the search box and press enter
Run the same adapter registry (.reg) file from this command prompt
Now you just need to add this adapter to the BizTalk Server Administration Console:
Open BizTalk Administration Console by pressing the Windows key to switch to the Start menu, type BizTalk Server Administration or BizTalk, click the BizTalk Server Administration option from the Search window.
In the console left tree, expand BizTalk Server Administration à BizTalk Group à Platform Settings and then Adapters.
In the Adapter Properties
In the Name box, type a descriptive name for this adapter.
FILE-RADITZ
In the Adapter combo box, select the adapter from the drop-down that you want to add.
FILE-RADITZ
In the Description box, type a description for the adapter (this is optional).
BizTalk Server File Adapter that is able to process all files except empty (zero byte) files.
Click OK to complete the process of adding the adapter.
Where can you use it?
This version available on GitHub is currently compiled on .NET 4.7.2 and optimized for BizTalk Server 2020. Nevertheless, you can take this code and compile it in other versions of .NET and BizTalk Server. It will be 100% compatible.
Download
THIS ADAPTER IS PROVIDED “AS IS”, WITHOUT WARRANTY OF ANY KIND.
You can download the BizTalk Server FILE-RADITZ Adapter from GitHub here:
Do you feel difficult to keep up to date on all the frequent updates and announcements in the Microsoft Integration platform and Azure iPaaS?
Integration weekly updates can be your solution. It’s a weekly update on the topics related to Integration – enterprise integration, robust & scalable messaging capabilities and Citizen Integration capabilities empowered by Microsoft platform to deliver value to the business.
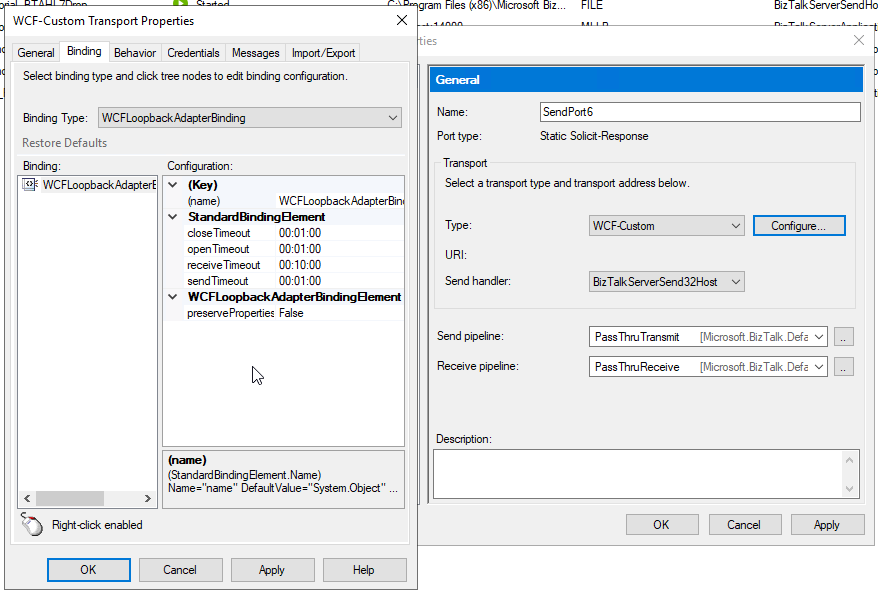
Unfortunately, some good BizTalk Server resources have disappeared over these years, and they are no longer available. A lot of these resources are custom adapters. One of these adapters was the BizTalk WCF Loopback Adapter initially developed by synthesis consulting (I think), providing back then the source code.
What is the WCF-Loopback Adapter?
The Loopback adapter is simply a two-way send adapter that, in its essence, returns a copy of the outbound message. This capability can be used in several situations or scenarios:
One of them is to replace the need to call pipelines inside an orchestration. Calling pipelines inside orchestrations is a good option, but it complicates the logic of the orchestrations with loops and expressions. You’ll also end up repeating the “code” for each message type/orchestration.
And when it comes back in without the overhead of some repository.
I was recently doing a proof-of-concept at a client, and I needed to invoke a receive pipeline inside the orchestration. That approach worked fine, but it feels like a static black hole that you don’t know is there, and if there is a need to apply any changes, you need to redeploy the orchestration. You cannot simply modify a setting on the pipeline. So, I decide to use the Loopback adapter to recreate the same experience implementing a different approach. Unfortunately, this adapter was no longer available for download, and all the references were wiped out from the face of the Earth. Luckily, I had some old print screens on my vast list of internal resources, and I decided to create a new version of this WCF adapter (king of re-creating) and make this WCF adapter available again.
It was also a good training experience to create a WCF Adapter.
How to install it?
This is a WCF adapter, so installing this adapter is the same as installing any other BizTalk Server WCF extension. And you have two options:
Using the machine.config files – This is the most complicated option, but it is the one I prefer to use;;
Or using the availability of registring WCF extensions on the receive and send handlers will not explain this approach.
You can choose to register this WCF adapter to run under 32-bit host instances, 64-bit host instances, or of course, both.
Open the machine.config present on the folder: C:WindowsMicrosoft.NETFrameworkv4.0.30319Config
I will also recomend, not mandatory, to change also the machine.config present on the folder: C:WindowsMicrosoft.NETFrameworkv2.0.50727CONFIG
To run under 64-bit host instances
Open the machine.config present on the folder: C:WindowsMicrosoft.NETFramework64v4.0.30319Config
I will also recomend, not mandatory, to change also the machine.config present on the folder: C:WindowsMicrosoft.NETFramework64v2.0.50727CONFIG
Restart the services.
Where can you use it?
This version available on GitHub is currently compiled on .NET 4.7.2 and optimized for BizTalk Server 2020. Nevertheless, you can take this code and compile it in other versions of .NET and BizTalk Server. It will be 100% compatible.
Download
THIS ADAPTER IS PROVIDED “AS IS”, WITHOUT WARRANTY OF ANY KIND.
You can download the BizTalk Server WCF-Loopback Adapter from GitHub here:
Do you feel difficult to keep up to date on all the frequent updates and announcements in the Microsoft Integration platform and Azure iPaaS?
Integration weekly updates can be your solution. It’s a weekly update on the topics related to Integration – enterprise integration, robust & scalable messaging capabilities and Citizen Integration capabilities empowered by Microsoft platform to deliver value to the business.
Today I’m going to go over how we solved a real scenario from one of our PowerBI Portal clients. For those who aren’t familiar with it, PowerBI Portal is a web tool that allows organizations to host an unlimited number of Power BI reports and dashboards on an online portal, and give access to it to any number of users, regardless of being in their organization or even having a Power BI account. PowerBI Portal is mainly used by organizations looking to share data with their clients, partners and suppliers, but there have been numerous entrepreneurial cases of people using it as a platform, selling their clients access to the portal or charging for the time they spent on PowerBI Portal.
Other interesting points about PowerBI Portal are the tool’s double layer of row-level security (user and role), which allows data managers to specify who has access to what, and the ability to only consume Power BI Embedded capacity when there’s activity on the platform, which can severely reduce an organization’s consumption bill.
Finally, it’s worth mentioning how flexible the PowerBI Portal API is, allowing for custom solutions such as the one we’ll cover in this blog post.
Challenge
Our PowerBI Portal client wanted a daily report of the top 10 vendors that accessed their organization’s portal along with the most viewed dashboards/reports to better understand how the tool was being used and by whom. The PowerBI Portal API is actually very powerful and straightforward to use, but it didn’t have this capability out-of-the-box so we proactively extend the product’s capabilities by using Azure Integration Services.
This proof-of-concept will explain how you can extend the product by using the existing APIs and creating a fancy Power BI access on the PowerBI Portal audit report.
Create Function App
If you don’t have yet a Function App with the .NET runtime stack created, the first step is to create one, and for that, you need to:
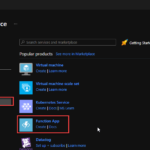
From the Azure portal menu or the Home page, select Create a resource.
In the Create a resource page, select Compute > Function App.
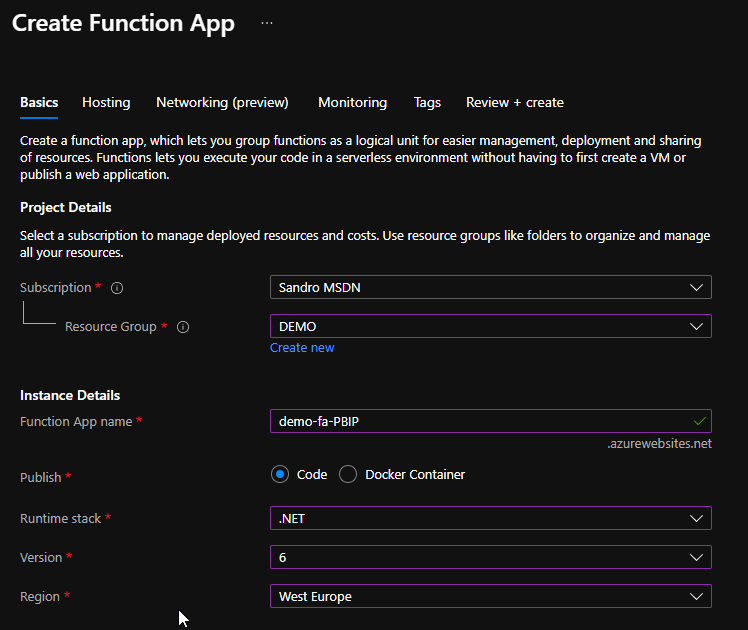
On the Create Function App Basics page, use the following function app settings:
Subscription: Select the subscription under which this new function app is created.
Resource Group: Select an existing Resource Group or create a new one in which your function app will be created.
Function App name: Name that identifies your new function app.
Publish: Select Code.
Runtime stack: Select the option .NET
Version: Choose the version of your installed runtime, in this case, 6
Region: Choose a region near you or near other services your functions access.
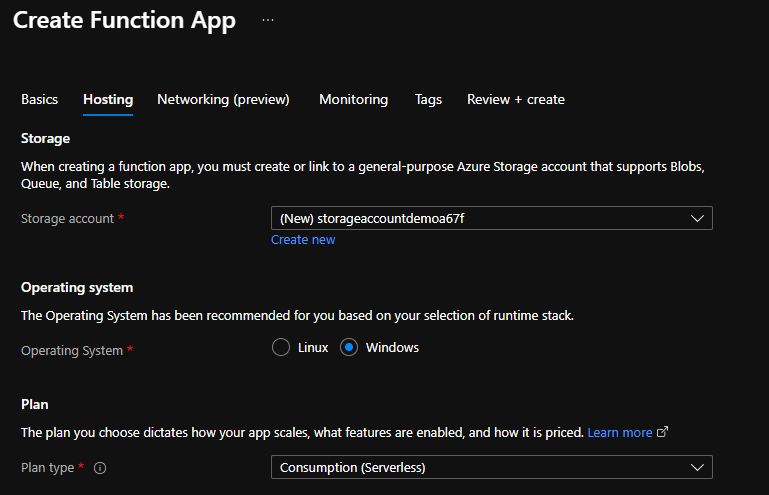
Select Next : Hosting. On the Hosting page, enter the following settings:
Storage Account: Create a storage account used by your function app or select an existing one
Operating system: I choose to use Windows since I’m feeling more comfortable with it.
Plan: Hosting plan that defines how resources are allocated to your function app. In this case, you need to select the Consumption plan.
You can customize the other option according to your intentions or leave the default values. For this demo, we will now select Review + create to review the app configuration selections.
On the Review + create page, review your settings, and then select Create to provision and deploy the function app.
Create HTTP trigger function
The next step is to create two HTTP trigger Function:
FA_Audit_Top10Reports
FA_Audit_Top10USers
For that we need to:
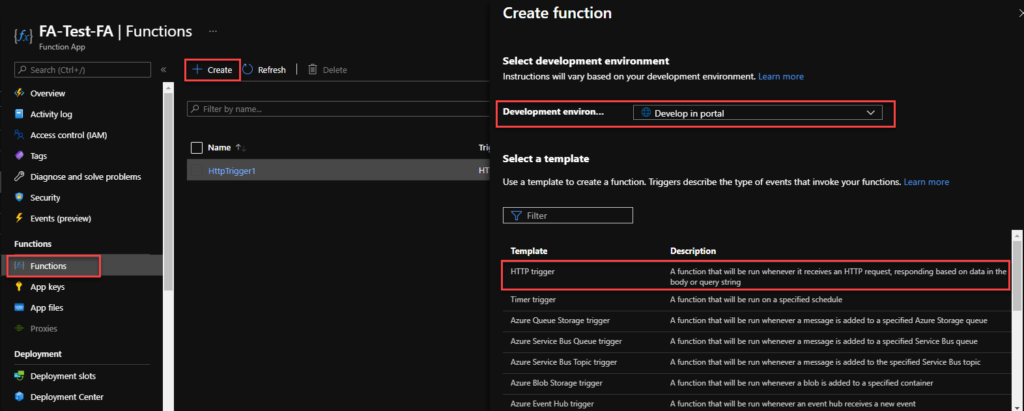
From the left menu of the Function App window, select Functions, then select Create from the top menu.
From the Create Function window, leave the Development environment property as Develop in portal and select the HTTP trigger template.
Under Template details give a proper name for New Function, and choose Function from the Authorization level drop-down list, and then select Create.
On the FA_Audit_Top10Reports window, select Code + Test, then on the run.ps1 file add the following code:
This function will return a list of top 10 reports in a HTML table format
...
string requestBody = new StreamReader(req.Body).ReadToEnd();
JArray data = (JArray)JsonConvert.DeserializeObject(requestBody);
var apiReport = new JArray();
var groups = data
.GroupBy(s => s["name"])
.Select(s => new
{
Dashboard = s.Key,
Count = s.Count()
})
.OrderByDescending(s=> s.Count).Take(10);
...
Note: this is a small part of the code. Click on the button below to download a simplified version of the source code from the overall solution.
On the FA_Audit_Top10USers window, select Code + Test, then on the run.ps1 file add the following code:
This function will return a list of top 10 users in a HTML table format
...
string requestBody = new StreamReader(req.Body).ReadToEnd();
JArray data = (JArray)JsonConvert.DeserializeObject(requestBody);
var apiReport = new JArray();
var groups = data
.GroupBy(s => s["userEmail"])
.Select(s => new
{
User = s.Key,
Count = s.Count()
})
.OrderByDescending(s=> s.Count).Take(10);
...
Note: this is a small part of the code. Click on the button below to download a simplified version of the source code from the overall solution.
Finally, we need to create a scheduling Logic App to trigger the monitoring Function and notify if any API Connection is broken. To simplify the solution, we will be using the Azure Portal to create also the Logic App.
From the Azure portal menu or the Home page, select Create a resource.
In the Create a resource page, select Integration > Logic App.
On the Create Logic App Basics page, use the following Logic app settings:
Subscription: Select the subscription under which this new Logic app is created.
Resource Group: Select an existing Resource Group or create a new one in which your Logic app will be created.
Type: The logic app resource type and billing model to use for your resource, in this case we will be using Consumption
Consumption: This logic app resource type runs in global, multi-tenant Azure Logic Apps and uses the Consumption billing model.
Standard: This logic app resource type runs in single-tenant Azure Logic Apps and uses the Standard billing model.
Logic App name: Your logic app resource name, which must be unique across regions.
Region: The Azure datacenter region where to store your app’s information. Choose a region near you or near other services your Logic app access.
Enable log analytics: Change this option only when you want to enable diagnostic logging. The default value in No.
When you’re ready, select Review + Create. On the validation page, confirm the details that you provided, and select Create.
After Azure successfully deploys your app, select Go to resource. Or, find and select your logic app resource by typing the name in the Azure search box.
Under Templates, select Blank Logic App. After you select the template, the designer now shows an empty workflow surface.
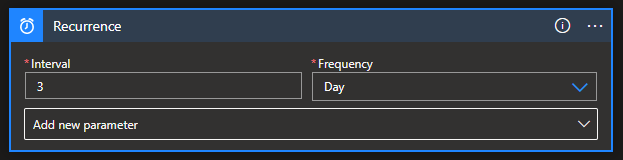
In the workflow designer, under the search box, select Built-In. From the Triggers list, select the Schedule trigger, Recurrence.
In the trigger details, provide the following information:
Interval: 1
Frequency: Day
Under the Recurrence trigger, select New step.
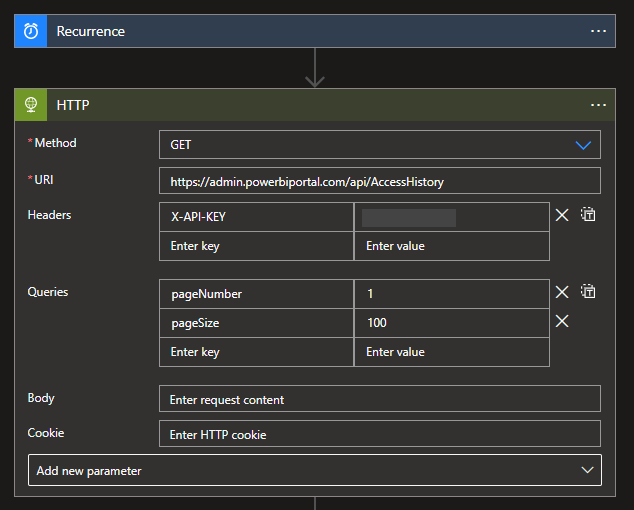
Select New step. In the search box, enter HTTP, and from the result panel select the HTTP, HTTP action and provide the following information:
Headers: you need to create the X-API-KEY with your access token
Queries: you need to specify two query parameters:
pageNumber: 1
pageSize: 100
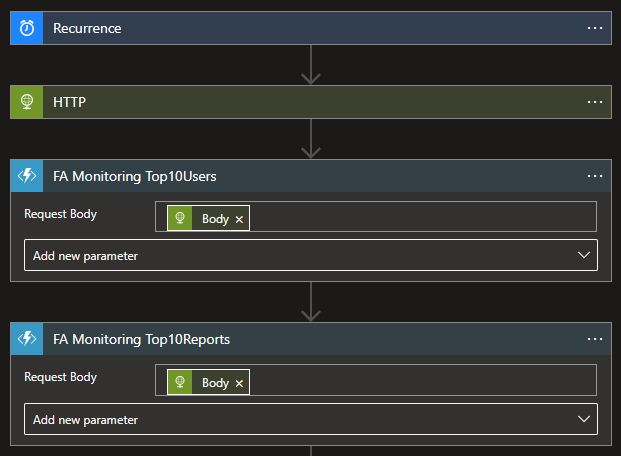
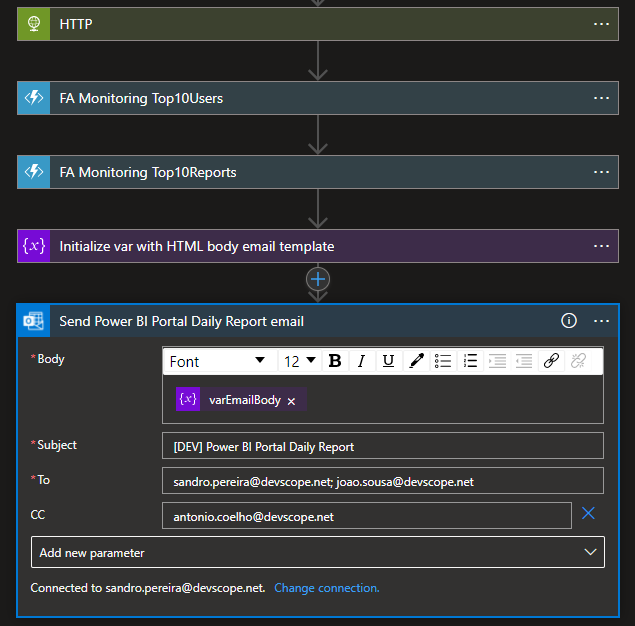
Select New step. In the search box, enter Azure Functions, and from the result panel select the Azure Functions, select the Function App that contains the Functions we create above and then select the FA_Audit_Top10Users function and provide the following information
Request Body: Result body of the HTTP action – @{body(‘HTTP’)}
Do the same steps, this time for the FA_Audit_Top10Reports function
Select New step. In the search box, enter Variables, and from the result panel select the Variables, Initialize variable action and provide the following information:
Name: varEmailBody
Type: String
Value: provide the HTML email body template and add the result of the functions to that template
Note: this is a small part of the HTML body template code. You should customize it according to your needs.
And finally, select New step. In the search box, enter Office 365 Outlook, and from the result panel select the Office 365 Outlook, Send an email (v2)action and provide the following information:
Body: varEmailBody – @{variables(‘varEmailBody’)}
Subject: [DEV] Power BI Portal Daily Report
To: list of your email addresses.
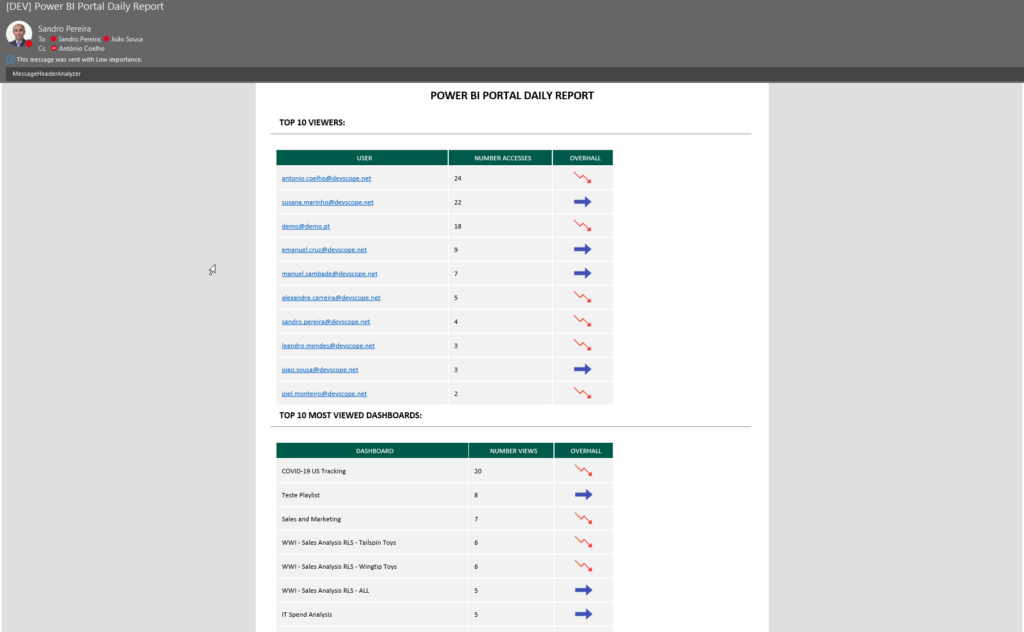
The result, once you try to execute the Logic App, will be a fancy HTML email:
More about Power BI Portal
PowerBI Portal is a web tool that allows users to embed any number of Power BI reports and dashboards on a portal with their organization’s layout, that can be shared with whoever they want, regardless of being in their organization or even having a Power BI account. Know more about it here.
We finally reach the last part of this small blog season on monitoring the status of your Azure API Connections. We start by using a simple PowerShell script locally on our machine to progress to an automated way using Azure Function Apps and Logic Apps. I mentioned in my last post that this previous option had a considerable handicap associated with costs since we couldn’t use the Consumption plan, and instead, we had to use an App Service plan.
Today we will go to address the best solution in my personal opinion:
Using a Schedule PowerShell Runbook on an Automation Account to check the Azure API Connection status
And once again, using a Logic App, this time with an HTTP- When a HTTP request is received trigger, to notify the internal support team if any findings (broken API Connections) were detected.
Note: the Logic App will only be triggered if the Runbook detects/find any non-coherent situations.
Solution 3: Using Automation Account and Logic App
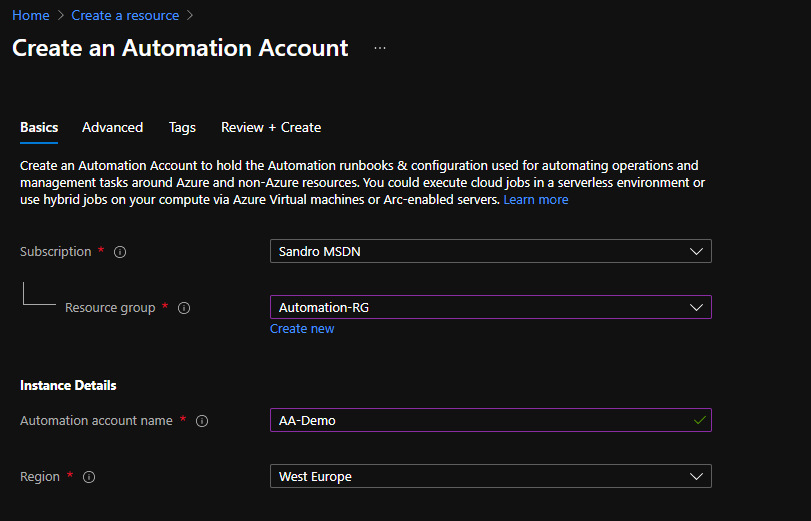
Create Automation Account
The first step, if you don’t have an Automation account yet, is to create one, and for that, you need:
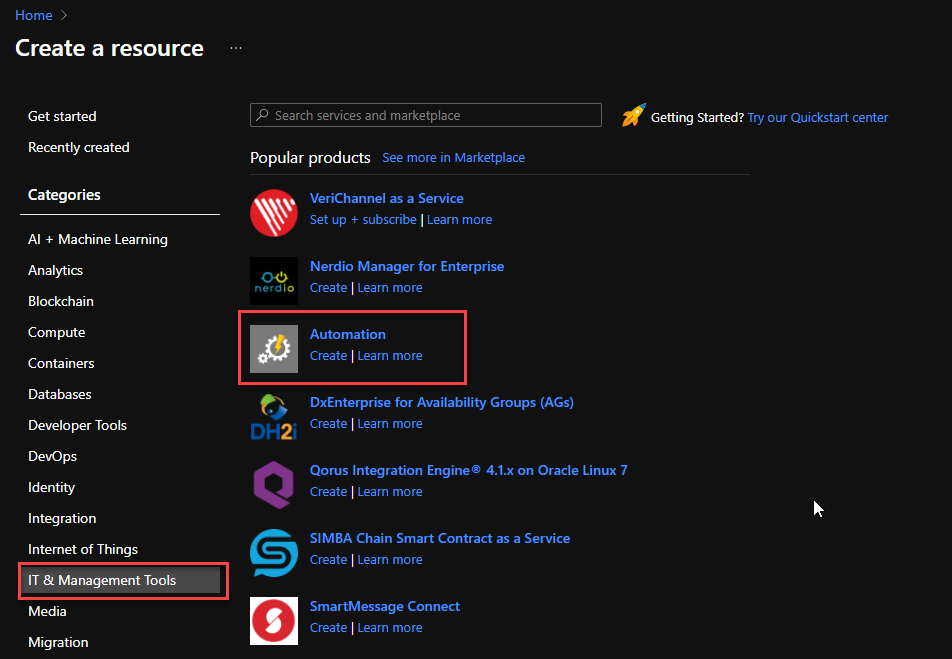
From the Azure portal menu or the Home page, select Create a resource.
In the Create a resource page, select IT & Management Tools > Automation.
On the Create an Automation Account Basics page, use the following settings:
Subscription: Select the subscription under which this new Automation Account will be created.
Resource Group: Select an existing Resource Group or create a new one in which your Automation Account will be created.
Automation account name: Name that identifies your new Automation Account.
Region: Choose a region near you or near other services your Automation Account access.
You can customize the other option according to your intentions or leave the default values. For this demo, we will now select Review + create to review the app configuration selections.
On the Review + create page, review your settings, and then select Create to provision and deploy the Automation Account.
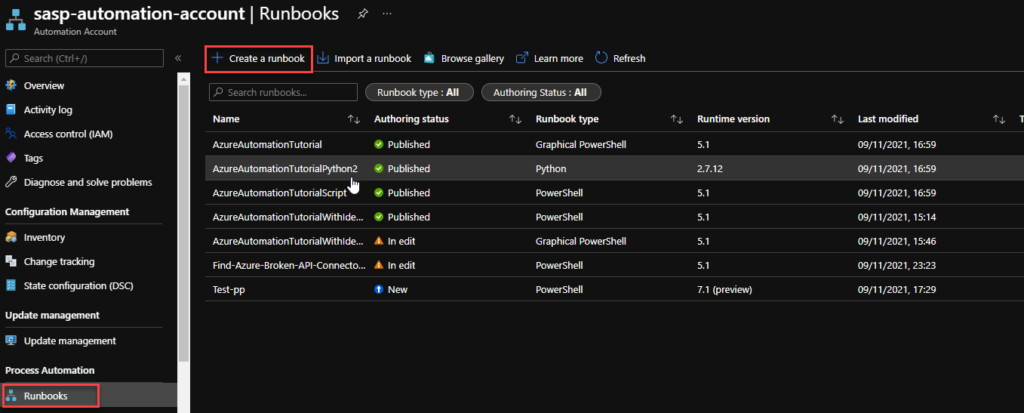
Create Automation PowerShell runbook
The next step is to create a PowerShell runbook. For that, you need to:
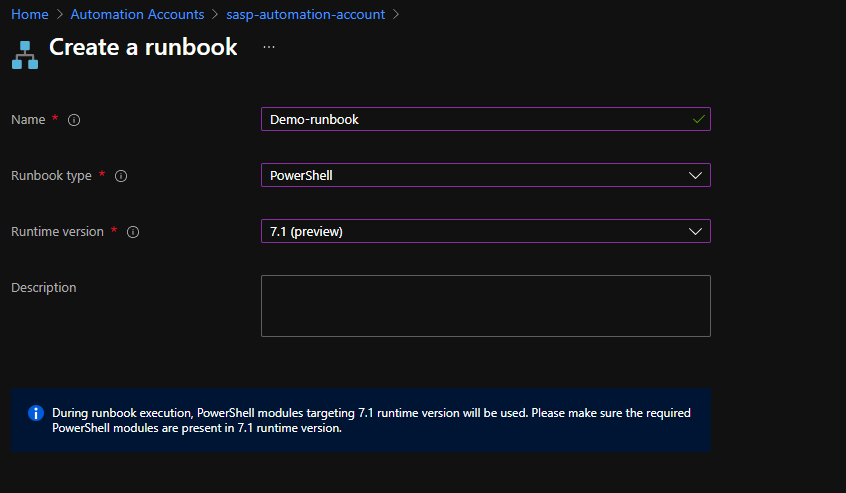
From the left menu of the Automation Account window, select Runbooks, then select Create a runbook from the top menu.
From the Create a runbook window, use the following settings:
Name: Name the runbook
Runbook type: From the Runbook type drop-down menu, select PowerShell.
Runtime version: From the Runtime time drop-down menu, select 7.1 (preview).
Description: Provide a description for this runbook (not mandatory filed)
Finally if everything works properly you can publish the runbook.
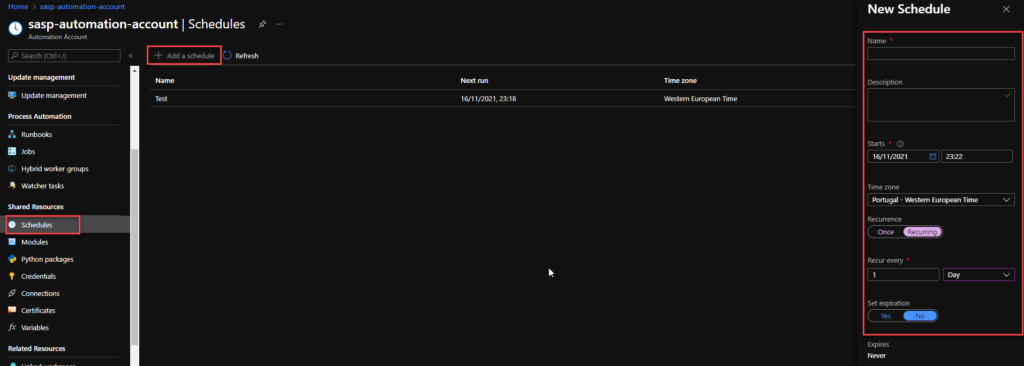
Now we need to schedule the runbook. For that, we need:
From the left menu of the Automation Account window, select Schedules, then select Add a schedule from the top menu.
From the New Schedule window, use the following settings:
Name: Name of the Schedule
Description: Provide a description for this schedule (not mandatory filed)
Starts: Datetime to start the schedule
Time zone: Time zone configured for this schedule, in my case Portugal – Western European Time
Recurrence: Select whether the schedule runs once or on a reoccurring schedule by selecting Once or Recurring. We are going to use Recurring
If you select Once, specify a start time and then select Create.
If you select Recurring, specify a start time.
Recur every: select how often you want the runbook to repeat. Select by hour, day, week, or month. In hour case, 1 per day
Set expiration: Leave the default property, No.
When you’re finished, select Create.
Now that we have our runbook and our schedule created, we need to bind these two, and for that, we need to:
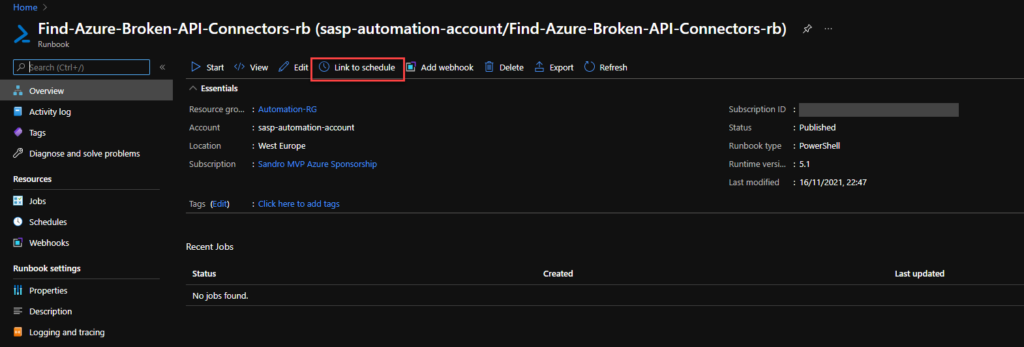
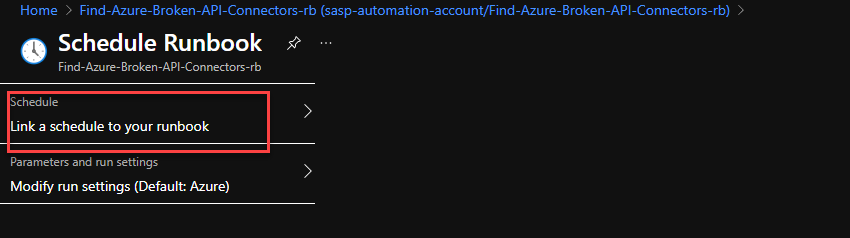
Access to the previous runbook the we create above, and on the runbook page select Link to schedule
On the Schedule Runbook page, select Link a schedule to your runbook.
On the Schedule page, select the schedule we create above from the schedule list
And then select OK.
Create a Logic App
Finally, we need to create a Logic App with an HTTP- When a HTTP request is received trigger to notify if any API Connection is broken. To simplify the solution, we will be using the Azure Portal to create also the Logic App.
Note: once again, the Logic App will only be triggered if the Runbook detects/finds any non-coherent situations..
To accomplish that, we need to:
From the Azure portal menu or the Home page, select Create a resource.
In the Create a resource page, select Integration > Logic App.
On the Create Logic App Basics page, use the following Logic app settings:
Subscription: Select the subscription under which this new Logic app is created.
Resource Group: Select an existing Resource Group or create a new one in which your Logic app will be created.
Type: The logic app resource type and billing model to use for your resource, in this case we will be using Consumption
Consumption: This logic app resource type runs in global, multi-tenant Azure Logic Apps and uses the Consumption billing model.
Standard: This logic app resource type runs in single-tenant Azure Logic Apps and uses the Standard billing model.
Logic App name: Your logic app resource name, which must be unique across regions.
Region: The Azure datacenter region where to store your app’s information. Choose a region near you or near other services your Logic app access.
Enable log analytics: Change this option only when you want to enable diagnostic logging. The default value in No.
When you’re ready, select Review + Create. On the validation page, confirm the details that you provided, and select Create.
After Azure successfully deploys your app, select Go to resource. Or, find and select your logic app resource by typing the name in the Azure search box.
Under Templates, select Blank Logic App. After you select the template, the designer now shows an empty workflow surface.
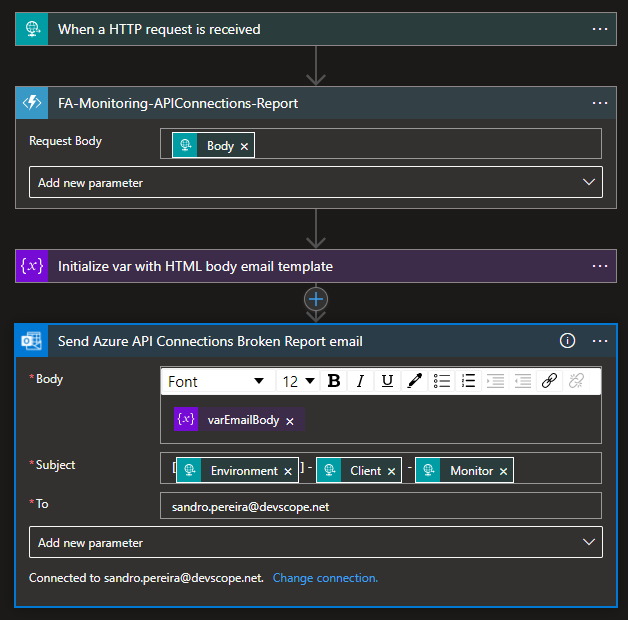
In the workflow designer, under the search box, select Built-In. From the Triggers list, select the Request connector, and the When a HTTP request is received trigger.
Use the following sample payload to generate the schema
Then we be using the following actions to notify the support team:
Choose an Azure function: I’m calling and Azure Function to transform the list of broken API’s in a HTML table.
Set variable: I’m setting the varEmailBody with my default HTML email body Template and add the HTML table that the Azure Function returned
Send an email (v2) – Office 365 Outlook: To send the email to the support team
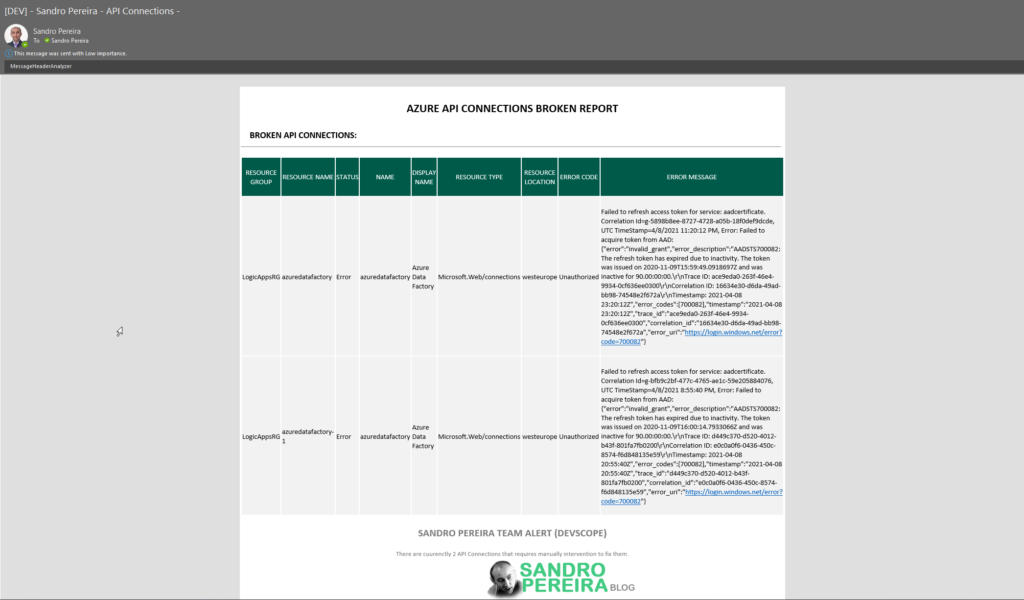
The result, once you try to execute the Logic App, will be a fancy HTML email:
Although this approach required quick learning about Azure Automation, that was quite simple, and for me, this is the best approach in terms of cost and architecture design.