Today I’m going to go over how we solved a real scenario from one of our PowerBI Portal clients. For those who aren’t familiar with it, PowerBI Portal is a web tool that allows organizations to host an unlimited number of Power BI reports and dashboards on an online portal, and give access to it to any number of users, regardless of being in their organization or even having a Power BI account. PowerBI Portal is mainly used by organizations looking to share data with their clients, partners and suppliers, but there have been numerous entrepreneurial cases of people using it as a platform, selling their clients access to the portal or charging for the time they spent on PowerBI Portal.
Other interesting points about PowerBI Portal are the tool’s double layer of row-level security (user and role), which allows data managers to specify who has access to what, and the ability to only consume Power BI Embedded capacity when there’s activity on the platform, which can severely reduce an organization’s consumption bill.
Finally, it’s worth mentioning how flexible the PowerBI Portal API is, allowing for custom solutions such as the one we’ll cover in this blog post.
Challenge
Our PowerBI Portal client wanted a daily report of the top 10 vendors that accessed their organization’s portal along with the most viewed dashboards/reports to better understand how the tool was being used and by whom. The PowerBI Portal API is actually very powerful and straightforward to use, but it didn’t have this capability out-of-the-box so we proactively extend the product’s capabilities by using Azure Integration Services.
This proof-of-concept will explain how you can extend the product by using the existing APIs and creating a fancy Power BI access on the PowerBI Portal audit report.
Create Function App
If you don’t have yet a Function App with the .NET runtime stack created, the first step is to create one, and for that, you need to:
- From the Azure portal menu or the Home page, select Create a resource.
- In the Create a resource page, select Compute > Function App.

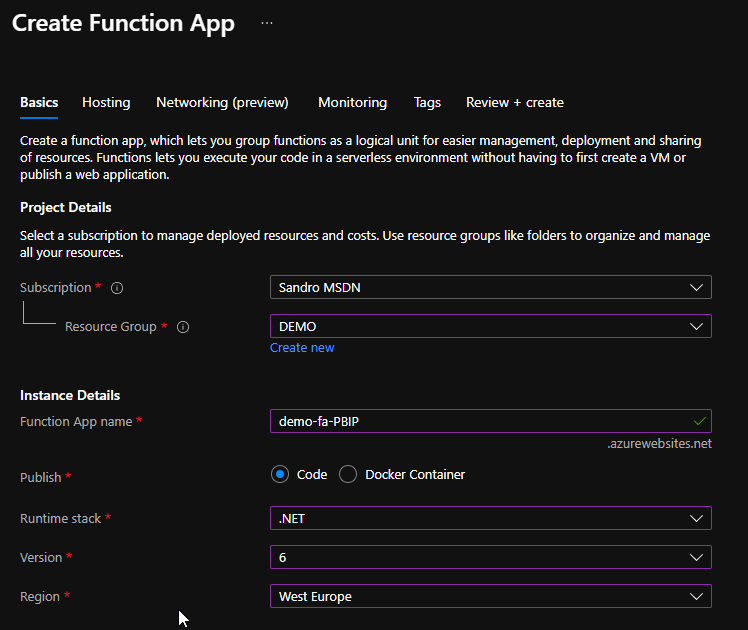
- On the Create Function App Basics page, use the following function app settings:
- Subscription: Select the subscription under which this new function app is created.
- Resource Group: Select an existing Resource Group or create a new one in which your function app will be created.
- Function App name: Name that identifies your new function app.
- Publish: Select Code.
- Runtime stack: Select the option .NET
- Version: Choose the version of your installed runtime, in this case, 6
- Region: Choose a region near you or near other services your functions access.
- Select Next : Hosting. On the Hosting page, enter the following settings:
- Storage Account: Create a storage account used by your function app or select an existing one
- Operating system: I choose to use Windows since I’m feeling more comfortable with it.
- Plan: Hosting plan that defines how resources are allocated to your function app. In this case, you need to select the Consumption plan.
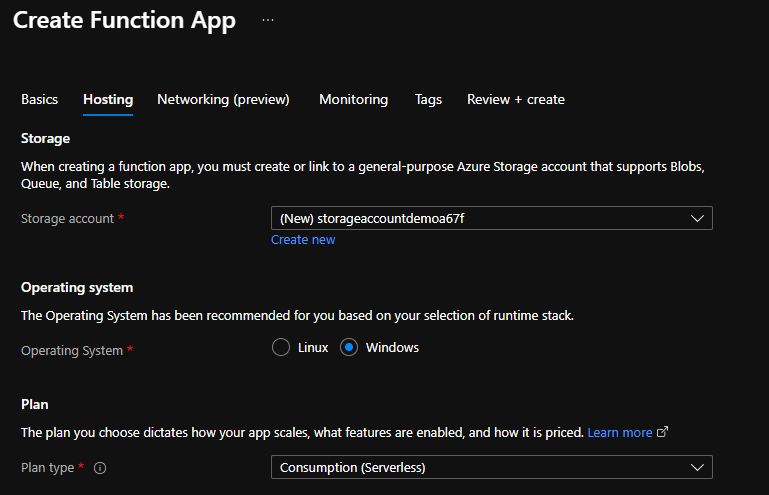
- You can customize the other option according to your intentions or leave the default values. For this demo, we will now select Review + create to review the app configuration selections.
- On the Review + create page, review your settings, and then select Create to provision and deploy the function app.
Create HTTP trigger function
The next step is to create two HTTP trigger Function:
- FA_Audit_Top10Reports
- FA_Audit_Top10USers
For that we need to:
- From the left menu of the Function App window, select Functions, then select Create from the top menu.
- From the Create Function window, leave the Development environment property as Develop in portal and select the HTTP trigger template.
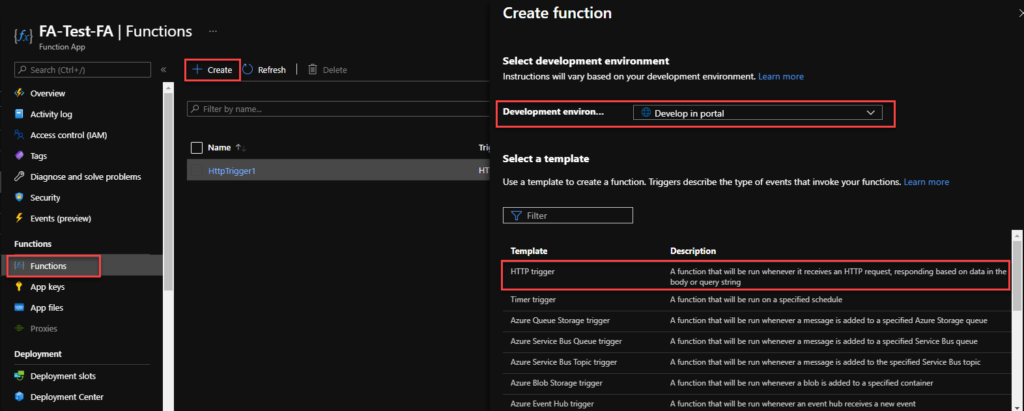
- Under Template details give a proper name for New Function, and choose Function from the Authorization level drop-down list, and then select Create.
- On the FA_Audit_Top10Reports window, select Code + Test, then on the run.ps1 file add the following code:
- This function will return a list of top 10 reports in a HTML table format
... string requestBody = new StreamReader(req.Body).ReadToEnd(); JArray data = (JArray)JsonConvert.DeserializeObject(requestBody); var apiReport = new JArray(); var groups = data .GroupBy(s => s["name"]) .Select(s => new { Dashboard = s.Key, Count = s.Count() }) .OrderByDescending(s=> s.Count).Take(10); ...Note: this is a small part of the code. Click on the button below to download a simplified version of the source code from the overall solution.
- On the FA_Audit_Top10USers window, select Code + Test, then on the run.ps1 file add the following code:
- This function will return a list of top 10 users in a HTML table format
... string requestBody = new StreamReader(req.Body).ReadToEnd(); JArray data = (JArray)JsonConvert.DeserializeObject(requestBody); var apiReport = new JArray(); var groups = data .GroupBy(s => s["userEmail"]) .Select(s => new { User = s.Key, Count = s.Count() }) .OrderByDescending(s=> s.Count).Take(10); ...Note: this is a small part of the code. Click on the button below to download a simplified version of the source code from the overall solution.
Create a Logic App
Finally, we need to create a scheduling Logic App to trigger the monitoring Function and notify if any API Connection is broken. To simplify the solution, we will be using the Azure Portal to create also the Logic App.
- From the Azure portal menu or the Home page, select Create a resource.
- In the Create a resource page, select Integration > Logic App.
- On the Create Logic App Basics page, use the following Logic app settings:
- Subscription: Select the subscription under which this new Logic app is created.
- Resource Group: Select an existing Resource Group or create a new one in which your Logic app will be created.
- Type: The logic app resource type and billing model to use for your resource, in this case we will be using Consumption
- Consumption: This logic app resource type runs in global, multi-tenant Azure Logic Apps and uses the Consumption billing model.
- Standard: This logic app resource type runs in single-tenant Azure Logic Apps and uses the Standard billing model.
- Logic App name: Your logic app resource name, which must be unique across regions.
- Region: The Azure datacenter region where to store your app’s information. Choose a region near you or near other services your Logic app access.
- Enable log analytics: Change this option only when you want to enable diagnostic logging. The default value in No.
- When you’re ready, select Review + Create. On the validation page, confirm the details that you provided, and select Create.
- After Azure successfully deploys your app, select Go to resource. Or, find and select your logic app resource by typing the name in the Azure search box.
- Under Templates, select Blank Logic App. After you select the template, the designer now shows an empty workflow surface.
- In the workflow designer, under the search box, select Built-In. From the Triggers list, select the Schedule trigger, Recurrence.
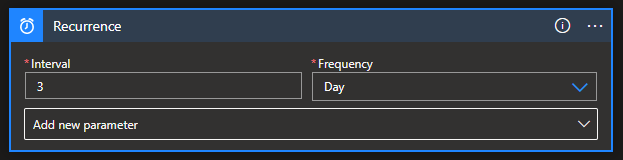
- In the trigger details, provide the following information:
- Interval: 1
- Frequency: Day
- Under the Recurrence trigger, select New step.
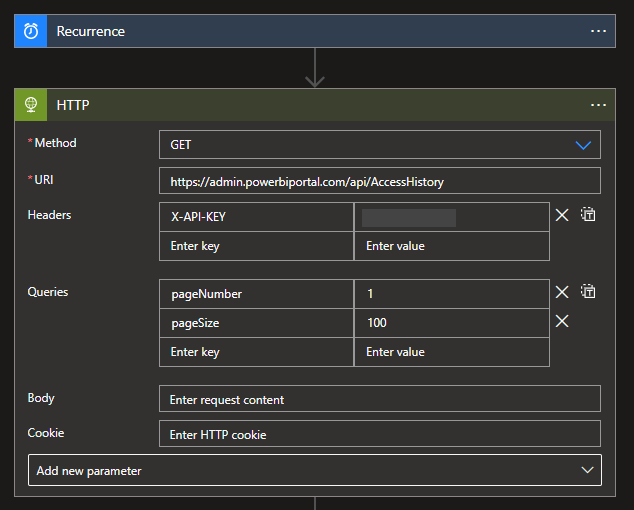
- Select New step. In the search box, enter HTTP, and from the result panel select the HTTP, HTTP action and provide the following information:
- Method: GET
- URI: specify the endpoint of PowerBI Portal API – https://admin.powerbiportal.com/api/AccessHistory
- Headers: you need to create the X-API-KEY with your access token
- Queries: you need to specify two query parameters:
- pageNumber: 1
- pageSize: 100
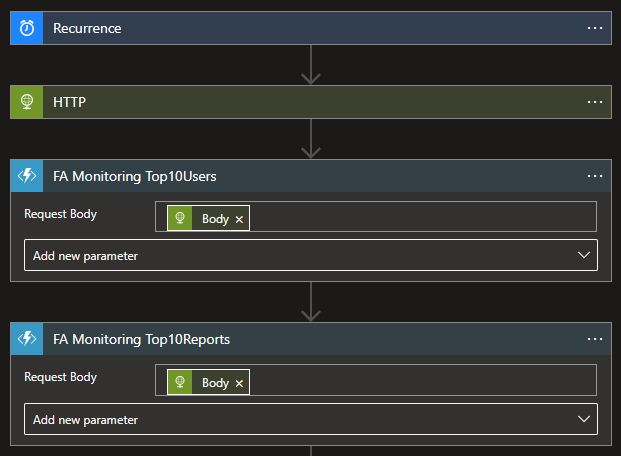
- Select New step. In the search box, enter Azure Functions, and from the result panel select the Azure Functions, select the Function App that contains the Functions we create above and then select the FA_Audit_Top10Users function and provide the following information
- Request Body: Result body of the HTTP action – @{body(‘HTTP’)}
- Do the same steps, this time for the FA_Audit_Top10Reports function
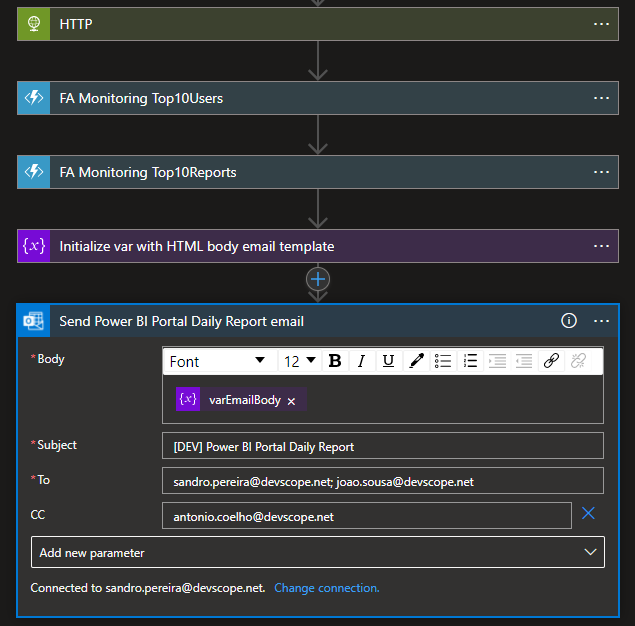
- Select New step. In the search box, enter Variables, and from the result panel select the Variables, Initialize variable action and provide the following information:
- Name: varEmailBody
- Type: String
- Value: provide the HTML email body template and add the result of the functions to that template
<!DOCTYPE html> <html> <style> .notification-body{ margin:0 auto; text-align:center; width: 1050px; border:1px black; border-collapse: collapse; background-color:#ffffff; } ... </style> <body style="background-color: #dfdfdf;"> <table style='background-color: #dfdfdf; height: 50px; width: 100%; line-height: 50px;'> <tr> <td> <p style='font-size:5.0pt;'> <span>&nbsp;</span> </p> </td> </tr> </table> ... <table style='width:992px;margin:0 auto;border-collapse:collapse;'> <tr style='height: 15px;'> <td> <table style="width:100%;"> <tr> <td class="notification-table-header" style='width:100%; height:9pt'> <p style='text-align:left; font-size:14.0pt;margin-left:5px; margin-bottom:10px;'><b>TOP 10 VIEWERS:</b></p> </td> <td style="width:auto;"></td> </tr> </table> </td> </tr> <tr> <td class="notification-table-text"> </br> <table class="table-list" style="width:70%; text-align:left;"> <tr class="table-list-header"> <td style='margin-left:10px; margin-top:5px; margin-bottom:5px;'>USER</td> <td style='margin-left:10px; margin-top:5px; margin-bottom:5px;'>NUMBER ACCESSES</td> <td style='margin-left:10px; margin-top:5px; margin-bottom:5px;'>OVERHALL</td> </tr> @{body('FA_Monitoring_Top10Users')} </table> </td> </tr> .... <tr> <td class="notification-table-text"> </br> <table class="table-list" style="width:70%; text-align:left;"> <tr class="table-list-header"> <td style='margin-left:10px; margin-top:5px; margin-bottom:5px;'>DASHBOARD</td> <td style='margin-left:10px; margin-top:5px; margin-bottom:5px;'>NUMBER VIEWS</td> <td style='margin-left:10px; margin-top:5px; margin-bottom:5px;'>OVERHALL</td> </tr> @{body('FA_Monitoring_Top10Reports')} </table> </td> </tr> ... </table> ... </body> </html>Note: this is a small part of the HTML body template code. You should customize it according to your needs.
- And finally, select New step. In the search box, enter Office 365 Outlook, and from the result panel select the Office 365 Outlook, Send an email (v2) action and provide the following information:
- Body: varEmailBody – @{variables(‘varEmailBody’)}
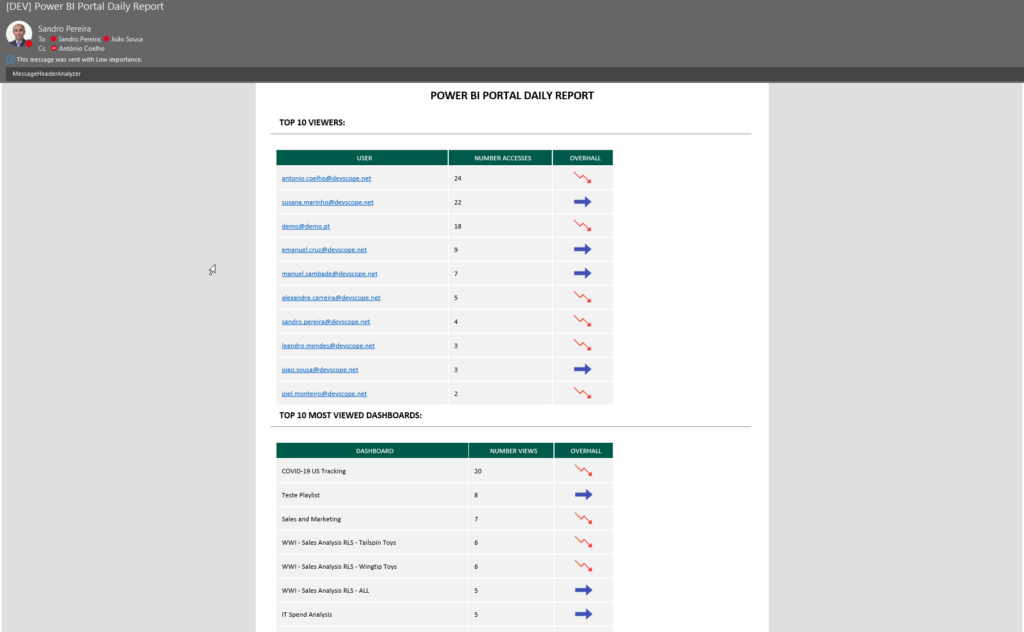
- Subject: [DEV] Power BI Portal Daily Report
- To: list of your email addresses.
The result, once you try to execute the Logic App, will be a fancy HTML email:
More about Power BI Portal
PowerBI Portal is a web tool that allows users to embed any number of Power BI reports and dashboards on a portal with their organization’s layout, that can be shared with whoever they want, regardless of being in their organization or even having a Power BI account. Know more about it here.
The post How to audit Power BI access on PowerBI Portal using Azure Logic App and Function App appeared first on SANDRO PEREIRA BIZTALK BLOG.