by Praveena Jayanarayanan | Aug 8, 2019 | BizTalk Community Blogs via Syndication
BizTalk360 is one-stop monitoring tool for monitoring your BizTalk environment. The BizTalk360 installation is a very quick process and does not take much time when all the prerequisites are met. For any software product, there would be some basic requirements that should be satisfied for its successful installation. BizTalk360 also has its own hardware and software requirements. In addition to these requirements, there are also some permissions and rules that need to be provided.
We have different documents that contain this information. But I thought it would be even more helpful for our customers if we have all this information in a single place. In this blog article, I would like to give a consolidation of all the requirements that one should make sure of before installing BizTalk360.
There are many considerations that need to be taken care of before installing BizTalk360, like where do you want to install BizTalk360, the service account permissions, the database creation, etc. Let’s look at each of them.
Installing guide for BizTalk360
BizTalk360, being a separate integration tool, always arises a query from the customers as to where we must install it. What is the best practice to install BizTalk360? It can be either installed on the same server where BizTalk is installed or in a standalone server.
The recommendation would be to install BizTalk360 on a separate server, rather than in the BizTalk server.
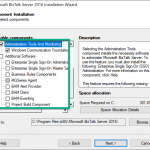
This will be useful in the performance perspective. The BizTalk server performance would not be hindered and BizTalk360 will notify the users when the BizTalk server is down. The important prerequisite for installing in a standalone server is that the BizTalk Admin Components must be installed beforehand in the standalone server.
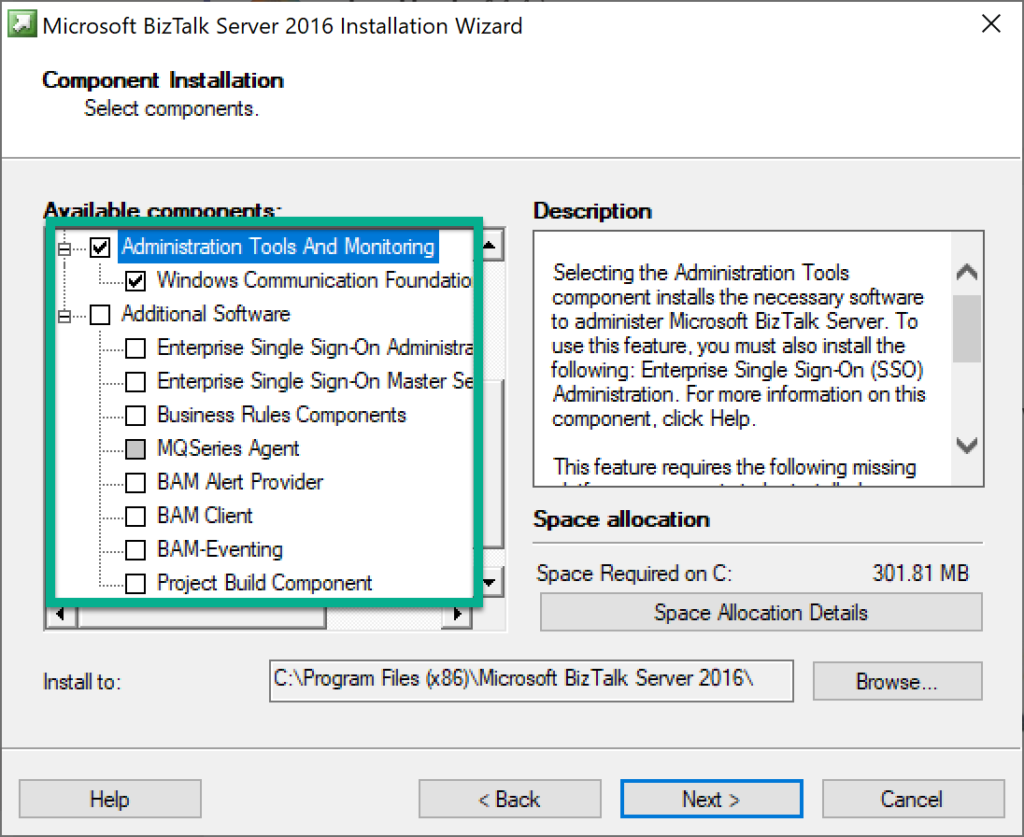
If these components are not installed, then the BizTalk360 installer will fail with the following error.
The role of the service account in BizTalk360
One of the most important prerequisites for BizTalk360 is to configure a separate service account. The service account will be one that is used for the IIS App pool that will be created during the installation and also for running the BizTalk360 Monitor and Analytics service.
The recommendation is to create a dedicated service account, the reason being there are some permissions that need to be provided for this account.
The permissions would be:
- Local administrator permission in the BizTalk360 server for starting the Monitor and Analytics service
- Local administrator in the BizTalk and SQL server(s) for collecting the event log data and for disk and system resource monitoring
- Sysadmin permission to the SQL Server for creating and updating the BizTalk360 database
- Sysadmin permission for the BizTalk databases for monitoring and autocorrecting the SQL jobs. In case if you do not prefer to provide Sysadmin permission, you can provide SQLAgentOperator role for the service account for monitoring the SQL jobs and performing the autocorrect functionality
- Member of all the BizTalk groups
Once you have created the service account, you will have to log in to the BizTalk360 server with this service account to install BizTalk360. Logging in with other users may result in other permissions related to the database as other users may not have the expected permissions as the service account.
Firewall ports and protocols to be checked
When you plan to install BizTalk360 in a separate standalone server, there are some configurations that need to be taken care in the security perspective. For example, there may be firewall rules that may restrict access to the server. For BizTalk 360 to be able to contact BizTalk Server, the MSDTC connection needs to be enabled in all the servers. BizTalk360 should be enabled with certain ports/protocols for communicating with the external servers.
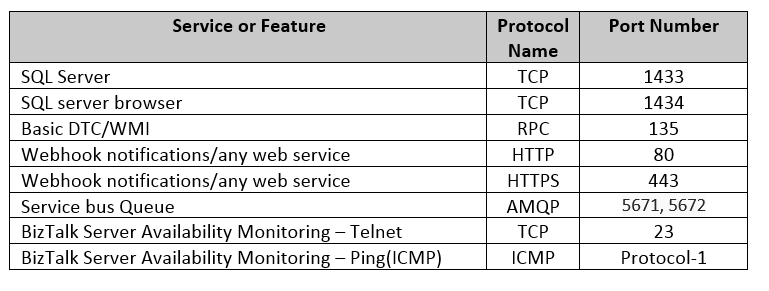
Next, make sure the below services are running in the server:

Also, make sure if custom ports are utilized for any service, unblock them as well from the firewall for the seamless working.
Ready to install BizTalk360
Once all the prerequisites are in place, you are now ready to install BizTalk360. The installation is a seamless process which would roughly take about 10-15 minutes when all permissions are in place.
You will have to make sure that you have logged into the server with the BizTalk360 service account. The reason for this is that when BizTalk360 is installed, the logged-in user will be created as a Super User in BizTalk360.
This Super User permission is required for the service account to perform certain automated processes like terminating/resuming service instances through Data Monitoring alarms and also for Analytics operations.
If for some reason, the installation fails, the first thing to be looked for the error, would be the installation logs.
Important configurations for BizTalk360
For BizTalk360 to be up and running, there are some configurations that need to be done. For example, the SMTP setting would be required for triggering the alert emails. You will need to create different users for accessing BizTalk360.
You can refer to the implementation of best practices here.
Best practices on a performance perspective
For any software product, the performance would be the foremost priority. Some of the performance measures that can be taken up for enhancing BizTalk360 would be:
- Configuring only the required sources in the Advanced Event Viewer so that the database growth is controlled
- Maintaining the appropriate purge duration to remove the historical data based on the business needs
- Enabling only the relevant performance counters for Analytics performance data collection
Upgrade and Migration Scenarios
- What happens when you upgrade BizTalk360 to a new version?
- What happens when you migrate your BizTalk server?
- Let’s have a look!
Upgrading BizTalk360
A new version of BizTalk360 is released every quarter with new features and enhancements picked up based on customer feedback. The release would also include certain bug fixes as well.
It is important that customers upgrade their BizTalk360 to the latest version to be in line with the release and enjoy the new features.
Things to be taken care while upgrading BizTalk360:
- You should log in with the BizTalk360 service account to the BizTalk360 server
- The license needs to be deactivated
- The database should be backed up so that in case of any errors, the old database can be restored
- Once after the successful upgrade, it is important to clear the browser cache and then launch BizTalk360
In a scenario where there might be some problems during the upgrade, the customer could have uninstalled and reinstalled BizTalk360. In this case, they would have restored the old database and the following error would occur.
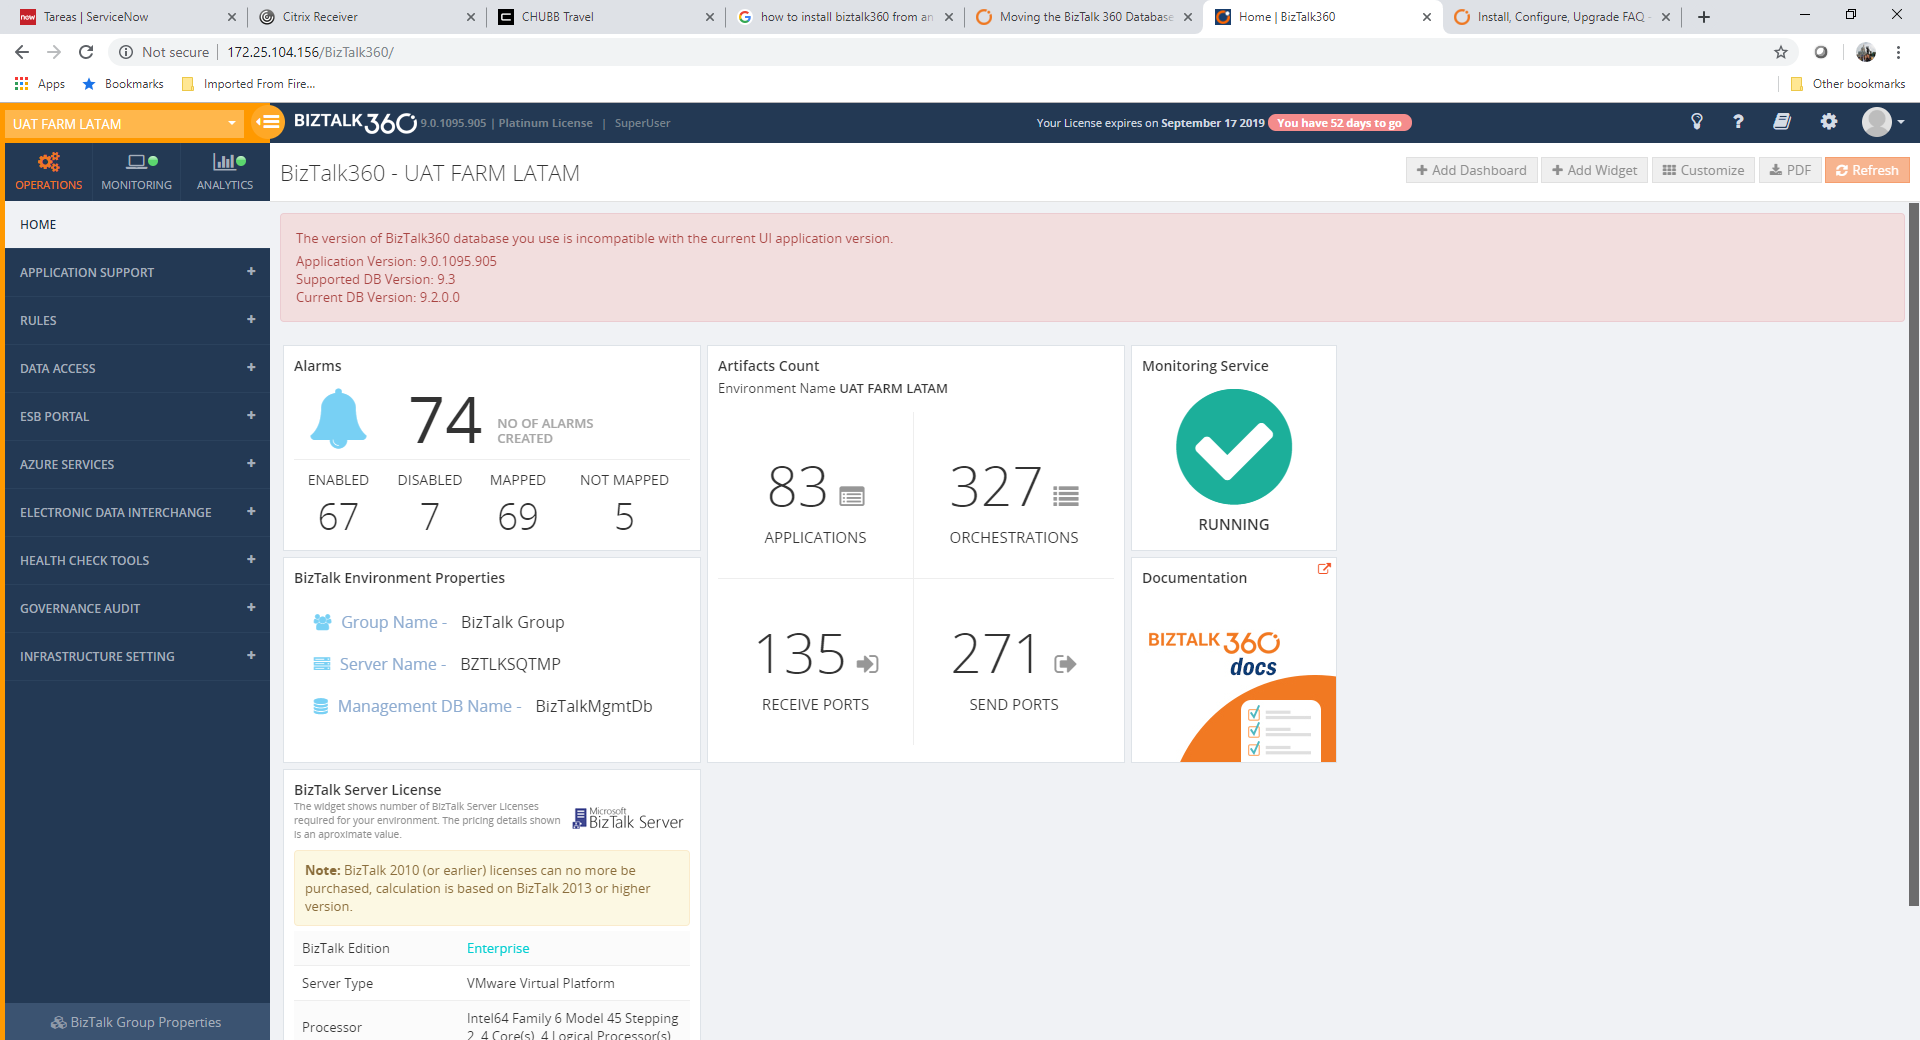
Here, we can see that the application has been upgraded but not the database since the old version of the database has been restored. The suggestion here would be to run the SQL scripts from the next version seen in the error from C:Program Files (x86)Kovai LtdBizTalk360ServiceSQL folder. Please note, if there is more than one script that needs to be executed, then they should be run in the same sequence.
Upgrading BizTalk Server
Customers might migrate from a lower version of BizTalk Server to a higher version, say for example from BizTalk Server 2013 to BizTalk Server 2016. There are some configuration changes that need to be done at the BizTalk360 side as well to point to the new BizTalk environment. The below steps need to be followed in the BizTalk360 box when you migrate the BizTalk server.
- Deactivate the license in BizTalk360 first before migration
- Install the new version of BizTalk admin components in BizTalk360 server
- After migration, update the environment details to point to the SQL instance which contains the BizTalk databases
- The below tables need to have the BizTalk version changed appropriately and the MS_BizTalk_install_location should be updated
b360_admin_BizTalkEnvironment -> BizTalk Version
b360_admin_GlobalProperties -> MS_BIZTALK_VERSION & MS_BIZTALK_INSTALL_LOCATION
You can export the alarms from the old BizTalk360 environment and import them to the new environment. The mappings will also get imported to the new environment. If you are using BizTalk360 v8.8 or later, then you can export the user settings as well.
- Modify the alarm mapping to point to the artifacts in the new environment
Migrating BizTalk360 database and application
When the BizTalk360 database is moved to a new server, the connection string needs to be modified in the following config files:
- Web.config
- BizTalk360.Monitor.exe.config
- BizTalk360.Analytics.exe.config
For more details, refer to the article.
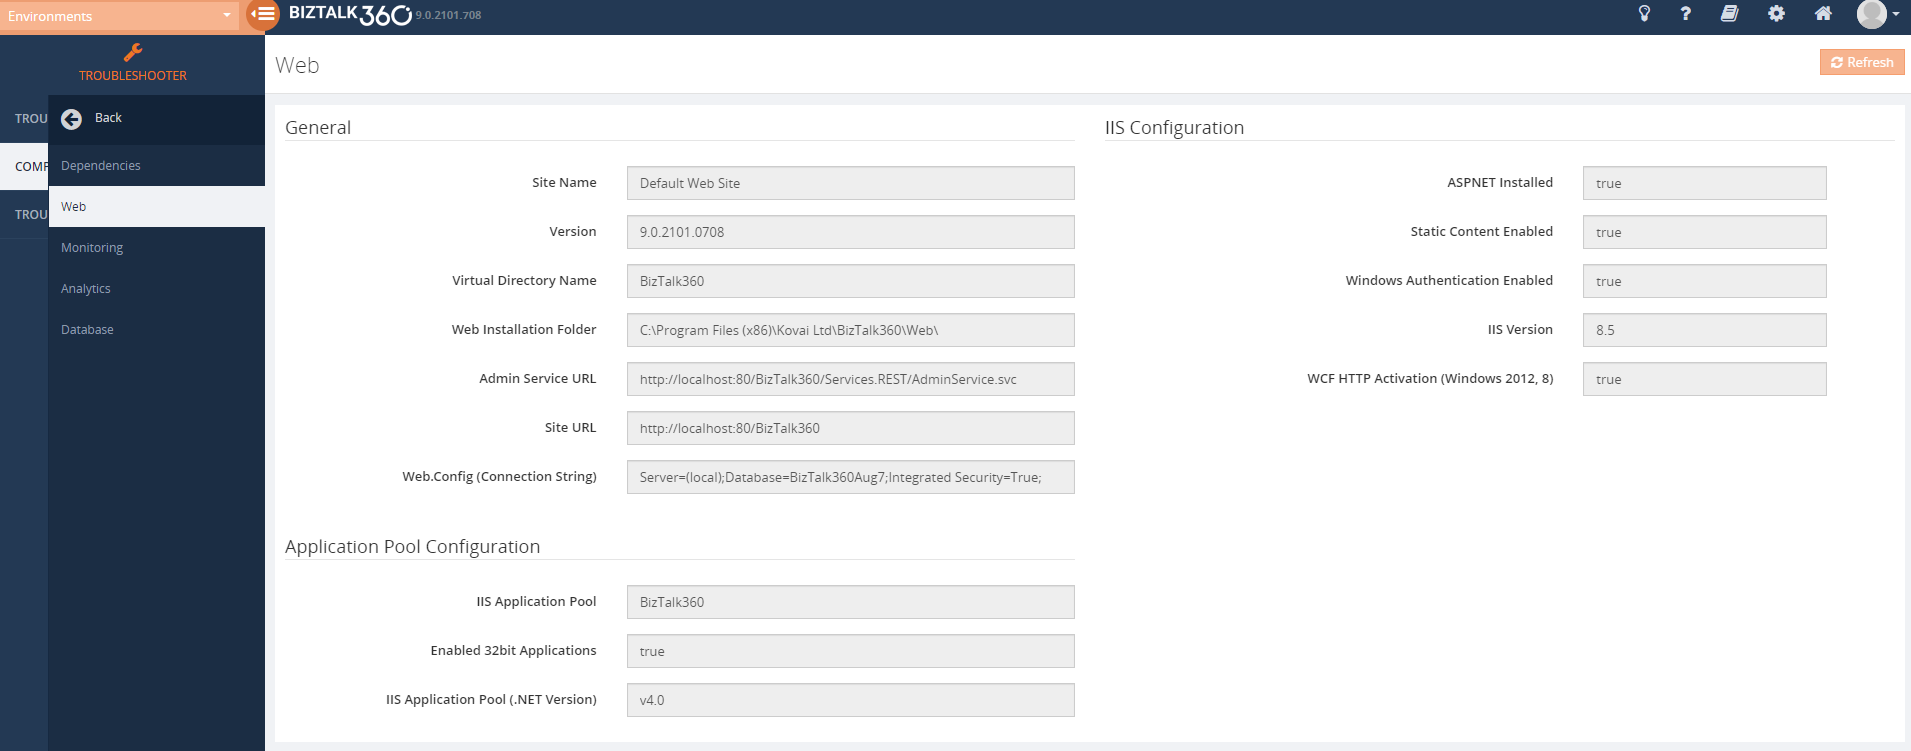
BizTalk360 additional details
The integrated Troubleshooter in the BizTalk360 UI will provide you with the complete details of BizTalk360 like the connection string, installation location, and the database.

Conclusion
Once all the setup and configurations are in place, it is a quick and seamless task to install/upgrade BizTalk360. The customer suggestion and feedback are always heard and addressed, which helps us to improve the product and provide better service.
Happy monitoring with BizTalk360! 
The post BizTalk360 – Ready to function appeared first on BizTalk360.
by Dan Toomey | Aug 6, 2019 | BizTalk Community Blogs via Syndication
Last week, Microsoft responded to numerous requests from the community by announcing a new developer tier offering for Integration Service Environments (ISE). The ISE has been generally available for several weeks, but the single available SKU prior to this announcement carried a hefty price tag.
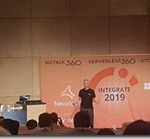
WhatsApp Image 2019-06-27 at 10.59.51 AM") I had the great honour and privilege of speaking about ISE at the INTEGRATE 2019 conference at Microsoft headquarters in Redmond, WA (USA) last month. My topic was Four Scenarios for Using an Integration Service Environment, which attempted to shed some light on what type of situations would justify using this flat-cost product as opposed to the consumption-based serverless offering of Logic Apps.
I had the great honour and privilege of speaking about ISE at the INTEGRATE 2019 conference at Microsoft headquarters in Redmond, WA (USA) last month. My topic was Four Scenarios for Using an Integration Service Environment, which attempted to shed some light on what type of situations would justify using this flat-cost product as opposed to the consumption-based serverless offering of Logic Apps.
While this presentation hopefully piqued interest in the offering, one of the burning questions from the attendees was “When will a lower cost developer SKU be available so we can try it out?” All Microsoft was able to say at that point was, “Soon.” Well, at least they were right, as it is now available only a few weeks later!
What is an Integration Service Environment?
The ISE is a relatively recent offering from the within Microsoft’s Azure Integration Services that enables you to provision Logic Apps and Integration Accounts within a dedicated environment – much like App Service Environments enable you to do the same for App Services. The advantages of this include:
- Predictable performance
- VNET connectivity
- Isolated storage
- Higher data transfer rates (especially for hybrid scenarios)
- Flat cost
The VNET connectivity is a large driving factor for using an ISE. Consumption-based Logic Apps do not offer any direct integration with VNETs – they operate within a multi-tenant context inside of each Azure location. This means that all connectors share the same pool of static outbound IP addresses for all instances deployed to that region. It also means that performance can potentially be affected by “noisy neighbours”.

Because an ISE is injected into a VNET that you create, all the runtime components now operate within that VNET and as such are isolated from other resources in that region. It also gives you the ability to put network-level security controls around your Logic Apps (for example using Network Security Groups), and also explicitly control the scaling of your application as opposed to relying on the reactive scaling offered by the serverless option (mind you, auto-scaling rules are still available within an ISE).
Flat-Cost Model
Unlike the consumption-based serverless offering of Logic Apps which charges per action execution, ISE runs at a flat hourly cost. The cost is calculated at a scale unit level. The base offering includes a single scale unit which can accommodate roughly 160 million action executions per month. Additional scale units will add capacity for about 80 million action executions each, and each costs 1/2 the price of the base unit.
While it may seem that the cost benefit is only realised in very high-volume scenarios, you need to consider that the base unit also includes a Standard Integration Account (worth ~US$1000/month) as well as an Enterprise Connector with unlimited connectivity (these connectors are charged at a higher rate in the consumption-based model). And that’s not considering the other benefits of an ISE (VNET connectivity, isolation, etc) that may justify the investment. It is worth noting that VNET integration for most other Azure services generally requires a premium tier or plan (e.g. Service Bus, API Management, Functions, Event Hubs).
Developer SKU
Still, the cost of an ISE in production is a significant investment, just as it is for an ASE. That can make it an expensive proposition, particularly for deployment into non-production environments (DEV, TEST). Initially, the ISE was only available in one SKU.
That is why the announcement last week was so greatly anticipated. The new developer pricing tier allows organisations to deploy and test an ISE in non-production environments at approximately one-sixth of the base cost of the production SKU (please refer to the Logic Apps pricing page). This makes it a much more affordable proposition and opens up the ISE to many organisations that would otherwise be unable to afford it.
Or course, this developer tier offers no SLA, does not support additional scale units, and includes only a free integration account – so this is definitely not suited for production use. It is a good idea to review the artefact limits imposed on integration accounts.
To choose the developer tier, simply select the non-premium option from the SKU drop-down list when creating your ISE:

For detailed instructions on how to provision an ISE including all of the pre-requisites, please refer to the Microsoft documentation.
Summary
Azure Integration Service Environments offer a solid solution for integrating your Logic Apps with a VNET, enabling your entire integration solution to be managed within the controls of a private network. It enables additional security controls and better performance in hybrid scenarios over the On-Premises Data Gateway, whilst reducing the impact of “noisy neighbours”. The introduction of the developer pricing tier now makes it much more affordable for enterprises to build and test solutions using an ISE before committing to production.
This article has been cross-posted. The original post may be found here.
by Gautam | Aug 4, 2019 | BizTalk Community Blogs via Syndication
Do you feel difficult to keep up to date on all the frequent updates and announcements in the Microsoft Integration platform and Azure iPaaS?

Integration weekly update can be your solution. It’s a weekly update on the topics related to Integration – enterprise integration, robust & scalable messaging capabilities and Citizen Integration capabilities empowered by Microsoft platform to deliver value to the business.
If you want to receive these updates weekly, then don’t forget to Subscribe!
Microsoft Announcements and Updates
Community Blog Posts
Videos
Podcasts
How get started with iPaaS design & development in Azure?
- Robust Cloud Integration with Azure
- Microsoft Azure for Developers: What to Use When
- Serverless Computing: The Big Picture
- Azure Logic Apps: Getting Started
- Azure Logic Apps: Fundamentals
- Microsoft Azure Developer: Creating Enterprise Logic Apps
- Microsoft Azure API Management Essentials
- Azure Functions Fundamentals
- Cloud Design Patterns for Azure: Availability and Resilience
- Architecting for High Availability in Microsoft Azure
Feedback
Hope this would be helpful. Please feel free to reach out to me with your feedback and questions.
by Lex Hegt | Aug 1, 2019 | BizTalk Community Blogs via Syndication
After the installation of BizTalk360, the implementation phase starts. One of the steps you will want to do is taking benefit of the rich automated monitoring features the product provides. For that, you must set up alarms in BizTalk360. In this article, we intend to give you some best practices around Alarm Configuration. Firstly, however, we’ll shortly explain the different monitoring concepts which are available in BizTalk360.
A short explanation of the supported monitoring types
BizTalk360 has multiple types of monitoring, which are Threshold monitoring, Health Monitoring, and Data Monitoring. Each alarm you create in BizTalk360 can support all types of monitoring, either as separate alarms or as combined alarms.
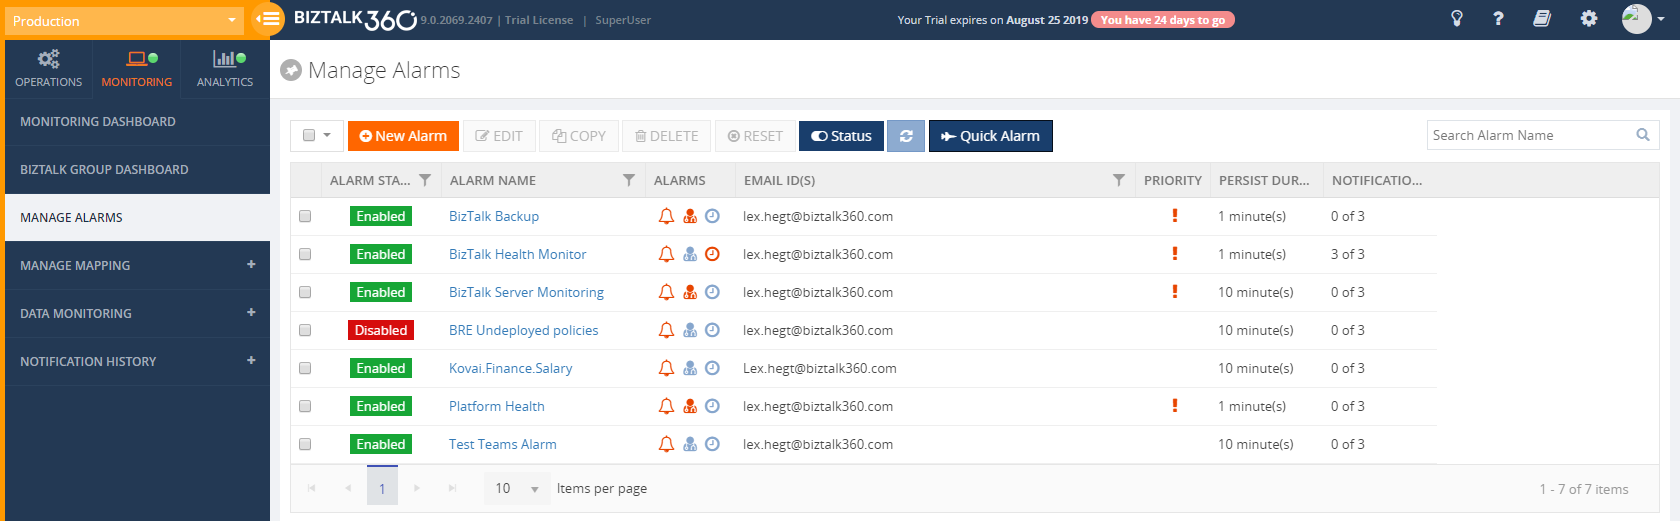
As you can see from the above screen, BizTalk360 enables you to configure an alarm for multiple purposes. So, in case you want the same people to receive the same notifications for both Thresholds as for Health Checks, you only need to create one alarm.
Threshold monitoring
With this kind of monitoring, you get notified in case a threshold occurs. For example, that can be a Receive Location which was Disabled, while it should be Enabled or any other artefact which is mapped in an alarm and is in an unexpected state.
At the Alarm creation level, you can configure the following:
- Name – each alarm needs to be given a name. The more descriptive the name, the easier it is for identifying the purpose of the alarm
- Description – optionally, you can provide a detailed description of the purpose of the alarm
- Email Ids – each alarm can send notifications to multiple recipients
- High Priority – in case you want specific notifications (for example when anything goes wrong with the BizTalk platform) to jump out in your email box, you can enable the High Priority switch
- Violation persistence – to configure after how much time and with which interval you want to be notified of exceptions
- Limit the number of notifications per exception – to prevent you from being bombarded with notifications and lose the overview as a result
- Back to Normal notification – receive a notification when the alarm no more contains artifacts in the wrong state
- Alert reset – start receiving notifications again after a specific time in case you have received the maximum number of notifications
- Alert schedule – configure when the alarm should perform monitoring. Handy when you know that specific artifacts are not available all the time, due to, for example, maintenance
Health monitoring
It can be helpful if you receive a report with the actual status of the monitored artifacts, for example at 9AM every business day. For such scenarios, you can configure alarms for Health monitoring.
BizTalk360 Health Monitoring alarms allow you to easily configure when you want to receive these status reports via an intuitive interface.
Below screenshot shows the screen where you can select when you want to receive these status reports.

This alarm has not only been configured to send a report at the beginning of each working day but also towards the end of the business day. This helps in being aware of the status of your environment before you leave home.
Data Monitoring
A detailed explanation of Data Monitoring falls outside the scope of this article, therefore we provide a somewhat better overview of its capabilities here.
The concept of Data Monitoring allows you to set up monitoring of your data flows. As an example, your BizTalk platform and applications might be in perfectly good health, but when a misconfigured firewall prevents messages from arriving in BizTalk, no processing will be taking place. This interrupts your business processes, with maybe bad consequences for your company. Data Monitoring can be used to monitor this kind of scenarios.
Data Monitoring provides monitoring at the following levels:
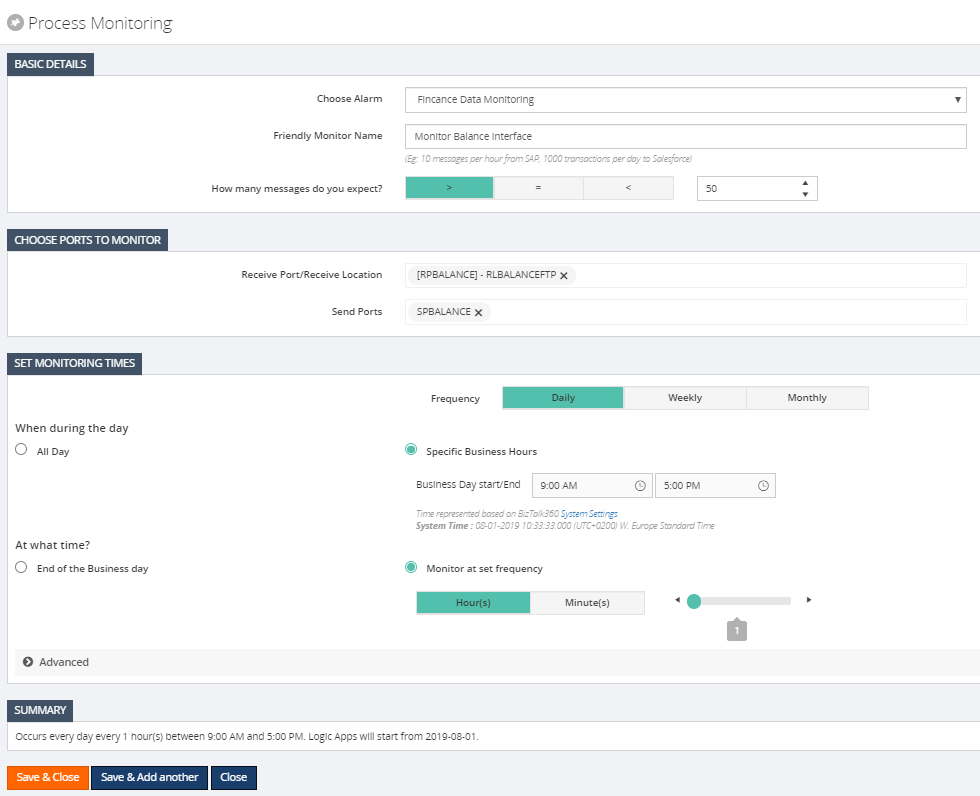
- Process Monitoring – monitor whether your processes run as expected
- MessageBox Monitoring – monitor the active processes and (optionally) take automated actions
- Tracking Data Monitoring – monitor completed processes
- BAM Monitoring – monitor your deployed BAM Views and Activities
- EDI Data Monitoring – monitor your EDI processes
- ESB Data Monitoring – monitor your ESB Exceptions and resubmissions
- Logic Apps Monitoring – monitor tens of metrics about the processing of your Azure Logic Apps
- Event Log Monitoring – monitor your consolidated Event Log entries of your BizTalk and/or SQL servers
After selecting which kind of Data Monitoring you want to set up, it now comes down to configure what exactly you want to monitor and when monitoring needs to be done.
Below screenshot gives an example of Process Monitoring.
Once you have set up Data Monitoring, the output of all the different monitor runs will be shown in a consolidated Data Monitoring dashboard. This dashboard helps in answering the questions from your business/functional users whether a specific process has taken place.
You can refer to the Data Monitoring section in the Documentation portal for a more detailed explanation of this way of monitoring in BizTalk360.
Some more information about BizTalk360 Alarms can be found here.
BizTalk platform versus BizTalk application monitoring
When setting up monitoring in BizTalk360, it is handy to make a difference between monitoring the actual BizTalk platform and the BizTalk applications which are deployed on it. Making this distinction gives several advantages, like:
- Notifying different people, depending on their role and needs
- Use different monitoring settings like:
-
- The monitoring interval for early notifications in case of important issues
- The number of notifications you want to receive per exception
- Receive a ‘back to normal’ notification in case everything is healthy again
- Set the High Priority flag to easily spot important notifications in your email box
- Run PowerShell scripts for immediate actions
Even within platform monitoring, you can make segregations for different administrators. For example, a SQL Server DBA has different needs than a System (Windows) Administrator, so other artefacts need to be monitored. BizTalk360 enables you to set up different Alarms for different needs.
What to setup for Platform monitoring
When you are creating an alarm for platform monitoring, you want to be notified of unexpected situations which might occur on your BizTalk platform. For this purpose, you will create a Threshold Monitoring Alarm. If you also want to receive a daily status report at say every business day at 8:00 AM, you can configure an alarm for Health Check Notification.
See below for a list of artefacts you could consider for monitoring BizTalk platform health:
- Host Instances (clustered and non-clustered)
- Host Throttling
- BizTalk Server availability
- SQL Server Jobs
- Windows NT Services
- Enterprise Single Sign-On service
- Internet Information Services
- BizTalk Health Monitor output
- Eventlog entries
- BizTalk Criticals, Errors, and Warnings
- SQL Server Criticals, Errors, and Warnings
- ESSO Criticals, Errors and Warnings
- Internet Information Services Criticals, Errors, and Warnings
- Server restarts
- Certificate expiration
- BizTalk and SQL related stuff
- Disk space
- CPU/Memory usage
- Windows NT Services
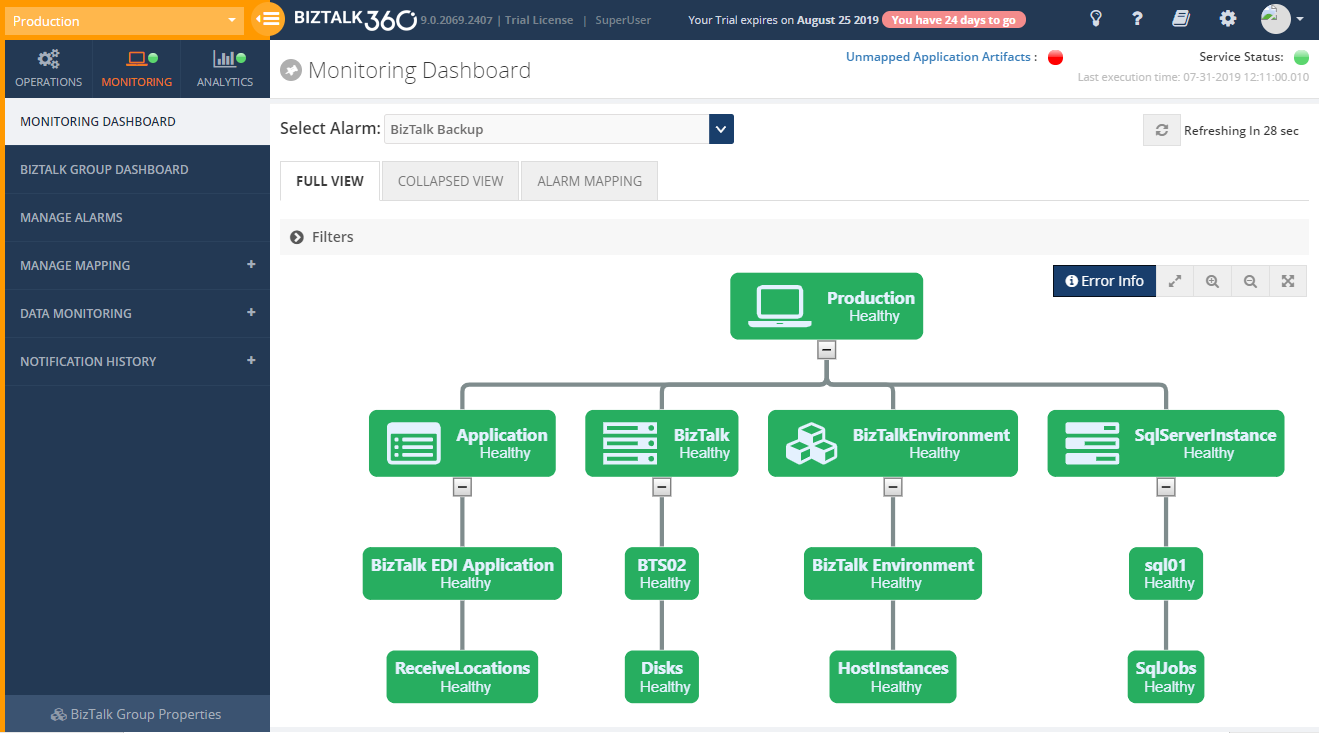
Below screen shows the Monitoring Dashboard for a Platform alarm.
What to setup for BizTalk Application monitoring
Before we move to discuss which artifacts to monitor from BizTalk Application alarms, let’s firstly discuss how to organize your BizTalk Application-oriented alarms. Basically, there are two ways you can set up your BizTalk Application alarms.
The Alarm equals Application approach
When deploying BizTalk applications, it is often handy to create an alarm per BizTalk application for Threshold Monitoring and/or Health Check Notification. The main motivation for this is, that a BizTalk Application is the unit which you will deploy, so setting up alarms around them will help in keeping the overview. For easy reference, you could give the alarms the same name as the BizTalk application it will be monitoring. This can be considered as a bit more technical approach for your monitoring.
The Alarm equals Interface approach
Another approach to set up your BizTalk Application-oriented alarms is around the interfaces which are being processed by BizTalk. Say, your BizTalk environment contains multiple applications of which several their contained artifacts together are part of a Purchase Order. To keep the overview of such an interface, it makes sense to monitor all artifacts related to that interface. This is totally fine and BizTalk360 allows you to set up your alarm in such a way. Ideally, you can give the alarm the name of the interface. This approach is a bit more business-wise way of monitoring and can be helpful if you need to notify your business/functional users in case of any issues.
However, there is a downside to monitoring your BizTalk artifacts around interfaces. Because artifacts from multiple BizTalk Applications need to be monitored, it might be a bit harder, especially when many artifacts are involved, to keep the overview and be sure that you are really monitoring all the relevant artifacts.
No ‘Always Right’ way
Summarizing, there is no ‘always right’ way to set up your BizTalk Application monitoring. Even a ‘hybrid’ setup, which follows both just mentioned practices, of your monitoring is totally fine and not uncommon. In the end, it all depends on what works the best for you and your organization. BizTalk360 gives you all the freedom you need.
Artifacts to be monitored
When setting up monitoring for your BizTalk Applications, you will set it up for your ports and orchestrations of your BizTalk Applications. However, you can also consider the following artefacts for monitoring:
- State of Services Instances
- Suspended (Resumable/Not Resumable)
- Active
- Dehydrated
- Ready to Run
- Scheduled
- Endpoints of your Receive/Send ports
- Web Endpoints
- Queues (MSMQ, IBM MQ, Azure Service Bus)
- File shares
- FTP sites
- API Apps
- Logic Apps
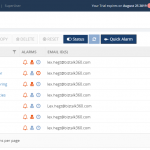
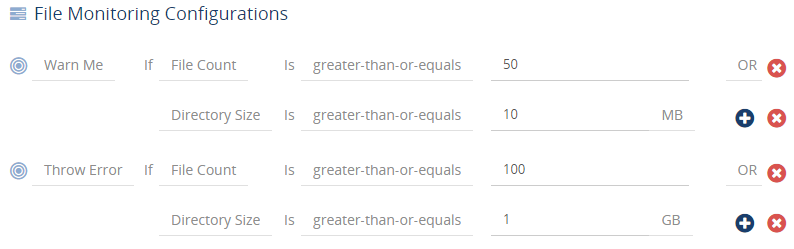
Tip: To be able to find out if files/messages are being picked up, you can monitor your File shares, FTP sites, and Queues. Below screen shows an example of monitoring a File share.
As a side note, BizTalk Server Best Practices suggest that you have a proper Host configuration in place, where separation takes place based on receiving/sending messages, processing of orchestrations and tracking of processed messages/service instances. However, sometimes Host configuration has been set up for a specific process or BizTalk application. In that case, it is valid to monitor your Host Instance(s) in your BizTalk application-oriented alarm, instead (or on top) of your BizTalk platform alarm.
Advanced Monitoring setup
Besides deciding on how to setup your alarms and which artifacts to monitor, there are a couple of other topics you could consider take benefit of. You can think of:
- Auto-Correct – the ability to automatically recover artifacts
- Notification Channels – inform people not just via email but also via different channels
- Customized Notification Templates – provide additional information or brand the templates
Using such features not just makes your life as an administrator easier, it will also help you in making the best of your investment in BizTalk360. Let’s have a better look at all these options.
Auto-Correct
For state-related artefacts like BizTalk Ports and Orchestrations, Host Instances and SQL Server jobs, you could consider using the Auto-Correct feature, which, after a threshold situation has been met, tries to get the artifacts back to the expected state.
Tip: You can use this feature to automatically Enable your Receive Locations, in case they failed to connect to their endpoints due to a temporary failure!
You can read more about the Auto-Correct feature in this article.
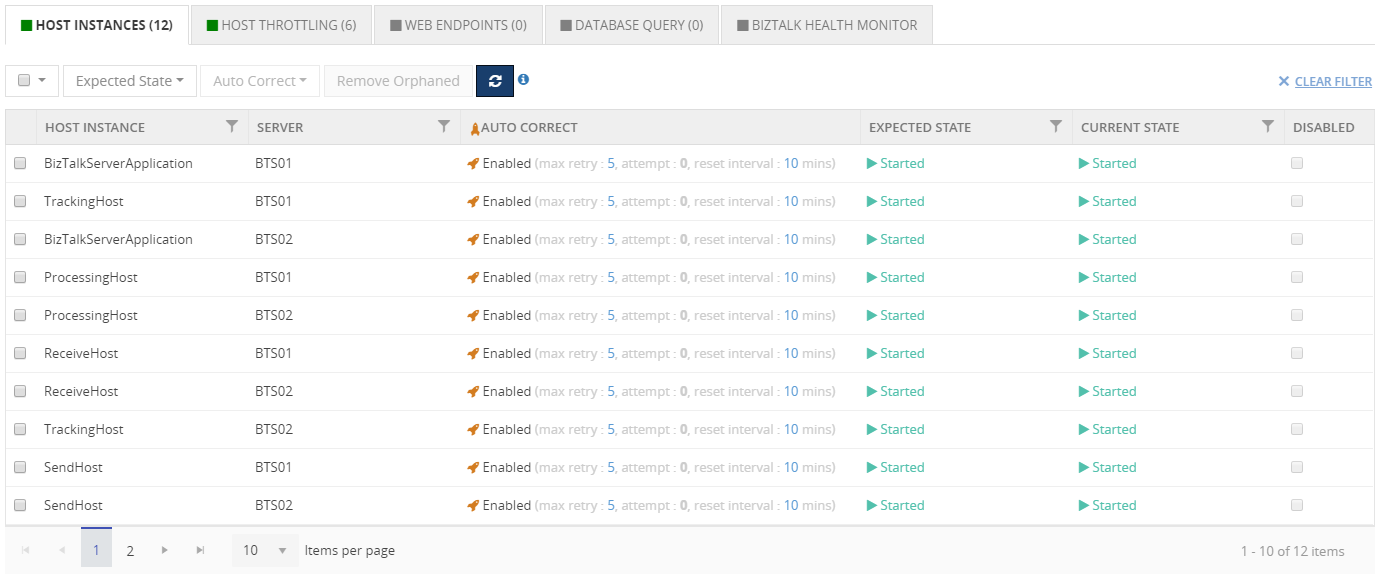
Below screen shows that BizTalk360 will try to automatically try to recover the Host Instances once they are no more in the Started state.
Notification Channels
The default way of BizTalk360 for sending notifications is via email. However, sending notifications does not end there. The product has a number of so-called Notification Channels you can use. Examples are:
- Slack – send notifications to a Slack channel
- ServiceNow – have tickets created, directly in ServiceNow
- Microsoft Teams – send notifications to a Teams channel
- PowerShell – trigger a PowerShell script to perform an action
- SMTP – have more control over the way notifications are being sent
- Webhook – connect to an already existing REST API
Besides this rich set of notification channels, there is also an easy to use API at your convenience. By implementing the API, you can, for example, connect to your ticketing system or other important backend systems.
Below screen shows the information you can provide when using the ServiceNow Notification channel.

More information about all the Notification channels can be found here.
Customized Notification Templates
BizTalk360 allows you to customize the notifications it sends. This allows you for example to provide some additional information/instructions for the people who receive the notifications. However, it can also be used for branding purposes.
Although some notification information can simply be provided via text input fields, the actual templates are based on XSLT, so some skills with editing such files will be helpful.
More information about customizing the notification templates can be found here.
Conclusion
With this article, we intended to provide you some help and guidelines with setting up your alarms. Both the Documentation portal and our Blog contain many articles on monitoring your BizTalk environment with BizTalk360. However, if you feel you need some more support with setting up your monitoring, feel free to reach out. We are here to help you!
The post Best Practices for BizTalk360 Alarm Configuration appeared first on BizTalk360.

by Gautam | Jul 28, 2019 | BizTalk Community Blogs via Syndication
Do you feel difficult to keep up to date on all the frequent updates and announcements in the Microsoft Integration platform and Azure iPaaS?

Integration weekly update can be your solution. It’s a weekly update on the topics related to Integration – enterprise integration, robust & scalable messaging capabilities and Citizen Integration capabilities empowered by Microsoft platform to deliver value to the business.
If you want to receive these updates weekly, then don’t forget to Subscribe!
Microsoft Announcements and Updates
Community Blog Posts
Videos
Podcasts
How get started with iPaaS design & development in Azure?
- Robust Cloud Integration with Azure
- Microsoft Azure for Developers: What to Use When
- Serverless Computing: The Big Picture
- Azure Logic Apps: Getting Started
- Azure Logic Apps: Fundamentals
- Microsoft Azure Developer: Creating Enterprise Logic Apps
- Microsoft Azure API Management Essentials
- Azure Functions Fundamentals
- Cloud Design Patterns for Azure: Availability and Resilience
- Architecting for High Availability in Microsoft Azure
Feedback
Hope this would be helpful. Please feel free to reach out to me with your feedback and questions.

by Senthil Kumar Palanisamy | Jul 25, 2019 | BizTalk Community Blogs via Syndication
Introduction
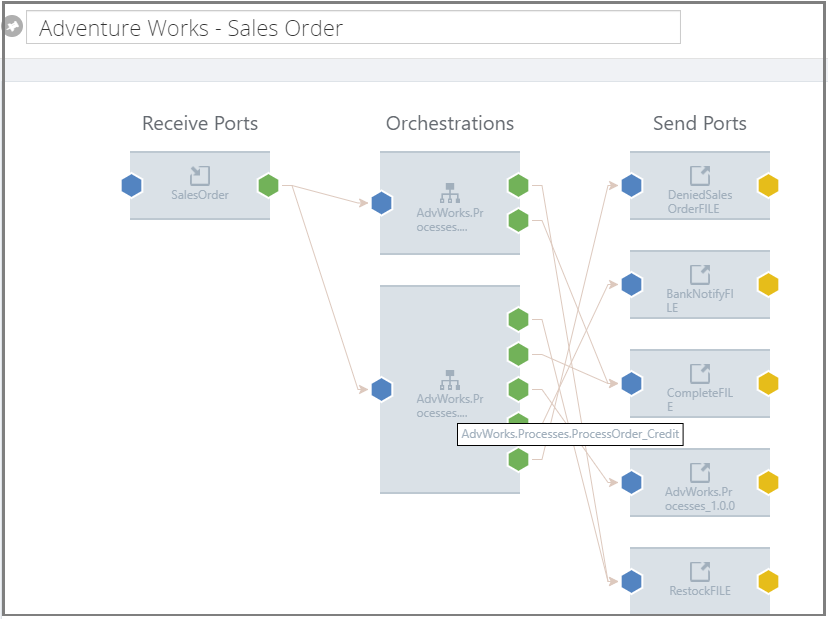
In complex BizTalk environment, it is important to visualize the patterns of how messages are processed within the system or integrate with multiple disparate systems to handle the message transfer from one point to another. It could be a simple direct transfer between the two ports, or through a complex messaging route passing through orchestrations to perform certain validations, etc. It is helpful to BizTalk Administrators or Business users to track the flow of messages in different stages. For this purpose, the BizTalk Admin Console has the capability to view the workflow of messages, although that feature will mainly be of use for BizTalk Administrators.
BizTalk360 has the functionality to allow users to view the graphical flow of the messages within your BizTalk Group. However, the challenge with the Graphical Message Flow Viewer is that, for instance, if there are 100 messages passing through the system at a point of time, each message is tracked at the service instance level with a unique id. The problem with this approach is that every single transaction is logged into the database. In an environment where there are lots of messages passing through the BizTalk system, there is every chance that the database will get filled up quickly.
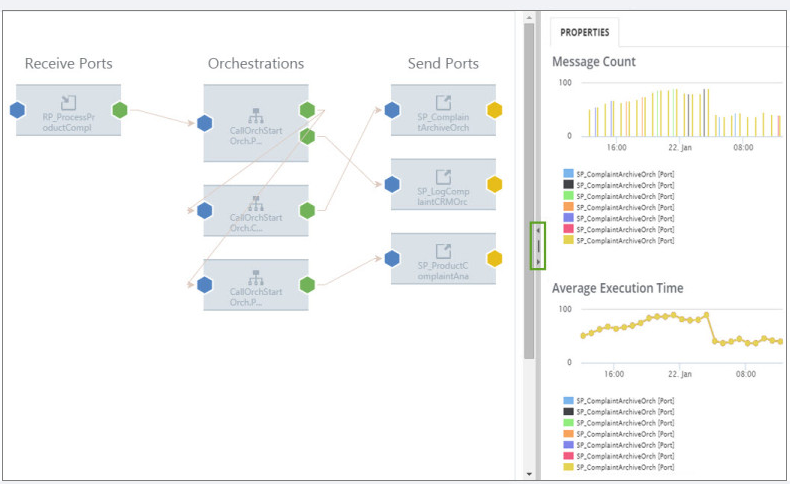
Message pattern is to visualize interactive message flows with additional capabilities like the number of messages processed and Average Execution Time in the artifacts.
Message Pattern using Tracking Data
In BizTalk360 v8.0 introduces the “Messaging Patterns” capability to visualize a list of unique message flows that are being processed by the system. The key difference from Graphical Message Flow Viewer is that, in the Message Flow list, only the unique messaging patterns get recorded. As in the previous case, if there are 100 messages passing through the system at a point of time, not all the 100 message flows are recorded in the Messaging patterns. Only the unique message patterns are recorded, which could be just, say, 15 or 20.
For Messaging Patterns to work, a backend service (called Mapping Data) is responsible for keeping track of the unique message flows. That Mapping data service will collect the tracked message in the DTA DB.
Note: Make sure you have enabled Tracking at the ‘Pipeline’ level for the unique data flow data to be captured.
Challenges in determining the Message Patterns
Determining the message flows using tracking data has some challenges. As BizTalk Developers and Administrators might be aware that the BizTalk DTADb has its own challenges. For example, few customers, face performance issues with the tracking database when the BizTalk360 Analytics service fetches message flows using the MessageInout table;
-
Query Time out
In the initial version of Message Pattern, we have seen that query timeout issues have happened while retrieving message service instance data.
-
Temp Database Growth
To address this issue of query time outs, since BizTalk360 Version 8.5, the relevant data is fetched in a temporary table in the tracking database. However, with a few customers, this approach causes temp database growth.
Alternate Technique (BizTalkMgmt Database)
To overcome this challenge, in BizTalk360 9v.0 Phase2, we bring an alternative mechanism to determine the message patterns. The alternate way of finding the message patterns uses the BizTalk Management database relational data. It has the advantage that here the flow is determined without enabling the pipeline tracking at the artifact level.
Message Flows have been determined by the following models:
-
Publish-Subscribe Model
This method is used to determine the message flow between ports without any orchestration being involved. It uses the Filter property in send ports to understand the start and endpoint of the flow.
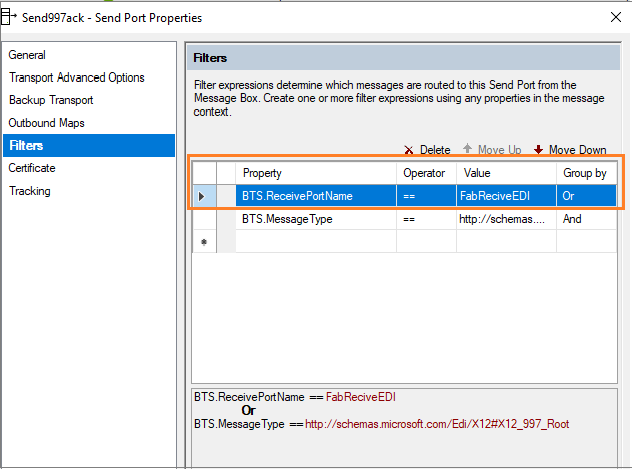
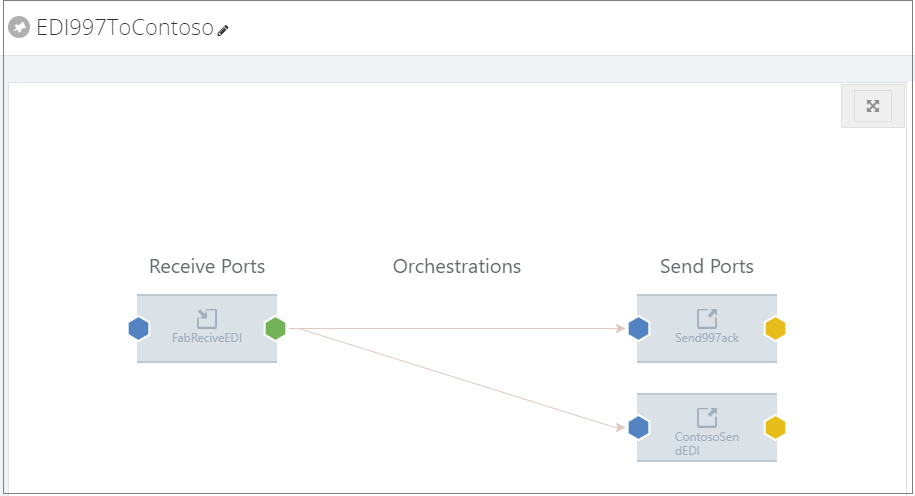
-
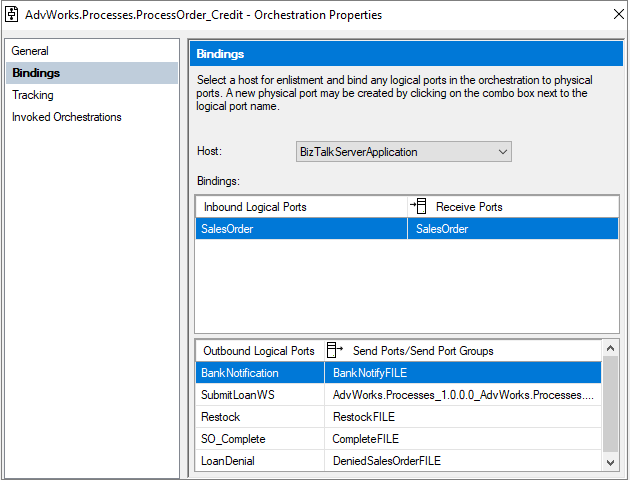
Orchestration Port Binding Model
The Orchestration Port Binding model uses the orchestration port binding relational data to determine the message flows. Using BizTalk Artifact tables (adm_ReceiveLocation, bts_receiveport, bts_sendport, bts_pipeline, bts_application) with orchestration port and orchestration port binding.
SELECT 'Pipeline' as fromServiceType,FROMPL.Name as fromServiceName,
RP.nvcName as fromPortName,
RP.uidGUID as fromUIdServiceId,
RPAPP.nvcName as fromAppName,

'Orchestration' as toServiceType, ORCH.nvcFullName as toServiceName, ORCH.uidGUID as toUIdServiceId, OP.nvcName as toPortName, '' as toAPPName

FROM [dbo].[bts_orchestration] ORCH

INNER JOIN  [dbo].[bts_orchestration_port] OP ON ORCH.nID = OP.nOrchestrationID

INNER JOIN [dbo].bts_porttype PT ON PT.nID = OP.nPortTypeID

INNER JOIN  [dbo].[bts_orchestration_port_binding] OPB ON OPB.nOrcPortID = OP.nID

LEFT OUTER JOIN [dbo].[bts_receiveport] RP ON RP.nID = OPB.nReceivePortID

LEFT OUTER JOIN adm_ReceiveLocation RL ON RL.ReceivePortId = RP.nID

LEFT OUTER JOIN bts_pipeline FROMPL ON FROMPL.Id = RL.ReceivePipelineId

LEFT OUTER JOIN bts_application RPAPP ON RPAPP.nID = RP.nApplicationID
WHERE OP.nPolarity = 2 AND RP.nvcName
IS NOT NULL AND (OP.nvcName  IS NOT NULL AND RP.nvcName IS NOT NULL)
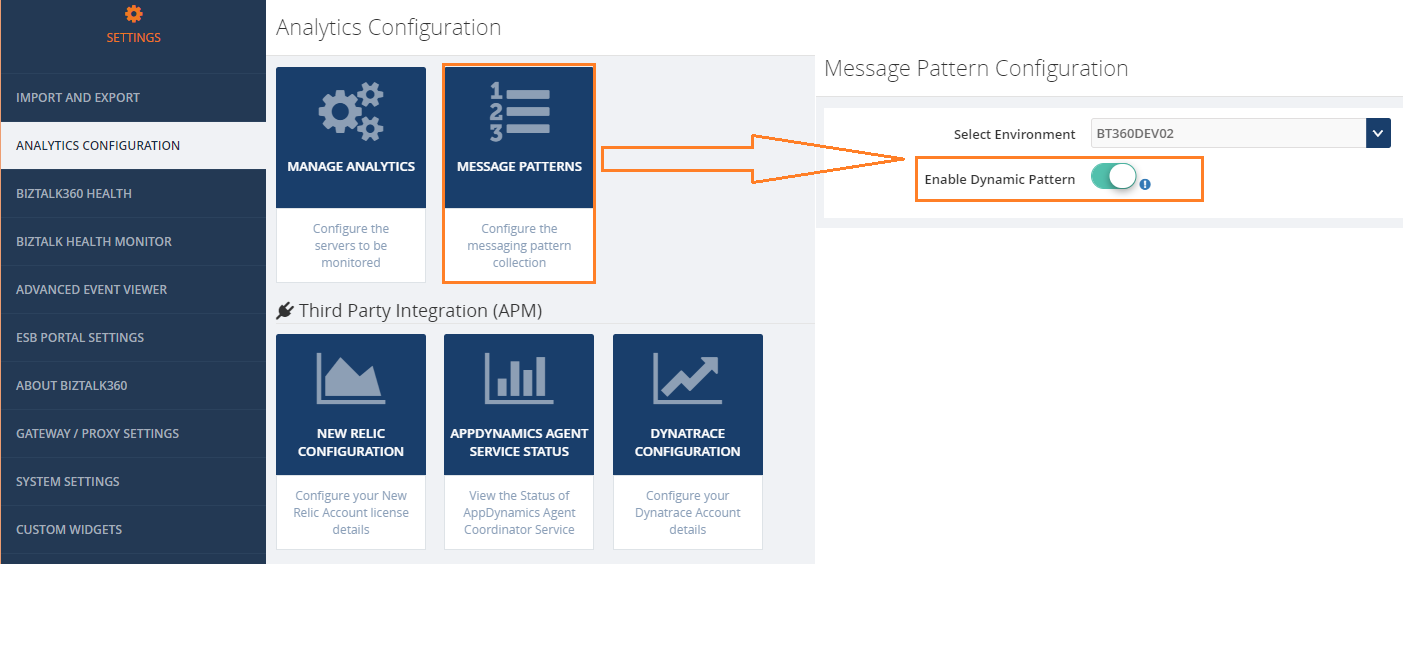
Message Pattern Configuration
Users can choose the message flow determination technique by enabling or disabling the Dynamic pattern option. When Dynamic pattern option is enabled, then the Message pattern will be determined using the tracking database. If it is disabled, it will use the BizTalk Management database to find the message patterns for the BizTalk Group.
 Few Points to be remembered to use this new mechanism (Dynamic Pattern – Disabled).
- Pipeline tracking needs to be enabled to see the message count and average execution time
- This mechanism will be able to determine the possible flows. In case a Port uses other filter criteria than Port Names, they are not determined
Other Improvements
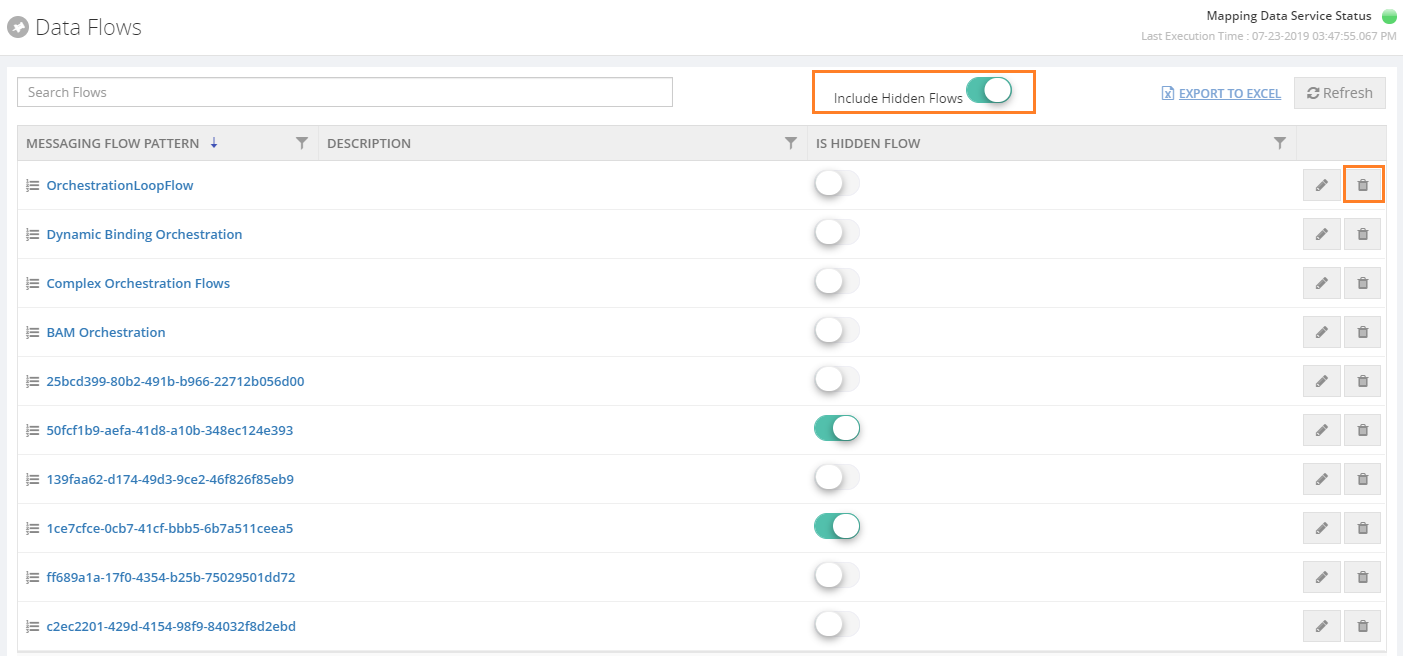
In the upcoming version of BizTalk360 v9.0 phase 2, we are bringing management capabilities like hiding and deleting of message flows.
The Hide Operation can be used on the message patterns that are decommissioned or less frequently used. The Delete Operation can be applied on the flows that are no longer used in BizTalk Group.
Conclusion
We hope these improvements will bring a new way to determine the message flows in your BizTalk environments. You can expect these improvements to be available in the upcoming version of 9.0 phase 2. We are constantly improving on customer feedback. Please share your requests through the feedback portal.
The post Challenges in determining the Message Pattern using tracking database appeared first on BizTalk360.
by Sandro Pereira | Jul 22, 2019 | BizTalk Community Blogs via Syndication
Recently on Serveless360, a community blog that I contribute, I explain how you able to expose an Azure Logic App as an API using Azure API Management (APIM) you can see more details about it here: How to Expose and protect Logic App using Azure API Management (Part 1) – Exposing the Logic App. Today’s question is: Can we do the same with Microsoft Flow? Can we expose a Microsoft Flow that exposes an HTTP endpoint as an API on APIM?
And the short answer is… yes yes! It not as easier as Logic Apps because you don’t have a direct and seamless way to do it, but it can manually be done. And the goal of this blog post is explained to you how to accomplish that.
What is Azure API Management?
Is not the goal of this blog post but for you to be contextualized, if you are not familiar with APIM, in a simple way, Azure API Management is a fully managed service that enables customers to publish, secure, transform, maintain, and monitor APIs.
And it will allow you in a matter of a few clicks in the Azure Portal, most of the times, for you to create an API façade that acts as a “front door” through which external and internal applications can access data or business logic implemented by your custom-built backend services, running on Azure, for example, Logic Apps, App Services, or other many services or running on-premises in your organization. The APIM then will be able to handle all the tasks involved in mediating API calls, like request authentication and authorization, rate limit and quota enforcement, request and response transformation, logging and tracing, and/or API version management.

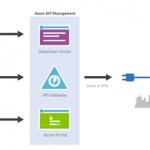
APIM is made up of the following components:
- The API gateway is the endpoint that:
- Accepts API calls and routes them to your backends.
- Verifies API keys, JWT tokens, certificates, and other credentials.
- Enforces usage quotas and rate limits.
- Transforms your API on the fly without code modifications.
- Caches backend responses were set up.
- Logs call metadata for analytics purposes.
- The Azure portal (old Publisher Portal) is the administrative interface where you set up your API program. Use it to:
- Define or import API schema.
- Package APIs into products.
- Set up policies like quotas or transformations on the APIs.
- Get insights from analytics.
- Manage users.
- The Developer portal serves as the main web presence for developers, where they can:
- Read API documentation.
- Try out an API via the interactive console.
- Create an account and subscribe to get API keys.
- Access analytics on their usage.
Note: in this blog post, I will not explain how you create an API Management resource on Azure.
Exposing a Microsoft Flow on Azure API Management
Triggered using an HTTP based trigger
The important thing, it needs to be triggered using an HTTP based trigger like the Request trigger.
Like Logic Apps, you can only expose a Microsoft Flow that is triggered using an HTTP based trigger like the Request trigger. Basically, that exposes an HTTP endpoint, on your APIM.
Exposing Microsoft Flow on Azure API Management
I told earlier that exposing a Microsoft Flow, it is not as easier as Logic Apps because you don’t have a direct and seamless way to do it.
The Microsoft APIM team has done a very good job and they created an intuitive and quite easy experience that quickly allows developers or administrators to add new APIs to APIM based on an Azure Logic Apps, if you try to add a new API you will get a “wizard” that you can actually choose to import a Logic App, and it will do everything for you:

So, for us to replicate the “Add Logic App” wizard and accomplish the goal of exposing a Flow on APIM we need to:
- First, we need to access to our Flow by accessing the Flow portal: https://flow.microsoft.com/ and sign in with your account
- In flow.microsoft.com, select My flows in the top navigation bar, and from the list of Flows, choose the flow you want to expose on APIM and select the Edit button.

- On the Flow Designer (or editor) click on top of the HTTP trigger to expand it and copy the HTTP POST URL property

We will need that URL in order to expose it in APIM.
Now that we have our Flow URL we can go ahead and start configuring our APIM:
- Access to your APIM on the Azure Portal (old Publisher Portal that is now built-in inside the Azure Portal;
- And on the left menu, under API Management section, click the API option

- By doing that under the All APIs section you will see the list of all APIs that you are already available, and on the main panel you will find several different options to add a new API to your list:
- From scratch – Blank API;
- Export based on an OpenAPI, WADL or WSDL specification;
- Or based on an Azure Service:
- Logic App
- API App
- Or a Function App
- In our case, we will be creating from the scratch, so go and press Blank API option

- And then let’s fill the creation form like this:
- On the Display name property give your API a name. I will call it “My Flow Demo”
- On the Name property, you may change the “internal” name. I will suggest leaving like that: “my-flow-demo”
- On the Web service URL property, paste the HTTP POST URL that we get from the Flow but only until the “triggers” word – Do not place the full
- https://{name}.azure.com:443/workflows/{GUID}/triggers
- You can put the full URL, but in this post, we will try to emulate almost all the steps that the APIM Logic App wizard does
- On the API URL suffix property, give a prefix to your API, for example: flowdemo
- On the Products property, you can bind this API to a product at this time or leave it blank. I will set mine as “Started”
- And finally, press Create

- What we need to do now is create our “manual-invoke” operation, to do that we need to do:
- Under our “My Flow Demo” API Design section, click + Add operation button

-
- And:
- On the Display name property give a name to the operation, I will call it “manual-invoke
- By the way, it doesn’t need to call this name, once again, we will use it just to emulate the API Logic App wizard behavior
- On the Name property, leave the default value: “manual-invoke”
- On the URL property:
- Set the operation to POST
- And set the URL like “/manual/paths/invoke”
- On the Description property, you may give a proper description for the operation, in our case, let’s put: Trigger a run of the Flow.
- Leave the rest of the configurations, we will deal with them later and go ahead and press Save

- Now that we have the basic outline of our operation let’s go ahead and configure it properly. To do that we need to:
- Select the “manual-invoke” operation and then click on the Frontend edit button

-
- And from the Frontend panel, select the Request option and them + Add representation button

-
-
- Set the Content type as “application/json”
- Provide a sample request on the Sample property
- And in the Definition property, select + New definition
- This will take your provide sample and generate the schema for you
- Just give a definition a name on the Definition name property: request-manual

-
-
-
-
- And then click Create definition button
- Go ahead and press Save once again
- Now let’s do the same for the Response. Once again, click on the Frontend edit button
- And from the Frontend panel, select the Responses option and them + Add response button
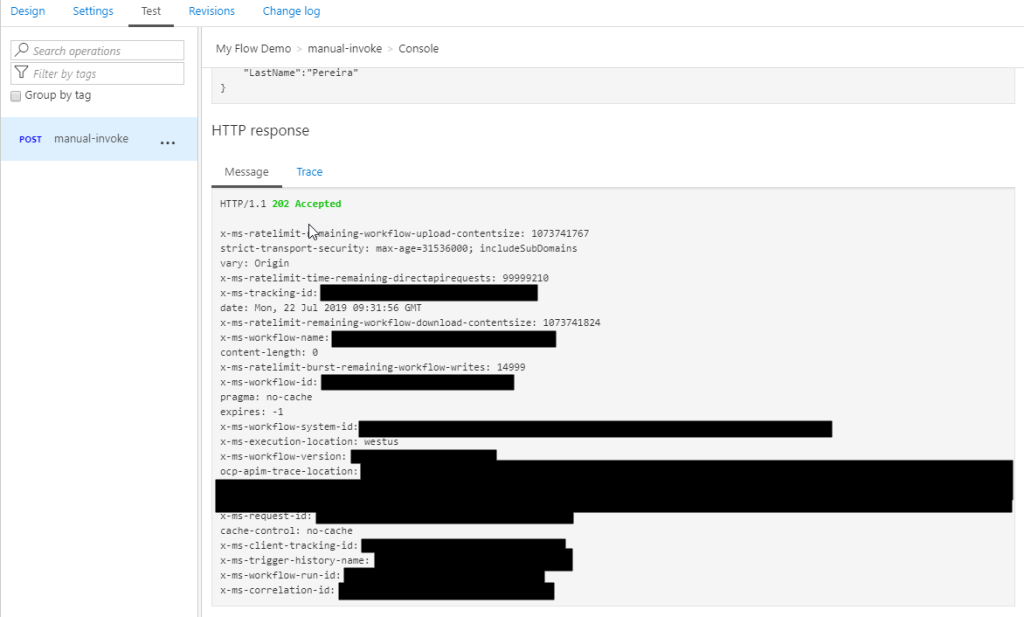
- Because my Flow doesn’t return any message back, instead of selecting the normal 200 OK HTTP Status, I will change that to be a 202 Accepted instead. So, on the response type select from the dropdown the 202 Accepted status and then press Save.
- Now that we have our Request and Response defined, the only thing we need to configure our policy properly, remember that in the API URL, we didn’t configure the entire URL. To do that we need to:
- Select the “manual-invoke” operation and then click on the Inbound processing Policies code editor button

-
-
- And in the Inbound policy we need to rewrite the URI, here is a sample of the policy you need to implement
<policies>
    <inbound>
        <base />
        <set-method id="apim-generated-policy">POST</set-method>
        <rewrite-uri id="apim-generated-policy" template="/manual/paths/invoke/?api-version=2016-06-01&sp=/triggers/manual/run&sv=1.0&sig=7xX3_XxX57XX-xXXXx-xXXXxXXxx5XXxXXxxxxXXXxx" />
        <set-header id="apim-generated-policy" name="Ocp-Apim-Subscription-Key" exists-action="delete" />
    </inbound>
    <backend>
        <base />
    </backend>
    <outbound>
        <base />
    </outbound>
    <on-error>
        <base />
    </on-error>
</policies>
Note: The only thing we didn’t do that the APIM Logic App wizard does is to create a key/value containing the “sig” property of the URL
Now we are all set to test our API.
Testing the Microsoft Flow exposed in Azure API Management
After all the above steps, the next step is for us to test the Logic App expose as an API on APIM before we give access to our developers, teams, or partners. And the easier way to do that is directly on the Azure Portal.
To do that you need to:
- Under the API top options menu, select Test option, and in this case, there is only one operation, so automatically is selected;
- On the Request body section, select Raw option and insert a valid and expected request to be sent to your Microsoft Flow;
- And finally, press Send.
And after that, you will see an expected response from the Microsoft Flow.
And we can check that the Flow was executed.
It failed because the payload is incorrect but other that everything is ok. We successfully exposed and trigger the Microsoft Flow from Azure API Management.
The post How to Expose Microsoft Flow thru Azure API Management appeared first on SANDRO PEREIRA BIZTALK BLOG.

by Gautam | Jul 21, 2019 | BizTalk Community Blogs via Syndication
Do you feel difficult to keep up to date on all the frequent updates and announcements in the Microsoft Integration platform and Azure iPaaS?
Integration weekly update can be your solution. It’s a weekly update on the topics related to Integration – enterprise integration, robust & scalable messaging capabilities and Citizen Integration capabilities empowered by Microsoft platform to deliver value to the business.
If you want to receive these updates weekly, then don’t forget to Subscribe!
Microsoft Announcements and Updates
Community Blog Posts
Videos
Podcasts
How get started with iPaaS design & development in Azure?
- Robust Cloud Integration with Azure
- Microsoft Azure for Developers: What to Use When
- Serverless Computing: The Big Picture
- Azure Logic Apps: Getting Started
- Azure Logic Apps: Fundamentals
- Microsoft Azure Developer: Creating Enterprise Logic Apps
- Microsoft Azure API Management Essentials
- Azure Functions Fundamentals
- Cloud Design Patterns for Azure: Availability and Resilience
- Architecting for High Availability in Microsoft Azure
Feedback
Hope this would be helpful. Please feel free to reach out to me with your feedback and questions.
by Sandro Pereira | Jul 18, 2019 | BizTalk Community Blogs via Syndication
Due to personal requests from some members of the community, I decided to release another minor version of my stencils pack that will include the following features:
- New shapes: new shapes were added to existing modules like:
- Logic App Inline Code (square – original that you can find in Logic App design)
- Logic App Inline Code JS (square – original that you can find in Logic App design)
- Logic App Inline Code (Custom shape version 1)
- Logic App Inline Code (Custom shape version 2)
- Secure Message Input
- Secure Message Output

Microsoft Integration, Azure, Power Platform, Office 365 and much more Stencils Pack it’s a Visio package that contains fully resizable Visio shapes (symbols/icons) that will help you to visually represent On-premise, Cloud or Hybrid Integration and Enterprise architectures scenarios (BizTalk Server, API Management, Logic Apps, Service Bus, Event Hub…), solutions diagrams and features or systems that use Microsoft Azure and related cloud and on-premises technologies in Visio 2016/2013:
- BizTalk Server
- Microsoft Azure
- Integration
- Integration Service Environments (ISE)
- Azure App Service (API Apps, Web Apps, Mobile Apps, and Logic Apps)
- Event Hubs, Event Grid, Service Bus, …
- API Management
- IoT, and Docker
- Machine Learning, Stream Analytics, Data Factory, Data Pipelines
- and so on
- Microsoft Power Platform
- Microsoft Flow
- PowerApps
- Power BI
- PowerShell
- Infrastructure, IaaS
- Office 365
- And many more…
- … and now non-related Microsoft technologies like:
You can download Microsoft Integration, Azure, BAPI, Office 365 and much more Stencils Pack for Visio from:
 Microsoft Integration, Azure, Power Platform, Office 365 and much more Stencils Pack for Visio
GitHub
Or from:
Microsoft Integration and Azure Stencils Pack for Visio 2016/2013 v4.0.2 (22,6 MB)
Microsoft | TechNet Gallery
The post New Logic App Inline Code icons are now included in Microsoft Integration (Azure and much more) Stencils Pack v4.0.2 for Visio appeared first on SANDRO PEREIRA BIZTALK BLOG.
by Yuvaranjani Kalichamy | Jul 18, 2019 | BizTalk Community Blogs via Syndication
At the moment we are working on release v9.0.2 of BizTalk360. As always, we have many exciting features and enhancements coming up with this release.
One of the main sections in BizTalk360 is the Analytics section. BizTalk360 Analytics offers a visual display of the most important performance counters that are consolidated and arranged on a single screen so that the information can be monitored in a glance. In addition to that, we have the Reporting feature in BizTalk360 where users are able to generate PDF documents of critical performance metrics and send emails to the user at specific time periods, depending on the requirement. This feature is available only to the platinum licensed BizTalk360 environments.
In the new version v9.0.2 of BizTalk360, you can add Secure SQL Queries which can be mapped to a schedule to get the SQL query output as a report.
Note: BizTalk360 consists of 6 default queries which the user can only execute. In addition to that, the user can create new custom SQL queries as per their business need.
Secure SQL Reports in Analytics Reporting
Scenario 1:
Consider the scenario where you have a list of messages that ware not received during the past few hours/days and you want to know the details of these unprocessed messages. Usually you will be checking this by executing the query manually, however, this can be difficult on your busy schedule as you need to switch between different tools. Luckily, this can now be done simply with the new “SQL Reports” feature under Reporting. Just create a query, map it to the schedule according to your needs and then you will start receiving the query output as a report.
Scenario 2:
Consider another scenario: in BizTalk360, you have many users using the application. It’s important that an administrator should be aware of who did what. This can be seen in the Governance and Auditing section manually, but you might need to filter the records every time. Instead of filtering the records manually each time, you can create a Custom SQL Query and map the query to the Reporting Schedule which will send a periodic report to the configured admin email address. With this, the admin can easily get a report with regards to the actions performed by the other users. You can schedule this report and get the query output as a PDF document in the Analytics Reporting.
User permissions required to Process the Secure SQL Query Reports in BizTalk360
By default, the Superuser will have access to all the queries and also to the BizTalk reporting feature.
In case of a normal user, as a first step of processing the Secure SQL Query Reports, the user should ensure that the below permissions are provided.
The user should have permissions to:
- BizTalk Reporting
- Secure SQL Queries
Note: whenever a new query is being created, the user should ensure that, the normal user will be provided access to the newly created query (BizTalk360-> Settings-> User Access Policy-> Manage Users-> Secure SQL Queries-> Advanced).
Once all permissions set, the next step is to create a Reporting Schedule.
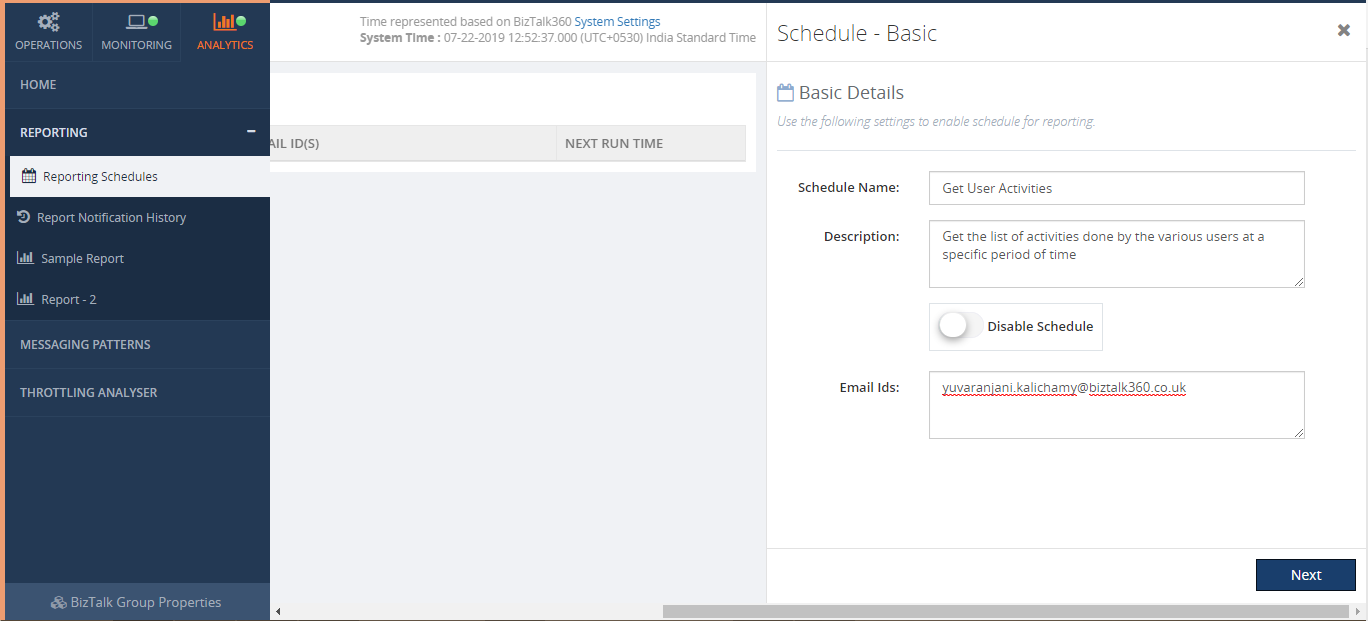
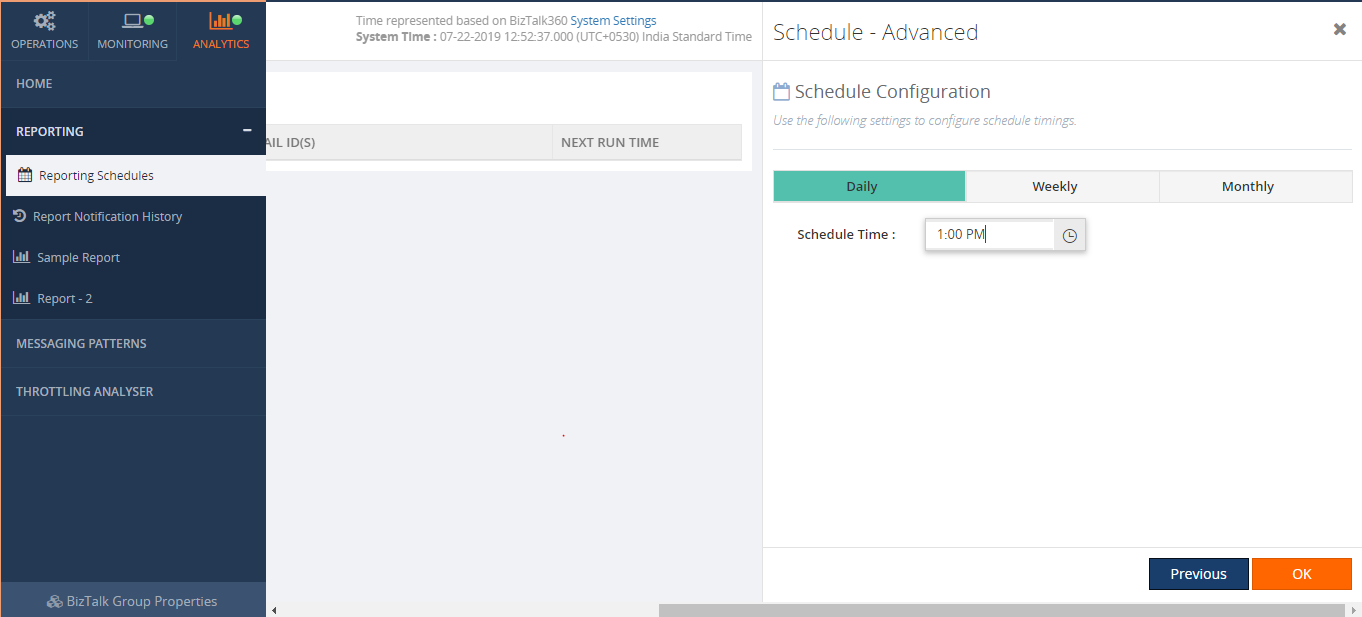
From the schedule configuration screen, you can define when you want to generate a report. The available options are Daily, Weekly and Monthly. Say, for instance, if the user wants to get a report on a daily basis, the user can choose Daily and set the time as per their need. This way the user will get the report on the scheduled time on a daily basis.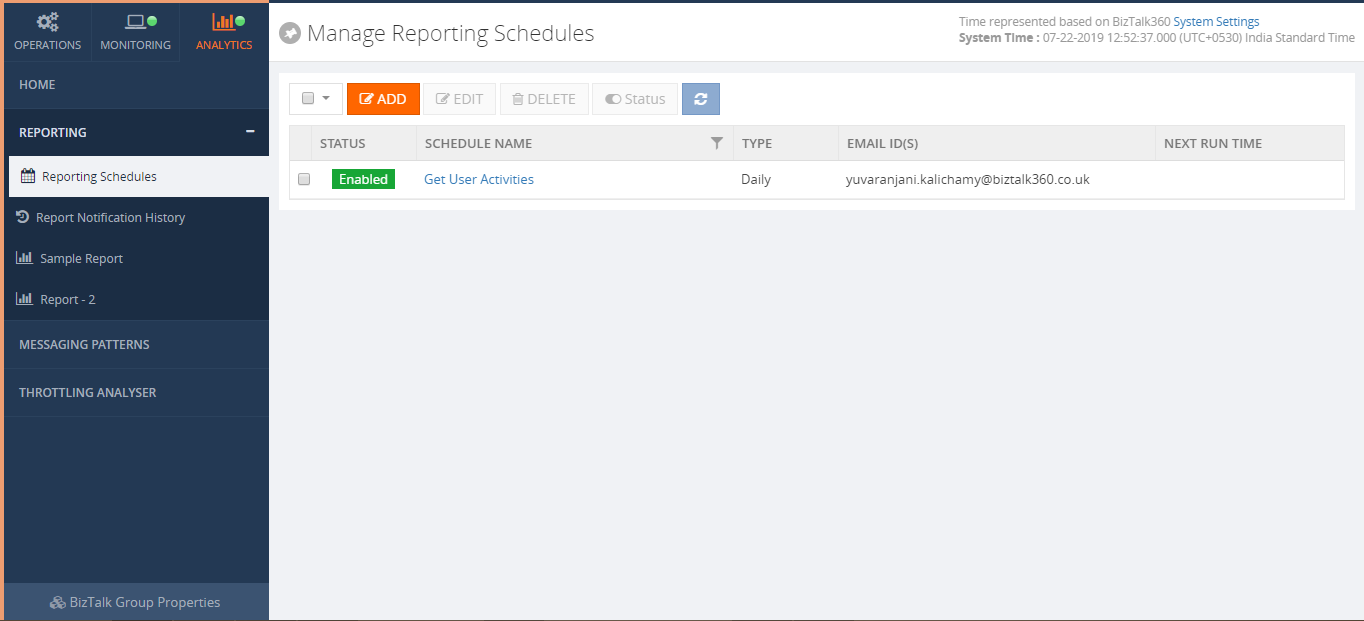
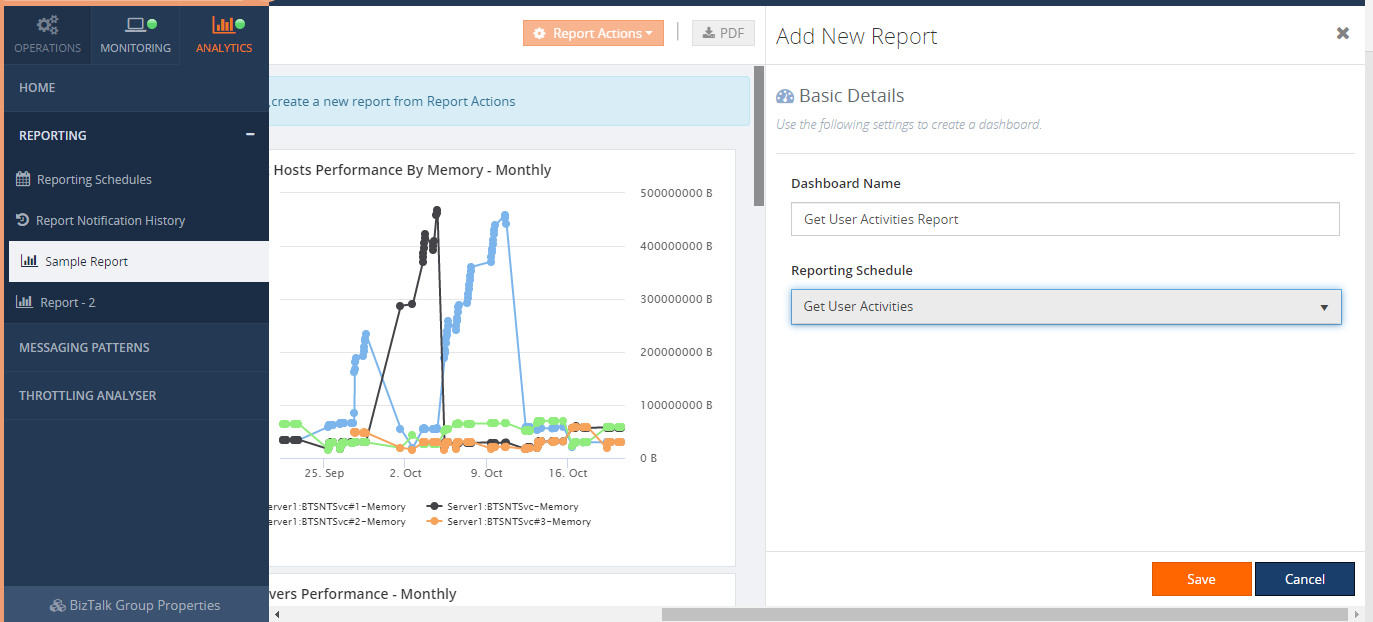
Once you have created a schedule, the next step is creating a report and map that report to the reporting schedule.
Once all is done, add a SQL Query widget by clicking ‘Secure SQL Query Results’ in the right panel.
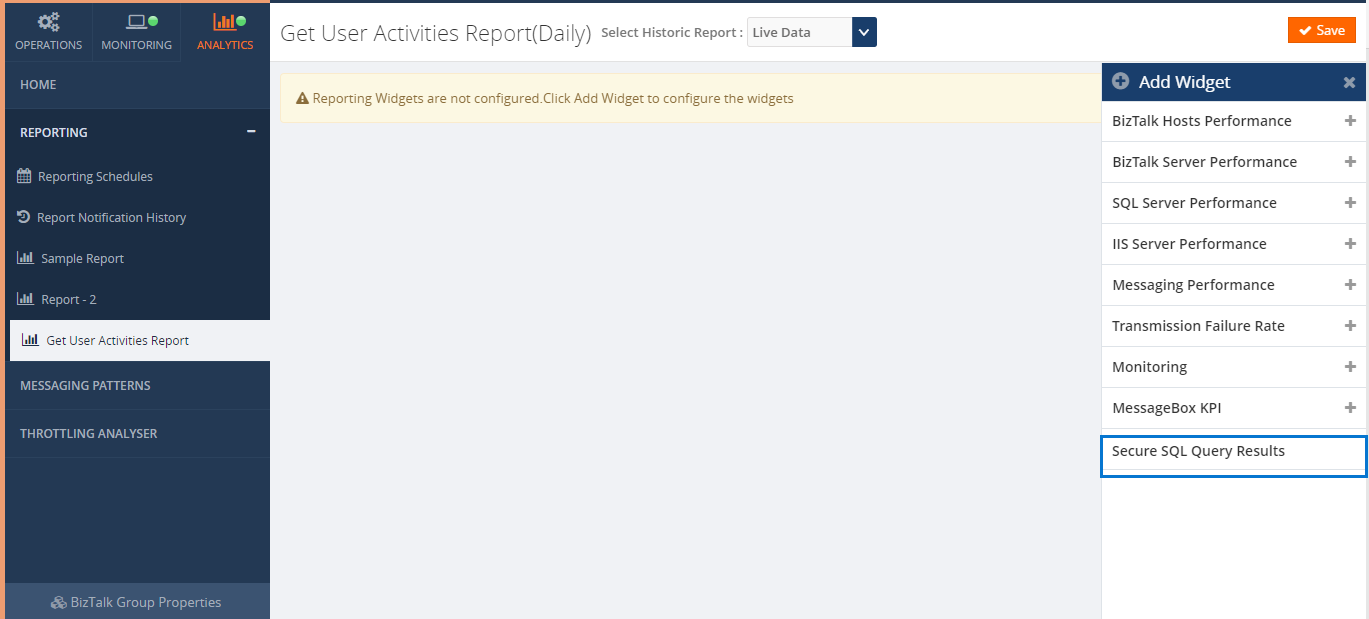
When you click on ‘Secure SQL Query Results’, it opens the blade where you can enter the widget title and select the query from the list (List of Saved queries created in BizTalk360-> Operation-> Data Access -> Secure SQL Queries section).
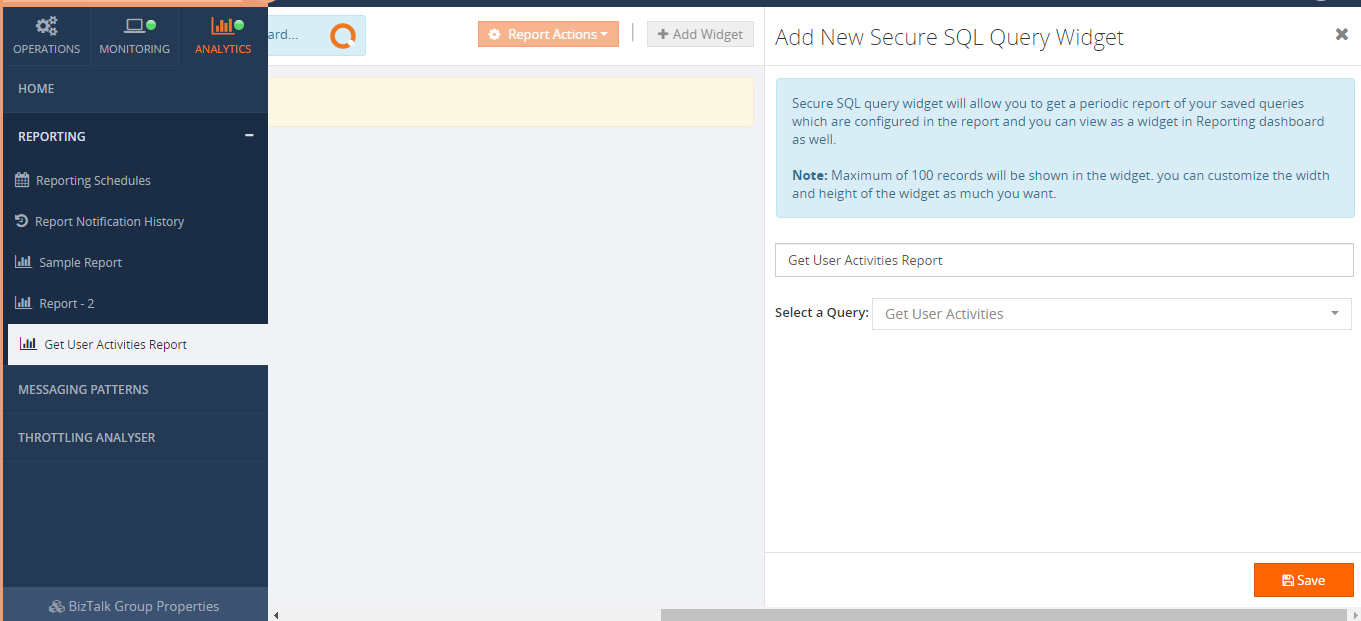
Once you click on ‘Save’, the widget will be added in a reporting dashboard.
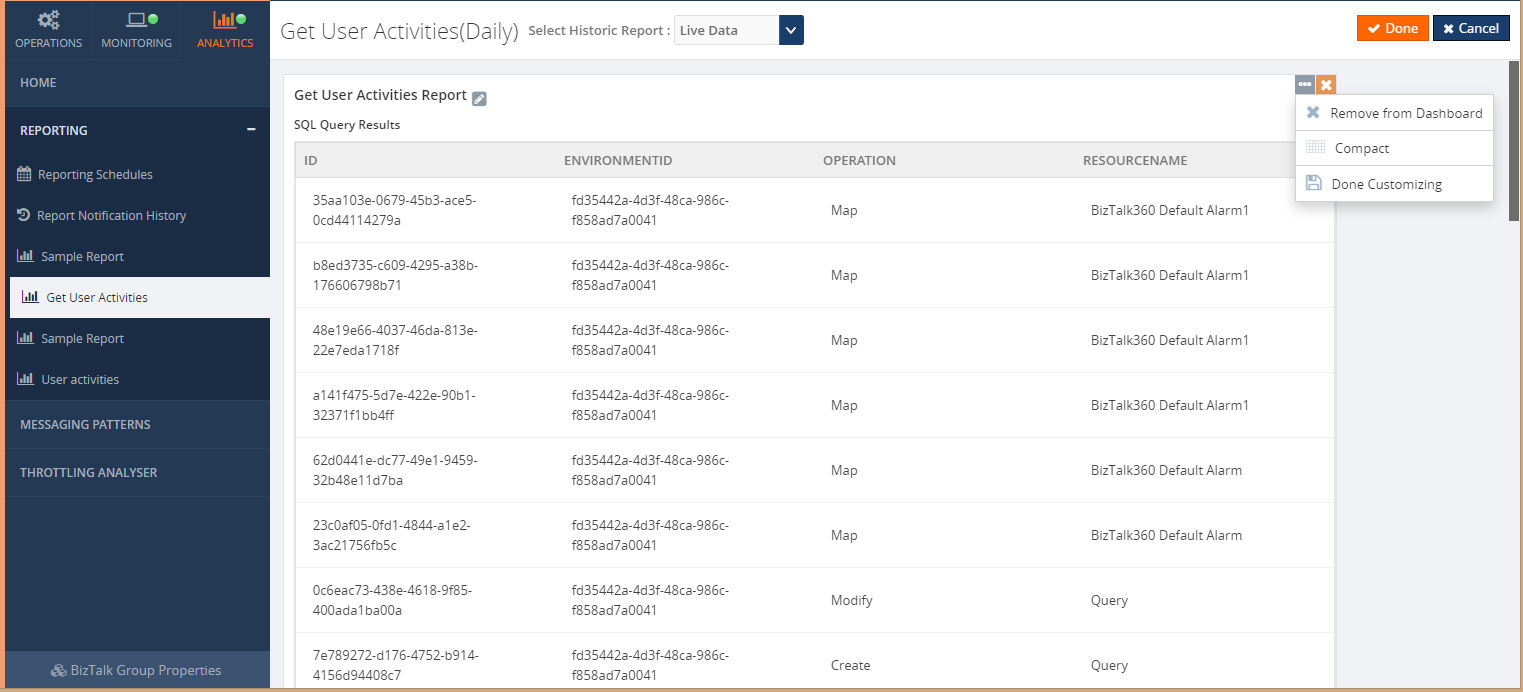
When the widget is added to the dashboard, it gets added with the maximum width and height. In the case of having a bigger number of records, space might not be enough to view all the records. For that, we have provided the option to customize the widget. You can expand the widget as much as you want. For now, we are allowing a maximum of 100 records (top 100 records) in the widget.

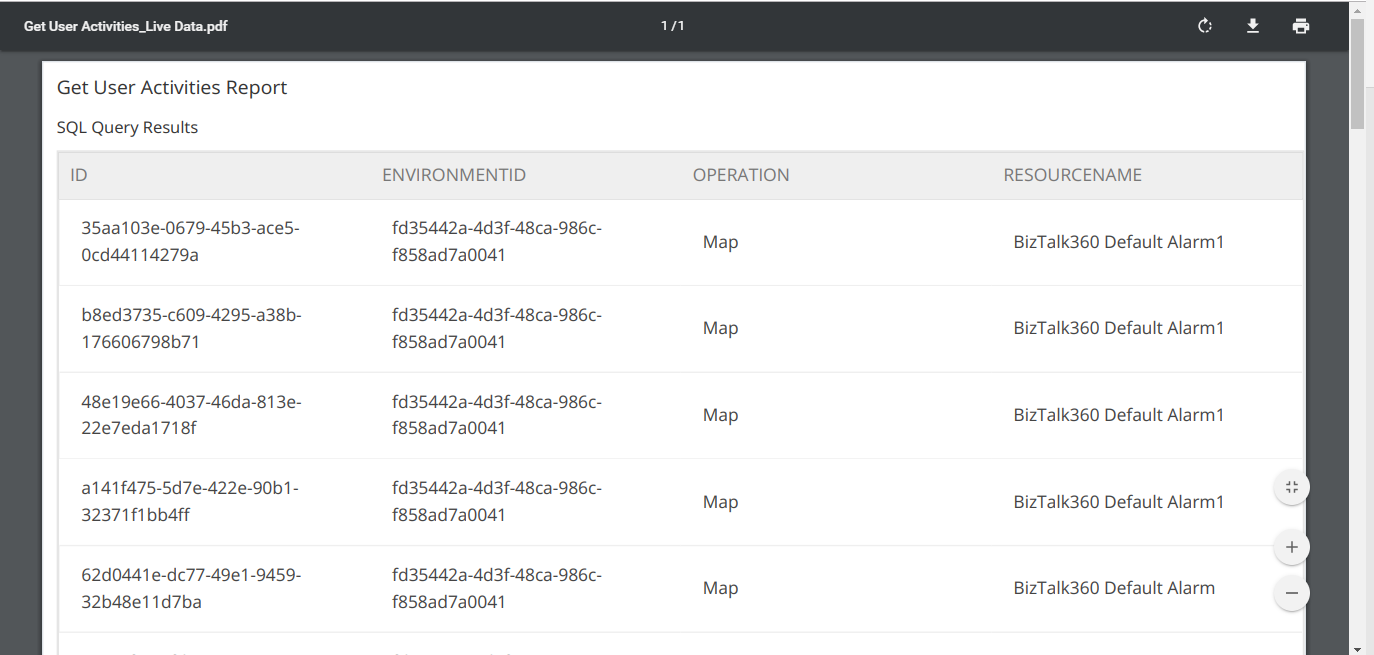
When you click on the ‘PDF’ button, the downloaded PDF document will look like below. The same will be sent to the configured email ids.
Conclusion
SQL Reports makes your work easier, you will get in time report summaries of what you want to know about your BizTalk environment.
The post Secure SQL Query Reports appeared first on BizTalk360.
WhatsApp Image 2019-06-27 at 10.59.51 AM")