Recently on Serveless360, a community blog that I contribute, I explain how you able to expose an Azure Logic App as an API using Azure API Management (APIM) you can see more details about it here: How to Expose and protect Logic App using Azure API Management (Part 1) – Exposing the Logic App. Today’s question is: Can we do the same with Microsoft Flow? Can we expose a Microsoft Flow that exposes an HTTP endpoint as an API on APIM?
And the short answer is… yes yes! It not as easier as Logic Apps because you don’t have a direct and seamless way to do it, but it can manually be done. And the goal of this blog post is explained to you how to accomplish that.
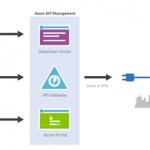
What is Azure API Management?
Is not the goal of this blog post but for you to be contextualized, if you are not familiar with APIM, in a simple way, Azure API Management is a fully managed service that enables customers to publish, secure, transform, maintain, and monitor APIs.
And it will allow you in a matter of a few clicks in the Azure Portal, most of the times, for you to create an API façade that acts as a “front door” through which external and internal applications can access data or business logic implemented by your custom-built backend services, running on Azure, for example, Logic Apps, App Services, or other many services or running on-premises in your organization. The APIM then will be able to handle all the tasks involved in mediating API calls, like request authentication and authorization, rate limit and quota enforcement, request and response transformation, logging and tracing, and/or API version management.

APIM is made up of the following components:
- The API gateway is the endpoint that:
- Accepts API calls and routes them to your backends.
- Verifies API keys, JWT tokens, certificates, and other credentials.
- Enforces usage quotas and rate limits.
- Transforms your API on the fly without code modifications.
- Caches backend responses were set up.
- Logs call metadata for analytics purposes.
- The Azure portal (old Publisher Portal) is the administrative interface where you set up your API program. Use it to:
- Define or import API schema.
- Package APIs into products.
- Set up policies like quotas or transformations on the APIs.
- Get insights from analytics.
- Manage users.
- The Developer portal serves as the main web presence for developers, where they can:
- Read API documentation.
- Try out an API via the interactive console.
- Create an account and subscribe to get API keys.
- Access analytics on their usage.
Note: in this blog post, I will not explain how you create an API Management resource on Azure.
Exposing a Microsoft Flow on Azure API Management
Triggered using an HTTP based trigger
The important thing, it needs to be triggered using an HTTP based trigger like the Request trigger.
Like Logic Apps, you can only expose a Microsoft Flow that is triggered using an HTTP based trigger like the Request trigger. Basically, that exposes an HTTP endpoint, on your APIM.
Exposing Microsoft Flow on Azure API Management
I told earlier that exposing a Microsoft Flow, it is not as easier as Logic Apps because you don’t have a direct and seamless way to do it.
The Microsoft APIM team has done a very good job and they created an intuitive and quite easy experience that quickly allows developers or administrators to add new APIs to APIM based on an Azure Logic Apps, if you try to add a new API you will get a “wizard” that you can actually choose to import a Logic App, and it will do everything for you:

So, for us to replicate the “Add Logic App” wizard and accomplish the goal of exposing a Flow on APIM we need to:
- First, we need to access to our Flow by accessing the Flow portal: https://flow.microsoft.com/ and sign in with your account
- In flow.microsoft.com, select My flows in the top navigation bar, and from the list of Flows, choose the flow you want to expose on APIM and select the Edit button.

- On the Flow Designer (or editor) click on top of the HTTP trigger to expand it and copy the HTTP POST URL property

We will need that URL in order to expose it in APIM.
Now that we have our Flow URL we can go ahead and start configuring our APIM:
- Access to your APIM on the Azure Portal (old Publisher Portal that is now built-in inside the Azure Portal;
- And on the left menu, under API Management section, click the API option

- By doing that under the All APIs section you will see the list of all APIs that you are already available, and on the main panel you will find several different options to add a new API to your list:
- From scratch – Blank API;
- Export based on an OpenAPI, WADL or WSDL specification;
- Or based on an Azure Service:
- Logic App
- API App
- Or a Function App
- In our case, we will be creating from the scratch, so go and press Blank API option

- And then let’s fill the creation form like this:
- On the Display name property give your API a name. I will call it “My Flow Demo”
- On the Name property, you may change the “internal” name. I will suggest leaving like that: “my-flow-demo”
- On the Web service URL property, paste the HTTP POST URL that we get from the Flow but only until the “triggers” word – Do not place the full
- https://{name}.azure.com:443/workflows/{GUID}/triggers
- You can put the full URL, but in this post, we will try to emulate almost all the steps that the APIM Logic App wizard does
- On the API URL suffix property, give a prefix to your API, for example: flowdemo
- On the Products property, you can bind this API to a product at this time or leave it blank. I will set mine as “Started”
- And finally, press Create

- What we need to do now is create our “manual-invoke” operation, to do that we need to do:
- Under our “My Flow Demo” API Design section, click + Add operation button

-
- And:
- On the Display name property give a name to the operation, I will call it “manual-invoke
- By the way, it doesn’t need to call this name, once again, we will use it just to emulate the API Logic App wizard behavior
- On the Name property, leave the default value: “manual-invoke”
- On the URL property:
- Set the operation to POST
- And set the URL like “/manual/paths/invoke”
- On the Description property, you may give a proper description for the operation, in our case, let’s put: Trigger a run of the Flow.
- Leave the rest of the configurations, we will deal with them later and go ahead and press Save
- On the Display name property give a name to the operation, I will call it “manual-invoke
- And:

- Now that we have the basic outline of our operation let’s go ahead and configure it properly. To do that we need to:
- Select the “manual-invoke” operation and then click on the Frontend edit button

-
- And from the Frontend panel, select the Request option and them + Add representation button

-
-
- Set the Content type as “application/json”
- Provide a sample request on the Sample property
- And in the Definition property, select + New definition
- This will take your provide sample and generate the schema for you
- Just give a definition a name on the Definition name property: request-manual
-

-
-
-
-
- And then click Create definition button
-
- Go ahead and press Save once again
-
- Now let’s do the same for the Response. Once again, click on the Frontend edit button
- And from the Frontend panel, select the Responses option and them + Add response button
- Because my Flow doesn’t return any message back, instead of selecting the normal 200 OK HTTP Status, I will change that to be a 202 Accepted instead. So, on the response type select from the dropdown the 202 Accepted status and then press Save.
- Now that we have our Request and Response defined, the only thing we need to configure our policy properly, remember that in the API URL, we didn’t configure the entire URL. To do that we need to:
- Select the “manual-invoke” operation and then click on the Inbound processing Policies code editor button
-

-
-
- And in the Inbound policy we need to rewrite the URI, here is a sample of the policy you need to implement
-
<policies>
    <inbound>
        <base />
        <set-method id="apim-generated-policy">POST</set-method>
        <rewrite-uri id="apim-generated-policy" template="/manual/paths/invoke/?api-version=2016-06-01&sp=/triggers/manual/run&sv=1.0&sig=7xX3_XxX57XX-xXXXx-xXXXxXXxx5XXxXXxxxxXXXxx" />
        <set-header id="apim-generated-policy" name="Ocp-Apim-Subscription-Key" exists-action="delete" />
    </inbound>
    <backend>
        <base />
    </backend>
    <outbound>
        <base />
    </outbound>
    <on-error>
        <base />
    </on-error>
</policies>- And then press Save.
Note: The only thing we didn’t do that the APIM Logic App wizard does is to create a key/value containing the “sig” property of the URL
Now we are all set to test our API.
Testing the Microsoft Flow exposed in Azure API Management
After all the above steps, the next step is for us to test the Logic App expose as an API on APIM before we give access to our developers, teams, or partners. And the easier way to do that is directly on the Azure Portal.
To do that you need to:
- Under the API top options menu, select Test option, and in this case, there is only one operation, so automatically is selected;
- On the Request body section, select Raw option and insert a valid and expected request to be sent to your Microsoft Flow;
- And finally, press Send.

And after that, you will see an expected response from the Microsoft Flow.
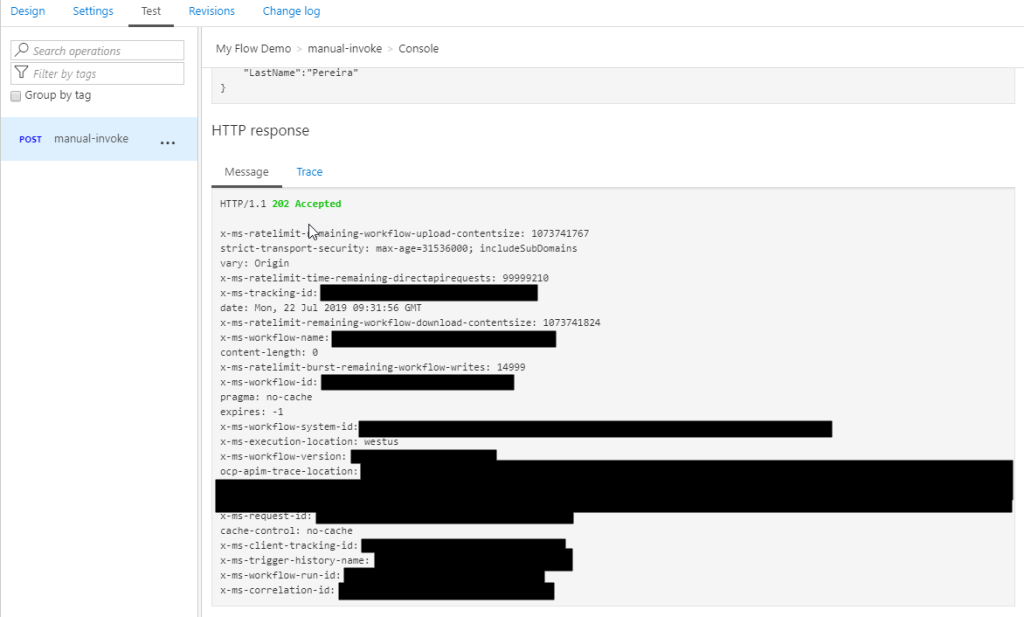
And we can check that the Flow was executed.

It failed because the payload is incorrect but other that everything is ok. We successfully exposed and trigger the Microsoft Flow from Azure API Management.
The post How to Expose Microsoft Flow thru Azure API Management appeared first on SANDRO PEREIRA BIZTALK BLOG.