by Yuvaranjani Kalichamy | Oct 15, 2019 | BizTalk Community Blogs via Syndication
The Analytics Reporting feature is one of the main features which offers out of the box capabilities. It allows users to create schedules and generate PDF documents based on critical performance metrics at specific time periods. In previous versions, we supported only default pre-configured widgets in the Analytics reporting section. From v9.0.2 we provided an option to configure the Secure SQL Queries widgets in the Reporting section.
In the upcoming version v9.0.3, we extended this to support Analytics custom widgets, with this the user can configure the performance metrics as a widget and get them as a report.
Analytics Custom Widgets
In the Analytics dashboard, we have an option to configure performance widgets to the dashboard. Once you enabled any of the types (BizTalk, SQL, IIS, and Windows) in any selected environment, the BizTalk360 Analytics service will start collecting the performance metrics. These performance metrics can be mapped to the custom widget.
Some of our customers requested us to bring the ability to manage analytics custom widgets in the Reporting section. Considering the business value, for BizTalk360 v9.0.3, we are bringing an option to manage analytics custom widgets to the Analytics Reporting, as well as new user experience of the Reporting section.
Analytics Custom Widgets in Reporting
Let’s take a few scenarios to understand what we can achieve with the custom widgets.
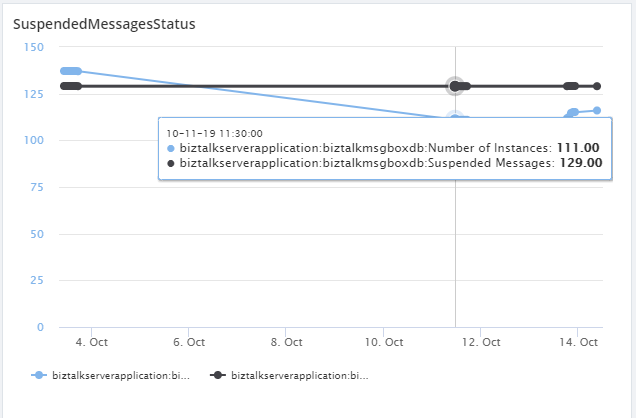
Get the Host Suspended Messages Metrics
Using Analytics custom widget, you can determine the Suspended messages metrics and also the number of instances, per host instances, in a graphical representation. For this, you need to enable the Performance counter Server->BizTalk->BizTalk: Message Box: Host Counters. Once you enabled the metrics and configured to the widget, it will fetch the current metrics values and represent them in a graphical way.
Comparing the performance of two BizTalk servers
Consider another scenario where you would like to compare the performance of two BizTalk servers and find which server consumes more memory and CPU. This can be achieved by configuring servers and select the appropriate metrics for the widgets.
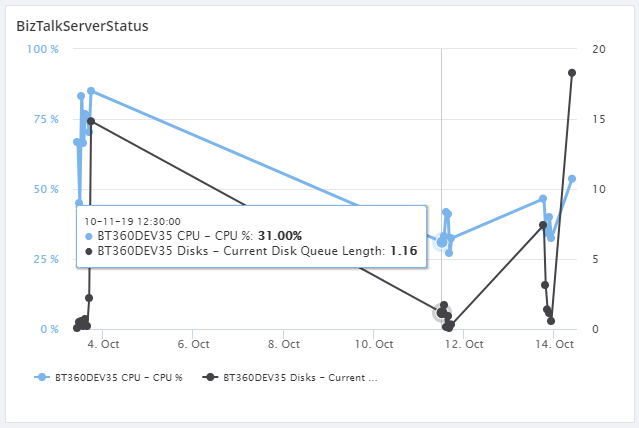
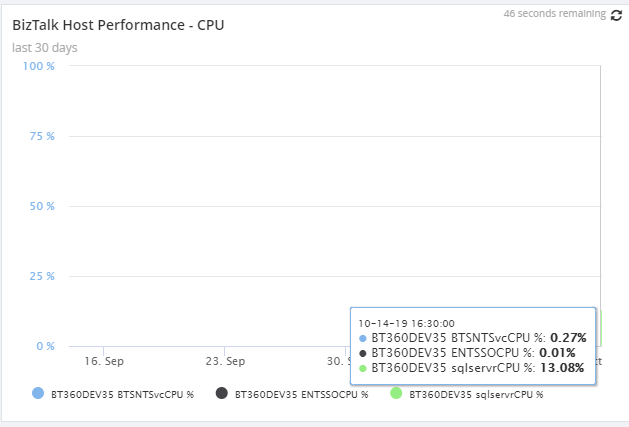
BizTalk Host Performance By CPU
By enabling the Server->BizTalk->Process -> % Process time, in Analytics Configuration under the Settings section, you can see the Host Performance by CPU, by using an Analytics custom widget. Once you enabled the metrics and configured the widget, the Analytics service will collect the counters for the selected metrics and represent it in a graphical way.
Below are some of the BizTalk performance metrics which you can configure as an analytics custom widget and get it as a report.
BizTalk and SQL Server Health
- CPU Usage
- Memory Usage
- Disk Free Space
- Average Disk Queue Length
- Network Performance
- IIS Request Per Sec
- IIS Worker Process: CPU Usage
- IIS Worker Process: Memory Usage
Host Performance
- Host Instance performance by CPU
- Host Instance Performance by Memory
- CPU Consuming Host Instances
- Top 10 Memory Consuming Host Instances
BizTalk Messaging Performance
- BizTalk Host Performance
- Documents Receive/Second
- Documents Processed/Second
- Inbound Latency (Sec)
- Outbound Latency (Sec)
- Outbound Adapter Latency (Sec)
- Request -Response Latency
Throttling Performance
- Message delivery Throttling State
- Message Publishing Throttling State
- Message Delivery Outgoing Rate
- Message Delivery Incoming Rate
- Active Instance Count
- Database Size
- Database Session
- Database Session Threshold
- In-Process message Count
- In-Process Message Count threshold
- Message publishing incoming Rate
- Message Publishing Outgoing Rate
Reports
In order to improve the user experience in the Analytics Reporting section, we have modified the User Interface for that section.
Previously, when we create a new report, the report would be added under the Reporting group on the left side navigation bar. We felt that it would be a bit confusing to the customer like where to start with. So, we removed the navigations and introduced a new page for Manage Reports.
In the Analytics Reporting Section, we now have 3 sub-menus:
- Reporting Schedules
- Manage Reports
- Report Notification History
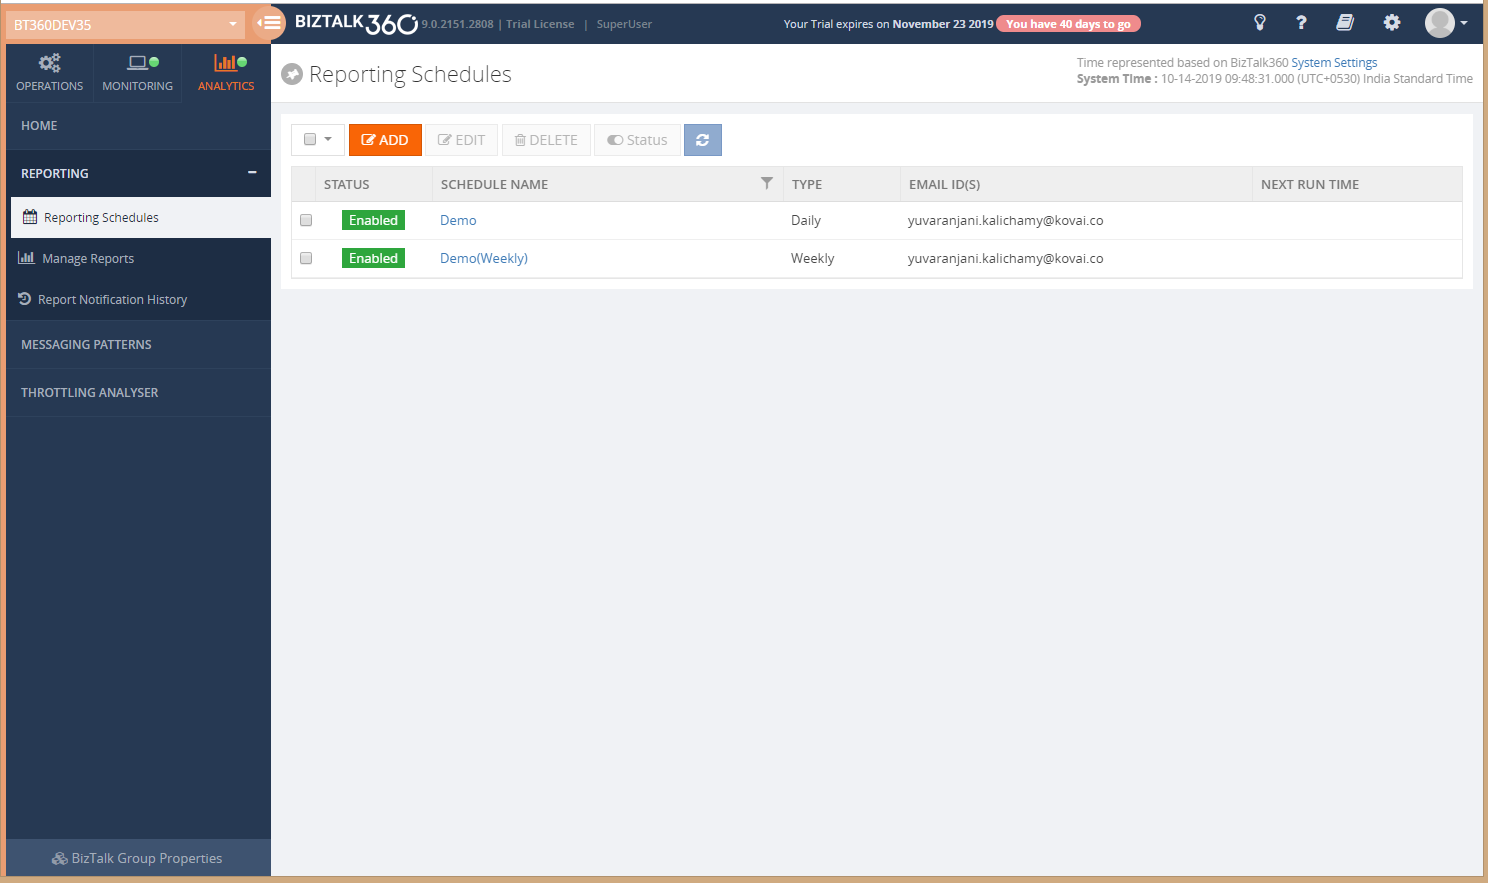
Reporting Schedules
As a first step, you need to create a schedule to get a periodic report of the configured widgets. To create a schedule, refer to this article.
Manage Reports
Once after creating a schedule, the next step is to create a report and add widgets to the report. Once you get into the Manage Reports section, you will be able to see the Sample report in the grid. You can’t do any operations with the ‘Sample Report’ except viewing the sample widgets.

By clicking Configure reports icon, you can see the Sample widgets in the Report.
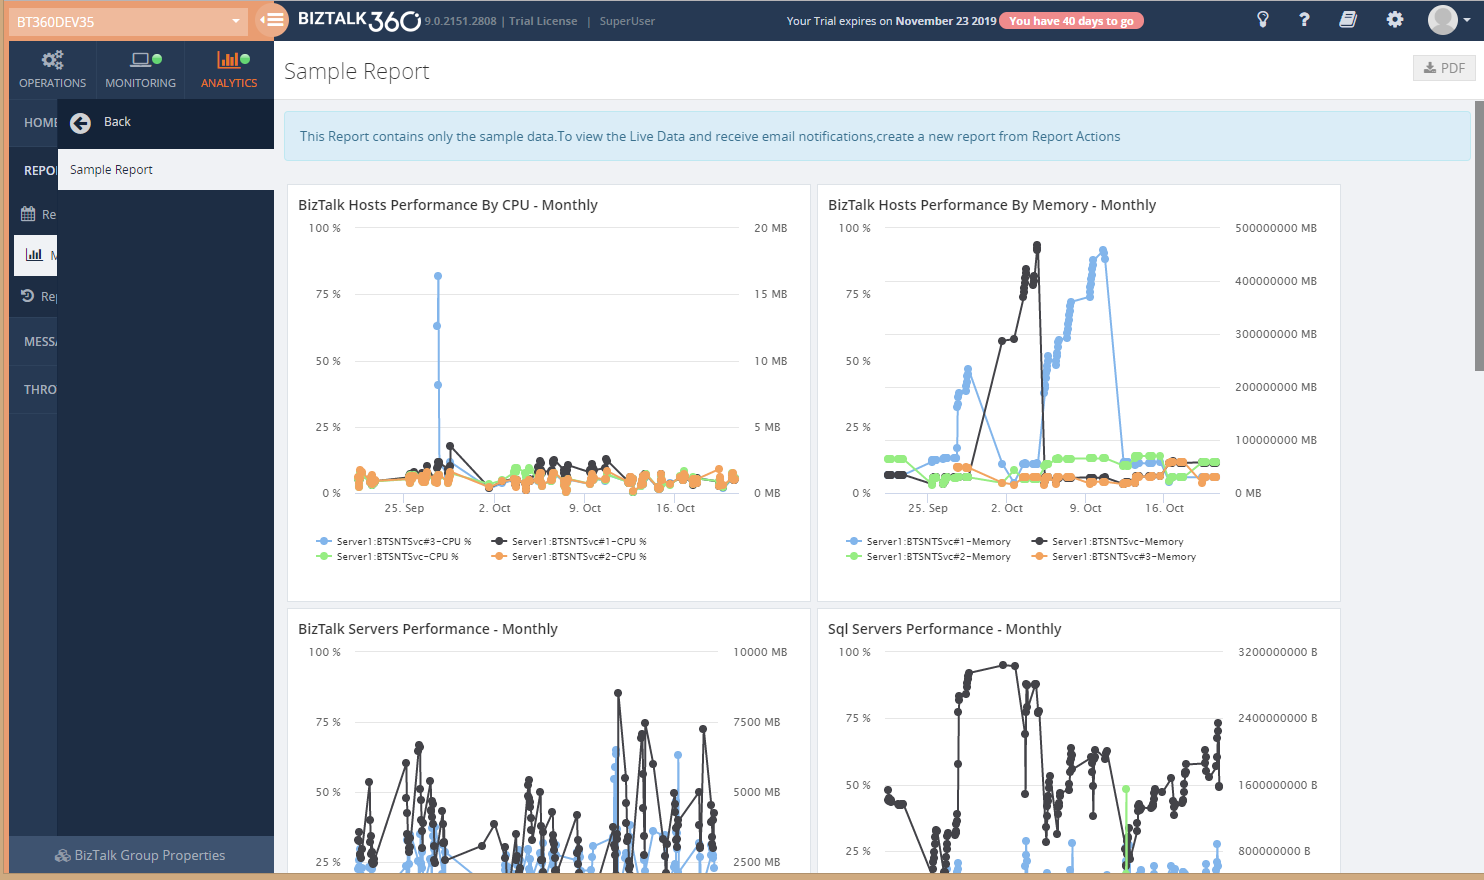
In the Manage Reports section, you can manage (Add/Edit/Delete/Clone) the reports.
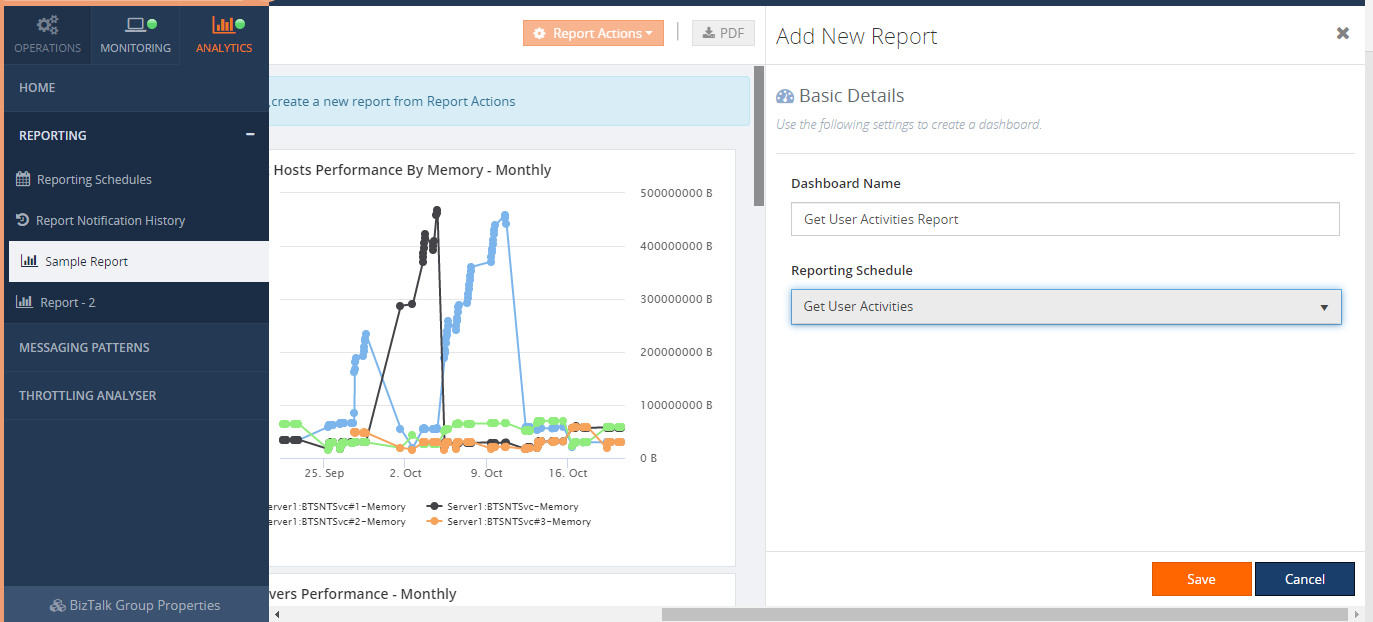
To create a new report, click on the ‘Add New Report’, the blade will open and then you can provide the name of the report and chose the schedule (how often do you want to receive the reported).
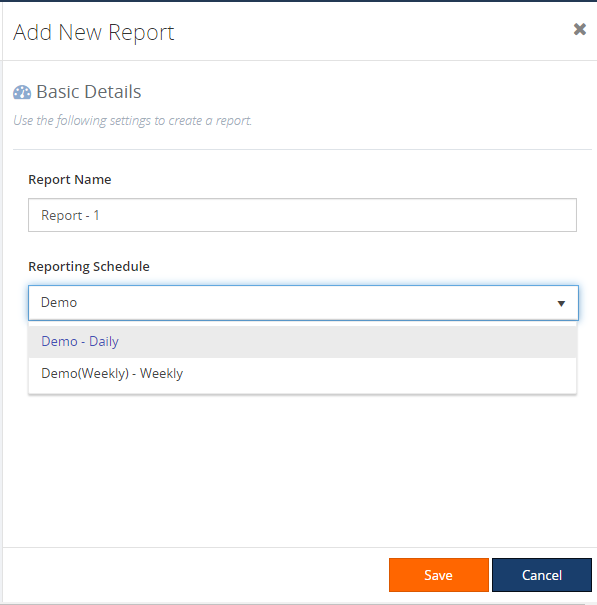
Once after you have saved the configuration, the new report will be generated and added to the grid. The Sample Report will be removed from the grid.
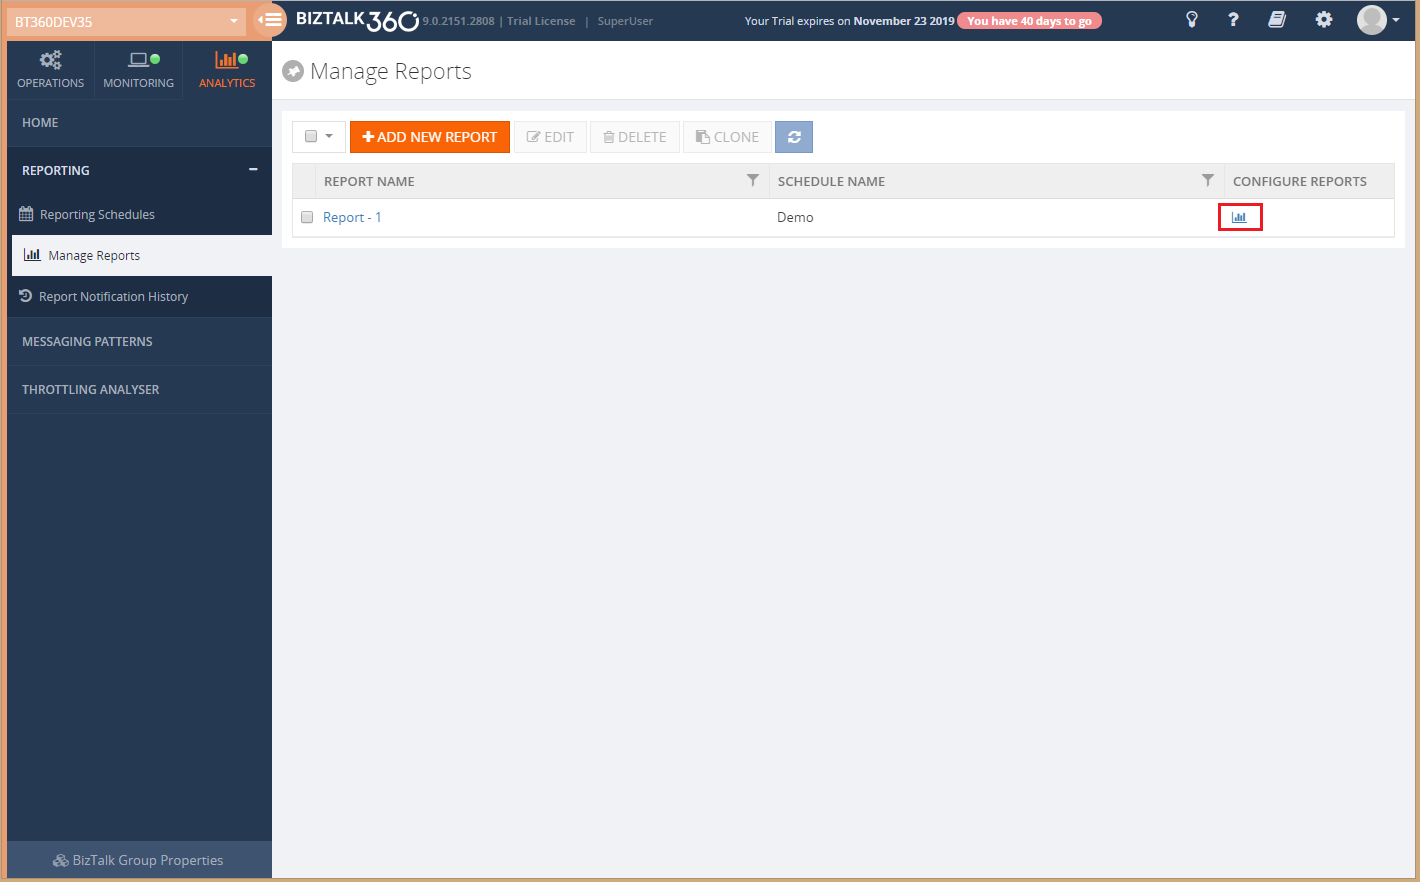
To manage the widgets in the report, click on the Configure Reports icon.
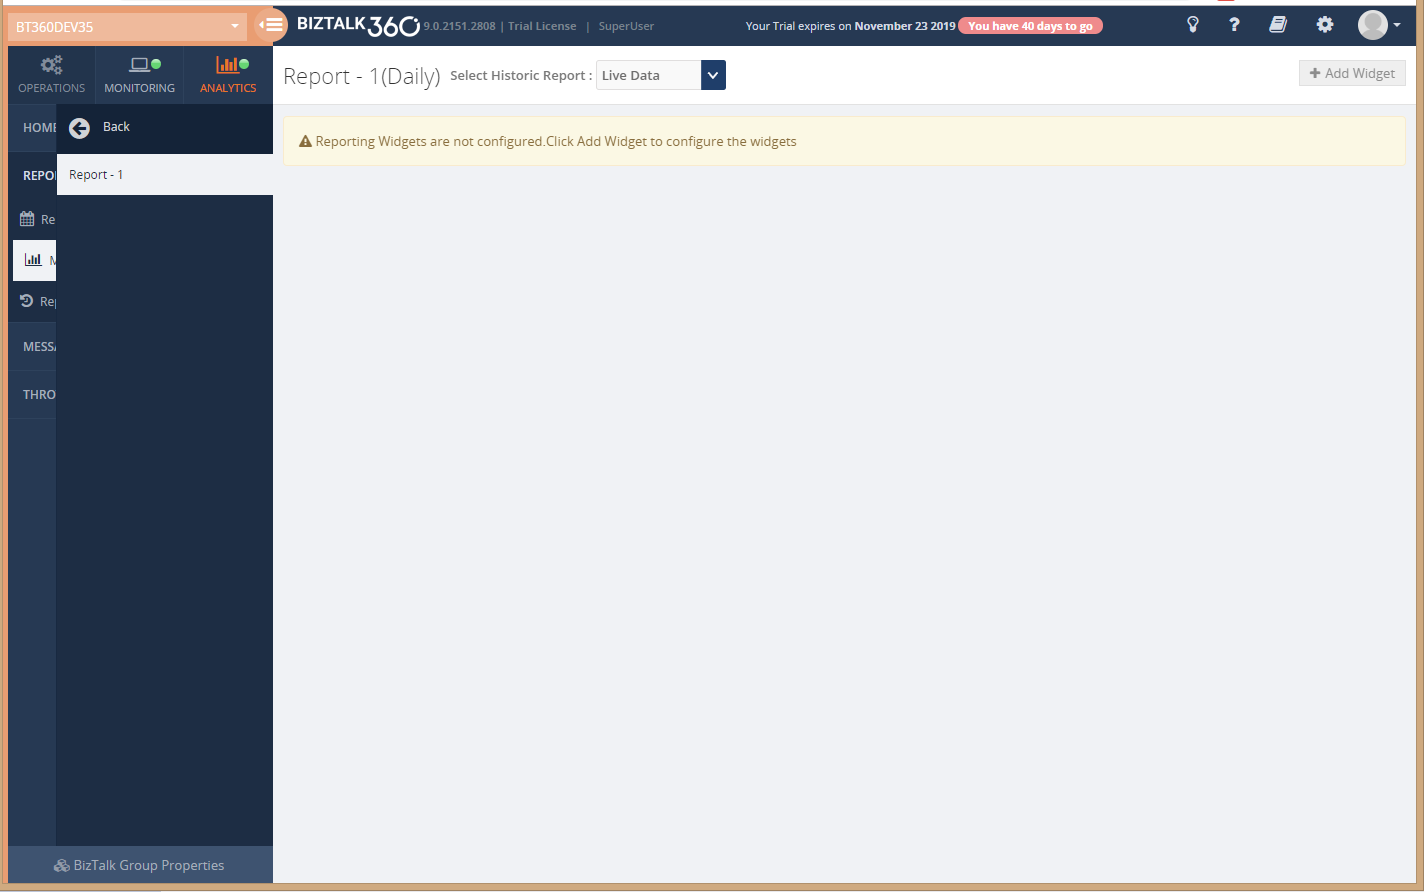
There you can see the options to add widgets(custom/basic). Refer to the Manage Widgets article to know more about how to manage the widgets in the Report.
Configure Analytics Custom Widgets to the Report
Click on ‘Add Widget’, this will open a blade. At the bottom of the blade you can see the ‘Create Analytics Custom widget’ option.
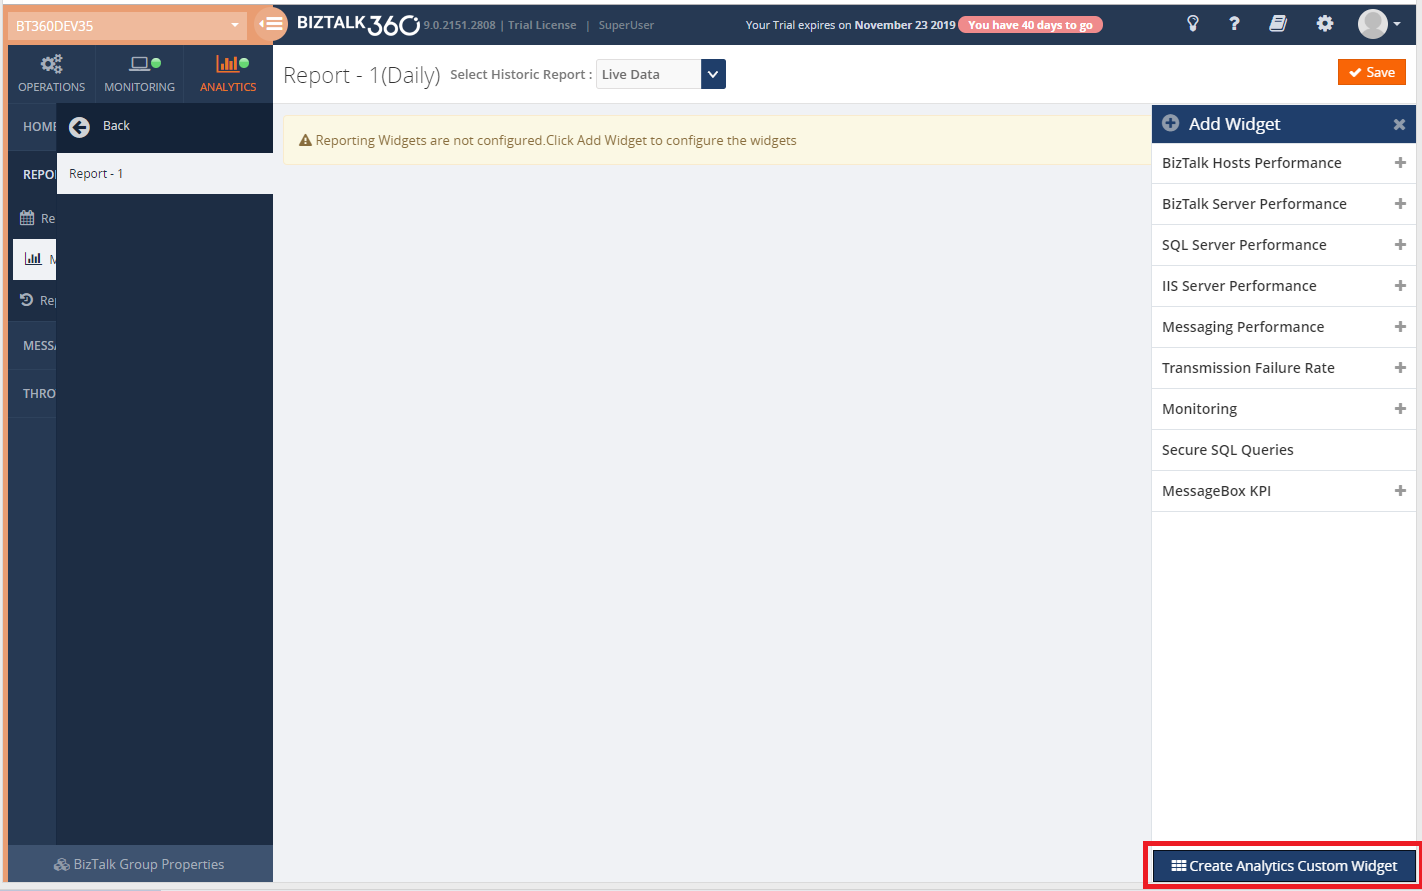
Click ‘Create Analytics Custom Widget’, it opens a blade where you can see the metrics which all are enabled (in Tracking data collection in the Settings section).
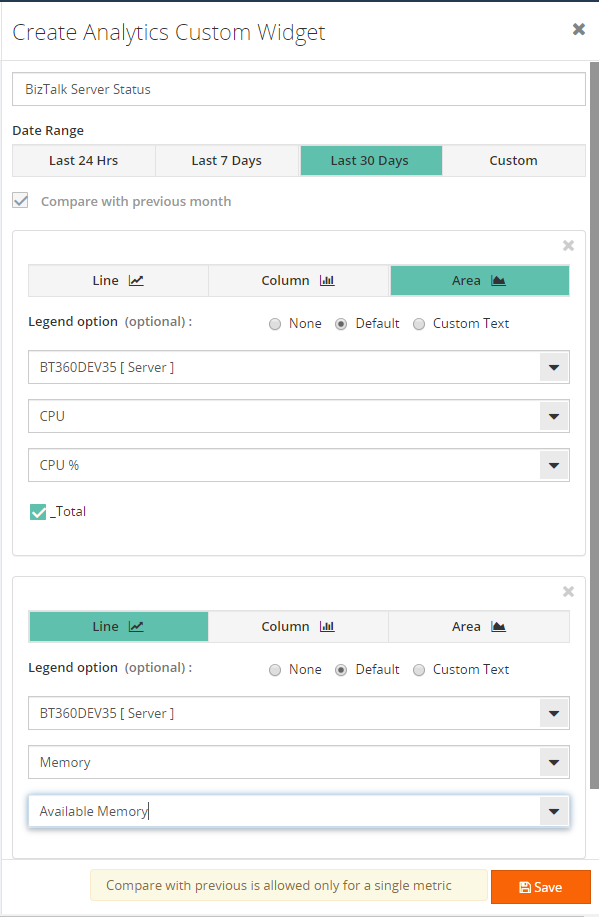
You can map whatever performance metrics you want to get as a PDF in your email box.
For instance, I will configure the metrics, as mentioned above, that I want to know how much memory and CPU my BizTalk Server consumes.
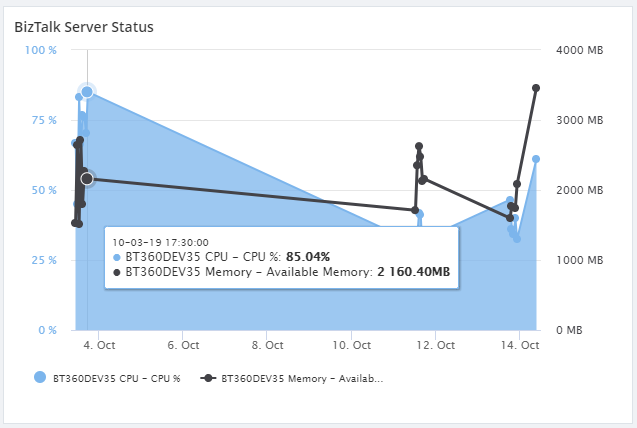
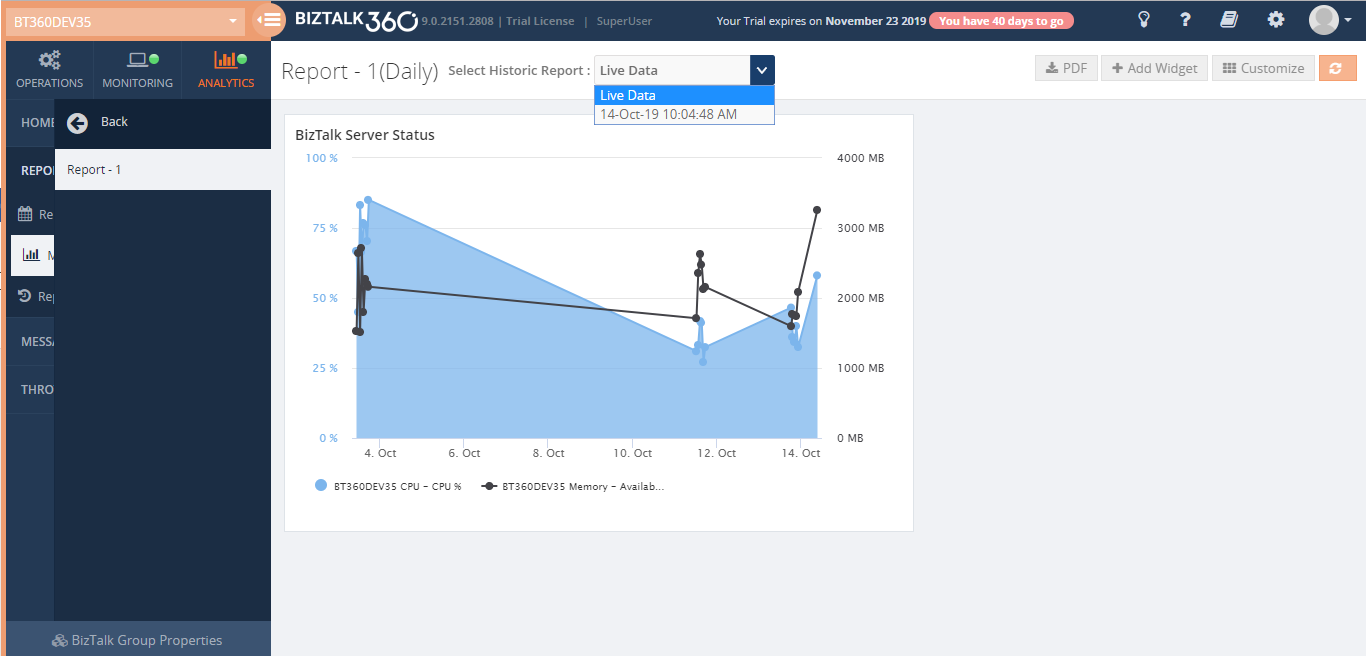
Live Data and Historical Data
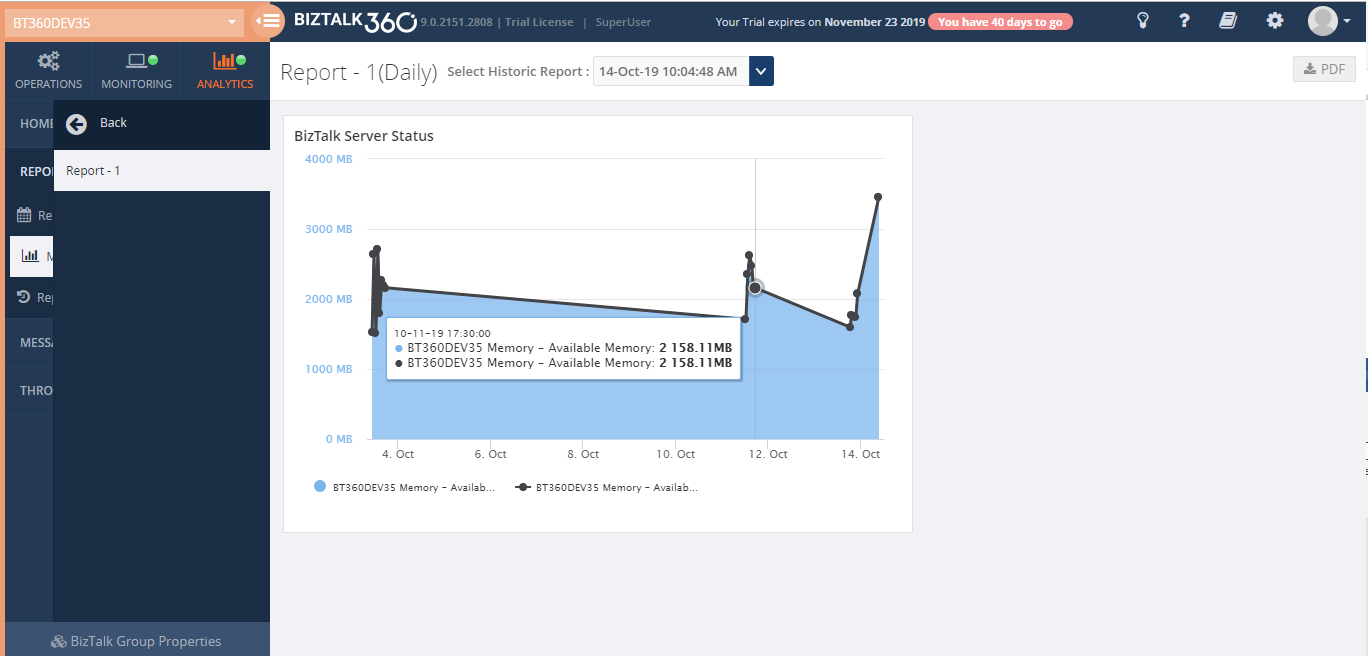
Once the report has been generated and sent to the recipient’s email, the generated report will be stored and can be viewed by choosing the Date Time in the filter.
You can see the actual data sent as an attachment to your email address.
Using Live Data, you can see the actual metrics.
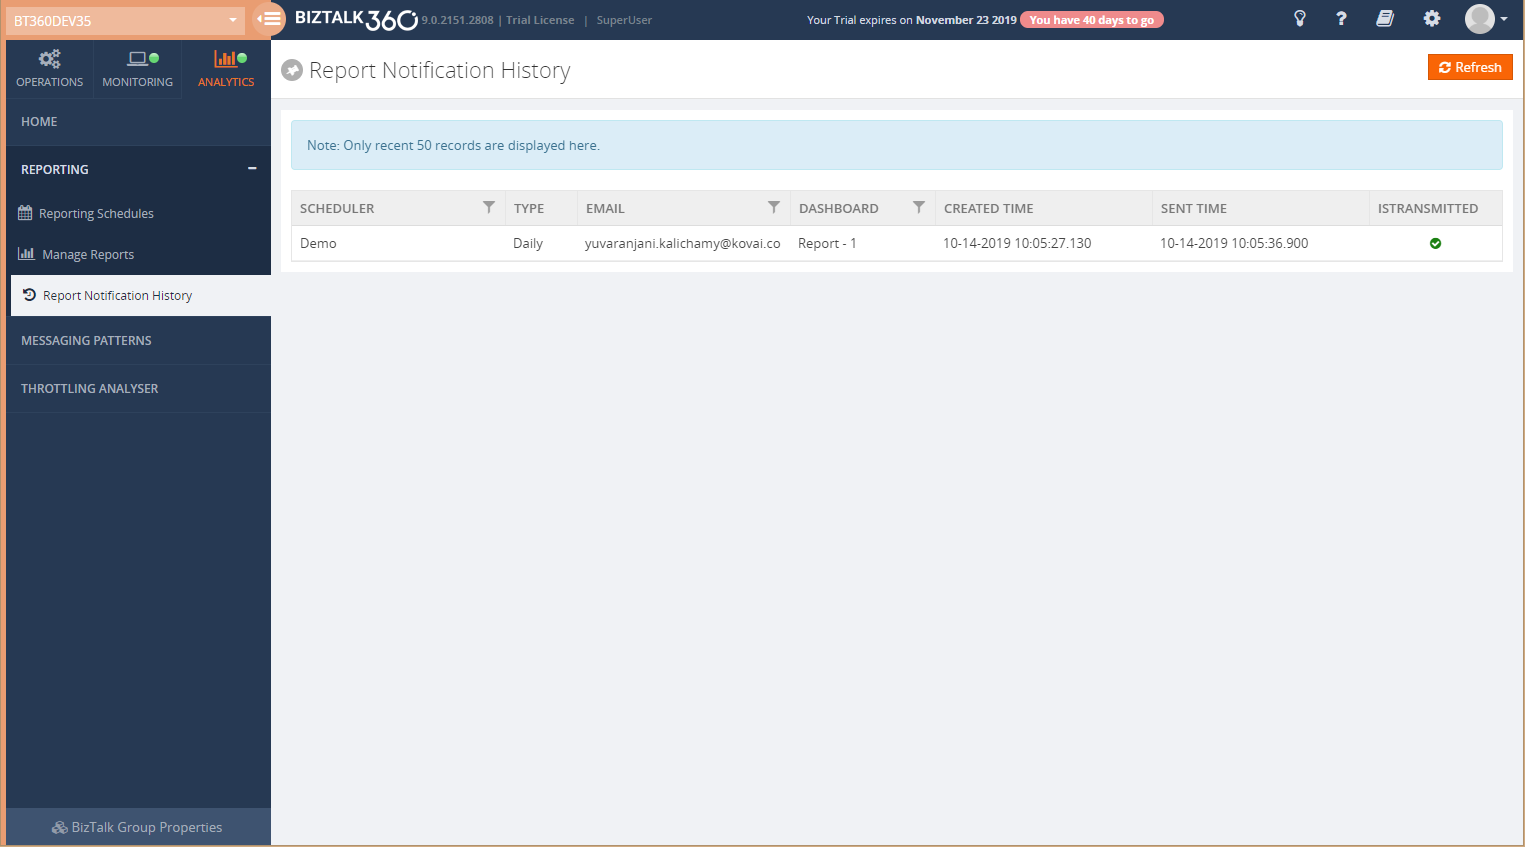
Report Notification History
Using Report Notification History, you can see whether the mail has been sent to the recipient’s Email address or not. This will be represented in a success and error icon; A green tick icon is for the successful message and a red cross icon for the failure of sent. It will show only the top 50 records.
Conclusion
I hope this blog has given you overall information about how to start with Analytics Reporting, the new user interface and how to configure the Analytics custom widget to the Reports.
For more information about how these widgets work, check our Documentation Portal.
The post Analytics Custom Widgets in Reporting appeared first on BizTalk360.
by Yuvaranjani Kalichamy | Jul 18, 2019 | BizTalk Community Blogs via Syndication
At the moment we are working on release v9.0.2 of BizTalk360. As always, we have many exciting features and enhancements coming up with this release.
One of the main sections in BizTalk360 is the Analytics section. BizTalk360 Analytics offers a visual display of the most important performance counters that are consolidated and arranged on a single screen so that the information can be monitored in a glance. In addition to that, we have the Reporting feature in BizTalk360 where users are able to generate PDF documents of critical performance metrics and send emails to the user at specific time periods, depending on the requirement. This feature is available only to the platinum licensed BizTalk360 environments.
In the new version v9.0.2 of BizTalk360, you can add Secure SQL Queries which can be mapped to a schedule to get the SQL query output as a report.
Note: BizTalk360 consists of 6 default queries which the user can only execute. In addition to that, the user can create new custom SQL queries as per their business need.
Secure SQL Reports in Analytics Reporting
Scenario 1:
Consider the scenario where you have a list of messages that ware not received during the past few hours/days and you want to know the details of these unprocessed messages. Usually you will be checking this by executing the query manually, however, this can be difficult on your busy schedule as you need to switch between different tools. Luckily, this can now be done simply with the new “SQL Reports” feature under Reporting. Just create a query, map it to the schedule according to your needs and then you will start receiving the query output as a report.
Scenario 2:
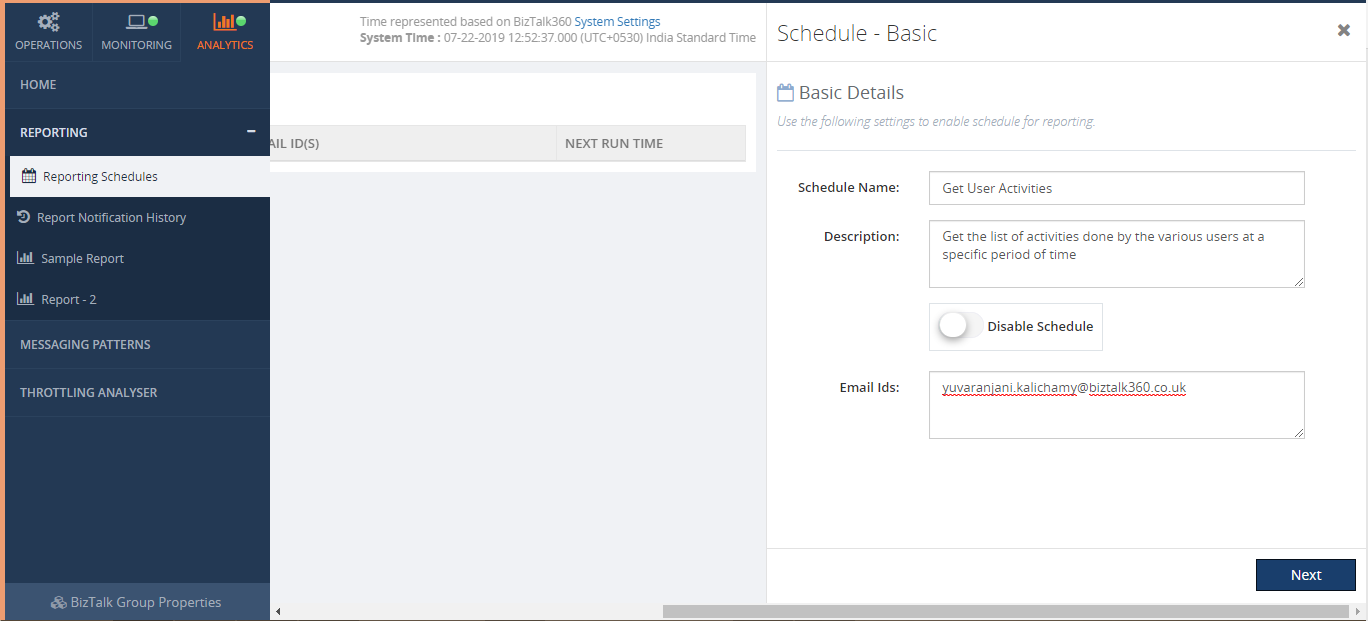
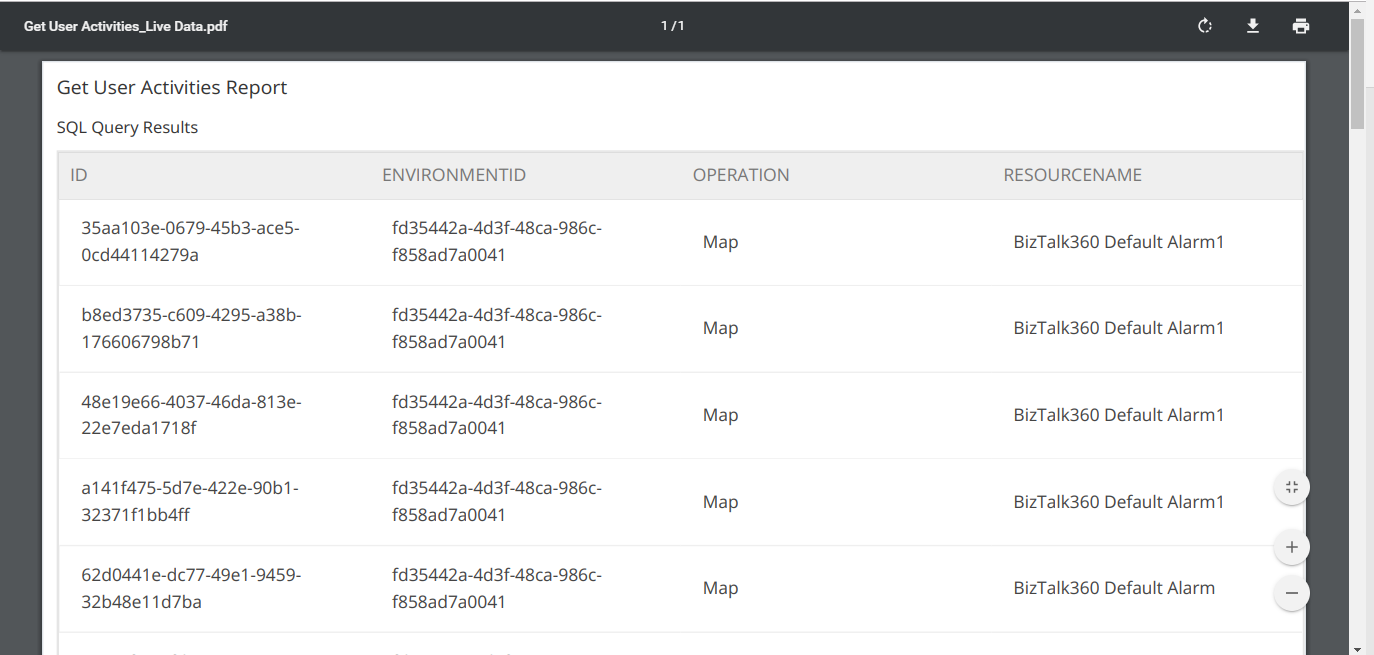
Consider another scenario: in BizTalk360, you have many users using the application. It’s important that an administrator should be aware of who did what. This can be seen in the Governance and Auditing section manually, but you might need to filter the records every time. Instead of filtering the records manually each time, you can create a Custom SQL Query and map the query to the Reporting Schedule which will send a periodic report to the configured admin email address. With this, the admin can easily get a report with regards to the actions performed by the other users. You can schedule this report and get the query output as a PDF document in the Analytics Reporting.
User permissions required to Process the Secure SQL Query Reports in BizTalk360
By default, the Superuser will have access to all the queries and also to the BizTalk reporting feature.
In case of a normal user, as a first step of processing the Secure SQL Query Reports, the user should ensure that the below permissions are provided.
The user should have permissions to:
- BizTalk Reporting
- Secure SQL Queries
Note: whenever a new query is being created, the user should ensure that, the normal user will be provided access to the newly created query (BizTalk360-> Settings-> User Access Policy-> Manage Users-> Secure SQL Queries-> Advanced).
Once all permissions set, the next step is to create a Reporting Schedule.
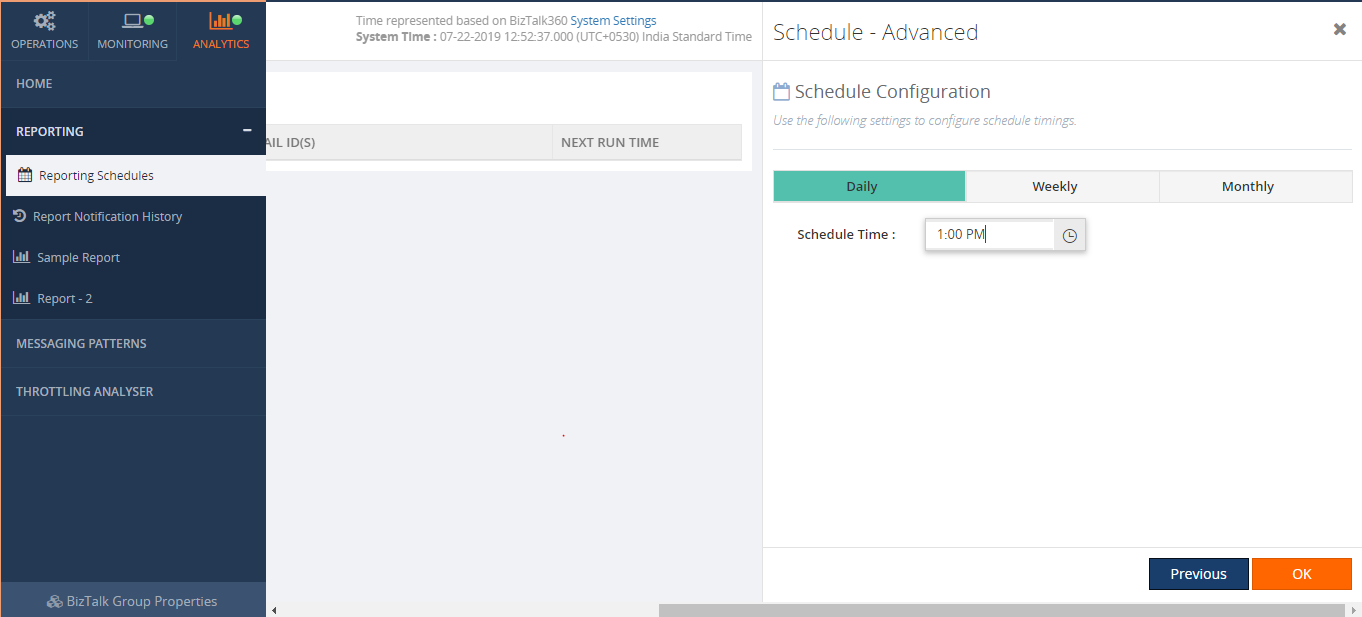
From the schedule configuration screen, you can define when you want to generate a report. The available options are Daily, Weekly and Monthly. Say, for instance, if the user wants to get a report on a daily basis, the user can choose Daily and set the time as per their need. This way the user will get the report on the scheduled time on a daily basis.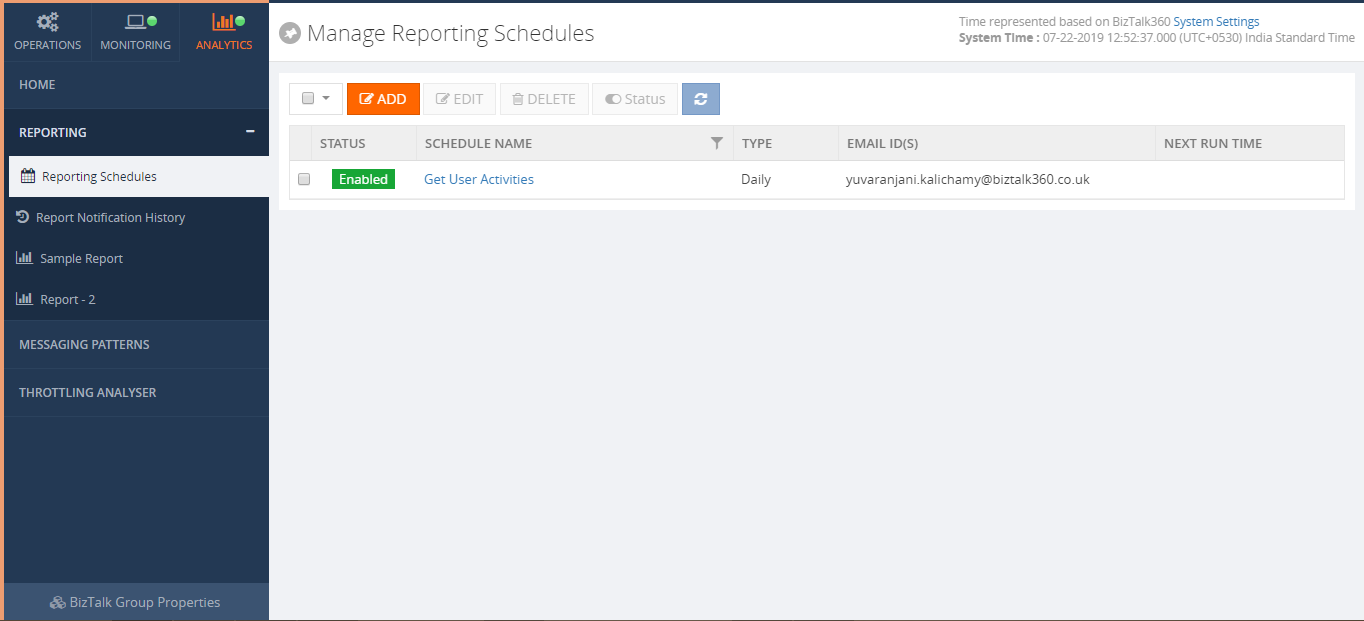
Once you have created a schedule, the next step is creating a report and map that report to the reporting schedule.
Once all is done, add a SQL Query widget by clicking ‘Secure SQL Query Results’ in the right panel.
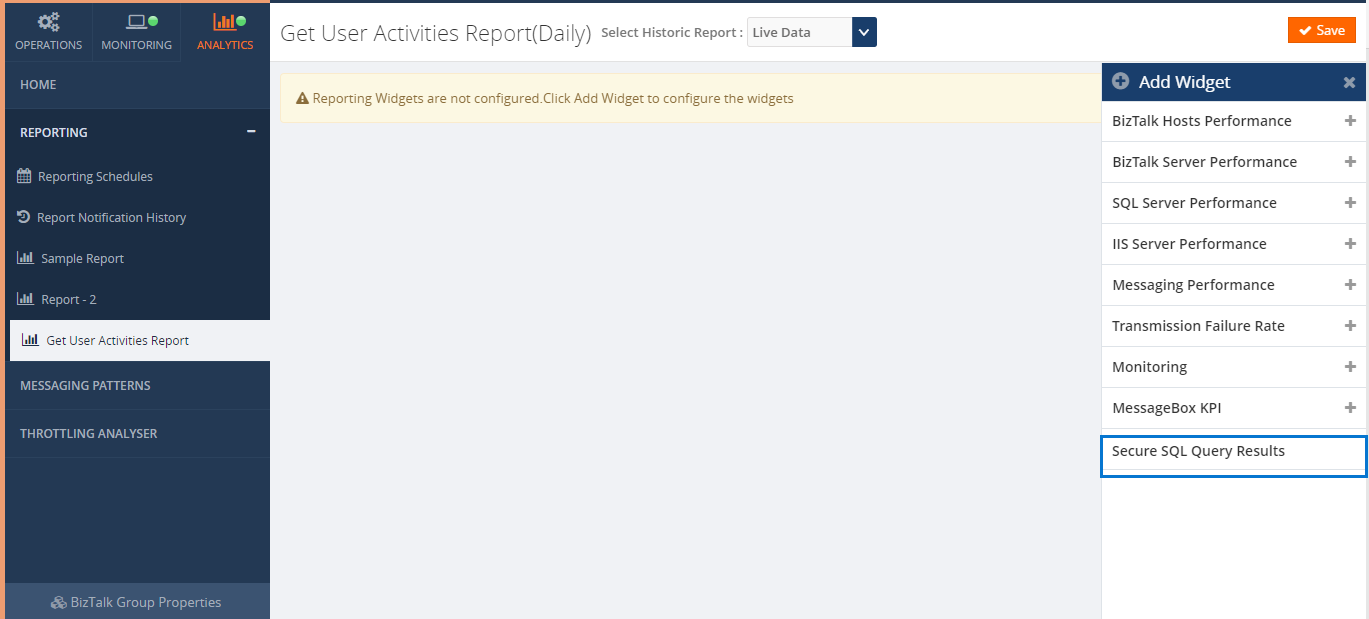
When you click on ‘Secure SQL Query Results’, it opens the blade where you can enter the widget title and select the query from the list (List of Saved queries created in BizTalk360-> Operation-> Data Access -> Secure SQL Queries section).
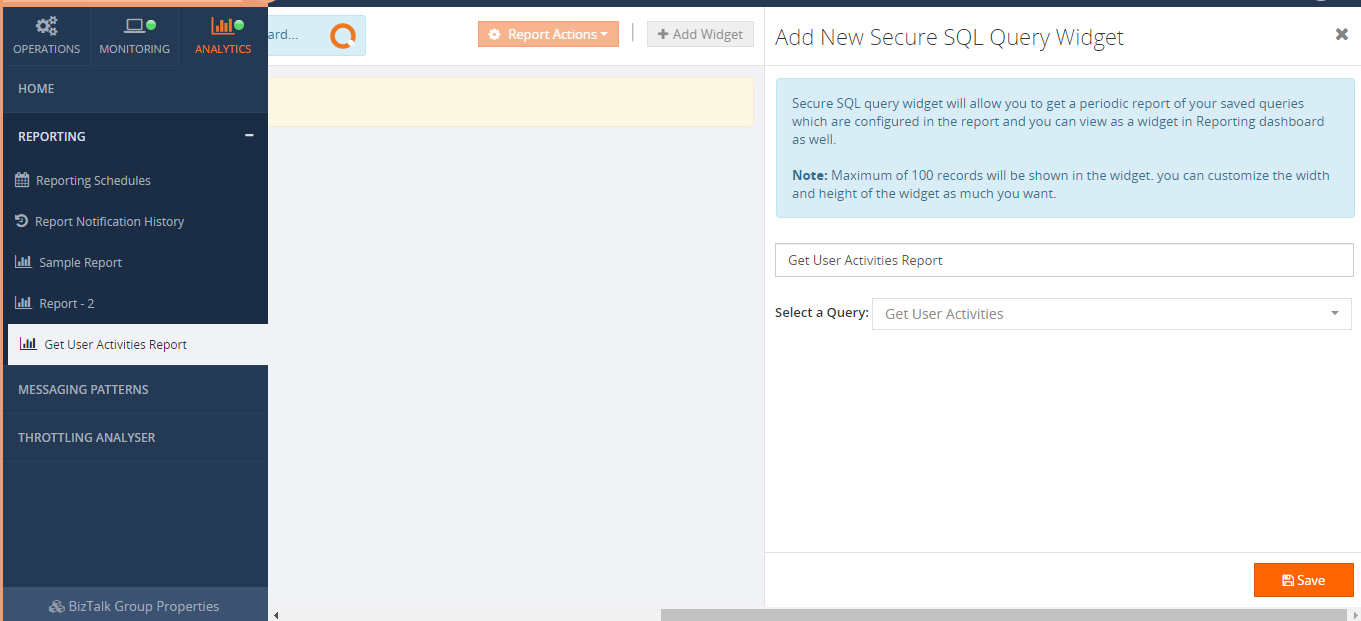
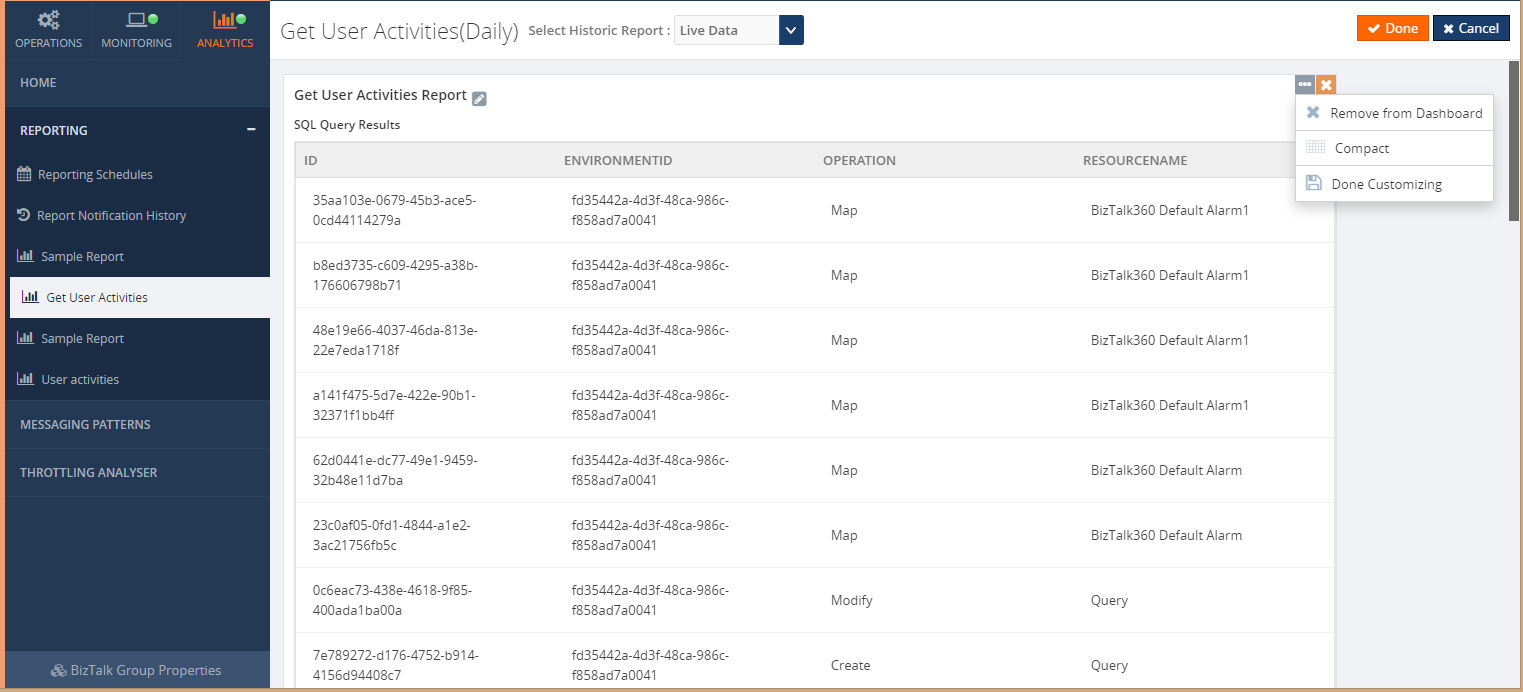
Once you click on ‘Save’, the widget will be added in a reporting dashboard.
When the widget is added to the dashboard, it gets added with the maximum width and height. In the case of having a bigger number of records, space might not be enough to view all the records. For that, we have provided the option to customize the widget. You can expand the widget as much as you want. For now, we are allowing a maximum of 100 records (top 100 records) in the widget.

When you click on the ‘PDF’ button, the downloaded PDF document will look like below. The same will be sent to the configured email ids.
Conclusion
SQL Reports makes your work easier, you will get in time report summaries of what you want to know about your BizTalk environment.
The post Secure SQL Query Reports appeared first on BizTalk360.
by Yuvaranjani Kalichamy | Jun 28, 2019 | BizTalk Community Blogs via Syndication
Every release, we aim at improving the usability of BizTalk360 by adding new features and enhancing existing features as per customer needs. At the moment, we are working on release v9.0.2 of BizTalk360 and we are very excited to blog about a feature which introduces Auditing for BizTalk360 Licensing and User Access Policy activities.
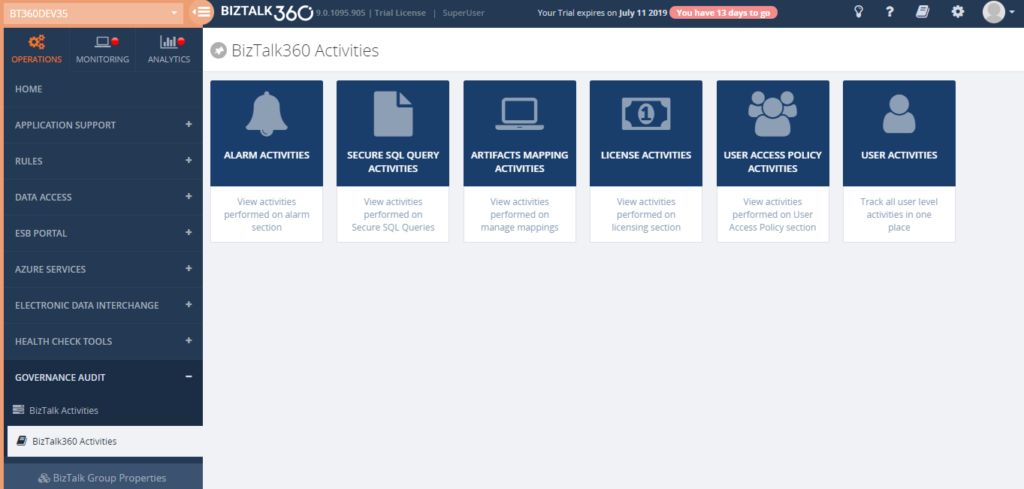
When it comes to cutting edge technology, security is the main key factor we always need to consider. Keeping that in mind we implemented auditing for BizTalk360 activities, in addition to the auditing capability for Alarm, Artifacts Mapping and Secure SQL Query activities, which we already have in the product.
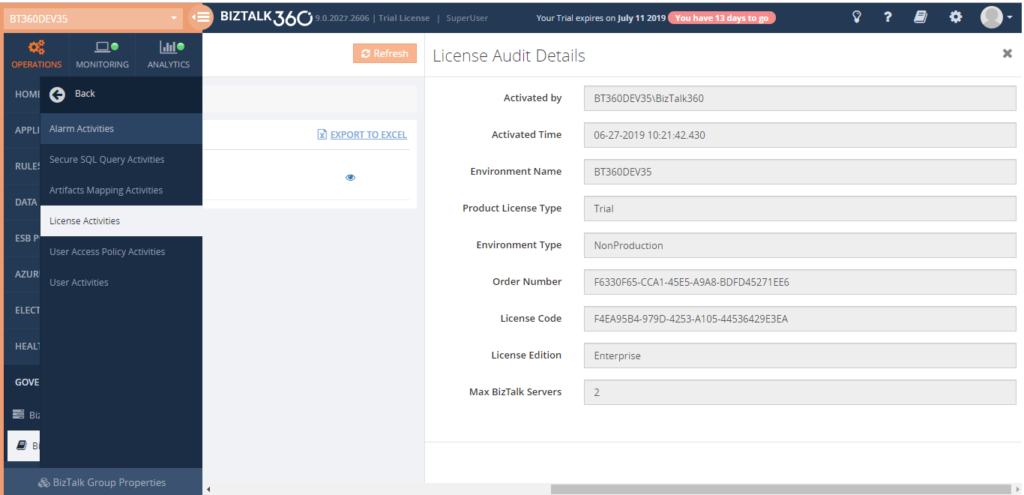
Licensing Auditing
License activation is the first step to be able to use the BizTalk360 application. It is a must to audit the License activities, so we are bringing this feature in our upcoming release v9.0.2. Let us consider the scenario where we have multiple super users and all the super users will have access to manage the BizTalk360 license. So anyone can activate, deactivate or remove the license at any time. If one of the users deactivated the license in one environment and activated the same in another environment, then no other user can use the BizTalk360 application. Without knowing that, other users may try to activate the same key and then they will get an exception saying, “There is already an active license for this order number/license code”. This may lead to lots of confusion. But now, with this license auditing feature, all the licensing activities will be audited. The administrator can easily get to know if any licensing changes are made in an environment.
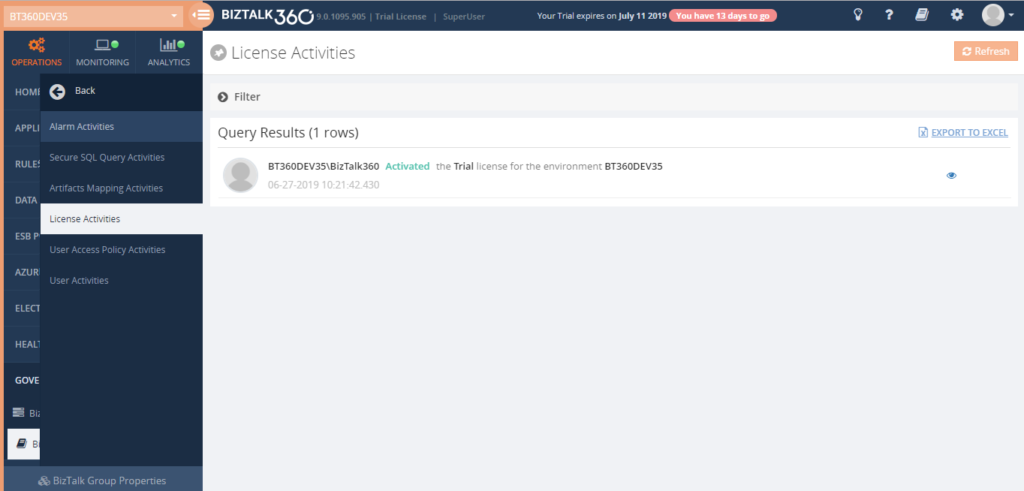
In License auditing, you will be able to see the activities like License Activation, Deactivation and Removal of licenses, along with the details like Environment name, Product License Type, Environment Type, Order number, License code, License edition and Max BizTalk servers.
User Access Policy Auditing
After the License activation, the next important activity will be creating Super/Custom users and provide access to the BizTalk360 features. This action can be done at BizTalk360 User Access Policy section and it’s very important to audit these activities.
In User Access Policy auditing, BizTalk360 captures the below activities:
-
-
-
- Adding Super/Custom users
- Modifying the access permission for existing users
- Removing users from an environment
- Creating, Modifying or Deleting the Application Groups
- Creating, Modifying or Deleting the Custom User Profiles
More information about these activities can be seen in the details view.
Manage Users
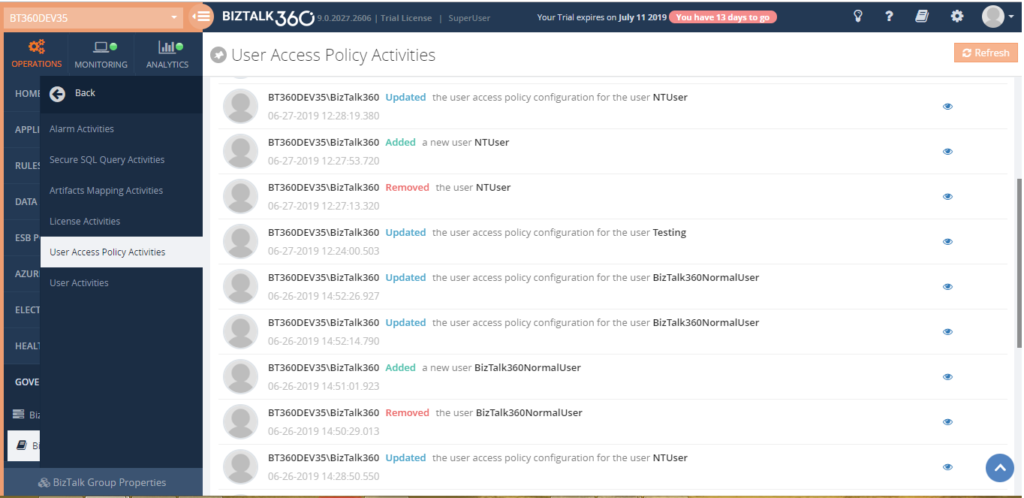
In the User Access policy => Manage Users section, you can add users as Superuser or Custom user. If you add a user as a Super User, then the user will have access to all environments. Otherwise, if you add the user as a Custom User, then the user will have access only to the provided environments. You can also give module wise access to the custom users.
If there is any need of role change between the users, you can also do that by switching role from Normal user to Superuser or from Superuser to Normal user.
Above all, the activities will be audited under User Access policy Activities in Governance and Audit.
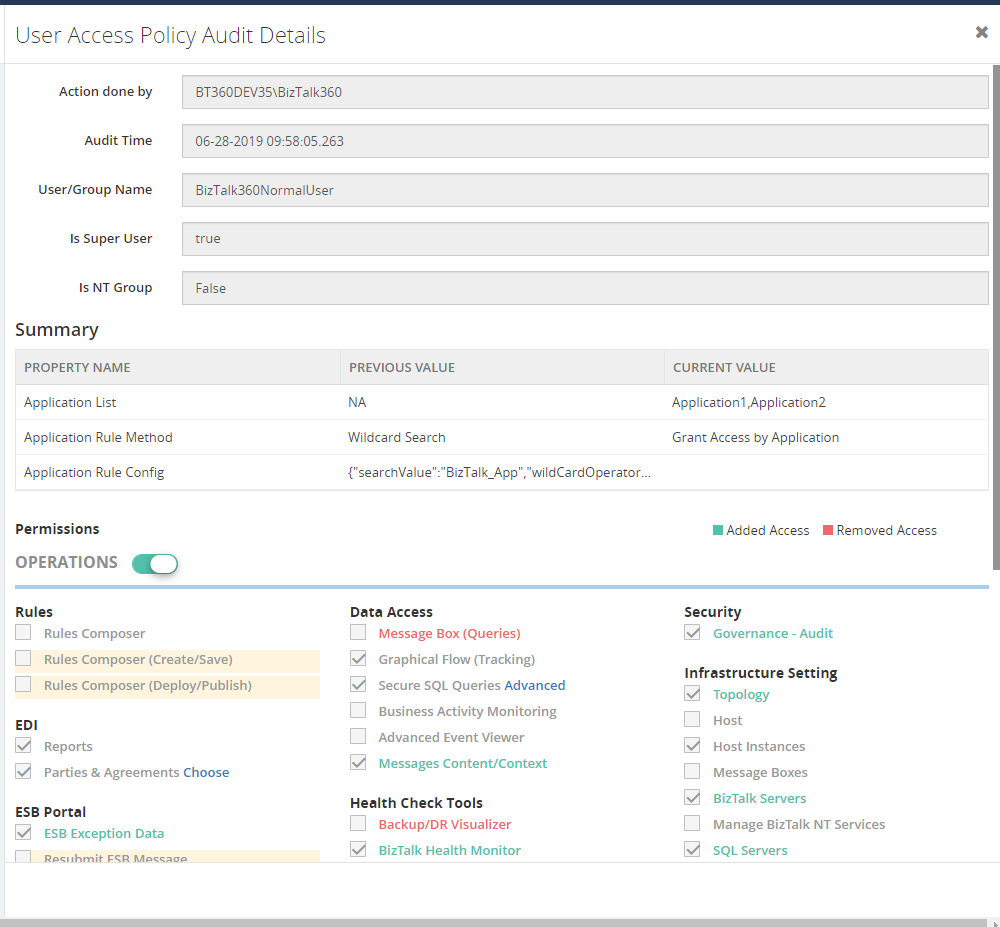
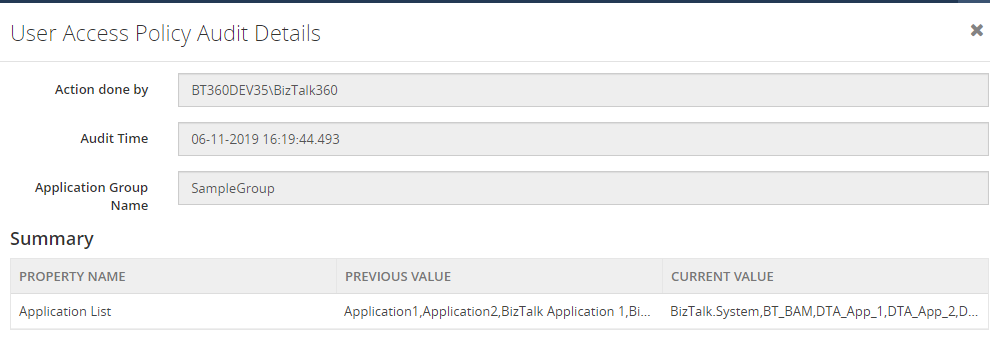
In the Details view, you can see who has done that activity, whether the added user is a Superuser or a Custom user, rules you applied for the user and user template, in which you can see what all the modules are the user will have access to.
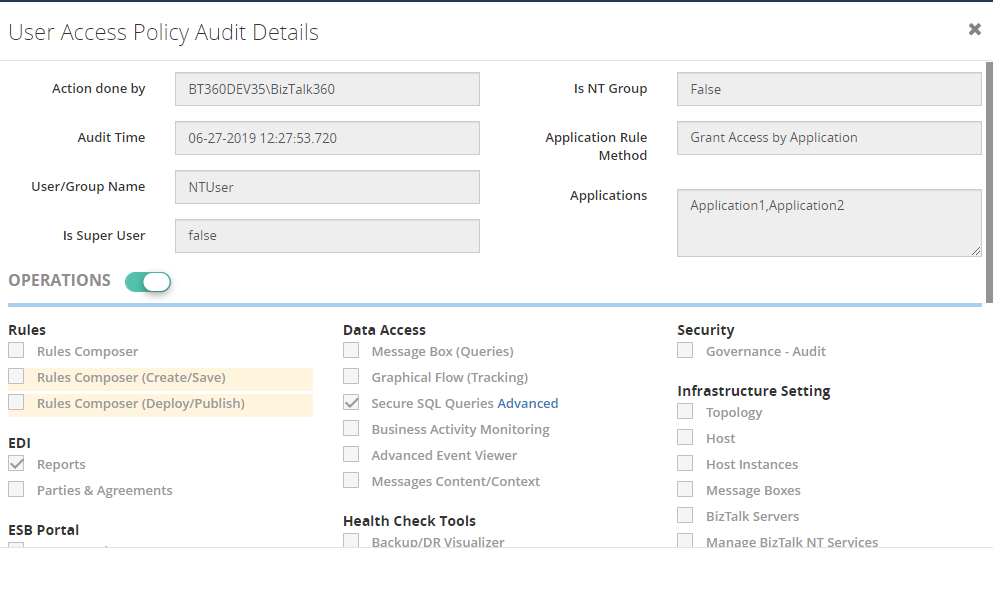
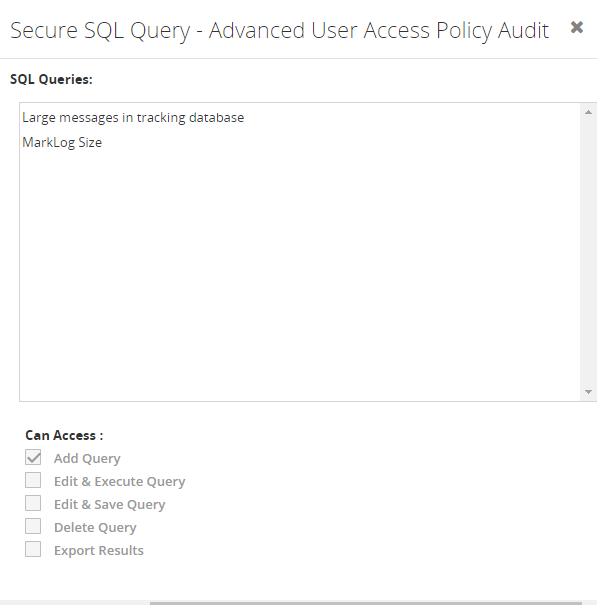
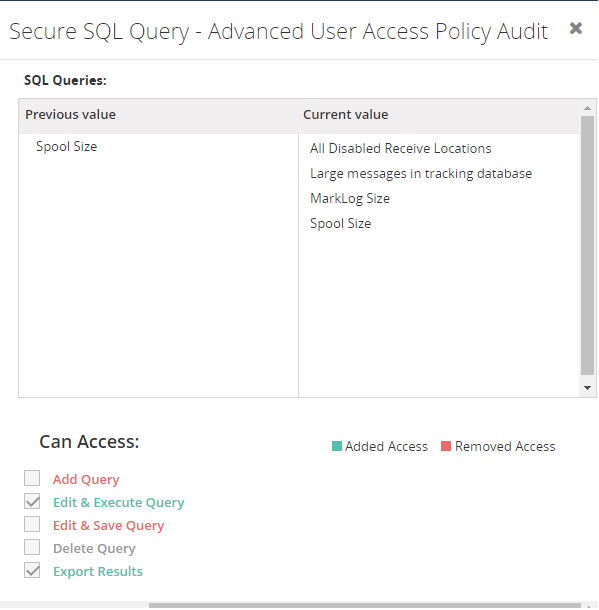
You can also see the inner level auditing. For example, in “Secure SQL Queries”, you can give access only to particular queries in which they can do the provided actions, like Adding query, Edit and Execute the query, etc.
To understand the applied changes, you can see all the updated values by comparing with the previous values. For user profile templates, you can see the difference by color codes (Red – removed access, Green – Added access).
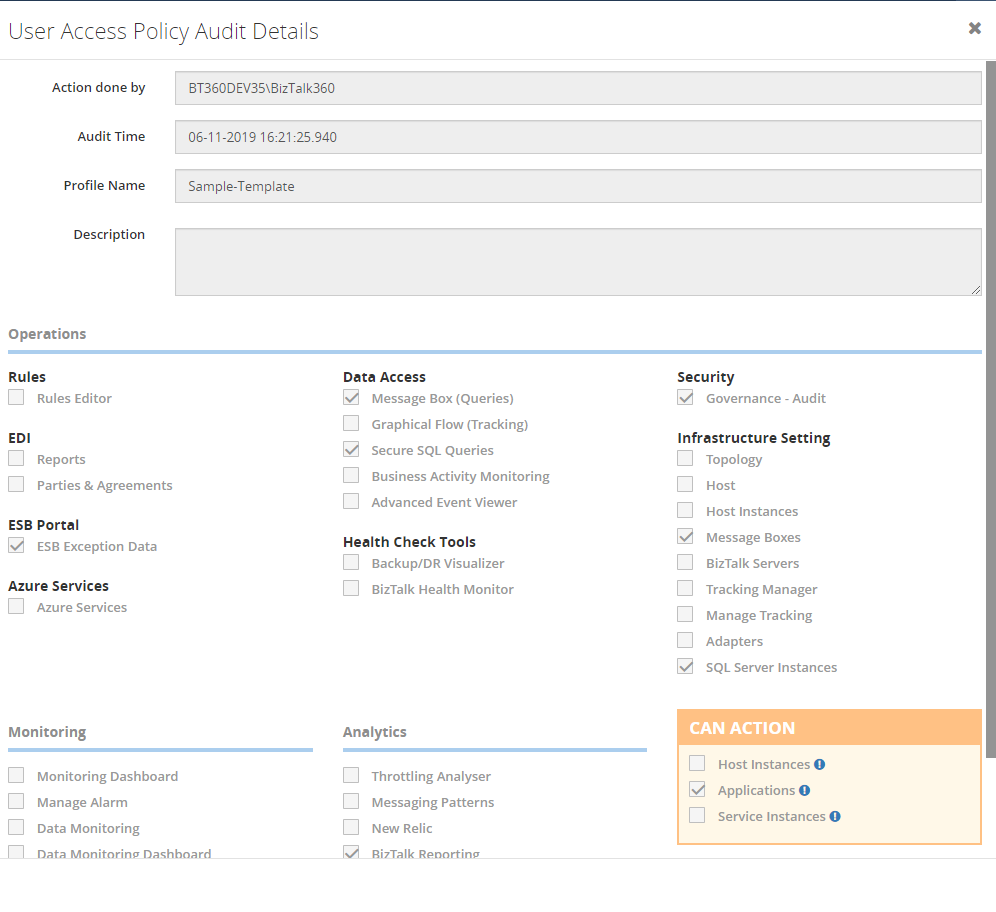
Manage Custom Profile Templates
In the User Access Policy => Manage Custom Profile Templates section, you can create user profile templates in which you can provide access to a set of modules. While adding (or modifying) a custom user, you can choose the right template to easily provide the user with the required access.
These activities (Creating, Editing and Deleting User Profile templates) will be captured under User Access Policy Auditing.
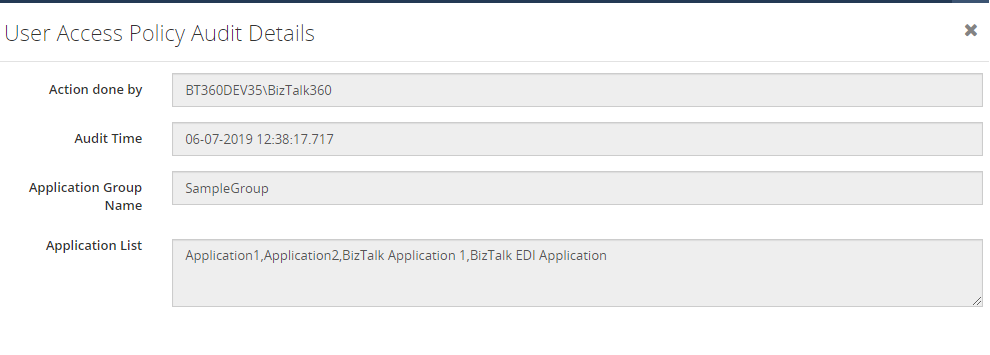
Manage Application Groups
In the User Access Policy => Manage Application Groups section, you can create groups which contain a set of BizTalk Applications. While configuring Application rules during user creation, you can select those Application Groups. The user will have access only to the applications which are configured in those Application Groups.
The creation, updating and deletion activities of Application Groups will be captured in User Access Policy auditing.
The same details can also be seen in Live Feed, just by enabling the Live Feed in BizTalk360 settings section
Purging
To avoid running out of disk space, purging needs to be done for older data. In BizTalk360, we are providing a configurable purging policy for the data in Governance/Audit. Administrators/Superusers can set up the purge duration under Settings. Audit data will persist in the BizTalk360 audit table based on the purge policy setup.
Conclusion
As discussed before, if a user accidentally did some changes on license activation/deactivation or User Access Policy configurations, then you can easily track those activities and can revert back to the existing configuration if needed using BizTalk360 Auditing.
The post BizTalk360 Auditing – Licensing and User Access Policy appeared first on BizTalk360.
by Yuvaranjani Kalichamy | Mar 28, 2019 | BizTalk Community Blogs via Syndication
We are very excited to blog about a new feature called BizTalk360 activity Auditing which will be available from BizTalk360 upcoming release v9.0.
When we work on cutting edge technology, security is one of the important factors we always need to consider. Keeping that in mind we implemented, amongst others, Governance and Auditing which actually audits BizTalk level activities done at (Application, Service Instances, Host Instances, Server, ESB Messages, Business Rules ) from BizTalk360.
Many customers requested as it could be great if BizTalk360 activities such as Alarm, User access policy, Artifacts Mapping activities, Secure SQL Queries executions, Licensing changes, etc. would also be audited. So, from v9.0 we have leveraged the auditing for BizTalk360 activities too. Considering the business value and time we are implementing Alarm Auditing, Artifact Mapping and Secure SQL Query auditing for this release.
Alarm Auditing
The Monitoring capability is one of the key features available in BizTalk360. The first and foremost step for monitoring is creating an alarm, which actually plays a crucial role in monitoring. Many users may have permission for managing the alarms. Which means whoever have permission for manage alarm they can easily create, modify and delete an alarm.
For instance, if you have 100 plus alarms configured in your environment and multiple users are using it. It would be very difficult to check who has worked on which alarm.
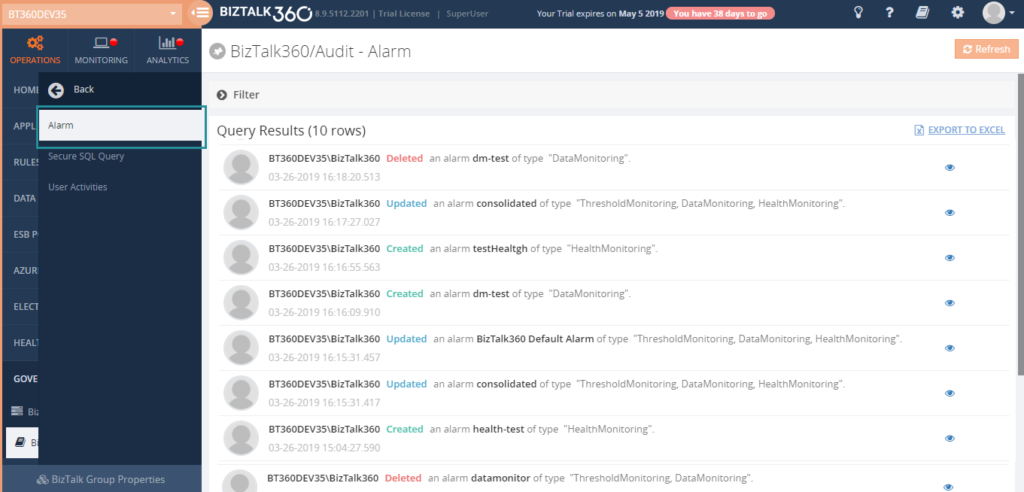
Considering that we have implemented BizTalk360 alarm activities auditing. Alarm activities such as alarm creation, deletion, modification, status changes (Enable/Disable) and reset alarm count will be audited.
Create: Alarm creation will include Quick alarm configuration and copying of alarms.
Update: Updating an alarm can be done by editing the alarm configuration, but you can also change the status (Enable/Disable) of the alarm. Both the activities will be captured under BizTalk360 Alarm Auditing. While updating the status of the alarm, a confirmation popup will appear in which you can provide the reason for the action. This way, you can administer why the action has been performed.
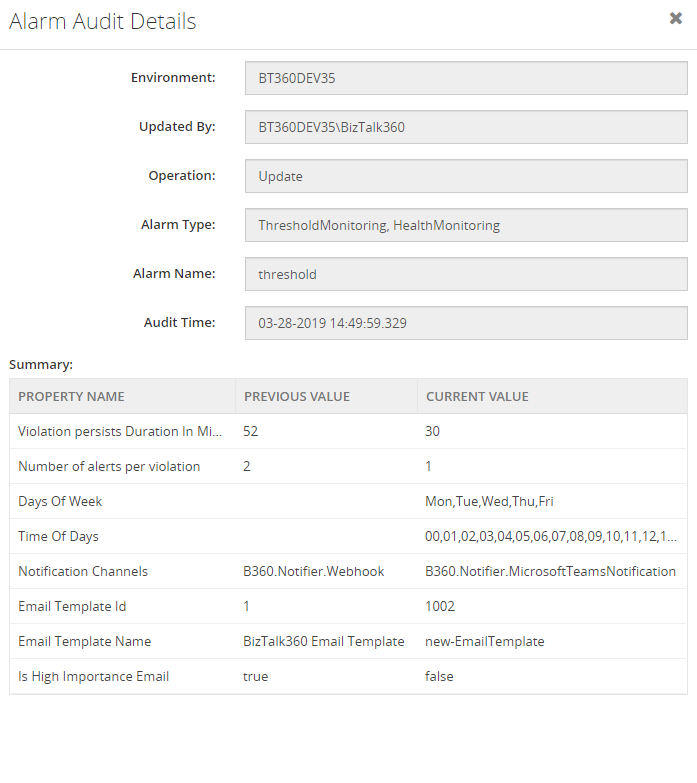
In the Audit details, you can see the summary which contains the property name, the previous value and the current value of the modified property.
Reset: An Alarm reset can also be done in two ways. It can be a manual action and it can also be an auto reset by the system. Both the actions will be captured under alarm auditing.
Manual Reset: For threshold monitoring, when the alerts per violation reach its limit, the alert needs to be reset, otherwise notification will not be triggered again. So, you can reset it manually in the Manage Alarm section.
Auto Reset: For threshold monitoring, users also have an option to automatically have alerts being reset. When the alert violation reaches its limit, after the alert reset timeout (minutes provided in alert reset), the system will automatically reset the alert. That action will also be captured under Alarm Auditing.
Delete: On Alarm deletion, we have newly introduced an optional text box in the confirmation popup to provide the reason for the deletion which will be audited in BizTalk360 Alarm Auditing.
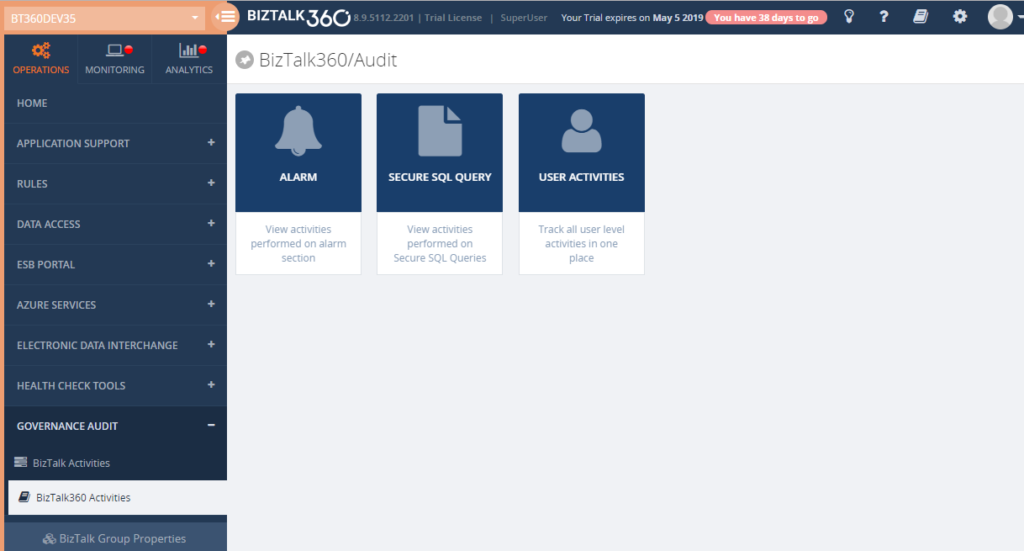
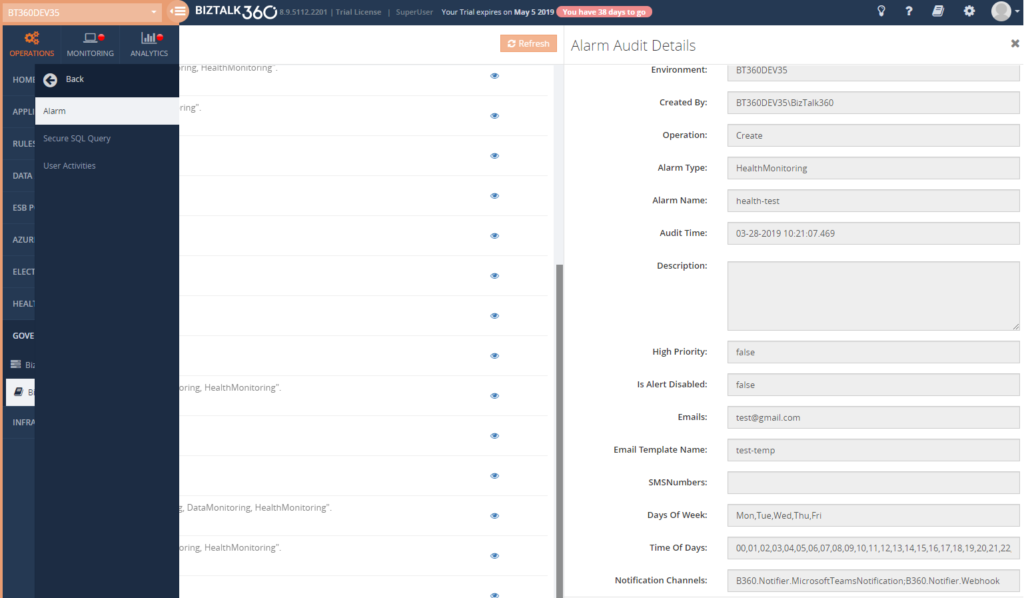
All the audit details will be available in the BizTalk360 Governance – Audit section. Super Users and Normal Users (who have permission for the Governance – Audit section) can get into BizTalk360 Audit details.
The same details can also be seen in Live Feed, just by enabling the Live Feed in BizTalk360 settings section.
Every auditing record contains a detailed view to know the exact configuration and updated values. This contains the user, environment details and the Date/Time. Also, in the case of an update, the current and previous value will be listed.
Below screen shows you the auditing details for an Alarm Update. There you can see the updated values alone. You can also compare the previous values with the current value and if you want to revert back the changes what you have before, you can use the auditing for your reference.
These actions will also be available under the User Activities.

Secure SQL Query Auditing
BizTalk360 offers the Secure SQL Queries functionality as a secure platform to store predefined queries and provide access to BizTalk members to execute the queries. BizTalk360, by default, comes pre-loaded with a set of queries and allows the users (with permissions) to build secure SQL queries that are appropriate to the organization’s business.
The query result may contain important business data. So, some of our customers requested us as it would be good to know who executed the query and which parameter values are passed while execution. That’s why we have implemented Secure SQL Query Auditing which includes any new query creation, modifying the existing query, deleting the query and, most importantly, query execution.
Auditing every execution of queries will come under the Platinum tier since it is more sensitive to audit. Users who have access to the Secure SQL Query section, can view the Secure SQL Query Auditing under BizTalk360 Activities.
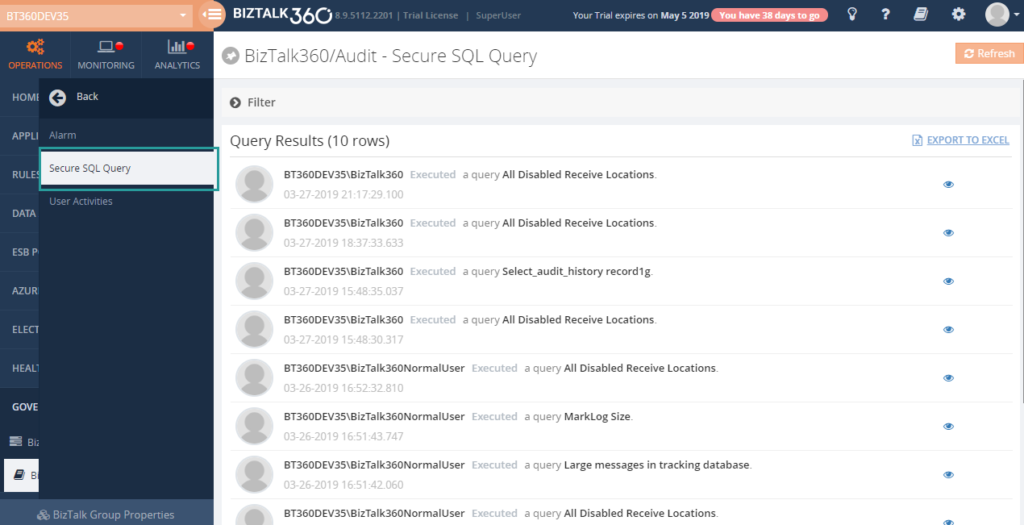
In Governance and Audit, Secure SQL Query section, you can see the list of SQL activities and you have a detailed view of every audited activity. In the detail view, you can see the database name, query name, SQL Server instance name and query which is created, executed or modified.
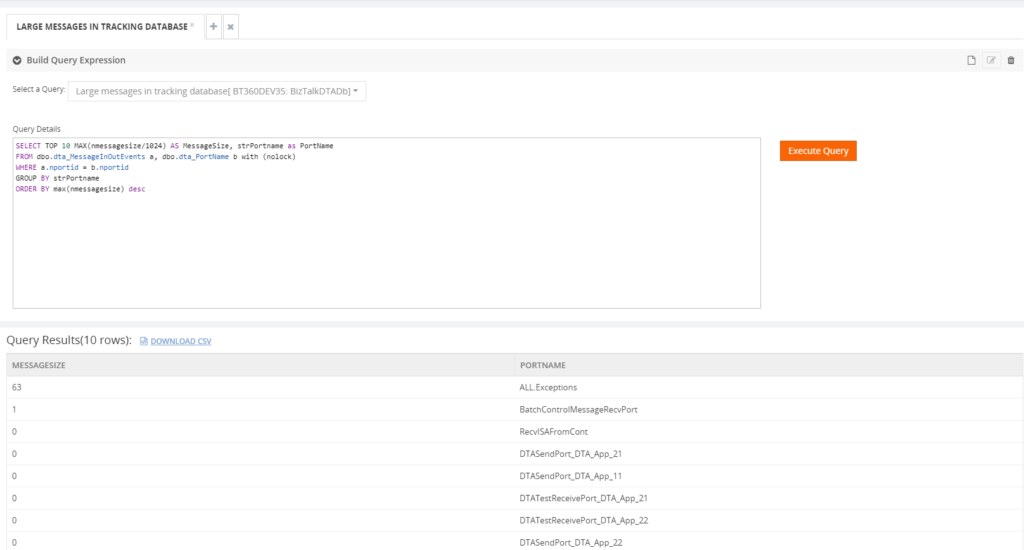
For example, I have executed the query ‘Large Messages in Tracking database’.
This action will be audited under Governance – Audit section with all the details.
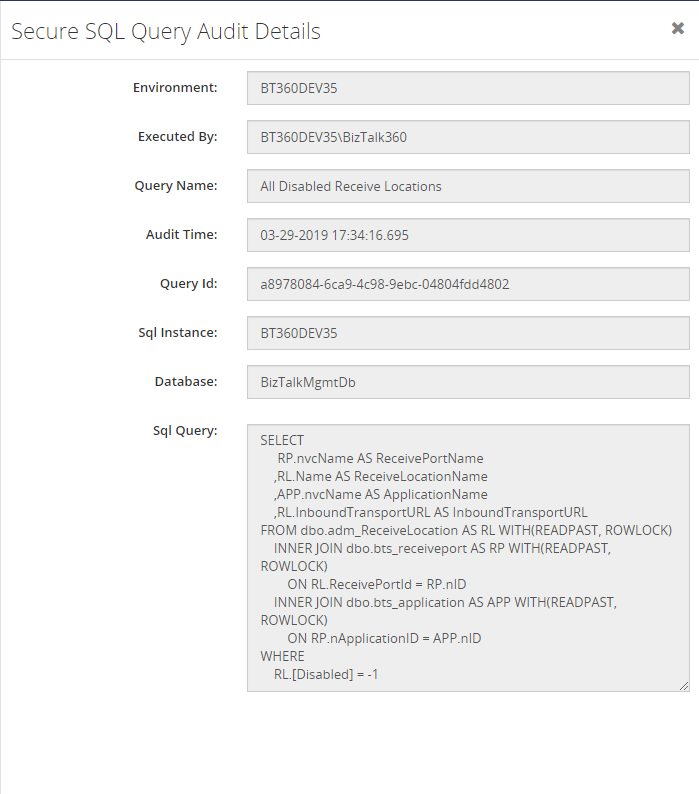
In this detail view, you can see which query has been executed and what are all the parameters passed to the query, when the query has been executed and who has done this operation.
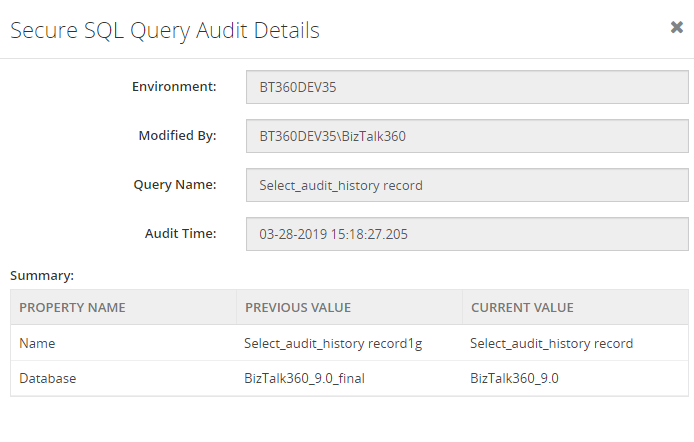
Modified values will look like shown below.
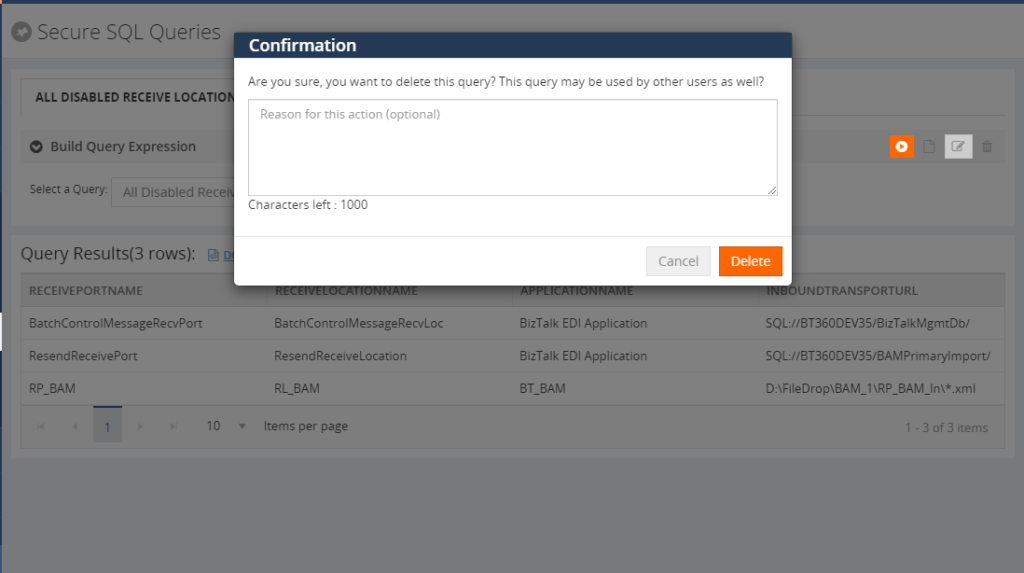
For query deletion, BizTalk360 will ask you for the confirmation with an optional text box to provide the reason for query deletion. It may be useful for future reference for the admin about the action.
Artifacts Mapping Auditing
For a healthy BizTalk Environment, it’s important to keep an eye on every artifact (Service Instances, Receive Locations, Send Ports, Send Port Groups, Orchestrations, Host Instances). Having a huge number of artifacts in the BizTalk environment, it is really difficult to monitor it manually by checking whether the host instance is started or not, Receive Locations are enabled or not, etc. To overcome these problems, BizTalk360 provides you with a feature called BizTalk360 Monitoring, that allows you to set up the monitoring for any desired state for your artifacts.
So, bringing auditing for Artifact mappings, would be helpful to the user to know the monitoring setup whenever they want.
For instance, when a user accidentally changes the mapping configuration, then it could lead to false alerts or it is irrelevant to your production environment. In this scenario, you should need auditing for these setups and what is the previous expected state of the artifacts. So, that is what you can recover immediately and also some of our customers requested us to bring this functionality.
Based on Customer feedback and their business needs, we are working on this feature for v9.0.
Also, a user who changes the expected state of the artifacts, will have an option to provide the reason for changing the state. So that admin/other users can know why they are changing the state.
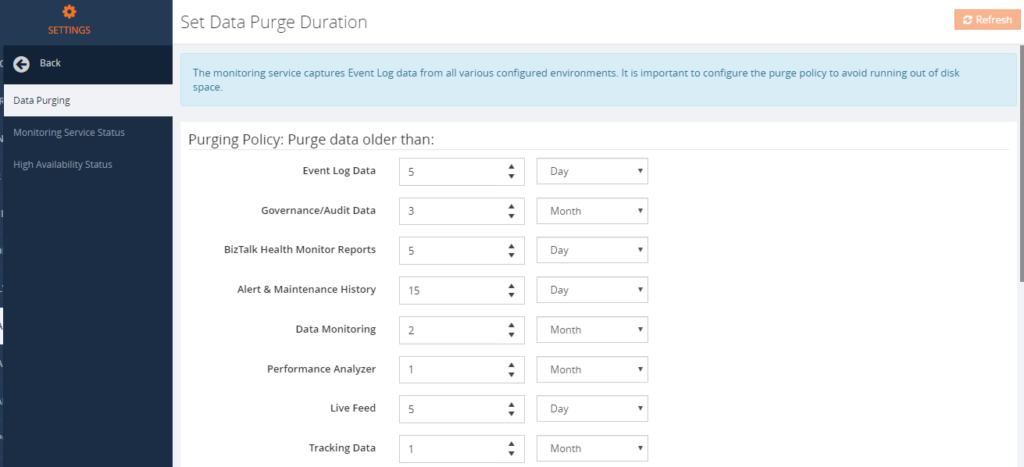
Purging
Auditing data will persist in the BizTalk360 database based on the purge policy setup.
To avoid running out of disk space, purging needs to be done for older data. In BizTalk360, we are providing a configurable purging policy to purge the data in Governance/Audit. Administrators/Super Users can set up the Purge duration under Settings.
User Access Policy
Super users will have permissions to all the sections and users who have access to the Governance – Audit section, can view the BizTalk360 Activity Auditing.
For Alarm Auditing – normal users/ NT group users who have access to the “Managing Alarms” section, can view the alarm auditing section under BizTalk360 Activity Auditing.
For Secure SQL Query Auditing – Normal Users/ NT group users who have access to the “Secure SQL Query” section, can view the Secure SQL Query auditing under BizTalk360 Activity Auditing.
For Artifacts Mapping Activity Auditing – Normal Users/NT group users who have access to the “Manage Alarms” section, can view the artifacts mapping activity auditing section.
The post BizTalk360 Activity Auditing appeared first on BizTalk360.