by Mark Brimble | Mar 11, 2017 | BizTalk Community Blogs via Syndication
My old blog at http://connectedpawns.wordpress.com is now being redirected to http://connectedpawns.com. All the old content is still there but it has been refreshed to a new more modern look. I thank Saravana Kumar and the BizTalk 360 team for sponsoring my blog and doing all the hard work to move my blog to its own domain.
The goals of my blog are;
- Record my daily experiences with software integration.
- Share want I am doing with other like minded people.
- Communicate important issues.
Looking back at my old blog articles I am surprised that I have been writing now for more than 8 years. My first post is here on Sept 23, 2008. I enjoy writing and I find it cathartic after a bad day. I also find it useful to know where I have been and where I am going.
What can you expect from my blog going forward ? Over the coming weeks I am going to refresh some of the old blogs with better pictures. I will continue to write about integration, but this year I will write more about Azure integration as I get to grips with all this new stuff.
Below is picture of Spring outside where I live which is rather fitting way to end the announcement of the rebirth of my blog.

Pity the weather here is the pits at the moment. We have had more rain in one day than we normally have in one month , 121 milliliters.
by Nino Crudele | Mar 10, 2017 | BizTalk Community Blogs via Syndication
After a while I’m back into Logic Apps, a customer asked me to have a look about the possibilities to use Logic Apps in a very interesting scenario.
The customer is currently using BizTalk Server in conjunction with Azure Service Bus and a quite important Java integration layer.
This is not a usual POC (Proof of Concept), in this specific case I really need to understand about the actual capabilities provided by Logic Apps in order to cover all the requirements, the customer is thinking to move and migrate part of the on premises processing into the cloud.
A migration or refactoring is normally to be considered an important operation which involves many critical aspects like , productivity, costs, performances, pros and cons, risks and important investments.
I started have a look into the new Logic App version and I have been focused in all of these factors without losing the customer objectives.
The first look accessing to the main Logic Apps portal is a clear and very well organized view, a quick tutorial shows how to create a very simple flow and the main page is organized into main categories.

Very intuitive approach is the possibility to start with the common triggers, very interesting will be the possibility to customize this area per developer profile, I’m sure the team is already working around that.
I selected one of the most used, an HTTP endpoint into the cloud in order to consume a process workflow.
Very good impression is the responsive time, a lot faster and all the new features in the UI as well.
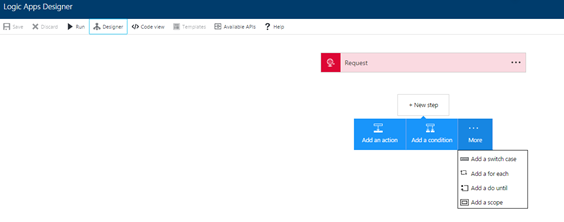
The top down approach is very intuitive as it follows the natural approach used for a natural workflow development and the one-click New Step offers a fast way to add new components very quickly.
What I normally like to consider when I look to a technology stack are the small details which are able to tell me a lot of important things, for instance, selecting the New
Step box and switching from the designer to the code view, the UI maintains exactly the status in the selection, considering that I’m using a Web UI this is a very appreciated behaviour.
Looking in the New Step box is clear that the Logic App team is following the BizTalk Server orchestration pattern approach, I like that because this provides the same developer experience used in BizTalk, in that case I don’t need to explain to the developers how to approach to a Logic Apps flow as they already know the meaning of each step and the using.
In term of mediation the approach used by Logic Apps is, what I’d like to call, Fast Consuming Mediation, essentially the process includes the mediation and it provides a fast approach to do that.
This is a different from BizTalk Server where the mediation is completely abstracted from the process, in the case of Logic Apps I see some very good points for using a fast mediation approach.
Logic Apps uses a concept of fast consuming, the approach to create a new mediation endpoint is very RAD oriented.
All the most important settings you needs to create a mediation endpoint are immediately accessible, fast and easy, the HTTP action is a very good example, we just add the action and it creates a new HTTP endpoint automatically, very fast and productive approach, fast consuming.
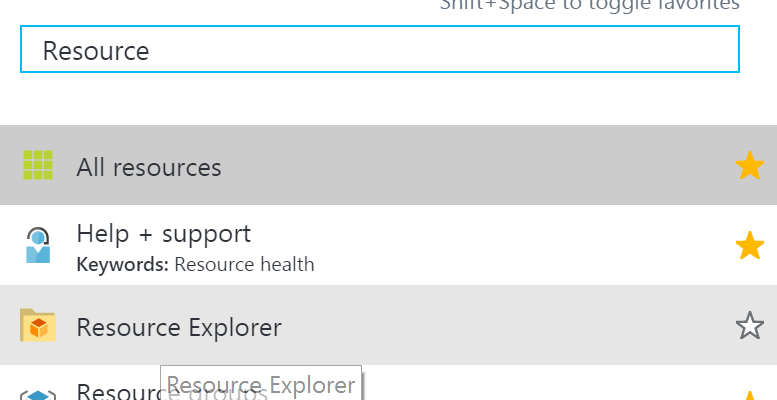
All people know how much is important for me the productivity, very appreciated is the search box in all the Logic Apps lists features.
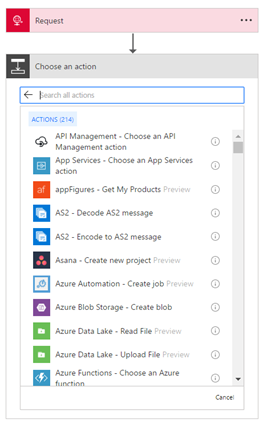
Very appreciated the quick feature bar on the left with all the most important tasks and with the search box as well.

Following the quick tutorial, I created a HTTP endpoint and I added a new action, I decided to add the Office 365 Email and just try to send the HTTP content to an email account.
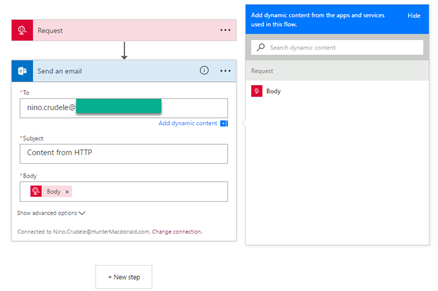
Each option provides a fast-dynamic parameter content which proposes all the public properties exposed by the previous step, this is very useful and fast and it shows the most important options, this is good to speed up the development.
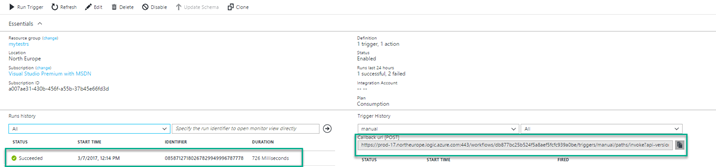
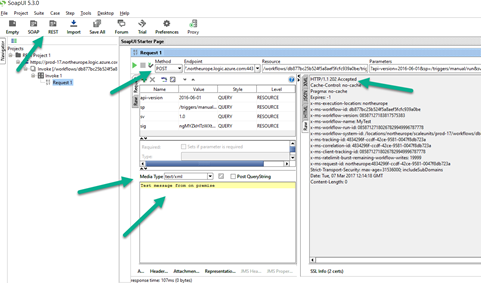
Just saved the flow and it creates the URL POST to use, I tried to send a message using SOAPUI and it works perfectly
If you are interested about the SOAPUI project, just add a new REST project, put the URL created by the Logic Apps flow, set POST, media type Text/xml, write any message and send, you will receive a 202 response.
Check your inbox.
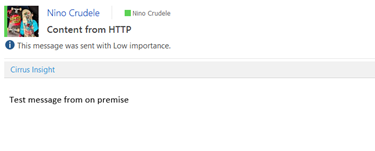
I’m definitely happy about the result, I created an HTTP endpoint able to ingest a post message and send an email in less than 2 minutes, quite impressive honestly.
Author: Nino Crudele
Nino has a deep knowledge and experience delivering world-class integration solutions using all Microsoft Azure stacks, Microsoft BizTalk Server and he has delivered world class Integration solutions using and integrating many different technologies as AS2, EDI, RosettaNet, HL7, RFID, SWIFT. View all posts by Nino Crudele

by michaelstephensonuk | Mar 9, 2017 | BizTalk Community Blogs via Syndication
When we build integration solutions one of the biggest challenges we face is “sh!t in sh!t out”. Explained more eloquently we often have line of business systems which have some poor data in it and then we have to massage this and work around it in the integration solution so that the receivers of the data don’t break when they get that data. Also sometimes the receiver doesn’t break but its functionality is impaired by poor data.
Having faced this challenge recently and the problem in many organizations is as follows:
- No one knows there is a data quality issue
- If it is known then its difficult to workout how bad it is or estimate its impact
- Often no one own the problem
- If no one owns the problem then its unlikely anyone is fixing the problem
Imagine we have a scenario where we have loaded all of the students from one of our line of business systems into our new CRM system and then we are trying to load course data from another system into CRM and to make it all match up. When we try to ask questions of the data in CRM we are not getting the answers we expect and people lack confidence in the new solution. The thing is, the root cause of the problem is poor data quality from the underlying systems but the end users don’t have visibility of that so they just see the problem being with the new system as the old stuff has been around and kind of worked for years.
Dealing with the Issue
There are a number of ways you can tackle this problem and we saw business steering groups discussing data quality and other such things but nothing was as effective and cheap as a simple solution we put in place.
If you can imagine that we use BizTalk to extract the data from the source system and then load it to Service Bus, from where we have various approaches to put/sub the data into other systems. The main recipient of most of the data was Microsoft Dynamics CRM Online. Our idea was to implement some tests of the data as we attempted to load it into CRM. We implemented these in .net and the result of the tests would be a decimal value representing a % score based on the number of tests passed and a string listing the names of the tests that failed.
We would then save this data alongside the record as part of the CRM entity so it was very visible. You can see an example of this below:

We implemented tests like the following:
- Is a field populated
- Does the text match a regular expression
- If we had a relationship to another entity can we find a match
For most of the records we would implement 10 to 20 tests of the data coming from other systems. We can then in CRM easily sort and manage records based on their data quality score.
Making the results visible
At this point from an operational perspective we were able to see how good and bad the data coming into CRM is on a per record basis. The next thing we need to do is to get some focus on fixing the data. The best way to do this is to provide visualisations to the key stakeholders to show how good or bad the data is.
To do this we used a simple Power BI report dashboard pointing at CRM which would do an average for each entity of the data quality score. This is shown in the below picture.
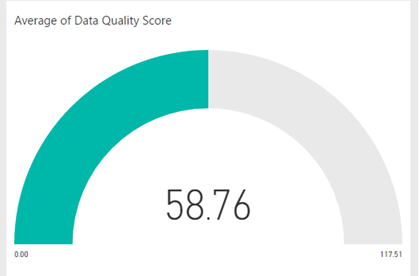
If I am able to say to the business stakeholders that we can not reliably answer certain questions in CRM because the data coming into CRM has a quality score of 50% then this is a powerful statement. Backed up by some specific tests which show whats good and isnt. This is highly likely to create an interest in the stakeholders in improving the data quality so that is serves the purpose they require. The great thing is each time they fix missing data or partly complete data which has accrued over the years into the LOB application, each time data is fixed and reloaded we should see the data quality score improving which means you will get more out of your investment in the new applications.
Summary
The key thing here isnt really how we implemented this solution. We were lucky that adding a few fields to CRM is dead easy. You could implement this in a number of different ways. What is important about this approach is the idea of testing the data during the loading process and recording that quality score and most importantly making it very visible to help everyone have the same view.
The post Dealing with Bad Data in Integration Solutions appeared first on Microsoft Integration & Cloud Architect.

by Nino Crudele | Mar 9, 2017 | BizTalk Community Blogs via Syndication
Thanks to BizTalk360 team and my dear friend Saravana my blog has now a new fantastic look and a lot of new improvements, first of all it is tremendously faster .
Well, I liked my previous style but was old and I think is time for a good refresh, the BizTalk360 guys redo graphic, migrated the blog with all the content, managed the redirections and all the other issues in a couple of days without any problem, fast and easy, this is what I like to call, done and dusted!
I really like the new style, more graphics and colours, I created a new about area and now I need to fix my categories and adding some more new content, the new look definitely motivates me on working more around it.
I have a very nice relationship with the BizTalk360 team and this nice relationship grown up any time more, any event we take the opportunity to enjoy time together, speaking about technologies and have fun.

I’m always happy to collaborate with them, the company is very solid with very strong experts inside and their products, BizTalk 360, TOP product in the market for BizTalk Server and ServiceBus 360, TOP product in the market for Microsoft Azure ServiceBus, prove the level of quality and the effort that this company is able to do, I’m always impressed by the productivity of this team.
We also have some plans around BizTalk NoS Ultimate, best tool ever to optimize the productivity during the BizTalk Server development but this is classified for now
Most of all I’m happy for this new opportunity to work closer together.
Thank you guys you are rock!
Author: Nino Crudele
Nino has a deep knowledge and experience delivering world-class integration solutions using all Microsoft Azure stacks, Microsoft BizTalk Server and he has delivered world class Integration solutions using and integrating many different technologies as AS2, EDI, RosettaNet, HL7, RFID, SWIFT. View all posts by Nino Crudele
by Sivaramakrishnan Arumugam | Mar 9, 2017 | BizTalk Community Blogs via Syndication
In BizTalk360 support, we often face a lot of interesting issues and we thought we would bring out a series to discuss the different cases that come our way and how we dealt with them. A previous blog by my colleague spoke on the Culture variant issue, a very unique case. Recently we came across a very interesting support case.
The customer was not able to view BizTalk applications due to the reason that BizTalk admin group name present in BizTalk360 License information did not match with the customer’s domain BizTalk Administrator’s group.
What happens during the activation of License in BizTalk360?
During the activation of an environment in BizTalk360, BizTalk360 License will fetch the information about BizTalk Admin Group, BizTalk server Management SQL Instance, Management Database name and BizTalk version information from customer’s environment. These details are stored into BizTalk360 license database and are embedded with the License after activation. If anything has changed at the BizTalk environment level, it will reflect in BizTalk360 UI or in performance.
Say for example: BizTalk servers were removed/added, changing BizTalk Admin Group name, BizTalk Server Management SQL Instance name, Management Database name, upgrading BizTalk server in one machine in multi-server environment., these changes will not be reflected with the BizTalk360 License information that is stored in the License database and hence it will display an exception message in BizTalk360 UI.
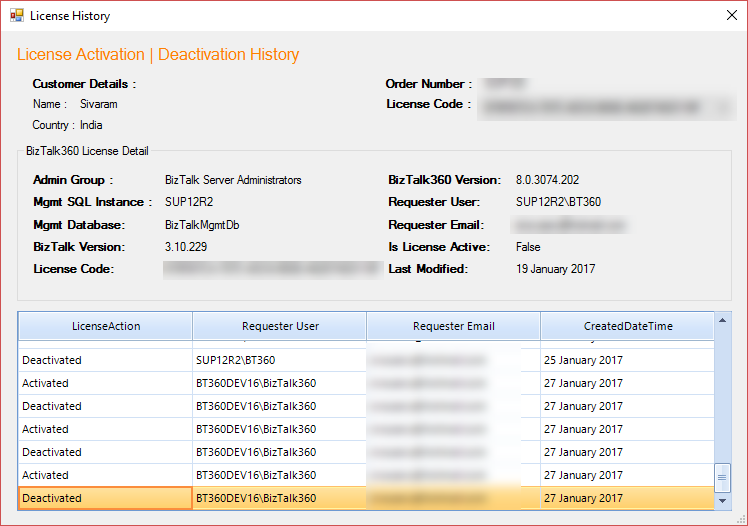
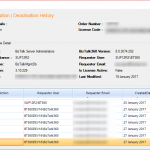
Screenshot of License history from BizTalk360 License application manager
It is always recommended that before making any environment related changes, you need to perform the license deactivation or else to contact our BizTalk360 support team for updating the changes into the License information and also for any guidance required.
Say for example: If the customer was not sure about moving the BizTalk360 database from one server to another server as a part of migration, we request our customers to contact our support team for the guidance.
Prologue to this story
From the BizTalk360 version 8.0 onwards, you will not be allowed to perform any action in BizTalk360 UI without activating the License.
The problem faced by the customer was that the name of the BizTalk Administrator group didn’t match with the information in the license.
- BizTalk Environment Domain: BT360BizTalk360-SG-Kovai-Biztalk Administrators-Dev,
- License Key Domain: BT360BizTalk360-SG-?Kovai-Biztalk Administrators-Dev
BizTalk Administrators group has the least privileges necessary to perform most administrative tasks. Members of that group can perform administrative tasks through the BizTalk Administration console or directly using the WMI provider and can deploy solutions, manage applications, and resolve message processing issues. Users will be added into the BizTalk Administrator’s group so that they can perform these administrative tasks.
Customer can change the name of the BizTalk Administrators group from BT360BizTalk360-SG-Kovai-Biztalk Administrators-Dev to BT360BizTalk360-SG-?Kovai-Biztalk Administrators-Dev which may resolve their problem. But, if they make any changes in BizTalk Administrators group, it may affect the BizTalk server process via the users who are added to that group to perform any operations.
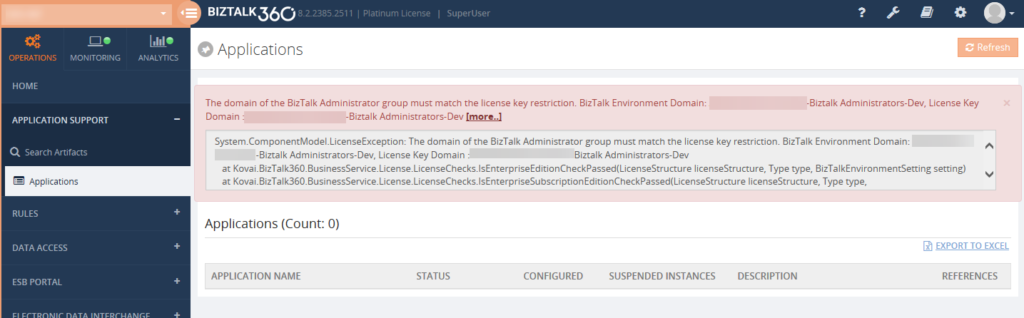
Screenshot of the exception from BizTalk360 UI
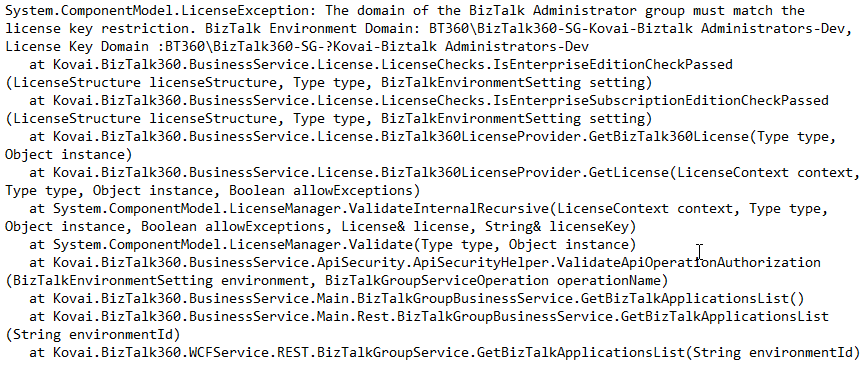
The exception what the customer exactly faced
We noticed that there was a question mark added in between the domain name and the BizTalk Administrator’s group (Domain: BT360BizTalk360-SG-? -Biztalk Administrators-Dev). The customer conveyed that they worked with the domain admin team and removed the question mark symbol. But we are very sure windows server/operating system doesn’t allow to create a name with ‘?’ question mark while creating the group or a user.
We wanted to investigate within customer environment and so we requested a screen sharing session to see what’s happening and from where the name was taken from. Before going to any customer call, we would prepare a list of questions related to the necessary information we wanted from the customer end and where all we want to check. Also, we will try to reproduce the same at our end.
How did we back track the case?
During the testing, we tried to replicate the same. So we just copied the same BizTalk Administrator’s group ‘BT360BizTalk360-SG- Kovai-Biztalk Administrators-Dev’ name from the exception and created a group in our test machine and we added to BizTalk360. Once after adding as a NT Group in BizTalk360 we found a strange thing it got created with a special character ‘?’ question mark BT360BizTalk360-SG-?Kovai-Biztalk Administrators-Dev. Then we checked by using PowerShell command, found a special character added which was like a mobile phone character.
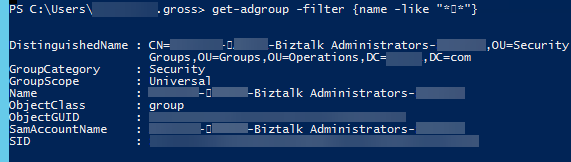
Screenshot of the BizTalk Admin group by using PowerShell
We asked the customer to change the Group name manually in all places in the database and in Windows Groups as well. But, it still showed the same exception even after the changes made by the customer. We requested for the desktop sharing session and checked all the places where the fault might be. But, we did not get any clue.
The idea was to verify the group name by editing and checking each and every individual character in the name by moving the cursor (that’s how we found special character during the testing). But we were not able to find the special character in the database and in Windows Groups.
Finally, in the properties of BizTalk Groups at BizTalk server we checked the BizTalk Administrator Group by each individual character by moving the cursor and we found the special character was still persisting. We asked the customer to remove the special character. They contacted their admin to change/modify the name, after which the exception was gone. BizTalk360 started working and the customer was able to view the applications without any problem.
What needs to be avoided?
We should try to avoid copy/paste while creating the group/user names most of the time instead type the name manually. Sometimes, while copying from a clipboard and pasting it in a password field may show some mismatch error due to the addition of special characters.
This was a good experience as a support engineer and had a different experience to learn as well.
The post Challenges in BizTalk360 Licensing after Environment Changes appeared first on BizTalk360.
![Azure Enterprise Integration Series – Part 3]()
by Daniel probert | Mar 8, 2017 | BizTalk Community Blogs via Syndication
Azure Enterprise Integration Series
Part 3: Visual Studio and Project Types
1. Visual Studio Development
As an enterprise integration developer, Azure gives you some new choices. Foremost amongst those is the ability to develop code *outside of Visual Studio*. Whilst that is the norm for most open-source and non-Microsoft technologies (e.g. Python, Ruby, anything developed on a non-Windows PC), for most Microsoft integration developers, developing outside of Visual Studio may take you outside of your comfort zone.
In fact, when Logic Apps first debuted, much was made of the fact that you could develop in your browser – a revolutionary idea (to Microsoft developers) and one that Microsoft have put a lot of time and effort into.
In fact, the early versions of Visual Studio Online were focused around you being able to write. Test, and deploy C# code from your browser, the legacy of which still carries on with Azure Functions today.
But developing in a browser introduces its own concerns: how you do manage your code, how do you source control it, what about promoting it to different environments, etc.
Some organisations love the idea of browser development: these are organisations that have jumped whole-heartedly on the Agile bandwagon, use Git and Scrum, release regularly, and much prefer a lighter-weight development process.
But for most Enterprises, Visual Studio is where it’s at: it complements our existing development processes; reduces training on new development techniques; and is familiar to most of the developers we employ.
2. Project Types
Although Visual Studio contains templates for many different types of projects, we’re only interested in a subset of them for Azure integration development:
|
Visual Studio Project Type
|
Supported Azure Resources
|
|
Azure Resource Group
|
API Connection
App Service
Azure SQL Server1
Integration Account2
Logic Apps3
Service Bus
Storage Account
etc.
|
|
Azure Functions
|
Functions
|
|
ASP.NET Web Application
|
Web App4
Mobile App4
API App4
|
|
Integration
|
Integration Account contents (schemas etc.) 3
|
|
Web Job
|
Web Job
|
|
SQL Server Database
|
Database objects (tables etc.) 2
|
There are a few discrepancies with the project types though:
1 An Azure SQL Server is defined in an ARM template, although the SQL entities (databases, tables, stored procedures, etc.) need to be defined in a separate SQL Server Database project.
2 At the current time, the Integration project type doesn’t support the creation of the actual Integration Account in Azure, so you need a separate Azure Resource Group project that contains the ARM Template for the Integration Account.
3 Although Logic Apps are created in an Azure Resource Group project, they have their own designer. They are the only resource in an Azure Resource Group project that has a dedicated designer.
4 The ASP.Net Web Application project type contains the code for web applications, but doesn’t define the App Service or App Service Plan (ASP): you need a separate ARM Template for this. Although you can create the App Service/ASP at the time you publish from Visual Studio, this doesn’t allow you put the definition for the App Service/ASP in source control.
Most of the project types we use for integration development can be found in the cloud category:
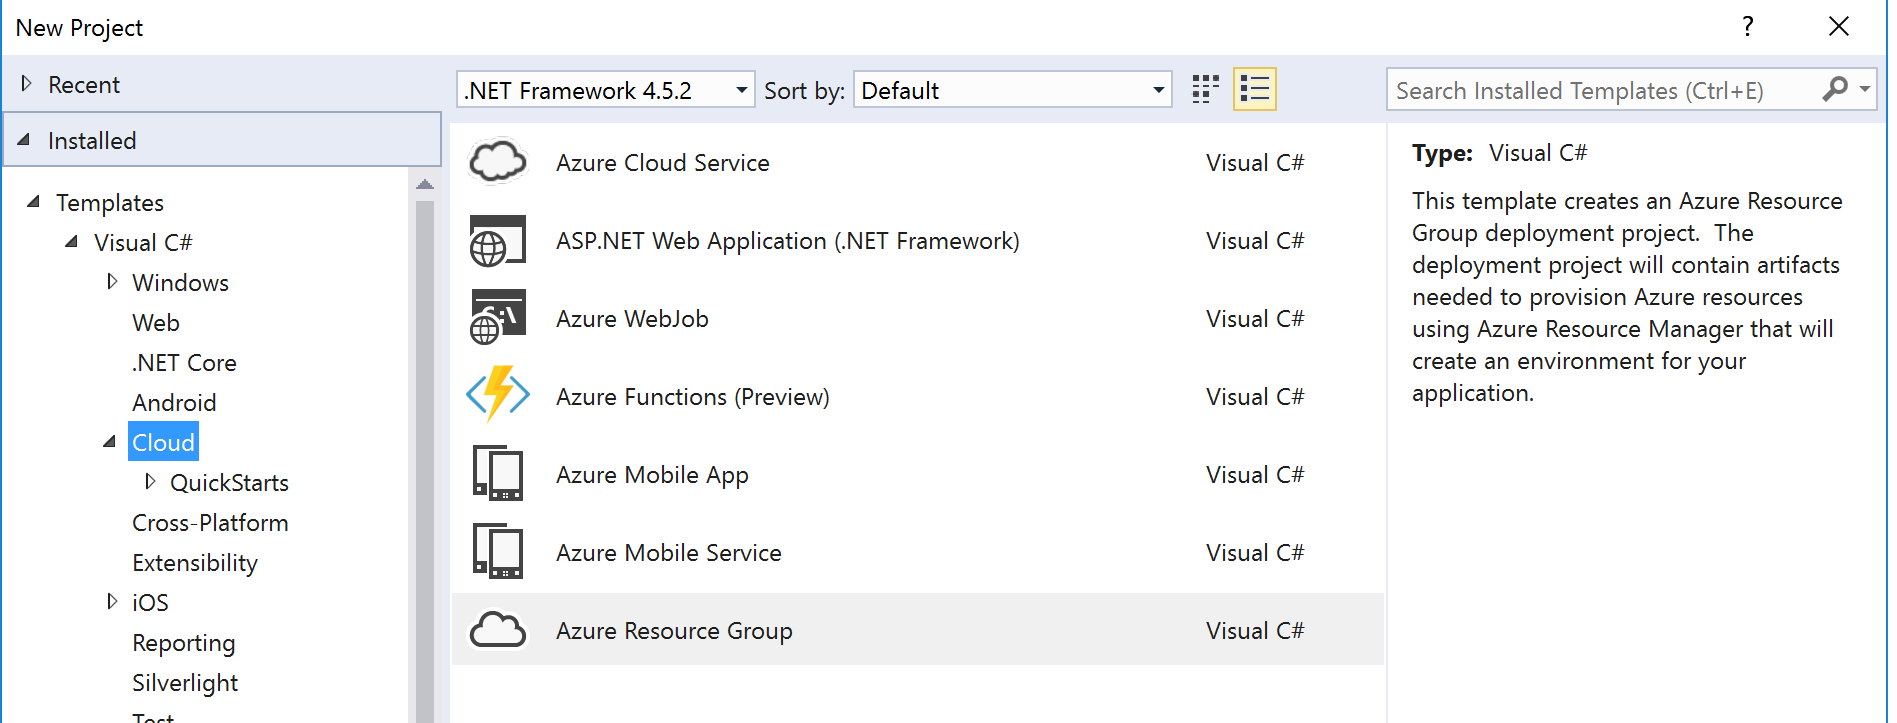
The rest of this section covers the individual project types.
2.1 ASP.NET Web Application Project
The ASP.NET Web Application project template covers most Azure App Service technologies (Web Apps, API Apps, Mobile Apps).
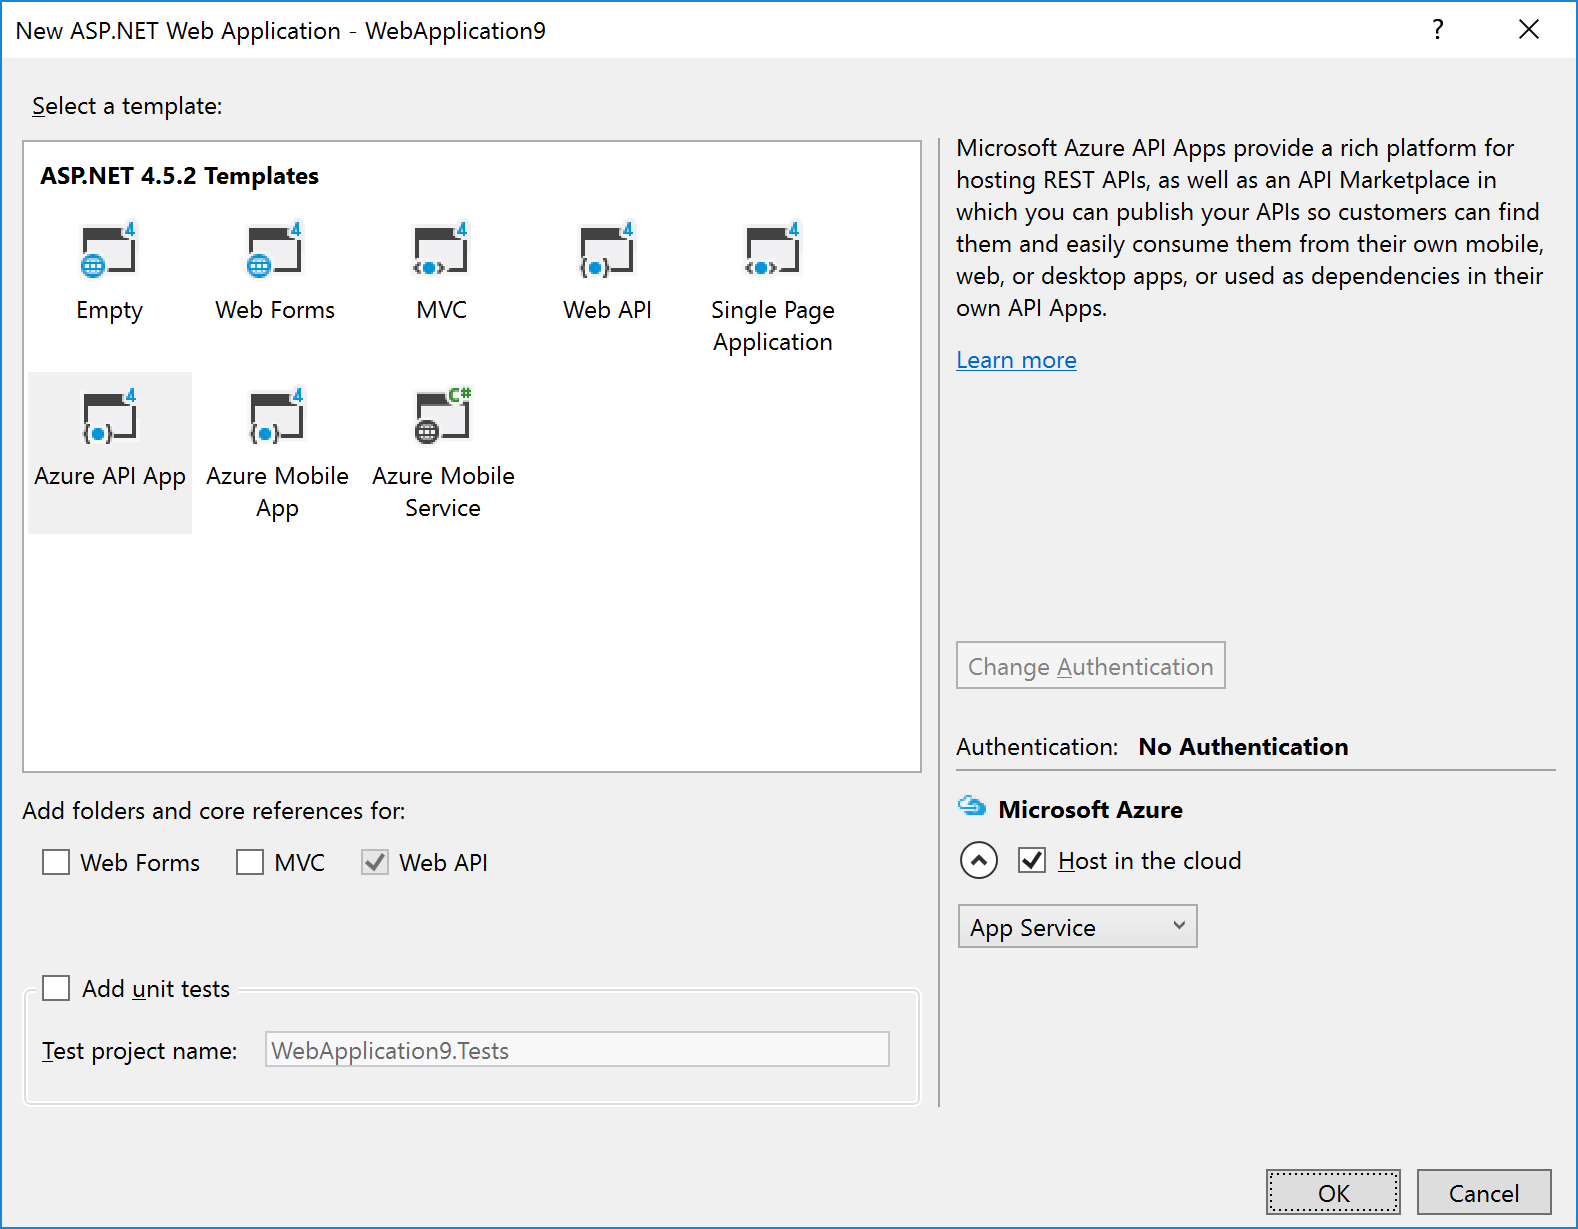
After selecting this option (and entering the project/solution name details), you are given a dialog where you can select the type of ASP.NET technology, and whether you want to host in in Azure:
|
Note: If you’re using the Visual Studio testing framework, we suggest you select the option to Add unit tests in the above dialog – this will create a separate Unit Tests project with an example of a unit test.
|
The example in the image above shows that we wish to create an Azure API App and to host it in Azure.
Selecting the Host in the cloud option will cause a secondary dialog to appear, which is used to create an App Service and create/select an App Service Plan (this is the same dialog used when you choose the Publish option):
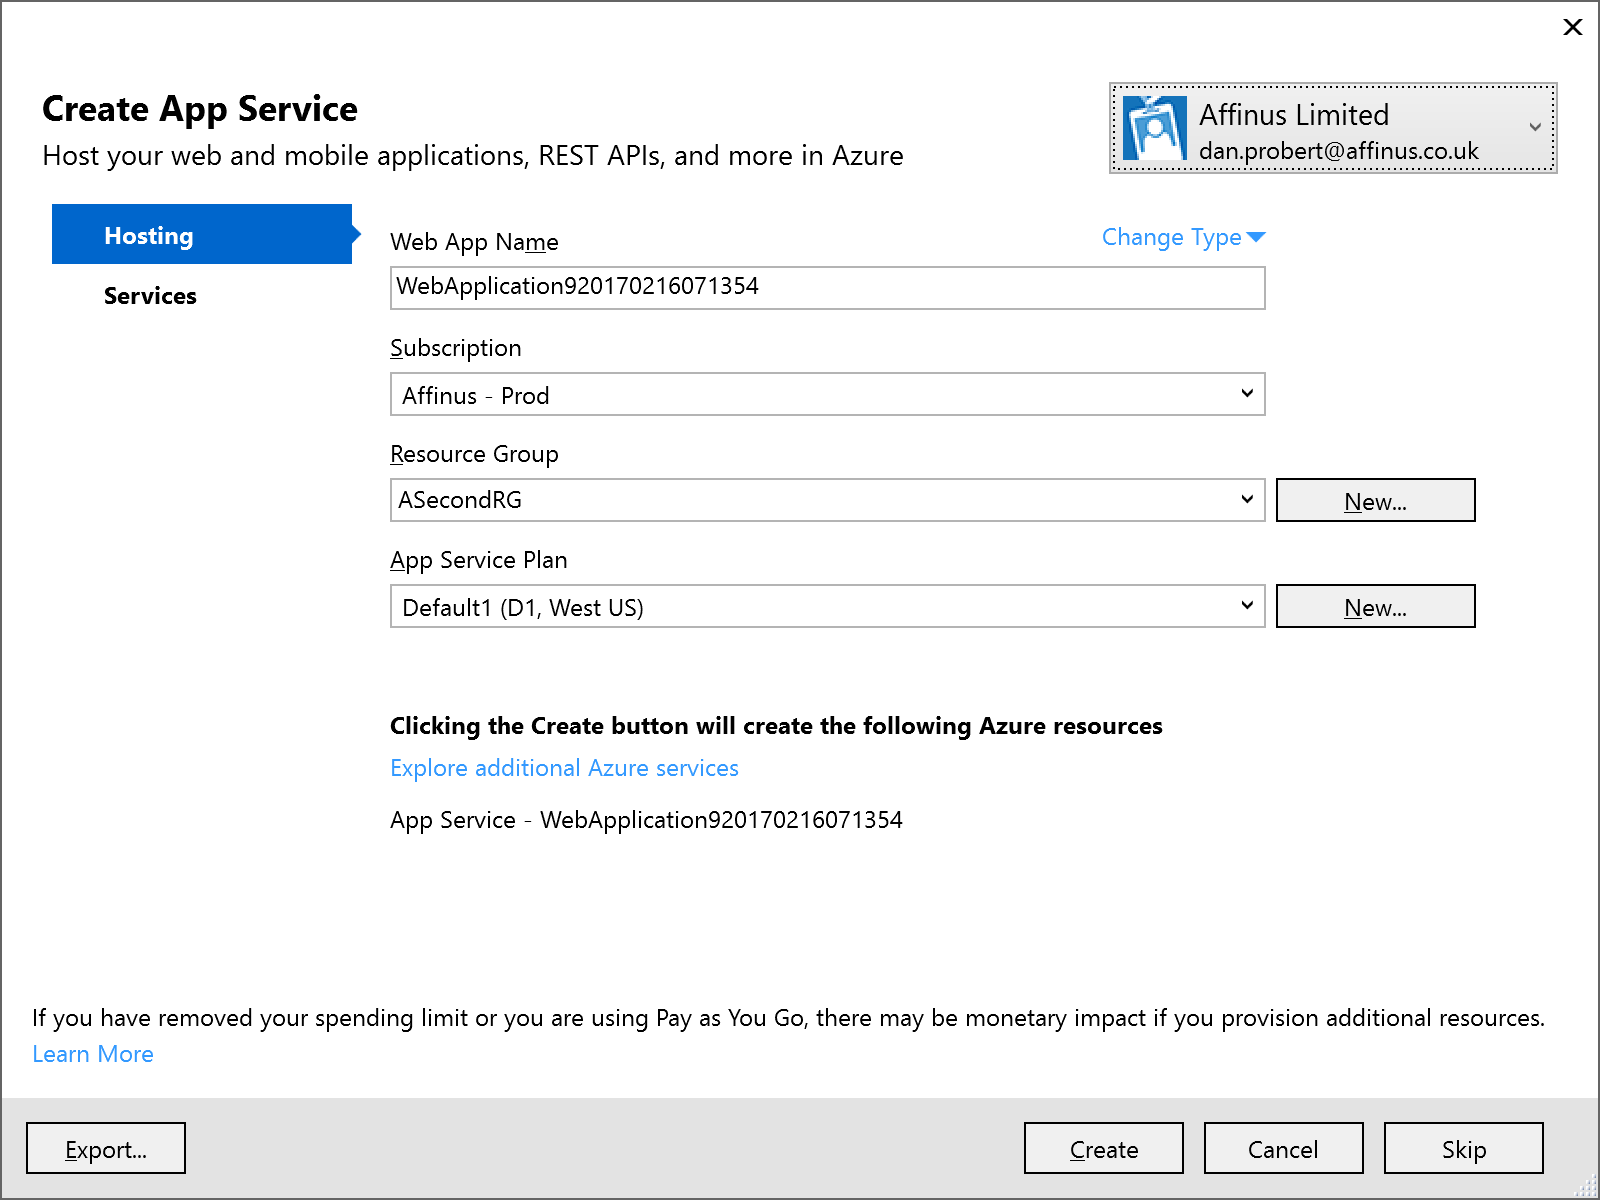
Remember: An App Service is equivalent to an IIS Application, and the App Service Plan defines the type of Server Farm your application is hosted on (i.e. how many servers, types of servers, how much memory you have, etc.).
We recommend that you *don’t* select the option to host in Azure at project creation: the rationale behind this is that you still must supply the same information in an ARM template (i.e. the App Service and App Service Plan) to deploy the App Service (and your ASP.NET application) from VSTS.
|
Note: Although Visual Studio can create an App Service/App Service Plan for this app (via the Publish option), we recommend creating a separate Azure Resource Group project in Visual Studio that contains an App Service and App Service Plan for this ASP.NET Web Application project. This Resource Group Project can then be deployed from both Visual Studio and VSTS.
|
|
Note: One thing that the above dialog is useful for, is creating an ARM Template that specifies your App Service and App Service Plan: if you fill in the dialogue, and then click the Export… button, it will save an ARM Template file that you can use in an Azure Resource Group project, and you can then cancel out of the dialog.
|
2.2 API App Project
API Apps are a type of ASP.NET Web Application project, and are created by selecting that option under Cloud projects. The API App template is then selected:
The API App template in Visual Studio creates a stubbed MVC REST app, with a Swagger interface:
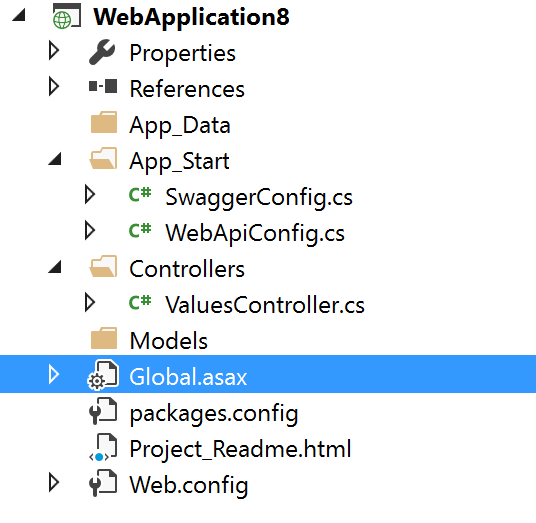
The developer then modifies this stub to implement the required functionality: the actual REST methods are contained in the ValuesController.cs file.
|
Note: Although Visual Studio can create an App Service/App Service Plan for this app (via the Publish option), we recommend creating a separate Azure Resource Group project in Visual Studio that contains an App Service and App Service Plan for this ASP.NET Web Application project. This Resource Group Project can then be deployed from both Visual Studio and VSTS.
|
2.3 Azure Functions Project
An Azure Functions project is a specialization of an ASP.NET Web Application project: Functions are hosted in a Function App, which is a specialized version of an App Service (technically, Functions are a type of Web Job, which is a type of App Service). Function Apps also use an App Service Plan: A Function App can use a standard App Service Plan (which limits the number of executions, but is charged at a regular monthly amount); or it can use a dynamic App Service Plan (known as consumption billing), where you pay per execution. The Azure Functions project in Visual Studio represents the Function App that needs to exist in Azure.
|
Note: Functions can also be authored in the portal, but this is not recommended as any changes are not automatically reflected in Source Control in VSTS.
|
The Azure Functions project template is (as of this writing) in preview – therefore its capabilities (and its location) may change in future.
To create an Azure Functions project, select the template from the New Project screen:
This will create a stub Function App project that looks like this:
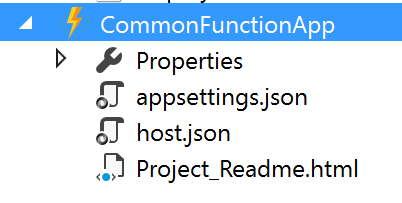
An Azure Functions project can contain one or more functions – each function will be in a separate folder in the project. When the project is first created, it will contain no functions – functions can be added by the “Add” option in the project:
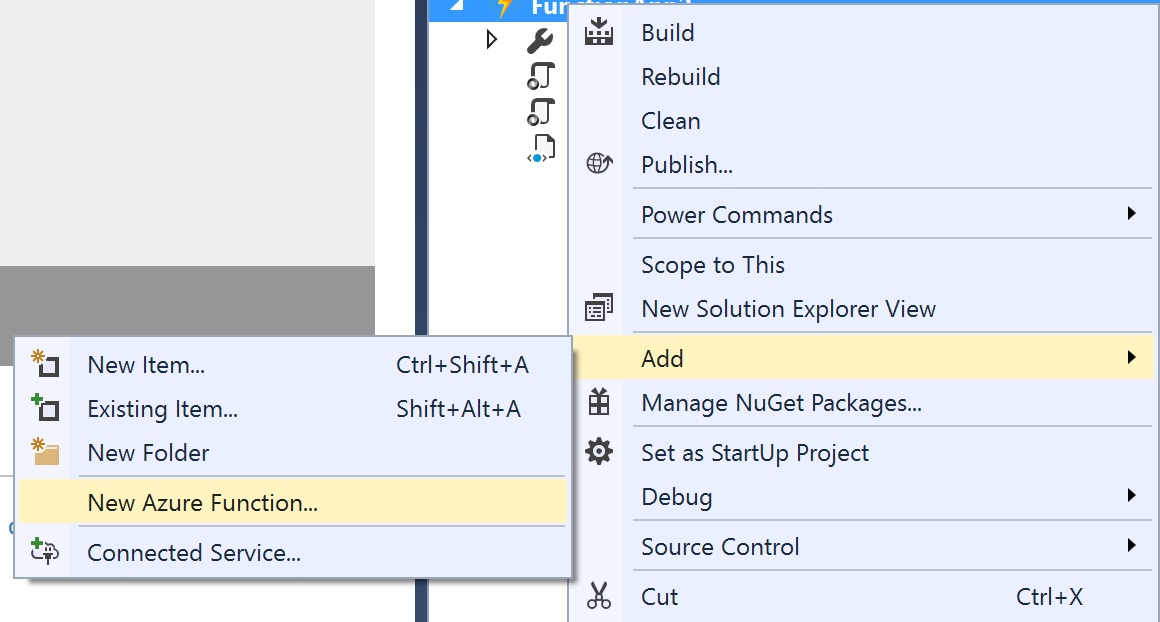
The New Azure Function dialog allows you to select the type of function to create:
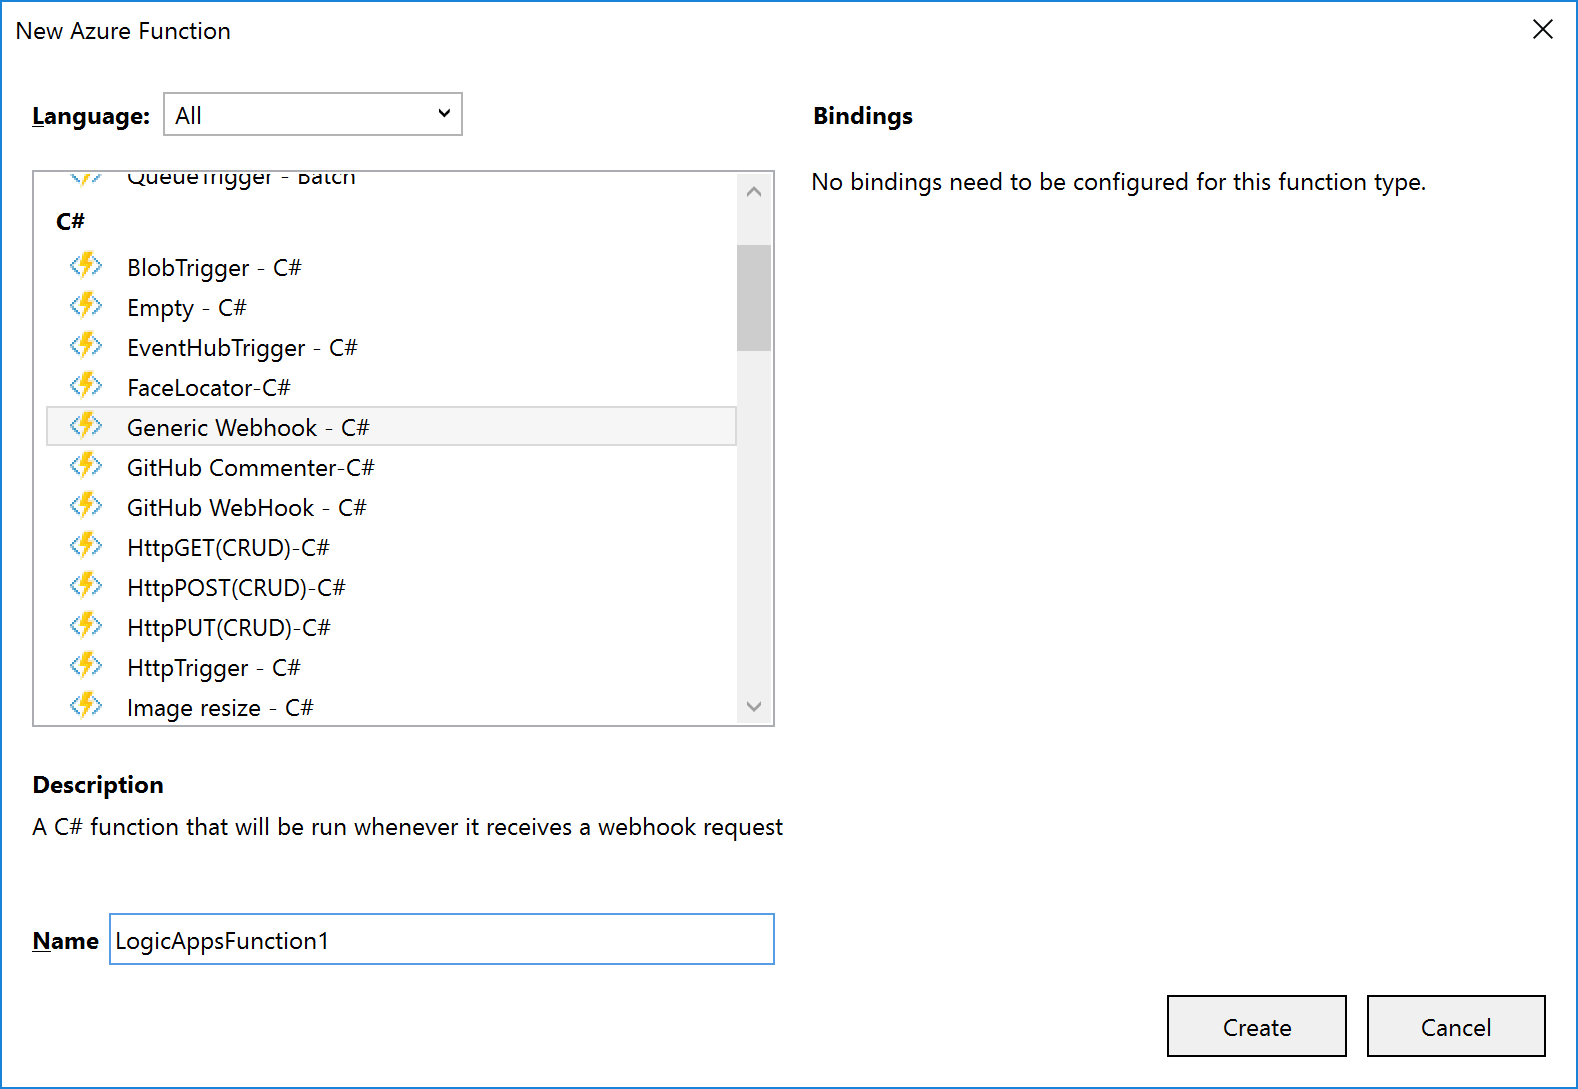
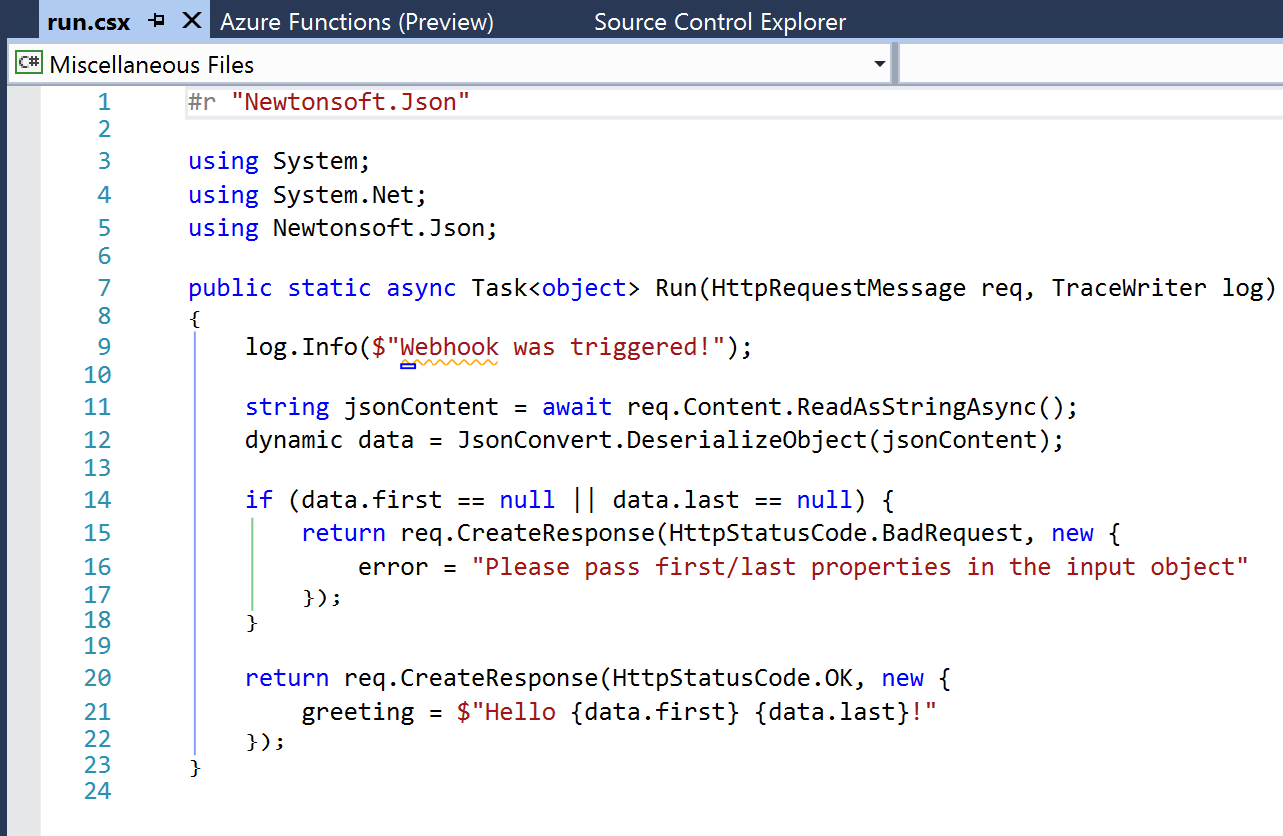
A function will consist of several files, depending on the template chosen. The example shown (and discussed) below is for a C# Generic Webhook function:
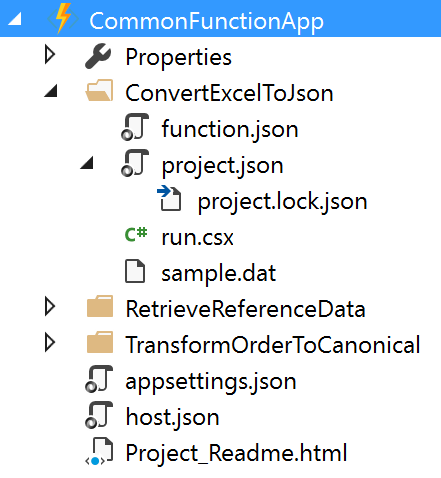
The function and function app files shown are:
|
File Name
|
Level
|
Description
|
|
function.json
|
Function
|
Contain settings for the function e.g. type of trigger, type of output, whether it starts disabled etc. For Logic App functions, you shouldn’t need to edit this, if a Generic WebHook template was used.
|
|
project.json
|
Function
|
Contains a list of dependencies this function needs from NuGet (or locally).
|
|
run.csx
|
Function
|
Contains the source code for the function.
|
|
sample.dat
|
Function
|
Contains sample data that works with the sample code in run.csx.
|
|
appsettings.json
|
Function App
|
Contains settings that affect the Function App App Service.
|
|
host.json
|
Function App
|
Contains information about the host used with the App Service.
|
|
Project_Readme.html
|
Function App
|
Read Me file, is displayed by Visual Studio when an Azure Functions project is first created.
|
|
Note: support is being added to functions for ability to use code from a pre-compiled assembly; and additionally, to have a parent function that can look at a request and forward it to a child function (function proxy). Neither of these features are available in Visual Studio now, but moving forward it will make sense to have a separate C# Library project that contains classes with the function code in them: this will allow for easier unit testing and editing.
|
|
Note: Although an Azure Functions project has a Publish option, the Function App it deploys is broken, and not visible from Logic Apps. For this reason, we recommend creating a separate Azure Resource Group project in Visual Studio that contains an App Service and App Service Plan for the Function App.
|
The default run.csx file for a C# Generic Webhook project looks like this:
2.4 Azure Resource Group Project
The Azure Resource Group project type lets you manage resources specified via ARM Templates.
When you create an Azure Resource Group project, you can choose to start from a number of pre-populated ARM Templates (including QuickStart templates from GitHub), or from a blank ARM Template:
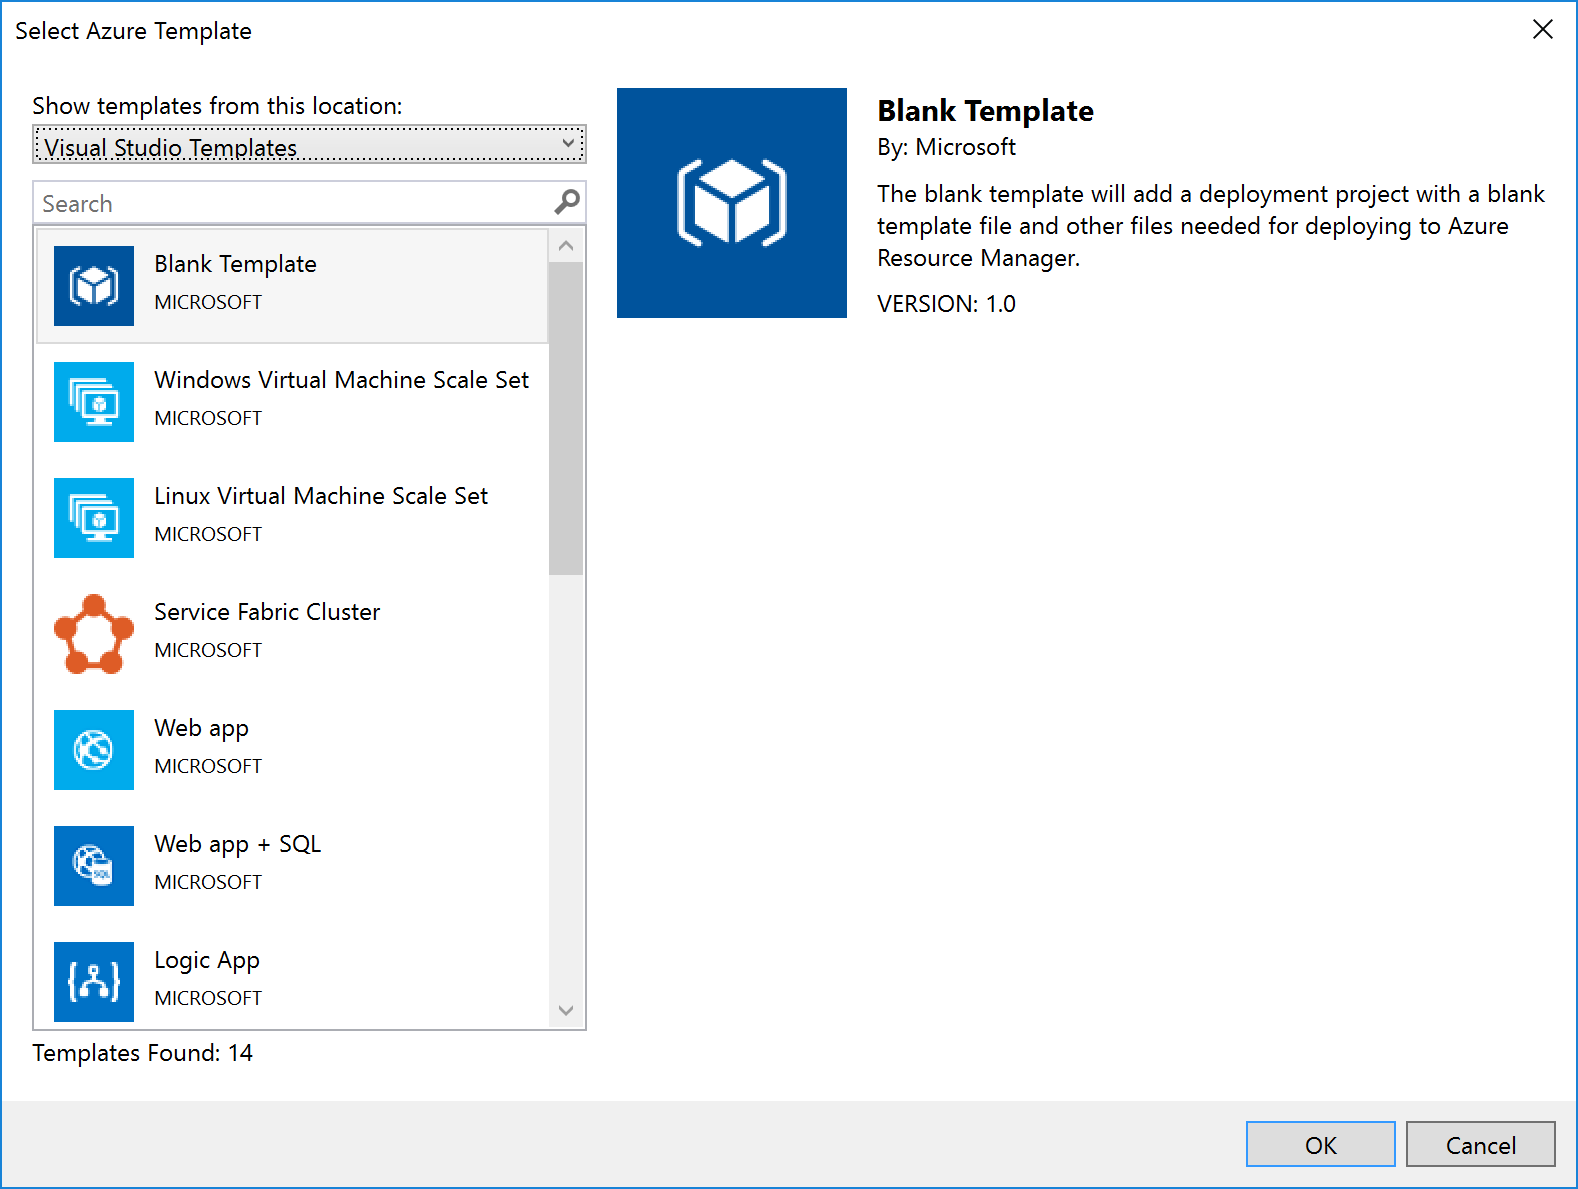
Notice that Logic Apps are one of the items in the list – if you select this option, you get a stub Logic App (i.e. something that the Logic App designer recognises as a Logic App and which it can open). Note that this assumes you have installed the Logic App tooling for Visual Studio.
|
Note: The link to download the Logic App visual studio extension can be found at the end of this article.
|
For some resources, e.g. Service Bus Namespaces, Storage Accounts, API Connections, etc., there is no template: you must start with a blank ARM Template file and add the content yourself.
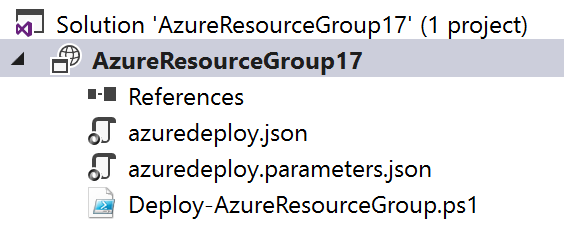
No matter which template you select, you’ll end up with a project with 3 files in it:
|
File Name
|
What
|
Description
|
|
azuredeploy.json
|
An ARM Template
|
A JSON file that describes what should be created.
|
|
azuredeploy.parameters.json
|
An ARM Template parameters file
|
A JSON file which contains values passed in to the ARM template.
Note: although only one of these is created, the idea is to create multiple template files, one for each environment.
|
|
Deploy-AzureResourceGroup.ps1
|
A Deployment PowerShell script
|
Contains a default script that creates the Resource Group and then deploys the ARM Template. This is the script that Visual Studio executes when you select the Deploy option for the project. Changing the name of this file will break the ability to deploy this project from Visual Studio.
|
When you right-click the project file and select Deploy, you’re given the option of selecting an existing deployment, or creating a new one. All this does is pre-populate the name of the ARM Template file to use, the Parameter file to use, and the subscription being used:

Creating a new deployment prompts us to select the Subscription, Resource Group, ARM Template, Parameters File, and also allows us to edit the parameter values:
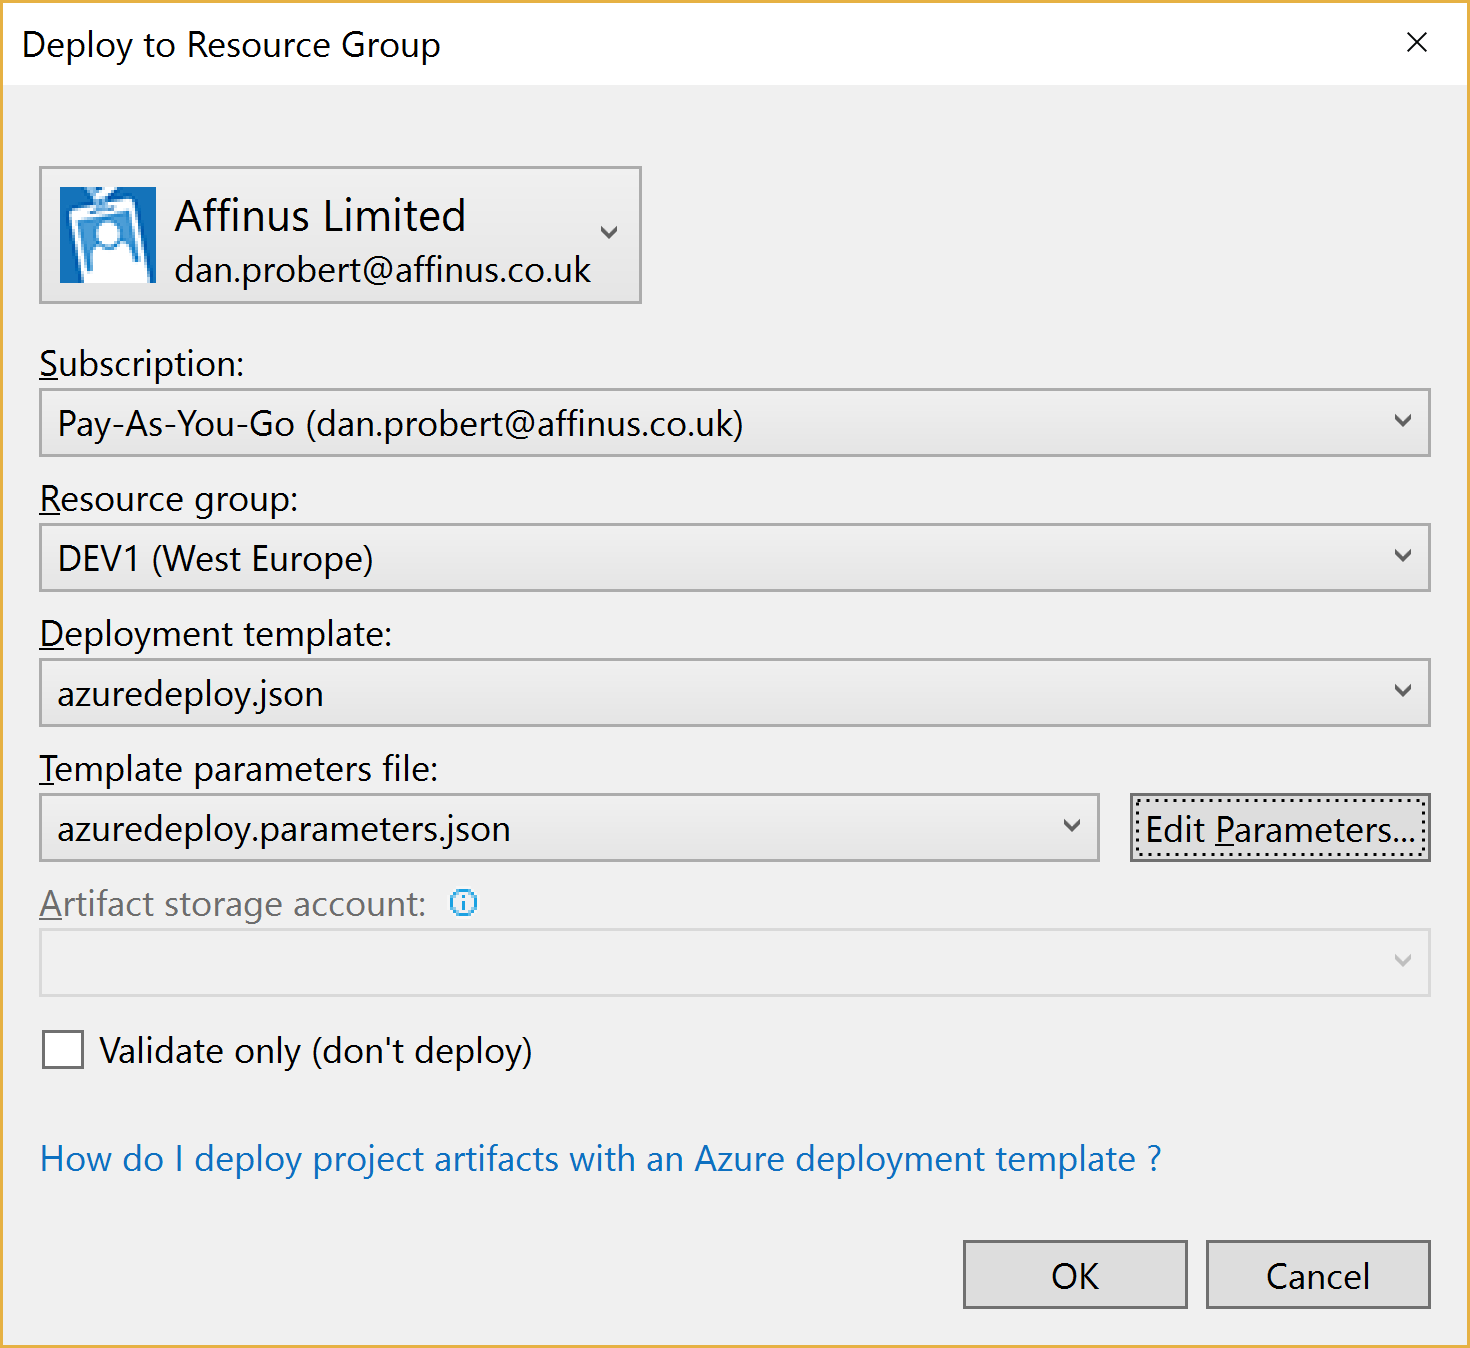
When we kick off a deployment, all that happens is that Visual Studio executes the Deploy-AzureResourceGroup.ps1 using the values supplied above.
For this reason, it is important that you don’t edit the Deploy-AzureResourceGroup.ps1 file unless you are extending the deployment in some fashion.
2.5 Integration Account Project
An Integration Account project type is used to create and store XSD Schemas and Transforms used with Azure Integration Accounts.
It is created via this option:
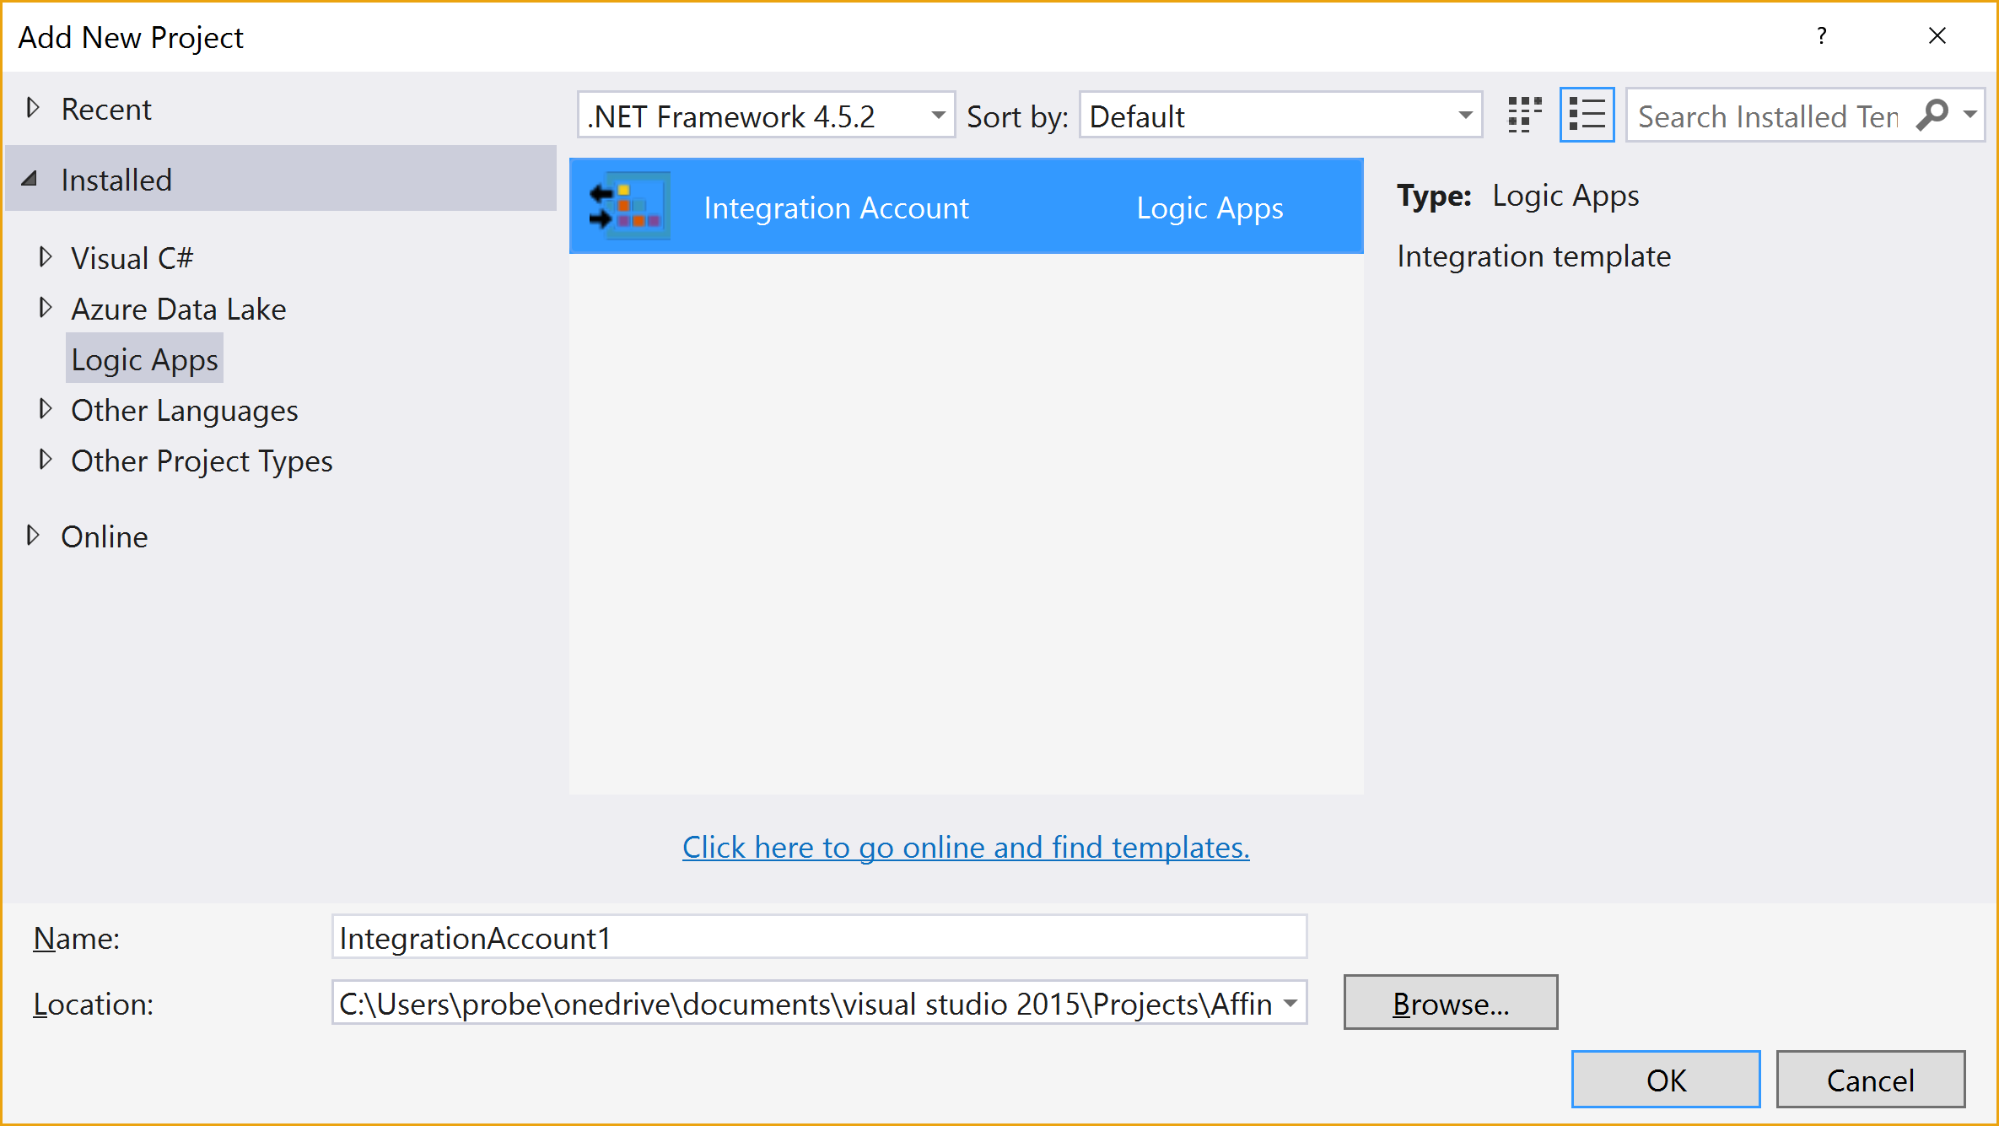
When the project is created, it has no resources in it.
Selecting the “Add New Item” gives 3 options:
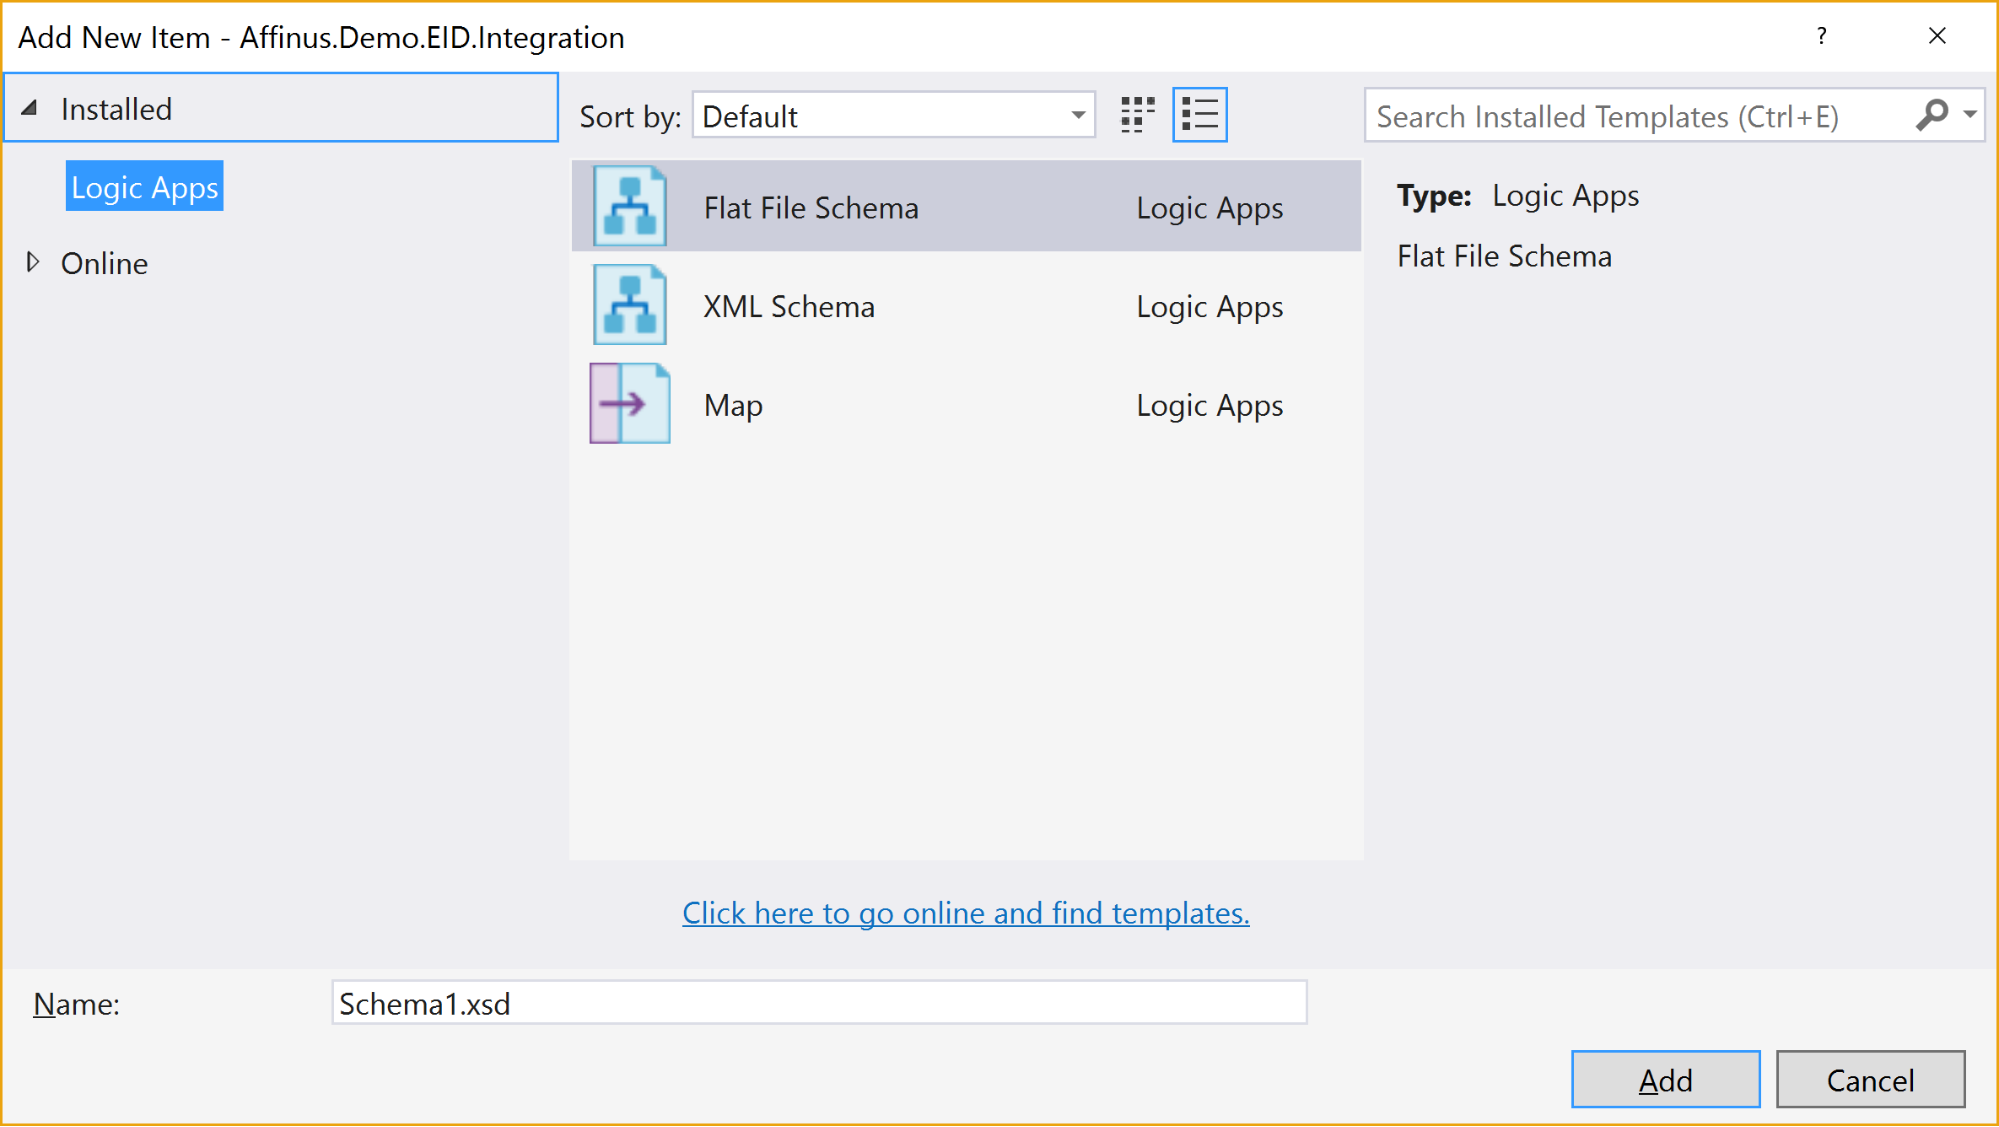
The available items are:
|
Item Name
|
Description
|
|
Flat File Schema
|
Opens the BizTalk Flat File Parser wizard, allowing you to build a flat-file schema (for use with the Flat File Parsing connectors in Logic Apps) from a sample flat file (e.g. csv or positional file).
|
|
XML Schema
|
Opens the BizTalk Schema Editor, which allows you to create/edit an XSD file.
|
|
Map
|
Opens the BizTalk Mapper, which allows you to create or edit a BTM map file.
|
There are a couple of restrictions with this project type:
- You can’t install the Integration Account type on the same PC that has BizTalk Server installed – they use the same components and don’t currently play nice with each other
- Only Visual Studio 2015 is supported (at this time)
- The BTM files generated by the mapper are converted into XSLT files (stored in the bin folder) when the project is built
- You can’t put maps in folders: they need to stay in the root folder
- There is no option to create an Integration Account nor publish the schemas/maps to an existing Integration Account from this project
|
Note: The link to download the Integration Account project extension can be found at the end of this article.
|
|
Note: We recommend that you create a separate Azure Resource Group project that will create the Integration Account in Azure and deploy the schemas/maps from this project. The script for this will be covered in the next article/video.
|
3. Further Reading
How to author an ARM template:
https://docs.microsoft.com/en-us/azure/azure-resource-manager/resource-group-authoring-templates
ARM Template expression and functions:
https://docs.microsoft.com/en-us/azure/azure-resource-manager/resource-group-template-functions
Integration Account visual studio extension
https://aka.ms/vsmapsandschemas
Logic Apps Visual Studio extension
https://visualstudiogallery.msdn.microsoft.com/e25ad307-46cf-412e-8ba5-5b555d53d2d9
by Daniel probert | Mar 8, 2017 | BizTalk Community Blogs via Syndication
Azure Enterprise Integration Series
Part 2: Azure Resource Manager Overview
1. Azure Resource Manager
The Azure Resource Manager (ARM for short) is the deployment engine behind Azure. It’s actually a whole lot more than that, but let’s just start with that.
In a nutshell, we can supply it a description of what we want to create (in a JSON file known as an ARM Template) and it will go away and provision all the required resources. It does this asynchronously, and we can check back regularly to see how it’s getting on.
The beauty of ARM is that we can group our resources however we want, and we can keep the definition of those resources in a single file, or group them in multiple files, depending on our needs.
Each resource to be created is represented by a Provider which uniquely identifies the type of resource being created. For each provider, there is also an API Version, which specifies which version of the resource to create. For example, to create a Logic App, you use a provider type of “Microsoft.Logic/workflows” and an API Version of “2016-06-01” (as at the current date).
Almost every resource in Azure can be created by the ARM engine, and the goal is to support all resource types. For example, you may want ARM to create: a virtual machine, the hard disks, a Virtual Network, Traffic Manager, and then kick off a script that install some software on the VM.
Alternatively, you may use ARM to create some Logic Apps, and API App, an Azure SQL Database, and an instance of API Management.
The ARM engine also sits behind the Azure Portal: when you provision a new resource in the portal (e.g. API Management) the portal sends a REST request to the ARM engine instructing it in what to create.
2. Resource Groups
A Resource Group is a mechanism for grouping a set of related resources in Azure. Any actions you perform on that Resource Group then apply to all the contained resources. The Resource Group also acts as a billing container, allowing you to see the costs of all contained resources.
The main criteria for which resources to group together is that all the resources share the same deployment lifecycle. Ultimately how you group your resources is left up to you, but the general rules to follow are:
- Resources that are exclusively used by an application, should be in the same Resource Group.
- Resources that are shared with other applications should be grouped with other resources used by those same applications
- If you would end up with a whole lot of resources on their own in a Resource Group, look at grouping those in a common Resource Group
- Use Resource Groups to delineate application environments e.g. Dev, Test, UAT, Prod
- For larger applications, it may make sense to split the application amongst multiple Resource Groups e.g. put Web Front end in one Resource Group, and middleware/database in another.
For example, say you had the following application, called CustomerService:
- 3x Logic Apps
- 1x API Apps
- 1x Function App
- 1x Azure SQL Server
If all those resources are only used by the same application, then we put them all in the same Resource Group (called CustomerServiceRG). That way, if we need to tear down the CustomerServiceRG Resource Group (e.g. to move it, or during redeploy) we don’t affect any other application. We can also apply Security (RBAC) and Tagging at the Resource Group level, and have it affect all the resources in the group.
Now imagine that 6 months later, the Azure SQL Server starts being used by 2 other applications.
If we *don’t* move the Azure SQL Server to a separate Resource Group, then next time we tear down the CustomerServiceRG resource Group, we inadvertently break those other two applications.
|
Note: you’ll notice that when you create a resource group, you need to specify a location (i.e. an Azure Data Center). And that you also need to do this when adding resources to the Resource Group.
The location for the Resource group is just the location where Resource Group metadata is stored. It has no bearing on the location where the actual resources are deployed.
In fact, you could have a Resource Group located in North Europe that contained some resources in Wes US, and some in South East Asia.
But for simplicities sake, it’s usually best to keep the Resource Group location, and the resource locations, the same.
One exception might be for Disaster Recovery situations, where you have a supplicate set of resources in a separate region.
|
3. ARM Templates
An ARM Template is a JSON file the specifies the resource that the ARM engine should create.
ARM templates also contains sections to handle parameters that are passed in, variables used during the execution, and for returning outputs.
There is a whole ARM Template language, containing expressions and functions, that you can use (along with the JSON you write) to set values and define the resources. You can read more about the format of an ARM template here, and see a list of supported expression and functions here.
Almost everything in Azure can be represented via an ARM template: Logic Apps are defined in ARM Templates, as are Integration Accounts, App Services, Virtual Machines, Storage Accounts, Service Bus Namespaces/Topics/Subscriptions, etc.
An empty ARM template looks like this:
|
{
“$schema”: “https://schema.management.azure.com/schemas/2015-01-01/deploymentTemplate.json#”,
“contentVersion”: “1.0.0.0”,
“parameters”: {},
“variables”: {},
“resources”: [],
“outputs”: {}
}
|
Looking at the sections above:
3.1 Parameters
The parameters section contains a list of parameter objects, defining the values to be passed into the ARM template (either by an ARM template parameter file, or via a parameter override).
A parameter definition contains:
- The name of the parameter (required)
- The type of parameter (required)
- Minimum length (for string parameters)
- Maximum length (for string parameters)
- Minimum value (for numerical types)
- Maximum value (for numerical types)
- Metadata (e.g. description)
- Default value (if no value passed in) – if this value is missing, it’s a required parameter
- Allowed values (an array of allowed values)
For example, a parameter that passed in a Logic App name might look like this:
|
“logicAppName”: {
“type”: “string”,
“minLength”: 1,
“maxLength”: 80,
“metadata”: {
“description”: “Name of the Logic App.”
}
|
|
Note: Parameterization is a crucial part of integration development in Azure.
|
3.2 Variables
The variables section contains values that are created at the time of deployment, usually from a combination of parameter values and expression/function value.
Variables allow you to simplify your template by putting common values in one place, improving readability and preventing repetition of values.
For example, imagine you have an Integration Account in a Logic App ARM Template.
You reference that Integration Account using an ID, which is a bit like a URL to the Azure resource (in fact, it’s a lot like a relative URL to the Azure resource!).
Suppose you had an Integration Account ID that looked like this:
/subscriptions/aaaaabbbbbbcccccccddddddeeeeeeffff/resourcegroups/integrationaccountresourcegroup/
providers/Microsoft.Logic/integrationAccounts/integrationaccountname
If you needed to reference that Integration Account at multiple places in your Logic App, you’d have the same value repeated in multiple places.
If you wanted to change the Integration Account ID, you’d have to change it at each location in the Logic App.
What would be easier, would be to define the Integration Account ID as a variable:
“variables”: {
“LogicAppIntegrationAccountId”: “/subscriptions/aaaaabbbbbbcccccccddddddeeeeeeffff/resourcegroups/
integrationaccountresourcegroup/providers/Microsoft.Logic/integrationAccounts/integrationaccountname
“
}
And you can then refer to this variable in your ARM Template like this:
variables(‘LogicAppIntegrationAccountId’)
Going one step further, you could parameterize the variable, so that the value came partly from expressions, and partly from passed in parameter values:
|
“variables”: {
“LogicAppIntegrationAccountId”: “[concat(subscription().id,’/resourcegroups/’,parameters(‘integrationAccountResourceGroupName’),
‘/providers/Microsoft.Logic/integrationAccounts/’,parameters(‘integrationAccountName’))]”
},
|
In the example, above, we are assuming that the Integration Account is in the same subscription as the ARM template we’re going to be deploying, and we pass in the name of the Integration Account and the Resource Group it is in.
3.3 Resources
The resources section contains an array of resource objects defining the Azure resources we want the ARM engine to create.
Each Resource object follows a standard format:
|
{
“name”: “”,
“type”: “”,
“location”: “”,
“tags”: {},
“apiVersion”: “2016-06-01”,
“properties”: {},
“dependsOn”: []
}
|
The values above are:
|
Section Name
|
Description
|
|
Name
|
Name of the resource being created
|
|
Type
|
Name of the provider to use for this type of resource e.g. Microsoft.Logic/workflows
Note: provider names are grouped under namespaces. In the example, above, “Microsoft.Logic” is the namespace. Not all providers are supported in all regions.
|
|
Location
|
The region the resource should be deployed in. Note: this doesn’t have to be the same region as the Resource Group.
|
|
Tags
|
Contains metadata for the resource e.g. for a logic app, the displayName value is stored here.
|
|
API Version
|
The specific version of the resource you want to create. API Version change occasionally, usually when a major new release (or breaking change) is introduced. This value allows you to specify which version of the resource you want created, which allows you to maintain compatibility even after a new version is realised.
|
|
Properties
|
The properties for the resource. This is where the actual resource content is stored. For example, for a logic app, this is where the Logic App definition is stored: if you switch to Code View in the Logic App designer, what you’re seeing is this properties value (i.e. you don’ see the rest of the ARM template that defines the Logic App).
|
|
Depends On
|
An array of resource name or IDs that this resource depends on. The ARM engine will build dependent resources first, and in sequence. Any resources that have no dependency are provisioned in parallel. The resources in this array must be defined in this template.
|
|
Note: You can see a full list of providers (grouped by namespace) in the portal, by selecting Resource Explorer, and then choosing providers:
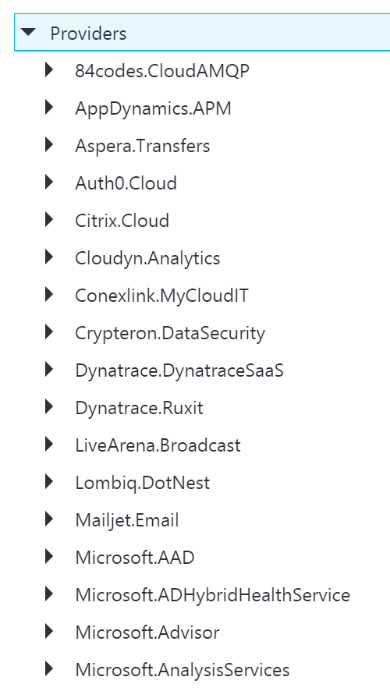
|
3.4 Outputs
The outputs section is a list of output objects, which are used to return values after the deployment is complete.
Often, the outputs section is used to return a URL to a resource, or a connection string (e.g. for a Service Bus Namespace).
A output object definition contains:
- The name of the output (required)
- The type of output (required)
- The value being returned
For example, an output that returns the Connection String for a newly created Service Bus Namespace might look like this:
|
“NamespaceConnectionString”: {
“type”: “string”,
“value”: “[listkeys(variables(‘authRuleResourceId’), variables(‘sbVersion’)).primaryConnectionString]”
}
|
4. ARM Template Parameter Files
An ARM Template Parameter File provides an easy way to group all the parameters required for an ARM template into one place.
The Parameter file is a JSON file that contains at least one parameter definition for each required parameter in the corresponding ARM Template.
There is no actual relationship between a parameter file and an ARM template: you could use one parameter file for multiple ARM Template, if the parameter names were the same.
A parameter file looks like this:
|
{
“$schema”: “https://schema.management.azure.com/schemas/2015-01-01/deploymentParameters.json#”,
“contentVersion”: “1.0.0.0”,
“parameters”: {
“logicAppName”: {
“value”: null
}
}
}
|
You can have multiple parameter files for a single ARM Template, with each parameter files containing the values for a given environment (e.g. Dev, Test, UAT, Production).
5. Deploying ARM Templates
There are multiple ways to deploy an ARM template: via the Portal, via the Resource Explorer web site (https://resources.azure.com/), via PowerShell, and directly via the ARM REST API.
To deploy an ARM Template using PowerShell, you use the New-AzureRmResourceGroupDpeloyment cmdlet:
|
New-AzureRmResourceGroupDeployment -Name DeploymentName `
-ResourceGroupName ResourceGroupName `
-TemplateFile ARMTemplateFile `
-TemplateParameterFile ParameterFile `
|
When you execute this cmdlet, you’ll get back a Tracking ID you can use to check the deployment status: this is because the deployment is asynchronous.
An ARM Template can only be deployed to a single Resource Group – you can’t have an ARM Template that spans Resource Groups.
However, you *can* have multiple ARM templates that all deploy to the same Resource Group: this allows you to separate resources into separate ARM templates by resource type, for example. You could then have all your Logic Apps in one ARM template, Storage Accounts in another, etc.
ARM Templates can be deployed in one of two modes:
- Full: In full mode, all existing resources in the Resource Group are removed, and only the resources in the ARM Template are deployed.
- Incremental: In Incremental mode, the ARM engine compares the resources in the ARM Template to the existing resources in the Resource group, and only deploys what has changed e.g. it might add some resources, and modify others, but it won’t remove any.
Incremental mode is what allows us to separate resources into multiple ARM Templates.
6. Obtaining ARM Template Samples
ARM templates can be obtained in several ways:
- Via the Resource Explorer application (https://resources.azure.com/)
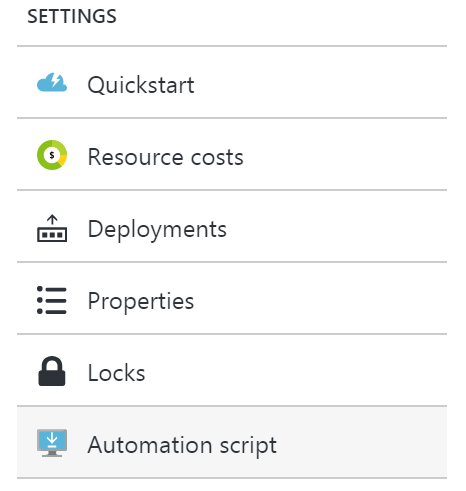
- From the Portal, using the Automation Script option:
- Via PowerShell cmdlets
- From the ARM management REST API
As an integration developer, it’s important that you learn how to author ARM templates: not all resources (in fact very few) have a visual designer. Instead, you either need to create your resources in the Portal and export the ARM Template; or you need to manually create the ARM Template in Visual Studio.
The best option is to have a library of ARM templates which you can then modify to suit your needs.
7. Further Reading
How to author an ARM template:
https://docs.microsoft.com/en-us/azure/azure-resource-manager/resource-group-authoring-templates
ARM Template expression and functions:
https://docs.microsoft.com/en-us/azure/azure-resource-manager/resource-group-template-functions
by BizTalk Team | Mar 8, 2017 | BizTalk Community Blogs via Syndication
With the recent release of BizTalk Server 2016 we are happy to announce that the developer image of BizTalk Server 2016 is licensed for free to use in your test and development scenarios. BizTalk Server 2016 is Microsoft’s latest release of the new hybrid integration software.
With BizTalk Server 2016, customers can automate mission critical business processes, leverage support for latest first party platforms and gain newer capabilities within the BizTalk Administration console. With this release, customers also have the flexibility to adopt a hybrid approach by choosing to connect to SaaS applications through Azure Logic Apps, or running BizTalk Server on Azure leveraging full support in production environments.
Azure Logic Apps is another core part of Microsoft’s Hybrid Integration Platform, that allows you to rapidly connect to numerous SaaS and enterprise applications, enable business to business communication and leverage the power of other Azure services like Functions, Cognitive Services, Machine Learning and many more. BizTalk Server 2016 is the first version to take full advantage of this hybrid integration story, with an out of the box adapter to connect directly to Azure Logic Apps. This opens up numerous hybrid and cloud integration scenarios – all from the comfort of using your on-premises BizTalk Server 2016.
BizTalk Server 2016 also provides support to many of the first party Microsoft platforms such as Windows Server 2016, Office 2016, Visual Studio 2015 and SQL Server 2016. In addition, it provides the ability to run your Enterprise Integration Solution in the cloud leveraging the AlwaysOn and Availability groups through SQL Server 2016 to achieve high available environments in Azure on IaaS.
Please follow this link to sign up for Visual Studio Dev Essentials and download BizTalk Server 2016 Developer edition for free today.

by Uma R | Mar 8, 2017 | BizTalk Community Blogs via Syndication
Document management and versioning is a regular and a necessary activity in any organization. We do face some challenges in our organization too. We searched the best option to overcome those. Finally, we found a solution via SharePoint versioning.
What is Versioning?
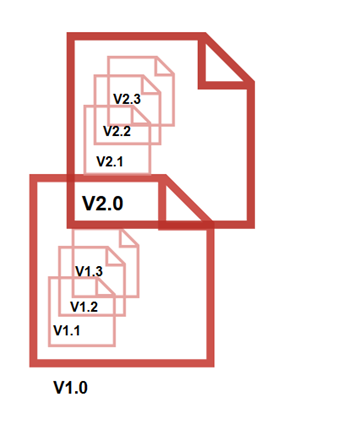
You can find a clear idea about versioning by seeing the picture below. Versioning describes the management of changes in your document. You can track your document changes in each version and can reuse whenever you want. You can maintain major versions (V1.0, V2.0) alone or if you need your draft copies, you can maintain them in minor versions too (V1.1. V1.2, V1.3 and V2.1, V2.2, V2.3).
Why we use Versioning
- Versioning, combined with other settings, like checkout and check-in, which gives you a lot of control over your document
- Versioning is automated. You don’t need to give version numbers for your updated files at each time when you check-in. It starts from 0.1 for Minor version and 1.0 for Major version. Versioning provides a user-friendly infrastructure for finding out who made what changes and when
- You can set your maximum major and minor versions limit values for avoiding large storage of files
How to use Versioning in SharePoint
You can enable versioning through either of the following two ways:
- Through Settings page
- Through Library Settings
Both ways are described below.
Through Settings Page
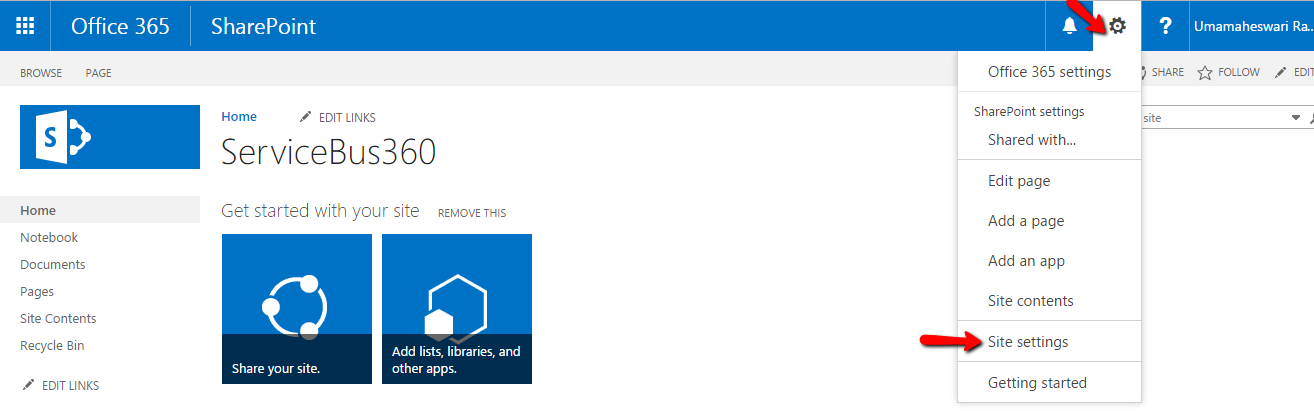
- Go to settings which is located in the top right corner -> Click Site settings from the drop-down
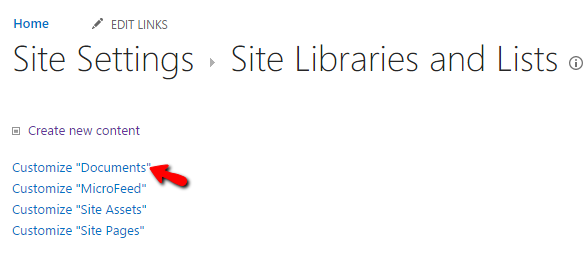
- Click Site libraries and lists -> Click Customize “Documents” -> Click Versioning settings.
Through Library settings:
- Select the file or folder -> Files or library items will be displayed in top menu.
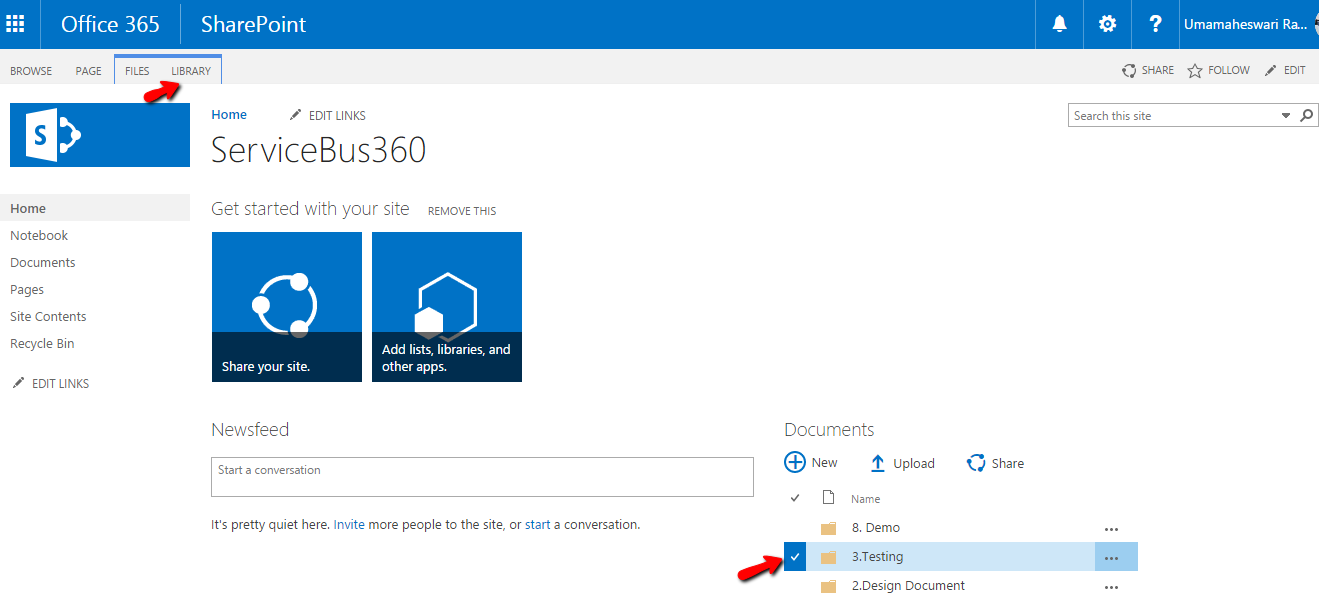
- As you click Library, a drop down window is displayed -> Click Library settings -> Click versioning settings link

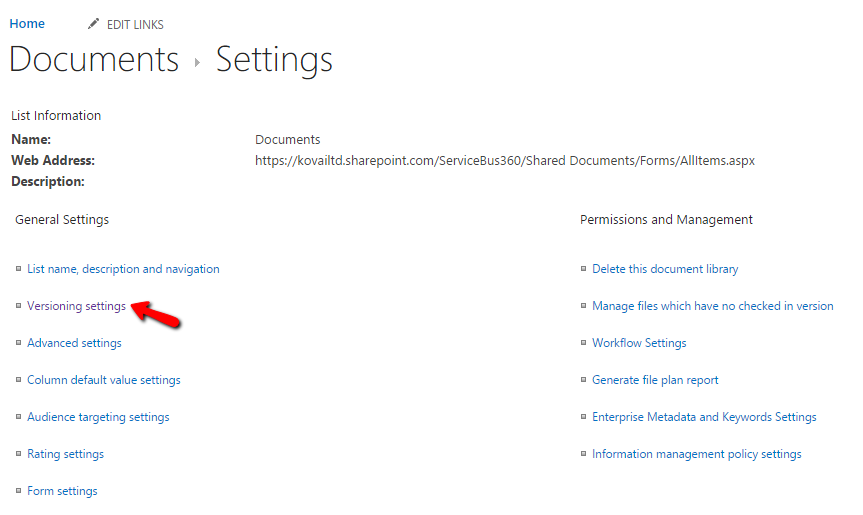
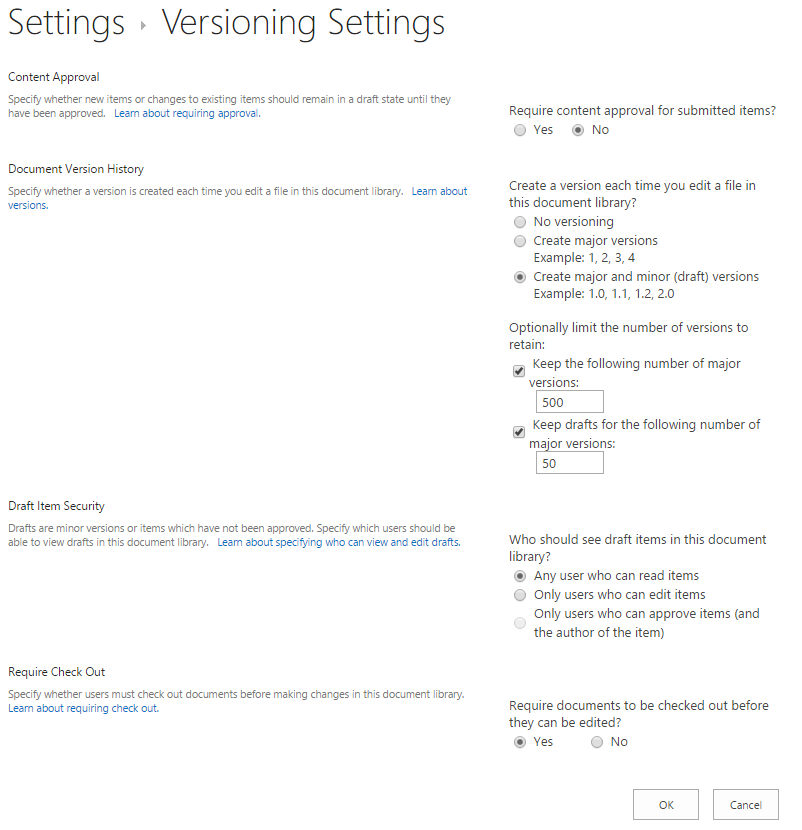
You can reach the Versioning Settings page. Here you can set your limitations. Let’s see the items briefly here:
- Content approval
If you enable this item, your file can be viewed only when your approver approves. Won’t We don’t use this option in our organization, as we see more time consuming and dependent on approver for any other team member to access the file.
- Document Version history
- No versioning – Disable the version control
- Create major versions – Only Major versions can be created and there are no draft items maintained here
- Create Major and minor versions – We are using this feature for finding the status of the document. If the document lies in Brainstorming or Review and is still being updated, we place it under minor versions.
Once finalized the document comes under Publish as a major version.
- You can set your maximum count value to maintain major and minor versions
- Draft item security
- You can set who can be able to view your changes of document after check in.
- Requires checkout
- You can set whether the checkout is needed or not every time you open the document
Scenario for versioning
The notable point in versioning is, it does not support in folder level. Only Documents can be maintained using version settings. Try out the following steps to perform versioning.
- When versioning enabled in site settings, the existing files were in Major version. When we want to update the same file or edit, Click Checkout option by clicking … -> Advanced -> check out

You can find a downward pointing arrow mark in green color that indicates check out is done. We can see who has checked out the document by doing mouse hover on that arrow mark. You can use the document for your changes now.
- After you are done with the changes, you have to check in the document by clicking the Check in button. In case you do not want to save the changes, you can use the option to Discard check out which will revert the document to the last checked in version
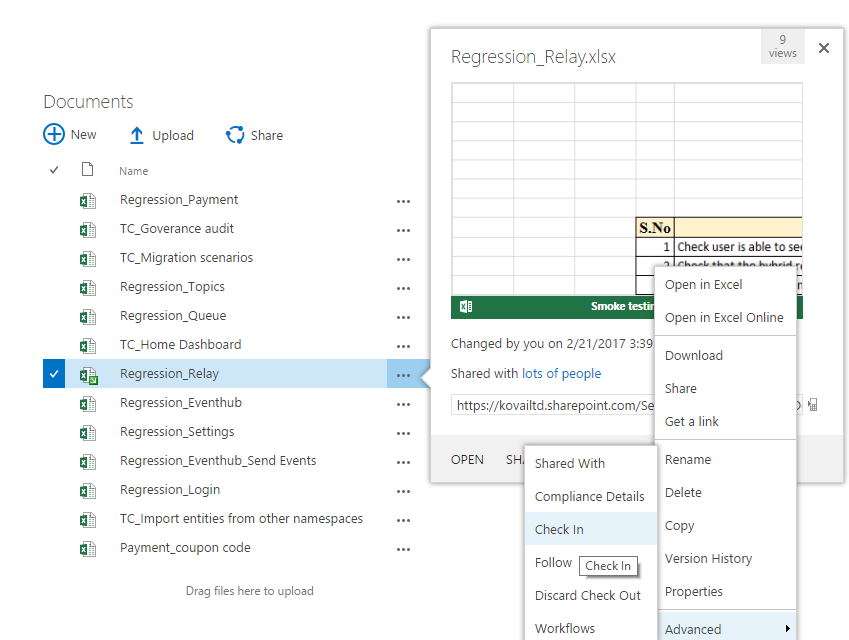
- When you click the Check in option, SharePoint asks the user to select the type of version based on your document which keeps as a draft item or published version.
You can see your items by clicking Version history option. All minor and major version items are listed. As mentioned before, Major versions items are maintained as whole numbers (1.0, 2.0) and minor version are maintained as decimal numbers starting from the last whole numbers (0.1, 0.2). User will not be able to change the versioning numbers.

We followed this versioning in our organization with both major and minor version concepts. The document is maintained as minor version for requirement analysis, brainstorming section and review stages until requirements freeze. Before the feature is considered for development, user will publish as a major version so that everyone can use it.
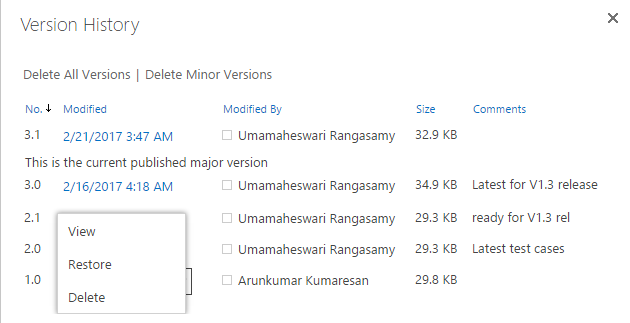
- Versioning also allows us to restore a document to earlier versions when required.
Conclusion
We started using Versioning in our organization to maintain same document base for feature development and any updates. All change requests, enhancements are captured in the same document by modifying it and saving it as different versions.
Though there are many document versioning systems, SharePoint in Office 365 is very easy to setup and use.
The post Enabling Versioning in Office365 SharePoint appeared first on BizTalk360.
by Mark Brimble | Mar 7, 2017 | BizTalk Community Blogs via Syndication
In a previous blog I wrote about an issue when sending a message to an Apache AMQ using the REST API. We decided introduce a workaround in the application that is using STOMP to retrieve the message. The workaround was to add custom property when we send the message to the AMQ like transport=rest. If the receiving application sees the transport property is rest it removes the linefeed. This is not ideal and we would still like to understand why the Apache AMQ REST API is adding an extra line feed to messages sent to the AMQ.