
by Sivaramakrishnan Arumugam | Jun 2, 2020 | BizTalk Community Blogs via Syndication
Introduction
This blog is an extraction of the session “Setting up a highly available BizTalk Server in Azure” in the Integrate 2020 event presented by Samuel Kastberg, Senior Premier Field Engineer at Microsoft.
It gives you an overview of setting a highly available BizTalk Server in Azure using BizTalk2020 at a very high level. More and more it is common to install BizTalk environments in Azure. As especially Production environments require high availability, today Samuel gives guidance on HA related topics like network configuration, load balancing and alternatives for clustering SQL Server
Things we will focus on
- Focus on BizTalk Server 2020
- No consideration on moving to Azure Integration services
- Things that are different/ specific to Azure
Considerations
When you are setting up the BizTalk server environment, we have lots of considerations. When it comes to Azure just as on-premises you have set of rules and it will vary on how your environment works, your requirements, organization policies, what kindly of policies were followed.
Here are some important aspects,
Governance
- Rules, requirements from Organizations
Set of Products what you are working
- BizTalk server
- SQL
- MSDTC
- MSMQ
- IIS
Clustering
Networking
- Load balancer
- Network Security Group (NSG)
- Application Gateway
Provisioning Automation
- ARM templates
- Scripting, e.g. PowerShell
Performance
- Expectations
- Measure
- Resource Sizing
Governance
When it comes to Governance, it will be considered based on your organization’s flexibility.
Things like,
- What set of policies and rules to be used?
- How the resources will work in Azure?
We need to determine first-hand with the owners or administrators of the corresponding Azure subscription. For Example,
- Who is the owner of different things?
- Who can perform different sets of actions?
And for resources, the following are the important aspects to be considered
- They will be placed in the Azure subscription under the resource groups.
- In order to organize the resources in the subscriptions, it will be different from business to business. For example, some customers have one subscription for everything and different subscriptions for different environments (Dev, QA, Production)
- This way it is easy for the admins or decision-makers to determine the privileges to be given for each environment.
- To organize the resources, it is important to device the plan like whether all the machines should be in the same resource group or hub (BizTalk Servers and SQL servers in different groups).
- And of course, who will be the owner of the resources is differs from customers to customers.
- Resource tagging is another important criterion where you need to tag the resources in order to identify different environments (Dev, QA, Production)
Cost Management
This is one of the essential criteria when you are working with Azure as the bill will be paid every month based on resource usage. Basically, a license in the Azure costs the difference between different products. Users will pay in advance for the resources or pay per usage. Purely, it depends on what kinds of enterprise you have with the Azure.
Tip: Azure pre-purchased License cost will be cheaper than when you pay as go.
Resource Provisioning is an essential task, you need to determine where you will organize your files and how to use it?
Security
Security is another important aspect to be considered. You need to have your account, groups, and determine the access control between your Azure Active Directory and the hub with networking security.
Networking
Basically, BizTalk will access to different folders in the on-prem solutions. And, communicate with SQL servers, Services (Http, Https), and other infrastructure elements. To have a seamless connection, the proper plan needs to devise with your infrastructure team.
Products
If we look at a little bit on the product side that is necessary to set up highly available here are some of the products SQL Server, MSMQ, BizTalk Server, MSDTC.
Here are some important aspects to be considered,
SQL server
- Only IAAS is supported (the only version of SQL that supports SQL transactions)
- Licensing BYOL or pay as you go
- Backup BYOL or pay as you go
- Backups to Blob storage
Tip: In Azure, it is cheaper with blob storage than using the file.
SQL Server High Availability (HA)
- Availability Groups that own its own storage
- Failover Cluster instance (FCI)
- Shared Storage
MSMQ HA
- Shared Storage
- Storage spaces direct
BizTalk server
- Licensing BYOL or pay as you go
BizTalk server HA
- Clustering for single instance hosts
- Enterprise SSO Master Secret Server
- Application gateway for incoming HTTP traffic
MSDTC HA
- Clustering and configure the Load Balancer
- Fixed port
- Use the same cluster role as SQL
- Shared storage
Clustering
For the clustering,
- Networking, you must use a load balancer to route traffic.
- Shared storage (will see the alternative solutions).
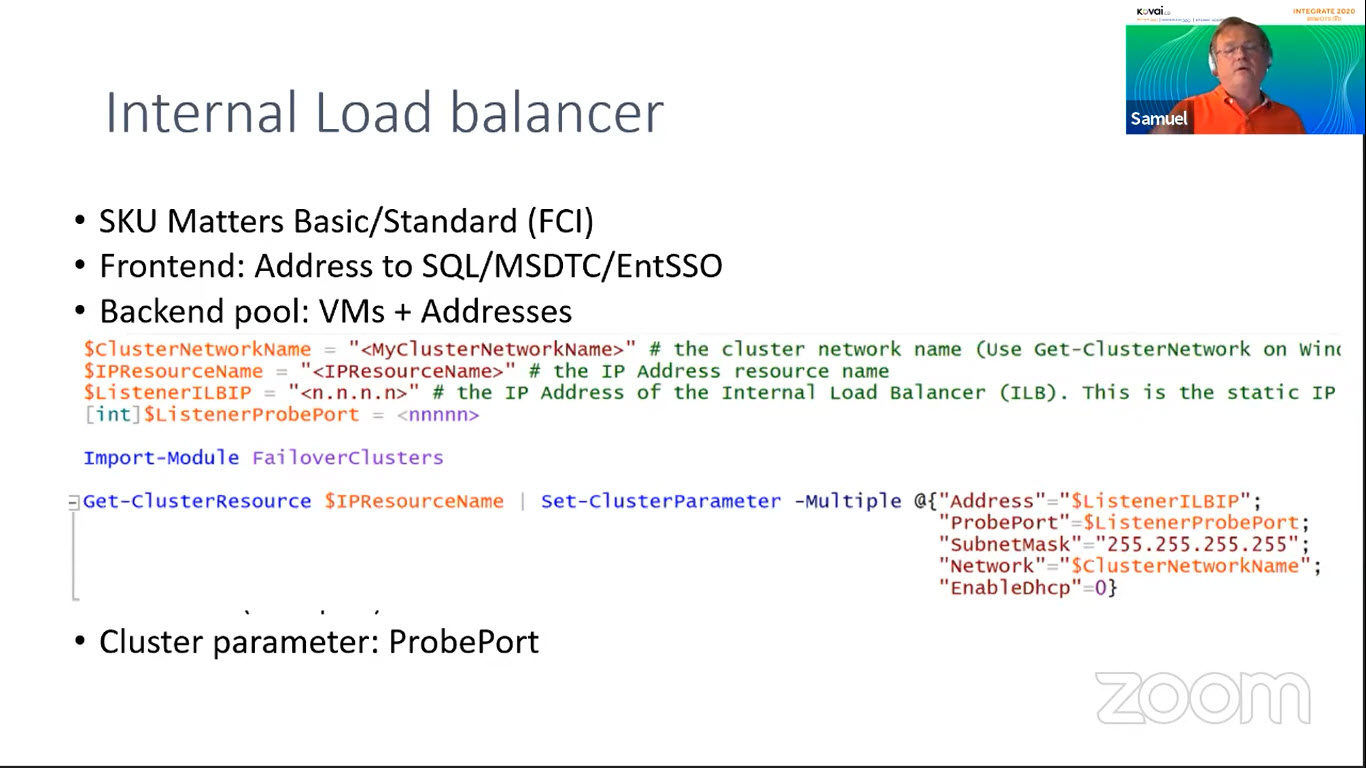
Internal load balancer
Let’s see the structure of the Internal load balancer
SKU Matters
There are two SKU Matters available as Basic and Standard for the load balancer. In the standard, there is always needed to have the network security group and the network card you select should be in standard SKU’s.
Frontend
- The front end is the service address. It could be SQL, MSDTC, EntSSO, etc.,
- Backend pool is the virtual machines and address
- To identify which machine is the current owner of the service, the health probe should be configured. This way load balance will ping and check the currently available service.
Load Balancing Rules
It will bind the front and the backend.
Port mapping is taken place here to determine only one port to be configured.
The other parameter is the Cluster. The ProbePort parameter needs to be set as it will check the health of the load balancer.

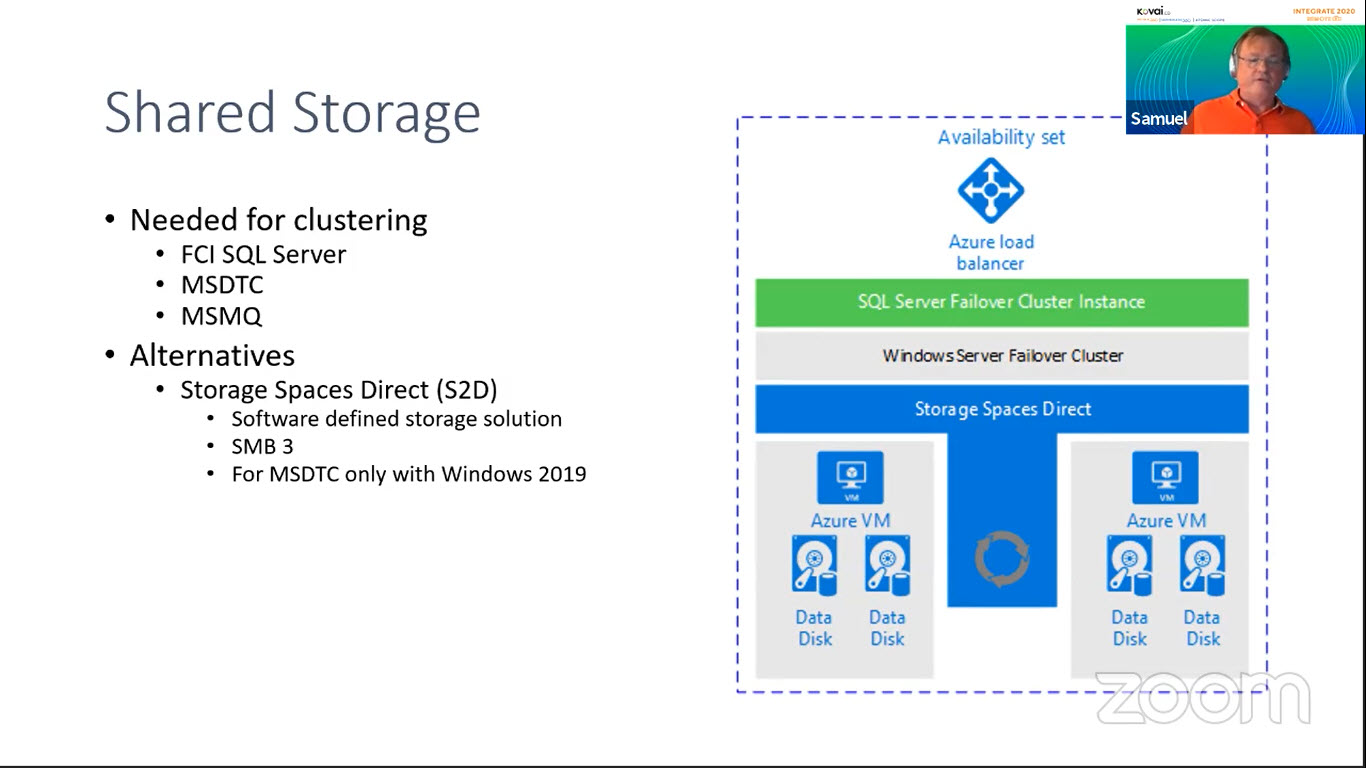
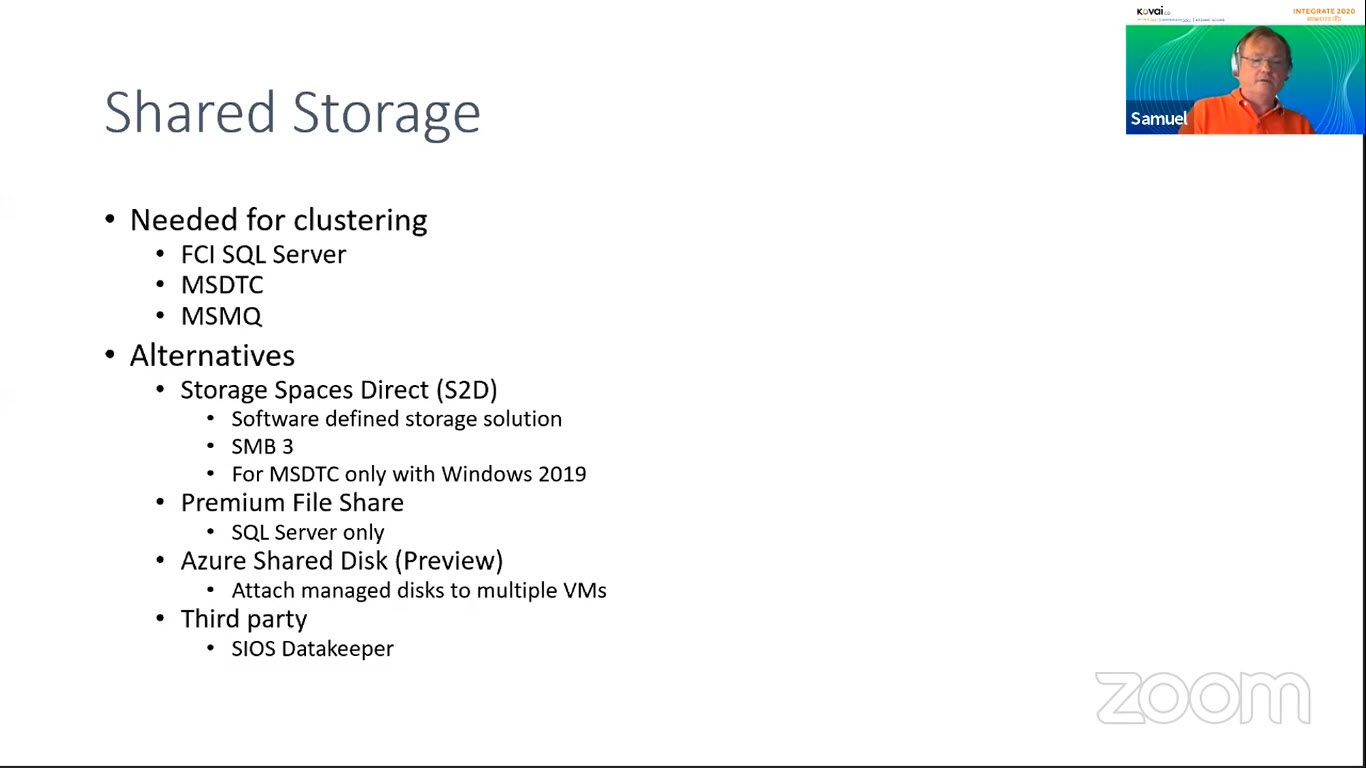
Shared storage
This will be needed for clustering when you use Fail over clustering,
MSMQ, MSDTC. So, there are alternatives, storage spaces direct which is a software-defined storage solution that uses SMB3. The synchronization is happening for a number of VM’s that have two or more disks dedicated to the specific storage spaces. You can create disk areas that represent the clusters and used by the services. For MSDTC, It is only available for Windows 2019 and onwards.
Performance
Virtual machines are coming in different editions, that are optimized to handle different kinds of workloads on the size that matters. It is one of the important aspects that we must look into it,
Selected VM size/option
- Optimized for different workloads
- Size matters for disk speed
- Review what you need CPU/Memory
- Remember licensing – BYOL/Pay as you go
Disk speed/size
- Size matters, size of the disk, and VMS affects IOPS that can be reached.
- Measure with e.g. Diskspd
- Baseline with your current environment
- Compare with your Azure Disks
Resources/References
- MSDTC Supported configurations
- Storage Spaces Direct
- Azure Shared Disks
- Azure VM Storage Performance and Throttling
Conclusion
It was indeed a fantastic session by Samuel. I hope it gives you an overview of setting up a highly available BizTalk Server in Azure using BizTalk2020 at a very high level. Happy clustering!
The post Setting up a highly available BizTalk Server in Azure appeared first on BizTalk360.

by Sivaramakrishnan Arumugam | Mar 22, 2020 | BizTalk Community Blogs via Syndication
The term purge means removing or erase something completely. Data purging is a process or activity mostly heard with Database technologies, i.e. Cleaning up of Database.
There are many different techniques and strategies for data purging, which is often contrasted with data deletion. Deletion is more of a temporary process whereas Purging removes data permanently which in turn frees up the storage and/or memory space for other uses.
Purging process lets you archive the data even though it removed from the main source permanently, giving us an option to retrieve from the archive in case there is a need for it. The deleting process also removes data permanently but doesn’t necessarily involve keeping a backup and generally involves on insignificant amounts of data.
Why Data Purging is Necessary?
For any organization and in any environment, it is important to keep track of database growth and execute the data purging policies whenever necessary.
When the database size grows, the SQL server needs more memory and CPU to read data from the tables, which slows down the database operation.
Besides that, there is also the risk that, due to the growing database(s), you are running out of disk space.
Database Administrators spend a lot of their time dealing with the problem of database processes consuming too much disk space. So, it’s very important to monitor the database size to ensure the database is not seizing the memory and CPU for smooth operation. Also, it’s essential and necessary to automate the purging process.

The Purge Process
The purge process moves data between and deletes data from three categories of data or data sets:
- The current data set, which contains data that needs to be available to users. Users can change or review the data.
- The history data set, which contains data that can only be reviewed or aggregated by users. Users can’t change the data.
- The archived data set, which contains data that falls out of the availability threshold but needs to be stored to meet legal or business requirements. This data is archived, so it can’t be changed, reviewed, or aggregated by users.
Available Options for Purging
In any BizTalk environment, to purge the SQL database there are two main categories of options available. The most common way is
- SQL Server Jobs (by using SQL Agent)
- Windows Services
SQL Server Jobs
The purpose of the SQL Agent is to serve as a job scheduler. Many experienced DBAs use jobs running inside the SQL Agent to perform routine tasks such as backups, updating statistics, and rebuilding indexes as needed.
Scheduling jobs is one of the core SQL Server functions. Many businesses have numerous SQL Server jobs scheduled that perform any number of different tasks from database maintenance jobs like backup and index rebuilds to running queries and kicking off ETL (Extract. Transform and Load) tasks.
What is SQL Agent?
The SQL Agent is the SQL Server subsystem that’s responsible for automatic task scheduling. The SQL Agent is available in all of the editions of SQL Server except the SQL Server Express edition. Taking advantage of SQL Agent enables you to automate many of your routine IT database infrastructure tasks.
Advantages of SQL Agent
The SQL Server Agent gives you a more specific focus around scheduling specific types of jobs around SQL Server. As the Agent is a part of the cluster resource when a failover occurs as long as the cluster has been set up correctly the SQL Agent job will start once the SQL Server Service has started.
Windows task Scheduler is a component of Microsoft Windows that provides the ability to schedule the launch of programs or scripts at pre-defined times or after specified time intervals. SQL Server Scheduler is created for Agent job scheduling, so using SQL Server Scheduler to schedule the job is the best method.
Disadvantages of SQL Agent
If the Agent is not running at the time a job is supposed to run, when the Agent is started it will run the job at the next scheduled time. It will not automatically run the job.
SQL Server Agent jobs that are running at the time of a failover event on a SQL Server failover cluster instance do not resume after failover to another failover cluster node. Jobs that begin but fail to complete because of a failover event are logged as started but do not show additional log entries for completion or failure. SQL Server Agent jobs in these scenarios appear to have never ended. So if your server failover, you need to run this job again in the other node.
Windows Services
Definition of Windows Services
Windows Services is a core component of the Microsoft Windows operating system and enables the creation and management of long-running processes.
Advantages
Unlike regular software that is launched by the end-user and only runs when the user is logged on, Windows Services can start without user intervention and may continue to run long after the user has logged off. The services run in the background and will usually kick in when the machine is booted. An option ideal for use on servers when long-running functionality is needed without interference with other users on the same system.
Data Collection in BizTalk360
BizTalk360 consists own database. Collecting the necessary data is important to be able to represent the data in BizTalk360. As many of you aware that BizTalk360 is a one-stop solution for BizTalk monitoring. So for monitoring and analytics purposes, we do collect different data from various environments (it collects the information from BizTalk, SQL Server, and Tracking database) and stored in the BizTalk360’s database for future references.
- Advanced Event viewer
- Analytics
They are the sparkling examples for the data collection within BizTalk360 when you have configured/added more environments (for each environment there will be multiple machines say example a simple multi-server environment consists of 2-BizTalk servers for HA, 1-SQL server. For cluster servers and Load balancing you can imagine the numbers). However, you don’t want unlimited growth of your database.
BizTalk360 comes out of the box with the “Data Purging” feature to able to manage the size of the BizTalk360 database.
Monitor BizTalk360 Database Growth
There might be a situation where the BizTalk360 database grows due to the amount and size of event log data and performance counter data. The BizTalk360 purging policy will take care of the data growth, but it is also important to monitor the size regularly to ensure BizTalk360 is working seamlessly.
Data Purging in BizTalk360
As mentioned, BizTalk360 comes out of the box with the ability to purge the historic data by setting up the purging duration (days to be monitor) after the specified period. The Administrators/Superusers can set up the “Purge duration” under “Settings -> BizTalk360 Health -> Data Purging”. This will control the database growth and hence the performance of BizTalk360 will not get affected.
Purge Mechanism in BizTalk360
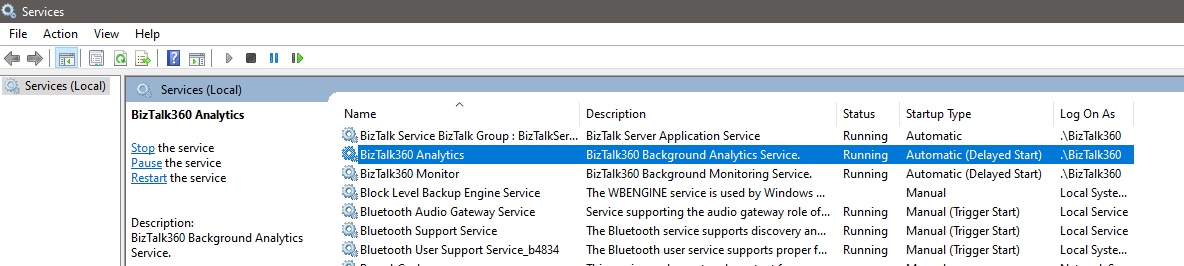
BizTalk360 uses Windows Services to trigger the purging. BizTalk360 owns two services,
- Monitoring service
- Analytics service
Out of those, purging was created as a sub-service of Monitoring service.
In a regular interval time (for every 2 hours) the “Purge Data – a sub-service of Monitoring service” will purge the data by hitting the Stored Procedures for purging available in the BizTalk360 database.
We have chosen the windows service to utilize the advantages of Sub-service and the services that can be started and paused. As most of you aware that the BizTalk360 services should be always running to collect the data and perform few operations, so we would like to effectively use the service rather than creating SQL job and monitor separately. Also, if any exception appears for the sub-service, the exception will be captured from the log files and it will be shown adjacent to the respective sub-service in the UI.
Based on the values set in the data purge duration, for every 2 hours, the data will be purged using the stored procedures with the trigger of Purge Data sub-service.
Until BizTalk360 v5.0, there was a single stored procedure (sp_b360_admin_PurgePolicies) called from our monitoring service which takes care of all the purging. In v6.0, we improved the logic by splitting it into multiple stored procedures (sp_b360_admin_PurgePolicies) which takes care of various parts of data purging.
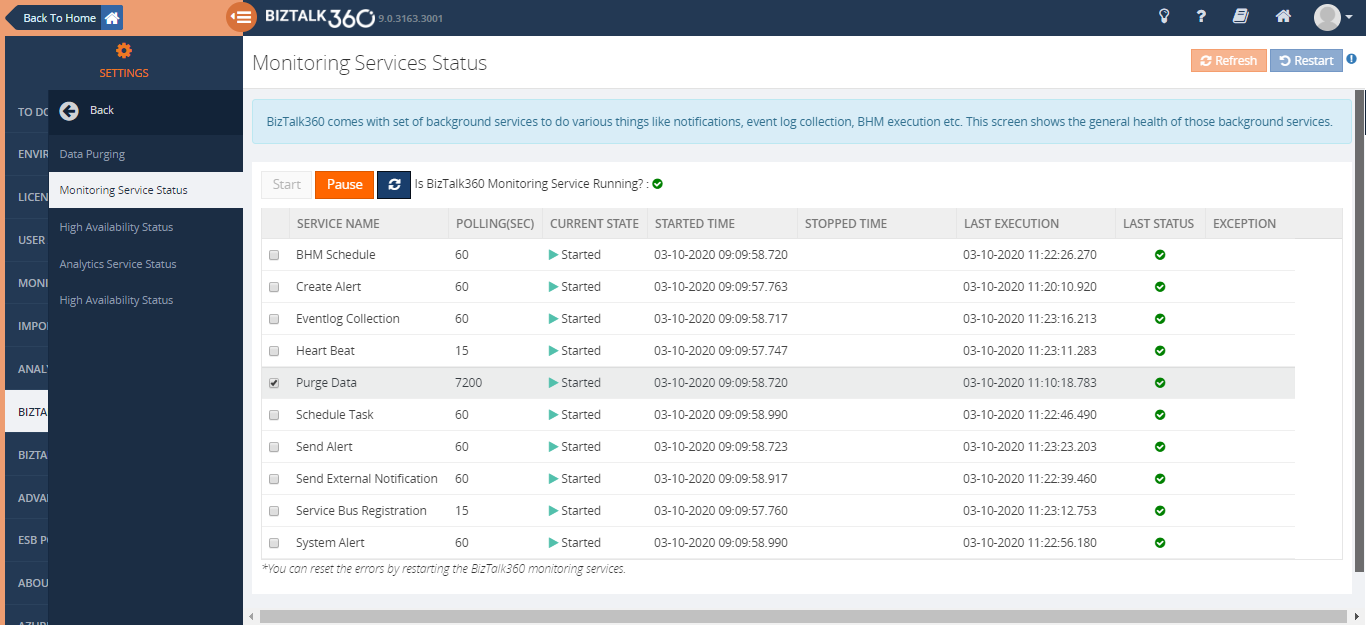
How to Check if Purging Service Status is Healthy?
Purge Data – a sub-service of Monitoring service from BizTalk360 Settings -> BizTalk360 Health -> Monitoring Service Status -> Purge Data, will help you to understand and find the information that the purging is running for every 2 hours.
If you can compare the started time and Last execution time, for every 2 hours the execution should happen. Even if there is an exception, the exception will be captured in the log files and it will be shown adjacent to the purge data sub-service.
Additional Capabilities
Along with the purging service within BizTalk360, there are few more options to check if the database size is under the expected size.
- Using the Database size monitoring feature, users can monitor the database and log file size of BizTalk and BizTalk360 databases, by simply configuring the error and warning threshold values for the database and log file sizes. By this when the database size exceeds the expected size, you will receive an alert from BizTalk360.
- Use Database Query monitoring to Monitor the size of a database.
Whenever the database grows beyond expectations, the first thing to be checked is the standard database reports. This will ensure which table occupies more space. Then we can act on the purging policy and change it according to the business needs and data flow.
What are the Stored Procedures Involved in Purging?
Till the latest release, there were 14 Stored Procedures involved in Purging for 32 tables. Each stored procedure will purge multiple tables. Let’s see what the stored procedures are used for purging the corresponding tables.
- sp_b360_admin_PurgePolicies_MBVReports – It will purge the BizTalk Health Check tool execution results.
- sp_b360_admin_PurgePolicies_GovernanceAudit – It will purge the complete Governance and Audit tables, which is related to BizTalk and BizTalk360 activities.
- b360_governance_Application
- b360_governance_HostInstance
- b360_governance_ServiceInstance
- b360_governance_rules
- b360_governance_Server
- b360_governance_ESBException
- b360_audit_History
- sp_b360_admin_PurgePolicies_AlertNotification – Will purge the Alert notifications which is sent out from BizTalk360 like Email, SMS and Notification channel.
- b360_alert_History_Email
- b360_alert_History_SMS
- b360_alert_History_System
- b360_historical_Alert_Maintenance
- sp_b360_admin_PurgePolicies_EventLog – Will purge the data of event logs that are already collected from different machines.
- sp_b360_admin_PurgePolicies_Throttling – Will purge the data collection for Throttling analyzer
- b360_td_Throttling
- b360_td_ThrottlingDataCollectionError
- sp_b360_admin_PurgePolicies_MonitoringDashboard – The alarm status update of the monitoring dashboard will be purged
- b360_alert_MonitorExecution
- sp_b360_admin_PurgePolicies_MonitoringLogState – will purge the monitoring log state, monitoring will put the entries of current and expected state.
- b360_alert_Monitor_LogStateCheck
- sp_b360_admin_PurgePolicies_MonitoringLogThreshold – will purge the monitoring threshold log, monitoring will put the current, warning and error levels.
- b360_alert_Monitor_LogThresholdCheck
- sp_b360_admin_PurgePolicies_ProcessMonitoring – will purge the data of all types of data monitoring like Process, Message box data, Tracking data, BAM, EDI, ESB, Logic Apps, and Event log data monitoring.
- b360_st_ScheduleActivity
- b360_st_ProcessMonitorResults
- b360_st_DataMonitorResults
- b360_st_DataMonitorTaskActionResults
- sp_b360_admin_PurgePolicies_PerformanceAnalyzer – The data collected for the Analytics module will be purged
- b360_perf_PerfCounter_Data
- b360_perf_PerfCounter_Expanded
- sp_b360_admin_PurgePolicies_LiveFeed – Live feed data will be purged
- sp_b360_admin_PurgePolicies_TrackingData – The data collected for the Analytics module will be purged.
- b360_dta_Counter_Data
- b360_dta_Counters_Expanded
- sp_b360_admin_PurgePolicies_DBCache –
- sp_b360_admin_PurgePolicies_BizTalkReporting – The data collected for the Analytics – Reporting module will be purged.
- b360_BizTalkDB_DiskUsages
- b360_BizTalkDB_Tbl_sizes
- b360_Report_History_Email
- b360_report_ReportArchive
Purge Settings in BizTalk360
Let’s see how purge helps. The default purging settings in BizTalk360 can be seen in the below screenshot;
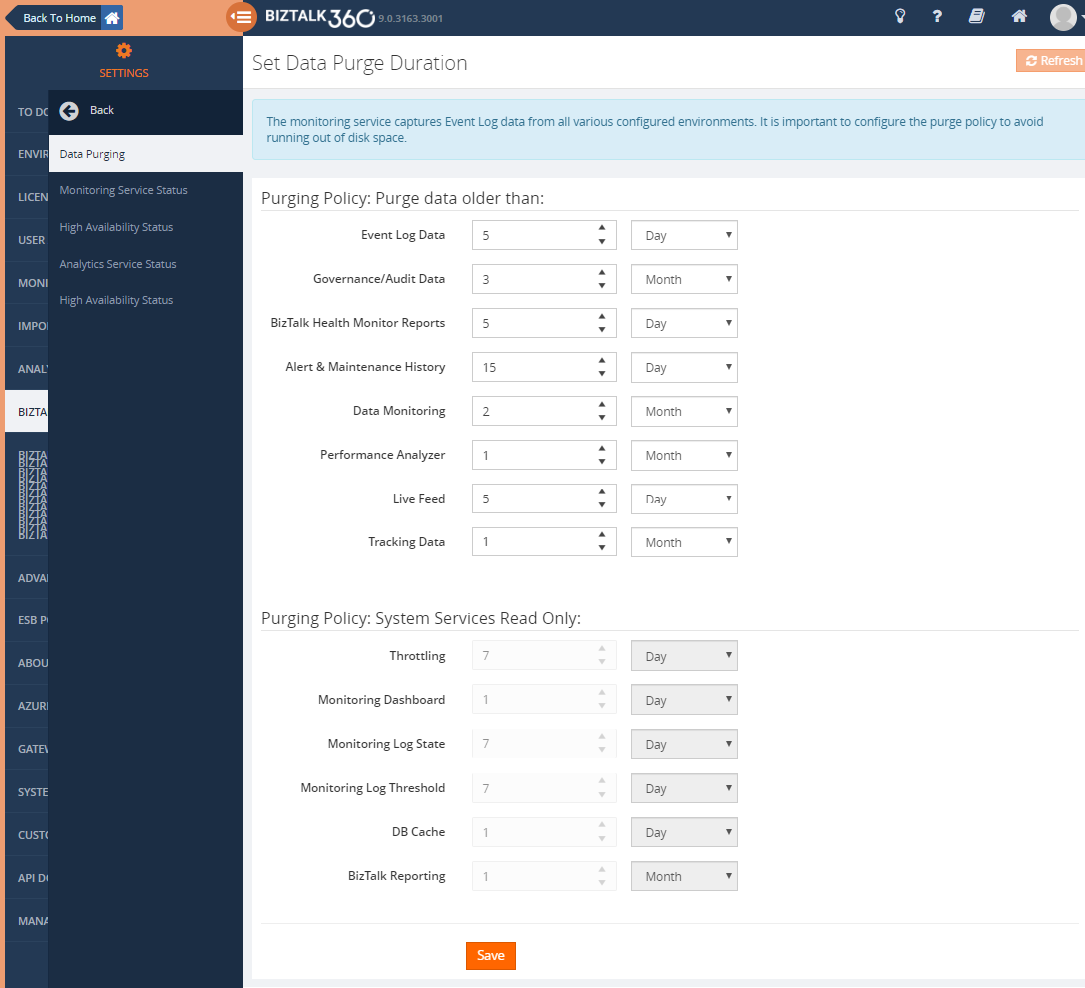
Based on the values/duration provided by the purging policy, the data will be purged. We can see that the purging duration for Data Monitoring is 2 months. Hence the historical data for 2 months will be present in the BizTalk360 database.
Purging needs to be done to remove the historical data, thereby making the database healthy. BizTalk360 purges the data by running the stored procedure in the specified duration specified in the settings. The purging settings can be altered by the customers according to their business needs and data flow. If a large volume of data flows through the ports, they can set the purge duration to a minimum value so that data growth is controlled.
The customer configured 3 environments in a single installation of BizTalk360. In each environment, there were 5 servers available due to BizTalk and SQL server. Hence there were 15 servers to collect data for Advanced Event Viewer and they have set-up 30days to monitor. The Database has grown almost to 300 GB because of the number of servers to monitor.
We have recommended the customer to decrease the purge duration from 1 month to 2days and TRUNCATE the particular table (Since the table belongs to BizTalk360 and it is historical data, it won’t affect the BizTalk server). After modifying the purge duration, the data were reduced to 2 GB started working as expected.
Can the Purging be done Manually?
BizTalk360 will purge the data automatically. Sometimes the data collection may be out/beyond our expectation and that leads to a huge volume of data.
Our first suggestion is to reduce the number of purge days. So that the data will be reduced.
Until v6.0, the stored procedure sp_b360_admin_PurgePolicies was used and in recent versions of BizTalk360, you can use the stored procedure sp_b360_admin_CleanupDB to manually purge the database in case of large database growth.
When the number of records in the database grows quickly, call to the stored procedure(s) can start to get timed out from the monitoring services. This will result in data not being cleared and resulting in unusual database growth.
Conclusion
Considering the feedback provided by our customers we have improved and fine-tuned the collection of the data into the BizTalk360 database.
Whenever the database grows beyond expectations, the first thing to be checked is the standard database reports. This will ensure which table occupies more space. Then we can act on the purging policy and change it according to the business needs and data flow.
If you have any questions, contact us at [email protected]. Also, feel free to leave your feedback in our forum.
The post Data Purging in BizTalk Server and BizTalk360 appeared first on BizTalk360.
by Sivaramakrishnan Arumugam | Feb 6, 2020 | BizTalk Community Blogs via Syndication
As most of us are aware, starting with BizTalk Server 2013 and newer versions, Microsoft BizTalk ESB Toolkit is integrated with the BizTalk Server setup.
The wait is over, BizTalk Server 2020 is out now! On 15th of January 2020, Microsoft announced the release of BizTalk Server 2020. We got an opportunity to install and configure the ESB toolkit using BizTalk Server 2020.
While installing and configuring ESB we faced a huge challenge and surprise, that the ESB Portal was missing!!! In this blog, we would like to share our experience with you all that we gained and how we configured the ESB portal.
We would like to start from scratch, right from the installation of ESB in BizTalk Server 2020.
Prerequisites
- Choose Windows Server 2019 (Preferred) / 2016
- Install Visual Studio 2019 – Required for BizTalk Server Developer Tools and SDK.
- .NET Framework 4.7 – BizTalk projects created in Visual Studio require the Visual Studio build target to be set to your .NET Framework version
- Microsoft SQL Server 2019 (Preferred) – 2017 / 2016 SP2
- Install Enterprise Library 5.0 from the link- http://www.microsoft.com/en-us/download/details.aspx?id=15104
- Install Microsoft Report Viewer Redistributable 2008 from the link – http://www.microsoft.com/en-us/download/details.aspx?id=577
Add Roles & Features
- IIS with IIS 6 compatibility Tools(complete)
- Windows Authentication & Basic Authentication (Under: Web Server(IIS) -> Security
- WCF & HTTP Activation for both .Net 3.5 and 4.5/4.7
Installing ESB
Close any programs you have opened.
- Run the BizTalk Server 2020 setup.exe file as Administrator
- On the BizTalk Server installation Start page, click Install Microsoft BizTalk ESB Toolkit
- On the License Agreement page, select “Yes, I accept the terms of the license agreement” and then select Next
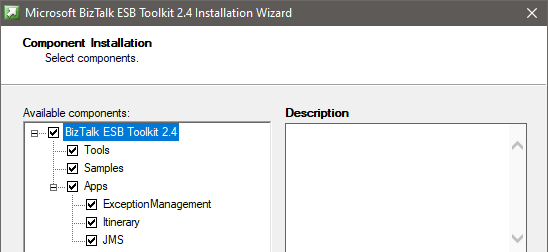
- In the Component Installation page, select the components you want to install, and then select Next
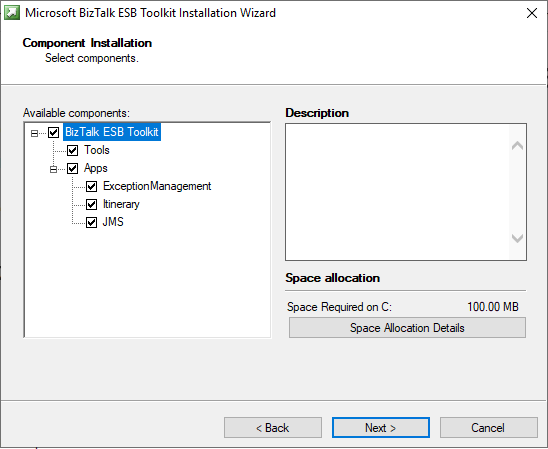
Note: If you observe the installation wizard, you may find the ESB Toolkit version is missing while comparing it with the BizTalk Server 2016.
- In the Summary, review the installation details that you chose, and then select Install
- On the Installation completed page, Select Finish to close the installation wizard. An install log file is created, similar to C:UsersyourUserNameAppDataLocalTempSetup(xxxxxx).htm
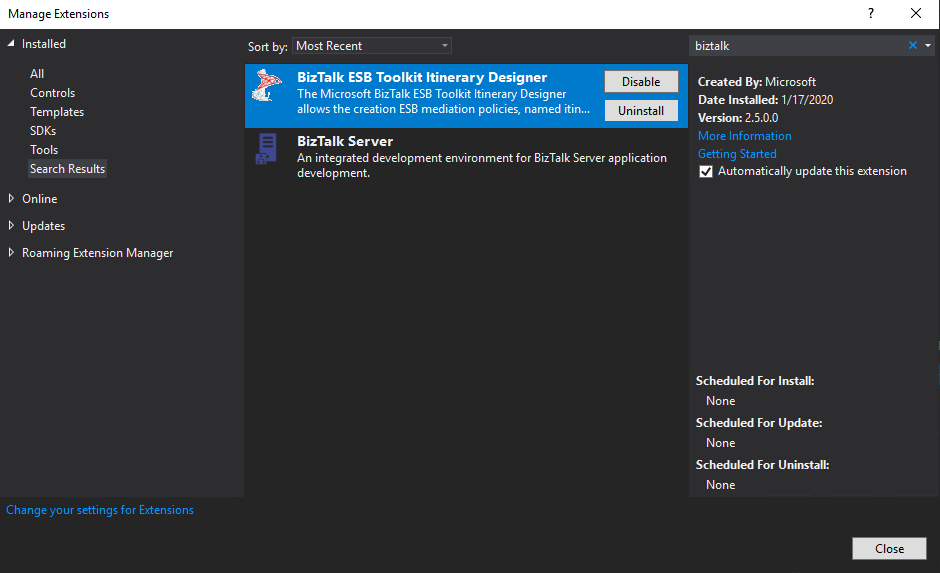
- Starting with BizTalk Server 2020, to install the Itinerary Designer, also install the BizTalk ESB Toolkit Itinerary Designer extension in Visual Studio
Using Visual Studio 2019 -> Continue without code -> Extensions -> Manage Extensions -> Install BizTalk ESB Toolkit Itinerary Designer
Note:
- You must configure BizTalk Server before configuring BizTalk ESB Toolkit
- You must run the ESB Configuration Tool as an administrator
Configuring Microsoft BizTalk ESB Toolkit
- From the Start menu, type ESB Configuration Tool or Scroll and select Microsoft BizTalk ESB Toolkit, and then select ESB Configuration Tool
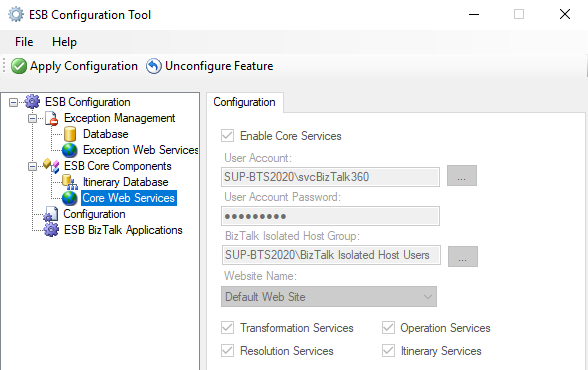
- In the ESB Configuration Tool, from the left pane, select ESB Configuration.
- On the right pane, for Database Server: specify the database server where the databases, which are required for BizTalk ESB Toolkit, are created
- In the IIS Web Services box, specify the User Account credentials under which the applications required for BizTalk ESB Toolkit are created. Also, specify the name of the website in IIS under which the applications are created
- The BizTalk User Groups box lists the default user groups which are available for ESB configuration
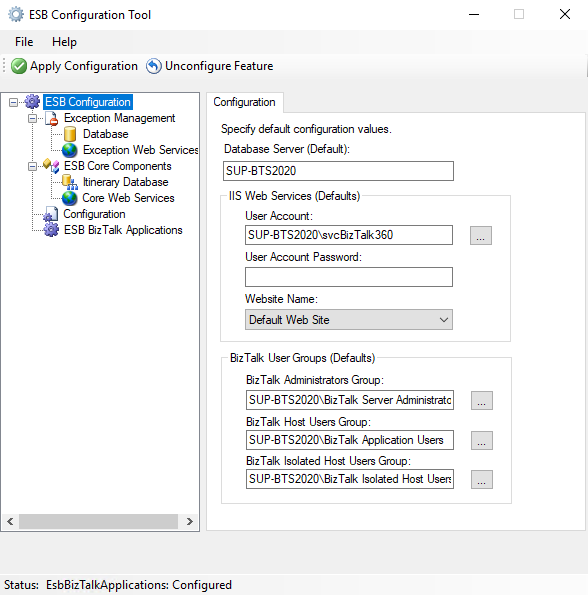
Note: At this stage, you can click “Apply Configuration” towards the top of the ESB Configuration Tool to configure the Microsoft BizTalk ESB Toolkit with the default settings. However, if you want to do a custom configuration, you can perform the remaining steps as well. In such a case, the values you specify in the subsequent steps take precedence over the default values.
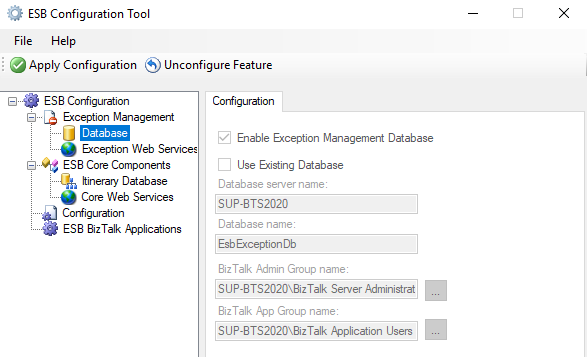
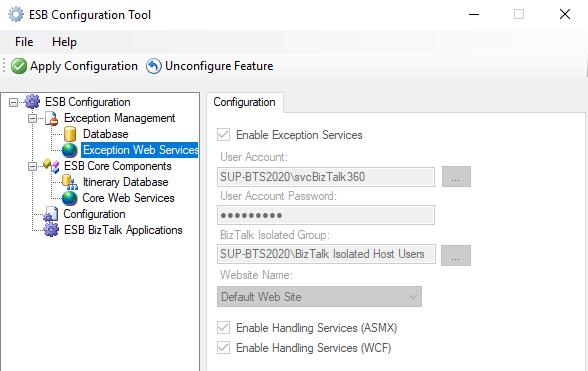
- In the left pane, expand ESB Configuration, expand Exception Management, and then:
- If you don’t want to configure an exception management database, then select Database, and uncheck the Enable Exception Management Database
- If you want to use an existing database instead of creating a new database, then select Database, and select Use Existing Database. Enter the database server name and the database name
- If you don’t want to configure exception web service, then select Exception Web Services, and uncheck Enable Exception Services. If you want to run these services under a different website, you can enter that here
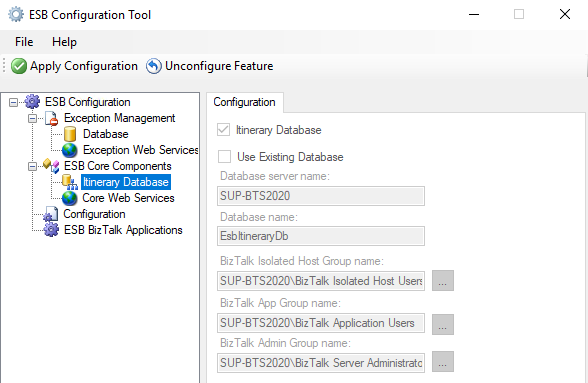
In the left pane, expand ESB Core Components, and then:
- If you don’t want to configure an itinerary database, then select Itinerary Database, and uncheck Itinerary Database
- If you want to use an existing itinerary database, then select Itinerary Database and select Use Existing Database. Enter the database server name and the database name
- If you don’t want to configure these web services, then select Core Web Services, and uncheck Enable Core Services. If you want to run these services under a different website, you can enter that here
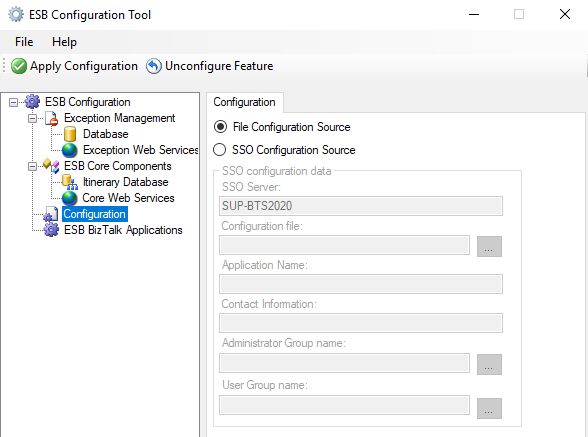
In the left pane, select Configuration
If you are installing and configuring the BizTalk ESB Toolkit in a single server environment, select File Configuration Source.
If you are setting up a multiple-machine deployment, select the SSO Configuration Source, and then enter the following:
- SSO Server: Enter the name of the SSO server
- Configuration file: Click the ellipsis, and then browse to the esb.config file (Program Files (x86)Microsoft BizTalk ESB Toolkit)
- Application Name: Enter a name for the SSO application. For example, enter ESB Toolkit
- Contact Information: Enter a valid email address the appropriate contact information in the following format: [email protected]
- Administrator Group Name: Select the ellipsis, and then browse to the appropriate admin group
- User Group Name: Select the ellipsis, and then browse to the appropriate group
Click Apply Configuration. Open IIS and notice that the applications required for BizTalk ESB Toolkit are now created under the website you specified while configuring BizTalk ESB Toolkit.
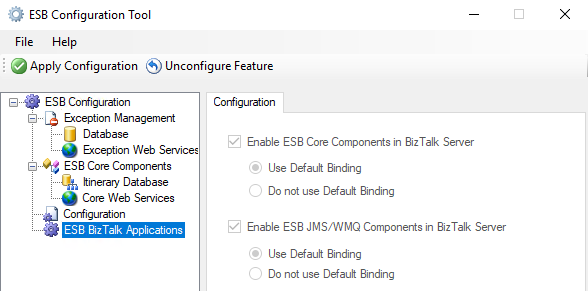
In the ESB Configuration Tool, select ESB BizTalk Applications, and then:
- Select Enable ESB Core Components in BizTalk Server to create the application in the BizTalk Server Administration console. Select Use Default Binding to bind this application to the default host. Select Do not use Default Binding, if you do not want to bind the application to the default host. In this scenario, you must explicitly bind the application to a host once the application is created.
- Select Enable ESB JMS/WMQ Components in BizTalk Server to create the application in the BizTalk Server Administration console. Select Use Default Binding to bind this application to the default host. Select Do not use Default Binding if you do not want to bind the application to the default host. In this scenario, you must explicitly bind the application to a host once the application is created.
- Click Apply Configuration to create the applications you selected. Verify that the applications are created in the BizTalk Server Administration console.
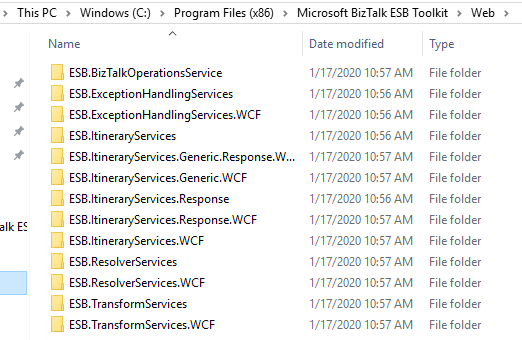
Verify Your Installation
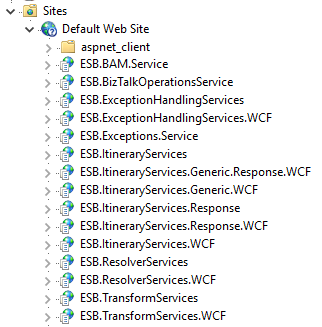
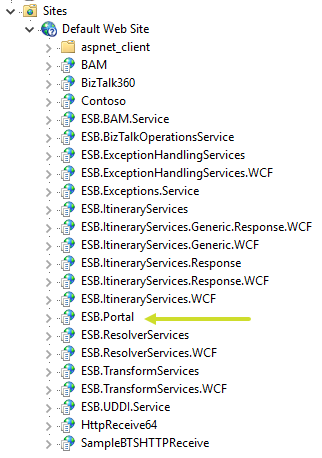
To ensure if the site has been configured correctly, navigate to the folder C:Program Files (x86)Microsoft BizTalk ESB ToolkitWeb. Compare the folders and subfolders, and the sites under IIS -> Sites -> Default Web Site.
Open the BizTalk Server Administration console and notice that the ESB applications is now installed and present in our console.

Finally, ensure the availability of the “EsbExceptionDb” and “EsbItineraryDb” in the database.
ESB Portal Findings
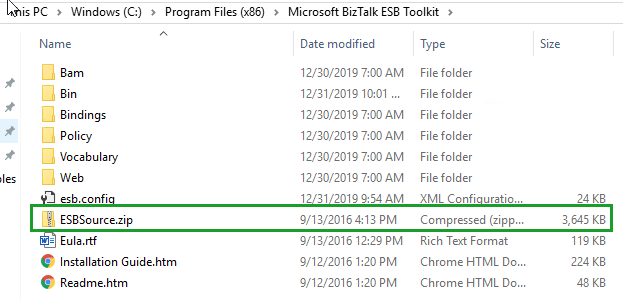
Once after the installation and configuration of ESB Toolkit, if you have a look at the installation folder to configure ESB Portal, you will find that the file “ESBSource.zip” is missing…!!!
Once after the configuration in BizTalk Server 2016, you will be able to find the ESBSource.zip file. But it is not available in BizTalk 2020.
*Screenshot from BizTalk Server 2016 ESB Toolkit installed folder location
*Screenshot from BizTalk Server 2020 ESB Toolkit installed folder location
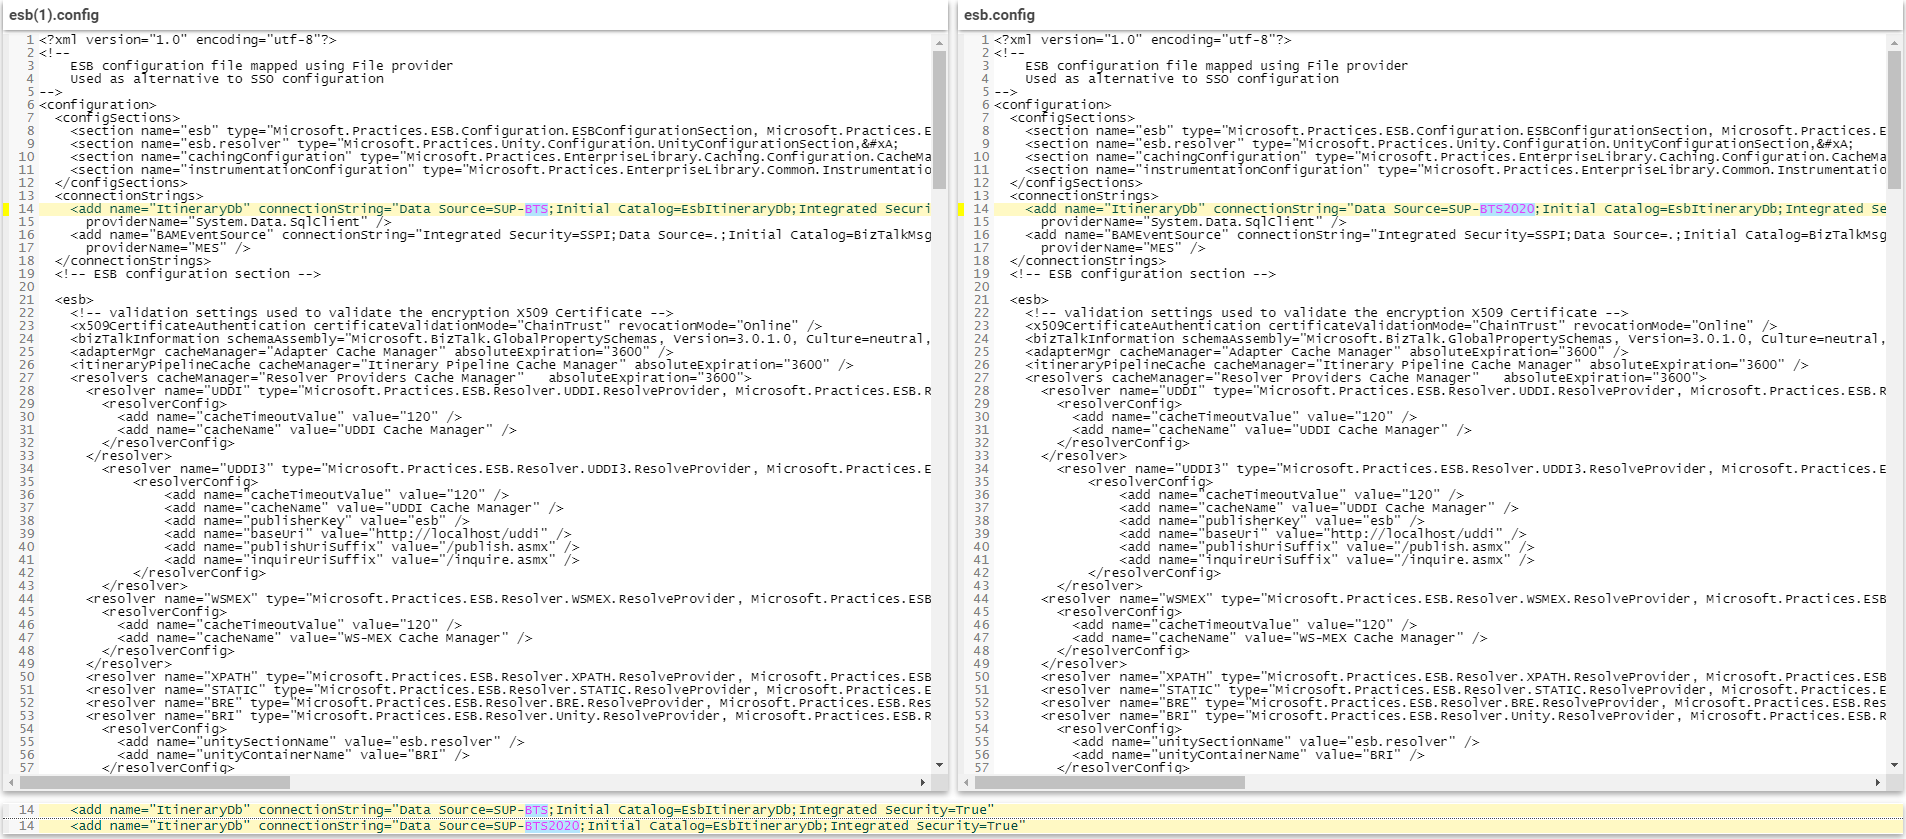
But, if you want to use the default ESB portal, you need the “ESBSource.zip” file to create it, or if you have another option, you can build your custom portal. We have compared the esb.config file to check if any changes have been done. When we checked the file, we found out that no changes have been done in the latest file. So, we thought of using the same portal in BizTalk server 2020 that was already used in the BizTalk server 2016.
To be able to use the existing ESB portal, we have copied the “ESBSource.zip” file from BizTalk Server 2016 and pasted inside the BizTalk Server 2020 folder C:Program Files (x86)Microsoft BizTalk ESB Toolkit.
ESB Portal Installation and Configuration
To install the default ESB portal
- Create a folder in your C: drive and name it as Projects. Now, unzip ESBSource.zip file from the download location into the C:ProjectsMicrosoft.Practices.ESB folder
- Once after extraction, Remove the Read-only attribute from all files in C:ProjectsMicrosoft.Practices.ESB folder
- Install Enterprise Library 5.0 from http://www.microsoft.com/en-us/download/details.aspx?id=15104
- Install Microsoft Report Viewer Redistributable 2008 from http://www.microsoft.com/en-us/download/details.aspx?id=577
Note: Leave step 4 and 5 if you have already done it earlier
- In Visual Studio 2019, open ESB.Portal.sln found in C:ProjectsMicrosoft.Practices.ESBSourceSamplesManagement PortalESB.Portal
- When Visual Studio 2019 starts converting the solution to the current format, a dialog pops up that warns you about ESB.Portal.Setup.vdproj file not being supported in Visual Studio 2019. Click OK. Wait until the solution opens
- In the Solution Explorer, add Microsoft.Practices.ServiceLocation.dll as a reference to the ESB.BAM.Service.Implementation project. This assembly is found in C:Program Files (x86)Microsoft Enterprise Library 5.0Bin
- Save all files in the solution
- Rebuild ESB.Portal solution
- Close Visual Studio
- Run Management_Install.cmd file found in C:ProjectsMicrosoft.Practices.ESBSourceSamplesManagement PortalInstallScripts
If you can successfully run the Management_Install.cmd without any error/exception, the portal will be configured. Now when you open Internet Explorer and navigate to http://localhost/ESB.Portal you should see the ESB Management Console home page.
If you face any issues/exceptions when you run the Management_Install.cmd and the portal is not created, follow the below steps.
- Open PowerShell as an Administrator and run the following command:
set-executionpolicy unrestricted
- Open a command prompt as an administrator and run the following command to ensure WCF script maps are registered:
C:WindowsMicrosoft.NETFrameworkv4.0.30319> ServiceModelReg.exe -r –y
- Got to turn on Windows Feature make sure the
- WCF features have been selected
- Web Core option also configured
Make sure that the UDDI Service is installed from BizTalk Server Setup before running the UDDI Publisher Tool. Run the UDDI Publisher tool (you can install it at %ESB Install Folder%BinMicrosoft.Practices.ESB.UDDIPublisher.exe). Now, continue to the next step, even though you might get some errors.
Navigate to SamplesManagement PortalInstallScripts from the command prompt run the following commands
- Powershell –executionpolicy bypass –file .Management_Install.ps1
- Management_Install.cmd
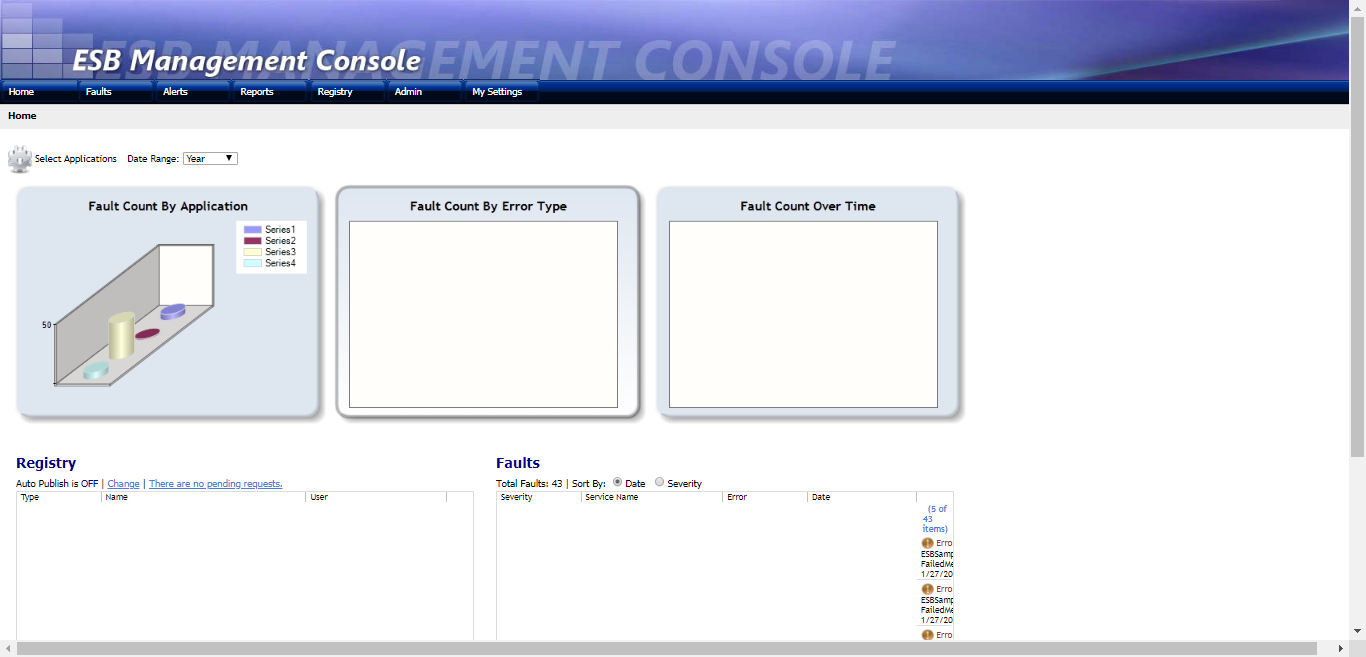
Now, without any errors/exceptions, the portal should be configured. Check if the ESB.Portal is available in IIS. When you open Internet Explorer and navigate to http://localhost/ESB.Portal you should see the ESB Management Console home page.
Phew!!! That’s how we configured ESB Portal.
Hub for Modern and Legacy World
Now we will come to the second option, custom portal…!
Even though the Exception Management framework is very robust and strong, the Exception Management Portal that comes out of BizTalk Server is not that easy to configure as we have experienced.
Firstly, the portal from the ESB Toolkit can be replaced with a portal within BizTalk360. BizTalk360 addresses these challenges in several ways. As with all features within BizTalk360, this portal is protected with security and auditing.
You don’t need to configure the default ESB portal. We want to mention here that a few of our customers haven’t installed the ESB portal.
Instead, they are using BizTalk360’s ESB Portal alone and from the portal, they are performing actions successfully.
To be able to repair ESB Faults, there is an Edit and Resubmit feature in BizTalk360. To make the repair even easier, you can write and associate Knowledge Base articles to the ESB Faults. So, in case of recurring problems, you can simply document the solution in such a KB article and associate it with the ESB Fault, thereby making repairs in the future easier.
How much time will it take to configure ESB portal within BizTalk360?
All you need to do to configure the ESB Exception management framework within BizTalk360, is to simply provide the connection string to your ESB exception database, relevant to your BizTalk Environment.
That’s it! You are set (takes about 3 minutes, definitely not more than that).
Check the below blogs to know more about BizTalk360 ESB Portal.
BizTalk360 is ready for BizTalk Server 2020!
For those of you who are not aware of BizTalk360, I would like to give a short intro and we are excited to announce that after working with Microsoft for the past few months, we are now fully supporting Microsoft BizTalk Server 2020 with our latest release.
Why not give BizTalk360 a try? It takes about 10 minutes to install on your BizTalk environments. Get started with the free 30 days trial.
The post Configuring ESB in BizTalk Server 2020 appeared first on BizTalk360.

by Sivaramakrishnan Arumugam | Jan 3, 2020 | BizTalk Community Blogs via Syndication
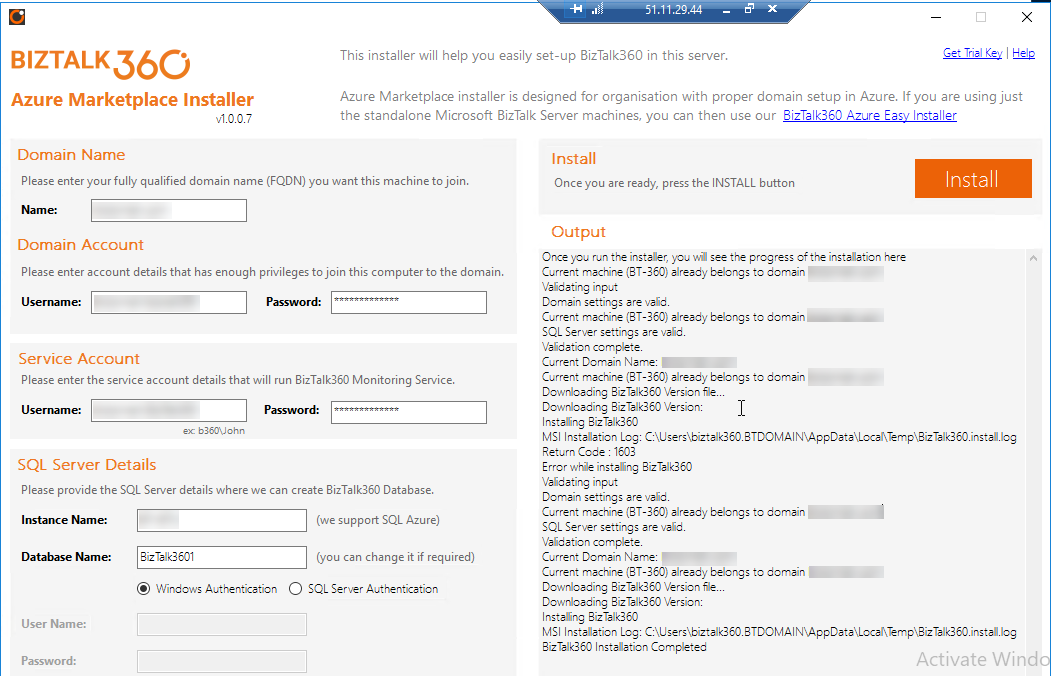
Working in Kovai.co provides a lot of opportunities to learn and explore new things. I’m sure within Kovai.co your job role doesn’t decide your day to day work routine. Click here to know more about the work culture. Recently we had an opportunity to work in Microsoft Azure Marketplace and interestingly we came across a new case related to IIS configuration.
In this blog, I’m going to share my experience in creating a Marketplace installer for BizTalk360 and how we solved the challenge.
Different ways to install BizTalk360
There are various deployment choices for BizTalk360. To fulfill all the customer needs, there are several ways to install BizTalk360 and we provide different types of installer options:
- Default installation
- Silent Installation
- Azure Marketplace installer
- Azure easy installer
For an overview please check here.
Before going to the problem, I would like to provide a brief insight into Microsoft Azure Marketplace and how to create an Azure Marketplace installer, since the problem appeared while creating Marketplace.
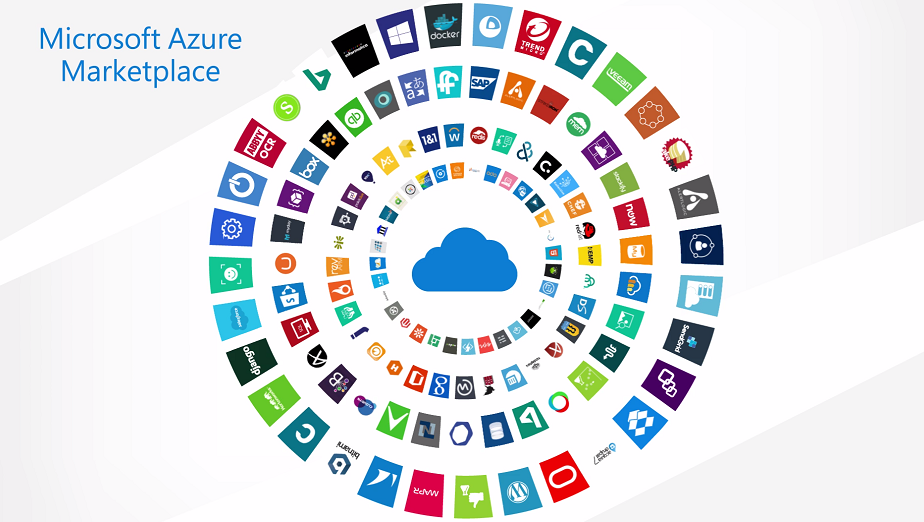
Microsoft Azure Marketplace
The Microsoft Azure Marketplace is an online store that offers applications and services either built on or designed to integrate with Microsoft’s public cloud computing platform.
The products and services offered through the Microsoft Azure Marketplace come from either Microsoft or its technology partners.
Before they become available for purchase on the Marketplace, all services and products are certified through the Microsoft Azure Certified program to ensure compatibility with the Azure public cloud.
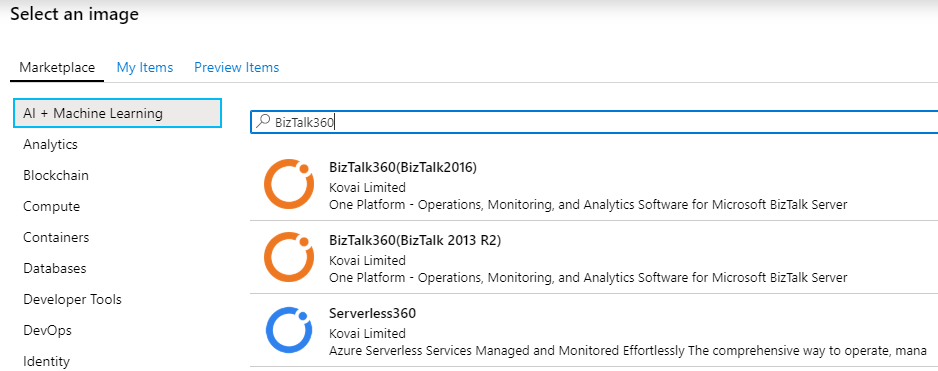
BizTalk360 in Azure Marketplace
BizTalk360 on Azure Marketplace is suitable for customers having a full-blown setup in the cloud, such as a domain setup, Active Directory and one or more BizTalk environments running within the network. In this scenario, customers can download BizTalk360 from the Marketplace. BizTalk360 will run independently in its own virtual machine environment and will connect to all the available BizTalk environments available in the same network.
So, our task is to make BizTalk360 support the BizTalk Server 2016 installations on Microsoft Azure. For this, we must provision a complete virtual machine for the BizTalk server 2016 along with the pre-requisites to install BizTalk360. To know more about the BizTalk360 Azure marketplace installer please check here.
Create a user VM Image
Since it’s a vast process, here we would like to give a general step that required to create a managed or an unmanaged image from a generalized VHD.
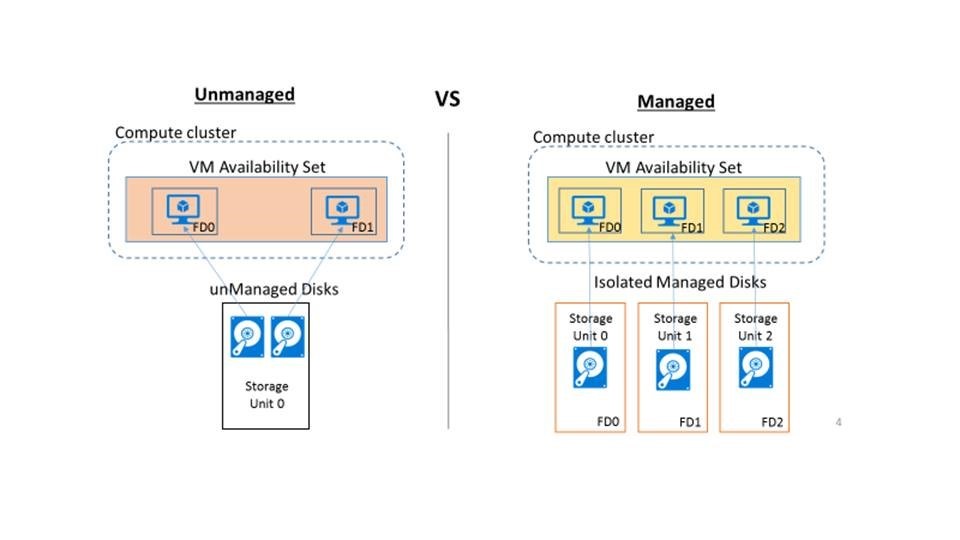
Capture the VM image (for a managed database)
Generalize the VM image (for an unmanaged database)
Azure marketplace virtual machine image publishing
- Sign in to the Cloud Partner Portal and create a VM offer
- Offer Settings – Define the offer within Azure Marketplace
- SKU’s – Solutions can be differentiated by SKU based on their features sets, the VM image type, throughput/scalability, billing model, or other specific features
- Publish a VM offer
For in-depth Azure marketplace documentation please refer to the article here.
Real Problem
Once after uploading the VM image into the Marketplace, before getting into public, the images will be available in preview items (inclusively for testing) for the configured subscriptions.
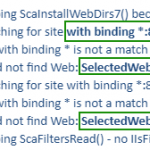
During the testing, we have tried installing BizTalk360 to verify the BizTalk360 is installing automatically without any issues. Without any problem, the BizTalk360 installed its services and created a database. But it failed to create the website. In the installation log, we have found error lines (some may face different error code) to the following:
WriteIIS7ConfigChanges: Error 0x80070002: Site not found for create application.
WriteIIS7ConfigChanges: Error 0x80070002: Failed to configure IIS application.
WriteIIS7ConfigChanges: Error 0x80070002: WriteIIS7ConfigChanges Failed.
WriteIIS7ConfigChanges Failed
We are able to understand that the problem is not due to the creation of the Website but during the changes in it. To drill down the problem, we tried to create a web pool manually and changed its identity. During the change, we faced an exception below.
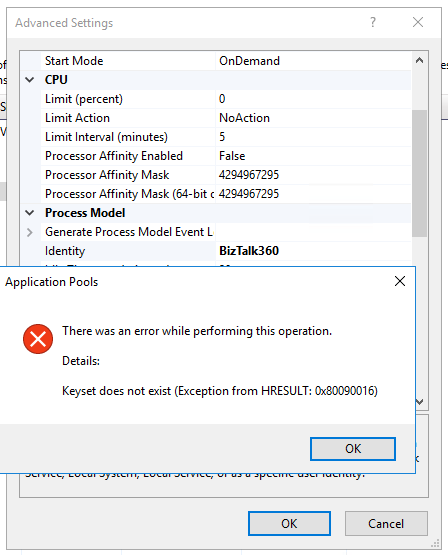
You may face this specific issue when you are running IIS 7+ and versions. When we try to change the application pool identity of an application pool to a domain account, we get the above error while committing the changes.
The error code might change according to your machine operating system and IIS version, but you will get the text as keyset does not exist while trying to update the application pool identity with a custom account or while trying to specify a connect as a user. You might also get the below error codes:
0x80090005
0x8009000D
Cause of the problem
Possibility 1
This issue happens when your IIS specific machine keys are corrupted or missing. Your machine keys might go corrupt if there was an improper shutdown of the machine or the machine was cloned from an existing image or if there was a system crash.
We have referred some blogs and articles for this issue, and they suggested to replace the machine keys. What if you don’t have a backup (Its always a good idea to have a backup of the machine keys)? Unfortunately, we have no idea about the corrupted machine keys.
Okay! Let’s see the different machine keys required in IIS for encryption.
The location of the key depends on the operating system (from Windows server 2012 onward) is basically C:ProgramDataMicrosoftCryptoRSAMachineKeys

Possibility 2
The BizTalk360 service should be the LOCAL SERVICE account of the IIS Web Management Service (also known as WMSvc). This problem occurs because the SERVICE account does not have Read access on the iisWasKey key.
Possibility 3
Check if the metabase.xml is corrupted or if c2319c42033a5ca7f44e731bfd3fa2b5_GUID is corrupted. In IIS any sensitive data like passwords won’t be stored in plain text and will have to be encrypted before it is stored in the config file and get decrypted accordingly when needed.
Most suggest to rebuild or reinstall IIS  . But what if reinstalling IIS is not an option?
How we solved the case
We can regenerate these machine keys without reinstalling IIS completely. To do that follow the below steps.
1. Rename the below files or move them to a different location from C:ProgramDataMicrosoftCryptoRSAMachineKeys. This time I don’t want to take the risk, so I just took existing machine keys as a backup.
|
6de9cb26d2b98c01ec4e9e8b34824aa2_GUID
|
iisConfigurationKey
|
|
d6d986f09a1ee04e24c949879fdb506c_GUID
|
NetFrameworkConfigurationKey
|
|
76944fb33636aeddb9590521c2e8815a_GUID
|
iisWasKey
|
2. Backup applicationhost.config, then delete everything inside the tags below in applicationhost.config. Delete the contents within <configProtectedData> or <providers>.
<configProtectedData>
<providers>
…
</providers>
</configProtectedData>
3. Open a command prompt in admin mode and run the below command
“%windir%system32inetsrviissetup.exe /install SharedLibraries”
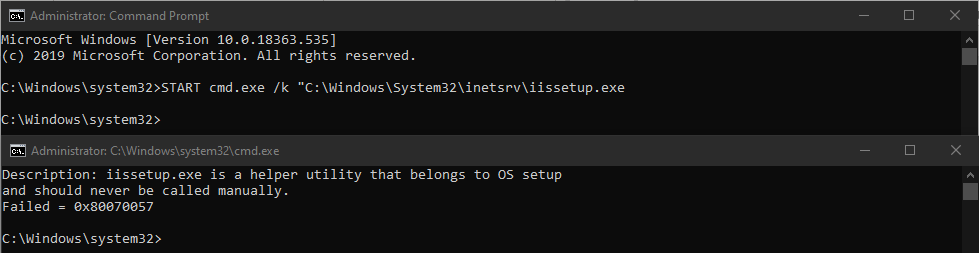
Now you will receive a message “the error Failed = 0x80070005”. Even though it shows a failure message, the above steps should regenerate the machine keys and the configprotecteddata section in applicationhost.config.
If the above suggestions don’t help, the most preferable option would be to reinstall IIS to fix the corruption (no other go).
Fix in the Marketplace
From my understanding, the machine keys might be corrupted due to an improper shutdown of the machine. Because we used the Sysprep command to generalize the VM.
sysprep.exe /oobe /generalize /shutdown /mode:vm
The above command helped the image to remove computer-specific information such as installed drivers and the computer security identifier (SID).
Once after running the sysprep.exe command, we faced the WriteIIS7ConfigChanges exception. So, to fix the issue, we used the below registry command to regenerate the machine keys during the machine provision/first-time launch.
in RegenerateIISKeys.reg file
Windows Registry Editor Version 5.00
[HKEY_LOCAL_MACHINESOFTWAREMicrosoftWindowsCurrentVersionRunOnce]
“BizTalk360 Azure Marketplace Installer”=””C:AzureMarketplaceInstallerRegenerateIISKeys.bat””
In RegenerateIISKeys.bat file
START cmd.exe /k “C:WindowsSystem32inetsrviissetup.exe”
After the bootup, at the initial launch (only one time) RegenerateIISKeys.bat file will be called by the RegenerateIISKeys.reg file to regenerate the machine keys. So, during the installation of BizTalk360, the installer will have the new machine keys and the installation will be successful.
Conclusion
Keeping the user perspective in mind, we have built various deployment choices for BizTalk360 customers which would ease the installation and provide a user-friendly experience. You are just one click away from provisioning a brand new BizTalk360 VM in Microsoft Azure.
I want to take this opportunity once again to thank everyone in and out of Kovai.co for this wonderful opportunity and believing in us. We are looking forward, for many more opportunities.
The post BizTalk360 Azure Marketplace Installer for BizTalk 2016 appeared first on BizTalk360.
by Sivaramakrishnan Arumugam | Nov 12, 2019 | BizTalk Community Blogs via Syndication
In this blog, we are going to look at the BizTalk360 functionality, how it went one step further and helped to automate the process to handle service instances. Before that, we will have a look at the service instances and their importance.
In BizTalk Server there are two main types of processing components:
- Orchestration Service Instances: If you are developing an orchestration and deploying it in your environment. At run-time, for every activation message you receive for that orchestration, a new instance of that orchestration will get created.
- Messaging Service Instances: The service instances that have been created by your receive and send ports at run time. A receive port/send port is a combination of various things like an adapter, receive/send pipeline and maps.
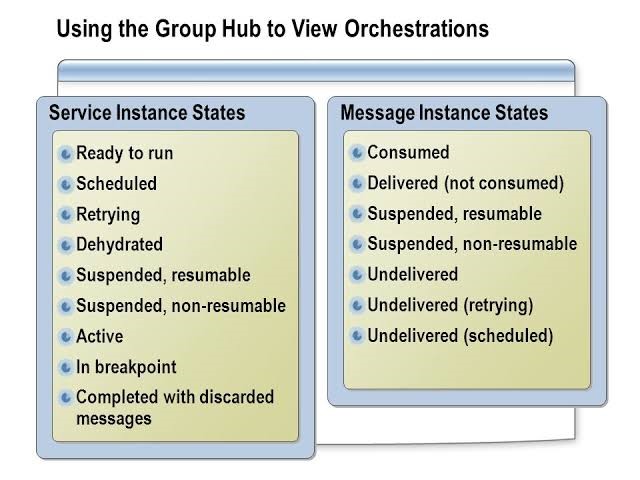
Instance states and stages
Service instance states and message instance states are displayed on the Group Hub page. They convey information about successfully processed messages and instances, failures, and suspensions during a specified time interval. The service instances get instantiated, like your objects for classes, and during the lifetime, they go through various states. Some of the common states include:
- Ready to Run
- Scheduled
- Dehydrated
- Suspended, Resumable
- Suspended, Non-resumable
- Active
When messages flow into the BizTalk server, the messages get persisted in BizTalk Server’s MessageBox database.
Each of the service instance state signifies certain value. Some of them are system-specific states (ex: Active, Dehydrated, Ready to Run, etc), which will change automatically as the message gets processed.
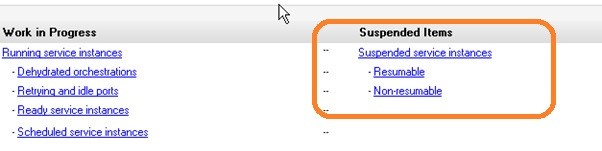
When any message is suspended in processing, then it is logged into the suspended instance. In BizTalk, when a message is suspended, then it falls into one of these two categories.
- Resumable: if the external resource (example web service, folder location in case of file adapter) is not available then the message will go for suspend resumable mode. Resumable means the service can be recovered.
- Non-Resumable: Typically hold metadata and cannot be resumed. They will either disappear when the corresponding resumable instance is resumed or in other cases, they might need manual termination. You can save the Messages referenced by the instance, and then you can terminate the instance.
Sometimes we can directly resume messages from the admin console, after which they are processed successfully and sometimes they are not processed successfully. Once the service instance moves into a state that demands user intervention, the BizTalk server administrator needs to manually log in to the BizTalk Server Administration Console and fix the problem with respect to the service instance.
Why should you monitor service instances
For a healthy BizTalk environment, it’s always important to keep an eye on the number of service instances in the environment. Having many suspended service instances will occupy most of your message box database and it will affect the overall performance of your BizTalk environment.
In BizTalk360 we are offering two ways to act against the instances.
- Action against suspended instances manually
- Action against suspended instances automatically
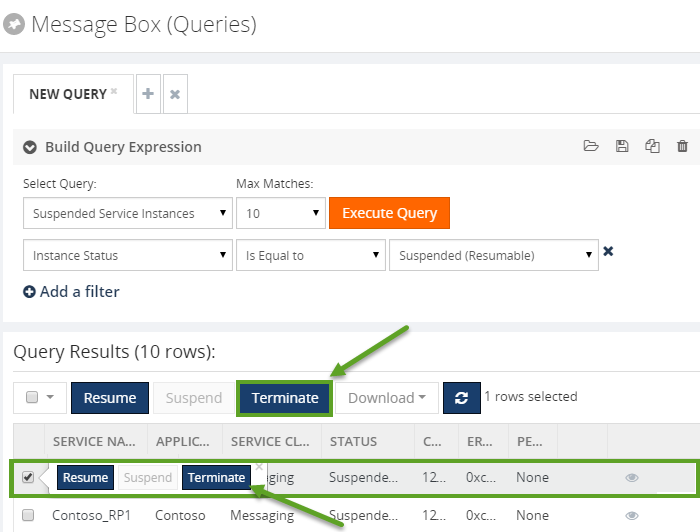
You can act against suspended instances manually through the MessageBox (Queries), offering administrators the ability to query the MessageBbox database for such messages and take action.
MessageBox Data Monitoring
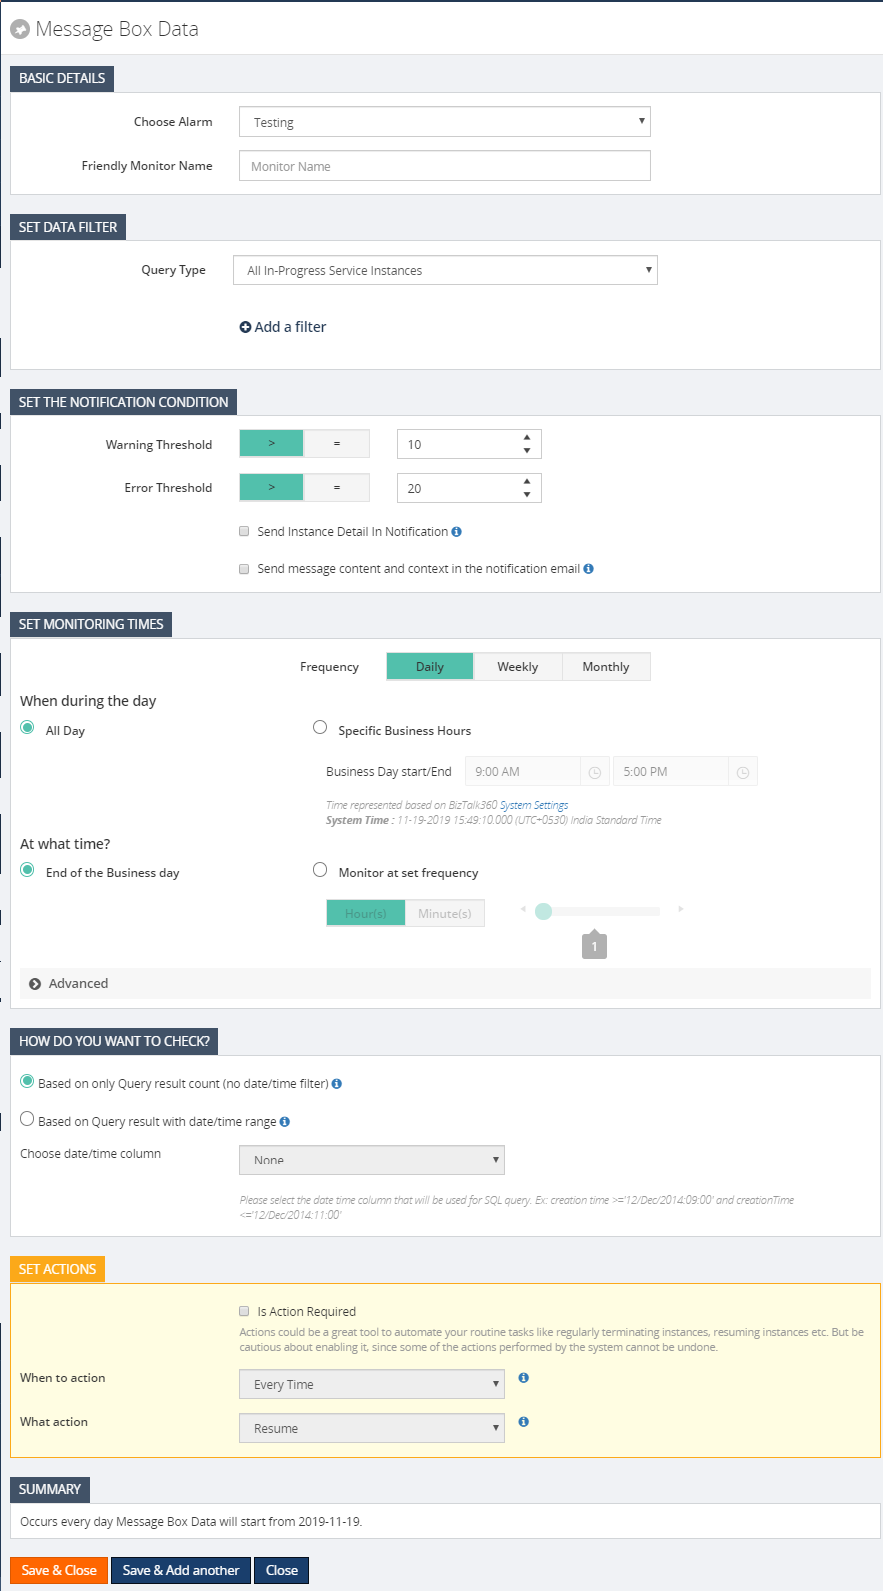
In MessageBox Data Monitoring, the user can configure the queries to monitor service instances and messages. The monitoring service will send the notification to the users whenever the service instances/Message count violates the configured threshold condition.
MessageBox Data Schedule can be configured in BizTalk360 -> Monitoring -> Data Monitoring -> MessageBox Data.
It can be scheduled at the different frequencies (Daily, Weekly, and Monthly) based on the volume and priority to take the action on service instances/messages.
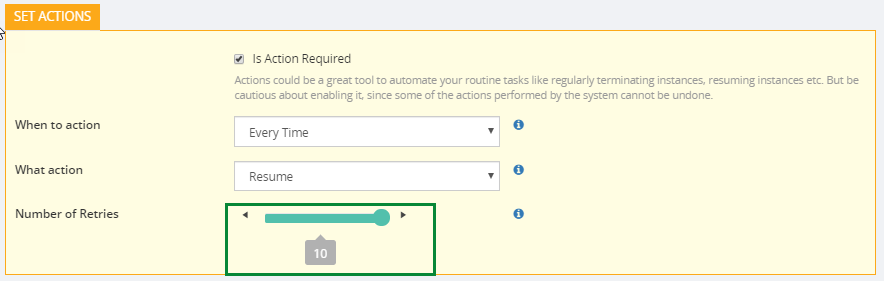
The operational user (either it will be a super user or a custom user has the permission to take action within BizTalk360) must closely watch the suspended service instances to act on. It is a tedious process to look after all the time. The MessageBox data monitoring feature can take automatic action on service instances when the set actions are configured in our schedule.
The monitoring service will Resume, Suspend or Terminate the service instances based on either error or warning condition without any manual intervention.
Service Instances Action Based on Retry Count
Most important to be noticed is that BizTalk360 will resume the suspended instance irrespective of the “Number of Retries” count set in the port. Retry count is nothing but the number of times for the send port to resend/resume a message on message failure.
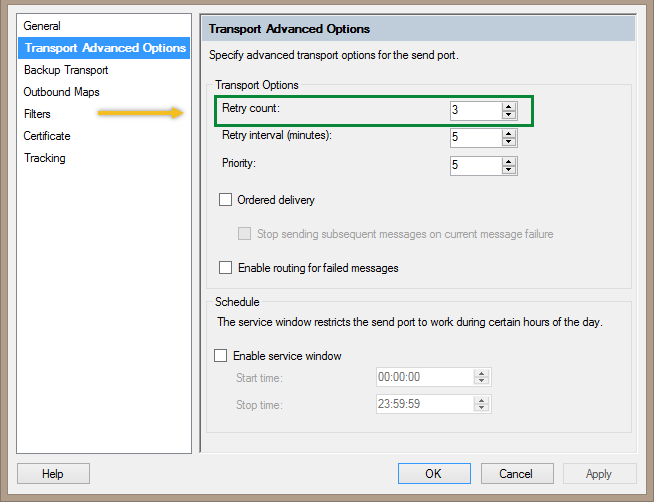
If the Instance is suspended in a port, then BizTalk360 will check how many times the instance is retried by BizTalk Server. If the number of retries done by BizTalk is less than or equal to the count set in BizTalk360, then it will resume the instance until it exceeds the count set.
If the number of retries done by BizTalk is greater than to the count set in BizTalk360 then it will stop resuming the instance on further monitoring schedule.
Check the retry count between the BizTalk artifact and in the BizTalk360 count in the UI
If the BizTalk360 configured value is 3 and the BizTalk server’s current Retry Count is 4, in that case, the BizTalk retry count is greater than BizTalk360, so it will not take any action against the instances. So, compare the instance count and set the retry count value high in BizTalk360.
Action on Long running service instance which is older than X days
You can also achieve the same scenario (task action like MessageBox Data monitoring) with the help of a prebuild custom notification channel: PowerShell. Let’s take a customer scenario here for how they utilized the PowerShell notification channel.
In the MessageBox data monitoring, you can act against the service instances based on,
- Only Query result count (no date/time filter)
- Query result with date/time range
Only Query result count (no date/time filter)
Selecting this option will execute the query without applying any date time filter. i.e. all the data will be considered for SQL query execution.
Based on Query result with date/time range
Selecting this option will apply the Creation Time filter for SQL query execution. (The values configured for setting trigger time, Set Monitoring Times ->At What Time, will be used for Creation Time filter).
For example: When Monitoring set frequency is set for 1 hour, then for every SQL query execution the query will consider only 1-hour of data.
In the customer scenario, they wanted to terminate the dehydrated and active service instances which are older than 15 days from the creation of the message. In data monitoring, this option is not available. To solve that, the customer terminated the dehydrated and active service with a PowerShell notification channel (custom script); the steps are below.
- Create a PowerShell script to call the BizTalk360 APIs to check for the dehydrated service instance and terminate them
- Attach this PowerShell script to a notification channel in BizTalk360
- Map this channel to an alarm so that the PowerShell script will get executed to take action when the alarm is triggered.
Here is the PowerShell script to terminate the dehydrated and active service instances which are older than 15days in GitHub.
Note: The environment id details can be obtained from b360_admin_BizTalkEnvironment table in the BizTalk360 database. Modify the details according to your environment configuration.
Conclusion
An automatic action feature of BizTalk360 can take corrective actions in the event of any threshold violations. With just a one-time setting we have our BizTalk360 to make sure all your routine tasks are addressed without manual intervention.
The post Different Approaches in Service Instances Automation appeared first on BizTalk360.
by Sivaramakrishnan Arumugam | Mar 12, 2019 | BizTalk Community Blogs via Syndication
In my previous blog post, I have highlighted 5 interesting cases we received and solved in the past year. In this blog, I would like to add 5 more interesting support cases.
Let’s get into the cases.
Case 6: Data Monitor Dashboard slow to respond
In the year 2017, we have started a new initiative called ‘Customer Relationship Team. This team will get in touch with our customers regularly in the frequency of 3-4 months. The team will make sure about how the customers are using the BizTalk360 product, whether they are facing any problems, and if they have any queries.
If so, we will clarify the customer queries during the call. If can’t clarify the problem within the short time of the call, then we will create a support case for their queries and make sure we will solve the case.
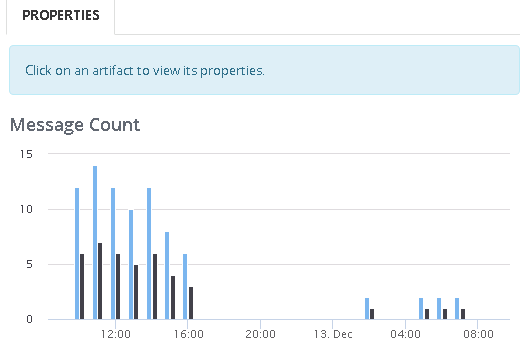
In one such a call, a customer raised a concern about the Data monitoring dashboard being slow to respond and it takes more and more time.
Troubleshooting
During the investigation of the slowness, we came to know that the customer had configured 147 data monitoring alarms. Out of those, 110 data monitoring alarms were scheduled for every 15 minutes cycle, which will produce a huge result.
In more detail:
110 data monitoring results for every 15 minutes cycle.
110*4*8(business hours) = 3520 results.
110*4*24(whole day) = 10,560 results.
Loading 10k results in a single load, for sure it will take time to load all the results.
Solution
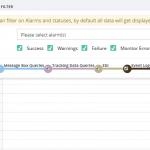
Most of the customers won’t use many schedules for data monitoring alarms. To handle such a huge load, we have improved the performance of the data monitoring dashboard, by having a filter option to select the specific alarms and corresponding status. The improved data monitoring dashboard is available from version 8.7 on.
Case 7: System resources configuration
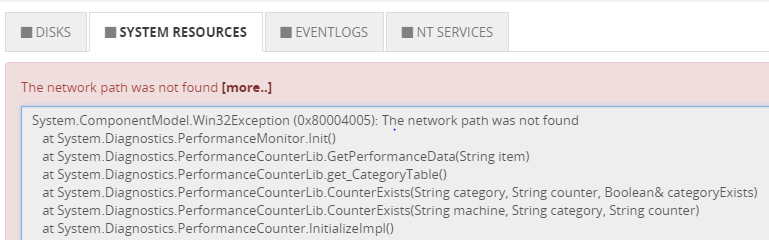
A customer faced an exception ‘the network path was not found’ while trying to enable SQL Server System resources monitoring.
Troubleshooting
We have requested the customer to check the below things:
- The BizTalk360 service account is a local admin on the machine where SQL server is hosted
- The Remote Registry service is started or not
- Firewall ports are opened for SQL server
- From BizTalk360 server, can you connect to that SQL server through SQL Management Studio
- Connect to the remote computer (SQL Server configured for monitoring) from the BizTalk360 machine where the monitoring service is running
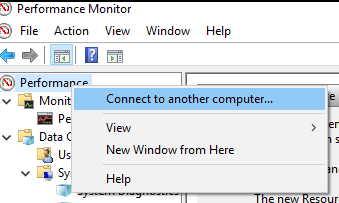
All other steps were passed, but in the Perfmon, while connecting the SQL Server on the BizTalk360 installed machine, they have faced the same exception.
Solution
To open the SQL server on another machine, port 1433 needs to be enabled. To monitor System resources of SQL machine, an additional port needs to be enabled ‘135’, which is for RPC and WMI. We have mentioned the depended ports what needs to be enabled in our existing blog.

Even after adding the port, still the problem persisted. At last, we found that the firewall rules were not activated/enabled, once after activating the rules we were able to solve the case. This is one such case in which we all missed to check the basic step that a rule should be activated because no one had access to view the rules other than the customer’s admin.
Case 8: SFTP Monitoring – PublicKeyAuthendication
A customer was trying to configure monitoring for an SFTP location and they were facing issues. It was working fine for the customer when the authentication was used with a simple username and password. However, once they configured for PublicKeyAuthendication, they faced issues during the configuration.
Troubleshooting
We started with the basic troubleshooting steps like authentication, access permissions and we understood that it has all rights to access the FTP site. During the investigation, we found that in a folder BizTalk was picking up the inner folders as well, instead of picking the files alone.
Solution

To find the exact root cause of the issue, we have developed a console application (with logs enabled) and provided it to the customer. It provided a clear picture of the problem, as mentioned earlier it has calculated the folder for PublicKeyAuthentication. Now, this has been fixed.
Case 9: Message Count mismatches
A customer faced a problem between the Receive and Send ports for the message count at Analytics Messaging Patterns.
Troubleshooting
The customer had a very simple scenario (see below) where a file is picked up and placed in a different location, but the Send Port count shows the Receive Port count twice. He gets similar doubling up on Receive and Send ports for other message flows as well.
Example:
Send Port – 12 messages
Receive Port – 6 messages
During the investigation, we have found that whenever BizTalk retries to submit the suspended messages the counts get double.
Solution
As of now, we are showing the message transfer count rather than the message count. We are doing this because this will help us to determine the message performance of BizTalk Artifacts in an environment. We are going to take this as a feature enhancement in the future.
Case 10: Not possible to expand columns in query outcome
Normally you can expand the column size of the query outcome in a grid. But customers were facing a problem that they were unable to expand the columns in the MessageBox Queries grid.
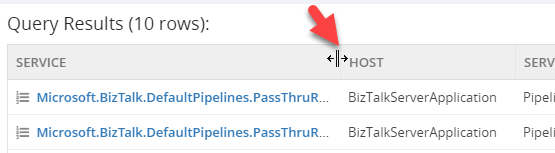
Troubleshooting
During the investigation the customers were facing this problem in Chrome, but not in Internet Explorer and Firefox. They faced the same issue while opening the browser in an incognito window as well. This is really something very strange for us, because while using the same version we were not able to reproduce the same problem.
We have investigated at the code level and everything seems fine at our end. So, we have decided to go for a meeting. During the meeting, we were able to see the problem at the customer end and we had no clue at that time, requested a few days time and closed the meeting.
We analyzed the case and it was hard to reproduce the case at our end. It is working for most of our team members and only a few are facing this issue. The team member who faced the issue and the one who’s working fine worked together, they compared each component from scratch to find what’s the difference and we found the cause.
Solution
If the Chrome page is zoomed out or zoomed in, then the column resize wasn’t working for us and this happened at the customer as well.
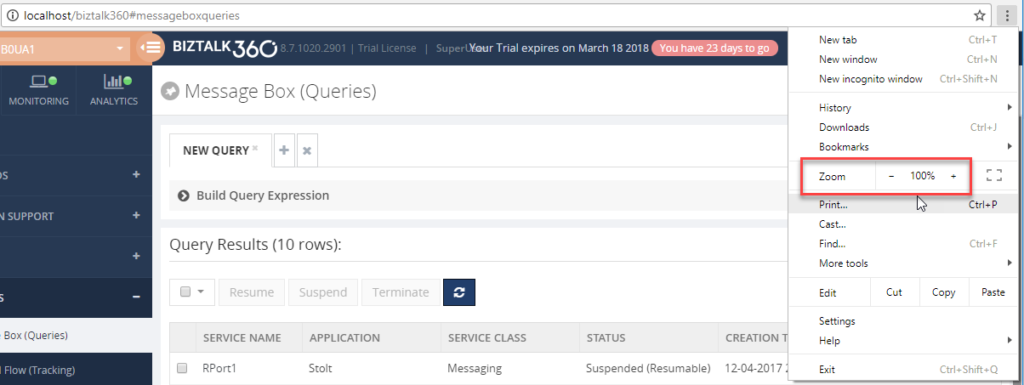
It seemed that this was a problem with the Kendo Grid control in the latest version this issue was introduced by Kendo. We worked along with Kendo and solved the case.
Satisfaction does it!
As a support engineer, we receive different cases on a daily basis. Every support case is unique because the problem will be faced by different customers in different environment architecture. But some of the support cases are interesting by the root cause of the problem and the way of troubleshooting the case. I’m happy that I have worked on such challenging and interesting cases.
The post Interesting support cases 2018 – Part 2 appeared first on BizTalk360.
by Sivaramakrishnan Arumugam | Feb 11, 2019 | BizTalk Community Blogs via Syndication
The year 2018 passed away just like few months have passed phew…! As a support engineer, we receive different cases on daily basis. Every support case is unique because the problem will be faced by different customers in different environment architecture. But some of the support cases will be interesting by the root cause of the problem and the way of troubleshooting the case.
We have already written a series of blogs about the interesting support tickets we often receive.
In a similar way, this blog post highlights 5 interesting cases we have received and solved in the past year. We are sure this consolidated blog will be useful for our customers if they come across any of them in the near future.
Case 1: Custom port number
A customer tried to upgrade BizTalk360 to the latest version 8.9.3153.0310. The installer ran the upgrade process till the end, however, for some reason, it failed without a failure warning or exception message shown in the installer.
Troubleshooting
During the troubleshooting, the customer informed that while installing the BizTalk360 default URL has been used.
Say for example:
http://localhost/biztalk360
Later they have changed the URL from HTTP (80) to HTTPS (443). Once after changing to the new URL, they have deleted the default port (HTTP: 80) in IIS.
In the log file, we found that the installer is still trying to find the default port.
Solution
Most of the customers will not delete or remove the default port from IIS. During the upgrade process, the installer will look for the registry values for the default port information. If there is any mismatch in the stored port information and available in IIS, the installer will be forcefully stopped, which leads to unsuccessful installation.
As a best practice, we recommend before deleting the default port, the new values (Custom Port number) required to be updated in the registry to experience a seamless installation.
Case 2: Unable to view the BizTalk360 API documentation section
Web APIs are becoming increasingly vital to the organization across all sectors. We exposed our APIs specifically to facilitate the creation of their own scripts to ease the use of BizTalk Server integration space much better. To access the BizTalk360 API documentation you must contact [email protected] as we are providing this feature as an Add-on pack.
In this case, a customer can access all the features except the API documentation menu, though they have a valid license to access it. After the investigation, we have observed an error “Access is denied” in Internet Explorer browser.
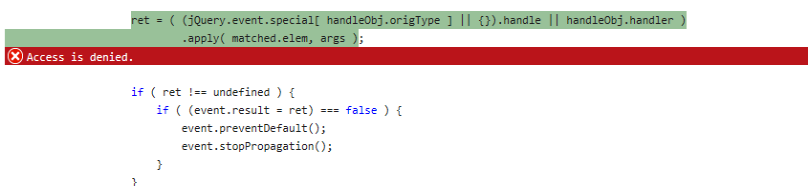
Troubleshooting
Most of the customers wanted to access the BizTalk360 application in a secure way (HTTPS) based on their Organisation policy. As we progressed on our investigation, we had identified the root cause is because of deleted/removed the default port configuration in the IIS.
We suggested them to add the HTTP port into IIS and check the API. Yes, it helped after adding the HTTP and they were able to access the API documentation.

Solution
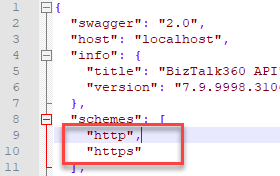
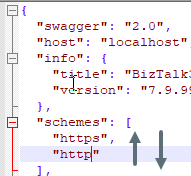
The interesting part was the fix to the problem. We are using Swagger for the API documentation. Since they removed the HTTP, Swagger kept on checking the HTTP as per mentioned in the configuration in the schemes. As a workaround, we recommended them to change the schemes upside down, it helped them to access the API documentation. Later we handled the part in the code for the permanent fix.
It took few months to solve this case because of the restricted access at a client side, we would like to appreciate the customer for their patience in this case as it took a long time to identify the root cause.
Case 3: Widgets moving around in the Dashboard
Sometimes we don’t believe our own eyes as the support ticket makes us think beyond the limit. One such interesting support case we have received is about the Analytics section. A customer added few widgets in the dashboard, but the changes were not persisted when they moved them around to different places and removed a few of the widgets. We suspect it’s a ghost activity, absolutely it’s an old joke, have a smile! 😛
Troubleshooting
As it is difficult to identify the root cause, we went for a web sharing session and found that a few widgets don’t have any data. We presumed that the issue is related to “Event Log data count” widget.
There were 4 Event log data count widgets added with different server names, out of that 2 were with data and 2 were empty.
In the generated widget, we were able to see two problems.
- Related to permission
- And with custom sources
Solution
The Event Log widget will collect information from all the servers (if permission is provided). When we check for the permissions in all the enabled servers, we were able to see some server hadn’t had local admin permission. After providing the necessary permission, they were able to remove the event log data count widget from the dashboard.
The second widget is with custom sources, this was identified as an issue at our code and we provided the fix in the related stored procedure to resolve the issue.
Case 4: NT Service monitoring
Monitoring few NT services leads to an exception “no longer exist in the server” in the alert email.
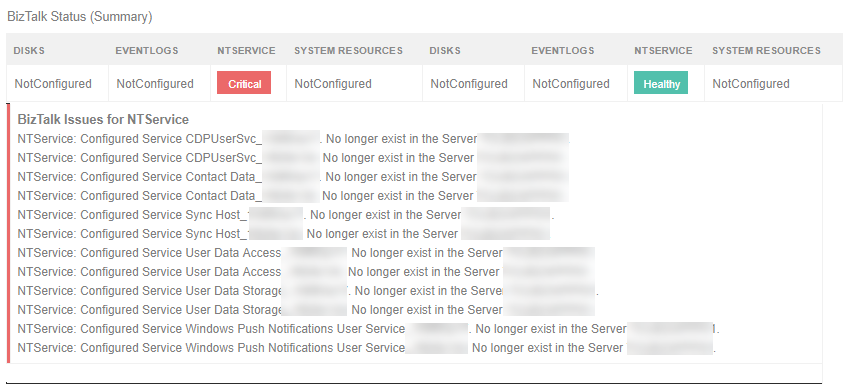
Troubleshooting
We monitor the NT services by using the service name. Every time while logging off the user, the monitored services were removed from the server and when logging in to the machine or once after a reboot, a new NT service was created with the addition of some random number (at prefix for both service name and display name).
This led to the “Orphaned” status as the originally mapped service was not found by the BizTalk360 monitoring service in the actual server
Example: If the service name is CDPUserSvc_159f93a17 once after the logout and login or after a reboot, the name will be changed to CDPUserSvc_29174f
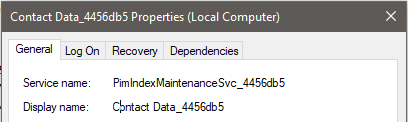
We investigated the usage of the services where those services are structured with user data like contact info, calendars, messages, and other content in Windows 10 and Windows Server 2016.
Solution
The Fix is available in our latest version, where it handles the new services created with random numbers.
Case 5: Cross-domain file monitoring
An issue is that file monitoring is getting Orphaned once after configuring it with an alarm.

Troubleshooting
We started with the basic troubleshooting steps and understood that the configured File path in BizTalk Server is present in a different domain configuration than the domain of the actual BizTalk server. Technically, BizTalk360 will monitor the specific file location without any issues because BizTalk360’s monitoring service account is being used to fetch the configuration information by providing the necessary permissions
Solution
To find the exact root cause of the issue, we have developed a console application (with logs enabled) and provided it to the customer. At last, we have found that it is an issue with authentication for the service account in cross-domain architecture. We have found this as an issue at our end and fixed the same in our latest version.
This case helps me to explore more in cross-domain architecture.
For more details on this case, please refer here.
Conclusion
Above are 5 interesting cases of 2018 which helped me to learn and explore new areas and technically learn new concepts. Wait for another blog post series where I would like to share another 5 more interesting cases.
Author: Sivaramakrishnan Arumugam
Sivaramakrishnan is our Support Engineer with quite a few certifications under his belt. He has been instrumental in handling the customer support area. He believes Travelling makes happy of anyone. View all posts by Sivaramakrishnan Arumugam
by Sivaramakrishnan Arumugam | Dec 20, 2018 | BizTalk Community Blogs via Syndication
A few days back we have received a question from one of our customer on the possibility to install BizTalk360 on Windows Azure Virtual machine. We have replied with suggestions, and he was impressed by the option what we have provided to install BizTalk360.
That’s the moment of inspiration for this blog. Here, we are going to look at the types of installers available and different ways to install BizTalk360.
I would recommend you to have a look at the prerequisites that should be met to install and work with BizTalk360.
Installing BizTalk360 – What are the options
One of the common questions that customers raise to us. There are various deployment choices available for BizTalk360.
This is one of the common questions we have observed recently on our customer engagements.
The deployments are purely based on the organization needs and based upon the BizTalk environment architecture. Here are the options BizTalk360 provides:
- Installing BizTalk360 On a BizTalk Server
- Installing BizTalk360 On a Stand-Alone (non-BizTalk) Server
- Installing Just the BizTalk360 Monitoring Service
- Installing Just the BizTalk360 Analytics Service
- Installing BizTalk360 on High Availability BizTalk Servers
How can you achieve the various deployment options?
If you are installing BizTalk360 for the first time, you can select the components that you wish to install on the server.
Option 1 – Installation on the BizTalk Server environment
You can install BizTalk360 in one of BizTalk Servers of the BizTalk Server environments (production, non-production etc.) and configure all the environments in one BizTalk360 interface.
Option 2 – Installation on a stand-alone server
This is another common scenario where customers don’t want to install BizTalk360 directly on their production environment.
BizTalk360 supports this scenario by allowing customers to install on a standalone server and access various environments. In this case, customers need to install BizTalk administration components (only) in the standalone server. Also, any third-party adapters must be installed on this server.
It is one of our recommendations to install BizTalk360 on a separate box for the customers who don’t want to install in their BizTalk Environment. The benefit is that once your BizTalk server goes down, your BizTalk360 server won’t go down along with it and be able to send notifications about your BizTalk server not being available.
Option 3 – Install Just the BizTalk360 Monitoring Service
The Monitoring Service plays a key role as it is responsible for fetching the status of artifacts from the BizTalk server to monitor them. Using this option, you can install the BizTalk360 Monitoring Service on a separate box and BizTalk360 database on a separate box.
This setup will be helpful in a scenario where the customer wants to have the BizTalk360 web services, user interface (IIS), BizTalk360 Monitoring service and the BizTalk360 Database all in separate boxes.
This setup can also be done when you want the BizTalk360 monitoring service to be in the high availability state. When monitoring service is installed in two servers in the high availability mode, when one service goes down, the other service will be up, where the monitoring of your BizTalk environment by BizTalk360 will be continued without any interruption.
Option 4 – Install Just the BizTalk360 Analytics Service
As like installing BizTalk360 monitoring service on a separate box you can install the BizTalk360 Analytics Service on a separate box as well.
Option 5 – Installing BizTalk360 on High Availability BizTalk Servers
You can install BizTalk360 on BizTalk high availability servers. At the same time, you can make BizTalk360 as a highly available setup.
Installing BizTalk360 on the single server environment is a straightforward task when the BizTalk server and database are existing in the same machine. You can simply run the BizTalk360 MSI from the Administrator Command prompt.
But in most of the cases, we have seen our customers use BizTalk360 in a High Availability mode to make it available all the time.
Different ways to install BizTalk360
To fulfil all the customer needs, there is a number of ways to install BizTalk360 and we provide different types of installer options:
- Default installation
- Silent Installation
- Azure Marketplace installer
- Azure easy installer
Default installation
The Default installation is the regular way of installing BizTalk360.
Once you have created and configured a machine with all the prerequisites met, download the latest version of BizTalk360 (.msi) and install it on the machine.
In which case will this be helpful?
When you have a physical/virtual server within an organization which may have or have not internet connectivity.
You can achieve all the various deployment choices,
- Installing BizTalk360 on a BizTalk Server
- Installing BizTalk360 on a Stand-Alone (non-BizTalk) Server
- Just the BizTalk360 Monitoring Service
- Just the BizTalk360 Analytics Service
- BizTalk360 on High Availability BizTalk Servers
You can download the latest version installer of BizTalk360 from http://www.biztalk360.com/free-trial/ . You must enter the registration information in the form before downloading the BizTalk360 MSI.
Silent Installation
This is one of the interesting cases which came to us. One of our customers was trying to install BizTalk360. Although he was from Admin team, he was not a member of the BizTalk groups.
He proposed a request that is there any option to install BizTalk360 without the installer user interface or screen. We do have Silent installation support.
So, we assisted the customer with the command which they need to run the installer without the installer GUI. But with the silent installation, you can’t achieve all the various deployment choices as seen with the regular installation (Refer the section “Default Installation -> In which case it will be helpful”).
Azure easy installer
The move to the cloud eventually means that customers using BizTalk360 for managing and monitoring their BizTalk server environments will need their BizTalk360 setup to run on their Azure setup. Without BizTalk360 on their Azure setup, the only way for customers to manage their BizTalk environment (running on Azure) is by physically logging into the server through RDP connection.
Also, there is a challenge with the number of RDP connections (no. of users) who can access the server at a time. Therefore, the presence of BizTalk360 becomes an important factor – be it in an on-premise setup or on a remote server (Azure).
In which case will this be helpful?
Any server which has BizTalk Server installed, with the help of BizTalk360 Azure Easy Installer, you can easily install BizTalk360 by executing a single PowerShell command on your BizTalk Server Machine.
Why did we introduce this?
As the technology and usability evolve, we would like to encourage customers who are already using BizTalk server in Azure, to move their BizTalk360 environment to the cloud as well.
The customers using BizTalk360 for managing and monitoring their BizTalk server environments in Azure will need their BizTalk360 setup to run on their Azure setup as well.
How easy to use is it?
With the BizTalk360 Azure Easy Installer, you can easily install BizTalk360 by executing a single PowerShell command on your BizTalk Machine. The installer will take care right from the scratch of creating a service account for BizTalk360, configuring the BizTalk server (optional), enabling HTTP feature, granting SQL permissions and IIS.
Azure Marketplace installer
This is helpful for customers having a Microsoft Azure account and provisioned BizTalk server machines in the cloud with a more complex setup such as a domain, Active Directory, and one or more BizTalk environments in the network.
With BizTalk360 in Azure, you get a complete deployment that can target your BizTalk environment running on-premise via VPN or ExpressRoute or on Azure IaaS Platform.
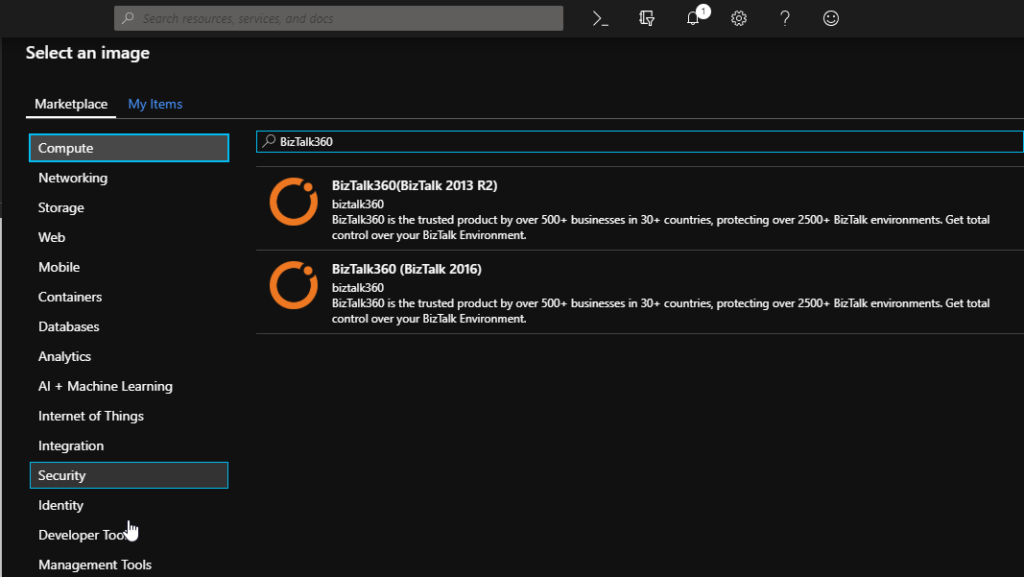
In which case it will be helpful?
With the help of BizTalk360’s Azure Marketplace installer, you can simply spin up and add a new BizTalk360 machine into your existing BizTalk environment. We support BizTalk Server 2013R2 and 2016.
Why did we introduce this?
To ease the installation process, where the customer has the BizTalk server setup in domain Azure architecture, this tool will be very helpful. In any architecture, to add a new application software will be a difficult job because so many changes need to be done right from the providing permission to other prerequisites.
Likewise, to install BizTalk360, set of prerequisites must be performed before installing. To make this job easier for the users, our Azure marketplace installer comes into the picture.
How easy to use is it?
While adding a new machine for BizTalk360, select new Virtual machine in the Marketplace and select the image according to your existing environment. As of now, we are providing support for BizTalk server 2013 R2 and BizTalk 2016.

It is just a simple process; once after the creation of the new BizTalk360 Virtual machine, the Azure Marketplace installer will be opened. Just providing the credentials, it will be added to the domain (the machine will be automatically restarted as a part of this process), and BizTalk360 installation will continue.
Upon successful completion, BizTalk360 will be installed and you will notice a browser window firing open with the BizTalk360 screen. We want to convey that using the BizTalk360’s Azure Marketplace installer, and the Azure easy installer is free of costs.
Conclusion
Keeping the user perspective in mind, we have built various deployment choices for BizTalk360 customers which would ease the installation and provide a user-friendly experience.
Author: Sivaramakrishnan Arumugam
Sivaramakrishnan is our Support Engineer with quite a few certifications under his belt. He has been instrumental in handling the customer support area. He believes Travelling makes happy of anyone. View all posts by Sivaramakrishnan Arumugam
by Sivaramakrishnan Arumugam | Nov 1, 2018 | BizTalk Community Blogs via Syndication
One of the core features of BizTalk360 is it’s monitoring and notification capability. BizTalk Server is used in mission-critical environments to integrate different applications within the enterprise. While BizTalk Server can integrate with multiple applications and provide a one-stop solution for enterprises, it lacks the ability to allow the administrators to monitor, amongst others, the health of connected applications.
BizTalk360 understands the problems faced by enterprises and offers an out-of-the-box monitoring solution that assists administrators to monitor the BizTalk environments. BizTalk360 solves the purpose of being able to monitor BizTalk Server solutions in a simple and easy manner.
So, What Can BizTalk360 Monitor?
BizTalk360 allows administrators to set up alerts on specific components of BizTalk Server, such as:
- BizTalk Applications and their Send Ports, Receive Locations, Orchestrations, Service Instances
- Disks
- Event Logs
- NT Services
- System Resources (CPU, Memory)
- SQL Jobs
- Web Endpoints
- BizTalk Health Monitor, Errors and Warnings
- Host instances (normal, clustered)
- Azure services
- Queues – MSMQ, Azure Service Bus, IBM MQ
- File Location – File, FTP and SFTP
- Database queries
I would like to explain the feature of File Location monitoring usage and the challenges we faced.
File Location Monitoring
File Locations Monitoring is one of the core monitoring capabilities which we had introduced in BizTalk360 v8.4. From our customers, we received many requests to introduce the ability to monitor Folder Level into BizTalk360.
How File Location monitoring works?
BizTalk360 has the capability of fetching the file locations which are configured in the BizTalk Admin console.
File Location Monitoring lists all the locations configured in the BizTalk Artifacts (Send Ports and Receive Locations) for the Transport Types (File, FTP, SFTP) respectively and shows them in the UI. Users can map only the file location of BizTalk Artifacts; file locations which are not mapped with the artifacts will not be monitored from BizTalk360.
Cross-domain
Just to give an overview of a domain
A domain is a group of computers and devices on a network that is administered as a unit with common rules and procedures. Within the Internet, domains are defined by the IP address. All devices sharing a common part of the IP address are said to be in the same domain.
Overview of Cross-domain
By cross-domain, we refer to the communication between different domains by creating trusts.
A trust is a relationship established between two different domains that enable users in one domain to be authenticated by a domain controller in the other domain. There are different types of trusts in the Microsoft Active Directory domain such as External, Realm, Forest and shortcut. An external trust is necessary when users of two different domains of two different business units want to utilize resources such as printers and file servers of trusted domains.
Cross-domain in BizTalk
In BizTalk, the receive locations or the send ports can be configured with the file locations present in the server. These locations may be in the same server or in a different server in the different domain. With the trust created between the domains, the file transfer would happen, and the message gets transferred.
File Location monitoring in BizTalk360
As said earlier, in BizTalk360 we have the capability to monitor file locations and trigger alerts based on the file count and directory size configuration.
The BizTalk360 monitoring service will check for the file count and directory size and trigger alert emails. So, as per the environment configuration, the service account running the monitoring service will need access permissions to the BizTalk environment to fetch the data of the BizTalk artifacts.
Often the support tickets raised by customers provide different learning experiences to the support team. One such ticket was an issue with the file monitoring.
Configure File Location monitoring
Configuring File Location monitoring is a very straightforward activity in BizTalk360. You have the option to configure with authentication mode as well as anonymous mode. BizTalk360 will automatically list down all the available file locations on the server.
Click the Gear icon to open the File Details blade and toggle on the Authentication button to enter the username and password. If the username and password columns are blank, it will be considered as anonymous authentication. Configure the warning and error rules for monitoring under the File Monitoring Configurations settings. Click Save Configurations to complete the process.
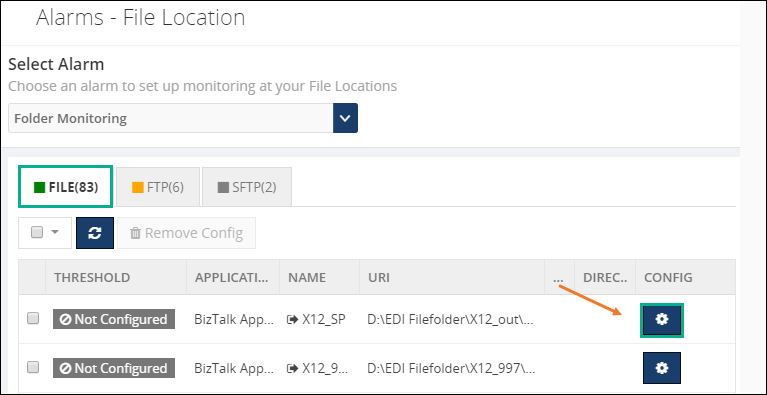
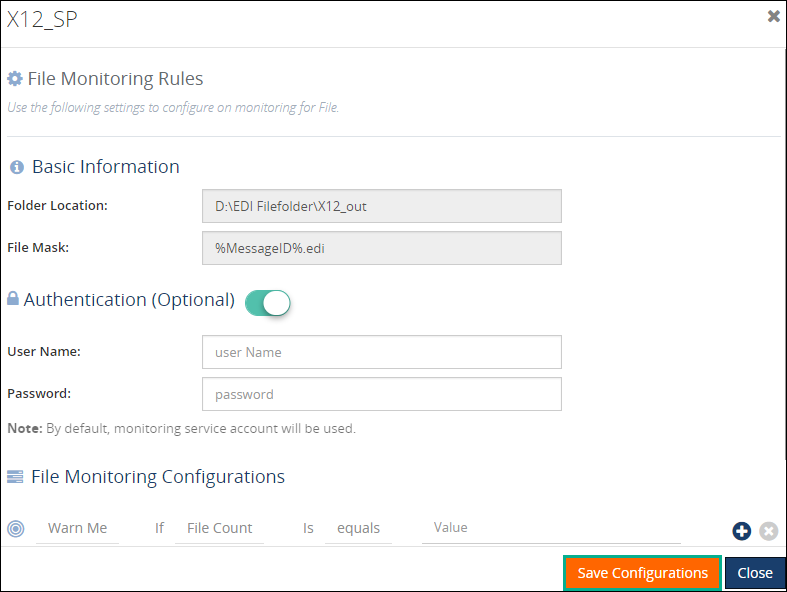
Scenario 1: Cross-domain file share
One of our customers raised an issue that a file share is getting Orphaned once after configuring with the alarm. We started with the basic troubleshooting steps.
We understood that customer configured a File path in BizTalk server which is a cross domain. In detail for the specific send port, they used a file adapter and while they provide a path they have provided a path where the folder is available in a different domain.
Troubleshooting the problem
We asked the customer to share if any exception appeared and we received that “the username and password are incorrect”.

Technically, BizTalk360 should monitor the specific file without any issues. This is the reason why we are using BizTalk360’s monitoring service account to fetch the details. If BizTalk360 monitoring service needs access across the domain, it should monitor without any problem.
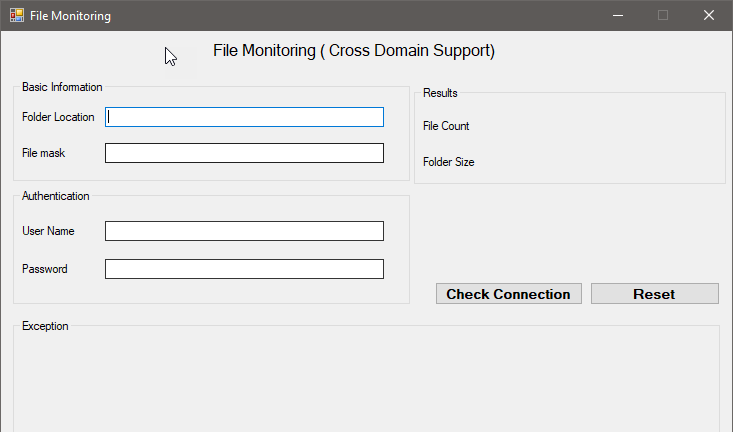
To find the exact root cause of the issue we have developed a console application(with logs enabled) and provided it to the customer. Developing back and forth, we found that it’s an authentication issue and solved it in version 8.9 of the product.
Scenario 2 – Monitoring a cross-domain Linux server
It’s again an interesting case once after the release of version 8.9 (fix for cross domain file monitoring). One of our customers came with a feedback that he is facing a problem with file monitoring.
Once we engaged a call with our customer, we found that they are using a Linux machine for a folder path in the BizTalk server, which is a cross domain. In detail, for the specific send port, they used a File adapter and while they provided the path, they have provided a folder which is available in a different domain in a Linux machine.
Troubleshooting the problem
We asked the customer to share if any exception appeared and we received the same error that “username and password is incorrect”.
To connect the Linux folder location from the Windows machine, the customer used a tool called Samba share. We have enhanced our code to authenticate and connect the Linux machines with encrypt and decrypt, along with NT service mechanism.
Later, we have provided a console application to our customer which solved the problem. We have planned to include the fix in our upcoming version.
What about FTP and SFTP?
By default, FTP and SFTP are hosted in a web(domain)and we support cross-domain in FTP and SFTP file monitoring.
Conclusion
This was another support case which was interesting for me as it helped me to understand the code from a Developer perspective. I have explored a different kind of cross-domains from the Tester perspective. Working along with the customer gave satisfaction as a Support engineer. Hope I will receive “an Awesome” review from the customer side 😊
Author: Sivaramakrishnan Arumugam
Sivaramakrishnan is our Support Engineer with quite a few certifications under his belt. He has been instrumental in handling the customer support area. He believes Travelling makes happy of anyone. View all posts by Sivaramakrishnan Arumugam
by Sivaramakrishnan Arumugam | Sep 27, 2018 | BizTalk Community Blogs via Syndication
In very few days, we will release BizTalk360 version 8.9. As everyone is excited, I’m excited too as, in every release of BizTalk360, we constantly improve and include features based on the customer’s feedback and business needs. In the upcoming version, we have implemented a few features purely based on the customer’s feedback.
Here is the list of features which I’m going to cover in this blog:
- PDF Download
- Restore System Email XSLT Template
- Monitoring IBMMQ and Azure Service Bus Queues using Message Age
- Performance improvements
PDF Download
Based on the existing implementation in the Analytics reporting module, many of our customers requested the PDF download feature. We have implemented the PDF Download capability for the following modules:
- Graphical Flow (Tracking)
- Messaging Patterns
- Operations Dashboard
- Monitoring Dashboard
- Analytics Dashboard
In Graphical Flow (Tracking)
The user views the entire flow of the message from where it entered the BizTalk server to the point where it left the BizTalk Server environment. All the message flows are indicated by arrow marks between the nodes, which will provide a clear indication of the message transactions.
Say, in a message flow a message is not sent to the expected node; this will become clear in the Graphical Flow (Tracking) feature.
Example: The Viewer shows you what messages a service instance (pipeline or orchestration) sent and received, and details such as the URL, port, and party used. You can also see which preceding service instances handled the messages coming into the service instance you are currently viewing.
You can link back to these instances and see the messages coming into and going out of these instances.You can also see the subsequent service instances that received messages from the service instance you are currently viewing, and link forward to these instances to see the messages coming into and going out of these instances.
In other words, you can walk through the entire path of an activation message through your business process.
In such cases, the new PDF download implementation will be helpful to download the flow and escalate the problem to the required team.
To capture the full message pattern, you can choose the full-screen view. Along with the zoom in and zoom out capability, we have introduced a new option PDF download feature.
The PDF will get downloaded and be given the name of a pipeline of the selected port. Say for example, in the graphical flow, if you choose a Receive Port and select the download option, the PDF will be downloaded and be given the name of the Receive Port pipeline.
Messaging Patterns
As you are aware, the message patterns are the unique flows that get recorded for the message transfers. To capture a message flow, choose the full-screen view option. Along with the zoom in and zoom out options, the PDF download button will now be visible
When the user wants to see a message flow, we display it as a graphical pattern with the artifacts involved.
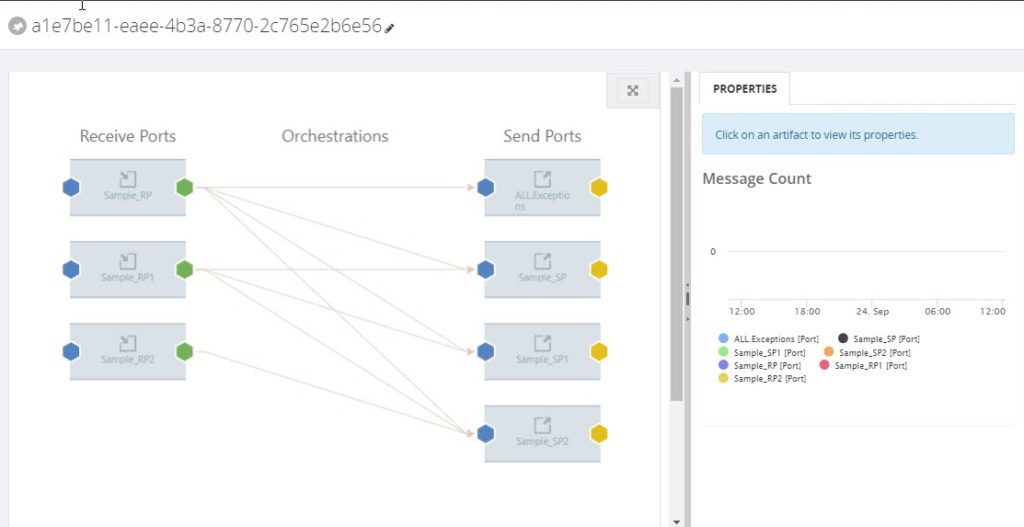
Example: A message can be received by a receive port, split up and processed in separate orchestrations, after which the processed messages are being sent to external processes/systems. To capture a unique message flow and use it for reference in the future, the PDF download will be helpful.
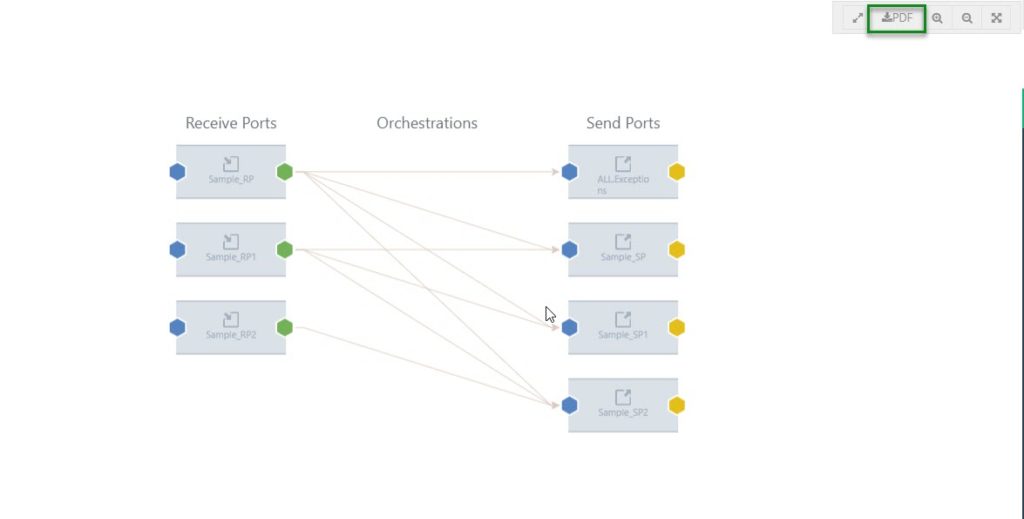
Messaging Patterns will be downloaded with the name of the message pattern.
Operations Dashboard
BizTalk360 has a capability to add default widgets and create your own custom widgets. In such cases, you have configured important widgets into the dashboard.
Even though you have an option to make the dashboard as global, when you want to share within the team you would have to make screenshots. To avoid creating screenshots again, we have implemented the PDF download option.
When you navigate to the Operations Dashboard, at the top right corner, next to the Refresh button, the PDF button will be available.
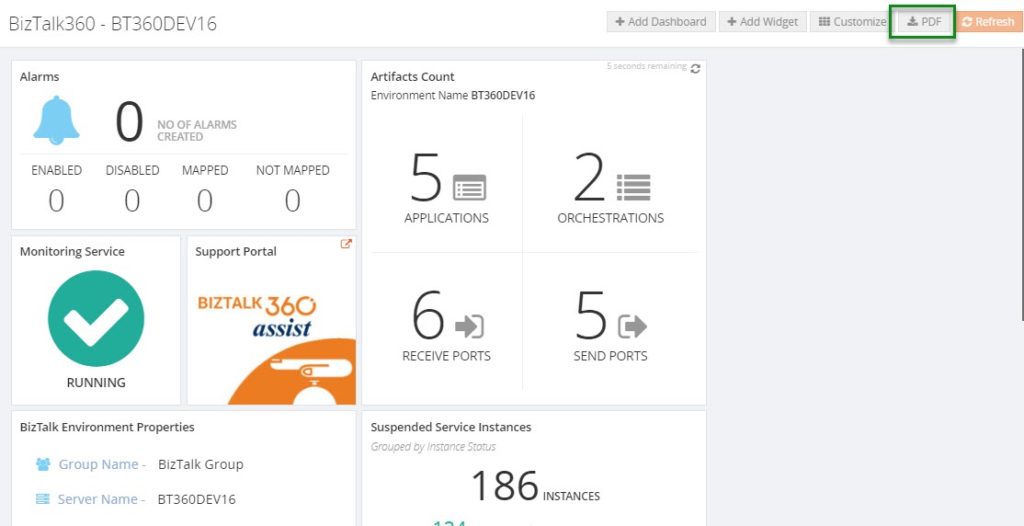
When you download the Operations Dashboard, the PDF will get downloaded with the name of the dashboard.
Monitoring Dashboard
You may get the status of an alarm via notifications from BizTalk360 whenever the port goes down. You can also receive the complete status of the monitored artifacts, with the help of a regular health check alarm for each hour. But, when you want to share the immediate status of the alarm the PDF download option will be helpful.
The download option will be enabled, similar to the Messaging Patterns for the Operations Dashboard. You can choose the full-screen view option. Along with the zoom in and zoom out buttons, the PDF download button will now be visible.
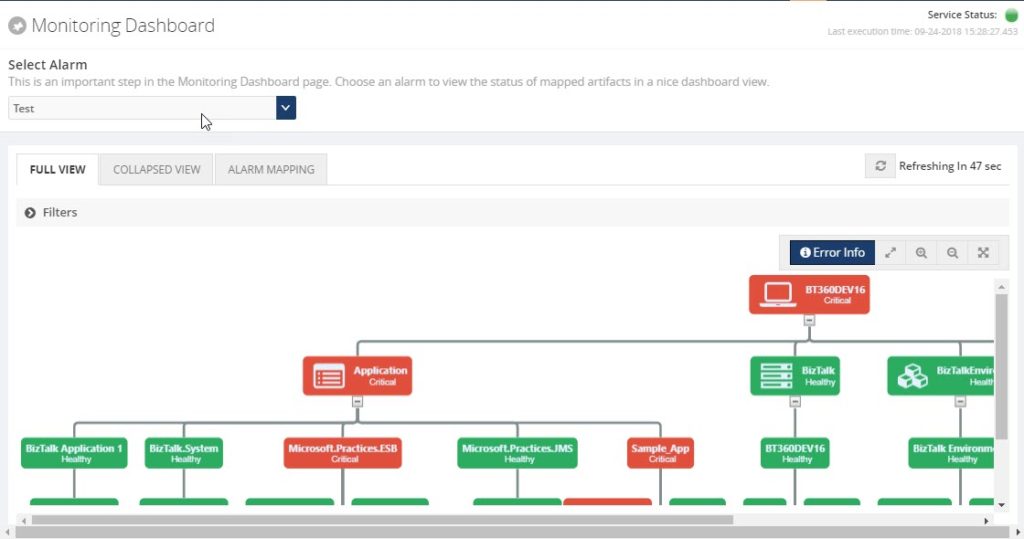
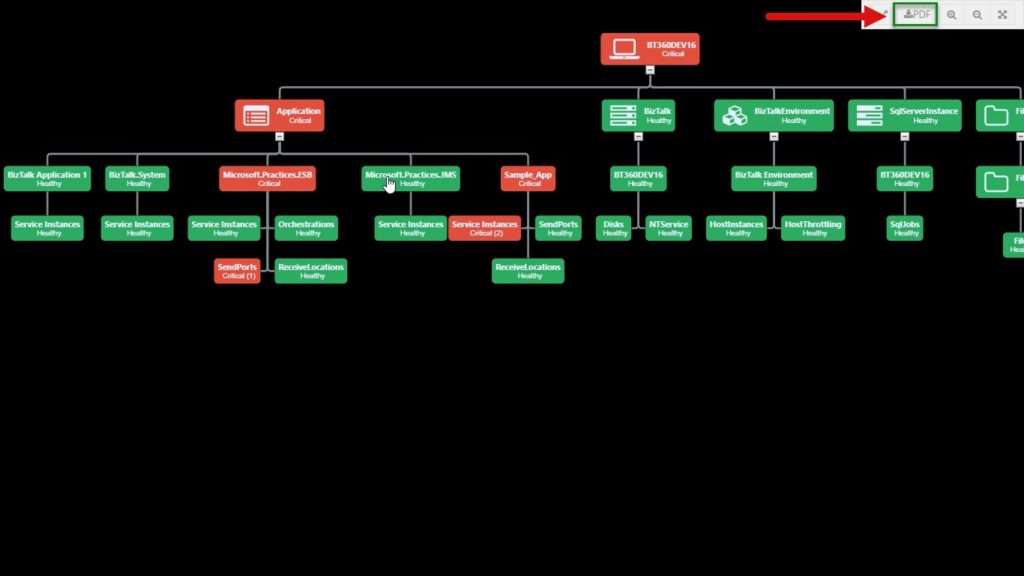
As seen in the messaging pattern, when you download the monitoring dashboard, the PDF will be saved with the alarm name which you were viewing.
Analytics Dashboard
Like the Operations Dashboard, in the Analytics Dashboard, at the top right corner, next to the Refresh button, the PDF download button will be available.
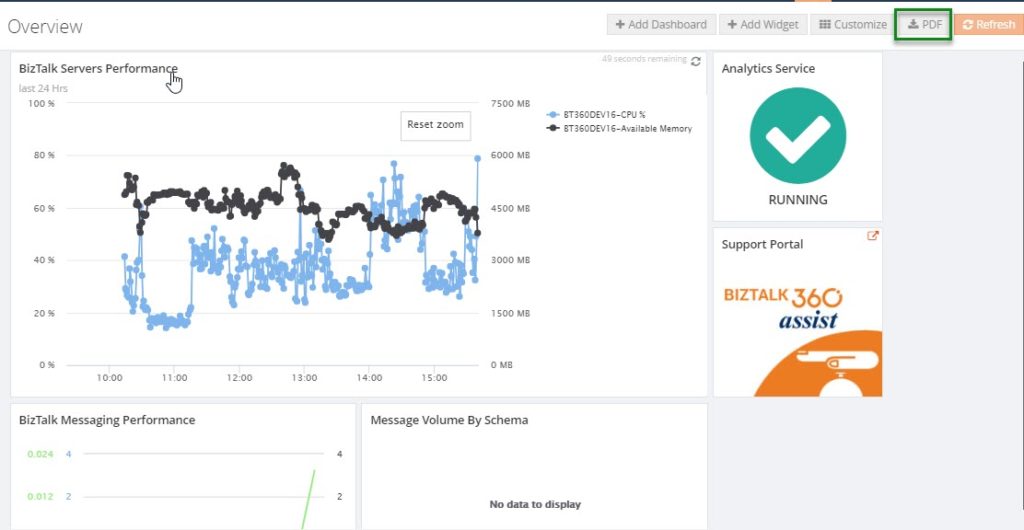
When you download the PDF, it will get downloaded with the name of the dashboard.
Restore System XSLT
We constantly improve the email templates based on the customer requests and we provide the templates directly to the customers. After that, we make the changes on the default email template in the very next release.
To make use of the newly improved email template in both default and custom email templates which are already created, until now people had to update their template(s) manually. While doing the manual changes, there may be a chance of misconfiguring the template. To avoid the manual changes, we brought this new capability “Restore System XSLT”, directly from the user interface.
Monitor with Message Age
Another most requested capability is monitoring IBMMQ and Azure Service bus queues with message age.
Message age is the time a message exists in a Queue. Using the message age parameter, you can monitor the queue messages along with the time messages exist in a queue.
In a real-time scenario, a message should be processed and send out, as the queues serve as first in first out. If it is not being processed and still pending in the queues over a particular period, you will get notified with the implementation of Message Age parameter.
We have implemented Message Age parameter as an additional monitoring filter option, in two places.
- Azure Service Bus queues
- IBM MQ
As of now, using the Message Age parameter, you can monitor the message age from few seconds to 24 hours Say, for example, if you want to monitor a queue using the message age parameter, you can monitor the queue messages along with the time of the message when it is created.
Performance Improvement
For the table “b360_BizTalkDB_Tbl_sizes”, every minute a stored procedure in BizTalk360 will clear a table of old records and insert new records.
One of our customers started facing problems, that due to high CPU usage because of that query is being executed every minute. Also, while deleting an entry, a full table scan is done, every time the query is executed. In an environment, this causes 2 seconds of CPU usage and half a million of I/O’s per query. Also, there were duplicate entries in the table for different regional settings.
The cleaning takes place on both the MessageBox and the Tracking database. It causes 4 statements per minute, like the one above, and it leads to high CPU usage.
We found that a table index is missing for the table b360_BizTalkDB_Tbl_sizes. So, we have created an index for the table and also tuned the query for making entries. This will help to reduce the CPU usage.
Conclusion
We always keep track of our Feedback Portal and take up the valid suggestions and feedback. Now, it is your turn to fill your business scenarios and features you are expecting to have in BizTalk360; please fill this questionnaire. Your valuable suggestions will help us to prioritize the next set of feature for upcoming releases.
Author: Sivaramakrishnan Arumugam
Sivaramakrishnan is our Support Engineer with quite a few certifications under his belt. He has been instrumental in handling the customer support area. He believes Travelling makes happy of anyone. View all posts by Sivaramakrishnan Arumugam


