
by Mark Brimble | Mar 7, 2017 | BizTalk Community Blogs via Syndication
In a previous blog I wrote about an issue when sending a message to an Apache AMQ using the REST API. We decided introduce a workaround in the application that is using STOMP to retrieve the message. The workaround was to add custom property when we send the message to the AMQ like transport=rest. If the receiving application sees the transport property is rest it removes the linefeed. This is not ideal and we would still like to understand why the Apache AMQ REST API is adding an extra line feed to messages sent to the AMQ.
by Daniel probert | Mar 6, 2017 | BizTalk Community Blogs via Syndication
Azure Enterprise Integration Series
Part 1: Challenges in Enterprise Integration Development in Azure
1. Why the need for this series
It’s been nearly 9 months now since Logic Apps went GA, and there’s starting to be real growth in adoption and usage. We’re also seeing a lot more community content, as developers and companies start to see the real benefits of cloud integration and, specifically, the use of Logic Apps.
But for all this, there is a lot that is missing. If you’re new to Logic Apps, especially if you’ve come from a more formal development background (e.g. BizTalk or C# development) you’ll notice that there’s not a massive amount of development or pattern guidance out there.
2. What is Enterprise Integration Development?
For our purposes, we’ve defined Enterprise Integration Development as development that:
- Follows a known and proven process
- Scales to hundreds of developers and thousands of interfaces
- Uses DevOps where possible
- Uses integration patterns
- Produces quality code
- Thinks ahead about production and maintenance
- Provides guidance on operations and monitoring
3. BizTalk Development
Let’s assume you’re a BizTalk developer: You’re used to how BizTalk development works.
For example, some of the tasks you perform may include:
- Receiving a design brief or requirements
- Preparing your development machine (which will likely have BizTalk, Visual Studio, SQL Server etc. on it)
- Following guidance on naming conventions, logging, exception handling, and common patterns
- Creating a BizTalk solution and projects on your development machine
- Creating BizTalk artefacts (pipelines, schemas, transforms, orchestrations, etc.)
- Probably creating at least one C# library project (with either helper classes, or custom components)
- Creating unit tests
- Creating integration tests
- Deploying your code to your development machine and testing it
- Monitoring your BizTalk system and viewing log files
- Checking in your code to a source repository (e.g. VSTS)
- Deploying your code to other environments using either BTS console, or Deployment Framework, or scripts in VSTS
And if you don’t know how to do any of the above, you’ll be able to easily find out online, or look in one of the many BizTalk books.
4. Azure Integration Development
Now compare this to Azure Integration Development. If you’re new to Logic Apps, you’ll find that it’s not clear what the equivalents to the above steps are: Cloud development in Azure works differently.
For example:
- There’s no concept of deploying your code to local development machine – instead you must deploy to a subscription in Azure
- There’s limited or no guidance on naming conventions, logging, exception handling or common patterns
- Do you do development in the Portal, or Visual Studio, or both?
- There’s (currently) no book to refer to
- It’s unclear how you create some resources in Visual Studio (e.g. how do you create a Service Bus namespace? Or a Storage Account?)
- Little guidance on unit testing or integration testing of resources
- It’s not always clear how resource should be deployed e.g. how do you deploy an Integration account from Visual Studio?
- What do different environments (e.g. Dev, test, UAT, Prod) look like in Azure? Are they different subscriptions? All in one?
- What extra considerations do you need to think about that you may not be aware of?
Azure integration development also introduces a series of unique challenges that we didn’t have with local development.
For example:
- The Logic Apps designer will discover other Logic Apps, API Apps, and Functions… but only if they’re deployed at the time you are creating your Logic App: the designer can’t find resources that exist in Visual Studio buy which haven’t yet been deployed
- The Logic Apps designer can (currently) only discover resources which are in the same region and subscription
- Every time you execute a Logic App, you’re charged some money (assuming you’re on a consumption plan and have no free credits). If your developers have MSDN subscriptions, then they each get USD$50-$150 of free credits to use in their own subscription – but then they can’t see code in other subscriptions (see above)
- When you design an Integration Solution, you should think about the runtime cost, and calculate what the yearly/monthly costs might be, and factor this into your design
- Some resources (e.g. Integration Accounts, premium API Connections) incur extra cost, so use of them should be shared where possible
5. How we’ll address these questions and issues
This series of videos and blog posts aims to answer most of those questions and address these issues, by providing guidance on how to develop integration solutions in Azure. It’s based on our experience, at Affinus, on working with Logic Apps and Azure integration for over a year, both internally and for our clients.
If you’ve been using BizTalk for a while, you might remember that when BizTalk 2004 first came out, there was very little guidance or patterns or conventions. But then the BizTalk 2004 Unleashed book came out, and the Bloggers Guide to BizTalk was released, and then various forums and blog posts appeared, and developers gained experience and gradually a network of community content and support appeared.
The same will happen with integration development in Azure: we’re at the early exciting stages of integration PaaS development, and what’s more, Microsoft have moved to a new agile model where new features and capabilities are being released on a 2-weekly cycle.
Whether you’re a single developer, a small-medium business, or a large enterprise, Azure integration has a lot to offer.
6. The solution we’ll build
This series is all about practical examples and samples, hence the video webcasts.
In this series, we’ll be creating a moderately complex integration application that will consist of the following:
- Web App
- API App
- Function App
- Logic Apps
- Integration Account
- Service Bus
- Connectors: SalesForce, SQL, Service Bus

by Gautam | Mar 6, 2017 | BizTalk Community Blogs via Syndication
Do you feel difficult to keep up to date on all the frequent updates and announcements in the Microsoft Integration platform?
Integration weekly update can be your solution. It’s a weekly update on the topics related to Integration – enterprise integration, robust & scalable messaging capabilities and Citizen Integration capabilities empowered by Microsoft platform to deliver value to the business.
If you want to receive these updates weekly, then don’t forget to Subscribe!
On-Premise Integration:
Cloud and Hybrid Integration:
Feedback
Hope this would be helpful. Please feel free to let me know your feedback on the Integration weekly series.
by Sandro Pereira | Mar 5, 2017 | BizTalk Community Blogs via Syndication
Introduction
The BizTalk Scheduled Task Adapter is an In-Process receive adapter that executes a prescribed task on a daily, weekly or monthly schedule. The adapter is configured entirely within BizTalk, all configurations are stored within the SSODB and can be exported and imported via binding files.
The schedule capabilities are similar to those available with the Windows Scheduled Task Service.
Four simple tasks are included in this version:
- XmlStringStreamProvider – generates a BizTalk message from a configured XML string
- FileStreamProvider – generates a BizTalk message from the contents of a file
- HttpDownload – generates a BizTalk message from data downloaded from a website
- SQLStreamProvider – generates a BizTalk message from the contents of a SQL Query (similar to the old SQL adapter)
Custom tasks can be created. Any .NET class that implements the appropriate interface can be scheduled.
Release History
This adapter is available since BizTalk Server 2004.
- Release 6.0: release on March 1, 2017, by Sandro Pereira, this adapter was tested to work on BizTalk Server 2016. Compiled in .NET Framework 4.6
- Release 5.0: release on February 18, 2015, by Sandro Pereira, this adapter was tested to work on BizTalk Server 2013 R2. Compiled in .NET Framework 4.5
- Release 4.0: release on June 12, 2012, by Sandro Pereira, this adapter was tested to work on BizTalk Server 2010. Compiled in .NET Framework 4.0
- Release 3.0: release on Aug 10, 2010, by Greg Forsythe, this adapter was tested to work on BizTalk Server 2009. Compiled in .NET Framework 2.0
- Release 2.0: last release on Apr 20, 2008, by Greg Forsythe, this adapter works with BizTalk Server 2006 and BizTalk Server 2006 R2. Compiled in .NET Framework 2.0
- Release 1.02: last release on Apr 20, 2008, by Greg Forsythe, this adapter works with BizTalk Server 2004, BizTalk Server 2006 and BizTalk Server 2006 R2. Compiled in .NET Framework 1.1
Requirements
The BizTalk Scheduled Task Adapter v6.0 will work with:
- BizTalk Server 2016
- .NET Framework 4.6
How to install BizTalk Scheduled Task Adapter
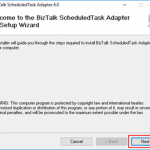
To install the adapter you need to run “ScheduledTaskAdapter.msi”.
- In the “Welcome” screen, click “Next”.

- In the “Select Installation Folder” screen, you must set the installation locations were you what to install the adapter and then click “Next”.

- In the “Confirm Installation” screen, click “Next”, then it will appear the installation progress
- Assuming all goes well, the “Installation Complete” screen will appear. Click “Close” to finish the installation process.

The setup will install the following assemblies in the selected folder (The default folder is: C:Program Files (x86)BizTalk ScheduledTask Adapter 6.0):
- BizTalk Scheduled Task Adapter.pdf (Installation manual)
- Biztalk.Adapter.ScheduledTaskProperties.dll
- Calendar.Schedules.dll
- Microsoft.BizTalk.CommonSettings.dll
- Microsoft.BizTalk.SqmFramework.dll
- ScheduledTaskAdapter.Admin.dll
- ScheduledTaskAdapter.dll
- ScheduledTaskAdapter.TaskComponents.dll
- stdole.dll
The setup will add the following assemblies to the Global Assembly Cache (GAC)
- Biztalk.Adapter.ScheduledTaskProperties.dll
- Calendar.Schedules.dll
- ScheduledTaskAdapter.dll
- ScheduledTaskAdapter.Admin.dll
- ScheduledTaskAdapter.TaskComponents.dll
The setup will add the following registry key:
- HKEY_CLASSES_ROOTCLSID{7A4BDD2A-3063-4f57-A108-DEA05DEB417E}
Post-Installation
Register the Adapter with BizTalk
As it happens with all adapters that we installed on our BizTalk Servers before we can begin to use it we need to register or configure the adapter. To accomplish that we need to:
- Open BizTalk Administration Console
- In the console left tree, expand “BizTalk Server Administration –> BizTalk Group –> Platform Settings” and then “Adapters”
- Right-click on “Adapters” and add a new adapter by selecting the option “New –> Adapter”

- In the “Adapter Properties” window
- Set the name of the adapter: Name = Schedule
- In the adapter combo box, select the option: Schedule
- Set the description of the adapter: “BizTalk Scheduled Task Adapter. The schedule capabilities are similar to those available with the Windows Scheduled Task Service.” (this property is optional but I would suggest to always be filled)

- Note: This configuration requires that you restart the host instance associated with the adapter. At this moment, click “Ok” to continue the configuration process.

- [Optional] By default, the Receive Handler configured for the BizTalk Scheduled Task Adapter will be the default Host configured in the environment, that normally is “BizTalkServerApplication”. We can change this behavior by:
- In the BizTalk Server Administration Console, expand “BizTalk Server Administration”, expand “BizTalk Group”, expand “Platform Settings”, and then expand “Adapters”.
- In the expanded adapter list, right-click the Schedule adapter and then select the option “New –> Receive Handler”

- In the Schedule – Adapter Handle Properties” dialog box, on the General tab, in the Host Name list, select the host with which the adapter handler will be associated. And then click “Ok”

- Again, at this point, a pop-up will appear notifying that this configuration requires that you restart the host instances associated with the adapter. At this moment, click “Ok” to finish the configuration process.

- To finish this configuration process, in the BizTalk Server Administration console tree, expand BizTalk Server Administration, expand the BizTalk group, click Platform Settings, and then click Host Instances.
- In the details pane, select host instance(s) you want to restart, right-click and then click “Restart”.
Using the adapter Context Properties (Optional)
To utilize the Scheduled Task adapter’s context properties within a filter or orchestration the Biztalk.Adapter.ScheduledTaskProperties.dll must be deployed into the BizTalkMgmtDb.
This can be achieved using the Biztalk Deployment Wizard or equivalent tool.
Note: This step is optional; you only need to do this if you want to use Scheduled Task adapter’s context properties within a filter or orchestration.
As previously mentioned, you can deploy Biztalk.Adapter.ScheduledTaskProperties.dll in various ways; I suggest that you do the following steps:
- Open BizTalk Administration Console
- In the console left tree, expand “BizTalk Server Administration –> BizTalk Group” and then “Applications”
- Right-click on “Applications” and add a new application by selecting the option “New –> Application”

- In the “Adapter Properties” window
- Set the name of the application: BizTalk.Global
- Set the description of the application: “Application that contains common resources to several applications” (this property is optional but I would suggest to always be filled)

- Expand the application created previous and select the option “Resources”
- Right-click and add a new BizTalk resource by selecting the option “New –> BizTalk Assemblies…”

- In the “Add Resources” window select “Add…” button and from the installation directory select the DLL “Biztalk.Adapter.ScheduledTaskProperties.dll” (You can find this DLL on the adapter installation folder, by default, C:Program Files (x86)BizTalk ScheduledTask Adapter 6.0)
- And select the options: “Overwrite all”, “Add to the global assembly cache on add resource (gacutil)” and “Add to the global assembly cache on MSI file install (gacutil)”

Author: Sandro Pereira
Sandro Pereira lives in Portugal and works as a consultant at DevScope. In the past years, he has been working on implementing Integration scenarios both on-premises and cloud for various clients, each with different scenarios from a technical point of view, size, and criticality, using Microsoft Azure, Microsoft BizTalk Server and different technologies like AS2, EDI, RosettaNet, SAP, TIBCO etc. He is a regular blogger, international speaker, and technical reviewer of several BizTalk books all focused on Integration. He is also the author of the book “BizTalk Mapping Patterns & Best Practices”. He has been awarded MVP since 2011 for his contributions to the integration community. View all posts by Sandro Pereira

by Sandro Pereira | Mar 4, 2017 | BizTalk Community Blogs via Syndication
Once again, after many requests and many postponements, due to my unavailability and free time to take these tasks, BizTalk Scheduled Task Adapter is finally official available (version 6.0) and optimized for BizTalk Server 2016!

This time is not a simple adapter migration, it actually has new schedule capabilities:
- You can now schedule for a message to be triggered in a time period, for example, each hour, minutes or seconds, every day or on certain days (for example all days except weekends).
And several reported issues were solved, for example:
- In some scenarios, trigger message sent twice at the same time – Solved
- Bug: Time change (DST) bug – Solved
- Bug: BizTalk Scheduled Task Adapter SQL Timeout issue – Solved
You can download this new version of the adapter in BizTalk Scheduled Task Adapter CodePlex project page:
The BizTalk Scheduled Task Adapter is an in-process receive adapter that executes a prescribed task on a daily, weekly or monthly schedule. The adapter is configured entirely within BizTalk, all configurations are stored within the SSODB and can be exported and imported via binding files.
The schedule capabilities are similar to those available with the Windows Scheduled Task Service.
Requirements
The Scheduled Task Adapter v6.0.0 is optimized and designed to be used with BizTalk Server 2016 (Compiled in .NET Framework 4.6).
V6.0.0 Changelog
- Compiled in Visual Studio 2015 and .NET Framework 4.6.
- Optimized for BizTalk Server 2016.
- Support for 32 and 64-bit Host Instances.
- New features
- New Schedule capabilities – Time Schedule running every day or on certain days (for example all days except weekends).
- Bug fixes
- Bug: In some scenarios, trigger message sent twice at the same time – Solved
- Bug: Time change (DST) bug – Solved
- Bug: BizTalk Scheduled Task Adapter SQL Timeout issue – Solved
- Improvements
- Some improvements in Monthly schedules form
- UTC support
Release History
This adapter is available since BizTalk Server 2004.
- Release 6.0: release on March 4, 2017, by Sandro Pereira, this adapter was tested to work on BizTalk Server 2016. Compiled in .NET Framework 4.6
- Release 5.0: release on February 18, 2015, by Sandro Pereira, this adapter was tested to work on BizTalk Server 2013 R2. Compiled in .NET Framework 4.5
- Release 4.0: release on June 12, 2012, by Sandro Pereira, this adapter was tested to work on BizTalk Server 2010. Compiled in .NET Framework 4.0
- Release 3.0: release on Aug 10, 2010, by Greg Forsythe, this adapter was tested to work on BizTalk Server 2009. Compiled in .NET Framework 2.0
- Release 2.0: last release on Apr 20, 2008, by Greg Forsythe, this adapter works with BizTalk Server 2006 and BizTalk Server 2006 R2. Compiled in .NET Framework 2.0
- Release 1.02: last release on Apr 20, 2008, by Greg Forsythe, this adapter works with BizTalk Server 2004, BizTalk Server 2006 and BizTalk Server 2006 R2. Compiled in .NET Framework 1.1
Author: Sandro Pereira
Sandro Pereira lives in Portugal and works as a consultant at DevScope. In the past years, he has been working on implementing Integration scenarios both on-premises and cloud for various clients, each with different scenarios from a technical point of view, size, and criticality, using Microsoft Azure, Microsoft BizTalk Server and different technologies like AS2, EDI, RosettaNet, SAP, TIBCO etc. He is a regular blogger, international speaker, and technical reviewer of several BizTalk books all focused on Integration. He is also the author of the book “BizTalk Mapping Patterns & Best Practices”. He has been awarded MVP since 2011 for his contributions to the integration community. View all posts by Sandro Pereira
by Mark Brimble | Mar 3, 2017 | BizTalk Community Blogs via Syndication
Last week I had to move some databases quickly from one SQL server environment to another. Traditionally you would have built your new SQL servers, backup and restored your databases, user logins and SQL agent jobs and then run some VB scripts from your BizTalk Server to reconnect everything up (https://msdn.microsoft.com/en-us/library/aa547833(v=bts.20).aspx). This article describes another way to do this if you have chosen to use availability groups.
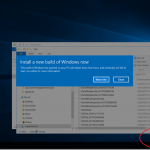
I had built a BizTalk 2016 on premise environment using SQL 2016 Availability groups for two talks that I did at Ignite NZ 2016 and on Integration Monday. I built this before Windows Server 2016 went RTM and had used the latest technical preview that was available at the time. I was preparing to put this into cold storage in case I wanted to demo this again but first I wanted to change to a supported version of Windows server. Windows Server 2016 Standard Technical Preview 5 expires this month and I tried upgrade to Windows Server 2016 but this was not allowed. I began to think about the traditional way of moving databases above but my brain began to hurt when I thought about how I was going to handle the availability groups etc but….then the light bulb went on 

I decided to use SQL Always ON and failover to move my databases to a new server and then retire the old servers.
- I created two new Windows Server 2016 Standard Servers and joined them to the same Windows Failover Cluster that the Windows 2016 Server TTP5 were part of.
- I installed SQL 2016 Developer Edition on these two new servers and installed the same SQL instances that I had on the TTP5 servers.
- I used a SQL service account for all instances and SQL server agents.
- I scripted all the logins and SQL agent jobs from the TTP5 server and applied these to the same instances on the new SQL servers. So now we had a new SQL servers like this without any BizTalk databases.

- On one of the SQL servers I had to open the registry and explicitly set the FQDN instance names for the SQL agents to run. e.g
- I copied all the firewall exclusions for the SQL instances and the SQL instance endpoints to the new servers.

- I created the SQL Endpoint listeners on each instance with a script like this — =============================================
— On both nodes, create an endpoint called AG1_endpoint that listens on TCP port **7022**
— Run this script once on each node. PLEASE DO THIS OR ELSE YO WILL HAVE PAIN.
— =============================================
— Create endpoint on server instance that hosts the primary replica:
CREATE ENDPOINT AGbts16sqlmgt_endpoint
STATE=STARTED
AS TCP (LISTENER_PORT=7023)
FOR DATABASE_MIRRORING (ROLE=ALL)
GO
- On each instance I added the two new replicas and started the synchronization. GOTCHA here: I had to remove one of my failover replicas before doing this because you can only have a maximum of three failover replicas. If you ignore this then all the steps work except you get an error like when you try to failover.

- Finally I failed over to one of the new servers , removed the old TTP5 servers and evicted them from the windows cluster. It was gratifying to see that BizTalk server kept running through out this process.
- I had to add two linked servers so that the “BizTalk Backup’ SQL agent job would run if a failover occurred. If you don’t do this you get “ Could not find server ‘bts16_listenerruntime’ in sys.servers. Verify that the correct server name was specified. If necessary, execute the stored procedure sp_addlinkedserver to add the server to sys.servers.”
select name from sys.servers
EXEC sp_addlinkedserver @server=’bts16_listenerruntime’
EXEC sp_addlinkedserver @server=’bts16_listenertracking’
select name from sys.servers
What I have learnt from this experience is that you can use the Availability groups as a way of moving BizTalk database to new servers without much downtime and fuss. This also shows how one might carry out a DR test.

by Rochelle Saldanha | Mar 3, 2017 | BizTalk Community Blogs via Syndication
Client Relationship is an approach to managing a company’s interaction with current and potential future customers, which tries to analyse data about customers’ history with a company and to improve business relationships with customers, specifically focusing on customer retention.
Building customer relationships is one of the main customer retention strategies you can use to improve customer service and reduce customer churn.
We at BizTalk360 want to learn more about our existing customers, we want to make them feel appreciated. Hence this new initiative – ‘Client Relationship Management’ to look after our customers.

The main idea is to build a rapport with the customer and understand their needs.
We aim to stay close to our customers after they have purchased our product, ensuring they use BizTalk360 to its full capacity and helping them overcome any obstacles that may arise. By maintaining this relationship and close collaboration, we can make BizTalk360 better together.
One of the best comments we received from a customer via support feedback was,
“I am glad that the BizTalk360 support team keep up the pace and put their best efforts to help customers out to resolve their issues. We are not left alone like other integration tool vendors in the market.”
The Client Relationship process has just begun but already we are getting lots of helpful information such as – common customer issues, how the product is being put to use at the customer end, feedback on the existing features and request for new features. We can now direct our efforts at resolving those issues and also maximizing the satisfaction of our customers by giving them what they need. (e.g. one customer required MSMQ monitoring but didn’t know it was available on BizTalk360 until we pointed it out; result – one happy client).
We always try to make communication as seamless as possible, acknowledging, acting on and following up on the feedback where necessary (by discussing with the Technical Team the feasibility of customer requests and issues and providing alternative solutions).
Today’s customers are no longer passive and they want to be listened to.
The key to maintaining a good relationship with our customers is to stay in regular contact. We look after our customers so they stay with us for a long period of time. We have touch points throughout the subscription at regular intervals.
What we are trying to achieve via these sync ups is quite simple –

- We arrange a call with the customer to understand how they are using the product, get real case scenarios of how the customers use the product (which areas of the product they are using) Are they having any issues? If so, we always have a technical member on hand to provide any solutions if possible. We also advise on how the product can be used better.
- We enquire how was their experience dealing with the support, licensing teams of BizTalk360 – so we can improve our interactions and customer support.
- We provide a lot of information regarding company news.
- Inform the customers about our roadmap.
- We are an innovative product company and from time to time we add new products to our repertoire. We take this opportunity to inform our customers of such additions. (ex. recently we launched our new product ServiceBus360).
- We keep them updated with the latest releases and encourage them to upgrade to the latest version. We are currently sending out Webinar invites for the 8.3 release to inform our customers of the new product features.
- We inform our customers of forthcoming events (ex: Integrate 2017).
- We set up another follow up call in the next quarter to discuss any issues to be brought to our attention. In such calls we ensure we keep updated with any changes in client structure and personnel. In many of our calls, the clients were happy to talk and had lots of feedback but due to daily priorities they were unable to approach us. This different approach where we reach out to them now gives them a platform to discuss issues.

In conclusion, BizTalk360 is always innovating; not only the product but also our customer support to enable us to keep our clients happy.
The post BizTalk360’s New Approach To Client Relationship appeared first on BizTalk360.

by Sandro Pereira | Mar 3, 2017 | BizTalk Community Blogs via Syndication
Pop quiz. How many times did you hear “BizTalk is dead”?
- Never.
- Once or twice
- Hundred times.
- I stopped counting…
If you agreed with the last two statements, this post and tool are definitely for you (because BizTalk is alive and well, even better, it has never been so good!). If you agreed with the first two, well, you’re a new kid on block but you’re still on time to learn this amazing platform.
You might have just realized that BizTalk360 is my main sponsor and once again I need to say to BizTalk360 team, THANK YOU! for the incredible work they have done.
I decided to go one-step further and request for more. What better way to this “blog premiere” than to distribute through the magnificent BizTalk Server community some amazing prizes… So, I decided to convince my sponsor to provide me some licenses of their products and good news… I GOT IT!!
The first contest I have 1 FREE PRODUCTION BRONZE LICENSE OF BIZTALK360 to give away, courtesy of BizTalk360.

Contest: “BizTalk360 License”
What do you need to do to participate in this contest?
All you have to do is sign-up for the Free 14 days trial version and activate the license in one or more of your BizTalk Environments (could be dev box, QA or Production)
Closing date: March 31th, 2017.
Terms of participation
What are the rules?
- Once you have activated your trial license, simply email the trial license code to my email address [email protected] with the subject line: “Contest – BizTalk360 License”.
- Along with that information, please provide your first and last name and your country.
Award
One contestant will win:
- 1 FREE PRODUCTION BRONZE LICENSE OF BIZTALK360
The award will be distributed by lottery and the license will be sent to the winner through email by BizTalk360.
Good luck!
PS: If you have never heard about BizTalk360 (possible only if you are a new kid in the BizTalk worldJ) you can glance through the product features here https://www.biztalk360.com/one-platform-biztalk-server/.
Author: Sandro Pereira
Sandro Pereira lives in Portugal and works as a consultant at DevScope. In the past years, he has been working on implementing Integration scenarios both on-premises and cloud for various clients, each with different scenarios from a technical point of view, size, and criticality, using Microsoft Azure, Microsoft BizTalk Server and different technologies like AS2, EDI, RosettaNet, SAP, TIBCO etc. He is a regular blogger, international speaker, and technical reviewer of several BizTalk books all focused on Integration. He is also the author of the book “BizTalk Mapping Patterns & Best Practices”. He has been awarded MVP since 2011 for his contributions to the integration community. View all posts by Sandro Pereira
by Rob Callaway | Mar 2, 2017 | BizTalk Community Blogs via Syndication
A few weeks ago, QuickLearn Training hosted a webinar with an overview of a few of the new features in BizTalk Server 2016. This post serves as a proper write-up of the feature that I shared. In this write-up, I’d like to drill a little deeper into the things that were discussed and even explore some other aspects that we simply didn’t have time for. In my portion of the webinar, I spoke about using the XslCompiledTransform class in maps. If you missed the full webinar, check it out over on the QuickLearn Training YouTube channel. If you prefer you can just watch the section on the XslCompiledTransform class.
There are so many resources comparing these .NET classes against one another that I’m really not sure that there’s anything I can add to the discussion. The best of these resources is the one I cited in the webinar by Anton Lapounov. Simply put, if you put these two classes in a straight-up foot race, the XslCompiledTransform is going to take longer to load, but will blow away the XslTransform class when it comes to the actual time to transform.
Now, if you’ve closely followed the features of other releases you may think this isn’t actually a new feature, and you would be mostly correct. You see, in BizTalk Server 2013 the mapping engine was changed to utilize the XslCompiledTransform class instead of the XslTransform class that the mapping engine had been using since BizTalk Server 2004. While this change was made to reap the performance benefits of the XslCompiledTransform class over the XslTransform class, it was a change that Microsoft made unilaterally to all BizTalk maps compiled for BizTalk Server 2013. While the intention was pure, this change wasn’t universally welcomed by BizTalk developers. There are several great write-ups exploring issues that arose in existing maps when updated (for example this great blog post from Dan Rosanova, or just the Known Issues for BizTalk Server 2013). In case you’re pressed for time and can’t read those, the issues arise from the differences in behavior between the XslCompiledTransform class and the XslTransform class. The specific differences are:
- If an input XML field is empty or contains a false value, the Scripting functoid will treat the input as a true
- The XslCompiledTransform class only supports calling public methods
- The XslCompiledTransform class does not support returning null
- In the XslCompiledTransform class, function overloads are differentiated by number of parameters rather than types
- The XslCompiledTransform class utilizes the XPathArrayIterator type rather than the XPathSelectionIterator type for looping through repeating records within the Scripting Your script must call the MoveNext() method to advance properly
While these five changes may seem relatively trivial, for some people they presented issues that completely broke their maps. There is a registry setting which allows you to tell the mapping engine to use the XslTransform class, but the change is applied globally to all maps and negates the potential performance gains offered by the XslCompiledTransform.
BizTalk Server 2016 now surfaces the option for the transformation class as a UI element. Furthermore, the transformation class isn’t specified globally, but instead we can set it for each map separately. So, any maps I’m upgrading that are negatively affected by the XslCompiledTransform class can target the XslTransform class. This ability to opt-in or opt-out gives us true backward compatibility that was sorely missing in the previous releases.
By default, any new or existing maps that you are upgrading will target the XslTransform class (for backward compatibility), but setting the transform class for the map couldn’t be easier. In your map, if you go to the Properties for the map grid, you will see a new property named Use XSL Transform (the default is True and indicates that the XslTransform class will be used). If you change it to False, the XslCompiledTransform is targeted instead. There is a third option for the property, Undefined. If you choose this option, that map will check the same registry settings used in earlier releases to control the transformation class.
Configuring the Use XSL Transform property
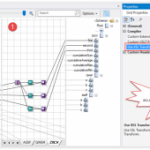
I don’t really want to rehash my test process or results, as you can watch the webinar or download the slides to get all of that. Instead, I wanted to answer a question that was posed in the webinar that I was unprepared to answer. Niyati asked if the increase in performance would have been the same if I were calling the map in an orchestration. This configuration was not part of my initial round of tests, but I cracked open my solution, and created an orchestration so I could definitively show whether it was true or not.
My orchestration has the simplest design possible. It receives the message, runs the map, and sends the transformed message out.
Orchestration used to test the XslCompiledTransform map
I made one of these babies that runs the XslCompiledTransform map, and another that runs the XslTransform map.
I went crazy in my testing and processed 10,000 instances of each orchestration using my batch file submission method. I’m not going to write a full-blown analysis of the results because I think the numbers speak for themselves.
The XslCompiledTransform class once again executed much faster
I had a lot of fun exploring transformation classes in preparation for this webinar and I really look forward to the next one. Please be on the lookout for details on that webinar in the coming weeks.
If you need to learn more about measuring and analyzing BizTalk Server performance, tuning performance, or controlling the throttling behaviors in BizTalk Server you really should check out our BizTalk Server Administrator Deep Dive course.
by Reshma Sultan | Mar 2, 2017 | BizTalk Community Blogs via Syndication
Error handling refers to anticipation, detection, and resolution of programming, application, and communication errors. Specialized programs, called error handlers, are available for some applications. The best programs of this type forestall errors if possible, recover from them when they occur without terminating the application, or (if all else fails) gracefully terminate an affected application and save the error information to a log file.
Programming error is the one that can be prevented mostly. Such an error can occur in syntax or logic. Syntax errors, which are a typographical mistake or improper use of special character, are handled by rigorous proofreading. Logic errors, also called bugs, occur when executed code does not produce the expected or desired result. Logic errors are best handled by meticulous program debugging. This can be an ongoing process that involves, in addition to the traditional debugging routine, beta testing prior to official release and customer feedback after release.
Error Handling in Web API
ASP.Net Web API is a lightweight framework from Microsoft that can be used for building stateless RESTful services that run on HTTP. Exceptions are errors that occur at runtime, and exception handling is the technique of handling runtime errors in your application code. You should have a good idea of how you can handle exception in Web API and send out appropriate error codes and error messages from your Web API controller methods.
Creating a Web API project:
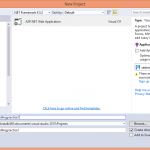
- Start Visual Studio ->File Menu -> Select New Project.
- Select Installed Templates -> expand the Visual C# . Under Visual C# select Web. In the list of project templates, selectNET Web Application. Name the project “Errorhandlingpractise1” and click OK.
- In the new ASP.NET Project -> select the Web API Click OK.
- Add folder and code folder for to select Web API check box
- click theView menu -> select Solution Explorer. In Solution Explorer -> right-click the Models folder. From the context menu, select Add then select Class.
MODEL CLASS:
Product class:
- Create a Product class and add the properties, then inherit the interface.
- Check the status code and response.
using System.Net;
using System.Net.Http;
using System.Threading;
using System.Threading.Tasks;
using System.Web.Http;

namespace Errorhandlingpractise1.Models
{
    public class Product : IHttpActionResult
    {
        public int Id { get; set; }
        public string Name { get; set; }
        public string Category { get; set; }
        public decimal Price { get; set; }
        public string ErrorMessage { get; set; }

        public HttpStatusCode StatusCode { get; set; }
        public Product Response { get; set; }

        public Product()
        {

        }

        public Product(HttpStatusCode statusCode, Product response)
        {
            this.StatusCode = statusCode;
            this.Response = response;
        }

        public HttpResponseMessage CreateResponse(HttpStatusCode statusCode, object
                response)

        {
            HttpRequestMessage request = new HttpRequestMessage();
           request.Properties.Add(System.Web.Http.Hosting.HttpPropertyKeys.HttpConfigurationKey,

    new HttpConfiguration());

            HttpResponseMessage httpResponse = request.CreateResponse(statusCode, response);

            return httpResponse;
        }

        public Task<HttpResponseMessage> ExecuteAsync(CancellationToken cancellationToken)
        {
            if (!string.IsNullOrEmpty(this.ErrorMessage))

                return Task.FromResult(CreateResponse(this.StatusCode, this.ErrorMessage));
                return Task.FromResult(CreateResponse(this.StatusCode, this.Response));
        }
    }
}
ADD CONTROLLER:
- In Solution Explorer, right-click the Controllers folder. Select Add and then select Controller.
Note: I have used ASP.NET MVC, ASP is already Familiar with controllers. Web API controllers are similar to MVC controllers, but inherit the API Controller class instead of the controller class.
- Select Web API 2 Controller – Empty. Click Add.
- Add the controller -> Name “Product Controller” and then click Add
- Double click the Product controller and open the file.
DESCRIPTION:
Products are stored in a fixed array in the controller class. The controller defines two methods that return products:
- The GetAllProductsmethod returns the entire list of products as an IEnumerable<Product>
- The GetProductmethod looks up a single product by its Id.
- The GetProduct method Check whether the Id is null or not. If the Id is null, throw the HttpResponseException and return the Id is not found the Httpstatuscode is 404.
- Whether the condition is not null return the product and the Httpstatuscode is 200.
PRODUCT CONTROLLER:
using Errorhandlingpractise1.Models;
using System;
using System.Collections.Generic;
using System.Linq;
using System.Net;
using System.Net.Http;
using System.Threading.Tasks;
using System.Web.Http;

namespace Errorhandlingpractise1.Controllers
{
    public class ProductsController : ApiController
    {
        Product[] products = new Product[]
        {
            new Product { Id = 1, Name = "Toys", Category = "Teady bear", Price = 100 },
            new Product { Id = 2, Name = "Watch", Category = "Fastrack", Price = 35.75M },
            new Product { Id = 3, Name = "Laptop", Category = "Dell", Price = 16.99M }
        };


        public IEnumerable<Product> GetAllProducts()
        {
            return products;
        }

        public Product GetProduct(int id)
        {
            var product = products.FirstOrDefault(p => p.Id == id);
            try
            {

                if (product == null)
                {
                    var resp = new HttpResponseMessage(HttpStatusCode.NotFound)
                    {
                        Content = new StringContent(string.Format("No product with ID = {0}", id)),
                        ReasonPhrase = "Product ID Not Found"
                    };
                    throw new HttpResponseException(resp);

                                    }

                return new Product(HttpStatusCode.OK, product);

            }
            catch (Exception ex)
            {

                var response = new Product(HttpStatusCode.NotFound, product) { ErrorMessage = "Product ID Not Found" };

                return response;
            }
        }
    }
}
Running the application:
What is Postman and how do I use it with Azure?
Postman is a REST Client that runs as an application inside the Chrome browser. It is very useful for interfacing with REST APIs such as those found in Azure. In the Chrome browser navigate to https://chrome.google.com/webstore then search for Postman and it will show as offered by www.getpostman.com. Click the Add to Chrome button to install the application into your browser. Click Add in the dialog displayed to confirm installation.
The Chrome App Launcher will be added to your Desktop and Taskbar. Select the App Launcher and click the Postman icon which will launch the application. You can then type in the various REST calls you wish to make using all the various REST verbs such as GET, POST, PUT etc.
If you wish to use this with Azure you need two pieces of information. Your Subscription ID and also a JWT (JSON Web Token which is an authorization token). The Subscription ID can be found by viewing the portal and browsing Subscriptions or using Get-Azure Subscription. To get the JWT you will need to run the PowerShell code below, making sure to change the adTenant to your tenant. This code is part of code I previously covered in FAQ http://windowsitpro.com/azure/communicate-azure-rest-powershell.
Conclusion:
ASP.Net Web API is a lightweight framework from Microsoft that can be used for building stateless RESTful services that run on HTTP, ASP.NET Web API supports fully functional exception handling to handle runtime errors,
We can use HttpResponseException when the possibility of exception is known by us. In the above example, we have thrown exception using HttpResponseException class as we know there is a chance to employee not found in the database, in this case it makes sense to return a HttpNotFound 404 status instead of the regular 200 code. Exceptions are errors that occur at runtime, and exception handling is the technique of handling runtime errors in your application code. We can handle the exception in Web API and send out appropriate error codes and error messages from your Web API controller methods.


