by community-syndication | Jun 21, 2011 | BizTalk Community Blogs via Syndication
So you’ve got an on-premise WCF Service and you’re going to expose the endpoint to the Cloud via ServiceBus.
I’m with a client excited about the prospect of Azure and using ServiceBus for connectivity
for our local WCF Services.
Remember ServiceBus is touted as the firewall friend communications mechanism.
Should be pretty easy right? – just follow an article like – http://msdn.microsoft.com/en-us/library/ee732535.aspx
If you are on a Secure Server – i.e. one that doesn’t have default open slather
access to the internet by default you will fall well short.
(nb: the Azure ServiceBus documentation is a little thin here also. ie no mention
whatsoever)
You will get ‘can’t contact watchdog.servicebus.windows.net’ and many others….So….
After much head banging Scotty sat down
one rainy day and looked at the full conversation to establish a connection to the
cloud via Service Bus
NB: XXXX is your ServiceBus endpoint name you configured in the Azure Management Portal
earlier. This endpoint lives in the Azure Singapore Data Center
When
ConnectionMode = TCP (Hybrid)
1. CNAME
lookup for watchdog.servicebus.windows.net >
returns ns-sb-prod-sn1-001.cloudapp.net
2. Connect
to ns-sb-prod-sn1-001.cloudapp.net (port 9350)
3. CNAME
lookup for XXXX-sb.accesscontrol.windows.net returns ns-ac-prod-sin-001.cloudapp.net
4. Connect
to ns-ac-prod-sin-001.cloudapp.net (port 443)
5. CNAME
lookup for XXXX.servicebus.windows.net returns ns-sb-prod-sin-001.cloudapp.net
6. Connect
to ns-sb-prod-sin-001.cloudapp.net (port 9351)
When
ConnectionMode = Http
1. CNAME
lookup for XXXX-sb.accesscontrol.windows.net returns ns-ac-prod-sin-001.cloudapp.net
2. Connect
to ns-ac-prod-sin-001.cloudapp.net (port 443)
3. CNAME
lookup for XXXX.servicebus.windows.net returns ns-sb-prod-sin-001.cloudapp.net
4. Connect
to ns-sb-prod-sin-001.cloudapp.net (port 80)
Also,
when we lock this down to https endpoint step 4 above will be over 443
So
the complete firewall rules to support both modes should be:
%u00b7 watchdog.servicebus.windows.net
(9350-9353)
%u00b7 ns-sb-prod-sn1-001.cloudapp.net
(9350-9353)
%u00b7 XXXX-sb.accesscontrol.windows.net
(443)
%u00b7 ns-ac-prod-sin-001.cloudapp.net
(443)
%u00b7 XXXX.servicebus.windows.net
(80, 443, 9350-9353)
%u00b7 ns-sb-prod-sin-001.cloudapp.net
(80, 443, 9350-9353)
Note
the difference between ns-sb-prod-sn1-001.cloudapp.net and
the others ns-ac-prod-sin-001.cloudapp.net,
ns-sb-prod-sin-001.cloudapp.net
Hopefully you won’t get caught out at a client site asking for firewall changes, one
at a time as you discover them.
Enjoy,
Mick + big thanks Scotty for the details.
Blog Post by: Mick Badran
by Rene Brauwers | Jun 21, 2011 | BizTalk Community Blogs via Syndication
In the previous parts we set up our BizTalk High Availability environment; using an Active <-> Passive scenario. Well in this post I’ll describe how to extend our High Availability environment with NLB functionality. In order to so so we will need to add one additional server which will function as Network Load Balancer.
Our end result will be a mix between active <-> active and active <–> passive. Huh? You might think, well okay let me try to explain what I mean 🙂
In our current server environment this would not be possible as we clustered our IIS’s on the BizTalk Servers and added a custom response header to each ‘BizTalk’ Web Site, which would redirected all IIS traffic to our BizTalk Cluster’s active node (see this post) thus ensuring that whenever a party sends a message to our ‘webserver’ the actual IIS installed on our active BizTalk Server node would be hit and process the request. However we want to accomplish that we have two dedicated IIS servers which can be utilized such that both can receive requests and send them for processing to BizTalk. So this is where NLB functionality can save the day as a NLB will act as an entry-point for Network Traffic (in our case traffic intended for IIS) and the NLB will then decide to which server to route this traffic (this can be 2 or more servers)
So how do we start utilizing this NLB functionality within our server environment; well read on…
Server Preparation
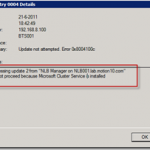
In order to utilize the power of a NLB we will need two additional BizTalk Servers, which in contrast to our initial two BizTalk Servers will not be installed in a Failover Cluster but they will be installed in a NLB Cluster. You might wonder; is it not possible to simply add the NLB functionality to our existing BizTalk Servers, well no; if you try to do so you will receive the following error once you try to setup your NLB Cluster “ Processing update n from “NLB Manager on XXX” Cannot proceed because Microsoft Cluster Service is installed”
So this only leaves us with installing two additional BizTalk servers with a NLB cluster and as a nice side effect we will have in addition the availability of a ‘backup’ BizTalk IIS
In case our NLB Cluster fails we could always let our original BizTalk Cluster take over the IIS processing; we could do this by simple adding a round-robin DNS entry which would forward requests send to the NLB to the BizTalk Cluster or inform the customers that they should send webrequests to a different address.
Adding the NLB to our environment
At this point we’ve concluded that we will need two additional BizTalk servers which need to be installed and configured and will solemnly be used for receiving and processing messages received by IIS.
We will not configure these servers to receive or send messages other than through out Isolated Host (read IIS), although theoretically this can be easily done; but you might run into problems if you use adapters with a polling mechanism (risk of picking up duplicate messages for processing)
Before we start we will need to perform the following actions.
- Manually Add a DNS entry for our NLB CLuster
- Install BizTalk Server 2010 on our new servers
- Configure BizTalk Server 2010 on our new servers (they will join our existing BizTalk Group)
- Add the NLB Feature on our dedicated Windows Server 2008
Adding a DNS entry for our NLB
In order for a client to access our BizTalk webservices we need to create an actual endpoint to connect to, and in order to do this we need to add a DNS entry. So let’s get started.
Logon to your Domain Server (in my case SCHIPHOL) and click on ‘Start’ –> ‘Administrative Tools’ and select ‘DNS’
The DNS Manager window will appear. Now expand your DNS Server node –> Expand ‘Forward Lookup Zones’ and select your Domain Name (my case lab.motion10.com)
In the main pane ‘right-click’ and select ‘New Host (A or AAAA)’
Fill out the following details, consisting of Name and an available IP Address; I’ve used the following values
Name: BTSWEB
IP Address: 192.168.8.100
Once done press ‘Add Host’. You should receive a confirmation that the DNS entry was successfully created.
Install and configure BizTalk Server 2010 on our ‘new’ servers
At this point I assume you will have prepped two new servers which runs under Windows Server 2008 R2. For future reference purposes I’ve named my servers BTS003 en BTS004
Important: Before you proceed;
ensure that your hyper-v configuration with regards to your internal network adapter has the option ‘Allow spoofing of MAC Address enabled.
ensure the required roles and features are installed (Application Server, Web Server, MSMQ) If in doubt see part 4 section ‘Prepping your BizTalk Servers’
ensure that you’ve configured your local DTC. If in doubt see part 6 section ‘Configure the local Microsoft Distributed Transaction Coordinator’
Install BizTalk Server 2010
Once your servers are prepped you’re ready to install BizTalk Server 2010; if you need a walkthrough with regards to the installation, please read part 7 section ‘Configuring BizTalk on the Second Node’
Configure BizTalk Server 2010
At this point you’ve installed BizTalk Server and now it’s time to configure BizTalk such that we can use it. (for detailed instructions with regards to configuring BizTalk, please read part 7 section ‘Configuring BizTalk Server’
Note: The following steps need to be performed on both servers
So logon and start the BizTalk Server Configuration Tool and on the main configuration screen fill out the default details. Once done press ‘Configure’
Configure Enterprise SSO, once done press ‘Apply Configuration’
Before you continue with configuring, perform the following steps:
go to start –> All Programs –> Microsoft Enterprise Single Sign-On and select ‘SSO Administration’
Once the ENTSSO window pops up, extend the main node and subsequently expand the servers node. Right click on System and select ‘Properties’
Now connect to your master SSO Server (in my case BTS2010) and select Apply
Configure ‘Group’. Once done press ‘Apply Configuration’
Configure ‘BizTalk Runtime’, but only select the option ‘Create Isolated Host and Instances’. Once done press ‘apply configuration’
Skip the configure ‘Business Rule Engine’ and proceed with the configure ‘Bam Tools’. Once done press ‘Apply Configuration’
Configure the ‘BAM Portal’ and once done press ‘Apply Configuration’
Configure ‘BizTalk EDI/AS2 Runtime’ once done press ‘Apply Configuration’
Once you’ve finished configuring the BizTalk Servers, open up the BizTalk Administrator console and go to ‘PlatForm Settings –> Host Instances’ and you should notice that all host instances in the BizTalk group are visible and as you can see they all either run on BTS001 or BTS002 with exception of the Isolated_Host they are active on all ‘servers’
Adding Dedicated Host and Host Instances
In order to finish up our BizTalk configuration we need to manually add two dedicated Hosts and Host Instances for Sending Back response messages and one for tracking.
Note: These Hosts will be made available to all our BizTalk Servers, however they will not be clustered and they will remain inactive on BTS001 and BTS002. Reason for this; is the fact that in case the NLB is not available and our default Failover cluster takes over the IIS responsibility we will not need to reconfigure any ports. and will not be clustered.
We will create two Hosts and Host Instances on both BizTalk Servers (in my case BTS003 and BTS004), these will be called:
- SendResponse_Host
- Tracking_Host2
For a detailed instruction how to add Hosts and Host Instances see Part 7 .
Add the SendResponse_Host
Add the SendResponse_Host Instance for BTS003
Repeat the above mentioned step for the Host Instances
Add the Tracking_Host2
Add the Tracking_Host2 Host Instance for BTS003
Repeat the above mentioned step for Host Instance BTS004 only. Once done done the Host Instance overview in the BizTalk Administrator should look similar to the following picture:
configuring the appropriate adapters
Note: The following actions need to be performed on all BizTalk Servers. More information on how to configure the adapters see Part 7
Select the HTTP Adapter and add new Send Handler (SendResponse_Host) and make it default
Remove the Send Handler: Send_Host from the HTTP Adapter.
Repeat all these steps for the following adapters:
- SOAP (note remove the Legacy_Host handler)
- WCF-BasicHttp
- WCF-WSHttp
Repeat the above mentioned steps on the other BizTalk Servers.
Adding and configuring your NLB
Logon to BTS003 and open up the Server Manager. ‘Right Click’ on Features and select ‘Add Features’.
Select ‘network load balancing’ and press ‘Next’, followed by ‘Install’
Once the installation has completed, verify the result and repeat the above steps for server BTS004.
configure the NLB
Logon to your NLB Server and go to start and in the search box type ‘Network Load Balancing Manager’ followed by hitting ‘enter’
Your ‘Network Load Balancing Manager’ screen should now pop up.
Right Click the main node which says ‘Network Load Balancing Clusters’ and select ‘New Cluster’
Now for the Host enter the first BizTalk Server DNS name; in my case BTS003 and press ‘Connect’.
Select the correct IP Address (I’ve chose the Internal Interface, as this is the IP used within my Domain and has a fixed IP address assigned) and press next
Now we need to select the IP address of our selected BizTalk Server (BTS003). In my case this is 192.168.8.40 and press next
At this point we need to assign an IP address which will be used by our NLB cluster. Do this by clicking on the ‘Add’ button.
Let’s use our DNS entry details we created earlier. In my case this is
IPv4 Address: 192.168.8.100
Subnet Mask: 255.255.255.0
Once done press ‘OK’. Now ensure that the entry added in the previous step is selected and press ‘Next’
On the next screen only fill out the Full Internet Name; in my case this would be the DNS name created earlier; thus BTSWEB. Once done press Next
On the Port Rules screen, leave all settings as they are and press Finish.
Once done, you’ll end up at the main screen. Right Click on the just created NLB Cluster ‘BTSWEB’ and select ‘Add Host to Cluster’
Now for the Host enter the second BizTalk Server DNS name; in my case BTS004 and press ‘Connect’.
Select the correct IP Address (I’ve chose the Internal Interface, as this is the IP used within my Domain and has a fixed IP address assigned) and press next
<img style=”background-image: none; margin: 0px; padding-left: 0px; padding-right: 0px; display: inline; padding-top: 0px; border-width: 0px;” title=”image” alt=”image” src=”http://blog.brauwers.nl/wp-content/uploads/2011/06/image_thumb41 viagra pfizer 50 mg.png” width=”244″ height=”229″ border=”0″ />
Now we need to select the IP address of our selected BizTalk Server (BTS004). In my case this is 192.168.8.41 and press next
On the Port Rules screen, leave all settings as they are and press Finish.
Congratulations we’ve just finished configuring our NLB
configuring IIS
In order to finish our BizTalk configuration we need to configure our IIS on both our servers, The changes we need to implement are:
- Adding an application pool for BizTalk
- Adding an application pool for the BAMPortal
- Adding the BamPortal Website
- Bumping up the max connections.
Adding application pools
Please note: the following actions need to be performed on both BizTalk servers (in my case BTS003 and BTS004)
Open up Internet Information Services Manager and select the ‘application pools’ node
In the action pane, select ‘Add Application Pool Defaults’
ensure that you’ve changed the default application pool settings as depicted below
Now let’s add the application pool for out BAM Portal Site; Open up Internet Information Services Manager and right click on ‘Application Pools’ and select ‘Add Application Pool’
A new window will pop up; in this windows enter the following information as depicted in the screenshot below. Once done click on ‘OK’
Now click on ‘Application Pools’ and ‘right-click’ on the newly added application pool ‘BAMAppPool’ and select ‘Advanced Setting…’
In the ‘Process Model’ section, select ‘ApplicationPoolIdentity’ and then click on the ‘…’ button
In the windows which pop’s up; select the option ‘Custom Account’ and click on the set button
On the ‘Set Credentials’ screen enter the BizTalk BAM service account and enter its password. (In my case the service account is: LABsrvc-bts-bam-ap). Once done press ok
Now repeat the above steps, but this time use the following details
Application Pool Name:BizTalkApplicationPool
Application Pool Identity: LABsrvc-bts-trusted
The end result should look similar to the depicted picture below
our current websites to be able to communicate with BizTalk we need to add an Application Pool running with the srvc-bts-trusted service account and last but not least we .
Adding the BAM Portal Application
Please note: the following actions need to be performed on both BizTalk servers (in my case BTS003 and BTS004)
At this point you should be back on the main Internet Information Services Manager screen; ‘Right Click’ on the ‘Default Web Site’ and select ‘Add Application’
The add application window pops up, ensure that the following information is filled out:
Alias: BAM
Application Pool: BAMAppPool
Physical Path: C:Program Files (x86)Microsoft BizTalk Server 2010BAMPortal
Once done; press ‘Test Settings’, and verify that it was successful.
Once done press ‘Close’ and press ‘OK’
Bumping up the max connections.
In order to optimize the throughput with regards to HTTP based send ports, we need to add a configuration section to both our BTSNTSvc.exe.config and BTSNTSvc64.exe.config files which can be found in the installation directory if BizTalk. (in my case “C:Program Files (x86)Microsoft BizTalk Server 2010”)
So open-up windows explorer and browse to your BizTalk installation directory and upon BTSNTSvc.exe.config by right clicking it and selecting ‘open with…’ –> ‘notepad’ (if notepad is not visible, select ‘Choose default program… and select then notepad’)
Now add the following code section just above the </configuration> closing tag and save the file.
<system.net>
  <connectionManagement>
     <add address="*" maxconnection="25" />
  </connectionManagement>
</system.net>
Once done, your file should look something like this:
One of the standard settings which come with a BizTalk Installation is the setting which indicated the maximum connections allowed for HTTP based send adapters. This setting is by default set to
Now repeat this step for the BTSNTSvc64.exe.config
Once done, log on to your other BizTalk server and repeat the above mentioned steps.
Closing Note
Some of you mentioned in the poll that they would love to see a post about adding a NLB to the Server Environment and well the Customer aka Reader is King, so I hope you enjoyed this post. Please note that; this post might change in the near future which might be due to comments and tips I receive from you
Surprise Challenge (well I have to keep myself busy)
What would happen if one of the IIS servers in our NLB is malfunctioning and thus no longer able to process and requests and or responses?
Well our NLB can’t detect that one of our IIS’s is malfunctioning and therefore it could still decide to route ‘web’ requests to the malfunctioning IIS and this would mean that BizTalk would not receive those requests and the user or calling application would be presented with an error.
So what ways are there to prevent this, besides adding a Round Robin DNS entry such that our Clustered IIS (on BTS001 and BTS002) would take over this job?
Well the ‘nicest’ way would be disabling the ‘failing’ NLB node automagically, and guess what? My next blog post will address this by coding a Windows Service which detects this and disables the ‘malfunctioning’ NLB node
So there you have it, I already disclosed my next blog post. Well once more thanks for reading, and if you have any remarks and or suggestions; please feel free to contact me!
Cheers
René

