by community-syndication | Jul 22, 2010 | BizTalk Community Blogs via Syndication
Proxy configuration for BizTalk has always been fairly straight forward. Go to the send point and click the “Configure” button then select the “Proxy” tab. Couldn’t be much easier.
A recent case pointed out what happens when the “Do not use proxy” option is selected. It turns out there is a hierarchy to the proxy assignment.
| 1 |
Send Port |
| 2 |
BizTalk App Config |
| 3 |
Machine Config |
| 4 |
local IE user setting |
Selecting “Do not use proxy” from the send port does not mean no proxy will be assigned. Some messages were getting a proxy assignment and other were not. This can be caused by logging into the BizTalk box using the account running the BizTalk host. The local box assigns the IE proxy settings to this user. Now one BizTalk box could be different than the others. Not only will the proxy settings be picked up, but also the IE “Automatically detect settings” configuration is also picked up. This can adversely impact BizTalk processing.
The solution is simple. Don’t leave proxy settings to default. Set the BizTalk app config to the appropriate settings. Here are a couple of links to deal with these issues.
http://support.microsoft.com/default.aspx?scid=kb;EN-US;968699 auto detect issue
http://msdn.microsoft.com/en-us/library/kd3cf2ex.aspx Configuring the default proxy settings

by community-syndication | Jul 21, 2010 | BizTalk Community Blogs via Syndication
Introduction A couple days ago I was working on creating some msbuild scripts for building my BizTalk solutions. I am not particularly knowledgeable about the way this is usually done. I checked out my friend (and fellow MVP)Michael Stephenson’s CodePlex project, the BizTalk MsBuild Generator at http://biztalkmsbuildtool.codeplex.com/. This tool is really helpful for getting […]
by community-syndication | Jul 21, 2010 | BizTalk Community Blogs via Syndication
by community-syndication | Jul 21, 2010 | BizTalk Community Blogs via Syndication
I was working with a customer recently where they do not want to install SSIS on the SQL Server hosting BizTalk databases, instead the requirement was to have a separate server dedicated to SSIS which will run the BAM packages. At the first instinct, it seemed like that this is not possible and we need to have SSIS on the SQL Server otherwise we cannot deploy any BAM package using bm.exe. While working on it, we figured out that it is not mandatory to have SSIS on the same SQL Server hosting BizTalk databases and we figured out some more pieces of it. So I thought this blog post will help if you are not aware of it.
Basically, when we deploy a BAM Activity, it creates the packages at the following location:
1. Data Maintenance(DM) packages are stored on the BAM Archive Database server.
2. Analysis(AN) packages are stored on the BAM Star Schema Database server.
bm.exe also needs a few components from SSIS management API’s to create BAM packages, therefore the servers from where you deploy (typically it will be BizTalk Server) also need to install them. You can go through the following posts if you are interested to find out what is the minimum requirement for the server from where you run bm.exe: http://blogs.msdn.com/joscot/archive/2009/05/25/do-i-need-to-install-ssis-on-my-biztalk-server-to-configure-and-use-bam-no.aspx and http://blogs.msdn.com/joscot/archive/2009/08/04/an-update-to-bam-ssis-pre-requisites.aspx
So now the question is where the SSIS package will be deployed if you do not have the SSIS installed on the SQL server (star schema, archive). These SSIS packages are stored in the MSDB database. If you are interested to know where it will be stored if you are running a named instance of SQL, I will recommend to go through another blog post by John Scott: http://blogs.msdn.com/b/joscot/archive/2009/05/25/do-i-need-to-install-ssis-on-my-biztalk-server-to-configure-and-use-bam-no.aspx
Now, you have got the SSIS packages stored in the MSDB database of SQL Server (star schema, archive). You can now remotely run these packages from another server which have got SSIS installed on it. A SSIS package runs on the same computer which starts the package. If a remote package is directly run from a local computer, the package will load and run from the local computer itself. As long as we have the right permissions, the packages should be able to run from anywhere. Considering these, SSIS must be installed on the server from where you plan to run these packages. You can go through http://blogs.msdn.com/b/michen/archive/2006/08/11/package-exec-location.aspx for more details on it.
We can now say that it is not mandatory to have SSIS on the SQL Server hosting BizTalk Databases and it is very much possible to have a dedicated SSIS Server to run these packages. Thanks to Rajat for providing me the information!
Atin Agarwal

by community-syndication | Jul 21, 2010 | BizTalk Community Blogs via Syndication
A couple of weeks ago I ran across a very interesting tool called Feature Builder. As I watched the videos about this tool I realized that it represented an opportunity to deliver Hands on Labs (along with other interesting things) directly inside of Visual Studio.
If you have done some of our labs from the Visual Studio 2010 Training Kit then you are familiar with the way we have done labs in the past. So to get started with Feature Builder I decided to update the Introduction to WF4 lab from the training kit and put the content into a VSIX package that you can download from Visual Studio Gallery and install directly in Visual Studio.
At this point, this is an experiment – I hope you like it. Let me know what you think.
Watch endpoint.tv – Lab Introduction to WF4: Getting Started
Exercises
Exercises
This Lab consists of the following exercises. You can jump to any exercise in the lab at any time. Just create a new project from the project template for the lab exercise
- Exercise 1 – Hello Workflow (video)
- Exercise 2 – Refactoring Workflow
- Exercise 3 – The CodeActivity
- Exercise 4 – Dynamic Workflows with XAML
- Exercise 5 – Testing Activities
- Exercise 6 – WorkflowApplication
- Exercise 7 – If/Else Logic
Download
Intro To WF4 Hands On Lab (Visual Studio Gallery)
Intro To WF4 Hands On Lab (MSDN Code Gallery)
by community-syndication | Jul 21, 2010 | BizTalk Community Blogs via Syndication
Using Ninject and Dependency Injection to enhance your ASP.Net MVC application’s Multi-Tenant Application.
by community-syndication | Jul 20, 2010 | BizTalk Community Blogs via Syndication
Hey folks,
As we’re all aware there’s more than one road that leads to Rome when dealing with
integration. When to use SSIS? For what? What about MSMQ? AppFabric and BizTalk etc.
At TechEd this year I’ve decided to run some preconference training dealing
with this exact issue across many different Microsoft Integration Technologies.
(This is one of the biggest questions I get from customers)
If you’re heading to the Gold Coast this year, then this training
is before TechEd – get up a couple of days early and then be fully
charged and armed with all your questions.
—- here’s the official blurb—-
When to use what Technologies Where [LINK
is Here]
AppFabric,
Azure Storage, BizTalk 2010, BizTalk Adapter Pack, WCF, WF, Oslo, MSMQ, .NET4 Distributed
Caching, SQL Service Broker, SSIS and SharePoint 2010 Service Applications…to name
a few technologies to be confused about.
There
is no silver bullet for application integration. Different situations call for different
solutions, each targeting a particular kind of problem. While a one-size-fits-all
solution would be nice, the inherent diversity of integration challenges makes such
a simplistic approach impossible. To address this broad set of problems, Microsoft
has created several different integration technologies, each targeting a particular
group of scenarios.
Together,
these technologies provide a comprehensive, unified, and complete integration solution.
Come
on a 2-day adventure examining each of these technologies and reviewing the When,
Why’s and How’s on each, with their own distinct role to play with integrating applications.
When you come through the other side you’ll be able to slot each of these technologies
into a *practical* use.
This
developer workshop is based on real world examples, real world problems and real world
solutions.
Join
me and be prepared to roll up your sleeves and unravel the maze that awaits….
TECHED
LINK
by community-syndication | Jul 20, 2010 | BizTalk Community Blogs via Syndication
When installing the 64 bits version of the BizTalk LOB Adapter Pack, you may experience that the bindings (sqlBindings, SAPBinding etc…) do not show in the Binding Type drop down list when using a WCF-Custom Transport Type.
MSDN explains that the installation package only updates the 64 bit version of the machine.config. But the administration console runs in a 32 bits process and will not pick-up the installed binding types.
The solution is:
Up to BizTalk 2009 and the .Net Framework 3.5: Install both the 32-bit and 64-bit versions of the BizTalk Adapter Pack on top of the 64-bit WCF LOB Adapter SDK installation. Note that only the 64-bit version of the SDK must be installed. This way, both machine.config (32 and 64 bits) will be updated.
From the 4.0 version of the adapter pack compatible for BizTalk 2010, this is not enough. Since the 32-bit version of the Adapter Pack only update the machine.config of the .Net 2.0 version, you must edit yourself the 32bit version of the .Net 4.0 machine.config file (C:\Windows\Microsoft.NET\Framework\v4.0.30319\Config). Refer to To register the adapter binding for the “how to”. Then everything will work fine!
This might get fixed in the RTM version of the .Net 4.0 version of the adapter pack.
Vincent Rouet, CODit
by community-syndication | Jul 20, 2010 | BizTalk Community Blogs via Syndication
Last month I blogged about the VS 2010 Productivity Power Tools Extensions – a free set of Visual Studio 2010 extensions that provide some really nice additional functionality.
The initial Visual Studio Productivity Power Tools release included a bunch of really useful productivity enhancements – including a much faster “Add Reference” dialog, lots of code editor additions and enhancements, and some nice IDE improvements around document tab management. You can learn more about these features in my previous blog post.
VS 2010 Productivity Power Tools Update
Yesterday we shipped an update to the VS 2010 Productivity Power Tools which adds some nice new features and enhancements.
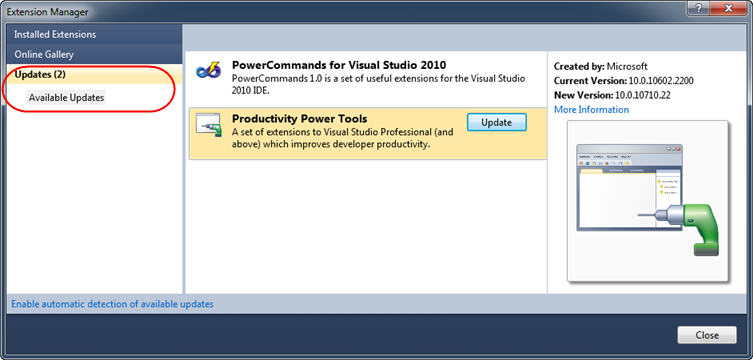
If you already have the VS 2010 Productivity Power Tools installed, you can update it to the latest release by choosing Visual Studio’s “Tools->Extension Manager” menu command. This will bring up the VS 2010 Extension Manager – which allows you to browse and download new extensions. If you click the “Updates” tab on the left-hand side of the dialog it also allows you to see any updates that are available for extensions you already have installed within your IDE.
Simply click the “Update” button for the Productivity Power Tools extension and it will download and install an update for it:
If you don’t already have the VS 2010 Productivity Power Tools installed, you can download and install it here.
Sean has a nice blog post that describes all of this week’s productivity power tool updates and additions. Below are a few of the highlights:
Tools Options Support
The top feature request with the productivity power tools has been to have the ability to turn on/off individual features and extensions it provides.
With last month’s release you couldn’t easily turn individual features on and off. Starting with this week’s update you can use Tools->Options within VS 2010, and use a new Productivity Power Tools section to easily enable/disable each feature individually:

In addition to enabling/disabling individual features, you can also tweak/edit their settings (including color schemes and behavior).
Solution Navigator
Solution Navigator is a new VS 2010 tool window provided with this week’s update. It acts like an enhanced Solution Explorer. It merges functionality from Solution Explorer, Class View, Object Browser, Call Hierarchy, Navigate To, and Find Symbol References all into one tool window – and is pretty darn cool. Here are just two scenarios of how you can take advantage of it:
File + Class Explorer in One
You can use the “Solution Navigator” to browse your project just like you would with the standard “Solution Explorer” tool window today. Except instead of ending with only file sub-nodes, you can now expand them to see classes as well as individual methods and members within them. Clicking on one of the sub-nodes will navigate you immediately to the appropriate code block within the code editor.
For example, below we’ve expanded the \Controllers folder within an ASP.NET MVC project and drilled into the AccountController.cs file – which has a AccountController class within it. We can now drill into that class within the “Solution Navigator” to see a listing of all of its members – and double-click any of them to jump to it within the code editor:

Filter Solution
You might have noticed the search box that is at the top of the Solution Navigator above. You can search within it to quickly filter your solution view.
For example, below I’ve entered the string “Log” – which causes the “Solution Navigator” to automatically filter to only show those files and members that contain the word “Log” in their names (everything else is hidden within the explorer). Notice below how my filtered views displays a “view template” file named “LogOn.cshtml”, the three “LogXYZ” methods within my AccountController class, the LogOnModel class within the AccountModels.cs file, and several tests within my test project whose names contain Log:

You can double click any of the filtered files or members to immediately navigate to it within the code editor.
Quick Access
Quick Access is a new VS 2010 tool window that allows you to quickly search for and execute common tasks within the IDE. Ever wondered where a particular menu command is located? Or ever struggled to find a specific option within the Tools->Options dialog? Just enter it within Quick Access and it will help you locate it:

Clicking any of the items within the list will execute the command, or take you to the appropriate place in the IDE where it lives (in the case of Tools->Options settings):

Above I searched for “format” and brought up all the tools->options format settings. Clicking the “Text Editor->C#->Formatting->New Lines” item within the list opens up the Tools-Options dialog to that exact option location.
Summary
I’ve only touched on a few of the improvements with this week’s update. Read Sean’s blog post for even more details on the updates and improvements.
If you haven’t installed the free VS 2010 Productivity Power Tools, I highly recommend doing so – I think you’ll find some useful extensions that you’ll like. If you already have last month’s release installed, you can easily update it to this week’s release to take advantage of even more cool features – as well as benefit from bug fixes and performance improvements.
Hope this helps,
Scott
P.S. In addition to blogging, I am also now using Twitter for quick updates and to share links. Follow me at: twitter.com/scottgu
by community-syndication | Jul 19, 2010 | BizTalk Community Blogs via Syndication
In this episode, Windows Workflow Foundation team Program Manager Leon Welicki drops in to show us the team’s guidelines for developing custom activities.


