by community-syndication | Jul 25, 2010 | BizTalk Community Blogs via Syndication
Hi all
I have decided to start up a personal blog as well. I get a few complaints from people
who don’t care about my personal life, and therefore, I will be moving personal blog
entries to my new blog at http://jan.eliasen.dk –
with an RSS feed at http://jan.eliasen.dk/syndication.axd
This blog will NOT change! Well personal blog entries will not appear anymore, but
other than that, I will still be blogging about technological abnormalities, funny
things, strange things, errors, and what not
So, for Jan, the person, go see http://jan.eliasen.dk
Thanks
—
eliasen
by community-syndication | Jul 24, 2010 | BizTalk Community Blogs via Syndication
[Source: http://geekswithblogs.net/EltonStoneman]
In my previous post, Cloud Services and Command-Query Separation: Part 1, I looked at the design of a service bus in the cloud based on Command-Query Separation. In this post, I’ll walk through a sample solution meeting the design, using Amazon Web Services.
Sample Cloud Service Bus Solution
I’ve worked through an implementation of this using Amazon Simple Queue Service and Amazon SimpleDB – it’s on github here: Cloud Service Bus sample solution. I’ll be extending it with the Azure alternatives in a later post.
CloudServiceBus is a VS 2010 solution, split into service, client and shared projects. To get started, you’ll need to sign up for an Amazon Web Services account, sign up for SQS and SimpleDB and set up your Access Identifiers. You’ll need to provide payment details, but trying out the solution won’t cost you anything provided you stay within the free tier (processing fewer than 100,000 messages a month).
Then there’s some one-time setup work to populate your own Access Key, Secret Key and message queue URL into the config files:
- Enter the AWSAccessKey and AWSSecretKey values to all the App.config files;
- Run the Service Provider solution and copy the “listening for messages” URL to the QueueUrl value in the client App.config – something like https://queue.amazonaws.com/[yourAWSid]/Sixeyed-CloudServiceBus-RequestQueue.
Run the solution with F5 and two console windows will load. The service provider is handling two types of message – GetChangedEmployees, which is a query service to retrieve a set of entities, and FlushDataStore which is a command service to empty the data store. The client window loads showing the URL of the public queue where requests are sent, and the URL of the private queue (generated randomly by the client) where this instance is listening for responses:
Type “get -1” in the client to retrieve a (randomly-generated) list of employees changed in the last day. You should see debug messages on the client when the message is sent, then on the server when the message received and the data is stored, then on the client again when the response message is received and the data is pulled:
Enter “get -1” again and the response will be much faster, as the service provider checks the data store and finds the data already there, so saves the time to build and store it. Enter “get -2” and a new set of data is stored and retrieved.
Load up multiple client and server windows and you’ll see the load being shared among servers, and clients receiving the correct responses on their private queues.
Enter “flush” at the end to clear out your SimpleDB store.
Implications
The cloud CQS service bus is a very different pattern from a synchronous on-premise ESB, but for solving the same type of problems the cloud solution has a lot to recommend it. Most appealing is the simplicity with which an access-anywhere solution can be built (the Cloud Service Bus sample took half a day to code and test), and the potential for that simple solution to grow to accommodate huge levels of service.
In my next post I’ll look in more detail at the implications of the cloud solution.
by community-syndication | Jul 24, 2010 | BizTalk Community Blogs via Syndication
[Source: http://geekswithblogs.net/EltonStoneman]
Overview
Cloud services available from Microsoft Azure and Amazon Web Services both offer message queues and data storage, combinations which enable a very simple SOA solution based on Command-Query Separation.
Consumers and service providers communicate through the cloud message queuing service, using a pair of queues. One queue is public, where the service provider listens for request messages which can be sent by any consumer. The second queue is private to a particular consumer, where the consumer listens for responses from the provider:
This is a pattern familiar to the NServiceBus implementation – it is fully asynchronous and is all you need for Command messages – the consumer sends a command request, and continues doing what it does; the provider actions the request and sends a response, which the consumer can act on when its received.
For Query messages, the message pattern is the same, but utilises a separate service for storing and retrieving data. The provider receives a query request message, and as part of actioning it, pushes the requested data into the store. The response message sent to the consumer contains enough detail for the consumer to pull the data from the store:
Important to note that the consumers and service providers are physically as well as logically separated – they can be on completely different networks with no direct link in between. This is also true of the service providers – any number of nodes can subscribe to process messages from any location, and these can be cloud services too. Any component can participate in the solution provided it has Internet access. The implementation of the cloud components can be left abstracted, as a third-party service the actual implementation is not relevant for the design.
Compare this to a typical on-premise service bus implementation, for example using BizTalk with the ESB Toolkit:
Compare the key differences:
- Endpoints – a single request/response endpoint is used for all consumers. The implementation can be scaled, but the design is inherently less scalable than the multiple response endpoints used in a paired-queue service bus;
- Communication patterns – the same pattern is used for all service types, the request passing through the ESB to the providers, and the response passing back through the ESB to the consumers. Large query responses and small command responses share the same infrastructure;
- Locations – although consumers and service providers are logically separated, the components are not physically separated. Consumers need network access to the ESB and the ESB needs network access to the Service Providers – typically all components are on the same domain;
- ESB implementation – being on-premise, the implementation of the bus is part of the design, so the BizTalk infrastructure needs to be accounted for.
A further advantage of the CQS version is the shared data source. It can use a simple lookup key for query responses, built from the request parameters. Long-lived data can remain in the store – when the provider receives a request for data, it can check the store and if already present, all it needs to do is send the key to the consumer. For even lower latency, the key-generation algorithm can be shared so the consumer can determine the data store key for a given request, allowing it to check the data source before sending a request, which could bypass the bus altogether.
The final advantage is the ease of getting started with a cloud service bus solution – in my next post I’ll walk through a sample implementation which is the product of half a day’s effort.

by community-syndication | Jul 23, 2010 | BizTalk Community Blogs via Syndication
Recently I was doing a review of some .NET 3.5 WCF REST code based on the REST Starter Kit to see what it would take to move it to .NET 4.
The more I looked at the code and thought about it deeply I realized that the mechanics of exposing a service over HTTP are not the hard part. What is difficult is to get the semantics of HTTP right. After spending some time reading through the HTTP spec I took a stab at creating the Canonical REST Entity Service
“ca%u00b7non%u00b7i%u00b7cal [ k%u0259 n%u00f3nnik’l ] conforming to general principles: conforming to accepted principles or standard practice’”
What I was after was a set of requirements that I could verify about the way in which a REST Entity Service should behave. Here is what I came up with.
First of all I learned that Canonical is spelled with 1 n and not two as in “Cannonical” [sic] which I used all over the place in this code so sorry.
Watch
Download
Canonical REST Service (MSDN Code Gallery)
Canonical REST Entity Service URI Map
Base URI: http://tempuri.org/Resource where Resource is the name of the REST collection (i.e. Customers, Orders etc.)
Web Formats XML and JSON are supported for all request/response messages
| URI Template |
HTTP Method |
Description |
Status |
Response Content |
Response Contains |
| /{key} |
GET |
Gets a resource by key |
200 |
OK |
Serialized resource |
| |
|
|
304 |
Not Modified |
Empty |
| |
|
|
400 |
Bad Request |
Empty or Serialized error message |
| |
|
|
404 |
Not Found |
Empty |
| /?skip={skip}&take={take} |
GET |
Gets a list of resources starting with skip+1 and returning take |
200 |
OK |
Serialized resources |
| |
|
|
400 |
Bad Request |
Empty or Serialized error message |
| / |
POST |
Adds a resource to the collection |
200 |
OK |
Serialized resource |
| |
|
|
204 |
No Content |
Empty |
| |
|
|
400 |
Bad Request |
Empty or Serialized error message |
| |
|
|
409 |
Conflict |
Empty or Serialized error message |
| /{key} |
PUT |
Adds or Updates a resource identified by {key}. Some services might not allow add with PUT. If you return the updated resource, return 200. If you don’t return 204. |
200 |
OK |
Updated resource |
| |
|
|
204 |
No Content |
Empty |
| |
|
|
400 |
Bad Request |
Empty or Serialized error message |
| |
|
|
404 |
Not Found |
Empty or Serialized error message |
| |
|
|
409 |
Conflict |
Empty or Serialized error message |
| /{key} |
DELETE |
Removes the resource identified by {key}. If you return the resource removed, return 200. If you don’t return 204. |
200 |
OK |
Deleted Resource |
| |
|
|
204 |
No Content |
Empty |
| |
|
|
400 |
Bad Request |
Empty or Serialized error message |
| |
|
|
404 |
Not Found |
Empty or Serialized error message |
| |
|
|
409 |
Conflict |
Empty or Serialized error message |
GET TESTS
GET Spec http://www.w3.org/Protocols/rfc2616/rfc2616-sec9.html
Tests GET /{key}
- GET MUST return a resource given a key if the resource with that key exists
- GET MUST return 400-BadRequest if the key is invalid
- GET MUST return 404-NotFound if the key is not found
- GET MUST return 304-NotModified if Conditional GET conditions are met using If-None-Match
- GET SHOULD return an ETag header
Tests GET /?skip={skip}&take={take}
- GET MUST skip {skip} resources in the collection and return up to {take} resources.
- GET MUST return resources starting with the first one when {skip} is not defined
- GET MUST return zero resources when {skip} is greater than the number of resources in the collection
- GET MUST return 400-BadRequest if {skip} is < 0
- GET MUST return zero or more resources when {take} is not provided
- GET MUST return 400-BadRequest if {take} is < 0
POST TESTS
POST Spec http://www.w3.org/Protocols/rfc2616/rfc2616-sec9.html
Tests POST /
- POST MUST append a valid resource to the resource collection using a server generated key and return 201 – Created with a location header, entity tag and entity body
- POST MUST return 400-Bad Request if the entity is invalid
- POST MUST return 409-Conflict if the entity conflicts with another entity
- POST MUST ignore writes to entity fields the server considers read only
PUT TESTS
PUT Spec http://www.w3.org/Protocols/rfc2616/rfc2616-sec9.html
Tests PUT /{key}
- PUT MUST Update the entity identified by the URI if it exists and return 200-OK with the modified entity and etag header
- PUT MAY Add a new entity using the key provided in the URI and return 201-Created with entity location and etag
- PUT MUST respect the Precondition If-Match
- PUT MUST be Idempotent
- PUT MUST NOT alter the key of the entity so that it does not match the key of the URI
- PUT MUST return 400-BadRequest if the entity is invalid
- PUT MUST return 400-BadRequest if the key is invalid
- PUT MUST ignore writes to entity fields the server considers read only
- PUT MUST return 404-NotFound if the server does not allow new entities to be added with PUT
DELETE TESTS
DELETE Spec http://www.w3.org/Protocols/rfc2616/rfc2616-sec9.html
Tests DELETE /{key}
- DELETE SHOULD delete an entity that exists and return 200-OK with the deleted entity or 204-No Content if the response does not include the entity
- DELETE SHOULD be idempotent
- DELETE SHOULD return with 412-PreconditionFailed if no matching entity for If-Match etag
- DELETE SHOULD succeed if matching entity for If-Match etag
- DELETE SHOULD succeed if wildcard used in If-Match etag
- DELETE SHOULD return 202-Accepted if the request to delete has not been enacted
- DELETE SHOULD return 400-BadRequest if the key is invalid
by community-syndication | Jul 23, 2010 | BizTalk Community Blogs via Syndication
Last week I blogged about the new Entity Framework 4 “code first” development option. The EF “code-first” option enables a pretty sweet code-centric development workflow for working with data. It enables you to:
- Develop without ever having to open a designer or define an XML mapping file
- Define model objects by simply writing “plain old classes” with no base classes required
- Use a “convention over configuration” approach that enables database persistence without explicitly configuring anything
In last week’s blog post I demonstrated how to use the default EF4 mapping conventions to enable database persistence. These default conventions work very well for new applications, and enable you to avoid having to explicitly configure anything in order to map classes to/from a database.
In today’s blog post I’m going to discuss how you can override the default persistence mapping rules, and use whatever custom database schema you want. This is particularly useful for scenarios involving existing databases (whose schema is already defined and potentially can’t be changed) as well as for scenarios where you want your model shape to be different than how you want to persist it within a relational database.
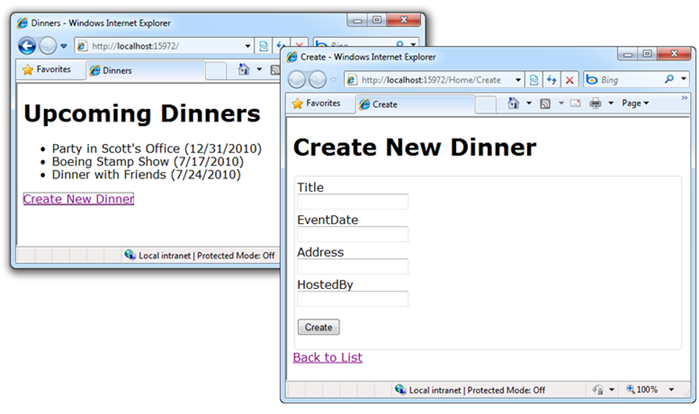
Quick Recap of our NerdDinner Sample
In my blog post last week I walked through building a simple “NerdDinner” application from scratch, and demonstrated the productivity gains EF “code first” delivers when working with data.
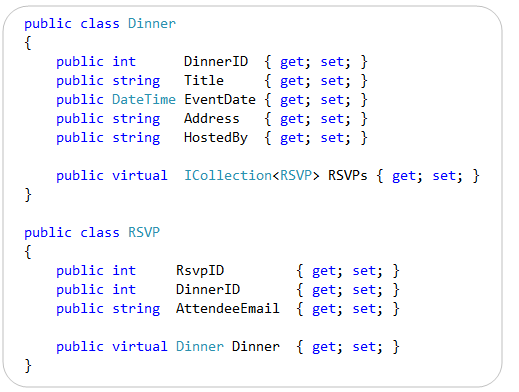
Below are the two model classes we created to represent data within the application. They are “plain old CLR objects” (aka “POCO”) that only expose standard .NET data types:
We then created a “NerdDinners” class to help map these classes to/from a database. “NerdDinners” derives from the DbContext class provided by the EF “code first” library and exposes two public properties:
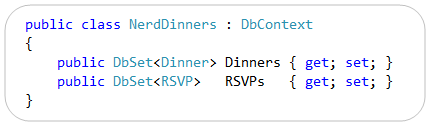
We used the default EF4 “code first” conventions to enable database persistence. This means that the “Dinners” and “RSVPs” properties on our “NerdDinners” class map to tables with the same names within our database. Each property on our “Dinner” and “RSVP” model classes in turn map to columns within the “Dinners” and “RSVPs” tables.
Below is the database schema definition for the “Dinners” table within our database:

Below is the database schema definition for the “RSVPs” table within our database:

We did not have to configure anything in order to get this database persistence mapping with EF4 “code first” – this occurs by default simply by writing the above three classes. No extra configuration is required.
Enabling Custom Database Persistence Mappings with EF4
EF4 “Code First” enables you to optionally override its default database persistence mapping rules, and configure alternative ways to map your classes to a database.
There are a few ways to enable this. One of the easiest approaches is to override the “OnModelCreating” method defined on the DbContext base class:

The OnModelCreating method above will be called the first time our NerdDinners class is used within a running application, and it is passed a “ModelBuilder” object as an argument. The ModelBuilder object can be used to customize the database persistence mapping rules of our model objects. We’ll look at some examples of how to do this below.
EF only calls the “OnModelCreating” method once within a running application – and then automatically caches the ModelBuilder results. This avoids the performance hit of model creation each time a NerdDinners class is instantiated, and means that you don’t have to write any custom caching logic to get great performance within your applications.
Scenario 1: Customize a Table Name
Let’s now look at a few ways we can use the OnModelCreating method to customize the database persistence of our models. We will begin by looking at a pretty common scenario – where we want to map a model class to a database schema whose table names are different than the classes we want to map them to.
For example, let’s assume our database uses a pattern where a “tbl” prefix is appended to the table names. And so instead of a “Dinners” table we have a “tblDinners” table in the database:

We want to still map our clean “Dinners” model class to this “tblDinners” table – and do so without having to decorate it with any data persistence attributes:

We can achieve this custom persistence mapping by overriding the “OnModelCreating” method within our NerdDinners context class, and specify a custom mapping rule within it like so:

The code within our OnModelCreating() method above uses a Fluent API design – which is a style of API design that employs method chaining to create more fluid and readable code. We are using the ModelBuilder object to indicate that we want to map the “Dinner” class to the “tblDinners” table.
And that is all the code we need to write. Now our application will use the “tblDinners” table instead of the “Dinners” table anytime it queries or saves Dinner objects. We did not have to update our Dinner or RSVP model classes at all to achieve this – they will continue to be pure POCO objects with no persistence knowledge.
Trying out the Above Change
If you downloaded the completed NerdDinner sample from my previous blog post, you can modify it to include the above custom OnModelCreating() method and then re-run it to see the custom database persistence in action.
We enabled the automatic database creation/recreation feature within EF “code-only” with the previous blog post. This means that when you re-run the downloaded NerdDinner application immediately after making the above OnModelCreating() code change, you’ll notice that the SQL CE database is updated to have a “tblDinners” table instead of a “Dinners” table. This is because EF detected that our model structure changed, and so re-created the database to match our model structure. It honored our custom OnModelCreating() mapping rule when it updated it – which is why the table is now “tblDinners” instead of “Dinners”.
Several people asked me at the end of my first blog post whether there was a way to avoid having EF auto-create the database for you. I apparently didn’t make it clear enough that the auto-database creation/recreation support is an option you must enable (and doesn’t always happen). You can always explicitly create your database however you want (using code, .sql deployment script, a SQL admin tool, etc) and just point your connection string at it – in which case EF won’t ever modify or create database schema.
I showed the auto-database creation feature in the first blog post mostly because I find it a useful feature to take advantage of in the early stages of a new project. It is definitely not required, and many people will choose to never use it.
Importantly we did not have to change any of the code within the Controllers or Views of our ASP.NET MVC application. Because our “Dinner” class did not change they were completely unaffected by the database persistence change.
Scenario 2: Customize Column/Property Mappings
Let’s now look at another common scenario – one where we want to map a model class to a database schema whose table and column names are different than the classes and properties we want to map them to.
For example, let’s assume our “tblDinners” database table contains columns that are prefixed with “col” – and whose names are also all different than our Dinner class:

We still want to map our clean “Dinners” model class to this “tblDinners” table – and do so without having to decorate it with any data persistence attributes:
We can achieve this custom persistence by updating our “OnModelCreating” method to have a slightly richer mapping rule like so:

The above code uses the same .MapSingleType() and .ToTable() fluent method calls that we used in the previous scenario. The difference is that we are also now specifying some additional column mapping rules to the MapSingleType() method. We are doing this by passing an anonymous object that associates our table column names with the properties on our Dinner class.
The dinner parameter we are specifying with the lambda expression is strongly-typed – which means you get intellisense and compile-time checking for the “dinner.” properties within the VS code editor. You also get refactoring support within Visual Studio – which means that anytime you rename one of the properties on the Dinner class – you can use Visual Studio’s refactoring support to automatically update your mapping rules within the above context menu (no manual code steps required).
Scenario 3: Splitting a Table Across Multiple Types
Relational tables within a database are often structured differently than how you want to design your object-oriented model classes. What might be persisted as one large table within a database is sometimes best expressed across multiple related classes from a pure object-oriented perspective – and often you want the ability to split or shred tables across multiple objects related to a single entity.
For example, instead of a single “colAddr” column for our address, let’s assume our “tblDinners” database table uses multiple columns to represent the “address” of our event:

Rather than surface these address columns as 4 separate properties on our “Dinner” model class, we might instead want to encapsulate them within an “Address” class and have our “Dinner” class exposes it as a property like so:

Notice above how we’ve simply defined an “Address” class that has 4 public properties, and the “Dinner” class references it simply by exposing a public “Address” property. Our model classes are pure POCO with no persistence knowledge.
We can update our “OnModelCreating” method to support a mapping of this hierarchical class structure to a single table in the database using a rule like so:

Notice how we are using the same mapping approach we used in the previous example – where we map table column names to strongly-typed properties on our model object. We are simply extending this approach to support complex sub-properties as well. The only new concept above is that we are also calling modelBuilder.ComplexType<Address>() to register our Address as a type that we can use within mapping expressions.
And that is all we have to write to enable table shredding across multiple objects.
Download an Updated NerdDinner Sample with Custom Database Persistence Rules
You can download an updated version of the NerdDinner sample here. It requires VS 2010 (or the free Visual Web Developer 2010 Express).
You must download and install SQL CE 4 on your machine for the above sample to work. You can download the EF Code-First library here. Neither of these downloads will impact your machine.
Summary
The CTP4 release of the “EF Code-First” functionality provides a pretty nice code-centric way to work with data. It brings with it a lot of productivity, as well as a lot of power. Hopefully these two blog posts provides a glimpse of some of the possibilities it provides.
You can download the CTP4 release of EF Code-First here. To learn even more about “EF Code-First” check out these blog posts by the ADO.NET team:
- EF CTP4 Announcement Blog Post
- EF CTP4 Productivity Enhancements Blog Post
- EF CTP4 Code First Walkthrough Blog Post
- DataAnnotations and Code First
- Default conventions with Code First
- Scott Hanselman’s Walkthrough Post about CTP4
Hope this helps,
Scott
P.S. In addition to blogging, I am also now using Twitter for quick updates and to share links. Follow me at: twitter.com/scottgu


