Historically, deploying BizTalk Server solutions across environments is or can be a complicated process depending how complex is your solution. There are many ways to deploy BizTalk artifacts for example:
Importing them as part of an application by using the Deployment Wizard (from an .msi file), importing them using BTSTask.exe – this is the default way to deploy across environments.
You can replace and use allow BTSTask, PowerShell scripts.
Or deploy them from Visual Studio – this is the default way to deploy to your development environment.
During the years, the BizTalk Server Community created an open-source deployment framework called Deployment Framework for BizTalk (BTDF) – https://github.com/BTDF/DeploymentFramework. The Deployment Framework for BizTalk is an easy-to-use toolkit for deploying and configuring your BizTalk solutions. In reality, BTDF is an MSBuild project with custom MSBuild tasks, and it can be customizable according to customer BizTalk project needs, and it is extensible. This framework brings new capabilities and advantages to deploying BizTalk Server solutions, but it also has limitations or disadvantages.
Azure DevOps and Azure Pipelines
Microsoft has introduced automated deployment of BizTalk Applications in BizTalk Server 2016 Feature Packs using Azure DevOps (previously called Visual Studio Team Services – VSTS). In BizTalk Server 2016 Feature Pack 1, automatic deployment and application lifecycle management (ALM) experience was introduced. The automatic deployment process has been improved with the release of BizTalk Server 2016 Feature Pack 2. These features were only available on the Enterprise edition of BizTalk Server 2016.
BizTalk Server 2020 brings all these functionalities out-of-the-box across all editions: Enterprise, Standard, Development, or Branch.
To accomplish this, we need basically 3 steps:
BizTalk Server: Add a BizTalk Server Application project in your Visual Studio solution.
We will not address this topic today.
DevOps: Create a build agent.
DevOps: Create a Build and release Azure Pipeline.
Today we will talk about starting to configure your Azure Pipeline to create a BizTalk Server Build Agent.
Create a Personal Access Token
A personal access token (PAT) is created in DevOps. This token is your password and is used by the DevOps build agent to authenticate. The token is only shown when you create it. After that, it isn’t shown anymore. Once you create it, you should save it to another file in a rememberable location.
If you do not have an account, select Create new account, and enter a name. To manage your code, choose your personal preference between Git or Team Foundation Version Control. When finished, your new account is created, you will be able to access Azure DevOps Portal.
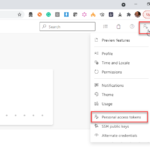
Select your DevOps organization and then click the top second right-side corner icon – User settings – and select User settings > Personal access tokens.
The Personal Access Tokens page will be presented a list of all existing personal access tokens.
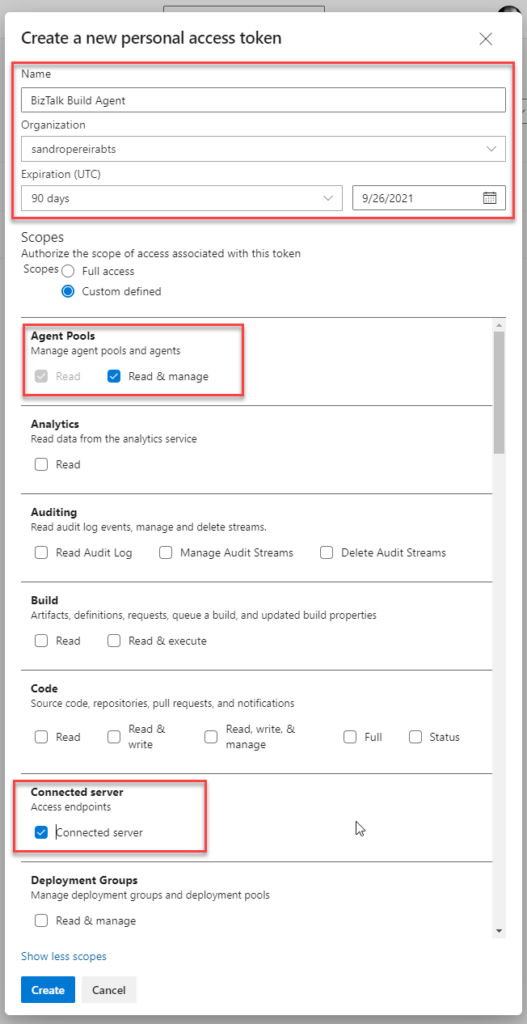
If you don’t have an existing PAT for your agent, select Add, and on the Create a new personal access token page, enter the following configuration:
On the Name property, enter a name for your PAT, for example, BizTalk Build Agent.
On the Organization property, leave the default organization.
On the Expiration (UTC) property, set an expiration date, for example, 90 days.
In Scopes, select Show all scopes, and then select Agent Pools – Read & manage option and Connected server – Connected server.
Select Create to finish the PAT creation.
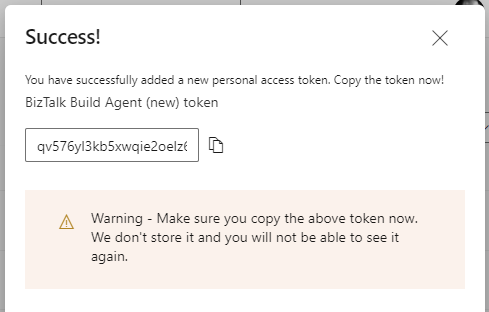
Important Note: You need to save the token value. You need it in future steps. If you don’t know the access token value and didn’t take note of it anywhere, it cannot be retrieved. In this case, you need to create a new PAT.
Install the Build Agent
The build agent is installed on the BizTalk development computer. If using deployment groups, the build agent is installed on all the BizTalk servers you want to deploy to. Also, use these same steps to add a build computer, which might be different than the BizTalk development computer.
The following steps show you how to install the build agent on a single computer:
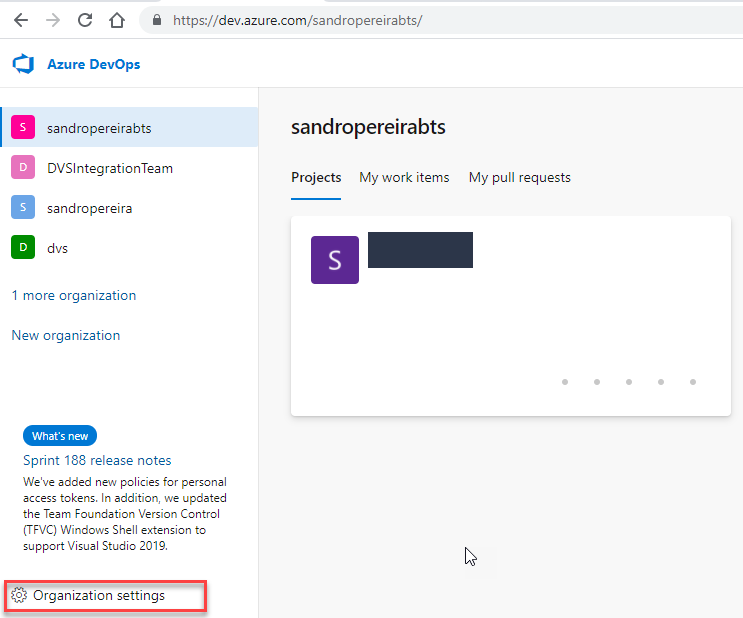
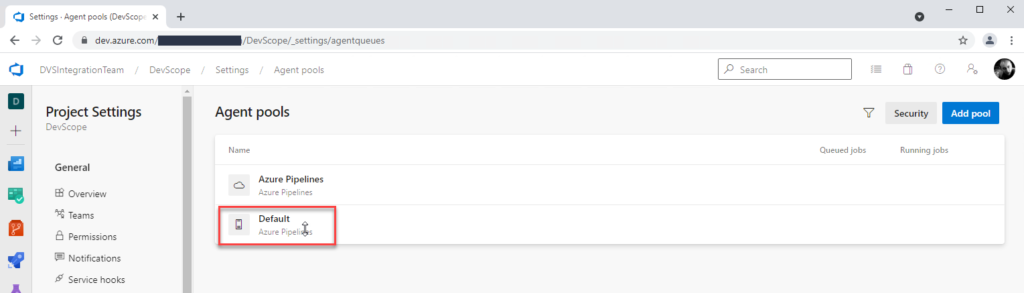
Open your Azure DevOps organization and then select the Organization settings icon and then Agent Pools.
Optional you can choose a Project inside your Organization and then select the Project settings icon and select Agent Pools.
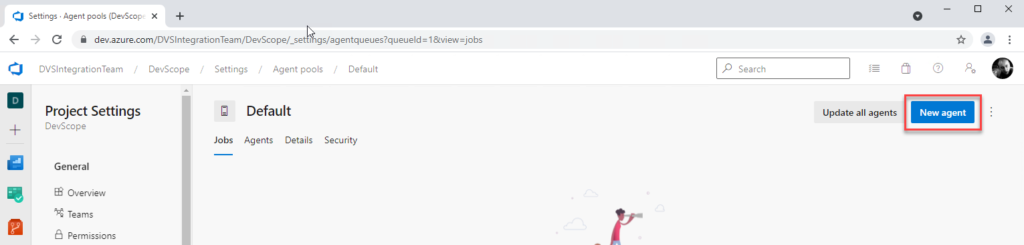
Open Agent pools page, select the Default (Azure Pipelines) agent.
On the Default agent page, select New agent.
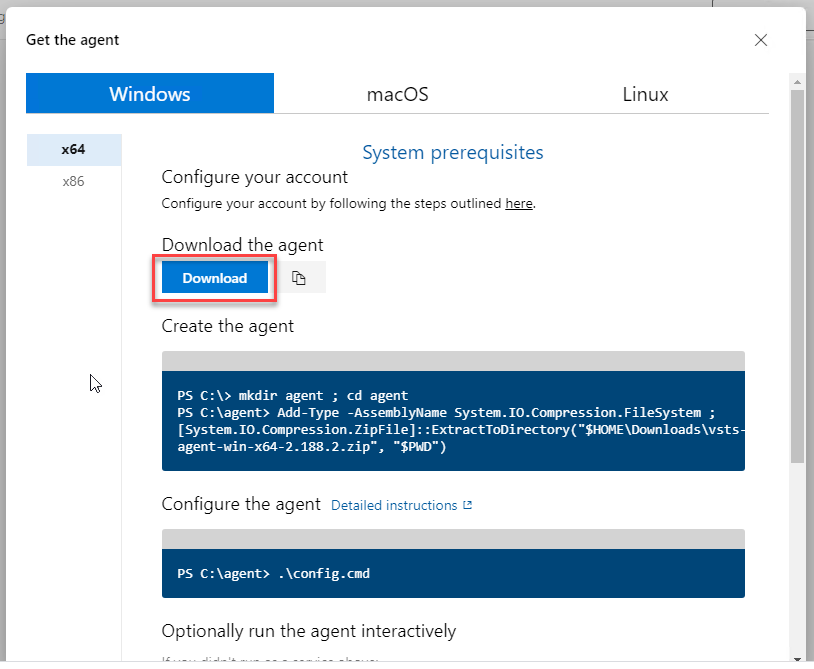
On the Get the agent pop-up window, select your SO, and on the Download the agent section, select Download.
It is important for you to save the file to your Downloads folder – on your BizTalk Server Development machine since the scripts will be referencing that folder.
Depending on your SO, this will download a zip file, for example, vsts-agent-win-x64-2.188.3.zip, that you will need to create the agent on the BizTalk Server Development machine.
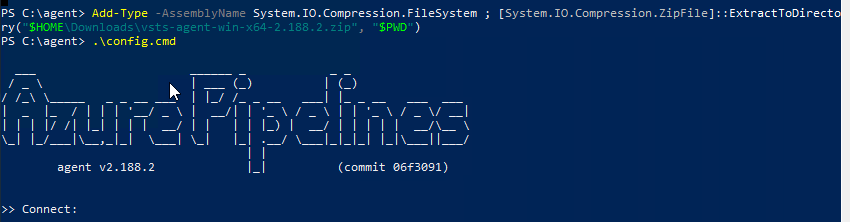
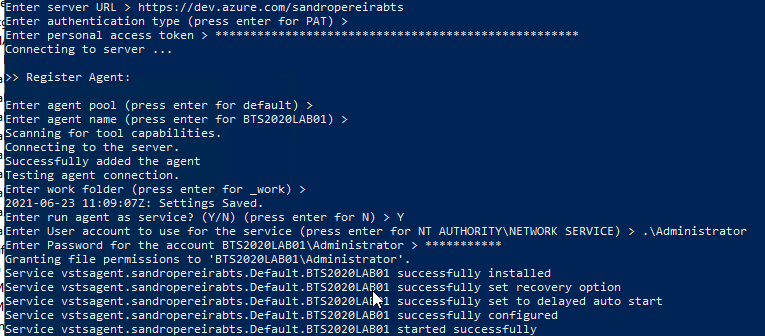
The first step is to create the agent on your BizTalk Server Development machine. To do that open Windows PowerShell as Administrator and type the following command:
Note: The vsts-agent file version changes. Make sure the zip file name is the correct one.
The second step, as you also see in the picture is to configure the agent. To do that type the following command:
PS C:agent> .config.cmd
Enter the following details:
Server URL: Type https://dev.azure.com/{your-organization}.
Authentication Type: Enter PAT.
Personal access token: Paste your Azure DevOps token.
Agent pool: Click Enter for assuming the default value.
Agent name: Click Enter for assuming the default value.
Replace: Only displays if you have an existing agent.
Work folder: Click Enter for assuming the default value.
Run agent as a service: Enter Y.
User account: This value is up to you, but you may run into a permissions issue. Consider entering your current logged-on account, which is a local admin.
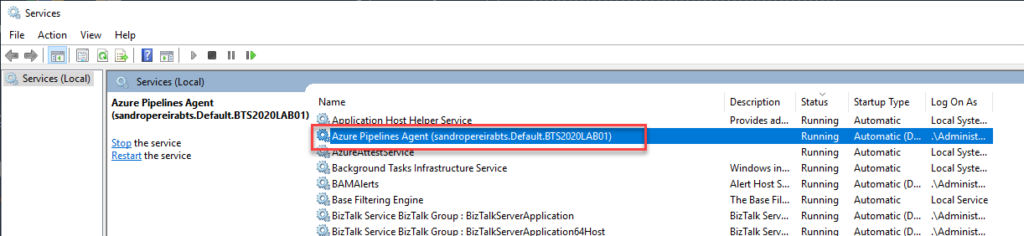
To validate if the agent was properly installed, Open services.msc to see the new service called Azure Pipelines Agent (<organization>.<agent pool>.<server>). The job should be running, otherwise type the following command:
PS C:agent> .run.cmd
Now, if we go back to our DevOps organization > Organization settings > Agent pools > Default (Azure Pipelines) > Agents, you will see your BizTalk Server Development server on the list:
I’m not a Dynamics 265 expert, and Dynamics 365 is not my focus area. Nevertheless, I couldn’t ignore the flood of requests to add the new Dynamics 365 logos, especially the App icons. It took a while, but they are finally here.
What’s new in this version?
These are the list of changes and additions present in this major release:
New shapes: There are new shapes on the following Visio Stencils files (.vssx):
MIS Office, Office 365 and Dynamics 365: add the new Dynamic 265 logo, Dynamics 365 App Icons, and Dynamics 365 Mixed Reality Icons.
MIS Azure Stencils and MIS Azure Additional or Support Stencils: there were a few new icons add to the stencils, most of them related to new preview features and integration services like the new Logic App icon.
SVG files: new SVG files added.
Microsoft Integration, Azure, Power Platform, Office 365 and much more Stencils Pack
Microsoft Integration, Azure, Power Platform, Office 365 and much more Stencils Pack it’s a Visio package that contains fully resizable Visio shapes (symbols/icons) that will help you to visually represent On-premise, Cloud or Hybrid Integration and Enterprise architectures scenarios (BizTalk Server, API Management, Logic Apps, Service Bus, Event Hub…), solutions diagrams and features or systems that use Microsoft Azure and related cloud and on-premises technologies in Visio 2016/2013:
BizTalk Server
Microsoft Azure
Integration
Integration Service Environments (ISE)
Logic Apps and Azure App Service in general (API Apps, Web Apps, and Mobile Apps)
Azure API Management
Messaging: Event Hubs, Event Grid, Service Bus, …
Azure IoT and Docker
AI, Machine Learning, Stream Analytics, Data Factory, Data Pipelines
SQL Server, DocumentDB, CosmosDB, MySQL, …
and so on
Microsoft Power Platform
Microsoft Flow
PowerApps
Power BI
Office365, SharePoint,…
DevOps and PowerShell
Security and Governance
And much more…
… and now non-related Microsoft technologies like:
SAP Stencils
The Microsoft Integration Stencils Pack is composed of 27 files:
Microsoft Integration Stencils
MIS Additional or Support Stencils
MIS AI and Machine Learning Stencils
MIS Apps and Systems Logo Stencils
MIS Azure Additional or Support Stencils
MIS Azure Black and Gray
MIS Azure Old Versions
MIS Azure Stencils
MIS Black and Cyan
MIS Buildings Stencils
MIS Databases and Analytics Stencils
MIS Deprecated Stencils
MIS Developer Stencils
MIS Devices Stencils
MIS Files and Message Types Stencils
MIS Generic Stencils
MIS Infrastructure and Networking Stencils
MIS Integration Fun
MIS Integration Patterns Stencils
MIS IoT Stencils
MIS Office, Office 365 and Dynamics 365
MIS Power BI Stencils
MIS Power Platform Stencils
MIS SAP Stencils
MIS Security and Governance
MIS Servers (Hexagonal) Stencils
MIS Users and Roles Stencils
Organisational Stencils
That you can use and resize without losing quality, in particular, the new shapes.
Download
You can download Microsoft Integration, Azure, BAPI, Office 365 and much more Stencils Pack for Visio from GitHub Here:
There was a big buzz this weekend regarding the release of a new Azure Logo by Microsoft. The new Azure icon represents the unity of Azure within the larger Microsoft family of product icons. It’s part of Microsoft’s Fluent Design System, carefully crafted to produce icons that look familiar to what customers know and love, while representing the agile future of our business.
I usually don’t update my stencils only because of a new icon. Still, this time I made an exception, and I updated my package with this new Azure icon (thanks, Tiago Costa, for providing me the resource). I also toked this opportunity to add also a previous request: the new Dataverse icon.
What’s new in this version?
These are the list of changes and additions present in this major release:
New shapes: There are new shapes on the following Visio Stencils files (.vssx):
MIS Power Platform Stencils: the new logo of Dataverse was added.
MIS Azure Stencils: the new logo of Azure was added.
SVG files: new SVG files added.
Microsoft Integration, Azure, Power Platform, Office 365 and much more Stencils Pack
Microsoft Integration, Azure, Power Platform, Office 365 and much more Stencils Pack it’s a Visio package that contains fully resizable Visio shapes (symbols/icons) that will help you to visually represent On-premise, Cloud or Hybrid Integration and Enterprise architectures scenarios (BizTalk Server, API Management, Logic Apps, Service Bus, Event Hub…), solutions diagrams and features or systems that use Microsoft Azure and related cloud and on-premises technologies in Visio 2016/2013:
BizTalk Server
Microsoft Azure
Integration
Integration Service Environments (ISE)
Logic Apps and Azure App Service in general (API Apps, Web Apps, and Mobile Apps)
Azure API Management
Messaging: Event Hubs, Event Grid, Service Bus, …
Azure IoT and Docker
AI, Machine Learning, Stream Analytics, Data Factory, Data Pipelines
SQL Server, DocumentDB, CosmosDB, MySQL, …
and so on
Microsoft Power Platform
Microsoft Flow
PowerApps
Power BI
Office365, SharePoint,…
DevOps and PowerShell
Security and Governance
And much more…
… and now non-related Microsoft technologies like:
SAP Stencils
The Microsoft Integration Stencils Pack is composed of 27 files:
Microsoft Integration Stencils
MIS Additional or Support Stencils
MIS AI and Machine Learning Stencils
MIS Apps and Systems Logo Stencils
MIS Azure Additional or Support Stencils
MIS Azure Black and Gray
MIS Azure Old Versions
MIS Azure Stencils
MIS Black and Cyan
MIS Buildings Stencils
MIS Databases and Analytics Stencils
MIS Deprecated Stencils
MIS Developer Stencils
MIS Devices Stencils
MIS Files and Message Types Stencils
MIS Generic Stencils
MIS Infrastructure and Networking Stencils
MIS Integration Fun
MIS Integration Patterns Stencils
MIS IoT Stencils
MIS Office, Office 365 and Dynamics 365
MIS Power BI Stencils
MIS Power Platform Stencils
MIS SAP Stencils
MIS Security and Governance
MIS Servers (Hexagonal) Stencils
MIS Users and Roles Stencils
Organisational Stencils
That you can use and resize without losing quality, in particular, the new shapes.
Continuous Integration/Continuous Delivery is a development practice that enables you to accelerate your deployments and delivery time to the customer, by reliably releasing software at any time and without manual intervention.
For this post series, I will explain how to enable this practice, oriented to Logic Apps and Azure Pipelines.
We will start by Building the Logic App, using Visual Studio. I will not approach Logic Apps Preview, because since it’s still a preview feature, many changes can happen and render all this useless.
As you may know, to create Logic Apps in Visual Studio, there are a few requirements, such as:
Visual Studio 2015, 2017, 2019 or greater, if available
Azure SDK
Azure Logic Apps Tools for Visual Studio Extension (if using VS)
An active Azure subscription
Time, will and patience.
After you have all this installed, you can begin to create and let your creativity flow!
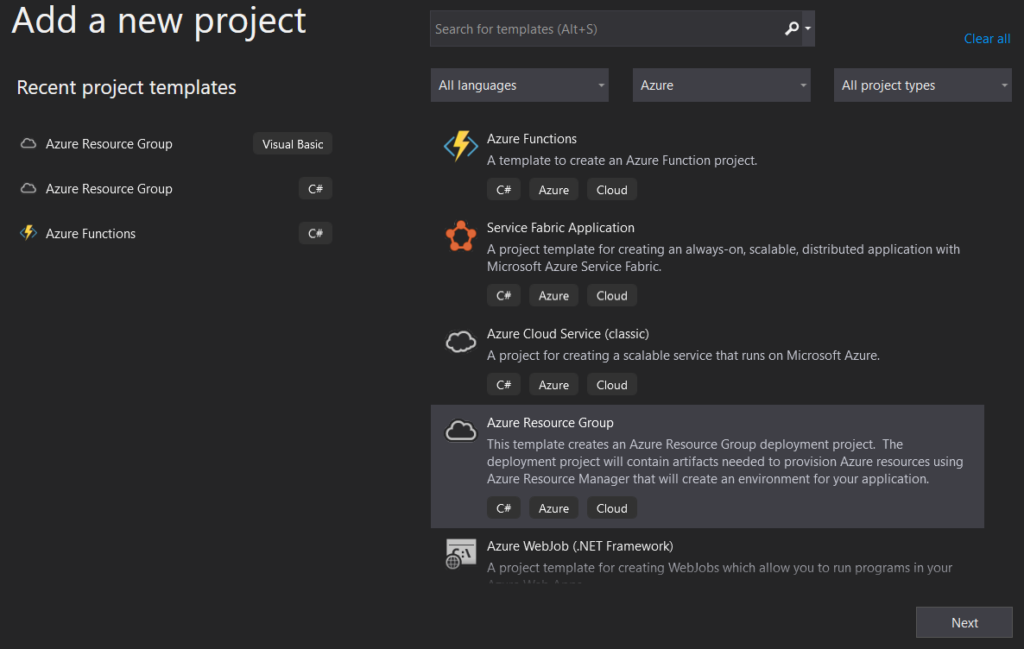
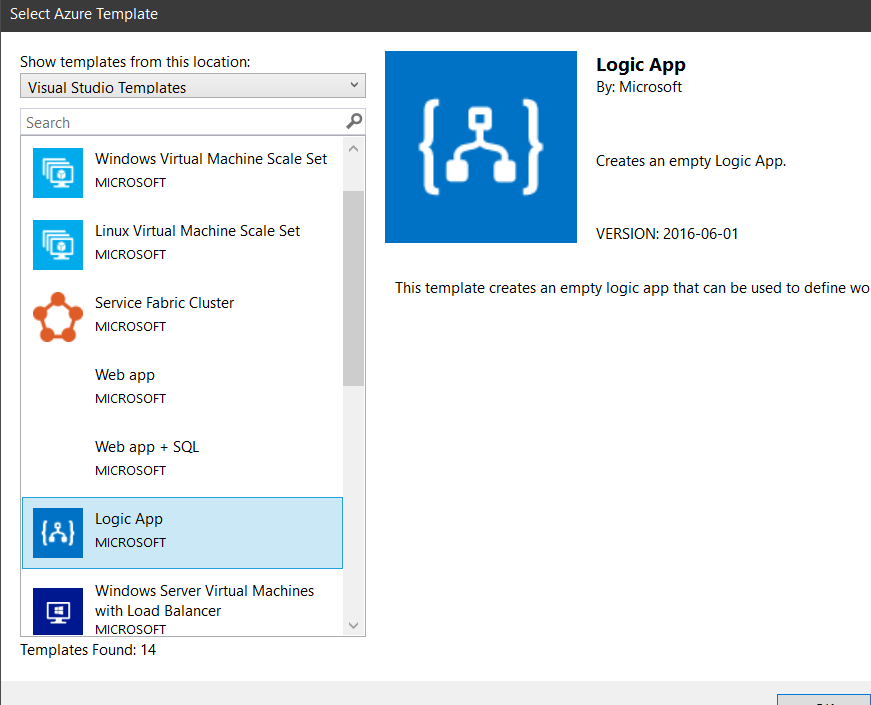
We’ll start from scratch. Open you VS and start a new Project, by selecting the Azure Resource Group C# template and the Logic App template after that.
You will end with a new Project, and Solution if it’s the case, with 3 files. The PowerShell file is the deployment script that VS uses to automate the ARM deployment. Only in a special case do you need to fiddle with this file.
The other two files are the Logic App code and the Parameters file. You will need to create a new one, to be used as a Template for the Azure Pipeline. So go ahead and copy the Parameters file and change the name to LogicApp.parameters.template.json .
You should end with something like this.
This Parameters Template file will contain our Tokens, which will be replaced in the Pipeline using the “Replace Tokens” Task. In the coming posts, I will explain how it works and why we’re using it.
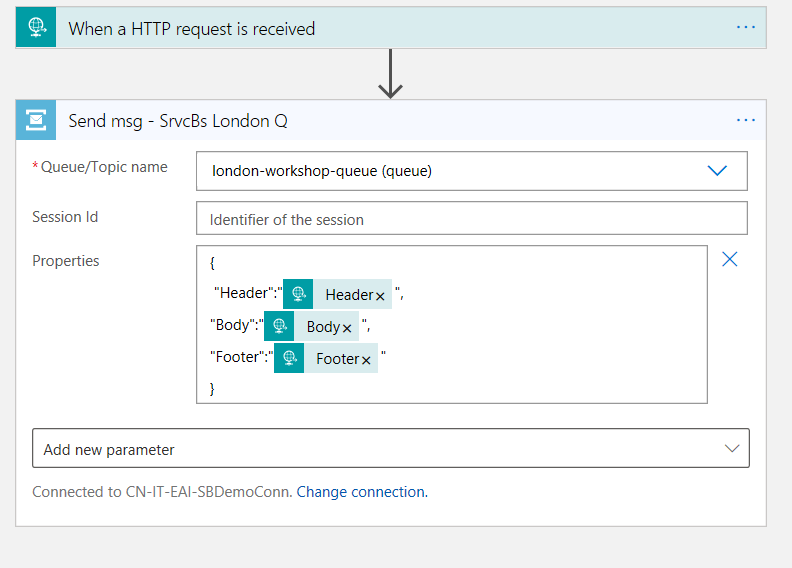
For the sake of simplicity, I’ll just use the Service Bus connector, where depending on the input, I’ll send a message to the Queue with the provided information.
After creating the connection, you will see that, in the back code, several parameters and a Resource node were created as well, that contain the link and inputs for this connection.
Even when working in a single Resource Group, it is a good practice to prepare this for CI CD, because even though it’s static, connections change and instead of having to re-do all of it, you just need to re-deploy the pipeline with the new configurations.
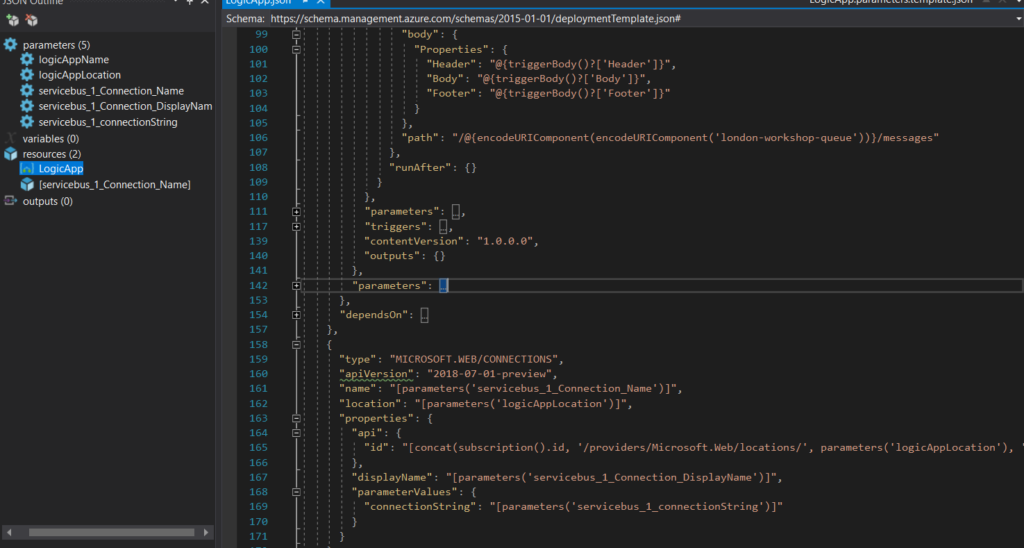
We will not be making any changes to the Resource node, but to the action path and parameters. This will define that instead of having a fixed value, it will point to the parameter itselft, making it possible to have an ARM parameter configurable in the Pipeline.
As part of development guides, it’s always a good idea to have a fallback plan and handle errors.
You can be 99.999% confident that your code won’t fail, but that 0.001% chance happens. “Anything that can go wrong will go wrong” – Murphy’s Law
And so, we resort to our very dear friend, Try-Catch.
In Logic Apps, it’s not exactly an out-of-the-box functionality, but it’s actually quite simple to achieve this and with a few steps. Also, there are multiple ways to catch your errors.
In this post, we will try two approaches:
Using a For-Each loop
and a Filter Array action.
Since I’ve started developing LAs, I’ve used the For-each loop approach but it had some flaws. It involved using a Parse Json to catch only the error message, but not all actions have the same schema.
So, the idea of the Filter array came to play. It’s actually quite easy as well and easy to maintain. You’ll find the same issue with the schemas, but it’s a faster approach.
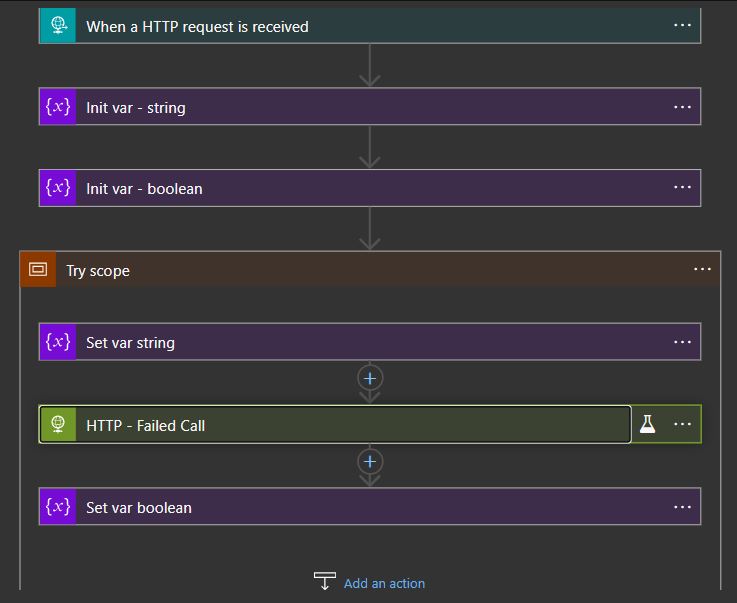
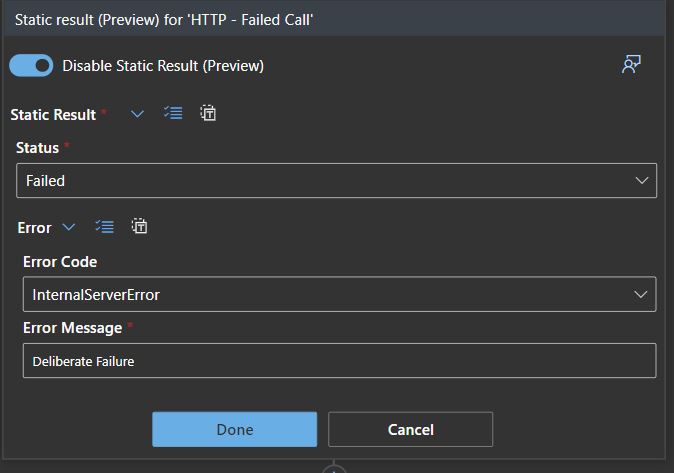
Let’s dig in. I started to build a simple Logic App, just creating a couple of variables and an HTTP call that I know that will fail. I mocked the results to ensure the outcome is what I needed.
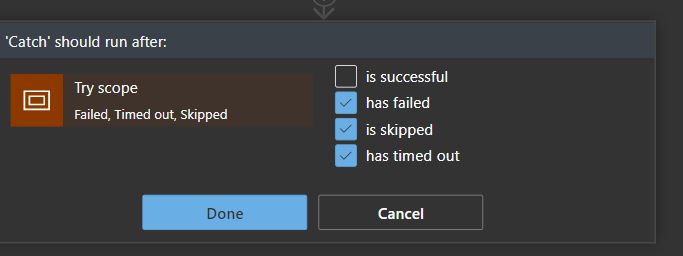
I’ve also built a scope, creating the Try block and a second scope to handle the Catch block. You’ll have to set the “Run after” properties to only trigger on errors, skips or timeouts, if not, it will run on success.
It will always relate to the previous scope.
The For-Each loop approach
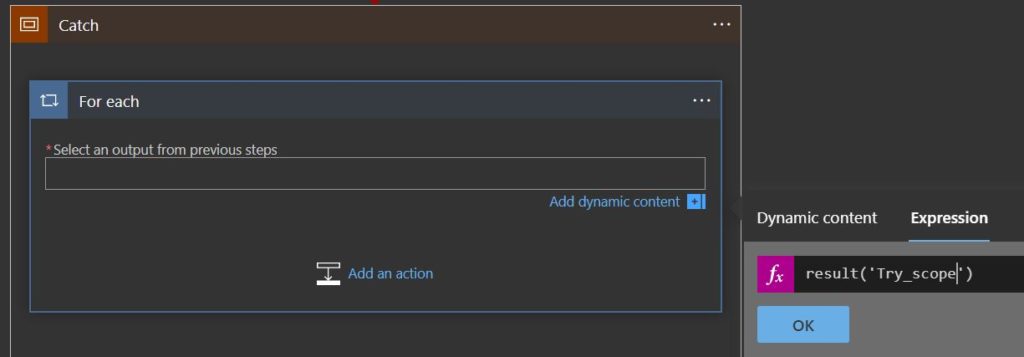
Now we start to build our Error handler. I’ve chosen the For Each loop first because it was faster to create since I’m used to it and even have some templates for it as well.
The For Each action requires an array action to iterate on, which means we need to find one. The Scope isn’t a loop, so what will we relate it to?
Well, the scope might not be, but there are N actions inside it, so if you search in the expressions box or the documentation, you’ll find the “result” expression, which records every result of the contained actions within a given scope.
Now, remember, this will need to point to the action you want, but you will not have it in the Dynamic Content, you need to write it using the _ for spaces, because this expression handles the JSON node name like if you’re working in the back code.
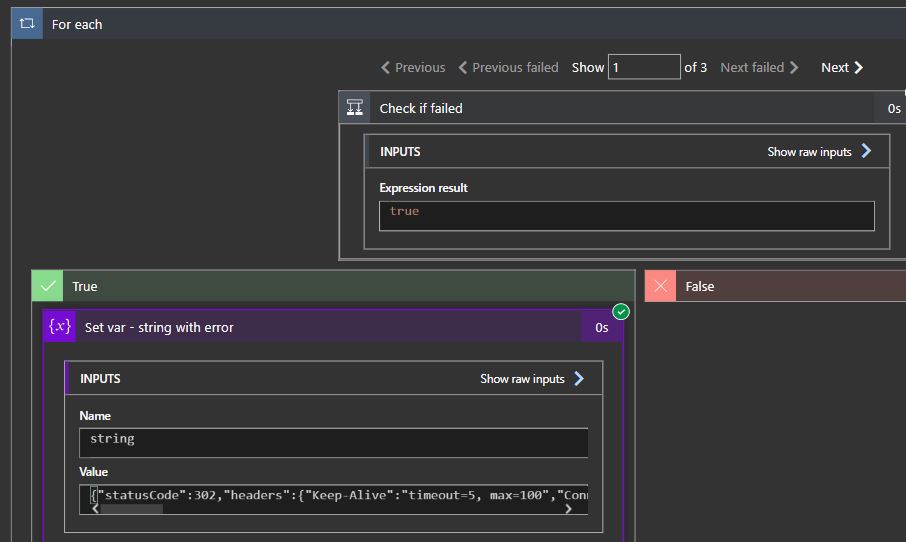
Once you have this set, you just need to create a condition to check if the status of the action was “Failed“. Pretty simple.
If you test the execution, you’ll see that the loop is working and iterating the actions batch that the “result” expression returns.
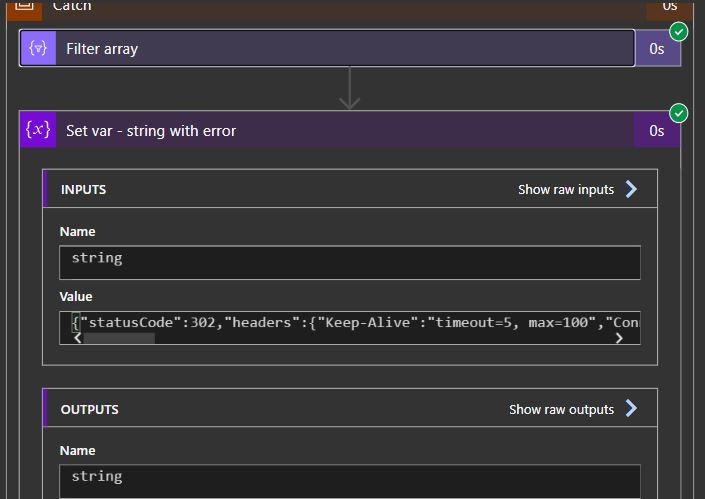
I’m just returning the action outputs in the error string, which will contain the StatusCode, Headers and Body. It should help to diagnose a possible error.
Let’s try the Filter array now.
The Filter Array action approach
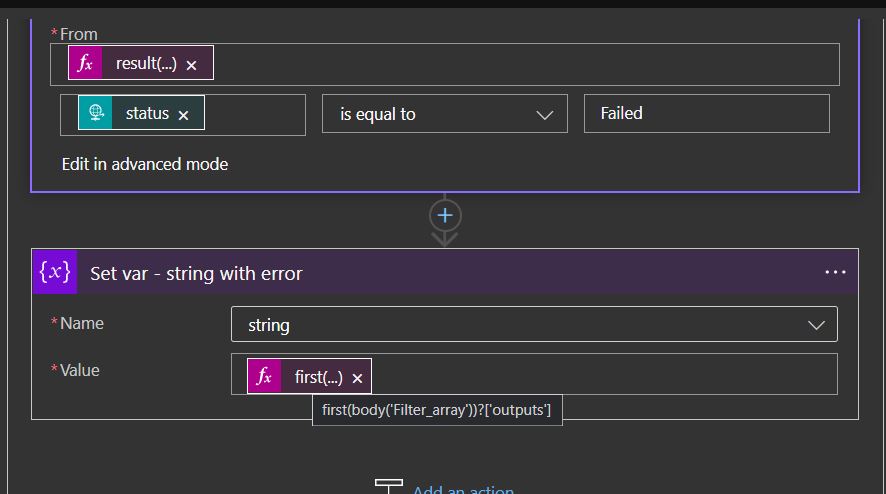
Similar to the For Each, we need to iterate through an action that contains child actions. We use the same “result” expression pointing to the same scope as the “From” property and choose “item()?[‘status’]” as the node to search for. Also, we only want the failed actions, so the node should be equal to “Failed“.
As for the error message, it’s a bit different from the For Each type. We’re still picking up the Outputs but we need to get the first action from the Filter array action.
The end result should be the same, as we’re picking up the same info as with the For Each loop.
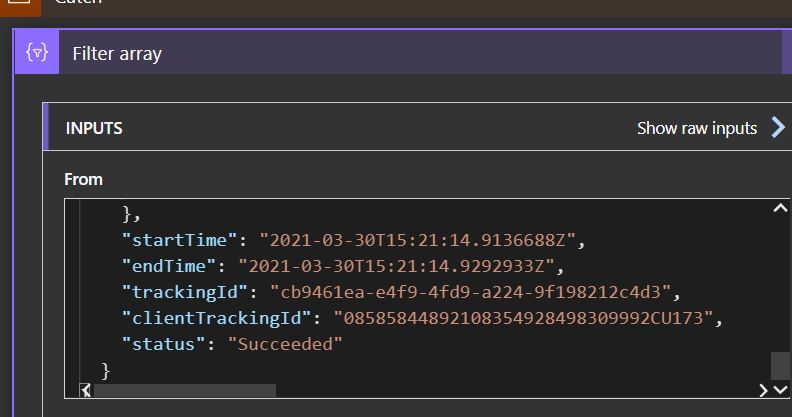
Usually, an action will return a JSON record as the result of its execution. There are some fields that will always be present, like “Status” and “Tracking ID”. There’s no easy way to find this info, so you have to deconstruct one or more actions to find it. With the information you have now, you can get it from anywhere, you just have to use the “Result” expression.
Here you can see some fields in the Set var action I created and how the status is recorded. For tracking purposes, the execution engine records the begining and end timestamps as well as other useful data.
Now that you know how, it’s time to get working and make your Logic Apps sturdier and with a proper error handling.
Everyday we learn new things and when it comes to Logic Apps, we tend to learn even more, because it’s always shifting and new components are added. If we’re using ARM templates, the deployment brings out some challenges and with it, new things to learn (and lots of cute little things that make you want to bang your head against a brick wall).
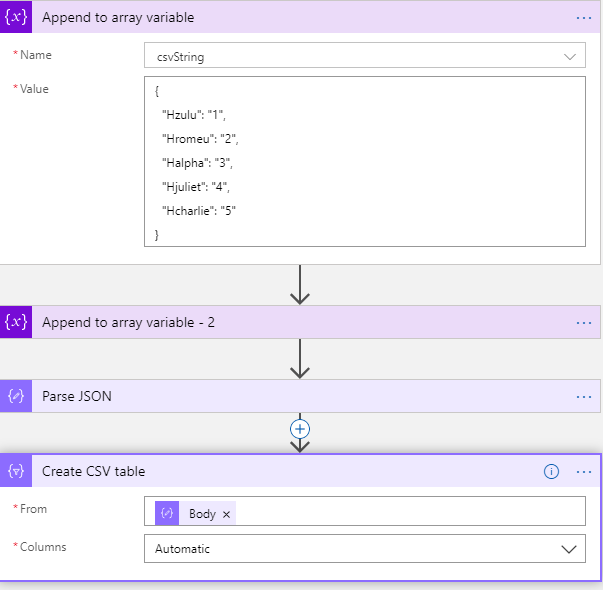
Usually when we work with a CSV file we tend to keep the sorting according to the specification. It isn’t always alphabetical nor descending/ascending.
Sometimes, it’s just a real mess but it makes sense to the client and to the application that is consuming it.
A few days ago, whilst working on a client project and after dozens of tests, we started to see errors in our CSV file, where the headers and columns were arranged in a alphabetical sorting. This was not my intent, when I built the CSV array I wanted it to be in a certain order.
So why was this array now being sorted, who gave that command and how could I correct it?
Why and who:
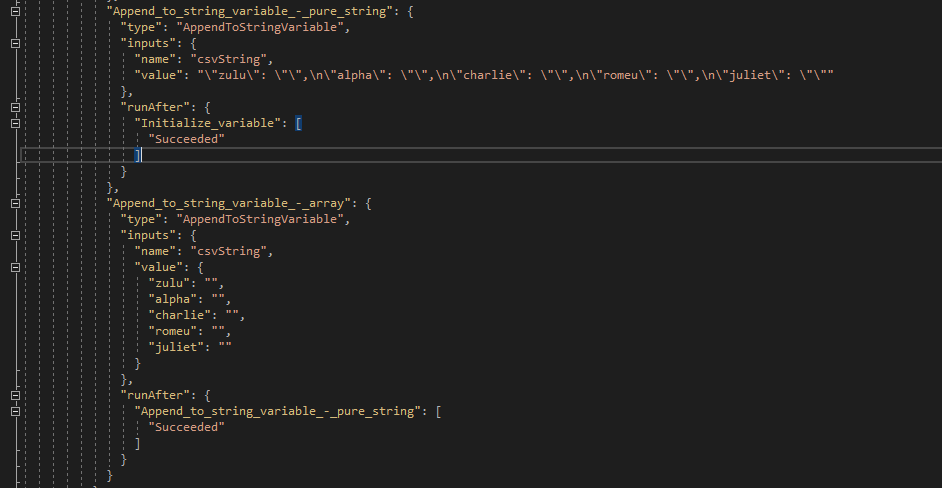
As we dig in the Logic App code, we see that the Logic App is JSON in its core (my god, shocking development!). As such, it will follow JSON rules on sorting. If we set / append our variable with an array, even though that array won’t show up ordered in our code, it will when we deploy it to our Resource Group.
Lets prove this.
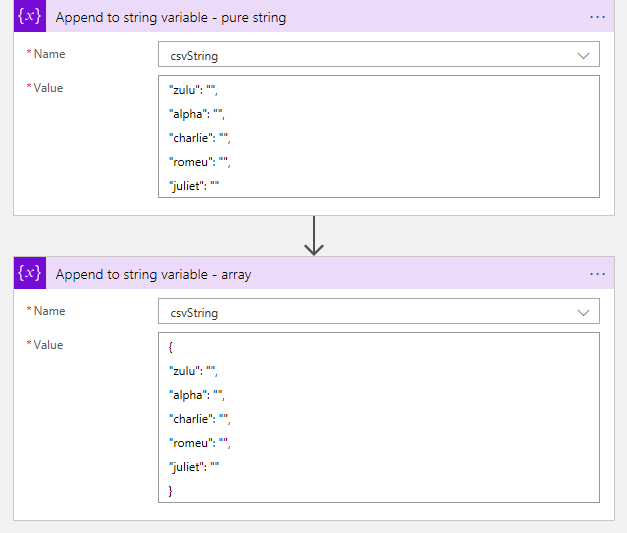
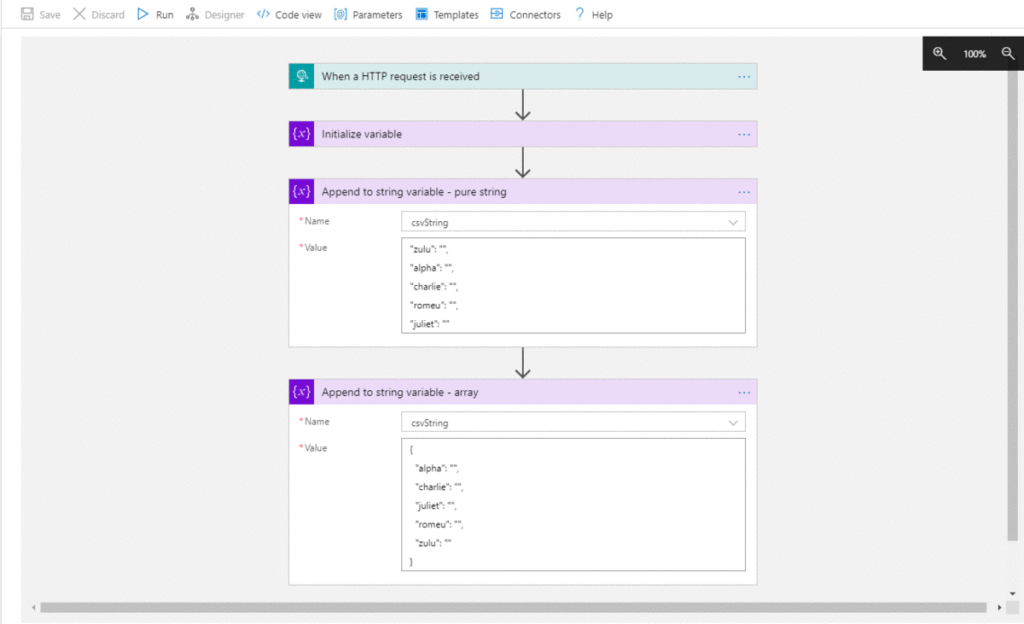
First, we set our LA in Visual Studio and initialize a string. Then we set two values to it ( “Append to string variable”) . One as a string and the other as an array.
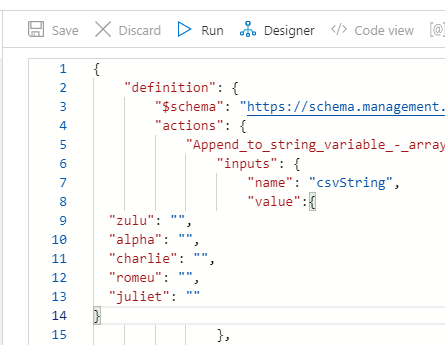
Let’s look at the back code.
Looking good so far. Our strings are set and it’s in the order we want.
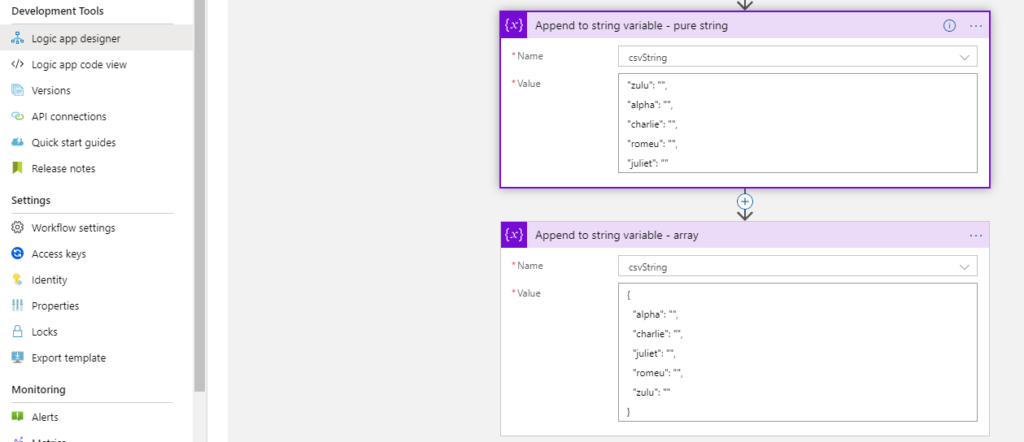
Lets deploy it to our RG and check again.
Well, there it is. In ARM deployment, if we write a JSON object, on deployment it gets sorted and will appear like this in the designer tool in Portal.
Funny thing is that if we change our object to the string we want, the designer will not recognize this as a change and doesn’t let you save.
Even in Code View the changes are not recognized.
But if we add other text to it, the changes are now recognized and Portal allows to save.
But still, it won’t show you the changes and will still sort out your CSV array, once again because it’s JSON.
A few weeks ago, this behavior wasn’t noticeable I had a few Logic Apps in place with the string array in a specific order and when deploying it didn’t get sorted.
I searched in Azure updates to see if anything was mentioned but nothing came up.
How to bypass this issue?
If you’re working with a CSV file like I was, after you build your array, you’ll need to build a CSV table.
The action “Create CSV table” will take care of this from you, but as we know, it will not be in the same format we need.
(notice I’ve switched to array variable because I can’t parse the string in JSON)
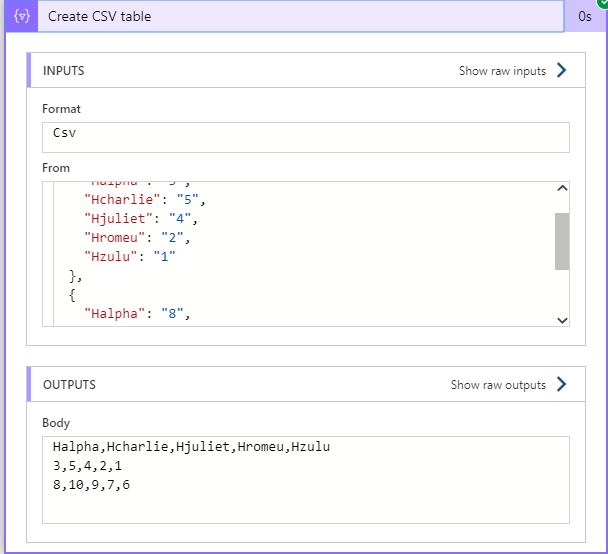
So, leaving the Columns in automatic mode will mess up your integration as you can see. The output will be sorted and it won’t be what you want / need.
What a mess!! This is nothing like we wanted.
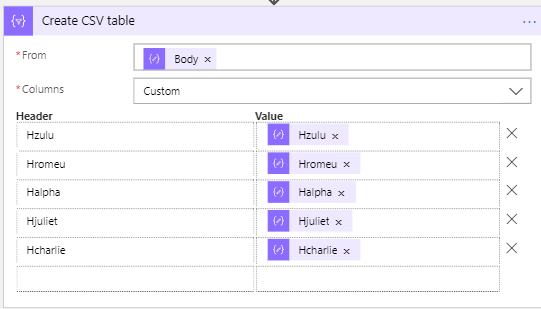
We will need to manually define the columns headers and the value they’re going to have.
If you don’t have many fields, it’s quick to do this, but when you have lots of fields… well, let’s just say I hope you have plenty of time and don’t lose focus.
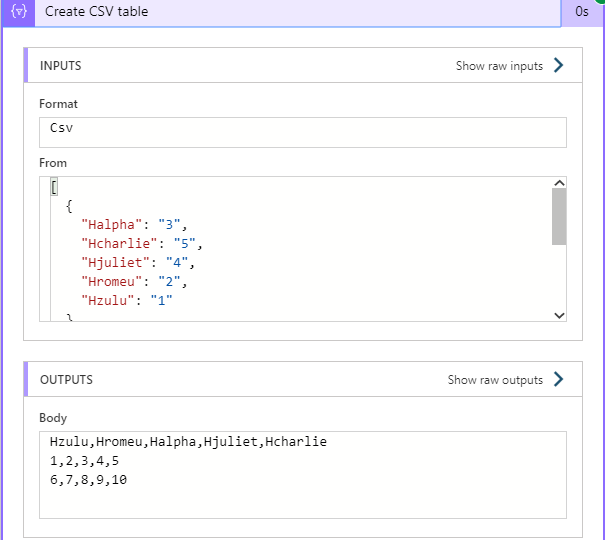
And there we have it. Fields are now displayed correctly, the data is in the right place and we’ve managed to get around this annoying problem.
Before we start with the actual post, I’d like to introduce a new brand we will be developing. This is the first official post with the “It’s not Rocket Science!” brand.
With this concept, we intend to explain how some procedures are not as complicated as you may think and that they’re not Rocket science. I’m open to suggestions on posts to demystify Azure Logic Apps and other Azure services.
So, welcome to a new concept and I hope you find it useful.
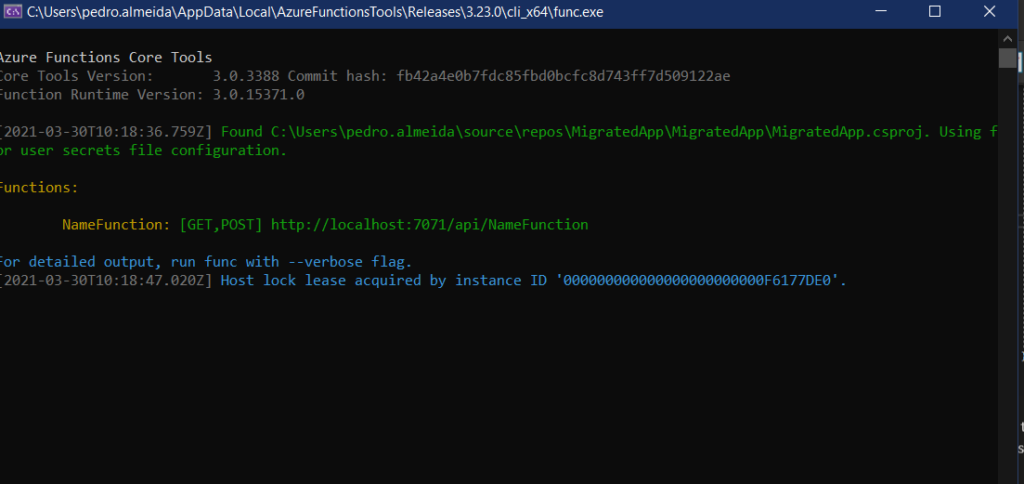
Azure Functions: Moving from Azure Portal to VS
Creating Functions in Portal presents some challenges, like lack of Intellisense, which, as we know, helps a lot. Not having CI/CD is also a concern and of the worse case scenarios:
Someone deleting you function by mistake!
Panic!, all hell broke loose. I tried to apply the same method as I did with the Logic Apps accidental delete recovery, but the “Change history” tab isn’t available for Functions. You end up losing your code, your executions and maybe some sleep over this.
The obvious next step is to get your backup from your repository and re-create the function. IF you have it in a repo.
We can’t prevent someone deleting our resources, everyone makes mistakes. But you can prevent letting your code sit in Azure Portal without version control, CI/CD and repository control.
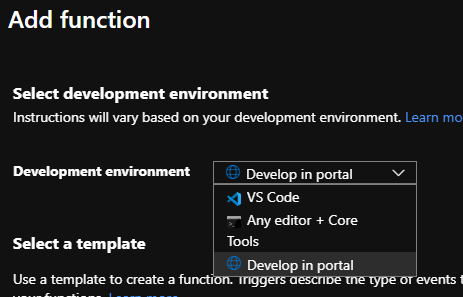
So, the best way to do this is to migrate it to a VS solution. In this post, I will use VS2019, but VSCode is also available as others IDEs. You can do this right from the start by choosing another development environment besides the Portal.
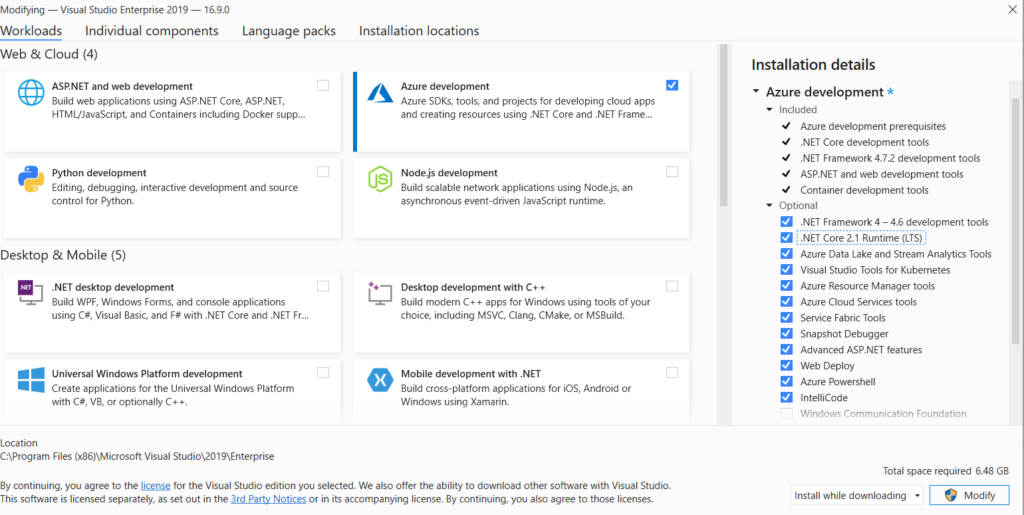
With an existing Function, you’ll need a few things before you can migrate it. Besides your VS with an active subscription, you will also need the Azure SDK feature. This can be installed using the Installer you’ve downloaded from MS or in VS itself, in the “Tools”-> “Get Tools and Features” menu.
After a fresh install of Windows, I didn’t installed the Azure SDK, so I had to download it and install. According to the setup, it should take about 6,5GB.
If you had to install the SDK, Updates are also important, keep that in mind.
Lets return to the code.
The good thing about VS is that you don’t need to reference the required DLLs, they will probably already be there.
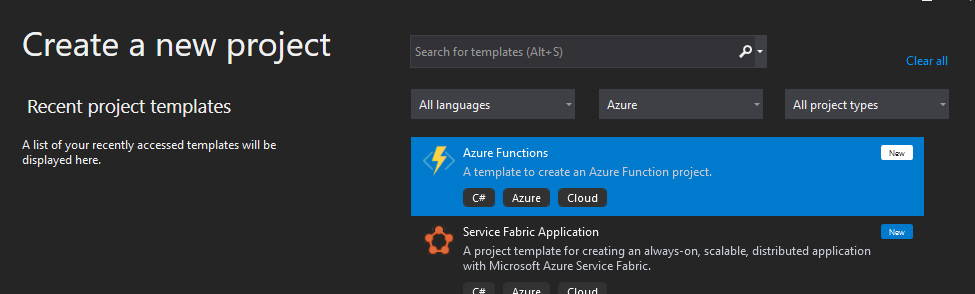
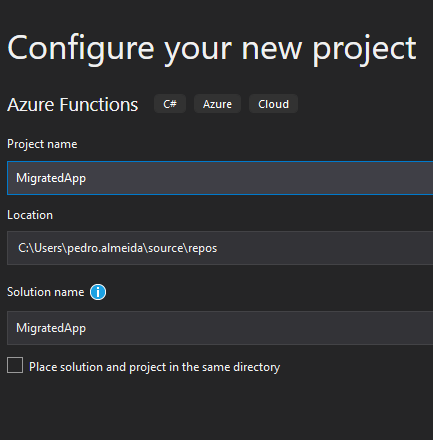
So you need to create a new Solution, with an Azure Function project.
Small note: you can also create a project using VB instead of C#, but… VB…
You can either choose a template with a trigger already created or you can choose an empty project, but when you try to Add a function, it will ask you again what template you want to use.
You can also add an empty class, but you will be missing some references.
As you can see, there are quite a few differences between the Class and the Function template.
I recommend you use the same template as the one you used to build your function, you will get more references that will be necessary for your code to work.
And now comes the easiest part. You can just copy-paste your code into VS, but leave the usings out. Most likely, if you haven’t used anything outstanding, they will already be there.
Now you have you code in VS, ready to run. Is it working properly? Well, you can just debug it locally, when pressing F5, the Azure emulator will start and you will be able to test your function like it was on the cloud.
You can just use your Postman or another web request tool to test your project.
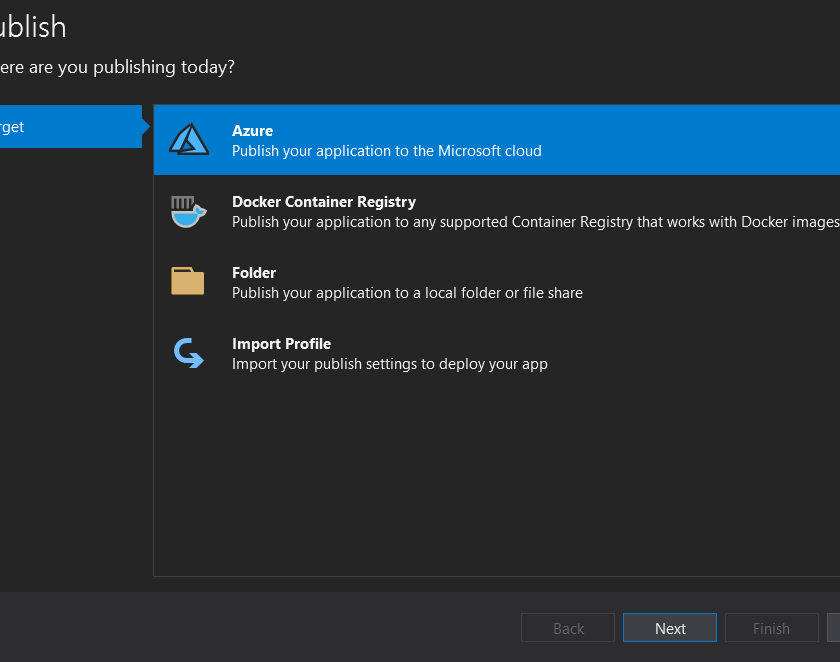
Once you’ve tested everything and are ready to deploy to your subscription, you’ll need configure the publishing profile.
You have two major ways of doing this. You can choose the blue pill and configure your connection by hand or you take the red pill and download the profile from the existing FA.
My advice, get the publish profile. Saves you time and it’s Plug’n’Play.
And that’s it. Your newly migrated function is now ready for your CI/CD and you can manage and version it with VS and DevOps.
Now, this does have a catch, or not depending on how you look at it. Because we deploy using a Zip file, the code is no longer available in the Portal, you must now always use VS to view it.
I like this, because it means that from a Security perspective, noone will be accessing the source code through the Portal and it forces new Devs, and old ones too, to join the best practices policy and have everything in a proper Repo and version controlled.
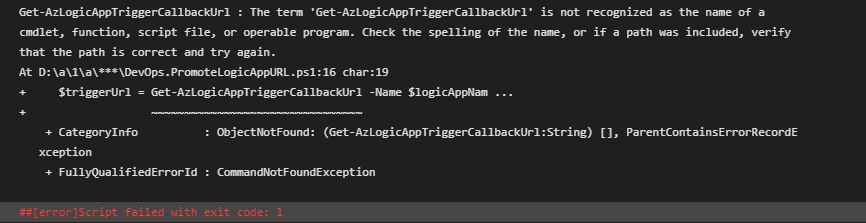
Last week, when preparing for a deployment, I bumped into this error again. As from my previous post, it could be easily fixed with a PowerShell module install.
But this time, the script was already fixed. Nothing had changed, as far as I knew. The last build and publish was in September, no errors there.
So what happened that killed my build?
It couldn’t be the Az module updates, because we were forcing the version. There had been several updates, so could this be it?
I tried to force a newer version, like 2.0.0, but still failed to execute the command. I even restricted the script to use only the command I needed, that was the CallbackUrl.
After a few other failures, my thinking was, “this can’t be the problem, the script was executing without issues, so it has to be something else.”
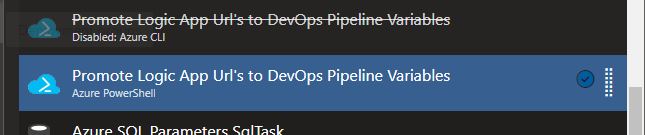
So I took another look at my pipeline. It was the same as before… Azure Powershell task to remove AzureRM, install Az module and Azure CLI task to execute the scri… wait!
Could this be the problem?
I switched the tasks and re-queued the pipeline.
And success! No more errors.
Azure CLI has received some updates in the past weeks, and the build I had before was 2.0.16 (Core 2.11.0) compared to 2.1.0 (Core 2.18.0) was running in these failed pipeline runs.
I looked into the Azure CLI release notes, but found nothing referring the LogicApp commands or Az.LogicApps.
This time, I can’t find a proper explanation for this error, but I’m suspecting some update broke the ability to run these Az module commands with Azure CLI or the Az.LogicApps commands specifically.
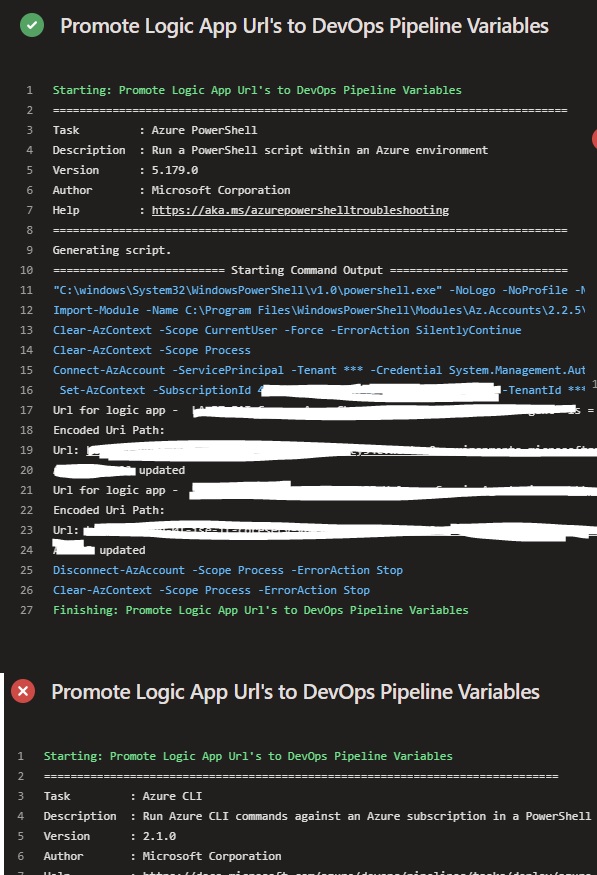
Sometimes I have the need to have a Logic App (LA) disabled when I deploy it. For instance, when deploying to Production, I like to have my LAs disabled, because I want to double check everything before starting the process.
This is helpful because usually, when using the “Recurrence” trigger, the LA will start immediately. If for some reason, a connector has the wrong configuration or is broken or the end system is offline, the execution will fail. Other scenarios can happen as well, but that’s another story.
An interesting fact is that you don’t have a proper way to control this in the Portal. You can add the control line to the code, but you won’t be able to control it with CI CD.
So, in comes Rocket science (or not).
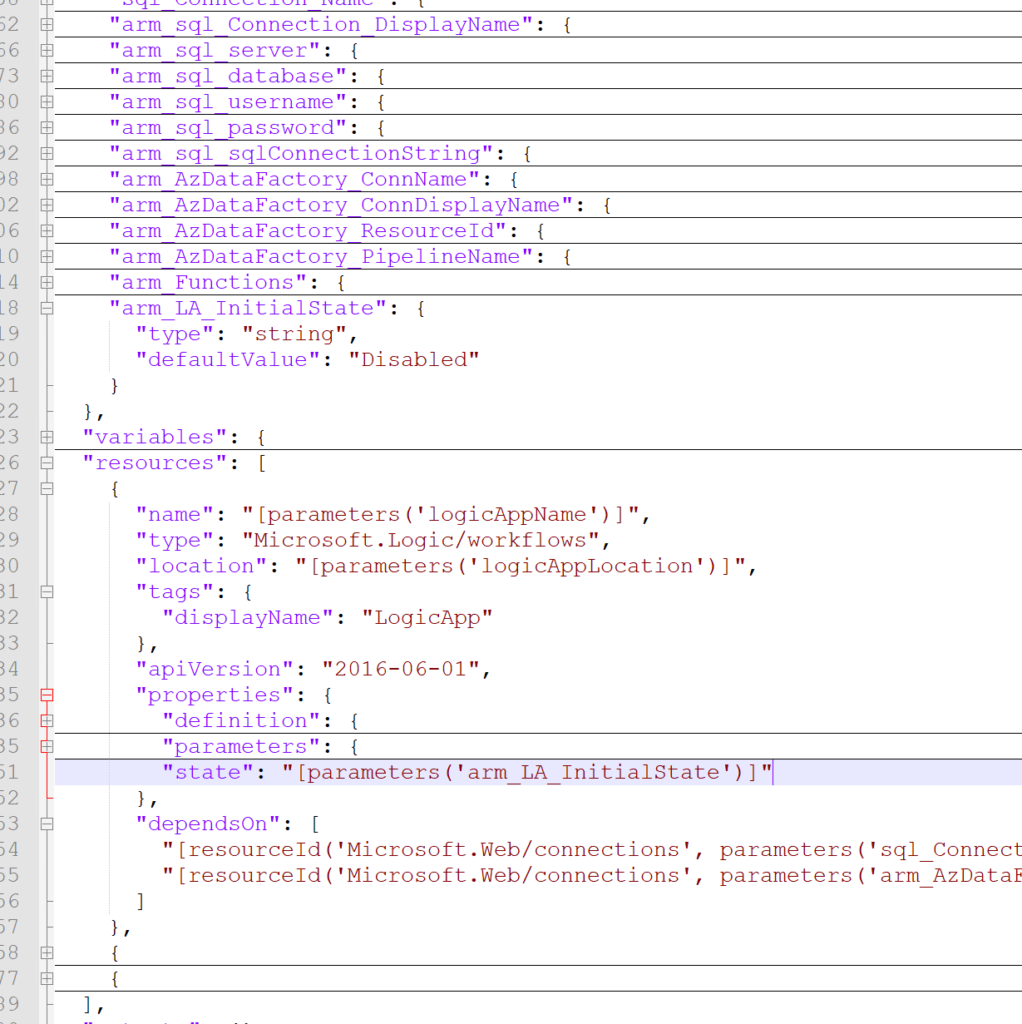
The resource code contains a property that will allow you to control the state of a LA and it’s quite easy to set. If you do not specify this property, the LA will start enabled and will trigger if it can.
The property is called “state” and lies within the “properties” node. Setting this property as a global parameter, allows you to prepare your CI/CD pipeline also allowing to parameterize this in your release.
This is quite and easy and simple insert, that should take no more than 5 minutes for you to configure.
If you choose the “Disabled” state, the LA will not start unless you specifically activate it.
We’ve all been through it. A few days ago, I accidentally deleted a Logic App when working for a customer.
I was working on migrating from the Portal resources to a Visual Studio solution, because CI/CD is being implemented.
Luckily it was the Dev environment, but still, there was some developments that I hadn’t migrated yet! Hours of work were lost! Or then again, maybe not.
After some research I found out that there’s no way of recovering or rollback a deleted Logic App. There’s some documentation to recover an App Service but no actual mentions to LAs.
Suggestions have been made in Azure Feedback, but so far, no replies.
So, how exactly do you recover a deleted Logic App?
Well, you have to dig a little bit and do some magic, but you will end up with a working Logic App after this.
Let’s work!
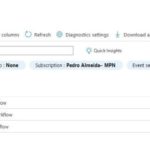
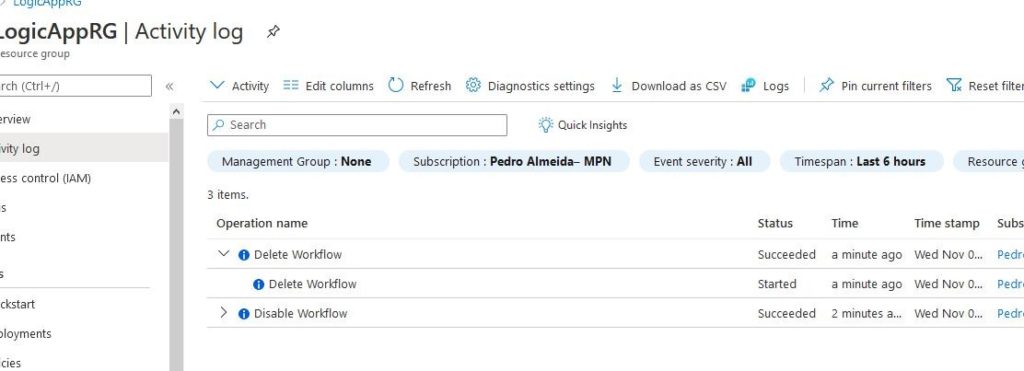
First, you must navigate to the Activity Log of your Resource Group.
There, you will find the last operations executed. This may not be easy, in this example I only have a few operations, but in the client tenant, I had to scavenge through a few days of logs.
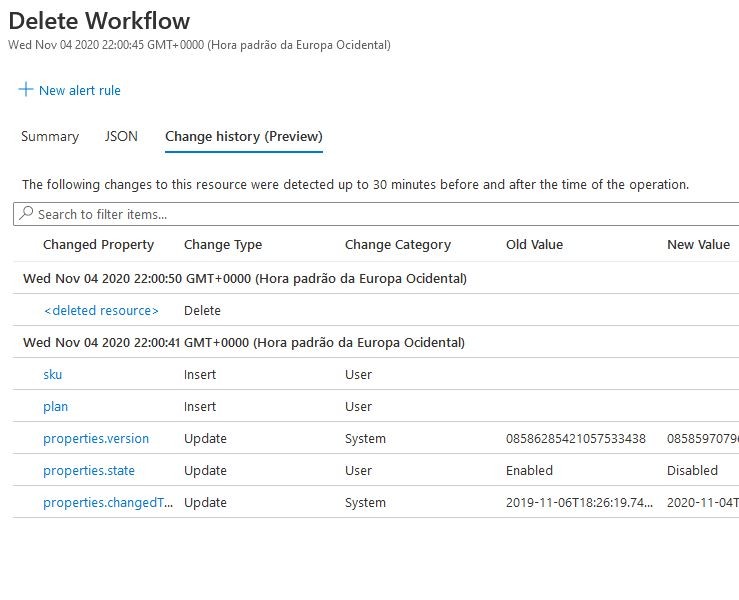
Once you find the correct deleted workflow AKA Logic App, you open it and check the Change History. This should in preview but it will be life boat.
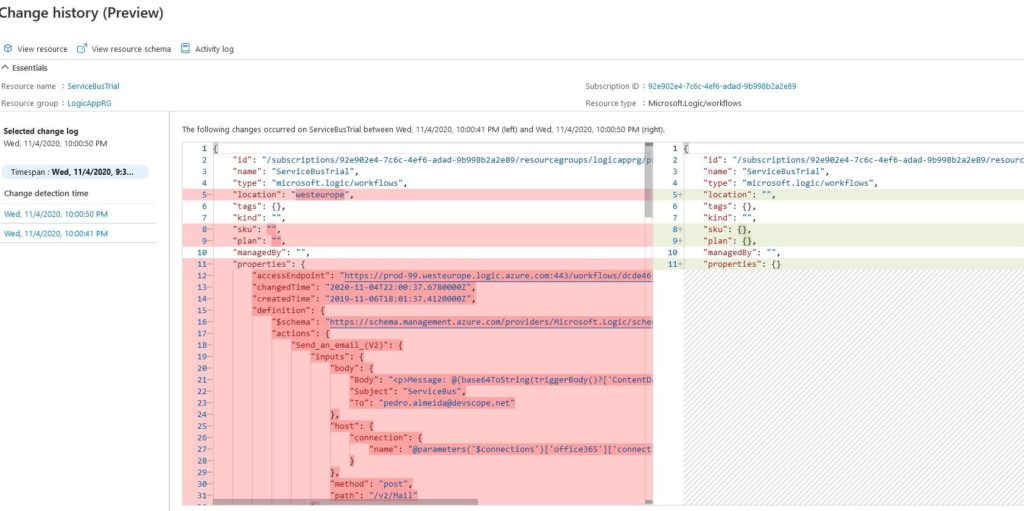
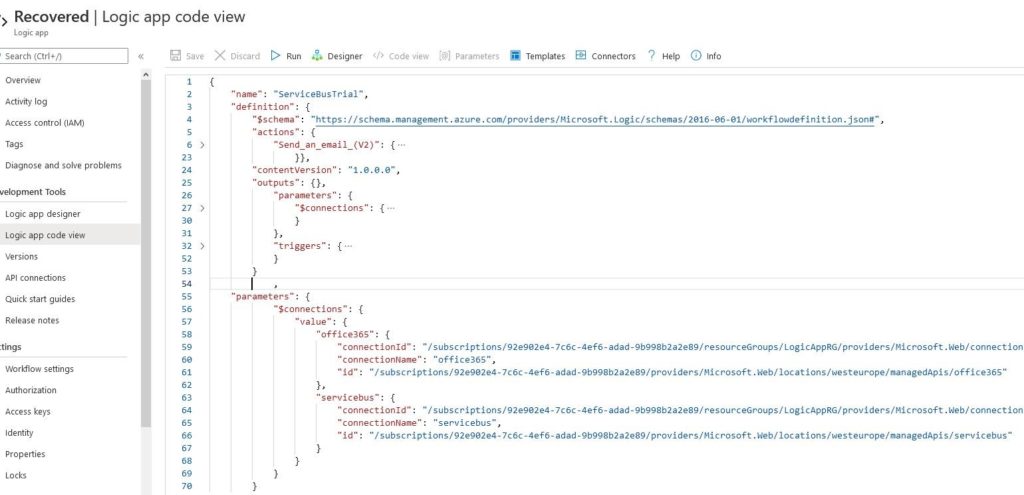
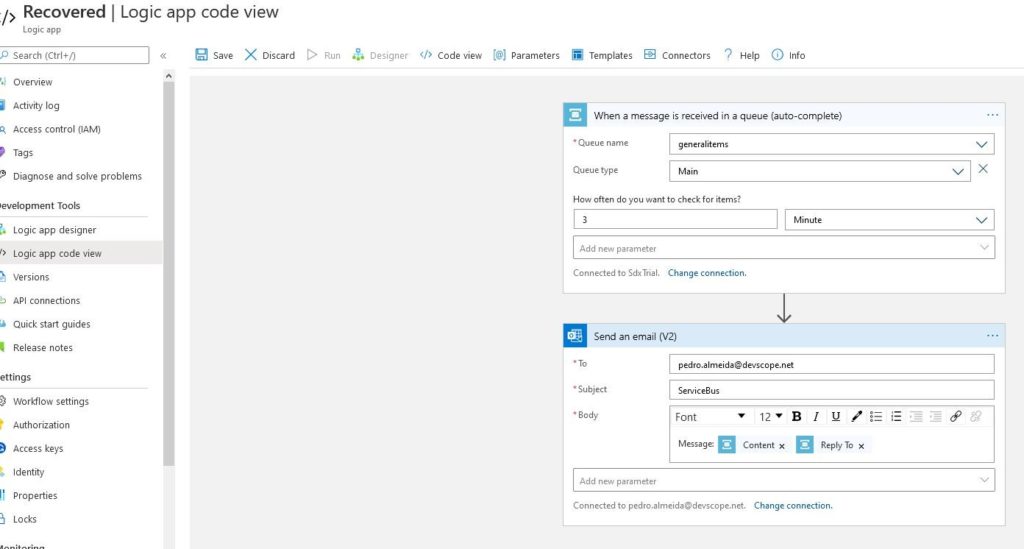
The “deleted resource” contains the JSON code and it is what we’re looking for. Although it requires a bit of magic dust to clean the data that’s in it, it does contain the most recent code you had. Migrating this to a new Logic App, either in Portal using Code View or in a VS solution, this is the best way to recover your little mistake.
The end result, should look like this:
And your Logic App should be ready to run!
It may not be the best way to get this nor the fastest, but it works and there’s no proper documentation for this. Hopefully, Microsoft will release a more convenient way to get your deleted code.