Historically, deploying BizTalk Server solutions across environments is or can be a complicated process depending how complex is your solution. There are many ways to deploy BizTalk artifacts for example:
Importing them as part of an application by using the Deployment Wizard (from an .msi file), importing them using BTSTask.exe – this is the default way to deploy across environments.
You can replace and use allow BTSTask, PowerShell scripts.
Or deploy them from Visual Studio – this is the default way to deploy to your development environment.
During the years, the BizTalk Server Community created an open-source deployment framework called Deployment Framework for BizTalk (BTDF) – https://github.com/BTDF/DeploymentFramework. The Deployment Framework for BizTalk is an easy-to-use toolkit for deploying and configuring your BizTalk solutions. In reality, BTDF is an MSBuild project with custom MSBuild tasks, and it can be customizable according to customer BizTalk project needs, and it is extensible. This framework brings new capabilities and advantages to deploying BizTalk Server solutions, but it also has limitations or disadvantages.
Azure DevOps and Azure Pipelines
Microsoft has introduced automated deployment of BizTalk Applications in BizTalk Server 2016 Feature Packs using Azure DevOps (previously called Visual Studio Team Services – VSTS). In BizTalk Server 2016 Feature Pack 1, automatic deployment and application lifecycle management (ALM) experience was introduced. The automatic deployment process has been improved with the release of BizTalk Server 2016 Feature Pack 2. These features were only available on the Enterprise edition of BizTalk Server 2016.
BizTalk Server 2020 brings all these functionalities out-of-the-box across all editions: Enterprise, Standard, Development, or Branch.
To accomplish this, we need basically 3 steps:
BizTalk Server: Add a BizTalk Server Application project in your Visual Studio solution.
We will not address this topic today.
DevOps: Create a build agent.
DevOps: Create a Build and release Azure Pipeline.
Today we will talk about starting to configure your Azure Pipeline to create a BizTalk Server Build Agent.
Create a Personal Access Token
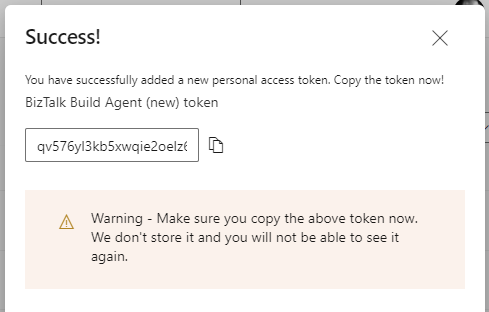
A personal access token (PAT) is created in DevOps. This token is your password and is used by the DevOps build agent to authenticate. The token is only shown when you create it. After that, it isn’t shown anymore. Once you create it, you should save it to another file in a rememberable location.
If you do not have an account, select Create new account, and enter a name. To manage your code, choose your personal preference between Git or Team Foundation Version Control. When finished, your new account is created, you will be able to access Azure DevOps Portal.
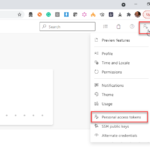
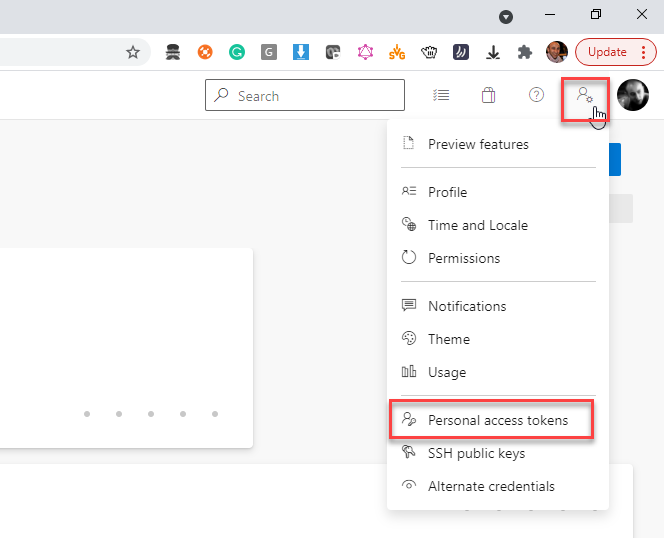
Select your DevOps organization and then click the top second right-side corner icon – User settings – and select User settings > Personal access tokens.
The Personal Access Tokens page will be presented a list of all existing personal access tokens.
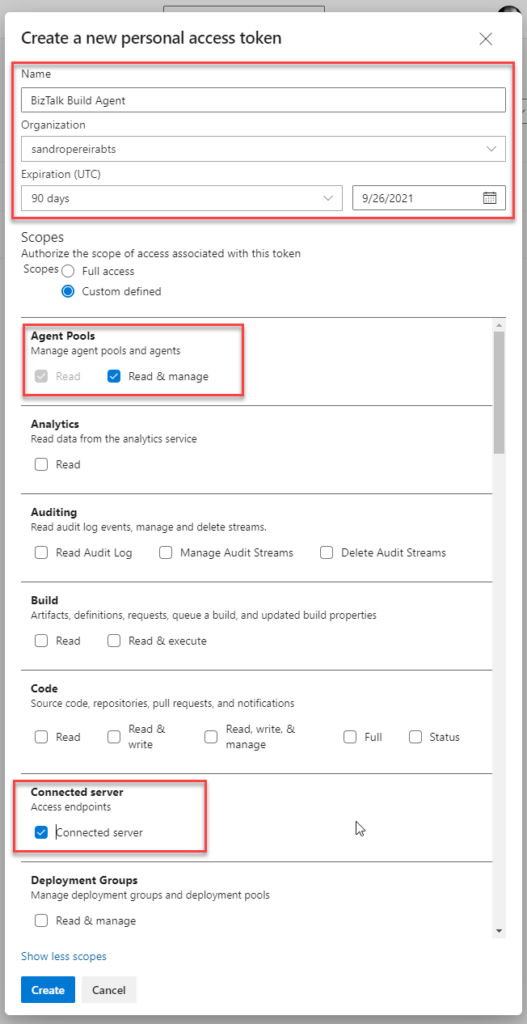
If you don’t have an existing PAT for your agent, select Add, and on the Create a new personal access token page, enter the following configuration:
On the Name property, enter a name for your PAT, for example, BizTalk Build Agent.
On the Organization property, leave the default organization.
On the Expiration (UTC) property, set an expiration date, for example, 90 days.
In Scopes, select Show all scopes, and then select Agent Pools – Read & manage option and Connected server – Connected server.
Select Create to finish the PAT creation.
Important Note: You need to save the token value. You need it in future steps. If you don’t know the access token value and didn’t take note of it anywhere, it cannot be retrieved. In this case, you need to create a new PAT.
Install the Build Agent
The build agent is installed on the BizTalk development computer. If using deployment groups, the build agent is installed on all the BizTalk servers you want to deploy to. Also, use these same steps to add a build computer, which might be different than the BizTalk development computer.
The following steps show you how to install the build agent on a single computer:
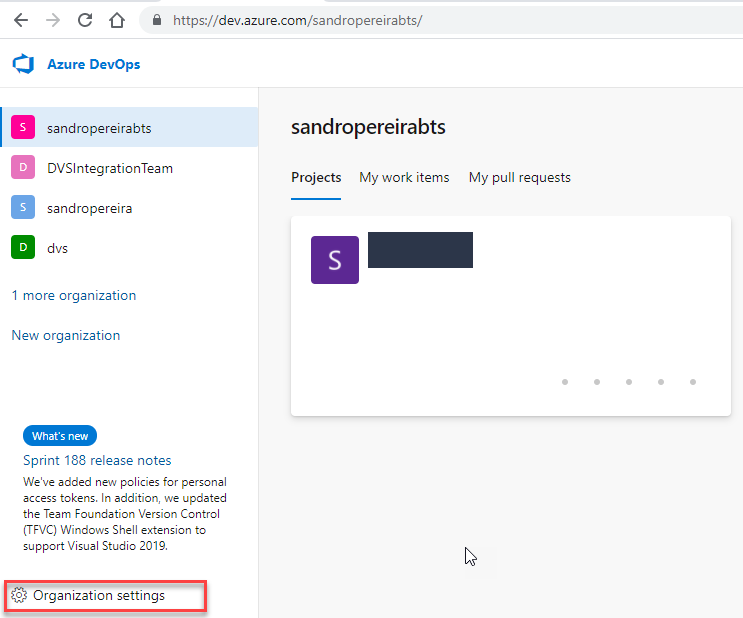
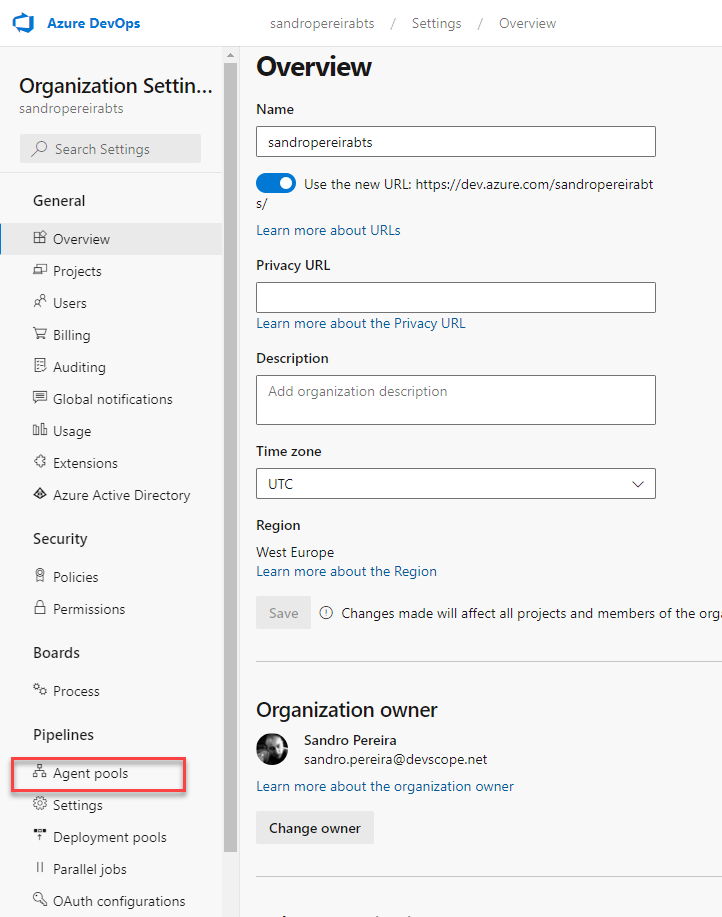
Open your Azure DevOps organization and then select the Organization settings icon and then Agent Pools.
Optional you can choose a Project inside your Organization and then select the Project settings icon and select Agent Pools.
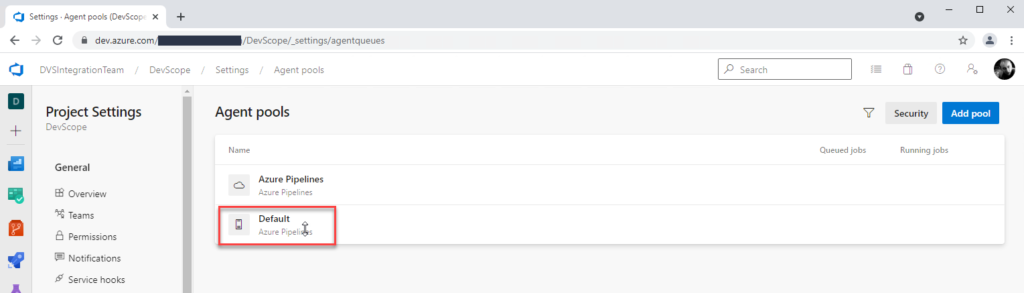
Open Agent pools page, select the Default (Azure Pipelines) agent.
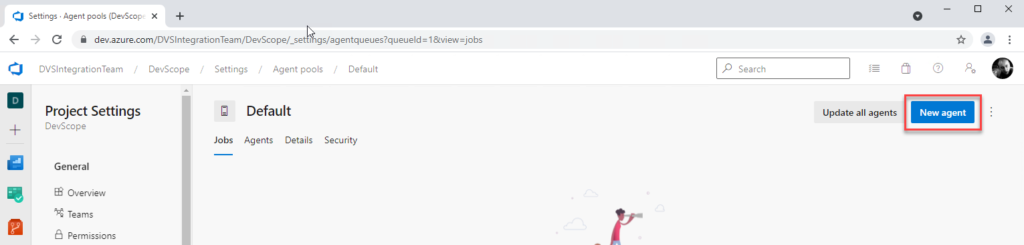
On the Default agent page, select New agent.
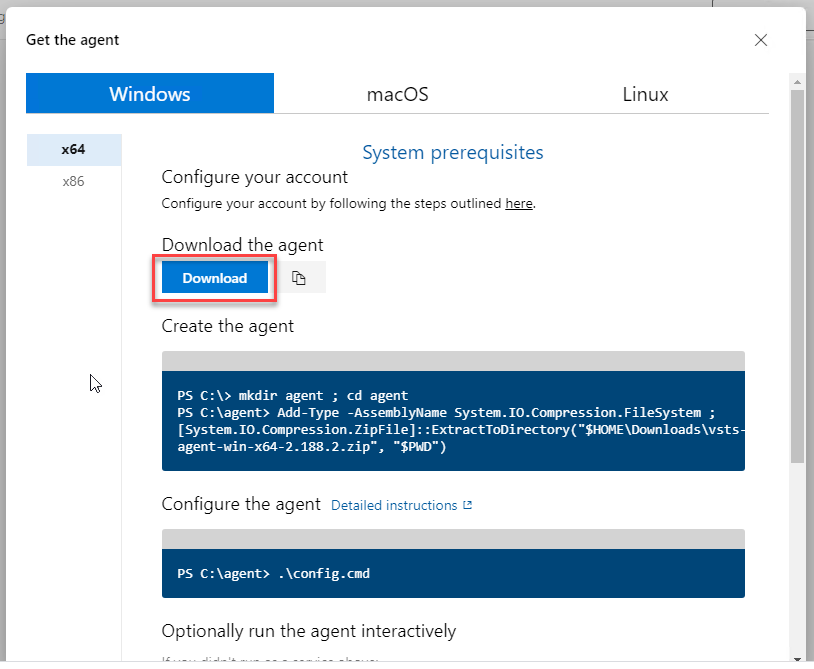
On the Get the agent pop-up window, select your SO, and on the Download the agent section, select Download.
It is important for you to save the file to your Downloads folder – on your BizTalk Server Development machine since the scripts will be referencing that folder.
Depending on your SO, this will download a zip file, for example, vsts-agent-win-x64-2.188.3.zip, that you will need to create the agent on the BizTalk Server Development machine.
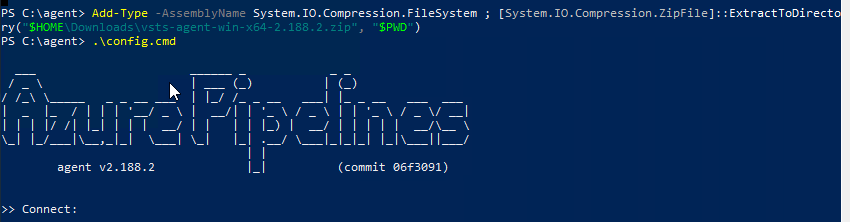
The first step is to create the agent on your BizTalk Server Development machine. To do that open Windows PowerShell as Administrator and type the following command:
Note: The vsts-agent file version changes. Make sure the zip file name is the correct one.
The second step, as you also see in the picture is to configure the agent. To do that type the following command:
PS C:agent> .config.cmd
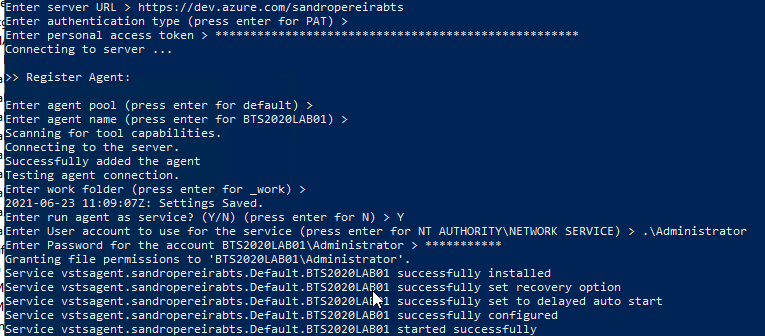
Enter the following details:
Server URL: Type https://dev.azure.com/{your-organization}.
Authentication Type: Enter PAT.
Personal access token: Paste your Azure DevOps token.
Agent pool: Click Enter for assuming the default value.
Agent name: Click Enter for assuming the default value.
Replace: Only displays if you have an existing agent.
Work folder: Click Enter for assuming the default value.
Run agent as a service: Enter Y.
User account: This value is up to you, but you may run into a permissions issue. Consider entering your current logged-on account, which is a local admin.
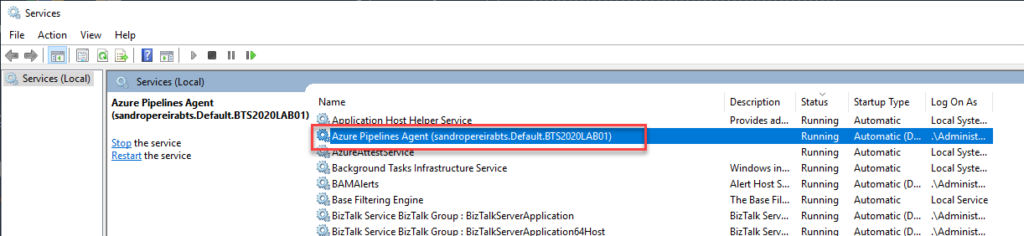
To validate if the agent was properly installed, Open services.msc to see the new service called Azure Pipelines Agent (<organization>.<agent pool>.<server>). The job should be running, otherwise type the following command:
PS C:agent> .run.cmd
Now, if we go back to our DevOps organization > Organization settings > Agent pools > Default (Azure Pipelines) > Agents, you will see your BizTalk Server Development server on the list:
I’m not a Dynamics 265 expert, and Dynamics 365 is not my focus area. Nevertheless, I couldn’t ignore the flood of requests to add the new Dynamics 365 logos, especially the App icons. It took a while, but they are finally here.
What’s new in this version?
These are the list of changes and additions present in this major release:
New shapes: There are new shapes on the following Visio Stencils files (.vssx):
MIS Office, Office 365 and Dynamics 365: add the new Dynamic 265 logo, Dynamics 365 App Icons, and Dynamics 365 Mixed Reality Icons.
MIS Azure Stencils and MIS Azure Additional or Support Stencils: there were a few new icons add to the stencils, most of them related to new preview features and integration services like the new Logic App icon.
SVG files: new SVG files added.
Microsoft Integration, Azure, Power Platform, Office 365 and much more Stencils Pack
Microsoft Integration, Azure, Power Platform, Office 365 and much more Stencils Pack it’s a Visio package that contains fully resizable Visio shapes (symbols/icons) that will help you to visually represent On-premise, Cloud or Hybrid Integration and Enterprise architectures scenarios (BizTalk Server, API Management, Logic Apps, Service Bus, Event Hub…), solutions diagrams and features or systems that use Microsoft Azure and related cloud and on-premises technologies in Visio 2016/2013:
BizTalk Server
Microsoft Azure
Integration
Integration Service Environments (ISE)
Logic Apps and Azure App Service in general (API Apps, Web Apps, and Mobile Apps)
Azure API Management
Messaging: Event Hubs, Event Grid, Service Bus, …
Azure IoT and Docker
AI, Machine Learning, Stream Analytics, Data Factory, Data Pipelines
SQL Server, DocumentDB, CosmosDB, MySQL, …
and so on
Microsoft Power Platform
Microsoft Flow
PowerApps
Power BI
Office365, SharePoint,…
DevOps and PowerShell
Security and Governance
And much more…
… and now non-related Microsoft technologies like:
SAP Stencils
The Microsoft Integration Stencils Pack is composed of 27 files:
Microsoft Integration Stencils
MIS Additional or Support Stencils
MIS AI and Machine Learning Stencils
MIS Apps and Systems Logo Stencils
MIS Azure Additional or Support Stencils
MIS Azure Black and Gray
MIS Azure Old Versions
MIS Azure Stencils
MIS Black and Cyan
MIS Buildings Stencils
MIS Databases and Analytics Stencils
MIS Deprecated Stencils
MIS Developer Stencils
MIS Devices Stencils
MIS Files and Message Types Stencils
MIS Generic Stencils
MIS Infrastructure and Networking Stencils
MIS Integration Fun
MIS Integration Patterns Stencils
MIS IoT Stencils
MIS Office, Office 365 and Dynamics 365
MIS Power BI Stencils
MIS Power Platform Stencils
MIS SAP Stencils
MIS Security and Governance
MIS Servers (Hexagonal) Stencils
MIS Users and Roles Stencils
Organisational Stencils
That you can use and resize without losing quality, in particular, the new shapes.
Download
You can download Microsoft Integration, Azure, BAPI, Office 365 and much more Stencils Pack for Visio from GitHub Here:
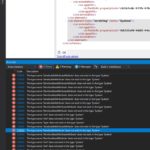
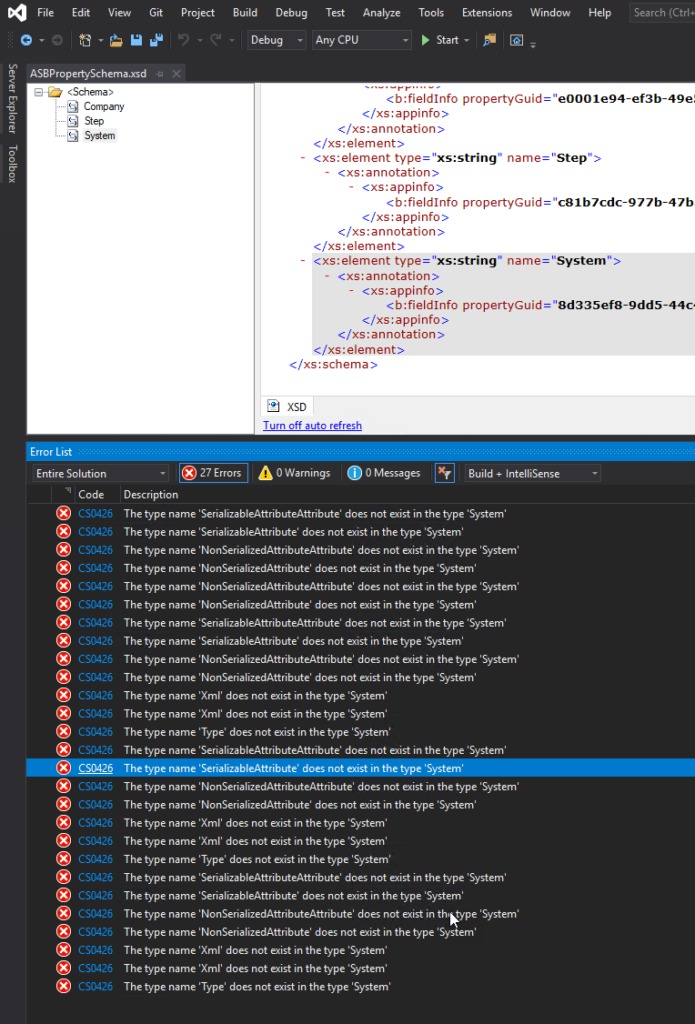
I’m just playing with BizTalk Server doing a small proof-of-concept using BizTalk Server and Azure Service Bus, and I was surprised with a few bunches of errors while I tried to compile my simple project:
Severity Code Description Project File Line Suppression State Error CS0426 The type name ‘SerializableAttributeAttribute’ does not exist in the type ‘System’ POC.BizTalk.AzureServiceBus C:DEVPOCPOC.BizTalk.AzureServiceBusPOC.BizTalk.AzureServiceBusSchemasASBPropertySchema.xsd.cs 9 Active Severity Code Description Project File Line Suppression State Error CS0426 The type name ‘Xml’ does not exist in the type ‘System’ POC.BizTalk.AzureServiceBus C:DEVPOCPOC.BizTalk.AzureServiceBusPOC.BizTalk.AzureServiceBusSchemasASBPropertySchema.xsd.cs 85 Active
Were is the full error list:
The type name ‘SerializableAttributeAttribute’ does not exist in the type ‘System’
The type name ‘SerializableAttribute’ does not exist in the type ‘System’
The type name ‘NonSerializedAttributeAttribute’ does not exist in the type ‘System’
The type name ‘NonSerializedAttribute’ does not exist in the type ‘System’
The type name ‘NonSerializedAttributeAttribute’ does not exist in the type ‘System’
The type name ‘NonSerializedAttribute’ does not exist in the type ‘System’
The type name ‘SerializableAttributeAttribute’ does not exist in the type ‘System’
The type name ‘SerializableAttribute’ does not exist in the type ‘System’
The type name ‘NonSerializedAttributeAttribute’ does not exist in the type ‘System’
The type name ‘NonSerializedAttribute’ does not exist in the type ‘System’
The type name ‘Xml’ does not exist in the type ‘System’
The type name ‘Xml’ does not exist in the type ‘System’
The type name ‘Type’ does not exist in the type ‘System’
The type name ‘SerializableAttributeAttribute’ does not exist in the type ‘System’
The type name ‘SerializableAttribute’ does not exist in the type ‘System’
The type name ‘NonSerializedAttributeAttribute’ does not exist in the type ‘System’
The type name ‘NonSerializedAttribute’ does not exist in the type ‘System’
The type name ‘Xml’ does not exist in the type ‘System’
The type name ‘Xml’ does not exist in the type ‘System’
The type name ‘Type’ does not exist in the type ‘System’
The type name ‘SerializableAttributeAttribute’ does not exist in the type ‘System’
The type name ‘SerializableAttribute’ does not exist in the type ‘System’
The type name ‘NonSerializedAttributeAttribute’ does not exist in the type ‘System’
The type name ‘NonSerializedAttribute’ does not exist in the type ‘System’
The type name ‘Xml’ does not exist in the type ‘System’
The type name ‘Xml’ does not exist in the type ‘System’
The type name ‘Type’ does not exist in the type ‘System’
Cause
Initially, I have to be honest, I was not realizing why this error was happening, mainly because the main error description may elude us and point us to DLL reference problems: Xml, System, SerializableAttributeAttribute, and so on. But looking carefully to the error message details, all of the errors will point us to the PropertySchema file.
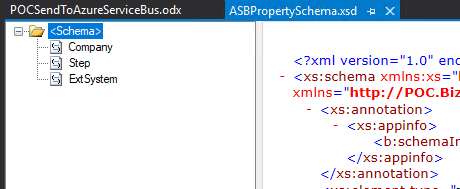
After realizing that, it was not difficult to realize that I had on my Property Schema an element call System. System is a reserved word that you CANNOT use inside the property schemas.
Solution
The solution to this issue is quite simple, you need to:
Rename your System element inside your Property Schema to another word, for example ExtSystem
Of course, fix all the dependencias inside your project, if you were already using this element iside your solution, for example Message Assigment shape
When migrating your BizTalk Server environment or deploy to a new or different environment, there are many different resources or configurations that you need to take into considerations like:
local queue creations
cloud queue creations
folder creations
and so on.
One of the common resources that we use on our integration solutions is local folders, whether for archiving or routing messages. I do not mean that it is a good practice or not. That you should do it or not, this is not the goal, only that this is common to happen.
In a first analysis, we could think that the quickest and most effective solution would be to copy and paste the folder structure from one environment to another. Still, it may not be the best solution in many cases since it may contain thousands of documents, which are unnecessary to copy/migrate.
This blog post will address how we can easily recreate a folder structure in a different environment/server using PowerShell.
PowerShell script to recreate a local folder structure
With this PowerShell sample, we will be able to recreate an existing local folder structure on a different BizTalk Server environment.
The output of this PowerShell script will be a creation of a different PS script containing the instructions that you can use to recreate all the folder structures in different environments.
When migrating your BizTalk Server environment or deploy to a new or different environment, there are many different resources or configurations that you need to take into considerations like:
local queue creations
cloud queue creations
folder creations
and so on.
In this blog post, I will address how we can easily “export” a list of existing local private Message Queues (MSMQ) and recreate them, and set proper permissions in a different environment/server.
PowerShell script to extract a list of all private Message Queues (MSMQ) names
With this PowerShell sample, we will be able to extract a list of all private Message Queues (MSMQ) names to a CSV file to be used on a different script to deployed these resources on a different BizTalk Server environment.
set or update the URI (address) or part of the URI on a list of BizTalk Server Receive Locations deployed in your BizTalk Server environment.
PowerShell script to create private Message Queues (MSMQ)
With this PowerShell sample, we will be able to create local Private Message Queues (MSMQ) and set proper permissions on a different BizTalk Server environment.
In my infamous crusade to document any BizTalk Server error that I have already come across, here is another error, warnings, cause, and solutions blog post, this time joining another of my favorite topic: Maps.
While trying to deploy a BizTalk Server solution – MSI – into production. While trying to import the BizTalk Application from the .msi file into the BizTalk group by using the BizTalk Server Administration Console by:
Opening the BizTalk Server Administration Console for the instance of BizTalk Server into which you want to import the application. Click Start, click All Programs, click Microsoft BizTalk Server 20xx, and then click BizTalk Server Administration.
In the console tree, expand BizTalk Server Administration, and then expand BizTalk Group.
Right-click Applications, point to Import and then click MSI file.
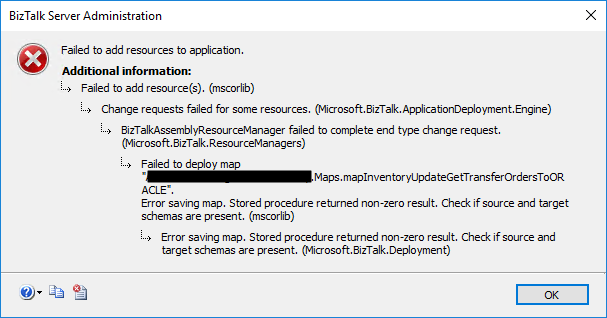
I came across this error during the progress phase:
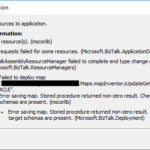
Failed to add resource(s). (mscorlib) – Change requests failed for some resources. (Microsoft.BizTalk.ApplicationDeployment.Engine) – BizTalkAssemblyResourceManager failed to complete end type change request. (Microsoft.BizTalk.ResourceManagers) – Failed to deploy map “FULLY-QUALIFIED-MAP-NAME”. Error saving map. Stored procedure returned non-zero result. Check if source and target schemas are present. (mscorlib) – Error saving map. Stored procedure returned non-zero result. Check if source and target schemas are present. (Microsoft.BizTalk.Deployment)
Cause
In previous versions of BizTalk Server, mainly 2010 and 2009, a bug was reported related to this issue. That problem occurred because BizTalk was trying to deploy the mapper assembly before the schema assembly. The solution for that case was installing the cumulative update 4 (or above) for BizTalk Server 2010 or the cumulative update 7 for BizTalk Server 2010.
Nevertheless, I was using BizTalk Server 2016, so that wasn’t the case. Luckily for us, the error provides a piece of clear evidence where the error is happening: FULLY-QUALIFIED-MAP-NAME.
To understand this issue, I went to my dev environment and opened that solution to analyze that specific map, mainly to know which schemas were being used. I then realize that one of the schemas was from an external assembly, a common schema that could be used by several applications.
The cause of this error was precisely that. I used a reference schema (external DLL) inside my map outside the project I was trying to deploy. But that assembly – DLL containing the map’s schema – was not yet deployed in the environment.
Solution
Make sure to deploy all the reference assemblies, special the ones outside your visual studio solution, are deployed before you deploy your solution. And in this case, make sure that all schemas are deployed before installing the maps.
But once again, the critical point here is to make sure to deploy all schemas outside your solution that are being used. Because, even if we use specific projects for maps and schemas inside our solution, BizTalk Server is smart enough to see the dependencies and deploy it accordingly.
After installing the external assembly that contains the schema used by that map, I was able to deploy the BizTalk project into production successfully.
When you deploy a new BizTalk Server solution to a different environment, and if for some reason, you don’t use or cannot use CI/CD (Continuous integration and continuous delivery):
Your environment is too small to justify using CI/CD;
The client doesn’t provide access to Visual Studio Team Services (VSTS);
Don’t like to use BTDF (Deployment Framework for BizTalk);
Not using custom tools like BizTalk Bindings Exporter tool;
Then one of the most common tasks you need to do is to change all the URI from all the ports, Receive Ports and Send Ports, from the binding files.
Of course, you can do it in many different ways, for example:
Before import to the new environment, open notepad or any other editor, and manually replace all the Inbound Transport URL and Outbound Transport URL;
Import AS IS and on the Administration Console, manually change these parameters;
Or script this process;
This is not always a quick and easy job. Luckily for us, these tasks can be automated, leading them to become simpler, faster, and avoid fewer errors.
This script that I will be showing you can be very useful, for example, in scenarios that during the lifecycle of existing applications, one system got updated or migrated to a different version or server (or both), and we need to update the URI or part of it on a range of the Receive Locations according to the new configuration/specification.
PowerShell script overview
With this PowerShell sample, we will be able to set or update the URI (address) or part of the URI on a list of BizTalk Server Receive Locations deployed in your BizTalk Server environment.
foreach($receivePort in $catalog.ReceivePorts)
{
# For each receive location in your environment
foreach($recLocation in $receivePort.ReceiveLocations)
{
# In this case ...
if($rcvLocations.Contains($recLocation.Name))
{
[string] $address = $recLocation.Address
$address = $address.Replace("DEV-SERVER-NAME","PRO_SERVER-NAME")
# Sample of additional custom changes
if($address.Contains("PREFIX"))
{
$address = $address.Replace("DATABASE","DATABASE-WITH-PREFIX-A")
}
else
{
$address = $address.Replace("DATABASE","DATABASE-WITH-PREFIX-B")
}
$recLocation.Address = $address
}
}
}
This script was tested in BizTalk Server 2016.
Download
THIS POWERSHELL SCRIPT IS PROVIDED “AS IS”, WITHOUT WARRANTY OF ANY KIND.
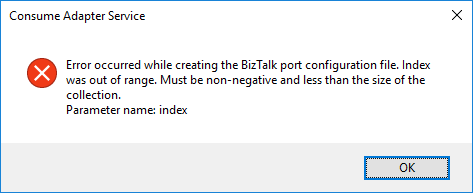
I have done these thousands of times and it is a very straightforward task once you know how to communicate with Oracle system but this time I got the following error:
Error occurred while creating the BizTalk port configuration file. Index was out of range. Must be non-negative and less than the size of the collection. Parameter name: index
A curiosity is that the Wizard was able to successfully generate the Oracle Schemas. The problem occurred while it was trying to generate the Binding file.
Cause
Unfortunately, I don’t know exactly the cause reason for this error. In my view, the same occurred due to some special character coming from the Oracle resources that are being consumed or incompatibilities between Oracle data types and .NET data types and that are used to generate the Binding file.
Nevertheless, this is not a stopping issue. You still have all the necessary BizTalk resources generated by the wizard: the Oracle schemas. The only thing that is not generated is the binding file, which is extremely useful to create the receive or send port in the BizTalk Server Administration Console. However, despite this constraint, you are still able to manually create the port without requiring the binding file.
Solution
Well, you know me, it is possible to manually create the ports without requiring the binding files, however, this is an accelerator that I prefer not to lose. So, I had to investigate and solve this problem, before it appears more often.
And in fact, the solution is quite easy:
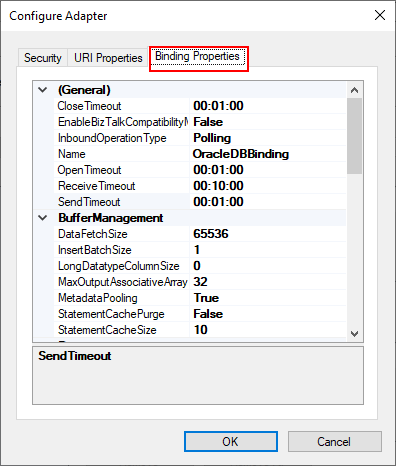
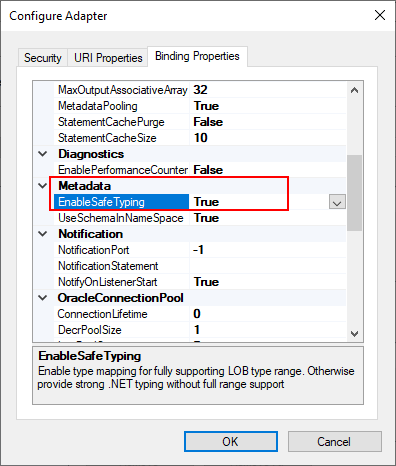
On the Consume Adapter Service Schema Generator Wizard, while you are configuring the connection string to Oracle, configure the URI, select the Binding Properties tab.
On the Binding Properties tab, scroll down to the Metadata section. There you will find a property called: EnableSafeTyping.
This feature controls how the adapter surfaces certain Oracle data types and by default this value is false.
To solve this issue you need to change the EnableSafeTyping value to true.
Since not all .NET and Oracle types are created equally, we occasionally need to set the value true for this property to handle some constraints around data types.
This is not a unique Oracle issue, this same error may happen when you are trying to generate schemas from SAP also.
BizTalk Server 2020 – 20 days, 20 posts – day 3. Sorry for the delay but with this COVID-19 situation and with 3 small kids at home, sometimes it can be a challenge to find time to do community work and to write. Nevertheless, for today I have chosen to migrate another crucial and productivity tool that I really enjoy using it: BizTalk Bindings Exporter Tool to be compatible with BizTalk Server 2020. Once again, I hope you enjoy it as much as I do.
BizTalk Bindings Exporter Tool
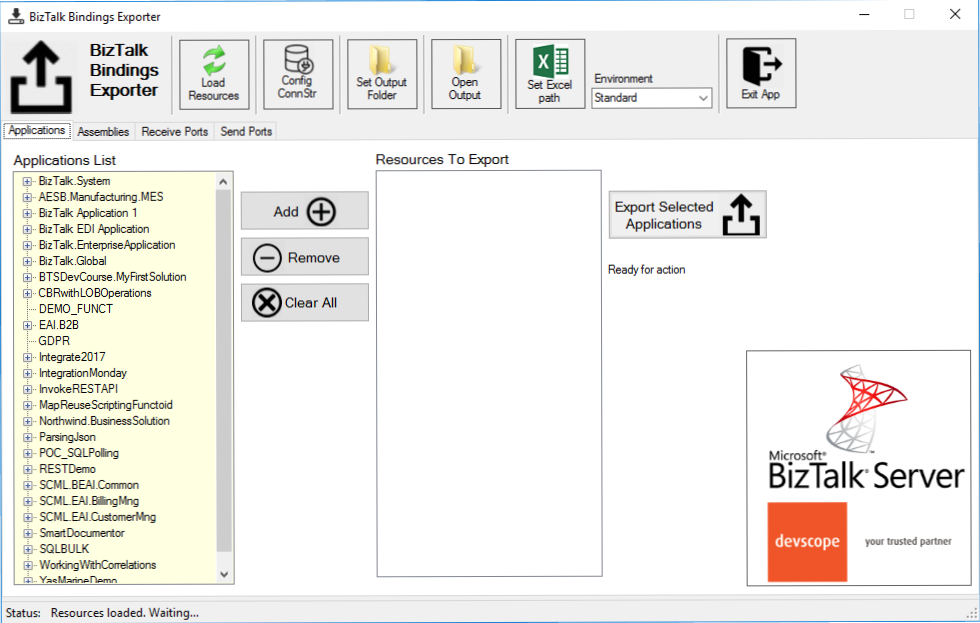
BizTalk Binding Exporter Tool is a simple tool that will suppress the absence of advanced binding file generation capabilities in the BizTalk Server Administration Console allowing you to generate and export a binding file from BizTalk Applications in an intuitive and easy way.
Exporting a BizTalk Server Application binding is, at first sight, a simple and quick task that can be done using the BizTalk Server Administration Console. But even in simple tasks, we may encounter challenges that require us to perform some monotonous and boring manual operations that consume some of our precious time and are always subject to failures.
Normally the binding exportation starts in development, but we also will need to generate the same bindings for other environments like production and for that we normally need to open the binding file and replace/fix the differences for each different environment… which is normally a tedious operation. What we need to replace is mainly:
the URI’s: it should be fixed, but it is not mandatory. If you know what you are doing, you can fix them directly on the environment after you import the Binding.
the host instances: not mandatory, if you have the same host and host instances names across all your different environments (as best practices will tell you to do).
the NT Group Name associated in the Services (Orchestrations): according to securities best practices you shouldn’t use the same BizTalk Groups in different environments, so in this case, if you follow these best practices, you need to change these parameters in your binding file.
Normally, everyone changes the URI’s but neglecting the other parameters may be causing problems during the Binding import.
This tool will extend default BizTalk Server capabilities transforming the tedious and sometimes complicate binding generation a little simple and easy.
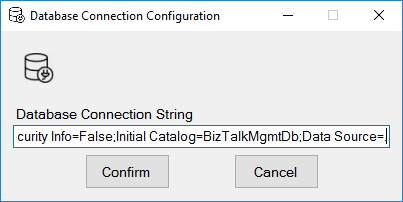
You just need to specify the connection string to the BizTalk Management database (BizTalkMgmtDb)
And this tool allows you to generate and export binding files with the following capabilities:
Export binding(s) file(s) for an entire Application or a list of Applications;
Export binding(s) file(s) from a specify Assembly or list of Assemblies;
Export binding(s) file(s) from a Receive Port or list of Receive Ports;
Export binding(s) file(s) from a Send Port or list of Send Ports;
Or Generate different binding files for each environment if you create an Excel File with the mapping for each environment ;
Other versions
This tool is also available for the following BizTalk Server versions:
You probably wonder why I haven’t written anything significant yet about this new version of the product. And I could come up with several real reasons but that is not the point here. However, to compensate for this “delay” I will start a crazy personal challenge, which I don’t know where I will find the time, to write 20 posts focus on BizTalk Server 2020 in the next 20 days: BizTalk Server 2020 – 20 days, 20 posts.
This series of posts could be about how to do certain things, what’s new in the product, step by steps guides, tools, components, tips and so on. And to start this series of posts I have chosen to migrate the BizTalk Port Multiplier Tool to be compatible with BizTalk Server 2020.
BizTalk Port Multiplier Tool
BizTalk Port Multiplier Tool is a simple tool that aims to simplify the port “cloning” process by allowing you to quickly “clone or duplicate” any existing port: Receive Port or Send Port.
Send Ports are quite easy to archive, you only need to give a different name to the port, and you can clone it;
Receive Ports are tricky because they may contain several Receive Locations and each URI needs to be unique;
This tool will extend default BizTalk Server capabilities transforming the tedious and sometimes complicate port creation based on an existing one a little simple and easy allowing you to:
Create a new Receive Port based on an existing one;
It will also export the binding file from that new Receive Port;
Create a new Send Port based on an existing one;
It will also export the binding file from that new Send Port;
Generate different binding files for each environment
Why do I need to “clone” a Receive Port?
Sometimes you also need to create a receive port with similar configurations of an existing one, also changing only a few settings or simple the URI, and instead of manually recreating, you can have 90% of the process done automatically.
Sometimes it is practical, occasionally, or in some scenarios, it may not work, but in most cases, it will. So it is a best-effort operation and not an exact clone because they may have several Receive Locations, and each Address/URI needs to be unique. So, you then need to go to each receive location and reconfigure them.
Other versions
This tool is also available for the following BizTalk Server versions: