Recently, a client asked me for help rectifying some existing logic apps in their environment because their resource had left the company. Not only to rectify the project but to put it in a better shape and use all good best practices.
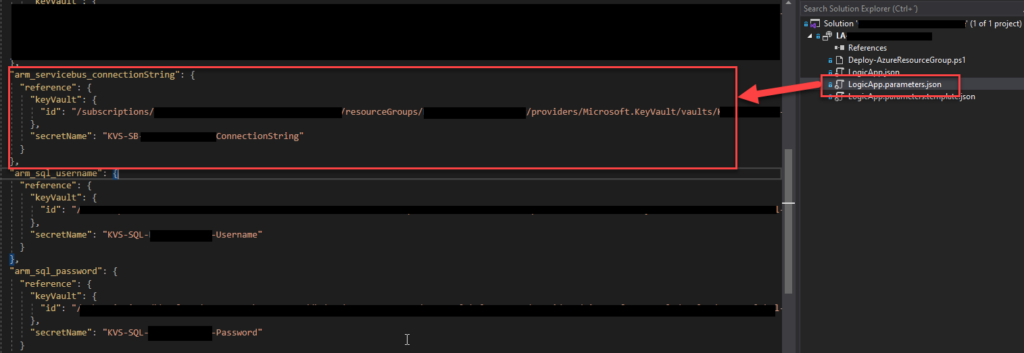
One of the tasks we decided to do was reference secrets in Key Vault for the deployment process, whether through CI/CD or directly through Visual Studio. We had administrator access to the Key Vault in the dev environment, so we were able to easily create those secrets and reference them in the Logic App parameter file, for example, an Azure Service Bus connection string. For those who are not aware, we can archive that by using the code below:
The problem was that when we tried to deploy the solution through Visual Studio, we got the following error:
Logic app visual studio deployment Multiple error occurred: Forbidden,Forbidden,Forbidden. Please see details.
Without any more detail. After some analysis, we realized that the number of Forbidden words in the messages matched the number of key vault secrets we were trying to reference. When we commented on them all and only left one, then we got an error message with more detail:
The secret of KeyVault parameter ‘name’ cannot be retrieved. Http status code: ‘Forbidden’. Error message: ‘Access denied to first party service. Caller: name=ARM;tid=;appid=… Vault:;location=’. Please see https://aka.ms/arm-keyvault for usage details.
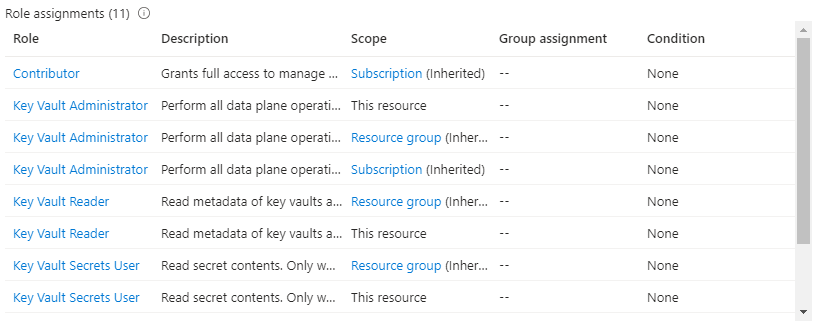
Initially, I thought that was a Key Vault access permission issue, even though I was a Key Vault administrator. However, sometimes, we also need some RBAC permission. In the end, I ended up giving Administrator, Reader, and Secret User permission access at the key vault, resource group, and subscription level:
Still, I was getting the same error!
Cause
When you are developing a Logic App Consumption, this is, in fact, an ARM template project and an ARM template deployment. So, when we reference a Key Vault secret in the LogicApp.parameters.json file, we are referencing a secure parameter that will be used during the ARM template deployment.
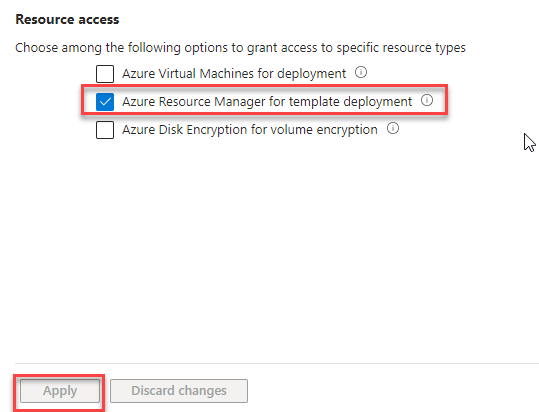
The problem is that to be able to access the key vault by the resource manager, you need to change the access policy to allow Azure Resource Manager for template deployment.
You can see this on the official documentation here:
When you need to pass a secure value (like a password) as a parameter during deployment, you can retrieve the value from an Azure Key Vault. To access the Key Vault when deploying Managed Applications, you must grant access to the Appliance Resource Provider service principal. The Managed Applications service uses this identity to run operations. To successfully retrieve a value from a Key Vault during deployment, the service principal must be able to access the Key Vault.
Solution
To solve this issue is quite very simple:
Sign in to the Azure Portal.
Open your key vault. Enter key vaults in the search box or select Key vaults.
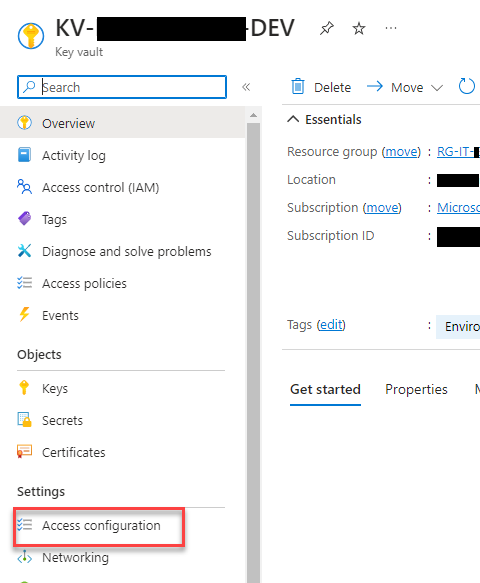
On the Key Vault, select Access configuration under the Settings section
Select Azure Resource Manager for template deployment under Resource access. Then, select Apply.
Now, you will be able to successfully reference the Key Vault secure parameter and deploy the Logic App Consumption solution from Visual Studio.
Hope you find this helpful! So, if you liked the content or found it useful and want to help me write more, you can buy (or help me buy) my son a Star Wars Lego!
Author: Sandro Pereira
Sandro Pereira lives in Portugal and works as a consultant at DevScope. In the past years, he has been working on implementing Integration scenarios both on-premises and cloud for various clients, each with different scenarios from a technical point of view, size, and criticality, using Microsoft Azure, Microsoft BizTalk Server and different technologies like AS2, EDI, RosettaNet, SAP, TIBCO etc.
He is a regular blogger, international speaker, and technical reviewer of several BizTalk books all focused on Integration. He is also the author of the book “BizTalk Mapping Patterns & Best Practices”. He has been awarded MVP since 2011 for his contributions to the integration community.
View all posts by Sandro Pereira
Last week, I was helping a client start their footprint on Azure by deploying our very first services: an Azure Function and a few Logic Apps Consumption. Because this was the first introduction to Azure to this client, we decided for a start small and get bigger approach. So, they have created a pay-per-use subscription and gave me access to it.
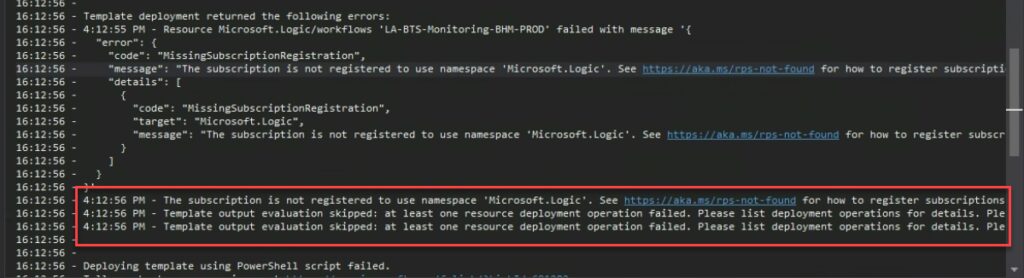
If we didn’t find any issue deploying our Azure Function, the same cannot be said for the Logic Apps. And when we were trying to deploy it from Visual Studio, the same solution that we had deployed without issue in other subscriptions, we were surprised to encounter the following error:
The subscription is not registered to use namespace ‘Microsoft.Logic’. See https://aka.ms./rps-not-found for how to register subscriptions.
Causes
Basically, this error means that the service you are trying to use is not currently registered in your Azure subscription.
You can change this at any point by allowing or prohibiting using specific namespace (services) in our Azure Subscription. Of course, as with everything in Azure, you need permissions on the subscription to execute these actions.
Solutions
The solution to this problem is quite simple to accomplish. You just need to:
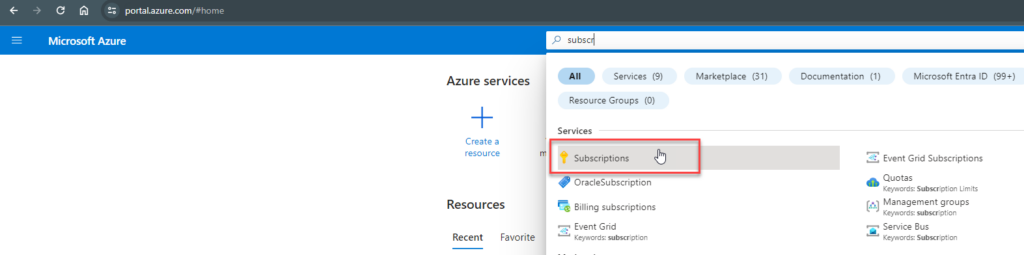
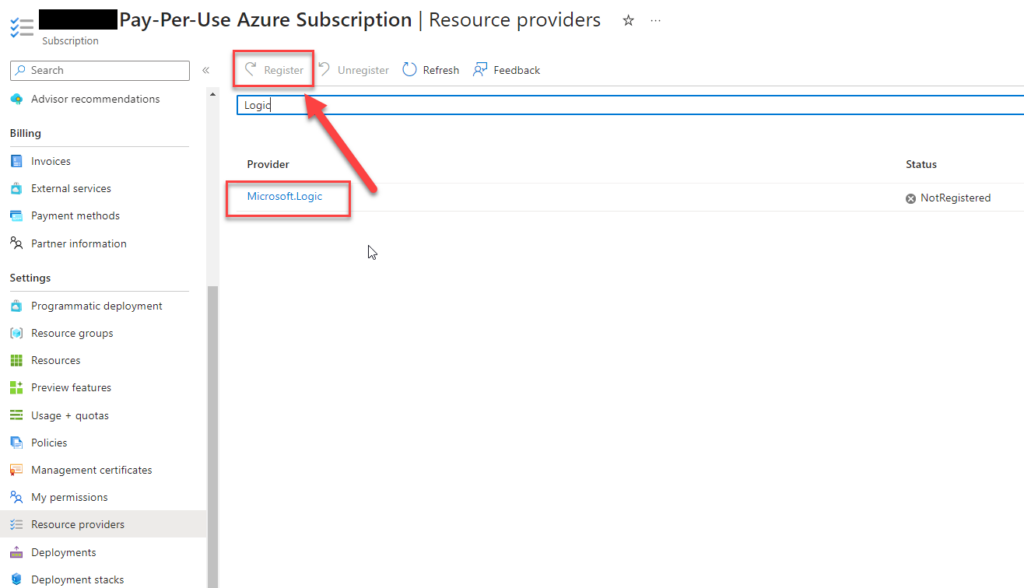
From the list of subscriptions page, select the subscription you want to use for registering the resource provider.
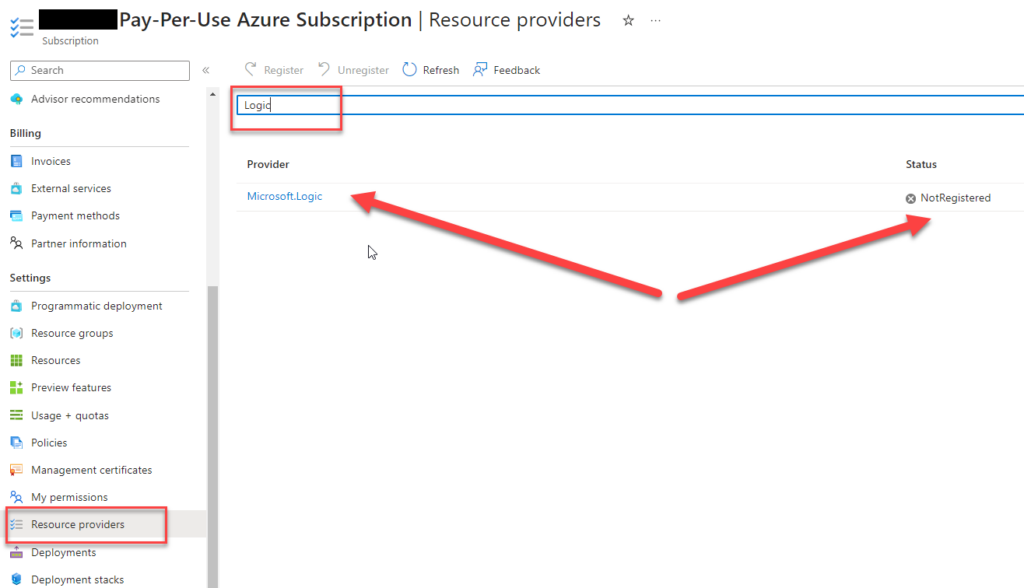
On the Subscription page, from the left menu, select the Resource providers option under the Settings section.
On the Resource providers page, on the search type Logic.
Click on the Microsft.Logic row, and that will enable the Register button. Click on the Register button.
After you click register, the provider will be registered, and you should be able to use the Logic App Service.
After these steps, we were able to deploy our Logic Apps from Visual Studio.
Hope you find this helpful! So, if you liked the content or found it helpful and want to help me write more content, you can buy (or help buy) my son a Star Wars Lego!
Author: Sandro Pereira
Sandro Pereira lives in Portugal and works as a consultant at DevScope. In the past years, he has been working on implementing Integration scenarios both on-premises and cloud for various clients, each with different scenarios from a technical point of view, size, and criticality, using Microsoft Azure, Microsoft BizTalk Server and different technologies like AS2, EDI, RosettaNet, SAP, TIBCO etc.
He is a regular blogger, international speaker, and technical reviewer of several BizTalk books all focused on Integration. He is also the author of the book “BizTalk Mapping Patterns & Best Practices”. He has been awarded MVP since 2011 for his contributions to the integration community.
View all posts by Sandro Pereira
Errors rarely appear alone; from time to time, it’s as if a project is determined to challenge you. But I find it rather enjoyable. It offers me inspiration and creative material for writing! Today’s U found an unfamiliar (or rare) problem that happened while I was migrating an old BizTalk Server 2013 solution into a recent version of the BizTalk Server.
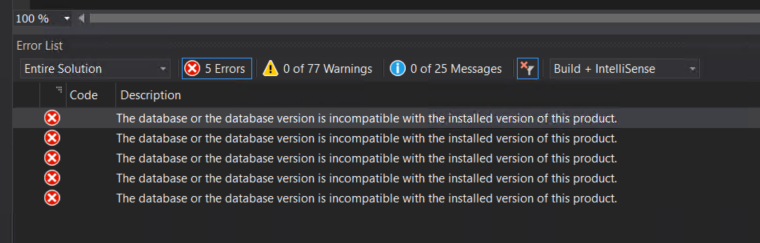
Following the migration of the Visual Studio solution to a newer version, which also involved changing the target .NET framework, I encountered the following error when attempting to deploy the BizTalk Server Visual Studio solution:
The database or the database version is incompatible with the installed version of this product.
Causes
Normally, when we are migrating side-by-side BizTalk Server solutions, that means that we are creating a new BizTalk Server developer environment that, most of the time, does not have access to the previous environment. But you must know that if you copy a BizTalk Server Visual Studio folder solution from the old environment to the new one, it will also copy the *.btproj.user files. This is an XML file that contains not only the BizTalk deployment Settings but also several personal user settings like References path, test file names, and so on.
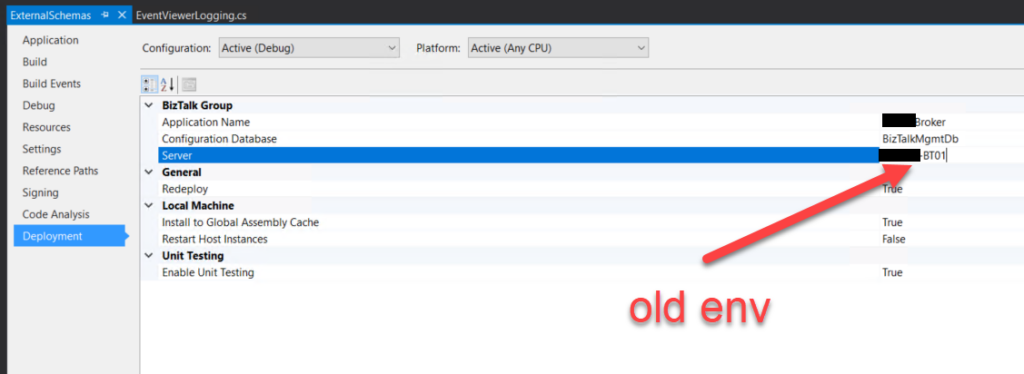
Regarding BizTalk deployment properties, all this setting are stored in the “*.btproj.user” file:
Application Name (ApplicationName): This is the name of the BizTalk application that we want to deploy the assemblies in this project. If the application already exists, the assemblies will be added to it when you deploy the project. If the application does not exist, the application will be created. If this field is blank, the assemblies will be deployed to the default BizTalk application in the current group (“BizTalk Application 1”). Names that include spaces must be enclosed in double quotation marks (“).
Configuration Database (ConfigurationDatabase): This is the name of the BizTalk Management database for the group. The default value is “BizTalkMgmtDb”.
Server (Server): This is the name of the SQL Server instance that hosts the BizTalk Management database on the local computer. By default, this is usually the name of the local computer.
Redeploy (Redeploy): Boolean property that indicates if you want to allow redeployments from within Visual Studio. Setting this to “True” (the default) enables you to redeploy the BizTalk assemblies without changing the version number.
Install to Global Assembly Cache (Register): Setting this to “True” (the default) installs the assemblies to the Global Assembly Cache (GAC) on the local computer when you install the application. Set this to False only if you plan to use other tools for this installation, such as gacutil.
Restart Host Instances (RestartHostInstance): Setting this to “True” automatically restarts all host instances running on the local computer when the assembly is redeployed. If set to False (the default), you must manually restart the host instances when redeploying an assembly.
Well, if you do not change, it will contain the previous SQL Server name and instance.
So, if this SQL Server is accessible by this machine and if you try to deploy the solution, you will get an error saying that the database version is incompatible because now you are using a higher version of the product.
Solutions
The solution is quite simple to accomplish:
Access the Deployment tab of the Properties of each BizTalk Server project inside the solution.
And make sure that you set correctly at least the Server name (or name and instance)
If you want to play safe, it will give you a little bit of more work, but you can:
Close the solution.
2Open Explorer and delete *.btproj.user files.
Reopen the solution, reconfigure the Deployment properties – this time mainly the Application name, because the rest will be properly configured by default – rebuild and deploy the solution.
Both these options will fix this problem.
Hope you find this helpful! So, if you liked the content or found it helpful and want to help me write more content, you can buy (or help buy) my son a Star Wars Lego!
Author: Sandro Pereira
Sandro Pereira lives in Portugal and works as a consultant at DevScope. In the past years, he has been working on implementing Integration scenarios both on-premises and cloud for various clients, each with different scenarios from a technical point of view, size, and criticality, using Microsoft Azure, Microsoft BizTalk Server and different technologies like AS2, EDI, RosettaNet, SAP, TIBCO etc.
He is a regular blogger, international speaker, and technical reviewer of several BizTalk books all focused on Integration. He is also the author of the book “BizTalk Mapping Patterns & Best Practices”. He has been awarded MVP since 2011 for his contributions to the integration community.
View all posts by Sandro Pereira
Continuous integration/continuous delivery (CI/CD) pipelines are a practice focused on improving software delivery using a DevOps approach.?
A CI/CD pipeline may sound like overhead, but it isn’t. It’s essentially a runnable specification of the steps that any developer needs to perform to deliver a new software product version. In the absence of an automated pipeline, Engineers would still need to perform these steps manually and, therefore, be far less productive.
This is a must to have when deploying resources to Azure! Especially for non-development environments.
In this whitepaper, I will address and explain in a detailed way a complete guide for automating the implementation of Logic Apps Standard using Azure DevOps Pipelines.
I will explain in detail all the basic things you have to know, from the creation of a Logic App Standard on Visual Studio Code to everything you need to create and configure inside DevOps to archive the implementation of the CI/CD process.
What’s in store for you?
This whitepaper will give you a detailed understanding of the following:
An introduction to:
What are Continuous Integration (CI) and Continuous Deployment (CD)?
What are CI/CD Pipelines?
What is Azure DevOps?
Create an organization or project collection in Azure DevOps
Create a project in Azure DevOps
Building your Logic App Standard from scratch
Publish your code from Visual Studio Code
A step-by-step approach to building Azure Pipelines
A step-by-step approach to building Azure Release Pipelines
Historically, deploying BizTalk Server solutions across environments is or can be a complicated process depending on how complex is your solution. There are many ways to deploy BizTalk artifacts for example:
Importing them as part of an application by using the Deployment Wizard (from a .msi file), importing them using BTSTask.exe – this is the default way to deploy across environments.
You can replace and use allow BTSTask, and PowerShell scripts.
Or deploy them from Visual Studio – this is the default way to deploy to your development environment.
Throughout the years, the BizTalk Server Community created an open-source deployment framework called Deployment Framework for BizTalk (BTDF) – https://github.com/BTDF/DeploymentFramework. The Deployment Framework for BizTalk is an easy-to-use toolkit for deploying and configuring your BizTalk solutions. In reality, BTDF is an MSBuild project with custom MSBuild tasks and it can be customizable according to customer BizTalk project needs, it is also extensible. This framework brings new capabilities and advantages to deploying BizTalk Server solutions, but it also has limitations or disadvantages.
Microsoft has introduced automated deployment of BizTalk Applications in BizTalk Server 2016 Feature Packs using Azure DevOps (previously called Visual Studio Team Services – VSTS). In BizTalk Server 2016 Feature Pack 1, automatic deployment and application lifecycle management (ALM) experience was introduced. The automatic deployment process has been improved with the release of BizTalk Server 2016 Feature Pack 2. These features were only available on the Enterprise edition of BizTalk Server 2016.
BizTalk Server 2020 brings all these functionalities out-of-the-box across all editions: Enterprise, Standard, Development, or Branch.
To accomplish this, we need basically 3 main steps:
BizTalk Server: Add a BizTalk Server Application project to your Visual Studio solution.
DevOps: Create a build agent.
DevOps: Create a Build and release Azure Pipeline.
This whitepaper will address and explain how you can implement CI/CD oriented to BizTalk Server using Azure DevOps Pipelines.
In this whitepaper, Pedro Almeida and I will provide a detailed introduction to CI/CD. It teaches how to Create a project collection. Learn how to prepare the visual studio for projects end to end. A well-defined pipeline. Helps you understand how to save development time by thinking long-term since it is a low-cost, high-return scenario.
What’s in store for you?
This whitepaper will give you a detailed understanding of the following:
An introduction to:
What is a CI/CD Pipeline?
What are CI/CD Pipelines?
What is Azure DevOps?
Create an organization or project collection in Azure DevOps
Create a project in Azure DevOps
Preparing your Visual Studio BizTalk Server project for CI/CD
Creating a BizTalk Server Deployment Project
Add the application project
Making your Bindings dynamic for deployment
Configure the BizTalkServerInventory JSON template
The full 7.3 version is complete with the release of v.7.3.1. This was a massive work of adding new shapes of new services that appear on Azure and changing the existing one with the new version of the shapes. Work is done and I hope you enjoy it!
What’s new in this version?
This is the list of changes and additions present in this release:
New shapes on MIS Azure Stencils, MIS Azure Additional or Support Stencils, MIS Developer Stencils, and MIS Security and Governance packages: add a considerable amount of new shapes of new services that appear on Azure has both changing the existing one with their new layout.
Move old versions of the shape layout to MIS Azure Old Versions package.
New shapes on MIS AI and Machine Learning Stencils: several new shapes add it to this package with several Cognitive Services.
New shapes on Microsoft Integration Stencils: some new shapes add it to this package describing Schemas, Maps, Aggrements, Partners, Assemblies and so on.
Lock the aspect ratio of the new stencil icons: This was a requested made that can be very handly to protects against accidental resizing with another shape aspect.
SVG files: new SVG files added.
Microsoft Integration, Azure, Power Platform, Office 365 and much more Stencils Pack
Microsoft Integration, Azure, Power Platform, Office 365 and much more Stencils Pack it’s a Visio package that contains fully resizable Visio shapes (symbols/icons) that will help you to visually represent On-premise, Cloud or Hybrid Integration and Enterprise architectures scenarios (BizTalk Server, API Management, Logic Apps, Service Bus, Event Hub…), solutions diagrams and features or systems that use Microsoft Azure and related cloud and on-premises technologies in Visio 2016/2013:
BizTalk Server
Microsoft Azure
Integration
Integration Service Environments (ISE)
Logic Apps and Azure App Service in general (API Apps, Web Apps, and Mobile Apps)
Azure API Management
Messaging: Event Hubs, Event Grid, Service Bus, …
Azure IoT and Docker
AI, Machine Learning, Stream Analytics, Data Factory, Data Pipelines
SQL Server, DocumentDB, CosmosDB, MySQL, …
and so on
Microsoft Power Platform
Microsoft Flow
PowerApps
Power BI
Office365, SharePoint,…
DevOps and PowerShell
Security and Governance
And much more…
… and now non-related Microsoft technologies like:
SAP Stencils
The Microsoft Integration Stencils Pack is composed of 28 files:
Microsoft Integration Stencils
MIS Additional or Support Stencils
MIS AI and Machine Learning Stencils
MIS Apps and Systems Logo Stencils
MIS Azure Additional or Support Stencils
MIS Azure Black and Gray
MIS Azure Old Versions
MIS Azure Stencils
MIS Black and Cyan
MIS Buildings Stencils
MIS Databases and Analytics Stencils
MIS Deprecated Stencils
MIS Developer Stencils
MIS Devices Stencils
MIS Files and Message Types Stencils
MIS Generic Stencils
MIS Infrastructure and Networking Stencils
MIS Integration Fun
MIS Integration Patterns Stencils
MIS IoT Stencils
MIS Office, Office 365 and Dynamics 365
MIS Power BI Stencils
MIS Power Platform Stencils
MIS SAP Stencils
MIS Security and Governance
MIS Servers (Hexagonal) Stencils
MIS Users and Roles Stencils
MIS API Connectors
Organisational Stencils
That you can use and resize without losing quality, in particular, the new shapes.
Download
You can download Microsoft Integration, Azure, BAPI, Office 365 and much more Stencils Pack for Visio from GitHub Here:
This is a topic that has been asked to me a few times, making me wonder how hard it actually was. Working with this nearly every day makes us assume some things are very easy, but not everyone has this insight.
So, exactly do we set variables for different environments and how does it work when we want to replace tokens?
Variables for different environments
Having multiple environments creates the need to have different values assigned to your variables, because, for example, that Test Webservice won’t work in PROD and you definitely don’t want to use that PROD file share and delete files in your DEV/Test environment.
Using Pipeline Variables helps you to set different values to different Stages.
This is extremely helpful because, even though you have to duplicate/triplicate variables, you won’t need to worry about the incorrect value going to the wrong stage. Also, having the Scope set to Release, it will affect all stages.
So, it’s a win-win situation.
But! It’s only valid for this Release Pipeline in specific. If you have another Release and some variables are common, you have to re-do everything… all, over, again.
Send in the Variable Groups!
Variable Groups
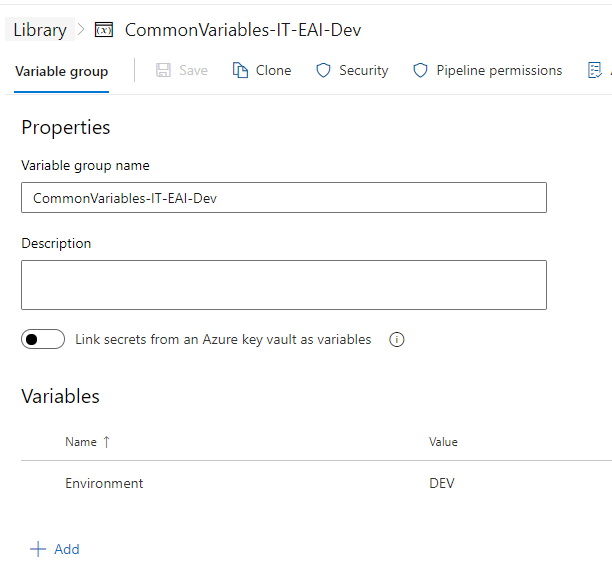
The Variable Groups are containers for variables that can be used in multiple Releases and Pipelines. Think of it as a common class in your project that you can reference anywhere.
You can define the Groups and their variables in the Library. Inside the group, you can set all the variables you need, and add to it any time as well, and assign the values right away.
Keep in mind that this is thought of as a static group, it’s not supposed to change often.
If you change a variable value or add a new one, it will not be considered in the already created releases. If anything changes in here, you will need to create new releases (not the pipelines) and redeploy them. When you create the release, it takes a snapshot of the values and uses them as they are. Thus the need to create a new one to get those new values.
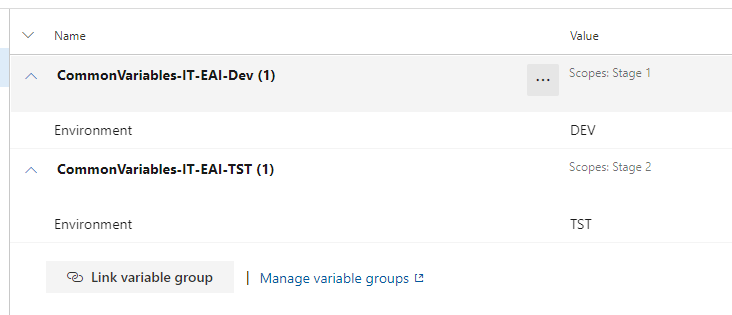
After linking the group to the Release, you will see that you can also set a Scope. This works exactly like the pipeline variables, they will only be used in that specific Stage and nowhere else.
Also, when expanded, you can see the values that are set for that group.
Now, how does the Token Replacement task works with this?
Replace Tokens
This task, our savior (yes, I like it very very much), comes to our rescue once again.
I’ve explained before how to use it and how it works.
But for this post, I’ll explain again. The task searches in the folders/files you’ve defined and tries to match the token that you’re setting in the definition with the one in the file(s). As the token is found, it uses a string.Replace function to inject the values in the files.
It will scour the Variables for a match and take the value to insert in the file.
But how does this link with the Variable Groups?
Well, at runtime, DevOps does a magical thing and sees the groups you’ve defined for a Stage as variables. So technically, it’s as if you’ve defined all the variables in one place and not in groups.
Pretty sweet, right?
So, the Replace Tokens will use all those variables and will try to replace them in your files. You don’t have to define the group or anything, it will just see the whole picture.
Hope this helps you with your automations and deployments.
In the previous posts of these series, we’ve talked about how to build and prepare your Logic App for CI/CD. In this last post, I’ll show you how to build your Azure Pipeline, making it prepared for any environment you need.
If you’ve missed the other posts, here are the links for them:
Assuming you already have your repo configured, building the pipeline is fairly simple and quick. I’m not a big fan of using YAML, I find it easier to use the classic editor, having the GUI seems more appealing to me.
Having your repo in place and all the code ready, you need create the Pipeline.
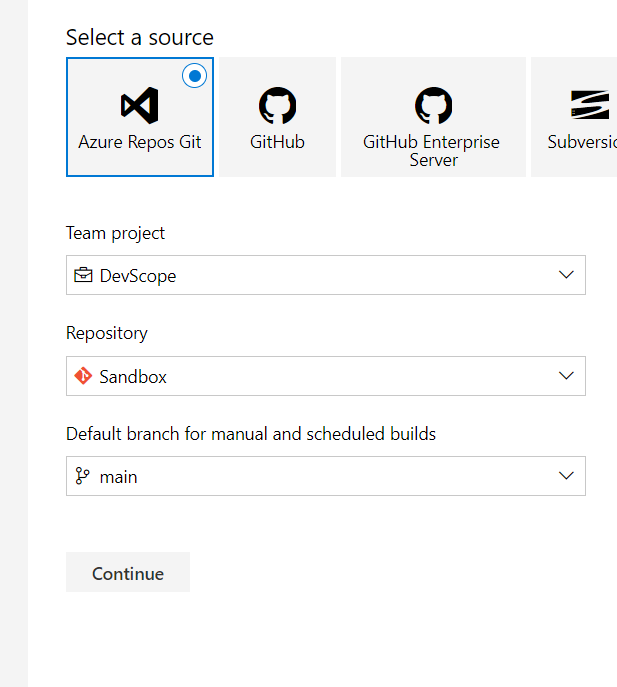
As such, you need to choose the classic editor (or venture yourself in YAML) and select your repo and branch.
The available templates are helpful but if you’re just trying to deploy logic apps, I’d suggest you start with an empty job, because you might have actions that are not necessary and you’ll have to delete them.
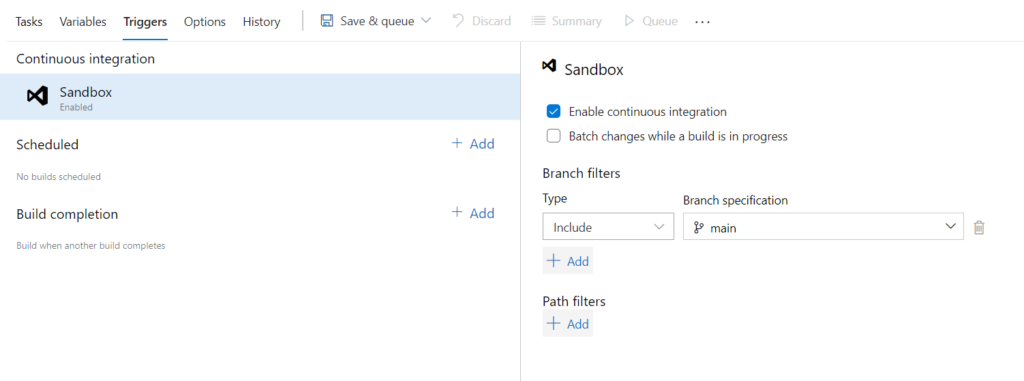
The first thing we’re going to do, is configure the pipeline for continuous integration. It doesn’t take much to achieve this, you just need to activate the needed triggers. By default, it will filter to your main branch, but you can change this and trigger for specific projects and branches. This comes in handy when you have multiple projects and you only want to include some in the build.
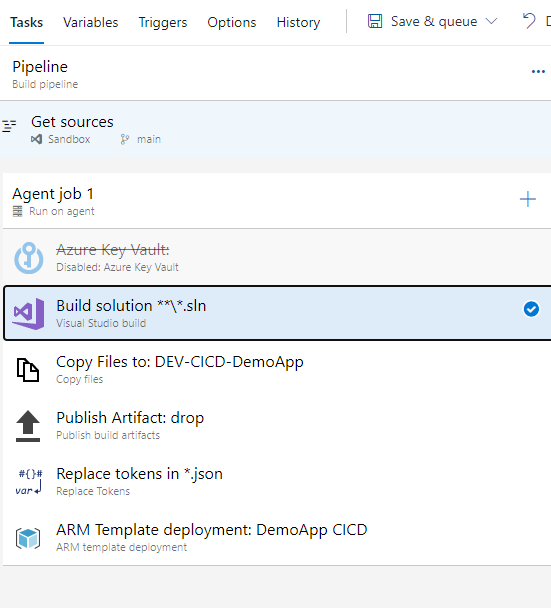
After enabling the triggers, you’ll need to add the required tasks to get your pipeline going. You might be getting a few secrets in Key vault, if that’s the case, do remember to add the Azure Key Vault task. This will pull either all the secrets or the filtered ones you’ve selected, keeping them in cache for the pipeline execution. This will be used in the Replace Tokens task, which I’ll discuss a bit down the road.
As you can see, it doesn’t take many tasks to have a functional pipeline, ready to deploy your Logic App to the CI environment.
The required tasks are:
Visual Studio build – to build your solution, obviously
Copy files – which will copy the desired files over to a folder in the Drop
Publish build artifacts – makes the drop available to use in the pipeline and the release
Replace Tokens – a very handy tool that allows you to replace your tokens with the variables or group variables values
ARM template deployment
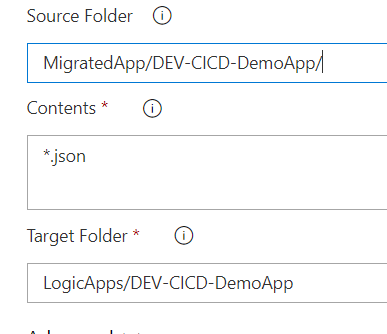
The Copy files task is very simple and easy to use. You take the input folder, copy the files you want/need to the target folder. Easy-peasy-lemon-squeezy.
I’d advise you to set the Target Folder as a named one, when you’re building the Release, it will be easier to find what you need if you divide your assets by name.
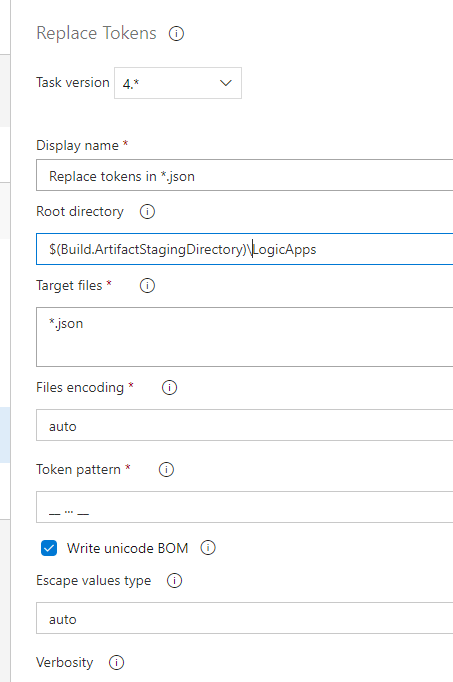
After copying the files, we will replace the tokens. How does this work?
Simply put, the task collects all the variables in memory and searches for the token pattern in all the target files. Given that we wrote our parameters with the __ … __ token, if we use other tokens in the files, it should not affect them. This is by far, in my opinion, the most helpful task in multi-environment deployment. It takes out the need to have multiple files by environment and having tons of variables.
Having the files copied, tokens replaced, our Logic App is ready for deployment in the CI environment. Now, this is not mandatory, you might not want to deploy your LA from the pipeline, you might want to use the Release instead. This is fine, you just need to move the ARM deployment tasks to the Release, it will not affect the outcome nor the pipeline.
As you can see, after selecting the Azure details (Subscription, RG, Location, etc) it becomes easy to select your LA to deploy. Since we used the LogicApps folder, we just need to reference the JSON files and the task will pick them up from the drop folder and deploy them.
Final notes
You’re now ready to go on your adventures and build your Logic Apps, get them ready for Continuous Integration and deploy them. I didn’t approached the Release Pipeline because it’s also very simple. You will only require to create your variables, replace your tokens and deploy the ARM templates.
You can fiddle around with gates, automated deployments, pre-deployment approvals and all, but that is a more advanced feature.
Having multiple releases that you want to joint deploy, you can even build Orchestrations (I can hear all the BizTalk bells ringing in our heads). This is not as simple as isolated deployments, because it does involve some orchestration of the parts (well, duhh).
I hope this small series of posts helped you to solve issues and to improve your deployments.
Patrick Wellink, a long-time BizTalk Server consultant from the Netherlands, asked me to broadcast this news. I’m happy to do it because I know that many of you use and like BizTalk Deployment Framework (BTDF) to perform deployment across your environments.
Patrick suppresses a need by developing a Visual Studio 2019 plugin (VSIX) for BizTalk Server 2020. Of course, there was already a new version of The BTDF Framework. But one of the convenient things was the visual studio plugin… that was missing.
Unfortunately, and I understand this feeling entirely because I also have several community projects, we always have to for the owner and developer to upgrade his project, and we usually struggle to find the time. So I take this opportunity to encourage all community members to start contributing to these initiatives as Patrick did. Start performing changes and submit your contributions to the repo. I speak for myself, and from what I know from the community, we accept the changes and are happy that you contribute.
And it wasn’t that difficult, rephrasing Patrick:
With some guidance of this post and some fiddeling I got the VSIX to work for VS2019. After some more fiddeling I got the project wizard to run as well.
I did so with minimal effort.
Where I can download it
You can download the Visual Studio 2019 plugin (VSIX) for BizTalk Server 2020 here:
The standard BizTalk Deployment task does a decent job in deploying the application, but it doesn’t handle changing tokens or registering DLLs in GAC.
To deploy in multiple machines or to change your Bindings according to your environment, you have to make your file dynamic. This means, replacing your connections with variables.
Let’s start with the basic:
Creating the project and installing it in DEV
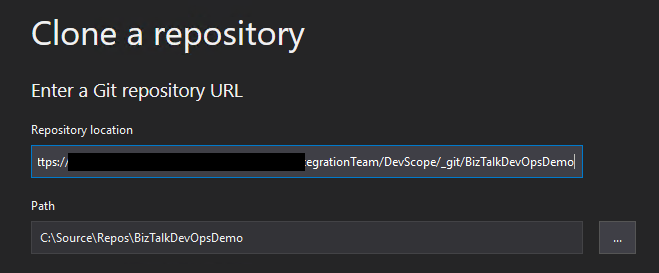
As always, it’s better to first create the DevOps repository and clone it in your machine.
Having this created, you need to get your project working and have a Deployment Project as well. This will contain the needed DLLs and Binding files pointers to your BTS project. This will also contain the Application name to be deployed and some other configurations.
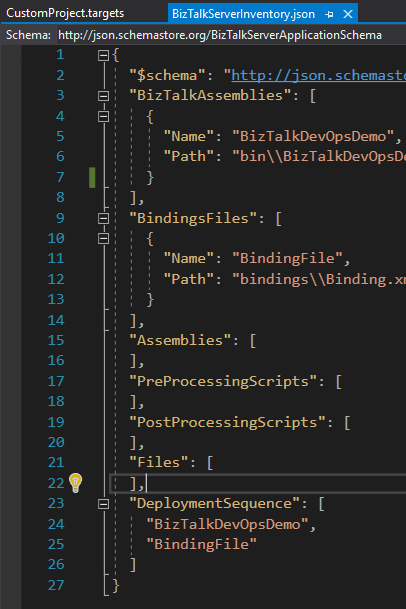
You will see that you can set the Biztalk Assemblies path as well as other Assemblies, Pre and Post processing scripts and the Deployment Sequence. This is one of the most important steps, because, as you know, it does matter in which order you deploy your BT Assemblies.
When referencing your BT projects, do make sure that the Application Project is using the same framework version as your other projects. If it’s not the same version, it will not be able to copy the DLLs to the referenced Path and will not build successfully.
Building this project will generate a ZIP file that contains all that is needed. You can try to publish it directly, after configuring the application.
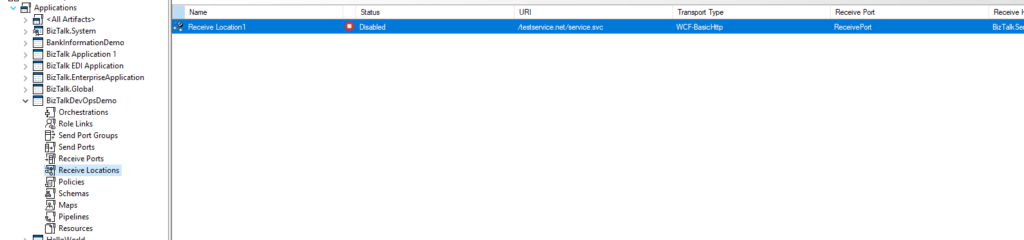
The bindings file that is created with the project is just an empty template, so you’ll want to deploy your application in your Dev Environment and create those bindings. It will make a difference if you export your application bindings when it’s started and when it’s stopped, so keep that in mind.
For this example, I’m going to export the bindings with the Application fully stopped.
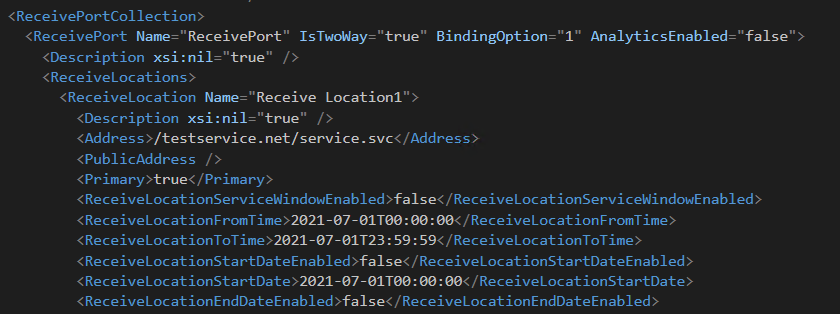
Your standard Bindings export will carry the ports and URIs/connections straight from the Admin console. Through a little magic, we will configure these values to be dynamic and it’s super easy.
Making your Bindings dynamic for deployment
Now you’ve exported the bindings and you want to make it ready for DevOps and to accept multiple configurations.
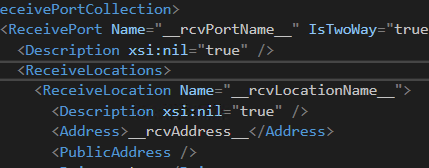
From my example, you can see that the ReceiveLocation and ReceivePort names are static. If we tokenize this, you can call it whatever you want, therefore reducing the risk of colliding with other existing ports in your end systems.
So, keeping in mind the desired token, I’m going to replace these values, ReceiveLocation address included, with a variable and token identifier. With a few magic touches, we end up with something like this:
And that’s it. Of course, this is a very small and simple example, but even with a goliath project, it will still be the same pattern. You find what you want to make dynamic, tokenize it, save and upload your changes to your Repo.
Building your Pipeline and Release Pipeline
Now you have your source code in your Repository, your bindings ready for dynamic changes and you want to deploy it.
You will need to set up your build Pipeline before you can get your Release ready, so get to work.
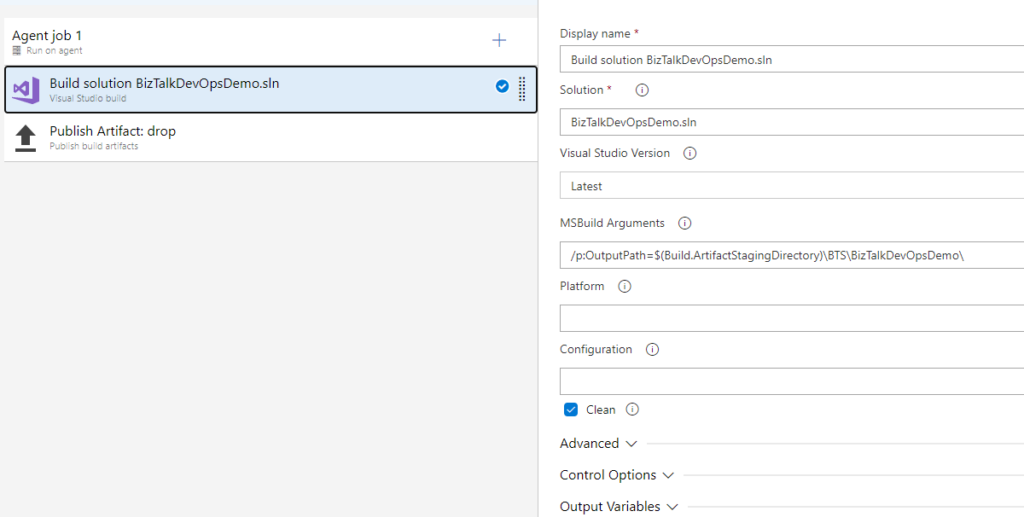
The Pipeline itself doesn’t need to be too complicated, you just need to build your Solution, with or without the OutPath argument (I found that setting this would make my life easier in some projects) and publish the drop.
With your drop created, your Release pipeline needs the following tasks:
Extract Files – to unzip your file
Replace Tokens (a great extension by Guillaume Rouchon, more info here)
Archive Files – to zip it back
BizTalk Server Application Deployment – I recommend this, but you can do it with PowerShell
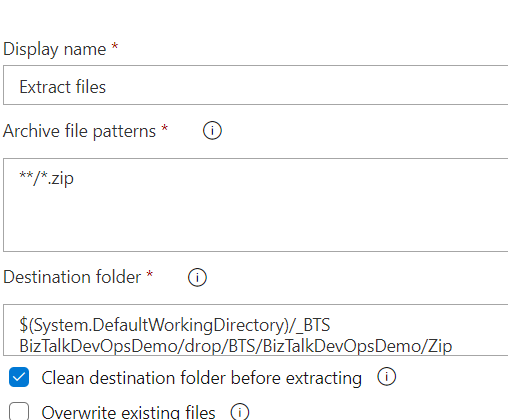
Extracting your file contents is straight forward, you just need to select your zip in your drop contents and a destination folder. Keep in mind that you will need to know where it lands, to zip it back.
Replacing the Tokens is just as before, you select the *.XML mask or point directly to your bindings and select the Token that it should be looking for. Remember, that the variables you define are case sensitive. You can also use a Variable Group, it is a great way of knowing your environment specific variables or common variables that your might have.
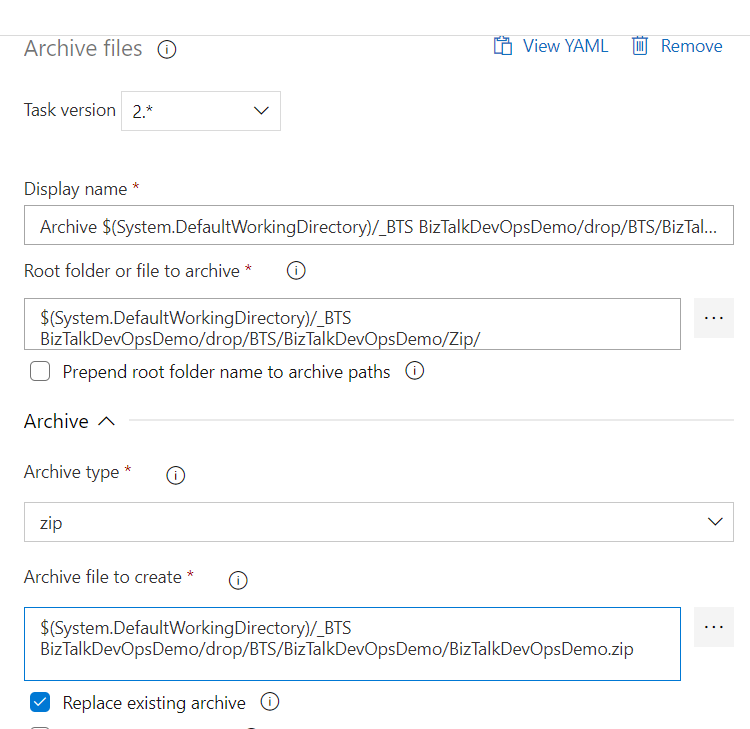
Once this is done, you can proceed to recreate the Zip file and it’s contents. The destination folder you’ve selected when Unzipping will now be the Root folder you are pointing to.
Remember to tick out the “Prepend root folder name to archive paths” option. If you keep this selected, your file will end up with a structure like “Zip / bindings” instead of just “bindings” and the deployment will fail, because it’s not the expected folder structure. Also, tick the “Replace existing archive” option, else you will create a copy and deploy the original version instead.
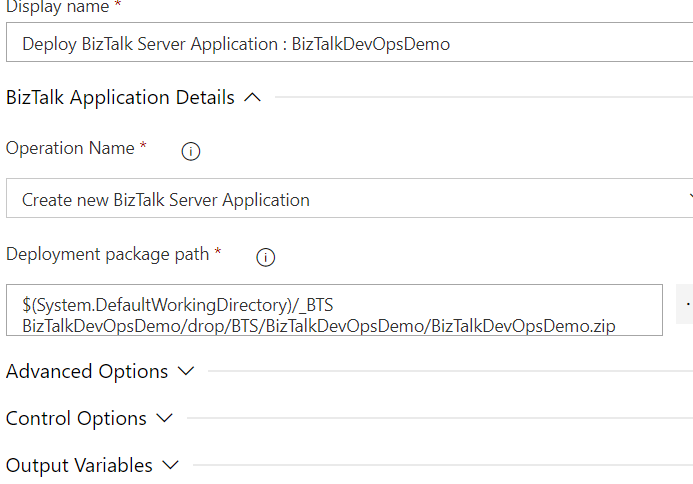
And for the final step, the Deployment Task. I chose to use the standard task instead of PowerShell, because I didn’t want to handle scripts at this point.
Select the Zip package and set the operation to Create. From what I’ve found out, this will Upsert your application, while Update will not create the app if it doesn’t exist.
And this is what you need. If you’ve set everything properly, your Release Pipeline will deploy your Application to your Server and get it up and running, with the parameters you’ve set in your bindings file.
It took a while to understand how this process worked but in the end, it turned out to be very simple and all it took was to apply the same concept we already used with the ARM deployment for Azure resources.