by Sandro Pereira | Sep 10, 2018 | BizTalk Community Blogs via Syndication
Sometimes errors seem to find me, sometimes it fills that I’m chasing errors! And because someone did something that you shouldn’t do, configuring the build folder of a Functoid project to be <BizTalk Server installation folder>Developer ToolsMapper Extensions directory, I got a new and strange error while trying to open a BizTalk map inside Visual Studio: Microsoft BizTalk Mapper Unable to load wrapper. Here is the full error message:
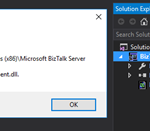
Microsoft BizTalk Mapper
Unable to load wrapper <BizTalk Server installation folder>Developer ToolsMapper ExtensionsMicrosoft.BizTalk.Interop.Agent.dll

Of course, at that time I was quite curious to know the cause of this problem because I didn’t do anything wrong, just building a custom Functoid project and a few minutes before I actually was working in a map and I was able to open without any kind of problems.
Cause
When you build a project, by default any kind of project it will add the project assemblies as well as the dependencies to the binDebug – again this is the default behavior.
In this case, by changing this behavior in a Custom Functoid project to the <BizTalk Server installation folder>Developer ToolsMapper Extensions directory, was causing the problem, because it was adding not only the custom Functoid assembly but also some BizTalk internal assemblies, in this case the Microsoft.BizTalk.Interop.Agent.dll, that are incompatible with the internal BizTalk Mapper wrapper.

Note: BizTalk Server installation folder>Developer ToolsMapper Extensions directory is where Visual Studio BizTalk project looks for custom functoids to be added to the Toolbox.
Solution
Once again, the solution is simple, you should delete all the unnecessary assemblies, especially the internal ones of the product.
Once you delete all the unnecessary assemblies, in this case, the Microsoft.BizTalk.Interop.Agent.dll, and I also advise to delete all the ones that are selected on the above picture, the Unable to load wrapper problem will be solved and you can once again open the BizTalk Mapper without any kind of problems inside Visual Studio
Author: Sandro Pereira
Sandro Pereira lives in Portugal and works as a consultant at DevScope. In the past years, he has been working on implementing Integration scenarios both on-premises and cloud for various clients, each with different scenarios from a technical point of view, size, and criticality, using Microsoft Azure, Microsoft BizTalk Server and different technologies like AS2, EDI, RosettaNet, SAP, TIBCO etc. He is a regular blogger, international speaker, and technical reviewer of several BizTalk books all focused on Integration. He is also the author of the book “BizTalk Mapping Patterns & Best Practices”. He has been awarded MVP since 2011 for his contributions to the integration community. View all posts by Sandro Pereira
by Lex Hegt | Sep 5, 2018 | BizTalk Community Blogs via Syndication
In this blog post we will update you on which new capabilities came with BizTalk Server 2016 Feature Pack 3. Earlier, we have also written about Feature Pack 1 and 2. You can find these articles here:
Introduction to BizTalk Server 2016 Feature Packs
In 2017, Microsoft started releasing so-called Feature Packs for BizTalk Server 2016. The concept of releasing these Feature Packs is that Microsoft doesn’t want their BizTalk Server customers to wait for new features, until a new release of BizTalk Server arrives. Instead, they want their customers to enjoy these new features, as soon as possible once they have been developed and are ready to go to market. As these Feature Packs contain non-breaking features, there is little risk that a BizTalk customer runs into issues as a result of installing such Feature Packs. These Feature Packs are only available with the Enterprise and Developer edition of BizTalk Server 2016.
Since Microsoft started with this strategy, they have released 3 Feature Packs:
The BizTalk Server 2016 Feature Packs are cumulative. This means that once you installed, for example, Feature Pack 3, you can also enjoy the features which were brought in Feature Pack 1 and 2.
You might have also noticed, that each Feature Update also contains a Cumulative Update. It is also possible to install these Cumulative Updates without the new capabilities which are provided by the Feature Packs. To check the most recent releases of these Cumulative Updates, please check this web site:
What’s new with BizTalk Server 2016 Feature Pack 3
This Feature Pack brings improvements in below mentioned areas:
- Compliance
- Compliance with US government accessibility standard
- Privacy – Compliance with FIPS and GDPR
- SQL Server 2016 SP 2 – Deploy multiple databases per instance of an Availability Group
- Adapters
- Office365 Outlook Email – Send and Receive messages using Office365 e-mail
- Office365 Outlook Calendar – Create appointments using Office365 schedules
- Office365 Outlook Contact – Create Office365 contacts
- Web Authentication – Authenticate with Azure AD and OAuth using Microsoft Enterprise Single Sign-On
- Administration
- Advanced Scheduling – Set up recurrence on Receive Locations with greater precision
Compliance with FIPS and GDPR
As of this Feature pack, BizTalk Server is compatible with FIPS (Federal Information Processing Standard) and GDPR (General Data Protection Regulation).
FIPS is a standard developed by the US federal government for use in computer systems by non-military government and agencies. The specification comes with standards for among others:
- Codes – country, region and state codes, weather conditions, emergency indications
- Encryption – Data Encryption Standard, Advanced Encryption Standard
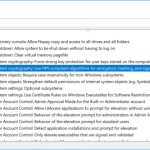
In case of BizTalk Server, this relates to how data becomes encrypted and decrypted in SQL Server. FIPS-compliance is enabled in the Operating System, under Local Policies; refer to the screenshot below. Once enabled, SQL Server will enter the FIPS compliant mode, thereby using cryptographic standards as defined in FIPS 140-2.

GDPR is a European law on data protection which intends to regulate the privacy of individuals in the European Union. This new law supersedes Data Protection Directive 95/46/EC from 1995.
If you want to read more about BizTalk and GDPR, there are few resources written by Sandro Pereira on this topic:
Multiple databases in Availability Groups SQL instances
Also SQL Server 2016 SP 2 is supported from Feature Pack 3. This is especially good news when you are running SQL Server Availability Groups. Because this allows you to have multiple BizTalk databases in the same SQL instance. As this was not possible earlier, this made setting up BizTalk Server in Availability Groups complex and expensive. The reason for that, is because you needed to have multiple SQL Server instances than without Availability Groups and more expensive as you need to license each SQL Server instance in the Availability Groups.
New Adapters for Office365 connectivity
Few other interesting features of this Feature Pack are the adapters for Office365 Email, Calendar and Contacts. These adapters allow you to use Office365 accounts for receiving and transmitting emails, creating and updating calendar items and creating contacts.
The Office365 Email adapter
This adapter can be uses both for receiving as for transmitting messages. In BizTalk terms, you can use this adapter both on Receive Locations as on Send Ports.
On the receive side the adapter enables you to:
-
Select a folder from which to retrieve email
-
Select a timestamp from which you want to receive emails
-
Retrieve unread emails only
-
Select an action after the email has been read, like marking the email as read or deleting the email
When transmitting emails via a Send Port, you can set the following properties:
-
To – separate email addresses with a semicolon (‘;’), maximum 256 characters
-
CC – separate email addresses with a semicolon (‘;’), maximum 256 characters
-
Subject – enter maximum 256 characters
-
Importance – select Low, Normal or High from the drop down in the Send Port
Also, it is important to realize that you can only send plain text messages.
Once you receive an email on a Receive Location, the Receive pipeline adds promoted properties, which you can use for routing the emails. These promoted properties are:
-
Importance
-
Subject
-
SenderName
-
SenderAddress
-
HasAttachments
The Office365 Calendar adapter
You can use this adapter both for receiving events as for transmitting events. To be able to receive/send events you need to have the XSD schemas for both operations. You will find these schemas here:
Program Files (x86)Microsoft BizTalk Server 2016SDKSchemas
Related to calendars, this folder contains the following schemas:
The advantage of having these schemas is, that you can determine yourself which elements you will promote for routing purposes.
When you want to receive calendar items, you can select a calendar from an Office365 Outlook account. Next, you can configure that you want to receive events which are starting within a particular time frame.
You can also use the adapter to create events from BizTalk Server. Therefore, you can, populate a message according the above mentioned Send schema. Yet, some event properties can also be set on the Send Port. The properties you can set on a Send Port are:
The Office365 Contact adapter
You can use the Contact Adapter for creating contacts in Office365. For this adapter too, Microsoft has provided a schema. You will find this schema in the same location as the Calendar schemas and has the following name:
Office365OutlookContactSend.xsd
Again, because you can add this schema to your BizTalk solution, you can determine yourself which fields you would like to promote. The Send Port configuration only allows you to sign in with an Office365 account. You cannot configure any contact properties on the Send Port.
Note: To be able to use the Office365 adapters from BizTalk, besides Feature Pack 3, you need to install TMS. This service refreshes the Office OAuth tokens which BizTalk uses. After installation of the Feature Pack, navigate to the installation folder of BizTalk Server (Program Files (x86)Microsoft BizTalk Server 2016). There you will find BizTalkTMS.msi, which you must install.
Read this article for more details about the Office365 adapters for BizTalk Server 2016.
Advanced Scheduling of Receive Locations
Scheduling Receive Locations has always been hard with the out-of-the-box capabilities of BizTalk Server. Often people used the open source Scheduled Task Adapter which exists since BizTalk Server 2004. Currently, Sandro Pereira maintains this adapter on GitHub.
The open source Scheduled Task Adapter does a good job. But, organisations might prefer not to go for open source software, but still they might have a need to schedule Receive Location(s). Microsoft has listened to their requests and introduced Advanced Scheduling of Receive Locations with Feature Pack 3!
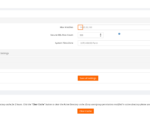
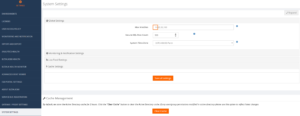
Below screenshots show how the scheduling capabilities of a Receive Location look like, before and after installation of Feature Pack 3.
In case of the Feature Pack 3 scenario, the upper part of the screen is extended with capabilities to select a time zone and to configure automatic adjustment for Daylight Saving Time (DST).
The ability of setting the time zone can help in case your integration partner(s) live in different regions of the world. Using the Time Zone drop down will make it easier to configure when Receive Locations will pick up messages according the partner’s time zone.
Daylight Saving Time, also mentioned Summer Time, is a practice which is done in a number of countries in the Northern and Southern hemisphere. During DST, the clock becomes advanced one hour close to Spring and adjusted backwards in Autumn. This way daylight lasts longer in the evening. These adjustments might effect the proper working of your interfaces. That’s why Microsoft introduced the ability to automatically adjust the schedule of your Receive Locations, according DST.
By the way: did you know that the Data Monitoring features in BizTalk360 are also compliant to Daylight Savings? Our colleague Mekala wrote an article about it. Here you have the link to that article:
Especially the Service Window capability of Receive Locations are improved hugely. The original ability to configure just a Start and a Stop time has been extended with the following recurrence features:
- Daily – configure the number of recurring days and from which date the recurrence will be active
- Weekly – configure the number of recurring days, from when the recurrence will be active and on which weekdays the recurrence must be active

- Monthly – configure which months and which days the recurrence should take place
Conclusion
With BizTalk Server 2016 Feature Pack 3, Microsoft has released many useful features for BizTalk Server 2016. The Office365 adapters, the improved scheduling capabilities and the support of SQL Server 2016 SP2 (because of simplification of Availability Groups) can be considered as the most useful ones.
Meanwhile, the community is also waiting for the release of BizTalk Server vNext which has been announced recently. This version of BizTalk underlines the on-going commitment of Microsoft in the platform. The new version of BizTalk will, amongst others, contain all the release Feature Packs for BizTalk Server 2016.
You can receive this kind of announcements and many other interesting articles in the Microsoft Integration space directly in your email box, by subscribing to our monthly Integration Newsletter. You can find the August edition of this newsletter, which provides more information about BizTalk vNext, here.
by Sowmiya Subramanian | Sep 4, 2018 | BizTalk Community Blogs via Syndication
Introduction
Here is another exciting capability we have added to our existing import and export capability. Curious to know? In this blog post, I would like to highlight what are all the new enhancements in Import/Export Configurations we made for our upcoming version V8.9. These enhancements would ease the BizTalk administrator’s day to day operations, particularly migrating data from one environment to another.
All the newly created BizTalk Server applications are being tested first in the preproduction or UAT and shadow environments to avoid business consequences. Likewise, customers would prefer to test all the functionalities of the BizTalk360 in their non-production environments. Further, they populate necessary data to operate, monitor and find analytical information of their environment.
Admins don’t need to recreate the data again in their production environment as in such scenarios, our import and export capability plays a major role. Already we have support to export and import,
- Alarms
- User Access Policies
- Saved Queries
- Secure SQL queries
New Capabilities
In the version 8.9, we added support for import and export of the following sections:
- Knowledge Base
- Service Instances
- ESB Exceptions
- Event Logs
- Throttling Data
- BizTalk Reports
- Dashboards
- Operation (Default & Custom Dashboards)
- Analytics (Default & Custom Dashboards)
- EDI Dashboards
- ESB Dashboards
- Custom Widgets
Using this rich capability, one can easily export and import the configuration between environments, thereby reducing the migration effort. This is especially useful in scenarios, where the user tries to carry out testing in a test environment, and upon achieving the desired result, they can import the configuration from the production environment.
What has enhanced in Import/Export Grid Pagination
Previously, BizTalk 360 has a static pagination which is available for the grid by default. In Import/Export, the user can customize the pagination using the “Max Matches” on System Settings sections in BizTalk360. Pagination will be visible for the Import/Export grid once the row count exceeds the max match size.
For Instance: If the Max Matches size is set to 10 means, then the pagination for each grid in import/export will be visible when the row count exceeds 10.
Exporting configurations
Exporting your data is a great way to make the information more digestible or find patterns that can give your team better insight between different environments. The user can make use of export functionality in two ways:
- To migrate configuration data between different Environment
- To archive the configurations in the local system
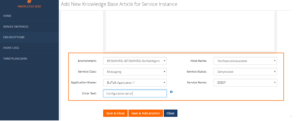
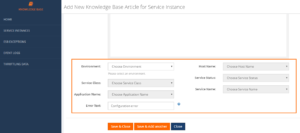
Exporting the Knowledge Base
The BizTalk360 knowledge base is useful to document the BizTalk issues which administrators encounter on a day-to-day basis. To migrate the BizTalk360 knowledge base it is possible to use the Export functionality.
The user can export the articles based on the sections Service instances, Event Log, Throttling Data and ESB Exception. The knowledge base section is preselected, the user can deselect and reselect the knowledge base according to their needs. Once the selection has been made, the user can Export the knowledge base articles.
Exporting BizTalk Reports
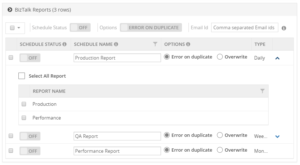
The BizTalk Reports help organizations to visualize/monitor their business data. Using the Export functionality, the user can archive or export the BizTalk Reports.
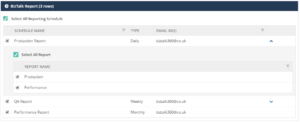
The BizTalk Reports and their associated schedules are preselected. The user can view the associated reports by clicking the arrow on each schedule and they can edit the selection according to their needs.
Importing Configuration
The Import functionality is mainly useful for importing large amounts of data quickly. By importing the configuration, you can replicate the required configuration on the target machine. To import the configurations from a certain environment, you should have already saved and exported those configurations in a Zip file. Import can be used in two ways in BizTalk360
- To create a new configuration from the source environment to the destination environment
- To update the existing configuration on the destination environment
Importing Knowledge Base
In BizTalk360, the customer can create KB articles as and when they fix issues in the environment. Over a period of time, they can have a wealth of information ready to fix those repeated issues. Those articles can be imported to another environment using the import knowledge base feature.
For Instance: The organization has Production Environment and they are planning to build a separate QA environment for testing. After creating the new environment, it is a lot of work to manually create the knowledge base article for frequent/repeated issues. Here, the import knowledge base comes into play. The user can easily import the knowledge base articles from the Production environment to QA environment.
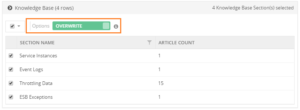
The existing articles can be overwritten or else can be ignored. If the article doesn’t exist, it will create a new article in the target environment.
In BizTalk360, the knowledge base articles can be created for a specific environment or globally (without selecting the environment) accessible articles. The BizTalk360 user can create or overwrite the articles.
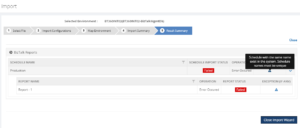
For specific Environments: The knowledge base articles will be imported to the target environment with the configuration tags (like Host Name, Application name etc.., which is specific for each error code they encounter) for specific articles. If the article is overwritten, then the import process will overwrite the configuration tags on the existing article.
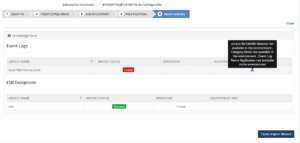
When the configuration tags are not available in the target environment, the article will not be imported and it will throw an exception on result summary.
For Global articles: When the global knowledge base is imported, the environment selection will not happen. The articles are accessible to all the available environments.
Importing BizTalk Reports
In a business environment, the BizTalk reports provide a comprehensive, high-level overview of the performance of their BizTalk environment. The configuration of these reports, can be easily managed using the Import BizTalk Reports feature.
For instance: An organization has deployed BizTalk360 on one of the Development/QA/UAT environment(s) and they want to move all configurations to the Production environment. The BizTalk360 administrator must do the usual practice to set up the configurations manually in a production environment. It is not feasible to configure all the configuration manually, instead BizTalk360 allows you to easily export and import all the BizTalk Reports.
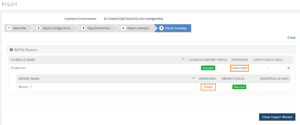
While importing the schedules and the associated reports to another environment, the user can edit the schedule name as per their requirement and the user can enable the schedule after importing by selecting the ON/OFF option available on each schedule. By default, the status of schedule during import, is disabled. The user can also change the Email ID after importing. This will help the user to create/overwrite the schedule and the reports as per their business needs.
Note: The user cannot import the reports without the selecting the associated schedule.
If the user sets the option to “Error or Duplicate”, the import process would not allow duplicate schedules and associated reports to be imported.
If the user sets the option to “Overwrite”, the import process will overwrite the existing schedule with the same name. In case the associated reports are not available, the import process will create the reports and associate to the schedule.
If the associated report already exists in another schedule means, it will ignore the report while importing.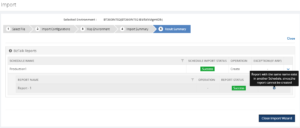
Conclusion
By adding the above feature, the Import/Export Configuration has become more versatile. This provides a great option for the administrators who find the migration process intimidating and would like expert help to assure an effortless transition between multiple environments. No matter where your configuration needs to go, BizTalk360 lets you Import/Export data with ease.
Apart from knowledge base and BizTalk reports we have included the Dashboards and Custom widgets for v8.9 release. I will cover those two functionalities on my next blog “Stay tuned!”.
by Sandro Pereira | Sep 3, 2018 | BizTalk Community Blogs via Syndication
Have you ever noticed that your SSO Administration Console tool doesn’t open in BizTalk Server 2016? Fortunately for Microsoft BizTalk Server team this tool is not heavily used by the customer, nevertheless, this is an existing and valid tool that needs to be working properly.
What is this tool?
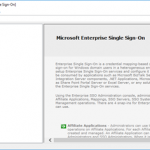
You can install the Enterprise Single Sign-On (SSO) Administration component as a stand-alone feature. This is useful if you need to administer the SSO system remotely. The hardware and software requirements are the same as for a typical Enterprise SSO installation.
After you install the administration component, you must use either ssomanage.exe or the SSO Administration MMC snap-in to specify the SSO server that will be used for management. Both processes are included in the procedure that follows.
Of course, with this tool, SSO Administration, you can do more than just configure the SSO server that will be used for management. Using the Enterprise SSO Administration console, administrators can easily manage Affiliate Applications, Mappings, SSO Servers, SSO System and also perform Password Management operations. There are 4 snap-ins for Enterprise SSO that administrators can use.
- Affiliate Applications – Administrators can use this to perform administrative operations on Affiliate Applications. For each Affiliate Application, mappings can be created and managed. An Affiliate Application can be created by SSO Affiliate Administrators and SSO Administrators. When it is defined, the administrator can optionally specify an Application Administrators account that contains users who can perform administrative operations on that Affiliate Application. In addition, an Application Users account must be specified that contains Windows domain users for whom mappings can be created. Other operations such as enabling or disabling Affiliate Applications, configuring SSO tickets for the Affiliate Application, and enabling or disabling mappings can also be performed by administrators using this snap-in.
- Password Management – Administrators can use this snap-in to perform administrative operations on Password Synchronization Adapters and Password Filters. Administrative operations need to be performed by the SSO Administrators. A filter rule can also be defined within an Adapter configuration. Once an Adapter or Filter is created, an administrator can associate Affiliate Applications with the Adapter or Filter so that the synchronization and filter rules defined are applied to that application.
- Servers – Administrators can build a list of SSO Servers to perform certain administrative operations and to view their status. Within an SSO system, an administrator can also perform a discovery process to automatically discover and add all the SSO Servers within the SSO system.
- System – Administrators can view SSO System level settings. These settings are stored in the centralized SSO Credential Database. Modifying these settings will apply to all SSO Servers that are using this SSO Credential Database. In addition, administrators can manage the Master Secret Server and perform tasks such as generate, backup and restore the secret. The system-level administrative operations can be performed only by the SSO Administrators.

However, SSO Administration shortcut that points to the Microsoft.EnterpriseSingleSignOn.StartMMC.exe executable file is not working properly in BizTalk Server 2016.
Cause
The reason why this problem is happening is that with BizTalk Server 2016 there is a bug and the installation wizard doesn’t create all the necessary keys in the Register.
Also, if you look at the properties of the “SSO Administration” shortcut, this is pointing to the Microsoft.EnterpriseSingleSignOn.StartMMC.exe executable file. I don’t know the reason why Microsoft decided to create this strategy but in reality, this executable file is just “an easy way” (or dummy way) to open the “ENTSSO.msc”, normally present in the “C:Program FilesCommon FilesEnterprise Single Sign-On” folder and this executable reads the “ENTSSO.msc” installation path from the Register:
…
key = Registry.LocalMachine.OpenSubKey(@"SoftwareMicrosoftENTSSO");
object obj2 = key.GetValue("InstallPath") as string;
…
string str2 = """ + str + "entsso.msc"";
ProcessStartInfo startInfo = new ProcessStartInfo("mmc.exe") {
    Arguments = str2
};
Process.Start(startInfo);
…
However, this is the aspect of the keys within BizTalk Server 2016:

Solution
The solution is easy, and you have very different ways to do it.
If you want to open the SSO Administration snap-in, you can:
- Go to the Enterprise Single Sign-On installation folder
- Normally, “C:Program FilesCommon FilesEnterprise Single Sign-on”
- And directly execute the “ENTSSO.msc” (double click)
If you want to fix the SSO Administration shortcut to work properly, you can:
- Open the Register
- And on the HKWY_LOCAL_MACHINESOFTWAREMicrosoftENTSSO add
- the following string: InstallPath
- with the value: C:Program FilesCommon FilesEnterprise Single Sign-On
BizTalk Server 2016: PowerShell to fix the SSO Administration Console
Because in a normal situation there are more keys (strings) present in the Register. I decided to create a simple PowerShell script that you can use to fix all these bugs and put everything working normally again:
...
Set-ItemProperty -Path $registryPath -Name InstallPath -Value "C:Program FilesCommon FilesEnterprise Single Sign-On"
Set-ItemProperty -Path $registryPath -Name ProductCode -Value "{F89B22BC-2768-4237-B300-5CFA52D9AC84}"
...
THIS POWERSHELL IS PROVIDED “AS IS”, WITHOUT WARRANTY OF ANY KIND.
 BizTalk Server 2016: PowerShell to fix the SSO Administration Console (2 KB)
Microsoft | TechNet Gallery
Author: Sandro Pereira
Sandro Pereira lives in Portugal and works as a consultant at DevScope. In the past years, he has been working on implementing Integration scenarios both on-premises and cloud for various clients, each with different scenarios from a technical point of view, size, and criticality, using Microsoft Azure, Microsoft BizTalk Server and different technologies like AS2, EDI, RosettaNet, SAP, TIBCO etc. He is a regular blogger, international speaker, and technical reviewer of several BizTalk books all focused on Integration. He is also the author of the book “BizTalk Mapping Patterns & Best Practices”. He has been awarded MVP since 2011 for his contributions to the integration community. View all posts by Sandro Pereira
by Sandro Pereira | Aug 30, 2018 | BizTalk Community Blogs via Syndication
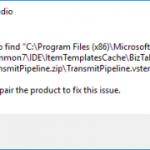
My blog backlog is full of precious things and I stop counting the number of pages I have on my OneNote to be published. Today I randomly selected this Unable to find transmitPipeline.vstemplate error that I got on December 4, 2017, in a client when I try to do something – unfortunately I don’t remember what I was trying to do – on Visual Studio. The full error message was:
Unable to find “C:program Files (x86)Microsoft Visual Studio 14.0Common7IDEItemTemplatesCacheBizTalkPipeline FilesTransmitPipeline.ziptransmitPipeline.vstemplate”.
Please repair the product to fix this issue.

Cause
Well, I don’t know the exact reasons why this happened or why these files were missing from the development machine.
However, and that is clear from the error message description. The visual studio templates, in this case, the Transmit Pipeline template was missing from the expected directory.
Solution
The easy solution for this problem is quite simple: use the BizTalk Server ISO file to repair the BizTalk Server installation.
This will “install/copy” all the files, including all BizTalk Server visual studio templates to the development machine.
Author: Sandro Pereira
Sandro Pereira lives in Portugal and works as a consultant at DevScope. In the past years, he has been working on implementing Integration scenarios both on-premises and cloud for various clients, each with different scenarios from a technical point of view, size, and criticality, using Microsoft Azure, Microsoft BizTalk Server and different technologies like AS2, EDI, RosettaNet, SAP, TIBCO etc. He is a regular blogger, international speaker, and technical reviewer of several BizTalk books all focused on Integration. He is also the author of the book “BizTalk Mapping Patterns & Best Practices”. He has been awarded MVP since 2011 for his contributions to the integration community. View all posts by Sandro Pereira
by Sandro Pereira | Aug 29, 2018 | BizTalk Community Blogs via Syndication
Another day, another error to report directly retrieved from my backlog to be published. Today is about another error that can happen on the Backup BizTalk Server job: “Executed as user NT SERVICESQLSERVERAGENT. Cannot open backup device destination pathdatabase name“. I got this error a few months ago in a client while doing an installation assessment:
Executed as user: NT SERVICESQLSERVERAGENT. Cannot open backup device ‘C:Program FilesMicrosoft SQL ServerMSSQL13.BIZTALKMSSQLBackup<destination path>NAME_BAMPrimaryImport_Log_BTS_2017_12_18_15_07_41_447.bak’. Operating system error 123(The filename, directory name, or volume label syntax is incorrect.). [SQLSTATE 42000] (Error 3201) BACKUP LOG is terminating abnormally. [SQLSTATE 42000] (Error 3013). The step failed.

This error was occurring on the third step of the Backup BizTalk Server job: MarkAndBackupLog.
Cause
On the third step, MarkAndBackupLog, of the Backup BizTalk Server job, if you check in input parameters of the stored procedure that is invoked there: the “sp_MarkAll” stored procedure. You will find out that the second parameter is the location of backup files and this location must exist in the file system.
The reason for this error to occur may be related for one of these reasons:
- This step is not properly configured, and you still have “<destination path>” set as the value for the location of backup files – second parameter;
- Or the folder/path that you define as the location of backup doesn’t exist;
Solution
You must remember that you need to ensure that all the paths specified in the BizTalk jobs must exist in the file system.
But in this case and as you will see in the error description, the backup job was not properly configured and still have “<destination path>” set as the value for the location of backup files.
To solve this problem, you need to:
- Press the “Windows key” type “SQL Management” or “SQL” and click in “SQL Server Management Studio”.
- In Object Explorer panel, connect to the SQL Server instance and expand the server tree.
- Expand the “SQL Server Agent” node
- Expand the “Jobs” node
- Double click “Backup BizTalk Server (BizTalkMgmtDb)” to open the job properties window.
- In the Job Properties – Backup BizTalk Server (BizTalkMgmtDb) dialog box, under “Select a page”, click “Steps”.
- In the “Job step list”, click on the job you want to edit, in this case, “MarkAndBackupLog”, and then click “Edit”
- On the “Command” property correctly specify a path for the backup files

After I properly configure the job this error was solved and I was successfully able to run the Backup BizTalk Server job.
Author: Sandro Pereira
Sandro Pereira lives in Portugal and works as a consultant at DevScope. In the past years, he has been working on implementing Integration scenarios both on-premises and cloud for various clients, each with different scenarios from a technical point of view, size, and criticality, using Microsoft Azure, Microsoft BizTalk Server and different technologies like AS2, EDI, RosettaNet, SAP, TIBCO etc. He is a regular blogger, international speaker, and technical reviewer of several BizTalk books all focused on Integration. He is also the author of the book “BizTalk Mapping Patterns & Best Practices”. He has been awarded MVP since 2011 for his contributions to the integration community. View all posts by Sandro Pereira
by Sandro Pereira | Aug 27, 2018 | BizTalk Community Blogs via Syndication
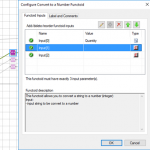
It’s been a while since I don’t make any changes to one of my favorite pet projects: BizTalk Mapper Extensions UtilityPack! Today I’m happy to announce the release of a new BizTalk Functoid: Convert to a Number Functoid.
Note: And it will not be the only one, soon I will release two new Functoids that I’m working on.
Today I was working on a map that I had the need to transform several numbers delivers in a string with a decimal format:
to an Oracle NUMBER(x) – without decimals.
Initial, I thought in create a Scripting Functoid and reuse it inside the map for each element. However, I realize that I will have to use the same transformation in different maps… so I end up creating this simple Functoid.
Convert to a Number Functoid
This functoid allows you to convert a string to a number (integer)
Parameters
The functoid takes three mandatory input parameters:
- The input value to be converted to a number;
- A character that describes what is the decimal separator (can be empty);
- A character that describes what is the group separator (can be empty);
The output of the functoid will be a Number (integer), example: 1234

In this sample described in the picture above we are receiving a string with a decimal: “1.000” and we want to transform into “1”. So, in this case, the functoid configuration will be:
- the first input will be our value;
- the second input will be “.” (dot) that describe the decimal separator;
- and the third input will be “” (empty) because there isn’t any group separator (delimitator);
BizTalk Mapper Extensions UtilityPack: Project Description
BizTalk Mapper Extensions UtilityPack is a set of libraries with several useful functoids to include and use it in a map, which will provide an extension of BizTalk Mapper capabilities.
Where to download?
You can download this functoid along with all the existing one on the BizTalk Mapper Extensions UtilityPack here:
BizTalk Server Community Extensions Utility Packs GitHub Repository
GitHub
Author: Sandro Pereira
Sandro Pereira lives in Portugal and works as a consultant at DevScope. In the past years, he has been working on implementing Integration scenarios both on-premises and cloud for various clients, each with different scenarios from a technical point of view, size, and criticality, using Microsoft Azure, Microsoft BizTalk Server and different technologies like AS2, EDI, RosettaNet, SAP, TIBCO etc. He is a regular blogger, international speaker, and technical reviewer of several BizTalk books all focused on Integration. He is also the author of the book “BizTalk Mapping Patterns & Best Practices”. He has been awarded MVP since 2011 for his contributions to the integration community. View all posts by Sandro Pereira
by Sandro Pereira | Aug 24, 2018 | BizTalk Community Blogs via Syndication
Another day, another error to report – still have plenty of them in my backlog to be published, they are an “easy and quick way” to publish something in my blog when I really don’t have much free time to write something different. Today is about “This is because either (a) ambient transaction is present and the TNS alias is longer than 39 characters” error message that I got when I was initially trying to connect for the first time to ORACLE database to insert some data:
Microsoft.ServiceModel.Channels.Common.MetadataException: Metadata resolution failed for OperationId: “http://Microsoft.LobServices.OracleDB/2007/03/STGADMIN/Table/TRANSACTIONS/Insert”. —> Microsoft.ServiceModel.Channels.Common.ConnectionException: Due to an Oracle Client limitation, the adapter failed to open a connection. This is because either (a) ambient transaction is present and the TNS alias is longer than 39 characters, or (b) ambient transaction is present and a non-TNS based URI was used. To resolve this, use a TNS alias to connect to Oracle and make sure it is not more than 39 characters.
at Microsoft.Adapters.OracleDB.OracleDBConnection.OpenConnection(OracleCommonExecutionHelper executionHelper)
— End of inner exception stack trace —
Server stack trace:
at System.Runtime.AsyncResult.End[TAsyncResult](IAsyncResult result)
at System.ServiceModel.Channels.ServiceChannel.SendAsyncResult.End(SendAsyncResult result)
at System.ServiceModel.Channels.ServiceCh.
 ambient transaction is present and the TNS alias is longer than 39 characters")
Followed by other similar warning messages:
A message sent to adapter “WCF-Custom” on send port “INSERT_PAYMENTS_WCFORACLE” with URI “oracledb://IP-ADDRESS:PORT-NUMBER/PATH” is suspended.
Error details: Microsoft.ServiceModel.Channels.Common.MetadataException: Metadata resolution failed for OperationId: “http://Microsoft.LobServices.OracleDB/2007/03/STGADMIN/Table/PAYMENTS/Insert”. —> Microsoft.ServiceModel.Channels.Common.ConnectionException: Due to an Oracle Client limitation, the adapter failed to open a connection. This is because either (a) ambient transaction is present and the TNS alias is longer than 39 characters, or (b) ambient transaction is present and a non-TNS based URI was used. To resolve this, use a TNS alias to connect to Oracle and make sure it is not more than 39 characters.
at Microsoft.Adapters.OracleDB.OracleDBConnection.OpenConnection(OracleCommonExecutionHelper executionHelper)
— End of inner exception stack trace —
Server stack trace:
at System.Runtime.AsyncResult.End[TAsyncResult](IAsyncResult result)
at System.ServiceModel.Channels.ServiceChannel.SendAsyncResult.End(SendAsyncResult result)
at System.ServiceModel.Channels.ServiceChannel.EndCall(String action, Object[] outs, IAsyncResult result)
at System.ServiceModel.Channels.ServiceChannel.EndRequest(IAsyncResult result)
Exception rethrown at [0]:
at System.Runtime.Remoting.Proxies.RealProxy.HandleReturnMessage(IMessage reqMsg, IMessage retMsg)
at System.Runtime.Remoting.Proxies.RealProxy.PrivateInvoke(MessageData& msgData, Int32 type)
at System.ServiceModel.Channels.IRequestChannel.EndRequest(IAsyncResult result)
at Microsoft.BizTalk.Adapter.Wcf.Runtime.WcfClient`2.RequestCallback(IAsyncResult result)
MessageId: {DE7ABF70-D6B7-4FC8-A570-5AAE4FFACBB9}
InstanceID: {5842C3C7-6746-4A56-8707-FF53123A4101}
Cause
Non-TNS based URI is not supported under an ambient transaction. If you have to use transactions, you should use the TNS alias.
Note: TNS Alias needs to be less than 39 characters.
Solution
To solve this problem, you need to:
- Open the send port properties, by double-clicking on the port;
- Click on “Configure…” button under Transport
- On the Transport Properties window, select the “Message” tab and then uncheck the “Use Transaction” box under Transactions
 ambient transaction is present and the TNS alias is longer than 39 characters")
If you try to resend the message this problem should be solved. Additionally, if this error still persists, you should change the following properties in the oracleDBbinding:
- “enableBizTalkCompatibilityMode” = True (this is set to false per default)
- And/or “useAmbientTransaction” = False
Author: Sandro Pereira
Sandro Pereira lives in Portugal and works as a consultant at DevScope. In the past years, he has been working on implementing Integration scenarios both on-premises and cloud for various clients, each with different scenarios from a technical point of view, size, and criticality, using Microsoft Azure, Microsoft BizTalk Server and different technologies like AS2, EDI, RosettaNet, SAP, TIBCO etc. He is a regular blogger, international speaker, and technical reviewer of several BizTalk books all focused on Integration. He is also the author of the book “BizTalk Mapping Patterns & Best Practices”. He has been awarded MVP since 2011 for his contributions to the integration community. View all posts by Sandro Pereira

by Sandro Pereira | Aug 21, 2018 | BizTalk Community Blogs via Syndication
Last month I wrote a blog post regarding the “An internal failure occurred for unknown reasons (WinMgmt)” error in the BizTalk Server Administration Console caused by the July 10, 2018 Microsoft Security Updates, you can see the entire blog post here: July 10, 2018 Microsoft Security Updates cause errors on the BizTalk Administration Console: An internal failure occurred for unknown reasons (WinMgmt). In which I document a workaround to solve the following problem:
TITLE: BizTalk Server Administration
——————————
Failed to create a BizTalkDBVersion COM component installed with a BizTalk server.
Class not registered (WinMgmt)
——————————
BUTTONS:
OK
——————————
")
And based on that you wouldn’t be able for example to: restart the host instances from the BizTalk Server Administration console.
Happy to inform you that Microsoft already released a new security update that will fix this problem.
Cause
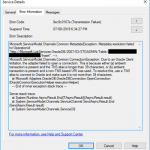
As official documentation (https://support.microsoft.com/en-gb/help/4345913/access-denied-errors-after-installing-july-2018-security-rollup-update) state: Applications that rely on .NET Framework to initialize a COM component and that run with restricted permissions may fail to start or run correctly after you install the July 2018 Security and Quality Rollup updates for .NET Framework.
Microsoft .NET Framework runtime uses the process token to determine whether the process is running within an elevated context. These system calls can fail if the required process inspection permissions are not present. This causes an “access denied” error.
After you install any of the July 2018 .NET Framework Security Updates, a COM component fails to load because of “access denied,” “class not registered,” or “internal failure occurred for unknown reasons” errors.
So, the cause of these problems was security updates that were released by Microsoft on July 10, 2018.
Solution
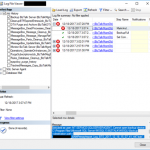
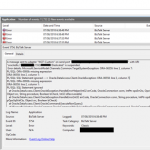
On July 30, 2018 Microsoft released new Security Updates https://www.catalog.update.microsoft.com/Search.aspx?q=4346877 that will fix these issues.
 fixed")
To solve my problem, I:
- Applied/installed all the possible available updates on my BizTalk Server machine;
- I manually download and installed the Security Update marked in the picture above;
After I restarted my BizTalk Server machine, this problem was fixed.
Author: Sandro Pereira
Sandro Pereira lives in Portugal and works as a consultant at DevScope. In the past years, he has been working on implementing Integration scenarios both on-premises and cloud for various clients, each with different scenarios from a technical point of view, size, and criticality, using Microsoft Azure, Microsoft BizTalk Server and different technologies like AS2, EDI, RosettaNet, SAP, TIBCO etc. He is a regular blogger, international speaker, and technical reviewer of several BizTalk books all focused on Integration. He is also the author of the book “BizTalk Mapping Patterns & Best Practices”. He has been awarded MVP since 2011 for his contributions to the integration community. View all posts by Sandro Pereira
by Sandro Pereira | Aug 20, 2018 | BizTalk Community Blogs via Syndication
In the last months I have been working with ORACLE adapter, mainly doing direct insert operations on ORACLE tables and as you might imagine, I found some errors that I find interesting to document. One of these errors was PL/SQL: ORA-00917: missing comma.
The first time I try to directly insert data inside a table – without using any stored procedure, that I normally use in SQL Server or other implementations that I worked with ORACLE – I got the following error:
A message sent to adapter “WCF-Custom” on send port “SEND-PORT-NAME” with URI “oracledb://IP-ADDRESS:PORT-NUMBER/PATH” is suspended.
Error details: Microsoft.ServiceModel.Channels.Common.TargetSystemException: ORA-06550: line 2, column 677:
PL/SQL: ORA-00917: missing comma
ORA-06550: line 2, column 1:
PL/SQL: SQL Statement ignored —> Oracle.DataAccess.Client.OracleException: ORA-06550: line 2, column 677:
PL/SQL: ORA-00917: missing comma
ORA-06550: line 2, column 1:
PL/SQL: SQL Statement ignored
at Oracle.DataAccess.Client.OracleException.HandleErrorHelper(Int32 errCode, OracleConnection conn, IntPtr opsErrCtx, OpoSqlValCtx* pOpoSqlValCtx, Object src, String procedure, Boolean bCheck, Int32 isRecoverable)
at Oracle.DataAccess.Client.OracleException.HandleError(Int32 errCode, OracleConnection conn, String procedure, IntPtr opsErrCtx, OpoSqlValCtx* pOpoSqlValCtx, Object src, Boolean bCheck)
at Oracle.DataAccess.Client.OracleCommand.ExecuteNonQuery()
at Microsoft.Adapters.OracleCommon.OracleCommonUtils.ExecuteNonQuery(OracleCommand command, OracleCommonExecutionHelper executionHelper)
— End of inner exception stack trace —
Server stack trace:
at System.Runtime.AsyncResult.End[TAsyncResult](IAsyncResult result)
at System.ServiceModel.Channels.ServiceChannel.SendAsyncResult.End(SendAsyncResult result)
at System.ServiceModel.Channels.ServiceChannel.EndCall(String action, Object[] outs, IAsyncResult result)
at System.ServiceModel.Channels.ServiceChannel.EndRequest(IAsyncResult result)
Exception rethrown at [0]:
at System.Runtime.Remoting.Proxies.RealProxy.HandleReturnMessage(IMessage reqMsg, IMessage retMsg)
at System.Runtime.Remoting.Proxies.RealProxy.PrivateInvoke(MessageData& msgData, Int32 type)
at System.ServiceModel.Channels.IRequestChannel.EndRequest(IAsyncResult result)
at Microsoft.BizTalk.Adapter.Wcf.Runtime.WcfClient`2.RequestCallback(IAsyncResult result)
MessageId: {29C0CAD2-1D48-4318-8C86-E4A4E38FBD1C}
InstanceID: {F64C65F2-99F2-410E-A92E-418D146C16C9}

Cause
When you import the Insert (or other operation) schema from a specific table, unlike SQL, that only brings fields for you to fill, ORACLE schema will have:
- Elements (fields) – that are the columns present in that specific table
- and each Element will have an optional “InlineValue” attribute.

The element, as you can imagine is to send the value data that you want to insert in that specify column of the database but what is the InlineValue attribute? And what is this for?
InlineValue
For all simple data records in a multiple record Insert operation, you can choose to override the value of a record by specifying a value for an optional attribute called “InlineValue“. The InlineValue attribute can be used to insert computed values into tables or views such as populating the primary key column using a sequence or inserting system date (using SYSDATE) into a date column. Again, this is an optional attribute and is available for all simple data records in a multiple record Insert operation.
Basically, in other words, it allows you to call ORACLE PL/SQL functions like SYSDATE, TO_DATE or others for that specific column. And you don’t need to insert any data on the element, again, by specifying the InlineValue attribute this will override the value that you insert on that element.
Why you are getting the PL/SQL: ORA-00917: missing comma error?
This error typically occurs when you are mistakenly putting the data to be inserted in the “InlineValue” attribute and not in the elements:
<ns0:PAYMENTSRECORDINSERT xmlns:ns0="http://Microsoft.LobServices.OracleDB/2007/03/STGADMIN/Table/RETAIL_PAYMENTS">
  <ns0:RECORD_UNIQUE_ID InlineValue="12345" />
  <ns0:BOOKING_REF_NUMBER InlineValue="12345" />
  <ns0:SOURCE_SYSTEM InlineValue="TEST" />
  <ns0:PAYMENT_METHOD InlineValue="MONEY" />
  <ns0:CURRENCY_CODE InlineValue="EUR" />
  <ns0:REFERENCE_CODE InlineValue="1234" />
  <ns0:PAYMENT_TRANSACTION_ID InlineValue="1234" />
  <ns0:INTERFACE_STATUS InlineValue="N" />
</ns0:ADMM_RETAIL_PAYMENTSRECORDINSERT>
Solution
The solution, in this case, is very simple: you need to place the data on the existing elements of the schema instead of using the InlineValue attribute of the element:
<ns0:PAYMENTSRECORDINSERT xmlns:ns0="http://Microsoft.LobServices.OracleDB/2007/03/STGADMIN/Table/RETAIL_PAYMENTS">
  <ns0:RECORD_UNIQUE_ID>1234</ns0:RECORD_UNIQUE_ID>
  <ns0:BOOKING_REF_NUMBER>1234</ns0:BOOKING_REF_NUMBER>
  <ns0:SOURCE_SYSTEM>TEST</ns0:SOURCE_SYSTEM>
  <ns0:PAYMENT_METHOD>MONEY</ns0:PAYMENT_METHOD>
  <ns0:CURRENCY_CODE>EUR</ns0:CURRENCY_CODE>
  <ns0:REFERENCE_CODE>1234</ns0:REFERENCE_CODE>
  <ns0:PAYMENT_TRANSACTION_ID>1234</ns0:PAYMENT_TRANSACTION_ID>
  <ns0:INTERFACE_STATUS>N</ns0:INTERFACE_STATUS>
</ns0:ADMM_RETAIL_PAYMENTSRECORDINSERT>
Author: Sandro Pereira
Sandro Pereira lives in Portugal and works as a consultant at DevScope. In the past years, he has been working on implementing Integration scenarios both on-premises and cloud for various clients, each with different scenarios from a technical point of view, size, and criticality, using Microsoft Azure, Microsoft BizTalk Server and different technologies like AS2, EDI, RosettaNet, SAP, TIBCO etc. He is a regular blogger, international speaker, and technical reviewer of several BizTalk books all focused on Integration. He is also the author of the book “BizTalk Mapping Patterns & Best Practices”. He has been awarded MVP since 2011 for his contributions to the integration community. View all posts by Sandro Pereira


 ambient transaction is present and the TNS alias is longer than 39 characters")
 ambient transaction is present and the TNS alias is longer than 39 characters")
")
 fixed")

