Almost 3 years ago, I wrote a blog post about How to get Key-values from Azure App Configuration within Logic Apps, and this is still valid today since we still don’t have an App Configuration Connector available out of the box. But I realize that I never blog about this resource in my blog.
There are many ways to store application configurations in Azure. At the top of the list is Key Vault which is ideal for storing secrets like passwords that should have limited access to the number of people that can see and modify these values.
However, not all configurations should need that tremendous restricted access. Neither all configurations are secrets. Of course, you can also use Key Vault to store non-secret information. But there are other options available like:
Using a SQL database with an app configuration table to store key values.
Depending on the services you are using, you can also use the default built-in App Configuration settings. For example, Azure Functions have it:
But you can also make use of the Azure App Configuration service.
Azure App Configuration stores configuration data as key-values. Key-values are a flexible and straightforward representation of developers’ application settings to make these configurations settings dynamic without redeploying your application if changes are required. However, they are not encrypted like the Key Vault, so it is a good solution to store non-sensitive data that you want to make dynamic in your application.
Combining Azure App Configuration to store and manage your configurations and Azure Key Vault to store your secrets, we will obtain apowerful configuration management nearly for free.
App Configuration makes it easier to implement the following scenarios:
Centralize management and distribution of hierarchical configuration data for different environments and geographies
Dynamically change application settings without the need to redeploy or restart an application
Control feature availability in real-time
The only problem was that unlike Key Vault, which has an available connector to be used inside Logic Apps, App Configuration doesn’t have a connector available.
Get Azure App Configuration Value Function
This Function App is intended to close this gap and for you to be able to use it inside Logic Apps (or any other resource) and read App Configurations.
You can download the complete code for the function from GitHub. The link is below at the bottom of the blog post. Here is a small code snippet:
public static class GetAzureAppConfigurationValue
    {
        [FunctionName("GetAzureAppConfigurationValue")]
        public static async Task Run(
            [HttpTrigger(AuthorizationLevel.Function, "get", Route = null)] HttpRequest req,
            ILogger log)
        {
            string appKey = req.Query["appKey"];

            ....

            try
            {
                ...
                var builder = new ConfigurationBuilder();
                builder.AddAzureAppConfiguration(connectionString);
                var build = builder.Build();

                string keyValue = build[appKey.ToString()];

                if (string.IsNullOrEmpty(keyValue))
                {
                    ...
                }
                else return new OkObjectResult(keyValue);
            }
            catch(Exception ex)
            {
                var result = new ObjectResult(ex.Message);
                result.StatusCode = StatusCodes.Status500InternalServerError;
                return result;
            }
        }
    }
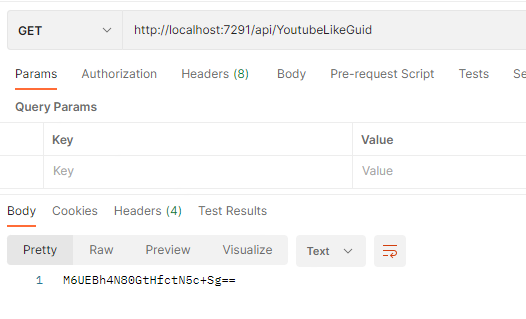
This function requires that you pass as a query parameter the appKey parameter:
https://URL?appKey=’’
Where can I download it?
You can download the complete Azure Function source code here:
Hope you find this helpful! So, if you liked the content or found it helpful and want to help me write more content, you can buy (or help buy) my son a Star Wars Lego!
Author: Sandro Pereira
Sandro Pereira lives in Portugal and works as a consultant at DevScope. In the past years, he has been working on implementing Integration scenarios both on-premises and cloud for various clients, each with different scenarios from a technical point of view, size, and criticality, using Microsoft Azure, Microsoft BizTalk Server and different technologies like AS2, EDI, RosettaNet, SAP, TIBCO etc.
He is a regular blogger, international speaker, and technical reviewer of several BizTalk books all focused on Integration. He is also the author of the book “BizTalk Mapping Patterns & Best Practices”. He has been awarded MVP since 2011 for his contributions to the integration community.
View all posts by Sandro Pereira
It is Friday, and just for fun and also because I would like to have a watch (one of my passions) in the cover picture, I decided to migrate a subset of an old project of mine: BizTalk MapperExtensions UtilityPack to Azure Functions, in this case, DateTime Conversion Functoids. You never know if they will be handy someday!
This project includes a list of Azure Functions that make data conversions easy to accomplish and that you can use anywhere, but most likely, I was thinking of using them inside Logic Apps if I will have a need to do this kind of task if they are not available out-of-the-box inside Logic Apps – and I know that some of them are not:
Convert from human-readable to epoch date function.
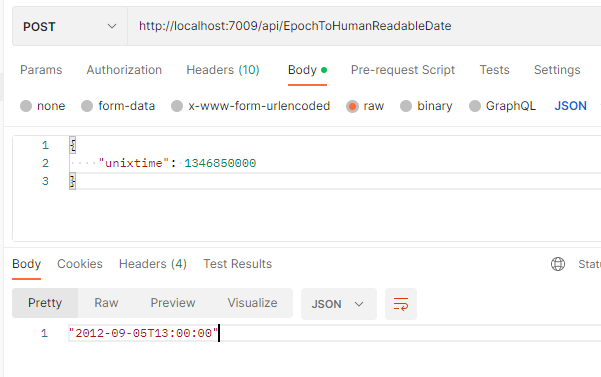
Convert from epoch to human readable date function.
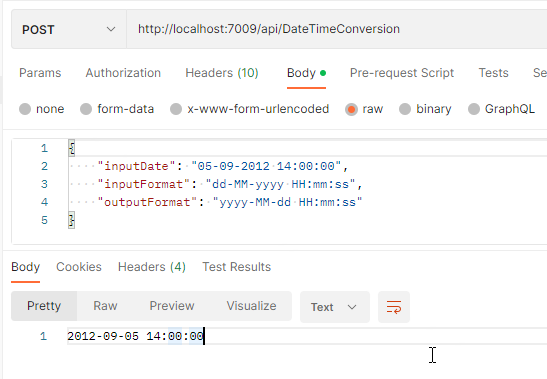
And Convert date time format function.
Convert from human-readable to epoch date function.
This function allows you to convert a traditional date (Human Readable Date) into a Unix date (Epoch Date).
What is epoch time?
The Unix epoch (or Unix time or POSIX time or Unix timestamp) is the number of seconds that have elapsed since January 1, 1970 (midnight UTC/GMT), not counting leap seconds (in ISO 8601: 1970-01-01T00:00:00Z). Literally speaking, the epoch is Unix time 0 (midnight 1-1-1970), but ‘epoch’ is often used as a synonym for ‘Unix time’. Many Unix systems store epoch dates as a signed 32-bit integer, which might cause problems on January 19, 2038 (known as the Year 2038 problem or Y2038).
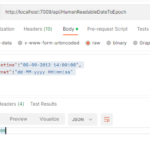
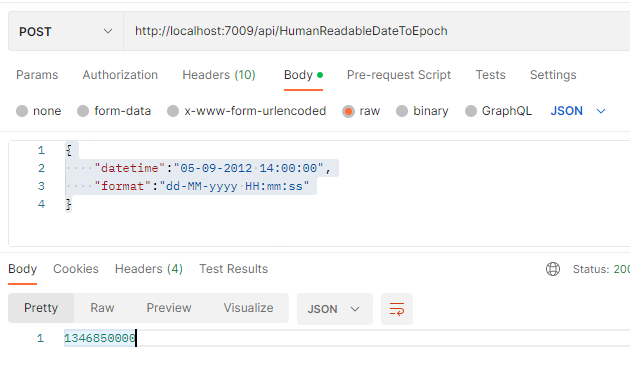
The function receives a JSON payload with two properties:
The input Date or DateTime.
And a string describing the input format of the first parameter
The function’s output is a DateTime string according to the output format specified : “2012-09-05 14:00:00”
Where can I download it
You can download the complete Azure Functions source code here:
Hope you find this helpful! So, if you liked the content or found it helpful and want to help me write more content, you can buy (or help buy) my son a Star Wars Lego!
Author: Sandro Pereira
Sandro Pereira lives in Portugal and works as a consultant at DevScope. In the past years, he has been working on implementing Integration scenarios both on-premises and cloud for various clients, each with different scenarios from a technical point of view, size, and criticality, using Microsoft Azure, Microsoft BizTalk Server and different technologies like AS2, EDI, RosettaNet, SAP, TIBCO etc.
He is a regular blogger, international speaker, and technical reviewer of several BizTalk books all focused on Integration. He is also the author of the book “BizTalk Mapping Patterns & Best Practices”. He has been awarded MVP since 2011 for his contributions to the integration community.
View all posts by Sandro Pereira
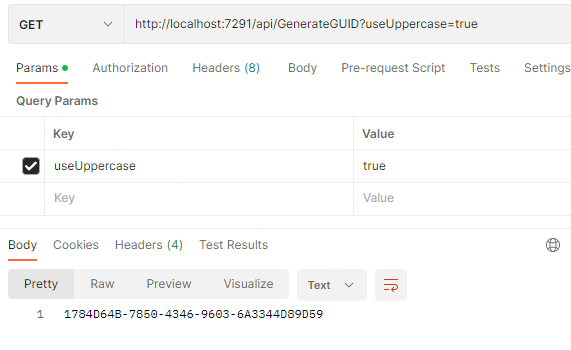
There are so many scenarios that I faced in more than 18 years doing integration that required me to generate a unique id that I don’t know how to start explaining all of them. Unique identifiers are handy when an automation process needs to generate a unique reference “number” to identify an object or entity like a Customer account, a document id, and so on. Most of the time, we use GUIDs, which stands for a globally unique identifier, and it is usually a 128-bit text string that represents an identification (ID) that is unlikely ever to repeat or create a collision to address these scenarios unless requirements don’t allow us to use a GUID.
This is a list of 4 Functions that will allow you to generate unique identifiers:
This function is another way that I used in the past, in BizTalk Server projects, to generate a tiny identifier. But looking now that I’m writing this blog post, it looks like a Youtube-like GUID.
Here is a small sample of the code behind this function:
You can download the complete Azure Functions source code here:
Once again, thank my team member Luis Rigueira for testing and helping me develop some of these function with me!
Hope you find this helpful! So, if you liked the content or found it helpful and want to help me write more content, you can buy (or help buy) my son a Star Wars Lego!
Author: Sandro Pereira
Sandro Pereira lives in Portugal and works as a consultant at DevScope. In the past years, he has been working on implementing Integration scenarios both on-premises and cloud for various clients, each with different scenarios from a technical point of view, size, and criticality, using Microsoft Azure, Microsoft BizTalk Server and different technologies like AS2, EDI, RosettaNet, SAP, TIBCO etc.
He is a regular blogger, international speaker, and technical reviewer of several BizTalk books all focused on Integration. He is also the author of the book “BizTalk Mapping Patterns & Best Practices”. He has been awarded MVP since 2011 for his contributions to the integration community.
View all posts by Sandro Pereira
If you come from BizTalk and have an integration background like me, you may remember that we had a Loopback Adapter in BizTalk Server.
The Loopback adapter is a two-way send adapter that, in essence, returns a copy of the outbound message back to the caller, in most cases, an orchestration. This capability can be used in several situations or scenarios:
One is to replace the need to call pipelines inside an orchestration. Calling pipelines inside orchestrations is a good option, but it complicates the logic of the orchestrations with loops and expressions. You’ll also end up repeating the “code” for each message type/orchestration.
Or have a way to invoke a party/agreement to get more details in the message.
Using Loopback adapter to subscribe NACKs off Web Services.
And so on.
However, while trying different implementation strategies using Azure Integration Services, I realize that the use of a Loopback API is also very handy.
Are you wondering where you can use this component or strategy?
In many different ways like:
If we need to do a liquid transformation inside Logic App Consumption, we need to have an Integration Account, which is expensive. Instead, we can expose an operation in API Management to perform a liquid transformation. For that, you will need the Loopback API.
Throwing an exception inside Logic Apps. There are many ways to archive these capabilities. One of the options is again exposing an operation in API Management to throw back the exception. For that, you will need the Loopback API.
And so on.
Soon I’m going to publish some of these implementation strategies.
For now, I leave you the Loopback API code for you to try and provide feedback.
Loopback API Azure Function
The Loopback API is simply an Azure Function that, in its essence, returns a copy of the inbound message/request back to the caller. We can say that this Azure Function mimics the Echo API, which comes by default in the API Management,
You can download the complete code for the function from GitHub. The link is below at the bottom of the blog post. Here is a small code snippet:
        public static async Task Run(
            [HttpTrigger(AuthorizationLevel.Function, "post", Route = null)] HttpRequest req,
            ILogger log)
        {
            log.LogInformation("C# HTTP trigger function processed a request.");

            string requestBody = await new StreamReader(req.Body).ReadToEndAsync();
            //dynamic data = JsonConvert.DeserializeObject(requestBody);

            string contentType = req.Headers["Content-Type"];

            return new ContentResult { Content = requestBody, ContentType = req.Headers["Content-Type"] };
Where can I download it
You can download the complete Azure Function source code here:
Once again, thank my team member Luis Rigueira for testing these concepts with me!
Hope you find this helpful! So, if you liked the content or found it helpful and want to help me write more content, you can buy (or help buy) my son a Star Wars Lego!
Author: Sandro Pereira
Sandro Pereira lives in Portugal and works as a consultant at DevScope. In the past years, he has been working on implementing Integration scenarios both on-premises and cloud for various clients, each with different scenarios from a technical point of view, size, and criticality, using Microsoft Azure, Microsoft BizTalk Server and different technologies like AS2, EDI, RosettaNet, SAP, TIBCO etc.
He is a regular blogger, international speaker, and technical reviewer of several BizTalk books all focused on Integration. He is also the author of the book “BizTalk Mapping Patterns & Best Practices”. He has been awarded MVP since 2011 for his contributions to the integration community.
View all posts by Sandro Pereira
Continuous Integration and Continuous Deployment (CI/CD) is a practice that has become an essential aspect of Azure development. Although it is possible to execute each of the CI/CD pipeline steps manually, the actual value can be achieved only through automation.
And to improve software delivery using CI/CD pipelines, either a DevOps or a Site Reliability Engineering (SRE) approach is highly recommended.
In this whitepaper, I will address and explain how you can implement CI/CD oriented to Azure Function Apps using Azure DevOps Pipelines.
I will explain in detail all the basic things you have to know, from the creation of an Azure Function on Visual Studio 2022 to everything you need to create and configure inside DevOps to archive the implementation of the CI/CD process using Azure Functions.
What’s in store for you?
This whitepaper will give you a detailed understanding of the following:
An introduction to:
What are Continuous Integration (CI) and Continuous Deployment (CD)?
What are CI/CD Pipelines?
What is Azure DevOps?
Create an organization or project collection in Azure DevOps
Create a project in Azure DevOps
Building your Azure Function from scratch
Publish your code from Visual Studio
A step-by-step approach to building Azure Pipelines
A step-by-step approach to building Azure Release Pipelines
The full 7.3 version is complete with the release of v.7.3.1. This was a massive work of adding new shapes of new services that appear on Azure and changing the existing one with the new version of the shapes. Work is done and I hope you enjoy it!
What’s new in this version?
This is the list of changes and additions present in this release:
New shapes on MIS Azure Stencils, MIS Azure Additional or Support Stencils, MIS Developer Stencils, and MIS Security and Governance packages: add a considerable amount of new shapes of new services that appear on Azure has both changing the existing one with their new layout.
Move old versions of the shape layout to MIS Azure Old Versions package.
New shapes on MIS AI and Machine Learning Stencils: several new shapes add it to this package with several Cognitive Services.
New shapes on Microsoft Integration Stencils: some new shapes add it to this package describing Schemas, Maps, Aggrements, Partners, Assemblies and so on.
Lock the aspect ratio of the new stencil icons: This was a requested made that can be very handly to protects against accidental resizing with another shape aspect.
SVG files: new SVG files added.
Microsoft Integration, Azure, Power Platform, Office 365 and much more Stencils Pack
Microsoft Integration, Azure, Power Platform, Office 365 and much more Stencils Pack it’s a Visio package that contains fully resizable Visio shapes (symbols/icons) that will help you to visually represent On-premise, Cloud or Hybrid Integration and Enterprise architectures scenarios (BizTalk Server, API Management, Logic Apps, Service Bus, Event Hub…), solutions diagrams and features or systems that use Microsoft Azure and related cloud and on-premises technologies in Visio 2016/2013:
BizTalk Server
Microsoft Azure
Integration
Integration Service Environments (ISE)
Logic Apps and Azure App Service in general (API Apps, Web Apps, and Mobile Apps)
Azure API Management
Messaging: Event Hubs, Event Grid, Service Bus, …
Azure IoT and Docker
AI, Machine Learning, Stream Analytics, Data Factory, Data Pipelines
SQL Server, DocumentDB, CosmosDB, MySQL, …
and so on
Microsoft Power Platform
Microsoft Flow
PowerApps
Power BI
Office365, SharePoint,…
DevOps and PowerShell
Security and Governance
And much more…
… and now non-related Microsoft technologies like:
SAP Stencils
The Microsoft Integration Stencils Pack is composed of 28 files:
Microsoft Integration Stencils
MIS Additional or Support Stencils
MIS AI and Machine Learning Stencils
MIS Apps and Systems Logo Stencils
MIS Azure Additional or Support Stencils
MIS Azure Black and Gray
MIS Azure Old Versions
MIS Azure Stencils
MIS Black and Cyan
MIS Buildings Stencils
MIS Databases and Analytics Stencils
MIS Deprecated Stencils
MIS Developer Stencils
MIS Devices Stencils
MIS Files and Message Types Stencils
MIS Generic Stencils
MIS Infrastructure and Networking Stencils
MIS Integration Fun
MIS Integration Patterns Stencils
MIS IoT Stencils
MIS Office, Office 365 and Dynamics 365
MIS Power BI Stencils
MIS Power Platform Stencils
MIS SAP Stencils
MIS Security and Governance
MIS Servers (Hexagonal) Stencils
MIS Users and Roles Stencils
MIS API Connectors
Organisational Stencils
That you can use and resize without losing quality, in particular, the new shapes.
Download
You can download Microsoft Integration, Azure, BAPI, Office 365 and much more Stencils Pack for Visio from GitHub Here:
The full 7.3.0 version is not yet complete, but I decided to release it in small pieces instead of taking a long time to make all the planned changes and being the Azure part that will require the most work.
What’s new in this version?
This is the list of changes and additions present in this release:
New shapes on MIS: Office, Office 365 and Dynamics 365 package: add some new Dynamic 365 shapes like Dataverse, SCM Warehousing, Project Timesheet, Return To School orReturn To Work, and several new Office/Office 365 shapes.
Remove API Connectors shapes from MIS: Power Platform package: there goal was to simplify this package and migrate that stencils to a dedicated package, since there are more then 600 connectors. Also these connectores are common to Power Automate, Power Apps and Logic Apps.
Create a new package MIS: API Connectors: This package will provide stencils to all connectors currently provided for Microsoft Power Automate, Microsoft Power Apps, and Azure Logic Apps.
Lock the aspect ratio of the new stencil icons: This was a requested made that can be very handly to protects against accidental resizing with another shape aspect.
SVG files: new SVG files added.
Microsoft Integration, Azure, Power Platform, Office 365 and much more Stencils Pack
Microsoft Integration, Azure, Power Platform, Office 365 and much more Stencils Pack it’s a Visio package that contains fully resizable Visio shapes (symbols/icons) that will help you to visually represent On-premise, Cloud or Hybrid Integration and Enterprise architectures scenarios (BizTalk Server, API Management, Logic Apps, Service Bus, Event Hub…), solutions diagrams and features or systems that use Microsoft Azure and related cloud and on-premises technologies in Visio 2016/2013:
BizTalk Server
Microsoft Azure
Integration
Integration Service Environments (ISE)
Logic Apps and Azure App Service in general (API Apps, Web Apps, and Mobile Apps)
Azure API Management
Messaging: Event Hubs, Event Grid, Service Bus, …
Azure IoT and Docker
AI, Machine Learning, Stream Analytics, Data Factory, Data Pipelines
SQL Server, DocumentDB, CosmosDB, MySQL, …
and so on
Microsoft Power Platform
Microsoft Flow
PowerApps
Power BI
Office365, SharePoint,…
DevOps and PowerShell
Security and Governance
And much more…
… and now non-related Microsoft technologies like:
SAP Stencils
The Microsoft Integration Stencils Pack is composed of 27 files:
Microsoft Integration Stencils
MIS Additional or Support Stencils
MIS AI and Machine Learning Stencils
MIS Apps and Systems Logo Stencils
MIS Azure Additional or Support Stencils
MIS Azure Black and Gray
MIS Azure Old Versions
MIS Azure Stencils
MIS Black and Cyan
MIS Buildings Stencils
MIS Databases and Analytics Stencils
MIS Deprecated Stencils
MIS Developer Stencils
MIS Devices Stencils
MIS Files and Message Types Stencils
MIS Generic Stencils
MIS Infrastructure and Networking Stencils
MIS Integration Fun
MIS Integration Patterns Stencils
MIS IoT Stencils
MIS Office, Office 365 and Dynamics 365
MIS Power BI Stencils
MIS Power Platform Stencils
MIS SAP Stencils
MIS Security and Governance
MIS Servers (Hexagonal) Stencils
MIS Users and Roles Stencils
Organisational Stencils
That you can use and resize without losing quality, in particular, the new shapes.
Download
You can download Microsoft Integration, Azure, BAPI, Office 365 and much more Stencils Pack for Visio from GitHub Here:
Today I’m going to go over how we solved a real scenario from one of our PowerBI Portal clients. For those who aren’t familiar with it, PowerBI Portal is a web tool that allows organizations to host an unlimited number of Power BI reports and dashboards on an online portal, and give access to it to any number of users, regardless of being in their organization or even having a Power BI account. PowerBI Portal is mainly used by organizations looking to share data with their clients, partners and suppliers, but there have been numerous entrepreneurial cases of people using it as a platform, selling their clients access to the portal or charging for the time they spent on PowerBI Portal.
Other interesting points about PowerBI Portal are the tool’s double layer of row-level security (user and role), which allows data managers to specify who has access to what, and the ability to only consume Power BI Embedded capacity when there’s activity on the platform, which can severely reduce an organization’s consumption bill.
Finally, it’s worth mentioning how flexible the PowerBI Portal API is, allowing for custom solutions such as the one we’ll cover in this blog post.
Challenge
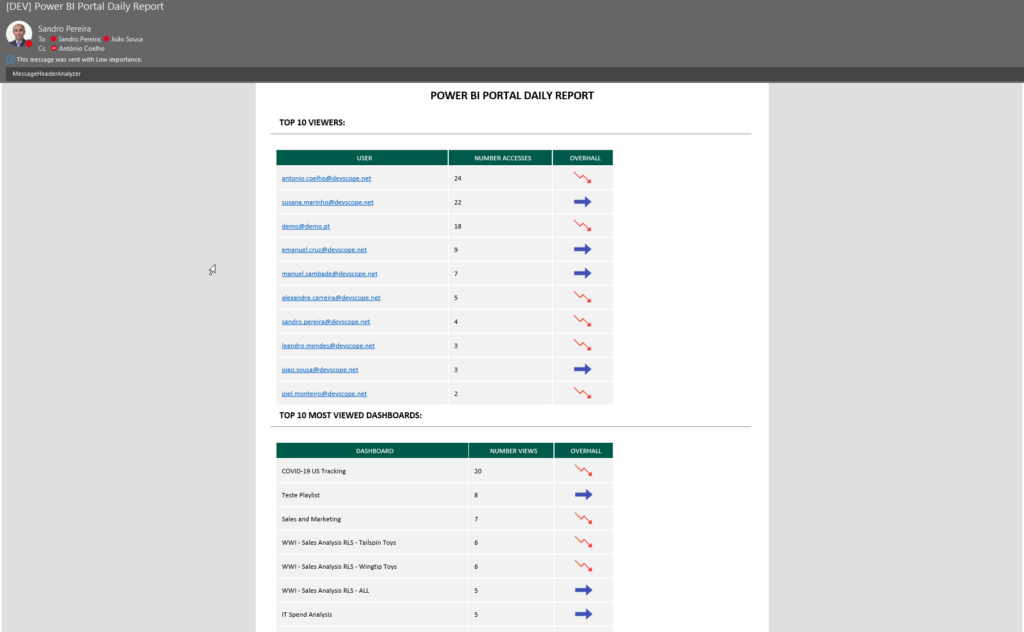
Our PowerBI Portal client wanted a daily report of the top 10 vendors that accessed their organization’s portal along with the most viewed dashboards/reports to better understand how the tool was being used and by whom. The PowerBI Portal API is actually very powerful and straightforward to use, but it didn’t have this capability out-of-the-box so we proactively extend the product’s capabilities by using Azure Integration Services.
This proof-of-concept will explain how you can extend the product by using the existing APIs and creating a fancy Power BI access on the PowerBI Portal audit report.
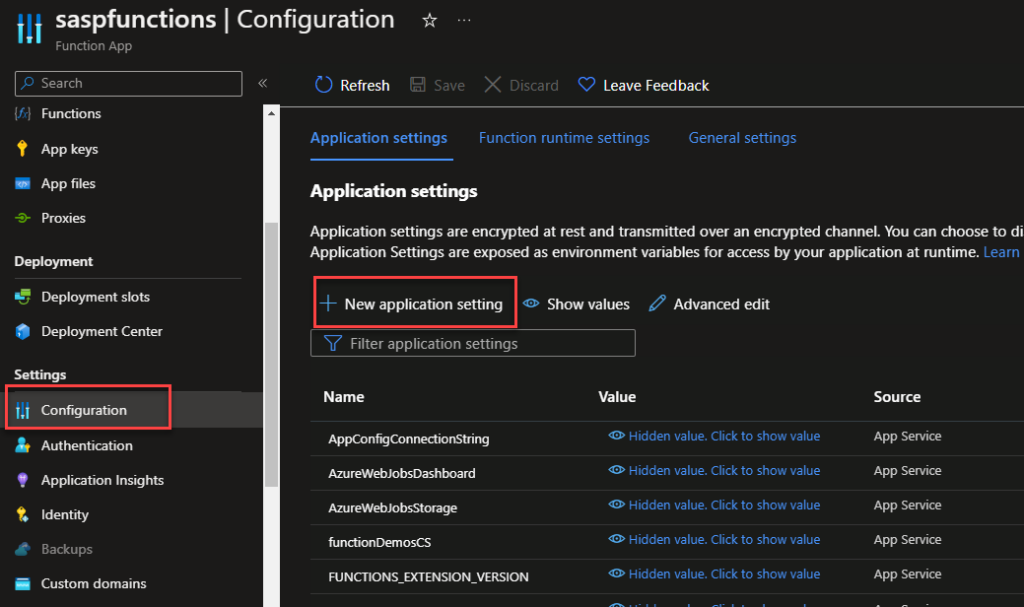
Create Function App
If you don’t have yet a Function App with the .NET runtime stack created, the first step is to create one, and for that, you need to:
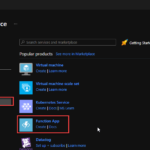
From the Azure portal menu or the Home page, select Create a resource.
In the Create a resource page, select Compute > Function App.
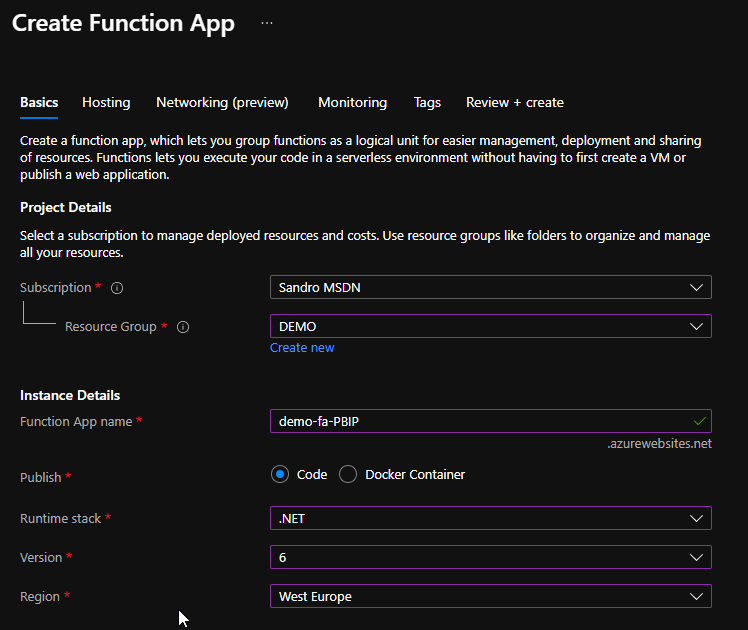
On the Create Function App Basics page, use the following function app settings:
Subscription: Select the subscription under which this new function app is created.
Resource Group: Select an existing Resource Group or create a new one in which your function app will be created.
Function App name: Name that identifies your new function app.
Publish: Select Code.
Runtime stack: Select the option .NET
Version: Choose the version of your installed runtime, in this case, 6
Region: Choose a region near you or near other services your functions access.
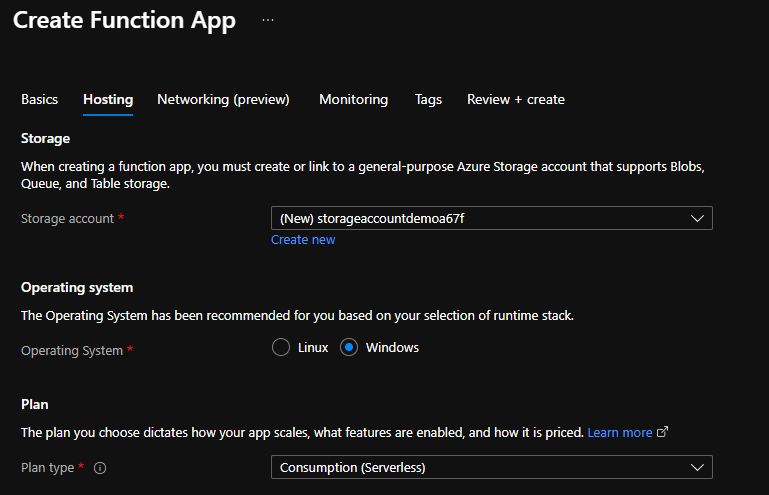
Select Next : Hosting. On the Hosting page, enter the following settings:
Storage Account: Create a storage account used by your function app or select an existing one
Operating system: I choose to use Windows since I’m feeling more comfortable with it.
Plan: Hosting plan that defines how resources are allocated to your function app. In this case, you need to select the Consumption plan.
You can customize the other option according to your intentions or leave the default values. For this demo, we will now select Review + create to review the app configuration selections.
On the Review + create page, review your settings, and then select Create to provision and deploy the function app.
Create HTTP trigger function
The next step is to create two HTTP trigger Function:
FA_Audit_Top10Reports
FA_Audit_Top10USers
For that we need to:
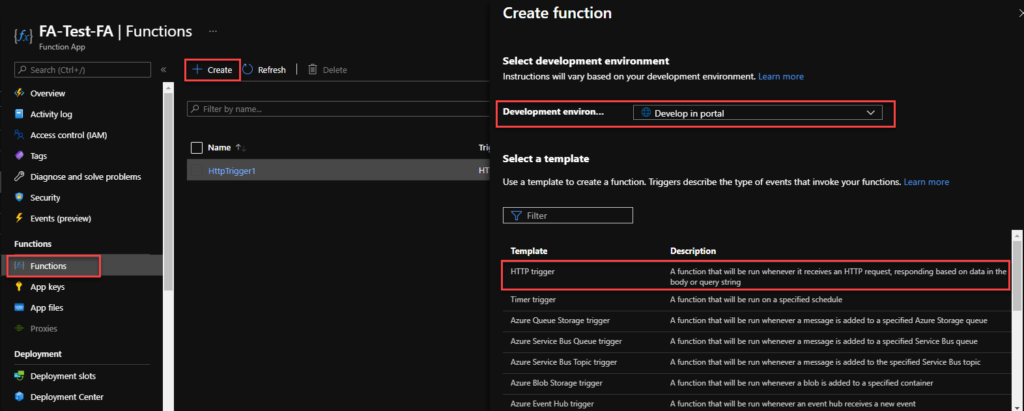
From the left menu of the Function App window, select Functions, then select Create from the top menu.
From the Create Function window, leave the Development environment property as Develop in portal and select the HTTP trigger template.
Under Template details give a proper name for New Function, and choose Function from the Authorization level drop-down list, and then select Create.
On the FA_Audit_Top10Reports window, select Code + Test, then on the run.ps1 file add the following code:
This function will return a list of top 10 reports in a HTML table format
...
string requestBody = new StreamReader(req.Body).ReadToEnd();
JArray data = (JArray)JsonConvert.DeserializeObject(requestBody);
var apiReport = new JArray();
var groups = data
.GroupBy(s => s["name"])
.Select(s => new
{
Dashboard = s.Key,
Count = s.Count()
})
.OrderByDescending(s=> s.Count).Take(10);
...
Note: this is a small part of the code. Click on the button below to download a simplified version of the source code from the overall solution.
On the FA_Audit_Top10USers window, select Code + Test, then on the run.ps1 file add the following code:
This function will return a list of top 10 users in a HTML table format
...
string requestBody = new StreamReader(req.Body).ReadToEnd();
JArray data = (JArray)JsonConvert.DeserializeObject(requestBody);
var apiReport = new JArray();
var groups = data
.GroupBy(s => s["userEmail"])
.Select(s => new
{
User = s.Key,
Count = s.Count()
})
.OrderByDescending(s=> s.Count).Take(10);
...
Note: this is a small part of the code. Click on the button below to download a simplified version of the source code from the overall solution.
Finally, we need to create a scheduling Logic App to trigger the monitoring Function and notify if any API Connection is broken. To simplify the solution, we will be using the Azure Portal to create also the Logic App.
From the Azure portal menu or the Home page, select Create a resource.
In the Create a resource page, select Integration > Logic App.
On the Create Logic App Basics page, use the following Logic app settings:
Subscription: Select the subscription under which this new Logic app is created.
Resource Group: Select an existing Resource Group or create a new one in which your Logic app will be created.
Type: The logic app resource type and billing model to use for your resource, in this case we will be using Consumption
Consumption: This logic app resource type runs in global, multi-tenant Azure Logic Apps and uses the Consumption billing model.
Standard: This logic app resource type runs in single-tenant Azure Logic Apps and uses the Standard billing model.
Logic App name: Your logic app resource name, which must be unique across regions.
Region: The Azure datacenter region where to store your app’s information. Choose a region near you or near other services your Logic app access.
Enable log analytics: Change this option only when you want to enable diagnostic logging. The default value in No.
When you’re ready, select Review + Create. On the validation page, confirm the details that you provided, and select Create.
After Azure successfully deploys your app, select Go to resource. Or, find and select your logic app resource by typing the name in the Azure search box.
Under Templates, select Blank Logic App. After you select the template, the designer now shows an empty workflow surface.
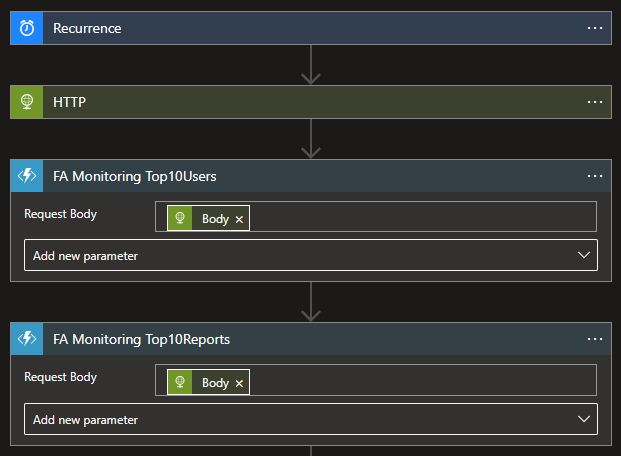
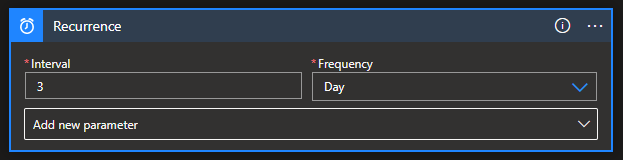
In the workflow designer, under the search box, select Built-In. From the Triggers list, select the Schedule trigger, Recurrence.
In the trigger details, provide the following information:
Interval: 1
Frequency: Day
Under the Recurrence trigger, select New step.
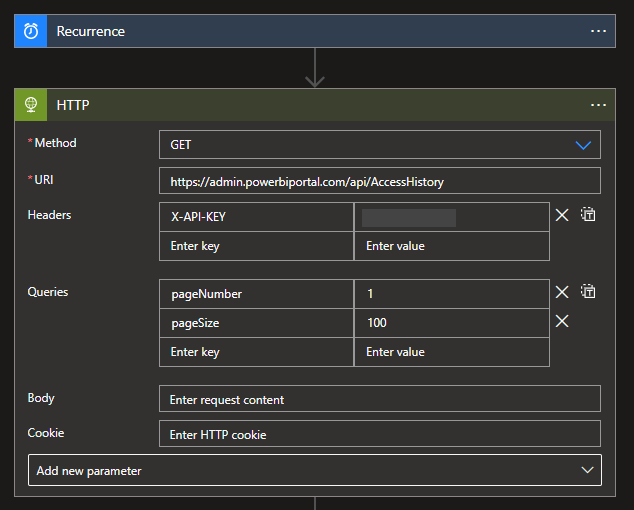
Select New step. In the search box, enter HTTP, and from the result panel select the HTTP, HTTP action and provide the following information:
Headers: you need to create the X-API-KEY with your access token
Queries: you need to specify two query parameters:
pageNumber: 1
pageSize: 100
Select New step. In the search box, enter Azure Functions, and from the result panel select the Azure Functions, select the Function App that contains the Functions we create above and then select the FA_Audit_Top10Users function and provide the following information
Request Body: Result body of the HTTP action – @{body(‘HTTP’)}
Do the same steps, this time for the FA_Audit_Top10Reports function
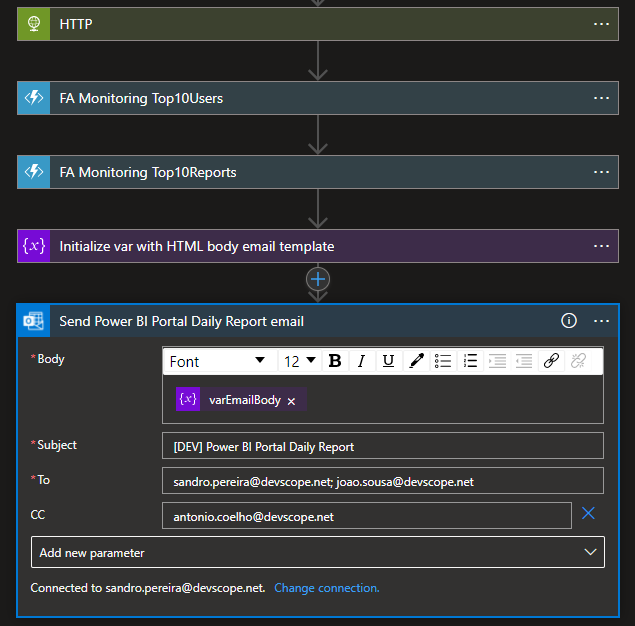
Select New step. In the search box, enter Variables, and from the result panel select the Variables, Initialize variable action and provide the following information:
Name: varEmailBody
Type: String
Value: provide the HTML email body template and add the result of the functions to that template
Note: this is a small part of the HTML body template code. You should customize it according to your needs.
And finally, select New step. In the search box, enter Office 365 Outlook, and from the result panel select the Office 365 Outlook, Send an email (v2)action and provide the following information:
Body: varEmailBody – @{variables(‘varEmailBody’)}
Subject: [DEV] Power BI Portal Daily Report
To: list of your email addresses.
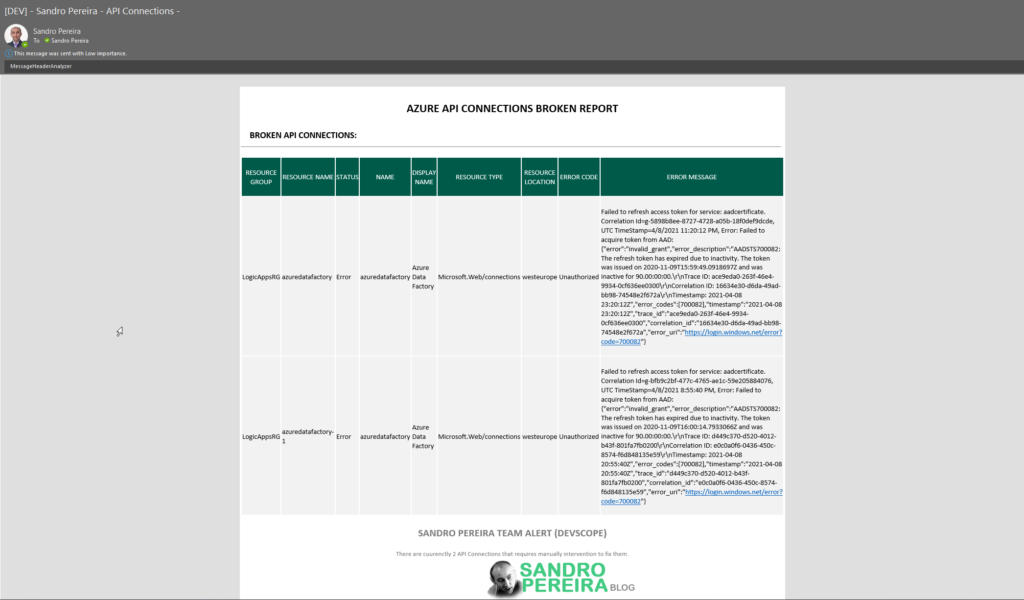
The result, once you try to execute the Logic App, will be a fancy HTML email:
More about Power BI Portal
PowerBI Portal is a web tool that allows users to embed any number of Power BI reports and dashboards on a portal with their organization’s layout, that can be shared with whoever they want, regardless of being in their organization or even having a Power BI account. Know more about it here.
We finally reach the last part of this small blog season on monitoring the status of your Azure API Connections. We start by using a simple PowerShell script locally on our machine to progress to an automated way using Azure Function Apps and Logic Apps. I mentioned in my last post that this previous option had a considerable handicap associated with costs since we couldn’t use the Consumption plan, and instead, we had to use an App Service plan.
Today we will go to address the best solution in my personal opinion:
Using a Schedule PowerShell Runbook on an Automation Account to check the Azure API Connection status
And once again, using a Logic App, this time with an HTTP- When a HTTP request is received trigger, to notify the internal support team if any findings (broken API Connections) were detected.
Note: the Logic App will only be triggered if the Runbook detects/find any non-coherent situations.
Solution 3: Using Automation Account and Logic App
Create Automation Account
The first step, if you don’t have an Automation account yet, is to create one, and for that, you need:
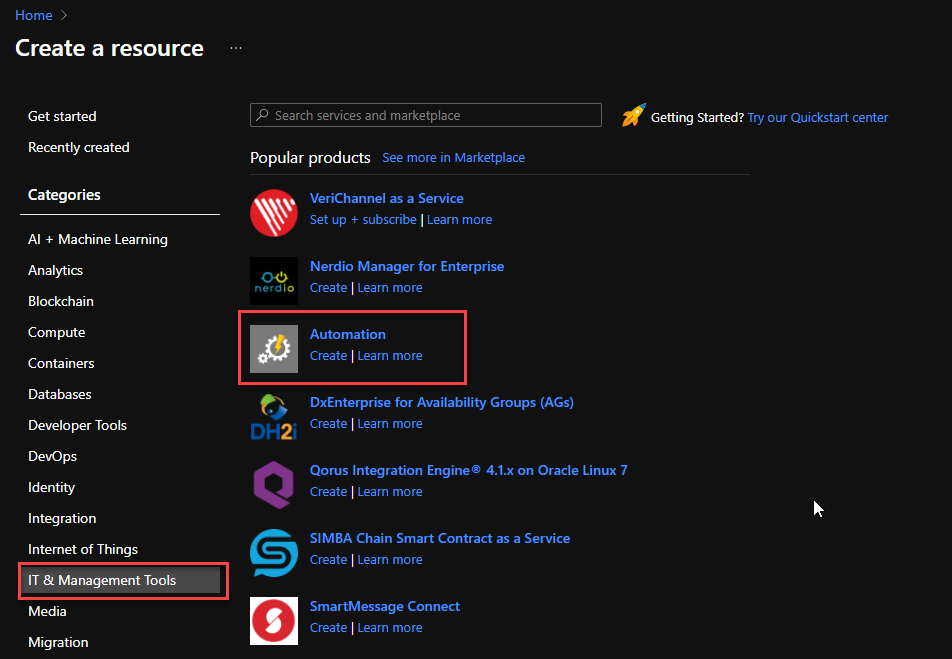
From the Azure portal menu or the Home page, select Create a resource.
In the Create a resource page, select IT & Management Tools > Automation.
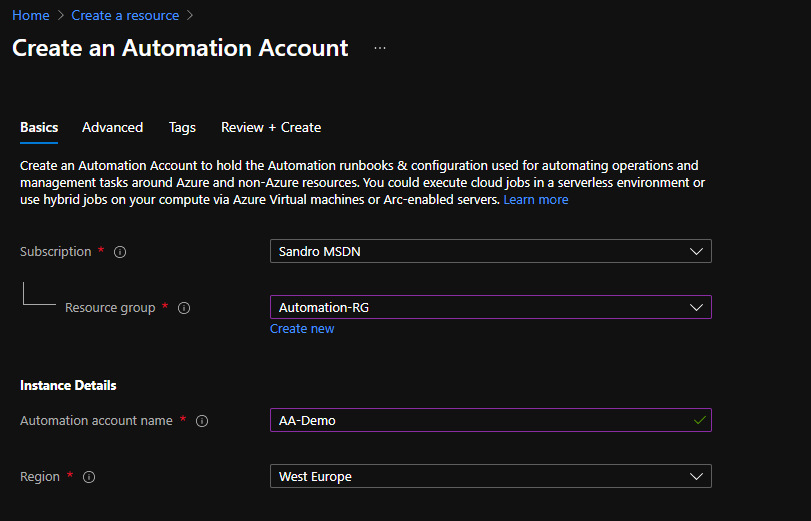
On the Create an Automation Account Basics page, use the following settings:
Subscription: Select the subscription under which this new Automation Account will be created.
Resource Group: Select an existing Resource Group or create a new one in which your Automation Account will be created.
Automation account name: Name that identifies your new Automation Account.
Region: Choose a region near you or near other services your Automation Account access.
You can customize the other option according to your intentions or leave the default values. For this demo, we will now select Review + create to review the app configuration selections.
On the Review + create page, review your settings, and then select Create to provision and deploy the Automation Account.
Create Automation PowerShell runbook
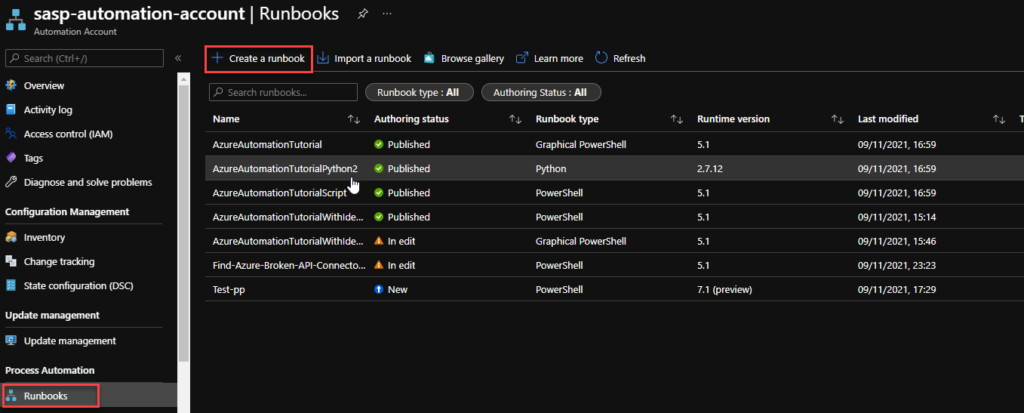
The next step is to create a PowerShell runbook. For that, you need to:
From the left menu of the Automation Account window, select Runbooks, then select Create a runbook from the top menu.
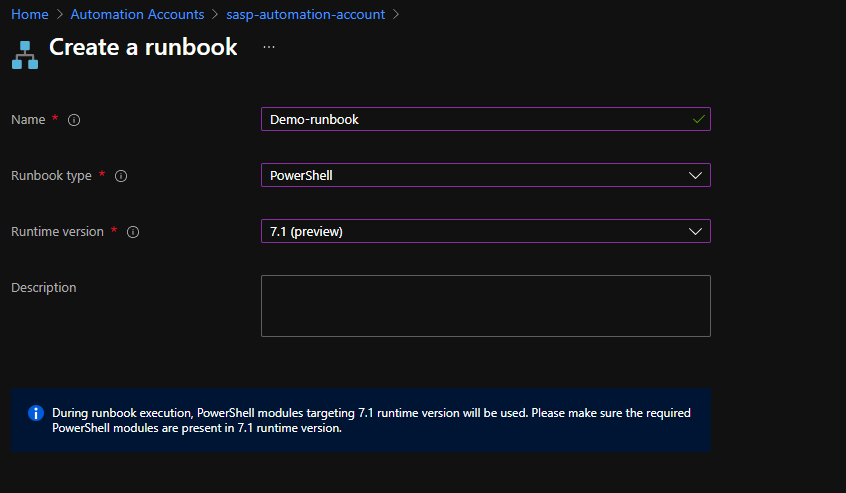
From the Create a runbook window, use the following settings:
Name: Name the runbook
Runbook type: From the Runbook type drop-down menu, select PowerShell.
Runtime version: From the Runtime time drop-down menu, select 7.1 (preview).
Description: Provide a description for this runbook (not mandatory filed)
Finally if everything works properly you can publish the runbook.
Now we need to schedule the runbook. For that, we need:
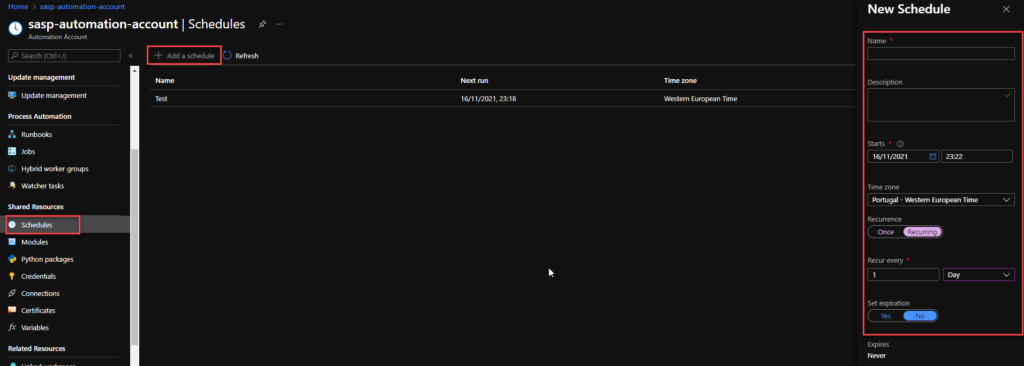
From the left menu of the Automation Account window, select Schedules, then select Add a schedule from the top menu.
From the New Schedule window, use the following settings:
Name: Name of the Schedule
Description: Provide a description for this schedule (not mandatory filed)
Starts: Datetime to start the schedule
Time zone: Time zone configured for this schedule, in my case Portugal – Western European Time
Recurrence: Select whether the schedule runs once or on a reoccurring schedule by selecting Once or Recurring. We are going to use Recurring
If you select Once, specify a start time and then select Create.
If you select Recurring, specify a start time.
Recur every: select how often you want the runbook to repeat. Select by hour, day, week, or month. In hour case, 1 per day
Set expiration: Leave the default property, No.
When you’re finished, select Create.
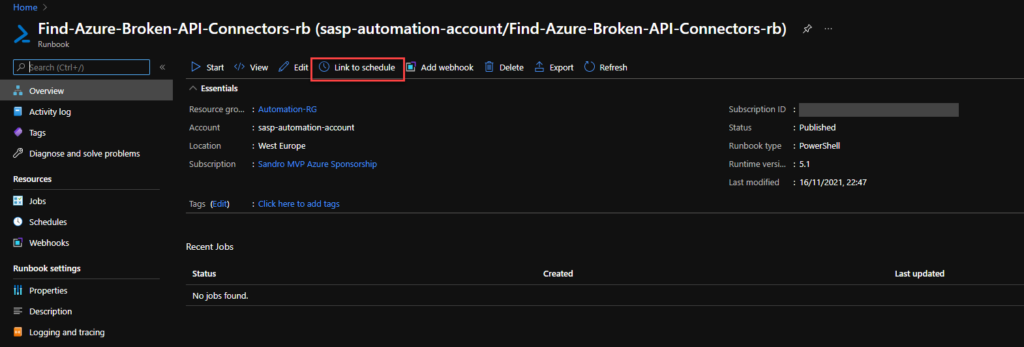
Now that we have our runbook and our schedule created, we need to bind these two, and for that, we need to:
Access to the previous runbook the we create above, and on the runbook page select Link to schedule
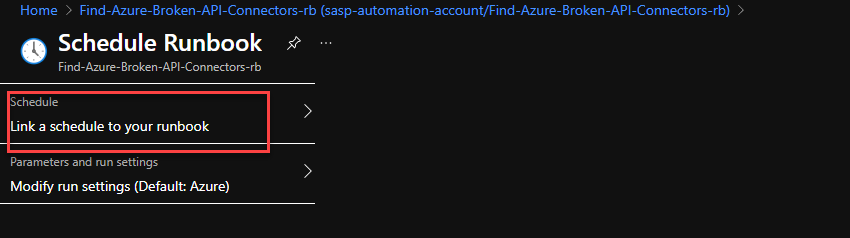
On the Schedule Runbook page, select Link a schedule to your runbook.
On the Schedule page, select the schedule we create above from the schedule list
And then select OK.
Create a Logic App
Finally, we need to create a Logic App with an HTTP- When a HTTP request is received trigger to notify if any API Connection is broken. To simplify the solution, we will be using the Azure Portal to create also the Logic App.
Note: once again, the Logic App will only be triggered if the Runbook detects/finds any non-coherent situations..
To accomplish that, we need to:
From the Azure portal menu or the Home page, select Create a resource.
In the Create a resource page, select Integration > Logic App.
On the Create Logic App Basics page, use the following Logic app settings:
Subscription: Select the subscription under which this new Logic app is created.
Resource Group: Select an existing Resource Group or create a new one in which your Logic app will be created.
Type: The logic app resource type and billing model to use for your resource, in this case we will be using Consumption
Consumption: This logic app resource type runs in global, multi-tenant Azure Logic Apps and uses the Consumption billing model.
Standard: This logic app resource type runs in single-tenant Azure Logic Apps and uses the Standard billing model.
Logic App name: Your logic app resource name, which must be unique across regions.
Region: The Azure datacenter region where to store your app’s information. Choose a region near you or near other services your Logic app access.
Enable log analytics: Change this option only when you want to enable diagnostic logging. The default value in No.
When you’re ready, select Review + Create. On the validation page, confirm the details that you provided, and select Create.
After Azure successfully deploys your app, select Go to resource. Or, find and select your logic app resource by typing the name in the Azure search box.
Under Templates, select Blank Logic App. After you select the template, the designer now shows an empty workflow surface.
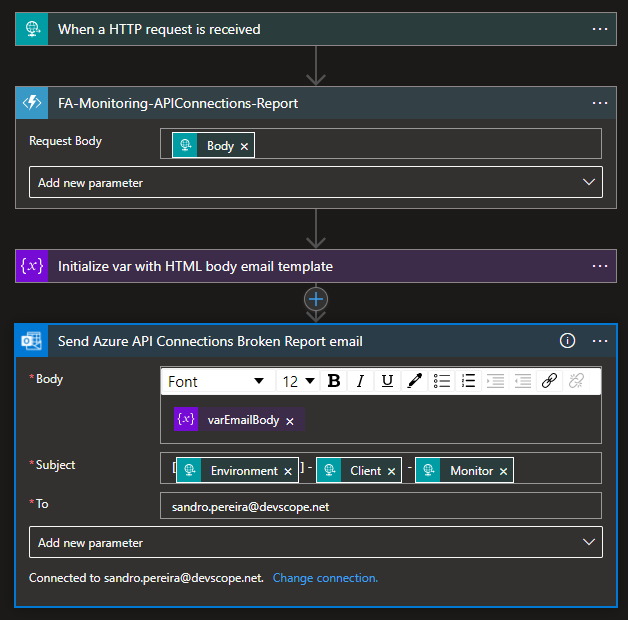
In the workflow designer, under the search box, select Built-In. From the Triggers list, select the Request connector, and the When a HTTP request is received trigger.
Use the following sample payload to generate the schema
Then we be using the following actions to notify the support team:
Choose an Azure function: I’m calling and Azure Function to transform the list of broken API’s in a HTML table.
Set variable: I’m setting the varEmailBody with my default HTML email body Template and add the HTML table that the Azure Function returned
Send an email (v2) – Office 365 Outlook: To send the email to the support team
The result, once you try to execute the Logic App, will be a fancy HTML email:
Although this approach required quick learning about Azure Automation, that was quite simple, and for me, this is the best approach in terms of cost and architecture design.
Last week I wrote the first part of this small blog season on monitoring the status of your Azure API Connections. In the first part, I described how you could easily create a simple PowerShell script to have a simple report of the status of all your existing Azure API Connections. I knew since the beginning that that solution wasn’t the ideal one, it was good enough to run it from time to time manually on-demand, but that is not the situation you want to be in. So, today we will go to address the first solution that came into my mind and, in fact, was also suggested both by Mike and Nino:
Using an Azure Function App to check the Azure API Connections status
I endup also added a schedule Logic App to trigger that Function App because I want to notify the internal support team if any findings (broken API Connections) were detected.
Solution 2: Using Function App and Logic App
The first question that appeared in this solution was: what kind of runtime stack to use on your Function App: .NET or PowerShell Core?
I decided to use PowerShell Core because I already have all the PowerShell working from the previous solution, so for me made all sense to use this instead of having to recreate all this logic with .NET.
Create Function App
If you don’t have yet a Function App with the PowerShell Core runtime stack created, the first step is to create one, and for that, you need to:
From the Azure portal menu or the Home page, select Create a resource.
In the Create a resource page, select Compute > Function App.
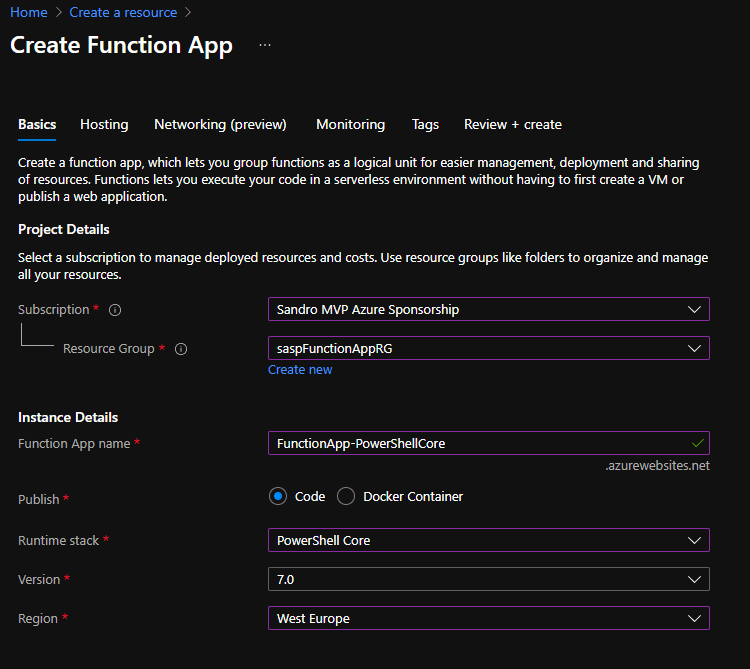
On the Create Function App Basics page, use the following function app settings:
Subscription: Select the subscription under which this new function app is created.
Resource Group: Select an existing Resource Group or create a new one in which your function app will be created.
Function App name: Name that identifies your new function app.
Publish: Select Code.
Runtime stack: Select the option PowerShell Core
Version: Choose the version of your installed runtime, in this case, 7.0
Region: Choose a region near you or near other services your functions access.
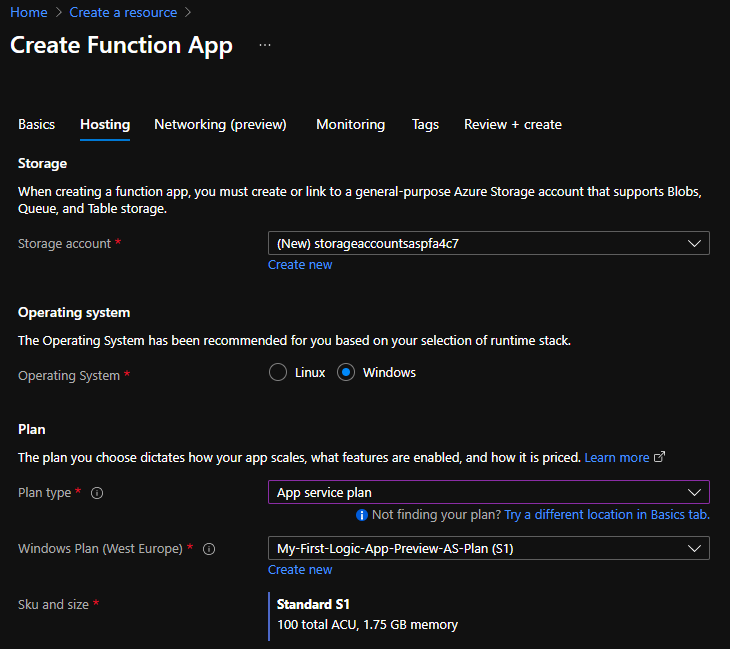
Select Next : Hosting. On the Hosting page, enter the following settings:
Storage Account: Create a storage account used by your function app or select an existing one
Operating system: I choose to use Windows since I’m feeling more comfortable with it.
Plan: Hosting plan that defines how resources are allocated to your function app. In this case, you need to select the App Service plan.
Note: I initially tried to use the Consumption plan, but I couldn’t import and use the Azure modules with the consumption plan. I think they are not supported in that type of plan.
Windows Plan: Select an existing plan or create a new one.
Sku and size: I use the Standard S1
YYou can customize the other option according to your intentions or leave the default values. For this demo, we will now select Review + create to review the app configuration selections.
On the Review + create page, review your settings, and then select Create to provision and deploy the function app.
Create HTTP trigger function
The next step is to create an HTTP trigger Function:
From the left menu of the Function App window, select Functions, then select Create from the top menu.
From the Create Function window, leave the Development environment property as Develop in portal and select the HTTP trigger template.
Under Template details use HttpTrigger1 (or provide a better name) for New Function, and choose Function from the Authorization level drop-down list, and then select Create.
On the HttpTrigger1 window, select Code + Test, then on the run.ps1 file add the following code:
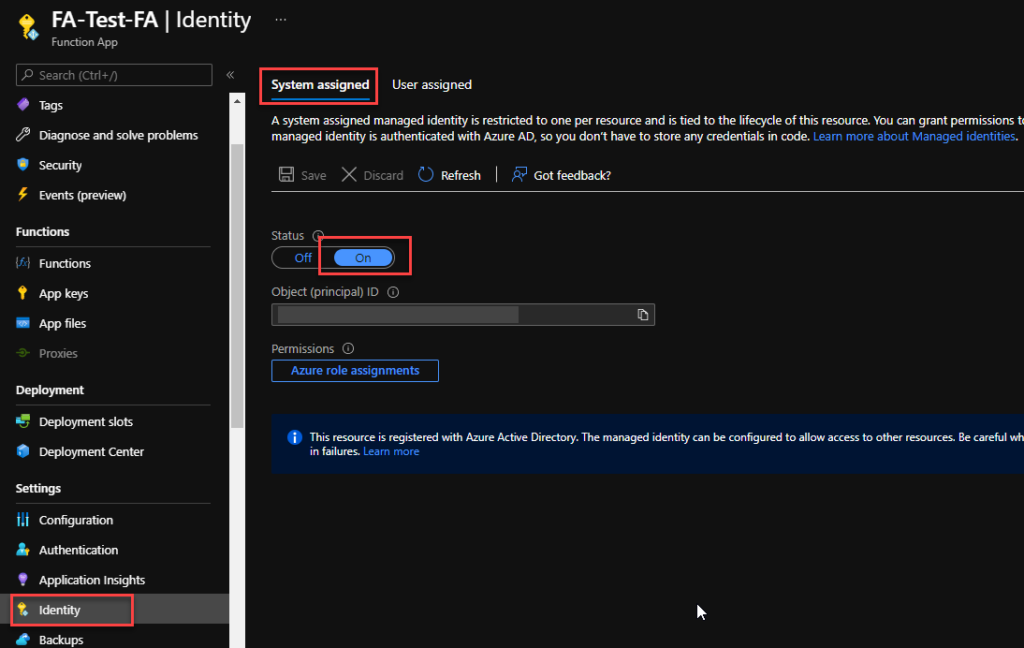
Now that we have created our function, we need to provide permission for this function to access and read from your subscription or different resource groups. I choose to provide permissions at the resource level. And for that, you need to:
From the left menu of the Function App window, select the Identity option, then select the System assigned tab from the top menu.
On the Status, select On and click Save. This will create an Object (principal) ID.
Click on the Azure role assignments button, and on the Azure role assignments window, click Add role assignment (Preview).
On the Add role assignment (Preview) page, set the following settings:
Scope: Select Resource Group from the combo box list.
Subscription: Select the subscription under the resource group you want to monitor is.
Resource group: Select the resource group you want to monitor.
Role: Select the Reader role.
Click Save.
Repeat the same steps for all the resource groups you want to monitor.
Create a Logic App
Finally, we need to create a scheduling Logic App to trigger the monitoring Function and notify if any API Connection is broken. To simplify the solution, we will be using the Azure Portal to create also the Logic App.
From the Azure portal menu or the Home page, select Create a resource.
In the Create a resource page, select Integration > Logic App.
On the Create Logic App Basics page, use the following Logic app settings:
Subscription: Select the subscription under which this new Logic app is created.
Resource Group: Select an existing Resource Group or create a new one in which your Logic app will be created.
Type: The logic app resource type and billing model to use for your resource, in this case we will be using Consumption
Consumption: This logic app resource type runs in global, multi-tenant Azure Logic Apps and uses the Consumption billing model.
Standard: This logic app resource type runs in single-tenant Azure Logic Apps and uses the Standard billing model.
Logic App name: Your logic app resource name, which must be unique across regions.
Region: The Azure datacenter region where to store your app’s information. Choose a region near you or near other services your Logic app access.
Enable log analytics: Change this option only when you want to enable diagnostic logging. The default value in No.
When you’re ready, select Review + Create. On the validation page, confirm the details that you provided, and select Create.
After Azure successfully deploys your app, select Go to resource. Or, find and select your logic app resource by typing the name in the Azure search box.
Under Templates, select Blank Logic App. After you select the template, the designer now shows an empty workflow surface.
In the workflow designer, under the search box, select Built-In. From the Triggers list, select the Schedule trigger, Recurrence.
In the trigger details, provide the following information:
Interval: 1
Frequency: Day
Under the Recurrence trigger, select New step.
In the search box, enter Variables, and from the result panel select the Variables, Initialize variable action and provide the following information:
Name: varEmailBody
Type: String
Value: leave it empty
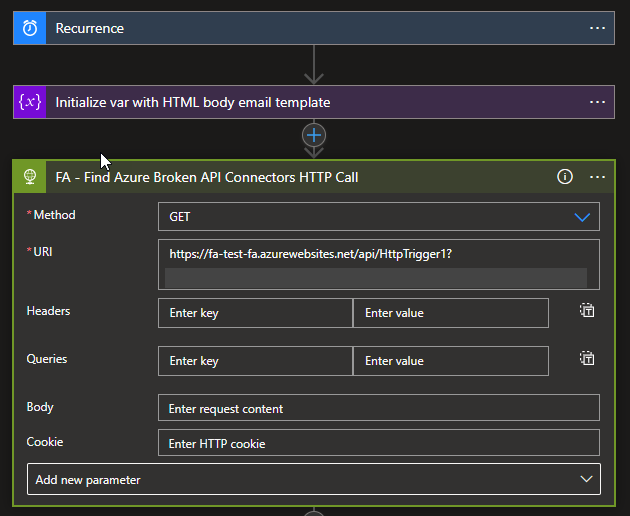
Select New step. In the search box, enter HTTP, and from the result panel select the HTTP, HTTP action and provide the following information:
Method: GET
URI: specify the endpoint of your Function that we created earlier on this blog post.
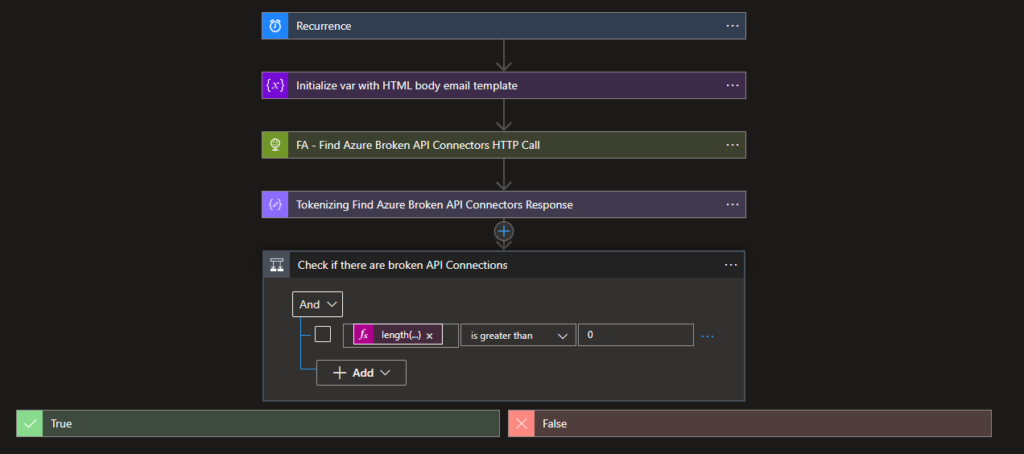
Select New step. In the search box, enter Data Operations, and from the result panel select the Data Operations, Parse Json action and provide the following information:
Method: body of the HTTP action
Use the following sample payload to generate the schema
Select New step. under the search box, select Built-In. From the Triggers list, select the Control, Condition action and provide the following condition:
length(body(‘Tokenizing_Find_Azure_Broken_API_Connectors_Response’)?[‘APIBroken’]) is greater than 0
Leave the False branch empty
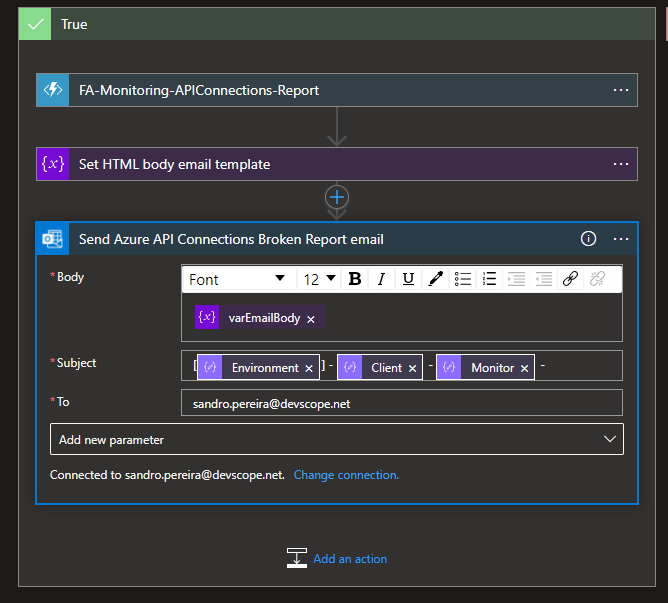
On the True branch I end up adding the following action to notify the support team:
Choose an Azure function: I’m calling and Azure Function to transform the list of broken API’s in a HTML table.
Set variable: I’m setting the varEmailBody with my default HTML email body Template and add the HTML table that the Azure Function returned
Send an email (v2) – Office 365 Outlook: To send the email to the support team
The result, once you try to execute the Logic App, will be a fancy HTML email:
This approach is an elegant solution and relatively easier to build, nevertheless it has a significant disadvantage:
Az modules are not supported on a Consumption plan. At least I couldn’t make it work. So that means I need to use an App Service plan, which means I will have an additional cost or more costs associated with this solution, more or less 36.94€/month.
This could be almost if not free if we use a Consumption plan.