by Bill Chesnut | Jul 15, 2018 | BizTalk Community Blogs via Syndication
By: Bill Chesnut
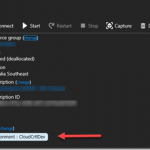
Tags have been around in Azure for a long time, but only recently have they been brought to the portal has a 1st class citizen. They are now on the overview page of almost every resource type

This is an example of a Virtual Machine, and Tags are now visible on the Overview Page
One of the best practices that some Azure users have been following is to Tag the Resource groups that resources are in, one assumption here is that those Tags would be available in the billing portal and/or billing files, but that is not the case, since Resource groups have no billing information associated with them they don’t appear in the billing files and cannot be used to separate the bills by Resource group Tags. This is a top request for most products that deal with reporting on Azure consumption. Until these products add support for rolling down the Tag from the Resource groups, there is a manual way to make this happen, but it could be lots of work for large Azure subscriptions.

In your Resource group select all the resources you want to Tag, Click “Assign tags”

Add the Tags to assign at the top and click ‘Assign”

Select one of the resources to verify the tags have been assigned
You can now go into the Azure Portal Billing and Cost Analysis and select the Tag you have assigned and see the costs associated with that tag

Hope this blog post helps you manage your Azure environment easier.
Note: The feature to roll down Tags from Resource groups is being added to SixPivot’s Cloud Control Product in the near future, please go and try Cloud Control

Trial for Free today
Cross posted to http://www.sixpivot.com.au

by Sandro Pereira | Jul 1, 2018 | BizTalk Community Blogs via Syndication
It seems like yesterday that I announce my first award, back them as a BizTalk Server MVP, but it’s been 8 years and a half on this amazing program. On 1st January 2011 I joined this amazing group of technicians and since then I was re-award in:
- 2012, again as BizTalk Server MVP,
- From 2013 to 2015, I was rebranded as Microsoft Integration MVP
- In 2017, Integration become part of Azure category, so I was award as Azure MVP
- And in middle of 2017, I was Award in two categories, Azure and Visio MVP
And today, with all the same pride, honor and enthusiasm than the first time, I’m delighted to share that the most expected email arrived once again and that I was renewed as a Microsoft Azure MVP (Microsoft Most Valuable Professional). This is my 8th straight year on the MVP Program, an amazing journey, and experience that, again, started in 2011, and that gave me the opportunity, and still does, to travel the world for speaking engagement, share the knowledge, and to meet the most amazing and skilled people in our industry.

As usual, I would like to thank:
First to my wife Fernanda, and my kids Leonor, Laura and now my new baby José (for all the “confusion and madness” they bring into my life), and to all members of my beautiful family… THANKS for all the support during these last years! You guys are my inspiration!
To my MVP Lead Cristina Herrero
The Microsoft Integration Team and Azure Teams like Paul Larson, Mandi Ohlinger, Dan Rosanova, Jon Fancey, Kevin-Lam and Kent Weare; Microsoft Portugal: Paulo Mena, Luís Calado, Ivo Ramos, Ricardo Jesus, Pedro Santos and all other Microsoft employees involved;
To DevScope (my company) and all my coworkers: no names here because all of them are amazing professionals – what an amazing team they are – we have 4 amazing MVP at DevScope, one Microsoft Regional Director, and one former MVP, WOW!! So, thanks for all the support given.
To all my fellow Microsoft Azure (Integration) MVP’s: Nino Crudele, Steef-Jan Wiggers, Saravana Kumar, Mikael Håkansson, Johan Hedberg, Tomasso Groenendijk, Salvatore Pellitteri, Richard Seroter, Stephen W. Thomas, Mick Badran, Michael Stephenson, Bill Chesnut, Thomas Canter, Mattias Lögdberg, Sam Vanhoutte, Glenn Colpaert, Howard S. Edidin, Martin Abbott, Leonid Ganeline, Dan Toomey, Wagner Silveira and Eldert Grootenboer for the support in this program.
Special thanks to all my blog readers, friends and of course to BizTalk and Azure/Integration Community – there are so many that I don’t want to mention names, so I don’t take the risk to forget someone.
And finally, to my Blog sponsor BizTalk360 and all their team for the amazing support and partnership.
It’s a big honor to be in the program and I’m looking forward to another great year!
Author: Sandro Pereira
Sandro Pereira lives in Portugal and works as a consultant at DevScope. In the past years, he has been working on implementing Integration scenarios both on-premises and cloud for various clients, each with different scenarios from a technical point of view, size, and criticality, using Microsoft Azure, Microsoft BizTalk Server and different technologies like AS2, EDI, RosettaNet, SAP, TIBCO etc. He is a regular blogger, international speaker, and technical reviewer of several BizTalk books all focused on Integration. He is also the author of the book “BizTalk Mapping Patterns & Best Practices”. He has been awarded MVP since 2011 for his contributions to the integration community. View all posts by Sandro Pereira
by Eldert Grootenboer | Jun 4, 2018 | BizTalk Community Blogs via Syndication
This is the fifth and final post in my series around setting up CI/CD for Azure API Management using Azure Resource Manager templates. We already created our API Management instance, added products, users and groups to the instance, and created unversioned and versioned APIs. In this final post, we will see how we can use linked ARM templates in combination with VSTS to deploy our solution all at once, and how this allows us to re-use existing templates to build up our API Management.

The posts in this series are the following, this list will be updated as the posts are being published.
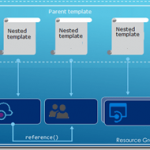
So far we did each of these steps from their own repositories, which is great when you want to have different developers only working on their own parts of the total solution. However if you don’t need this type of granular security on your repositories, it probably makes more sense to have you entire API Management solution in a single repository. When working with ARM templates, they can quickly become quite large and cumbersome to maintain. To avoid this, we can split up the template into smaller templates, which each does it’s own piece of work, and link these together from a master template. This allows for re-use of templates and breaking them down into smaller pieces of functionality. For this post we will be creating a API Management instance, create products, users and groups for Contoso, and deploy a versioned API. We will be re-using the templates we created in the previous blogposts from this series for our content.
We will start by creating a new GIT repository in our VSTS project called Linked Template. This repository will hold the master and nested templates which will be used to roll out our API Management solution.

Create Linked Template repository
Once the repository has been created, we will clone it to our local machine, and add a folder called templates in the repository. In the templates folder, create a new file called instance.json, which will hold the following nested ARM template for the API Management instance. All the ARM templates in this post should be placed in the templates folder unless otherwise specified.
{
    "$schema": "https://schema.management.azure.com/schemas/2015-01-01/deploymentTemplate.json#",
    "contentVersion": "1.0.0.0",
    "parameters": {
      "APIManagementSku": {
        "type": "string",
        "defaultValue": "Developer"
      },
      "APIManagementSkuCapacity": {
        "type": "string",
        "defaultValue": "1"
      },
      "APIManagementInstanceName": {
        "type": "string",
        "defaultValue": "MyAPIManagementInstance"
      },
      "PublisherName": {
        "type": "string",
        "defaultValue": "Eldert Grootenboer"
      },
      "PublisherEmail": {
        "type": "string",
        "defaultValue": "[email protected]"
      }
    },
    "resources": [
      {
        "type": "Microsoft.ApiManagement/service",
        "name": "[parameters('APIManagementInstanceName')]",
        "apiVersion": "2017-03-01",
        "properties": {
          "publisherEmail": "[parameters('PublisherEmail')]",
          "publisherName": "[parameters('PublisherName')]",
          "notificationSenderEmail": "[email protected]",
          "hostnameConfigurations": [],
          "additionalLocations": null,
          "virtualNetworkConfiguration": null,
          "customProperties": {
            "Microsoft.WindowsAzure.ApiManagement.Gateway.Security.Protocols.Tls10": "False",
            "Microsoft.WindowsAzure.ApiManagement.Gateway.Security.Protocols.Tls11": "False",
            "Microsoft.WindowsAzure.ApiManagement.Gateway.Security.Protocols.Ssl30": "False",
            "Microsoft.WindowsAzure.ApiManagement.Gateway.Security.Ciphers.TripleDes168": "False",
            "Microsoft.WindowsAzure.ApiManagement.Gateway.Security.Backend.Protocols.Tls10": "False",
            "Microsoft.WindowsAzure.ApiManagement.Gateway.Security.Backend.Protocols.Tls11": "False",
            "Microsoft.WindowsAzure.ApiManagement.Gateway.Security.Backend.Protocols.Ssl30": "False"
          },
          "virtualNetworkType": "None"
        },
        "resources": [],
        "sku": {
          "name": "[parameters('APIManagementSku')]",
          "capacity": "[parameters('APIManagementSkuCapacity')]"
        },
        "location": "[resourceGroup().location]",
        "tags": {},
        "scale": null
      }
    ]
  }
|
The next ARM template will hold the users of Contoso, add a users.json file to the same local repository and add the following template.
{
    "$schema": "https://schema.management.azure.com/schemas/2015-01-01/deploymentTemplate.json#",
    "contentVersion": "1.0.0.0",
    "parameters": {
        "APIManagementInstanceName": {
          "type": "string",
          "defaultValue": "MyAPIManagementInstance"
        }
    },
    "resources": [
        {
            "type": "Microsoft.ApiManagement/service/users",
            "name": "[concat(parameters('APIManagementInstanceName'), '/john-smith-contoso-com')]",
            "apiVersion": "2017-03-01",
            "scale": null,
            "properties": {
                "firstName": "John",
                "lastName": "Smith",
                "email": "[email protected]",
                "state": "active",
                "note": "Developer working for Contoso, one of the consumers of our APIs",
                "confirmation": "invite"
            }
        }
    ]
  }
|
Now add a groups.json file to the repository containing the following ARM template, this will add the groups for Contoso.
{
    "$schema": "https://schema.management.azure.com/schemas/2015-01-01/deploymentTemplate.json#",
    "contentVersion": "1.0.0.0",
    "parameters": {
        "APIManagementInstanceName": {
          "type": "string",
          "defaultValue": "MyAPIManagementInstance"
        }
    },
    "resources": [
        {
            "type": "Microsoft.ApiManagement/service/groups",
            "name": "[concat(parameters('APIManagementInstanceName'), '/contosogroup')]",
            "apiVersion": "2017-03-01",
            "scale": null,
            "properties": {
                "displayName": "ContosoGroup",
                "description": "Group containing all developers and services from Contoso who will be consuming our APIs",
                "type": "custom",
                "externalId": null
            }
        }
    ]
  }
|
The following ARM template will be used to add the product for Contoso, for this we are going to add products.json to the repository.
{
    "$schema": "https://schema.management.azure.com/schemas/2015-01-01/deploymentTemplate.json#",
    "contentVersion": "1.0.0.0",
    "parameters": {
        "APIManagementInstanceName": {
          "type": "string",
          "defaultValue": "MyAPIManagementInstance"
        }
    },
    "resources": [
        {
            "type": "Microsoft.ApiManagement/service/products",
            "name": "[concat(parameters('APIManagementInstanceName'), '/contosoproduct')]",
            "apiVersion": "2017-03-01",
            "scale": null,
            "properties": {
                "displayName": "ContosoProduct",
                "description": "Product which will apply the high-over policies for developers and services of Contoso.",
                "terms": null,
                "subscriptionRequired": true,
                "approvalRequired": true,
                "subscriptionsLimit": null,
                "state": "published"
            }
        }
    ]
  }
|
We have created our templates for the products and groups, so the next template, which will be called products-groups.json, will link the Contoso group to the Contoso product.
{
    "$schema": "https://schema.management.azure.com/schemas/2015-01-01/deploymentTemplate.json#",
    "contentVersion": "1.0.0.0",
    "parameters": {
        "APIManagementInstanceName": {
          "type": "string",
          "defaultValue": "MyAPIManagementInstance"
        }
    },
    "resources": [
        {
            "type": "Microsoft.ApiManagement/service/products/groups",
            "name": "[concat(parameters('APIManagementInstanceName'), '/contosoproduct/contosogroup')]",
            "apiVersion": "2017-03-01",
            "scale": null,
            "properties": {}
        }
    ]
  }
|
Likewise we will also link the Contoso users to the Contoso group using the following ARM template in a file called groups-users.json.
{
    "$schema": "https://schema.management.azure.com/schemas/2015-01-01/deploymentTemplate.json#",
    "contentVersion": "1.0.0.0",
    "parameters": {
        "APIManagementInstanceName": {
          "type": "string",
          "defaultValue": "MyAPIManagementInstance"
        }
    },
    "resources": [
        {
            "type": "Microsoft.ApiManagement/service/groups/users",
            "name": "[concat(parameters('APIManagementInstanceName'), '/contosogroup/john-smith-contoso-com')]",
            "apiVersion": "2017-03-01",
            "scale": null,
            "properties": {}
        }
    ]
  }
|
Next up are the policies for the product, for this add a file called policies.json to the repository.
{
    "$schema": "https://schema.management.azure.com/schemas/2015-01-01/deploymentTemplate.json#",
    "contentVersion": "1.0.0.0",
    "parameters": {
      "APIManagementInstanceName": {
        "type": "string",
        "defaultValue": "MyAPIManagementInstance"
      }
    },
    "resources": [
        {
            "type": "Microsoft.ApiManagement/service/products/policies",
            "name": "[concat(parameters('APIManagementInstanceName'), '/contosoproduct/policy')]",
            "apiVersion": "2017-03-01",
            "scale": null,
            "properties": {
                "policyContent": "<policies>rn  <inbound>rn    <base />rn    <rate-limit calls="20" renewal-period="60" />rn  </inbound>rn  <backend>rn    <base />rn  </backend>rn  <outbound>rn    <base />rn  </outbound>rn  <on-error>rn    <base />rn  </on-error>rn</policies>"
            }
        }
    ]
  }
|
Now lets add the subcription for the Contoso user, which contains the Contoso product, by adding a file called subscriptions.json.
{
    "$schema": "https://schema.management.azure.com/schemas/2015-01-01/deploymentTemplate.json#",
    "contentVersion": "1.0.0.0",
    "parameters": {
      "APIManagementInstanceName": {
        "type": "string",
        "defaultValue": "MyAPIManagementInstance"
      }
    },
    "resources": [
        {
            "type": "Microsoft.ApiManagement/service/subscriptions",
            "name": "[concat(parameters('APIManagementInstanceName'), '/5ae6ed2358c2795ab5aaba68')]",
            "apiVersion": "2017-03-01",
            "scale": null,
            "properties": {
                "userId": "[resourceId('Microsoft.ApiManagement/service/users', parameters('APIManagementInstanceName'), 'john-smith-contoso-com')]",
                "productId": "[resourceId('Microsoft.ApiManagement/service/products', parameters('APIManagementInstanceName'), 'contosoproduct')]",
                "displayName": "ContosoProduct subscription",
                "state": "active"
            }
        }
    ]
  }
|
Next we will create the version set which will hold the different versions of our versioned API. Add a file to the repository called versionedAPIVersionSet.json and add the following template to it.
{
    "$schema": "https://schema.management.azure.com/schemas/2015-01-01/deploymentTemplate.json#",
    "contentVersion": "1.0.0.0",
    "parameters": {
        "APIManagementInstanceName": {
          "type": "string",
          "defaultValue": "MyAPIManagementInstance"
        }
    },
    "resources": [
        {
            "name": "[concat(parameters('APIManagementInstanceName'), '/versionsetversionedapi')]",
            "type": "Microsoft.ApiManagement/service/api-version-sets",
            "apiVersion": "2017-03-01",
            "properties": {
                "description": "Version set for versioned API blog post ",
                "versionQueryName": "api-version",
                "displayName": "Versioned API",
                "versioningScheme": "query"
            }
        }
    ]
}
|
We will now add the template for the first version of the versioned API, by creating a file in the repository called versionedAPIv1.json.
{
    "$schema": "https://schema.management.azure.com/schemas/2015-01-01/deploymentTemplate.json#",
    "contentVersion": "1.0.0.0",
    "parameters": {
        "APIManagementInstanceName": {
          "type": "string",
          "defaultValue": "MyAPIManagementInstance"
        }
    },
    "resources": [
        {
            "type": "Microsoft.ApiManagement/service/apis",
            "name": "[concat(parameters('APIManagementInstanceName'), '/versioned-api')]",
            "apiVersion": "2017-03-01",
            "scale": null,
            "properties": {
                "displayName": "Versioned API",
                "apiRevision": "1",
                "description": "Wikipedia for Web APIs. Repository of API specs in OpenAPI(fka Swagger) 2.0 format.nn**Warning**: If you want to be notified about changes in advance please subscribe to our [Gitter channel](https://gitter.im/APIs-guru/api-models).nnClient sample: [[Demo]](https://apis.guru/simple-ui) [[Repo]](https://github.com/APIs-guru/simple-ui)n",
                "serviceUrl": "https://api.apis.guru/v2/",
                "path": "versioned-api",
                "protocols": [
                    "https"
                ],
                "authenticationSettings": null,
                "subscriptionKeyParameterNames": null,
                "apiVersion": "v1",
                "apiVersionSetId": "[concat(resourceId('Microsoft.ApiManagement/service', parameters('APIManagementInstanceName')), '/api-version-sets/versionsetversionedapi')]"
            }
        }
    ]
}
|
Operations
For the first version of the API we will now add a file called versionedAPIv1Operations.json which will hold the various operations of this API.
{
    "$schema": "https://schema.management.azure.com/schemas/2015-01-01/deploymentTemplate.json#",
    "contentVersion": "1.0.0.0",
    "parameters": {
        "APIManagementInstanceName": {
          "type": "string",
          "defaultValue": "MyAPIManagementInstance"
        }
    },
    "resources": [
        {
            "type": "Microsoft.ApiManagement/service/apis/operations",
            "name": "[concat(parameters('APIManagementInstanceName'), '/versioned-api/getMetrics')]",
            "apiVersion": "2017-03-01",
            "scale": null,
            "properties": {
                "displayName": "Get basic metrics",
                "method": "GET",
                "urlTemplate": "/metrics",
                "templateParameters": [],
                "description": "Some basic metrics for the entire directory.nJust stunning numbers to put on a front page and are intended purely for WoW effect :)n",
                "responses": [
                    {
                        "statusCode": 200,
                        "description": "OK",
                        "headers": []
                    }
                ],
                "policies": null
            }
        },
        {
            "type": "Microsoft.ApiManagement/service/apis/operations",
            "name": "[concat(parameters('APIManagementInstanceName'), '/versioned-api/listAPIs')]",
            "apiVersion": "2017-03-01",
            "scale": null,
            "properties": {
                "displayName": "List all APIs",
                "method": "GET",
                "urlTemplate": "/list",
                "templateParameters": [],
                "description": "List all APIs in the directory.nReturns links to OpenAPI specification for each API in the directory.nIf API exist in multiple versions `preferred` one is explicitly marked.nnSome basic info from OpenAPI spec is cached inside each object.nThis allows to generate some simple views without need to fetch OpenAPI spec for each API.n",
                "responses": [
                    {
                        "statusCode": 200,
                        "description": "OK",
                        "headers": []
                    }
                ],
                "policies": null
            }
        }
    ]
}
|
Policies
The policies for the first version of our API are next, lets add the versionedAPIv1Policies.json file for this.
{
    "$schema": "https://schema.management.azure.com/schemas/2015-01-01/deploymentTemplate.json#",
    "contentVersion": "1.0.0.0",
    "parameters": {
        "APIManagementInstanceName": {
          "type": "string",
          "defaultValue": "MyAPIManagementInstance"
        }
    },
    "resources": [
        {
            "type": "Microsoft.ApiManagement/service/apis/operations/policies",
            "name": "[concat(parameters('APIManagementInstanceName'), '/versioned-api/getMetrics/policy')]",
            "apiVersion": "2017-03-01",
            "scale": null,
            "properties": {
                "policyContent": "[concat('<!--rn    IMPORTANT:rn    - Policy elements can appear only within the <inbound>, <outbound>, <backend> section elements.rn    - Only the <forward-request> policy element can appear within the <backend> section element.rn    - To apply a policy to the incoming request (before it is forwarded to the backend service), place a corresponding policy element within the <inbound> section element.rn    - To apply a policy to the outgoing response (before it is sent back to the caller), place a corresponding policy element within the <outbound> section element.rn    - To add a policy position the cursor at the desired insertion point and click on the round button associated with the policy.rn    - To remove a policy, delete the corresponding policy statement from the policy document.rn    - Position the <base> element within a section element to inherit all policies from the corresponding section element in the enclosing scope.rn    - Remove the <base> element to prevent inheriting policies from the corresponding section element in the enclosing scope.rn    - Policies are applied in the order of their appearance, from the top down.rn-->rn<policies>rn  <inbound>rn    <base />rn    <set-backend-service base-url="https://api.apis.guru/v2/" />rn    <rewrite-uri template="/metrics.json" />rn  </inbound>rn  <backend>rn    <base />rn  </backend>rn  <outbound>rn    <base />rn  </outbound>rn  <on-error>rn    <base />rn  </on-error>rn</policies>')]"
            }
        },
        {
            "type": "Microsoft.ApiManagement/service/apis/operations/policies",
            "name": "[concat(parameters('APIManagementInstanceName'), '/versioned-api/listAPIs/policy')]",
            "apiVersion": "2017-03-01",
            "scale": null,
            "properties": {
                "policyContent": "[concat('<!--rn    IMPORTANT:rn    - Policy elements can appear only within the <inbound>, <outbound>, <backend> section elements.rn    - Only the <forward-request> policy element can appear within the <backend> section element.rn    - To apply a policy to the incoming request (before it is forwarded to the backend service), place a corresponding policy element within the <inbound> section element.rn    - To apply a policy to the outgoing response (before it is sent back to the caller), place a corresponding policy element within the <outbound> section element.rn    - To add a policy position the cursor at the desired insertion point and click on the round button associated with the policy.rn    - To remove a policy, delete the corresponding policy statement from the policy document.rn    - Position the <base> element within a section element to inherit all policies from the corresponding section element in the enclosing scope.rn    - Remove the <base> element to prevent inheriting policies from the corresponding section element in the enclosing scope.rn    - Policies are applied in the order of their appearance, from the top down.rn-->rn<policies>rn  <inbound>rn    <base />rn    <set-backend-service base-url="https://api.apis.guru/v2" />rn    <rewrite-uri template="/list.json" />rn  </inbound>rn  <backend>rn    <base />rn  </backend>rn  <outbound>rn    <base />rn  </outbound>rn  <on-error>rn    <base />rn  </on-error>rn</policies>')]"
            }
        }
    ]
}
|
And now we will add the second version of our versioned API as well, in a file called versionedAPIv2.json.
{
    "$schema": "https://schema.management.azure.com/schemas/2015-01-01/deploymentTemplate.json#",
    "contentVersion": "1.0.0.0",
    "parameters": {
        "APIManagementInstanceName": {
          "type": "string",
          "defaultValue": "MyAPIManagementInstance"
        }
    },
    "resources": [
        {
            "type": "Microsoft.ApiManagement/service/apis",
            "name": "[concat(parameters('APIManagementInstanceName'), '/versioned-api-v2')]",
            "apiVersion": "2017-03-01",
            "scale": null,
            "properties": {
                "displayName": "Versioned API",
                "apiRevision": "1",
                "description": "Wikipedia for Web APIs. Repository of API specs in OpenAPI(fka Swagger) 2.0 format.nn**Warning**: If you want to be notified about changes in advance please subscribe to our [Gitter channel](https://gitter.im/APIs-guru/api-models).nnClient sample: [[Demo]](https://apis.guru/simple-ui) [[Repo]](https://github.com/APIs-guru/simple-ui)n",
                "serviceUrl": "https://api.apis.guru/v2/",
                "path": "versioned-api",
                "protocols": [
                    "https"
                ],
                "authenticationSettings": null,
                "subscriptionKeyParameterNames": null,
                "apiVersion": "v2",
                "apiVersionSetId": "[concat(resourceId('Microsoft.ApiManagement/service', parameters('APIManagementInstanceName')), '/api-version-sets/versionsetversionedapi')]"
            }
        }
    ]
}
|
Operations
Add the operations for the second version of our API in a file called versionedAPIv2Operations.json.
{
    "$schema": "https://schema.management.azure.com/schemas/2015-01-01/deploymentTemplate.json#",
    "contentVersion": "1.0.0.0",
    "parameters": {
        "APIManagementInstanceName": {
          "type": "string",
          "defaultValue": "MyAPIManagementInstance"
        }
    },
    "resources": [
        {
            "type": "Microsoft.ApiManagement/service/apis/operations",
            "name": "[concat(parameters('APIManagementInstanceName'), '/versioned-api-v2/listAPIs')]",
            "apiVersion": "2017-03-01",
            "scale": null,
            "properties": {
                "displayName": "List all APIs",
                "method": "GET",
                "urlTemplate": "/list",
                "templateParameters": [],
                "description": "List all APIs in the directory.nReturns links to OpenAPI specification for each API in the directory.nIf API exist in multiple versions `preferred` one is explicitly marked.nnSome basic info from OpenAPI spec is cached inside each object.nThis allows to generate some simple views without need to fetch OpenAPI spec for each API.n",
                "responses": [
                    {
                        "statusCode": 200,
                        "description": "OK",
                        "headers": []
                    }
                ],
                "policies": null
            }
        }
    ]
}
|
Policies
And add a file called versionedAPIv2Policies.json which will hold the policies for the second version of our versioned API.
{
    "$schema": "https://schema.management.azure.com/schemas/2015-01-01/deploymentTemplate.json#",
    "contentVersion": "1.0.0.0",
    "parameters": {
        "APIManagementInstanceName": {
          "type": "string",
          "defaultValue": "MyAPIManagementInstance"
        }
    },
    "resources": [
        {
            "type": "Microsoft.ApiManagement/service/apis/operations/policies",
            "name": "[concat(parameters('APIManagementInstanceName'), '/versioned-api-v2/listAPIs/policy')]",
            "apiVersion": "2017-03-01",
            "scale": null,
            "properties": {
                "policyContent": "[concat('<!--rn    IMPORTANT:rn    - Policy elements can appear only within the <inbound>, <outbound>, <backend> section elements.rn    - Only the <forward-request> policy element can appear within the <backend> section element.rn    - To apply a policy to the incoming request (before it is forwarded to the backend service), place a corresponding policy element within the <inbound> section element.rn    - To apply a policy to the outgoing response (before it is sent back to the caller), place a corresponding policy element within the <outbound> section element.rn    - To add a policy position the cursor at the desired insertion point and click on the round button associated with the policy.rn    - To remove a policy, delete the corresponding policy statement from the policy document.rn    - Position the <base> element within a section element to inherit all policies from the corresponding section element in the enclosing scope.rn    - Remove the <base> element to prevent inheriting policies from the corresponding section element in the enclosing scope.rn    - Policies are applied in the order of their appearance, from the top down.rn-->rn<policies>rn  <inbound>rn    <base />rn    <set-backend-service base-url="https://api.apis.guru/v2" />rn    <rewrite-uri template="/list.json" />rn  </inbound>rn  <backend>rn    <base />rn  </backend>rn  <outbound>rn    <base />rn  </outbound>rn  <on-error>rn    <base />rn  </on-error>rn</policies>')]"
            }
        }
    ]
}
|
And finally we will add the products-apis.json file, which will link the versions of our versioned API to the Contoso product.
{
    "$schema": "https://schema.management.azure.com/schemas/2015-01-01/deploymentTemplate.json#",
    "contentVersion": "1.0.0.0",
    "parameters": {
        "APIManagementInstanceName": {
          "type": "string",
          "defaultValue": "MyAPIManagementInstance"
        }
    },
    "resources": [
        {
            "type": "Microsoft.ApiManagement/service/products/apis",
            "name": "[concat(parameters('APIManagementInstanceName'), '/contosoproduct/versioned-api')]",
            "apiVersion": "2017-03-01",
            "scale": null,
            "properties": {}
        },
        {
            "type": "Microsoft.ApiManagement/service/products/apis",
            "name": "[concat(parameters('APIManagementInstanceName'), '/contosoproduct/versioned-api-v2')]",
            "apiVersion": "2017-03-01",
            "scale": null,
            "properties": {}
        }
    ]
}
|
We have now created all of our linked templates, so lets create the master template in a file called master.json. Don’t place this file in the templates folder, but instead place it in the root directory of the repository. This template will call all our other templates, passing in parameters as required. This is also where we handle our dependOn dependencies.
{
    "$schema": "https://schema.management.azure.com/schemas/2015-01-01/deploymentTemplate.json#",
    "contentVersion": "1.0.0.0",
    "parameters": {
      "TemplatesStorageAccount": {
        "type": "string",
        "defaultValue": "https://mystorageaccount.blob.core.windows.net/templates/"
      },
      "TemplatesStorageAccountSASToken": {
        "type": "string",
        "defaultValue": ""
      },
      "APIManagementSku": {
        "type": "string",
        "defaultValue": "Developer"
      },
      "APIManagementSkuCapacity": {
        "type": "string",
        "defaultValue": "1"
      },
      "APIManagementInstanceName": {
        "type": "string",
        "defaultValue": "MyAPIManagementInstance"
      },
      "PublisherName": {
        "type": "string",
        "defaultValue": "Eldert Grootenboer"
      },
      "PublisherEmail": {
        "type": "string",
        "defaultValue": "[email protected]"
      }
    },
    "resources": [
        {
           "apiVersion": "2017-05-10",
           "name": "instanceTemplate",
           "type": "Microsoft.Resources/deployments",
           "properties": {
             "mode": "Incremental",
             "templateLink": {
                "uri":"[concat(parameters('TemplatesStorageAccount'), '/instance.json', parameters('TemplatesStorageAccountSASToken'))]",
                "contentVersion":"1.0.0.0"
             },
             "parameters": {
                "APIManagementSku": {"value": "[parameters('APIManagementSku')]" },
                "APIManagementSkuCapacity": {"value": "[parameters('APIManagementSkuCapacity')]" },
                "APIManagementInstanceName": {"value": "[parameters('APIManagementInstanceName')]" },
                "PublisherName": {"value": "[parameters('PublisherName')]" },
                "PublisherEmail": {"value": "[parameters('PublisherEmail')]" }
              }
           }
        },
        {
           "apiVersion": "2017-05-10",
           "name": "usersTemplate",
           "type": "Microsoft.Resources/deployments",
           "properties": {
             "mode": "Incremental",
             "templateLink": {
                "uri":"[concat(parameters('TemplatesStorageAccount'), '/users.json', parameters('TemplatesStorageAccountSASToken'))]",
                "contentVersion":"1.0.0.0"
             },
             "parameters": {
                "APIManagementInstanceName": {"value": "[parameters('APIManagementInstanceName')]" }
              }
           },
           "dependsOn": [
            "[resourceId('Microsoft.Resources/deployments', 'instanceTemplate')]"
           ]
        },
        {
           "apiVersion": "2017-05-10",
           "name": "groupsTemplate",
           "type": "Microsoft.Resources/deployments",
           "properties": {
             "mode": "Incremental",
             "templateLink": {
                "uri":"[concat(parameters('TemplatesStorageAccount'), '/groups.json', parameters('TemplatesStorageAccountSASToken'))]",
                "contentVersion":"1.0.0.0"
             },
             "parameters": {
                "APIManagementInstanceName": {"value": "[parameters('APIManagementInstanceName')]" }
              }
           },
           "dependsOn": [
            "[resourceId('Microsoft.Resources/deployments', 'instanceTemplate')]"
           ]
        },
        {
           "apiVersion": "2017-05-10",
           "name": "productsTemplate",
           "type": "Microsoft.Resources/deployments",
           "properties": {
             "mode": "Incremental",
             "templateLink": {
                "uri":"[concat(parameters('TemplatesStorageAccount'), '/products.json', parameters('TemplatesStorageAccountSASToken'))]",
                "contentVersion":"1.0.0.0"
             },
             "parameters": {
                "APIManagementInstanceName": {"value": "[parameters('APIManagementInstanceName')]" }
              }
           },
           "dependsOn": [
            "[resourceId('Microsoft.Resources/deployments', 'instanceTemplate')]"
           ]
        },
        {
           "apiVersion": "2017-05-10",
           "name": "groupsUsersTemplate",
           "type": "Microsoft.Resources/deployments",
           "properties": {
             "mode": "Incremental",
             "templateLink": {
                "uri":"[concat(parameters('TemplatesStorageAccount'), '/groups-users.json', parameters('TemplatesStorageAccountSASToken'))]",
                "contentVersion":"1.0.0.0"
             },
             "parameters": {
                "APIManagementInstanceName": {"value": "[parameters('APIManagementInstanceName')]" }
              }
           },
           "dependsOn": [
            "[resourceId('Microsoft.Resources/deployments', 'groupsTemplate')]",
            "[resourceId('Microsoft.Resources/deployments', 'usersTemplate')]"
           ]
        },
        {
           "apiVersion": "2017-05-10",
           "name": "productsGroupsTemplate",
           "type": "Microsoft.Resources/deployments",
           "properties": {
             "mode": "Incremental",
             "templateLink": {
                "uri":"[concat(parameters('TemplatesStorageAccount'), '/products-groups.json', parameters('TemplatesStorageAccountSASToken'))]",
                "contentVersion":"1.0.0.0"
             },
             "parameters": {
                "APIManagementInstanceName": {"value": "[parameters('APIManagementInstanceName')]" }
              }
           },
           "dependsOn": [
            "[resourceId('Microsoft.Resources/deployments', 'productsTemplate')]",
            "[resourceId('Microsoft.Resources/deployments', 'groupsTemplate')]"
           ]
        },
        {
           "apiVersion": "2017-05-10",
           "name": "subscriptionsTemplate",
           "type": "Microsoft.Resources/deployments",
           "properties": {
             "mode": "Incremental",
             "templateLink": {
                "uri":"[concat(parameters('TemplatesStorageAccount'), '/subscriptions.json', parameters('TemplatesStorageAccountSASToken'))]",
                "contentVersion":"1.0.0.0"
             },
             "parameters": {
                "APIManagementInstanceName": {"value": "[parameters('APIManagementInstanceName')]" }
              }
           },
           "dependsOn": [
            "[resourceId('Microsoft.Resources/deployments', 'productsTemplate')]",
            "[resourceId('Microsoft.Resources/deployments', 'usersTemplate')]"
           ]
        },
        {
           "apiVersion": "2017-05-10",
           "name": "policiesTemplate",
           "type": "Microsoft.Resources/deployments",
           "properties": {
             "mode": "Incremental",
             "templateLink": {
                "uri":"[concat(parameters('TemplatesStorageAccount'), '/policies.json', parameters('TemplatesStorageAccountSASToken'))]",
                "contentVersion":"1.0.0.0"
             },
             "parameters": {
                "APIManagementInstanceName": {"value": "[parameters('APIManagementInstanceName')]" }
              }
           },
           "dependsOn": [
            "[resourceId('Microsoft.Resources/deployments', 'productsTemplate')]"
           ]
        },
        {
           "apiVersion": "2017-05-10",
           "name": "versionedAPIVersionSetTemplate",
           "type": "Microsoft.Resources/deployments",
           "properties": {
             "mode": "Incremental",
             "templateLink": {
                "uri":"[concat(parameters('TemplatesStorageAccount'), '/versionedAPIVersionSet.json', parameters('TemplatesStorageAccountSASToken'))]",
                "contentVersion":"1.0.0.0"
             },
             "parameters": {
                "APIManagementInstanceName": {"value": "[parameters('APIManagementInstanceName')]" }
              }
           },
           "dependsOn": [
            "[resourceId('Microsoft.Resources/deployments', 'instanceTemplate')]"
           ]
        },
        {
           "apiVersion": "2017-05-10",
           "name": "versionedAPIv1Template",
           "type": "Microsoft.Resources/deployments",
           "properties": {
             "mode": "Incremental",
             "templateLink": {
                "uri":"[concat(parameters('TemplatesStorageAccount'), '/versionedAPIv1.json', parameters('TemplatesStorageAccountSASToken'))]",
                "contentVersion":"1.0.0.0"
             },
             "parameters": {
                "APIManagementInstanceName": {"value": "[parameters('APIManagementInstanceName')]" }
              }
           },
           "dependsOn": [
            "[resourceId('Microsoft.Resources/deployments', 'versionedAPIVersionSetTemplate')]"
           ]
        },
        {
           "apiVersion": "2017-05-10",
           "name": "versionedAPIv1OperationsTemplate",
           "type": "Microsoft.Resources/deployments",
           "properties": {
             "mode": "Incremental",
             "templateLink": {
                "uri":"[concat(parameters('TemplatesStorageAccount'), '/versionedAPIv1Operations.json', parameters('TemplatesStorageAccountSASToken'))]",
                "contentVersion":"1.0.0.0"
             },
             "parameters": {
                "APIManagementInstanceName": {"value": "[parameters('APIManagementInstanceName')]" }
              }
           },
           "dependsOn": [
            "[resourceId('Microsoft.Resources/deployments', 'versionedAPIv1Template')]"
           ]
        },
        {
           "apiVersion": "2017-05-10",
           "name": "versionedAPIv1PoliciesTemplate",
           "type": "Microsoft.Resources/deployments",
           "properties": {
             "mode": "Incremental",
             "templateLink": {
                "uri":"[concat(parameters('TemplatesStorageAccount'), '/versionedAPIv1Policies.json', parameters('TemplatesStorageAccountSASToken'))]",
                "contentVersion":"1.0.0.0"
             },
             "parameters": {
                "APIManagementInstanceName": {"value": "[parameters('APIManagementInstanceName')]" }
              }
           },
           "dependsOn": [
            "[resourceId('Microsoft.Resources/deployments', 'versionedAPIv1Template')]",
            "[resourceId('Microsoft.Resources/deployments', 'versionedAPIv1OperationsTemplate')]"
           ]
        },
        {
           "apiVersion": "2017-05-10",
           "name": "versionedAPIv2Template",
           "type": "Microsoft.Resources/deployments",
           "properties": {
             "mode": "Incremental",
             "templateLink": {
                "uri":"[concat(parameters('TemplatesStorageAccount'), '/versionedAPIv2.json', parameters('TemplatesStorageAccountSASToken'))]",
                "contentVersion":"1.0.0.0"
             },
             "parameters": {
                "APIManagementInstanceName": {"value": "[parameters('APIManagementInstanceName')]" }
              }
           },
           "dependsOn": [
            "[resourceId('Microsoft.Resources/deployments', 'versionedAPIVersionSetTemplate')]"
           ]
        },
        {
           "apiVersion": "2017-05-10",
           "name": "versionedAPIv2OperationsTemplate",
           "type": "Microsoft.Resources/deployments",
           "properties": {
             "mode": "Incremental",
             "templateLink": {
                "uri":"[concat(parameters('TemplatesStorageAccount'), '/versionedAPIv2Operations.json', parameters('TemplatesStorageAccountSASToken'))]",
                "contentVersion":"1.0.0.0"
             },
             "parameters": {
                "APIManagementInstanceName": {"value": "[parameters('APIManagementInstanceName')]" }
              }
           },
           "dependsOn": [
            "[resourceId('Microsoft.Resources/deployments', 'versionedAPIv2Template')]"
           ]
        },
        {
           "apiVersion": "2017-05-10",
           "name": "versionedAPIv2PoliciesTemplate",
           "type": "Microsoft.Resources/deployments",
           "properties": {
             "mode": "Incremental",
             "templateLink": {
                "uri":"[concat(parameters('TemplatesStorageAccount'), '/versionedAPIv2Policies.json', parameters('TemplatesStorageAccountSASToken'))]",
                "contentVersion":"1.0.0.0"
             },
             "parameters": {
                "APIManagementInstanceName": {"value": "[parameters('APIManagementInstanceName')]" }
              }
           },
           "dependsOn": [
            "[resourceId('Microsoft.Resources/deployments', 'versionedAPIv2Template')]",
            "[resourceId('Microsoft.Resources/deployments', 'versionedAPIv2OperationsTemplate')]"
           ]
        },
        {
           "apiVersion": "2017-05-10",
           "name": "productsAPIsTemplate",
           "type": "Microsoft.Resources/deployments",
           "properties": {
             "mode": "Incremental",
             "templateLink": {
                "uri":"[concat(parameters('TemplatesStorageAccount'), '/products-apis.json', parameters('TemplatesStorageAccountSASToken'))]",
                "contentVersion":"1.0.0.0"
             },
             "parameters": {
                "APIManagementInstanceName": {"value": "[parameters('APIManagementInstanceName')]" }
              }
           },
           "dependsOn": [
            "[resourceId('Microsoft.Resources/deployments', 'productsTemplate')]",
            "[resourceId('Microsoft.Resources/deployments', 'versionedAPIv1Template')]",
            "[resourceId('Microsoft.Resources/deployments', 'versionedAPIv2Template')]"
           ]
        }
    ]
  }
|
As you will notice, the first parameter is a path to a container in a storage account, so be sure to create this container. You could even do this from the build pipeline, but for this blog post we will do it manually.

Create storage account

Create container
We should now have a repository filled with ARM templates, so commit and push these to the remote repository.

Overview of ARM template files
Switch to our project in VSTS, and create a build pipeline called API Management CI-CD ARM-CI – Linked Template to validate the ARM template. Remember to enable the continous integration trigger, so our build runs every time we do a push to our repository.

Create build template for Linked Template repository
In the build definition, we will add a Azure File Copy step, which will copy our linked templates to the blob container we just created, so update the settings of the step accordingly.

Set Azure File Copy steps properties
In the output of this step we will get back the URI and SAS token for our container which we will need in our ARM template, so make sure to update the variables here.
Set output names so we can use these in our ARM template
The other steps in the build pipeline are just as described in the first post in this series, except that we now use the variables from the Azure Copy File step in our Azure Resource Group Deployment step to update the location and SAS token of the storage account, and we include an extra Publish Built Artifacts step.

The complete build pipeline for validation
Note that in first the Publish Built Artifacts step we just publish the master.json files.

Only publish master template in first Publish Build Artifacts step
While in the second Publish Built Artifacts step we publish the linked templates.

Publish templates folder in second Publish Build Artifacts step
Once done, make sure to save and queue the build definition.
We will now create the deployment pipeline using a new release definition called API Management Linked Template, which again is almost the same as described in the first post of this series, except we will now include the Azure Copy File step just like in the build pipeline to copy our linked templates to the templates container.

Use output from build pipeline as artifact
Do not forget to enable the Continuous deployment trigger so this deployment is triggered each time the build runs successfully. In the Test environment, add a Azure File Copy step to copy the linked template files to our templates container, and set variables containing the URI and SAS token.

Set properties for Azure Copy Files step
In the Azure Resource Group Deployment step use the variables from the Azure File Copy step to set the location and SAS token of the container.

Use URI and SAS token from previous step
Clone the test environment and set the cloned environment up as production environment, do remember to include an approval step.
Approval should be given before deploying to production
We have now finished our complete CI/CD pipeline, if we make push any changes to our repository it will trigger the build which does validation of the ARM templates, and then uses them to deploy or update our complete API Management instance including all users, groups, products and APIs which we defined in our templates.
API Management instance created including users, groups, products and APIs
by Eldert Grootenboer | May 28, 2018 | BizTalk Community Blogs via Syndication
This is the fourth post in my series around setting up CI/CD for Azure API Management using Azure Resource Manager templates. So far we have created our API Management instance, added the products, users and groups for Contoso, and created an unversioned API. In this post we will create an versioned API, allowing us to run multiple versions of an API side by side.

The posts in this series are the following, this list will be updated as the posts are being published.
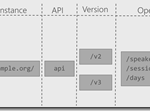
When working with APIs we will sometimes have to implement breaking changes to our solution. Whenever possible, we should give the consumers of our API the chance to migrate to the new implementation at their own pace, which can be done by exposing multiple versions of an API. In this post we will again be exposing the APIs.guru service through API Management, with two versions, where we remove an operation in the second version.
Use the guidance from the first post of this series to set up a repository and clone this to our local machine. The name of the repository we will be creating should be Versioned API, and will hold the ARM template for this post.

Create Versioned API repository
Once the GIT repository has been created and cloned to your local machine, add a file called versioned-api.json and add the following ARM template to it.
{
  "$schema": "https://schema.management.azure.com/schemas/2015-01-01/deploymentTemplate.json#",
  "contentVersion": "1.0.0.0",
  "parameters": {
      "APIManagementInstanceName": {
        "type": "string",
        "defaultValue": "MyAPIManagementInstance"
      }
  },
  "variables": {},
  "resources": [
      {
          "name": "[concat(parameters('APIManagementInstanceName'), '/versionsetversionedapi')]",
          "type": "Microsoft.ApiManagement/service/api-version-sets",
          "apiVersion": "2017-03-01",
          "properties": {
              "description": "Version set for versioned API blog post",
              "versionQueryName": "api-version",
              "displayName": "Versioned API",
              "versioningScheme": "query"
          }
      }
    ]
}
|
This will create the version set which is needed to create versioned APIs. In this case we will be using a query string as the versioning scheme.
Next we will implement the two versions of the API.
{
    "$schema": "https://schema.management.azure.com/schemas/2015-01-01/deploymentTemplate.json#",
    "contentVersion": "1.0.0.0",
    "parameters": {
        "APIManagementInstanceName": {
          "type": "string",
          "defaultValue": "MyAPIManagementInstance"
        }
    },
    "variables": {},
    "resources": [
        {
            "name": "[concat(parameters('APIManagementInstanceName'), '/versionsetversionedapi')]",
            "type": "Microsoft.ApiManagement/service/api-version-sets",
            "apiVersion": "2017-03-01",
            "properties": {
                "description": "Version set for versioned API blog post",
                "versionQueryName": "api-version",
                "displayName": "Versioned API",
                "versioningScheme": "query"
            }
        },
        {
            "type": "Microsoft.ApiManagement/service/apis",
            "name": "[concat(parameters('APIManagementInstanceName'), '/versioned-api')]",
            "apiVersion": "2017-03-01",
            "scale": null,
            "properties": {
                "displayName": "Versioned API",
                "apiRevision": "1",
                "description": "Wikipedia for Web APIs. Repository of API specs in OpenAPI(fka Swagger) 2.0 format.nn**Warning**: If you want to be notified about changes in advance please subscribe to our [Gitter channel](https://gitter.im/APIs-guru/api-models).nnClient sample: [[Demo]](https://apis.guru/simple-ui) [[Repo]](https://github.com/APIs-guru/simple-ui)n",
                "serviceUrl": "https://api.apis.guru/v2/",
                "path": "versioned-api",
                "protocols": [
                    "https"
                ],
                "authenticationSettings": null,
                "subscriptionKeyParameterNames": null,
                "apiVersion": "v1",
                "apiVersionSetId": "[concat(resourceId('Microsoft.ApiManagement/service', parameters('APIManagementInstanceName')), '/api-version-sets/versionsetversionedapi')]"
            },
            "dependsOn": [
                "[concat(resourceId('Microsoft.ApiManagement/service', parameters('APIManagementInstanceName')), '/api-version-sets/versionsetversionedapi')]"
            ]
        },
        {
            "type": "Microsoft.ApiManagement/service/apis",
            "name": "[concat(parameters('APIManagementInstanceName'), '/versioned-api-v2')]",
            "apiVersion": "2017-03-01",
            "scale": null,
            "properties": {
                "displayName": "Versioned API",
                "apiRevision": "1",
                "description": "Wikipedia for Web APIs. Repository of API specs in OpenAPI(fka Swagger) 2.0 format.nn**Warning**: If you want to be notified about changes in advance please subscribe to our [Gitter channel](https://gitter.im/APIs-guru/api-models).nnClient sample: [[Demo]](https://apis.guru/simple-ui) [[Repo]](https://github.com/APIs-guru/simple-ui)n",
                "serviceUrl": "https://api.apis.guru/v2/",
                "path": "versioned-api",
                "protocols": [
                    "https"
                ],
                "authenticationSettings": null,
                "subscriptionKeyParameterNames": null,
                "apiVersion": "v2",
                "apiVersionSetId": "[concat(resourceId('Microsoft.ApiManagement/service', parameters('APIManagementInstanceName')), '/api-version-sets/versionsetversionedapi')]"
            },
            "dependsOn": [
                "[concat(resourceId('Microsoft.ApiManagement/service', parameters('APIManagementInstanceName')), '/api-version-sets/versionsetversionedapi')]"
            ]
        },
        {
            "type": "Microsoft.ApiManagement/service/products/apis",
            "name": "[concat(parameters('APIManagementInstanceName'), '/contosoproduct/versioned-api')]",
            "apiVersion": "2017-03-01",
            "scale": null,
            "properties": {},
            "dependsOn": [
                "[resourceId('Microsoft.ApiManagement/service/apis', parameters('APIManagementInstanceName'), 'versioned-api')]"
            ]
        },
        {
            "type": "Microsoft.ApiManagement/service/products/apis",
            "name": "[concat(parameters('APIManagementInstanceName'), '/contosoproduct/versioned-api-v2')]",
            "apiVersion": "2017-03-01",
            "scale": null,
            "properties": {},
            "dependsOn": [
                "[resourceId('Microsoft.ApiManagement/service/apis', parameters('APIManagementInstanceName'), 'versioned-api-v2')]"
            ]
        },
        {
            "type": "Microsoft.ApiManagement/service/apis/operations",
            "name": "[concat(parameters('APIManagementInstanceName'), '/versioned-api/getMetrics')]",
            "apiVersion": "2017-03-01",
            "scale": null,
            "properties": {
                "displayName": "Get basic metrics",
                "method": "GET",
                "urlTemplate": "/metrics",
                "templateParameters": [],
                "description": "Some basic metrics for the entire directory.nJust stunning numbers to put on a front page and are intended purely for WoW effect :)n",
                "responses": [
                    {
                        "statusCode": 200,
                        "description": "OK",
                        "headers": []
                    }
                ],
                "policies": null
            },
            "dependsOn": [
                "[resourceId('Microsoft.ApiManagement/service/apis', parameters('APIManagementInstanceName'), 'versioned-api')]"
            ]
        },
        {
            "type": "Microsoft.ApiManagement/service/apis/operations",
            "name": "[concat(parameters('APIManagementInstanceName'), '/versioned-api/listAPIs')]",
            "apiVersion": "2017-03-01",
            "scale": null,
            "properties": {
                "displayName": "List all APIs",
                "method": "GET",
                "urlTemplate": "/list",
                "templateParameters": [],
                "description": "List all APIs in the directory.nReturns links to OpenAPI specification for each API in the directory.nIf API exist in multiple versions `preferred` one is explicitly marked.nnSome basic info from OpenAPI spec is cached inside each object.nThis allows to generate some simple views without need to fetch OpenAPI spec for each API.n",
                "responses": [
                    {
                        "statusCode": 200,
                        "description": "OK",
                        "headers": []
                    }
                ],
                "policies": null
            },
            "dependsOn": [
                "[resourceId('Microsoft.ApiManagement/service/apis', parameters('APIManagementInstanceName'), 'versioned-api')]"
            ]
        },
        {
            "type": "Microsoft.ApiManagement/service/apis/operations",
            "name": "[concat(parameters('APIManagementInstanceName'), '/versioned-api-v2/listAPIs')]",
            "apiVersion": "2017-03-01",
            "scale": null,
            "properties": {
                "displayName": "List all APIs",
                "method": "GET",
                "urlTemplate": "/list",
                "templateParameters": [],
                "description": "List all APIs in the directory.nReturns links to OpenAPI specification for each API in the directory.nIf API exist in multiple versions `preferred` one is explicitly marked.nnSome basic info from OpenAPI spec is cached inside each object.nThis allows to generate some simple views without need to fetch OpenAPI spec for each API.n",
                "responses": [
                    {
                        "statusCode": 200,
                        "description": "OK",
                        "headers": []
                    }
                ],
                "policies": null
            },
            "dependsOn": [
                "[resourceId('Microsoft.ApiManagement/service/apis', parameters('APIManagementInstanceName'), 'versioned-api-v2')]"
            ]
        },
        {
            "type": "Microsoft.ApiManagement/service/apis/operations/policies",
            "name": "[concat(parameters('APIManagementInstanceName'), '/versioned-api/getMetrics/policy')]",
            "apiVersion": "2017-03-01",
            "scale": null,
            "properties": {
                "policyContent": "[concat('<!--rn    IMPORTANT:rn    - Policy elements can appear only within the <inbound>, <outbound>, <backend> section elements.rn    - Only the <forward-request> policy element can appear within the <backend> section element.rn    - To apply a policy to the incoming request (before it is forwarded to the backend service), place a corresponding policy element within the <inbound> section element.rn    - To apply a policy to the outgoing response (before it is sent back to the caller), place a corresponding policy element within the <outbound> section element.rn    - To add a policy position the cursor at the desired insertion point and click on the round button associated with the policy.rn    - To remove a policy, delete the corresponding policy statement from the policy document.rn    - Position the <base> element within a section element to inherit all policies from the corresponding section element in the enclosing scope.rn    - Remove the <base> element to prevent inheriting policies from the corresponding section element in the enclosing scope.rn    - Policies are applied in the order of their appearance, from the top down.rn-->rn<policies>rn  <inbound>rn    <base />rn    <set-backend-service base-url="https://api.apis.guru/v2/" />rn    <rewrite-uri template="/metrics.json" />rn  </inbound>rn  <backend>rn    <base />rn  </backend>rn  <outbound>rn    <base />rn  </outbound>rn  <on-error>rn    <base />rn  </on-error>rn</policies>')]"
            },
            "dependsOn": [
                "[resourceId('Microsoft.ApiManagement/service/apis', parameters('APIManagementInstanceName'), 'versioned-api')]",
                "[resourceId('Microsoft.ApiManagement/service/apis/operations', parameters('APIManagementInstanceName'), 'versioned-api', 'getMetrics')]"
            ]
        },
        {
            "type": "Microsoft.ApiManagement/service/apis/operations/policies",
            "name": "[concat(parameters('APIManagementInstanceName'), '/versioned-api/listAPIs/policy')]",
            "apiVersion": "2017-03-01",
            "scale": null,
            "properties": {
                "policyContent": "[concat('<!--rn    IMPORTANT:rn    - Policy elements can appear only within the <inbound>, <outbound>, <backend> section elements.rn    - Only the <forward-request> policy element can appear within the <backend> section element.rn    - To apply a policy to the incoming request (before it is forwarded to the backend service), place a corresponding policy element within the <inbound> section element.rn    - To apply a policy to the outgoing response (before it is sent back to the caller), place a corresponding policy element within the <outbound> section element.rn    - To add a policy position the cursor at the desired insertion point and click on the round button associated with the policy.rn    - To remove a policy, delete the corresponding policy statement from the policy document.rn    - Position the <base> element within a section element to inherit all policies from the corresponding section element in the enclosing scope.rn    - Remove the <base> element to prevent inheriting policies from the corresponding section element in the enclosing scope.rn    - Policies are applied in the order of their appearance, from the top down.rn-->rn<policies>rn  <inbound>rn    <base />rn    <set-backend-service base-url="https://api.apis.guru/v2" />rn    <rewrite-uri template="/list.json" />rn  </inbound>rn  <backend>rn    <base />rn  </backend>rn  <outbound>rn    <base />rn  </outbound>rn  <on-error>rn    <base />rn  </on-error>rn</policies>')]"
            },
            "dependsOn": [
                "[resourceId('Microsoft.ApiManagement/service/apis', parameters('APIManagementInstanceName'), 'versioned-api')]",
                "[resourceId('Microsoft.ApiManagement/service/apis/operations', parameters('APIManagementInstanceName'), 'versioned-api', 'listAPIs')]"
            ]
        },
        {
            "type": "Microsoft.ApiManagement/service/apis/operations/policies",
            "name": "[concat(parameters('APIManagementInstanceName'), '/versioned-api-v2/listAPIs/policy')]",
            "apiVersion": "2017-03-01",
            "scale": null,
            "properties": {
                "policyContent": "[concat('<!--rn    IMPORTANT:rn    - Policy elements can appear only within the <inbound>, <outbound>, <backend> section elements.rn    - Only the <forward-request> policy element can appear within the <backend> section element.rn    - To apply a policy to the incoming request (before it is forwarded to the backend service), place a corresponding policy element within the <inbound> section element.rn    - To apply a policy to the outgoing response (before it is sent back to the caller), place a corresponding policy element within the <outbound> section element.rn    - To add a policy position the cursor at the desired insertion point and click on the round button associated with the policy.rn    - To remove a policy, delete the corresponding policy statement from the policy document.rn    - Position the <base> element within a section element to inherit all policies from the corresponding section element in the enclosing scope.rn    - Remove the <base> element to prevent inheriting policies from the corresponding section element in the enclosing scope.rn    - Policies are applied in the order of their appearance, from the top down.rn-->rn<policies>rn  <inbound>rn    <base />rn    <set-backend-service base-url="https://api.apis.guru/v2" />rn    <rewrite-uri template="/list.json" />rn  </inbound>rn  <backend>rn    <base />rn  </backend>rn  <outbound>rn    <base />rn  </outbound>rn  <on-error>rn    <base />rn  </on-error>rn</policies>')]"
            },
            "dependsOn": [
                "[resourceId('Microsoft.ApiManagement/service/apis', parameters('APIManagementInstanceName'), 'versioned-api-v2')]",
                "[resourceId('Microsoft.ApiManagement/service/apis/operations', parameters('APIManagementInstanceName'), 'versioned-api-v2', 'listAPIs')]"
            ]
        }
    ]
}
|
What we did here, was add two versions of the API, set their operations and policies, add them to the product for Contoso, and link them to the version set by setting the apiVersionSetId property on the APIs. We now have finished our ARM template, so commit it and push it to our repository.
Build pipeline
Now switch back to VSTS and create a build template called API Management CI-CD ARM-CI – Versioned API. Once again make sure to select the correct GIT repository.

Create build template for Versioned API
Once the build template has been created, make sure to set enable the continuous integration trigger, and create a validation pipeline just like in the first post of this series.

Create validation build pipeline
Once finished, save and queue the build definition.
Now create a new release definition called API Management Versioned API with a continious deployment trigger on the artifact deployed by our build pipeline we just created. Set up the test environment to deploy as soon as a new artifact is available.

Set up test environment
And finally clone the Test environment, and set the cloned environment up for the production environment. Remember to provide a approval step before deploying in this environment.
Set up deployment pipeline including approvals
We now have completed our CI/CD process for the versioned API, if we want to test this we’ll just make a change in the ARM template on our local machine and check this in, which will start the build pipeline, which in turn will trigger the deployment pipeline updating our API Management instance.

Versioned API has been deployed

by Sandro Pereira | May 25, 2018 | BizTalk Community Blogs via Syndication
INTEGRATE (formerly known as BizTalk Summit) is the primary conference for professionals working in the Microsoft Integration Space and once again is back to London. From June 4 to 6, 25 speakers – 11 MVPs and 14 Microsoft PM – will address the entire Microsoft Integration Platform landscape on topics like BizTalk Server, Logic Apps, Service Bus, Event Grid, Event Hubs, Microsoft Flow, API Management, Azure Functions and many more.
And once again I will be there delivering a session – since the first BizTalk Summit event, I’m a constant presence as a speaker at these events – about BizTalk Server! And if you are wondering why I don’t speak about other integration topics the reasons are:
- The organization team specific ask me to talk about BizTalk Server…
- … and I really love to speak about BizTalk Server so I couldn’t refuse! I have plenty of other events to speak about other topics hehe

From June 4 to 6, and our MVP Sandro Pereira is one of the guest speakers for the sixth year in a row. Following the last event in Seattle, DevScope joins Integrate once again as a Silver Sponsor.
About my session
After receiving a huge amount of positive feedback regarding my previous talk last year: “BizTalk Server Fast & Loud” I fill a little pressure to continues to match the attendee expectations… almost! Because I’m confident that you will enjoy! Why wouldn’t you enjoy? In this session, I will address real cases that happen to all of us daily.
Session Name: BizTalk Server: Lessons from the Road

Abstract: The session will cover small pieces of stories with practical real examples from the field to address certain scenarios/requirements. See real techniques being used in some of the most important features of BizTalk Server, some of them are out-of-the-box capabilities others are custom extensions been made on the platform. Topics include BizTalk migration strategy, content-based routing techniques, Mapping, JSON support, BizTalk administration tips, extending BizTalk out-of-the-box capabilities and many more.
Content is not all you get from this event…
Content is hugely important, and as you read previously, this event will address the entire Microsoft Integration Platform landscape… but that’s not all!
This will also be an amazing opportunity to Network, Connect, and Reconnect with Colleagues. Meet some of the people you have been following on Twitter and blogs and network with them and others who are interested in the same things you are. To hang out with the smartest people you know – and I’m not talking about the speakers or Microsoft PM’s! I’m talking about you guys! – last year were 400 attendees from over 150 companies across 25+ countries attending the event, so imagine the experience that all of us have combined!

The knowledge and experience of all the attendees, speakers and product group members at these events is unreal!!! You will not find an opportunity like this every day.
So, this event is a huge opportunity for you to:
- Get insight and answers to your questions from these real-world experts: attendees, MVP’s and/or Microsoft PM’s;
- Know and became friends of people you are interested or that you follow for social media: again, maybe there are attendees, MVP’s and/or Microsoft PM’s
- I have to say that in this last 8 year I was able to meet and became good friends of several amazing people and all of that because of this type of events and all post-event activities like coffee breaks, dinner with speakers, …
- Build your personal Business Networking and it is also a good opportunity for Partnerships… and new opportunities
And finally: Refresh and recharge and have some fun!
DevScope is sponsoring INTEGRATE 2018 event
I’m extremely happy to announce that, for the second consecutive time, DevScope is also joining this event as a sponsor. The first time was in INTEGRATE 2017 USA and now it will be the first time in London event.
I’m extremely happy for that for several reasons:
- It is the only Portuguese company sponsoring the biggest Microsoft Integration focused event in the world.
- It shows the commitment that my company has in the Integration landscape.
- But we are also one of the unique partners that, not only can support you in the Integration landscape challenges but also in other Microsoft key areas like BI/Power BI, SharePoint, Dynamics and of course Azure.
- which show not only the diversity present in our team but also its quality that can be proven by the diverse certifications and distinctions attributed to our professionals

Fill free to contact DevScope at [email protected] if you want to know more about us, what we do and/or how can we help you and your business.
INTEGRATE 2018 Registration
You are still on time to register for the conference here.

Author: Sandro Pereira
Sandro Pereira lives in Portugal and works as a consultant at DevScope. In the past years, he has been working on implementing Integration scenarios both on-premises and cloud for various clients, each with different scenarios from a technical point of view, size, and criticality, using Microsoft Azure, Microsoft BizTalk Server and different technologies like AS2, EDI, RosettaNet, SAP, TIBCO etc. He is a regular blogger, international speaker, and technical reviewer of several BizTalk books all focused on Integration. He is also the author of the book “BizTalk Mapping Patterns & Best Practices”. He has been awarded MVP since 2011 for his contributions to the integration community. View all posts by Sandro Pereira
by Eldert Grootenboer | May 21, 2018 | BizTalk Community Blogs via Syndication
This is the thirth post in my series around setting up CI/CD for Azure API Management using Azure Resource Manager templates. In the first post we created our API Management instance, and have set up our build and release pipelines, … Continue reading →
by Eldert Grootenboer | May 14, 2018 | BizTalk Community Blogs via Syndication
This is the second post in my series around setting up CI/CD for Azure API Management using Azure Resource Manager templates. In the previous post we created our API Management instance, and have set up our build and release pipelines. In this post we will add custom products, users and groups to our API Management instance, which will be used to set up our policies and access to our APIs.

The posts in this series are the following, this list will be updated as the posts are being published.
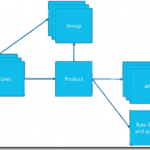
For this post, we will be adding a new user to the API Management instance we created in the previous blog post in this series. This user will represent a client developer from the Contoso company, who will be using the APIs which we will define later on. In this scenario, Contoso consumes our APIs in their own processes. The user will be placed into a group, which represents the Contoso company. In a real life scenario, this group would contain users for all the developers and services of this particular client. And finally we will create a product for the Contoso company as well, and link the group to the product. The product is where we will be setting up policies and quotas, so we can limit the usage our services.
As explained in the first post in this series, we will be using different repositories for the various parts of our API Management setup. In that post, we already showed how we can set up a repository and clone this to our local machine. For this post, we will be creating a new repository, in which we will create the ARM template for our products, users and groups. Create the API Management products, users and groups repository and clone it to you machine.

Create new repository

API Management products, users and groups repository
Now we will start by creating the ARM template for adding a user for Contoso, who will be consuming our APIs. In your cloned repository, create a new file and name it products-users-groups.json, and add the following ARM template contents to the file.
{
    "$schema": "https://schema.management.azure.com/schemas/2015-01-01/deploymentTemplate.json#",
    "contentVersion": "1.0.0.0",
    "parameters": {
        "APIManagementInstanceName": {
          "type": "string",
          "defaultValue": "MyAPIManagementInstance"
        }
    },
    "variables": {},
    "resources": [
        {
            "type": "Microsoft.ApiManagement/service/users",
            "name": "[concat(parameters('APIManagementInstanceName'), '/john-smith-contoso-com')]",
            "apiVersion": "2017-03-01",
            "scale": null,
            "properties": {
                "firstName": "John",
                "lastName": "Smith",
                "email": "[email protected]",
                "state": "active",
                "note": "Developer working for Contoso, one of the consumers of our APIs",
                "confirmation": "invite"
            },
            "dependsOn": []
        }
    ]
}
|
What we do here, is creating a new user (John Smith), and add it to our API Management instance. We have the name of the instance as a parameter, so we could override this from our deployment pipeline. As you will notice, we don’t set anything in our dependsOn, as the API Management instance has been created from another template. Also note the “confirmation”: “invite” line, which makes sure that the user will receive an email on the specified address to finish his registration by setting his own password.
Next we will expand our ARM template to also create the group, so let’s update the ARM template to the following.
{
    "$schema": "https://schema.management.azure.com/schemas/2015-01-01/deploymentTemplate.json#",
    "contentVersion": "1.0.0.0",
    "parameters": {
        "APIManagementInstanceName": {
          "type": "string",
          "defaultValue": "MyAPIManagementInstance"
        }
    },
    "variables": {},
    "resources": [
        {
            "type": "Microsoft.ApiManagement/service/users",
            "name": "[concat(parameters('APIManagementInstanceName'), '/john-smith-contoso-com')]",
            "apiVersion": "2017-03-01",
            "scale": null,
            "properties": {
                "firstName": "John",
                "lastName": "Smith",
                "email": "[email protected]",
                "state": "active",
                "note": "Developer working for Contoso, one of the consumers of our APIs",
                "confirmation": "invite"
            },
            "dependsOn": []
        },
        {
            "type": "Microsoft.ApiManagement/service/groups",
            "name": "[concat(parameters('APIManagementInstanceName'), '/contosogroup')]",
            "apiVersion": "2017-03-01",
            "scale": null,
            "properties": {
                "displayName": "ContosoGroup",
                "description": "Group containing all developers and services from Contoso who will be consuming our APIs",
                "type": "custom",
                "externalId": null
            },
            "dependsOn": []
        },
        {
            "type": "Microsoft.ApiManagement/service/groups/users",
            "name": "[concat(parameters('APIManagementInstanceName'), '/contosogroup/john-smith-contoso-com')]",
            "apiVersion": "2017-03-01",
            "scale": null,
            "properties": {},
            "dependsOn": [
                "[resourceId('Microsoft.ApiManagement/service/groups', parameters('APIManagementInstanceName'), 'contosogroup')]"
            ]
        }
    ]
}
|
What we did here, was add two additional resources, one for the ContosoGroup group, and one to link the user to the group.
And finally, we will add a product for the Contoso consumers. On this product we will set a throttling policy, so these consumers are limited in the number of calls they can make to our APIs. Update the ARM template as following, this will also be the final version of this ARM template.
{
    "$schema": "https://schema.management.azure.com/schemas/2015-01-01/deploymentTemplate.json#",
    "contentVersion": "1.0.0.0",
    "parameters": {
        "APIManagementInstanceName": {
          "type": "string",
          "defaultValue": "MyAPIManagementInstance"
        }
    },
    "variables": {},
    "resources": [
        {
            "type": "Microsoft.ApiManagement/service/users",
            "name": "[concat(parameters('APIManagementInstanceName'), '/john-smith-contoso-com')]",
            "apiVersion": "2017-03-01",
            "scale": null,
            "properties": {
                "firstName": "John",
                "lastName": "Smith",
                "email": "[email protected]",
                "state": "active",
                "note": "Developer working for Contoso, one of the consumers of our APIs",
                "confirmation": "invite"
            },
            "dependsOn": []
        },
        {
            "type": "Microsoft.ApiManagement/service/groups",
            "name": "[concat(parameters('APIManagementInstanceName'), '/contosogroup')]",
            "apiVersion": "2017-03-01",
            "scale": null,
            "properties": {
                "displayName": "ContosoGroup",
                "description": "Group containing all developers and services from Contoso who will be consuming our APIs",
                "type": "custom",
                "externalId": null
            },
            "dependsOn": []
        },
        {
            "type": "Microsoft.ApiManagement/service/groups/users",
            "name": "[concat(parameters('APIManagementInstanceName'), '/contosogroup/john-smith-contoso-com')]",
            "apiVersion": "2017-03-01",
            "scale": null,
            "properties": {},
            "dependsOn": [
                "[resourceId('Microsoft.ApiManagement/service/groups', parameters('APIManagementInstanceName'), 'contosogroup')]"
            ]
        },
        {
            "type": "Microsoft.ApiManagement/service/products",
            "name": "[concat(parameters('APIManagementInstanceName'), '/contosoproduct')]",
            "apiVersion": "2017-03-01",
            "scale": null,
            "properties": {
                "displayName": "ContosoProduct",
                "description": "Product which will apply the high-over policies for developers and services of Contoso.",
                "subscriptionRequired": true,
                "approvalRequired": true,
                "state": "published"
            },
            "dependsOn": []
        },
        {
            "type": "Microsoft.ApiManagement/service/products/groups",
            "name": "[concat(parameters('APIManagementInstanceName'), '/contosoproduct/contosogroup')]",
            "apiVersion": "2017-03-01",
            "scale": null,
            "properties": {},
            "dependsOn": [
                "[resourceId('Microsoft.ApiManagement/service/products', parameters('APIManagementInstanceName'), 'contosoproduct')]",
                "[resourceId('Microsoft.ApiManagement/service/groups', parameters('APIManagementInstanceName'), 'contosogroup')]"
            ]
        },
        {
            "type": "Microsoft.ApiManagement/service/subscriptions",
            "name": "[concat(parameters('APIManagementInstanceName'), '/5ae6ed2358c2795ab5aaba68')]",
            "apiVersion": "2017-03-01",
            "scale": null,
            "properties": {
                "userId": "[resourceId('Microsoft.ApiManagement/service/users', parameters('APIManagementInstanceName'), 'john-smith-contoso-com')]",
                "productId": "[resourceId('Microsoft.ApiManagement/service/products', parameters('APIManagementInstanceName'), 'contosoproduct')]",
                "displayName": "ContosoProduct subscription",
                "state": "active"
            },
            "dependsOn": [
                "[resourceId('Microsoft.ApiManagement/service/users', parameters('APIManagementInstanceName'), 'john-smith-contoso-com')]",
                "[resourceId('Microsoft.ApiManagement/service/products', parameters('APIManagementInstanceName'), 'contosoproduct')]"
            ]
        },
        {
            "type": "Microsoft.ApiManagement/service/products/policies",
            "name": "[concat(parameters('APIManagementInstanceName'), '/contosoproduct/policy')]",
            "apiVersion": "2017-03-01",
            "scale": null,
            "properties": {
                "policyContent": "<policies>rn  <inbound>rn    <base />rn    <rate-limit calls="20" renewal-period="60" />rn  </inbound>rn  <backend>rn    <base />rn  </backend>rn  <outbound>rn    <base />rn  </outbound>rn  <on-error>rn    <base />rn  </on-error>rn</policies>"
            },
            "dependsOn": [
                "[resourceId('Microsoft.ApiManagement/service/products', parameters('APIManagementInstanceName'), 'contosoproduct')]"
            ]
        }
    ]
}
|
The steps we added in this template were to create the ContosoProduct product, add ContosoGroup to the product, create a subscription for the Contoso user John Smith and link it to the product, and finally create a policy which implements throttling on the product level. Commit and push this final ARM template to your repository.
Now that we have finished our template, we will create new build definition called API Management CI-CD ARM-CI – Products, users and groups. The exact steps for creating a build pipeline have already been described in the previous blogpost. Make sure to select the correct GIT repository.

Select correct GIT repository
Set up the build pipeline to validate the ARM template using a continuous integration tirgger and publish if the template is correct, just like in the previous post. Once done make sure to save and queue the build definition.

Set up build pipeline for validation
The next step will be to set up the deployment pipeline, which has also been thoroughly described in the previous post. Create a new continous deployment triggered release definition called API Management products, users and groups and use the artifact we just published from our build pipeline.

Create release pipeline with artifact published from build pipeline
Set up the test environment to be triggered as soon as the artifact is available, and deploy to your test environment.

Deploy to test environment
Clone the Test environment and update it to deploy to your production environment. Make sure to include an approval before deployment is being done.
Deploy to production environment after approval
We now have completed our CI/CD process for the products, users and groups, so to test this we just need to make a change in the ARM template on our local machine and check this in, after which our build and deployment pipelines will kick off and update our API Management instance.
API Management instance has been updated
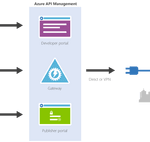
by Eldert Grootenboer | May 7, 2018 | BizTalk Community Blogs via Syndication
This is the first in a series of blogposts around setting up CI/CD for Azure API Management using Azure Resource Manager templates. We will be using Visual Studio Team Services to host our repositories and set up our build and release pipeline. By using CI/CD our API Management will be updated any time we check in changes made in our ARM templates.
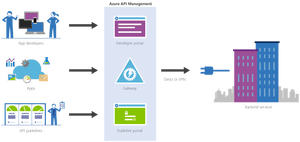
The posts in this series are the following, this list will be updated as the posts are being published.
We will have several developers who are working in API Management creating and updating API definitions. The developers can either do this directly in the ARM template files, or by creating the API definition in the portal first and exporting it with a tool like the API Management ARM Template Creator. They will then check in their changes to a GIT repository hosted in VSTS.
In this first post we will create an instance of API Management, without any custom APIs defined, just the Echo API which comes out of the box. We will start by creating a account in VSTS.

Create VSTS account
Once your account has been created, add a new project under which we will host our repositories. Select GIT as the version control provider.

Browse projects

Create new project

Set up project properties
Once our project has been created, let’s create a new GIT repository which will be used to hold the ARM template used to deploy our API Management instance. By creating a repository we can easily detect changes to trigger a specific deployment, like the instance or a specific API definition. This also allows us to limit developers to specific repositories, for example we might only want our lead developers to work on the instance, but have all developers work on APIs within the instance.

Create new repository

Set repository properties
Once created, switch to your new repository.

Switch to API Management instance repository
Clone the repository to your local machine. When working with ARM template I like using Visual Studio Code in combination with the Azure Resource Manager Tools extension, but you can use any tool you like.
Once you have cloned your repository, create a new file called instance.json, and use the following code to make it an ARM template.
Notice that we use a couple of parameters, these can be overridden at deployment time according to the environment we are deploying to, for example we will want to use the Developer sku in our test environment, but use the Standard sku in the production environment. The other thing to notice is we use [resourceGroup().location] for our location, this will make sure our API Management instance lands in the same region as the resource group to which we deploy from our deployment pipeline.
{
    "$schema": "https://schema.management.azure.com/schemas/2015-01-01/deploymentTemplate.json#",
    "contentVersion": "1.0.0.0",
    "parameters": {
      "APIManagementSku": {
        "type": "string",
        "defaultValue": "Developer"
      },
      "APIManagementSkuCapacity": {
        "type": "string",
        "defaultValue": "1"
      },
      "APIManagementInstanceName": {
        "type": "string",
        "defaultValue": "MyAPIManagementInstance"
      },
      "PublisherName": {
        "type": "string",
        "defaultValue": "Eldert Grootenboer"
      },
      "PublisherEmail": {
        "type": "string",
        "defaultValue": "[email protected]"
      }
    },
    "variables": {},
    "resources": [
      {
        "type": "Microsoft.ApiManagement/service",
        "name": "[parameters('APIManagementInstanceName')]",
        "apiVersion": "2017-03-01",
        "properties": {
          "publisherEmail": "[parameters('PublisherEmail')]",
          "publisherName": "[parameters('PublisherName')]",
          "notificationSenderEmail": "[email protected]",
          "hostnameConfigurations": [],
          "additionalLocations": null,
          "virtualNetworkConfiguration": null,
          "customProperties": {
            "Microsoft.WindowsAzure.ApiManagement.Gateway.Security.Protocols.Tls10": "False",
            "Microsoft.WindowsAzure.ApiManagement.Gateway.Security.Protocols.Tls11": "False",
            "Microsoft.WindowsAzure.ApiManagement.Gateway.Security.Protocols.Ssl30": "False",
            "Microsoft.WindowsAzure.ApiManagement.Gateway.Security.Ciphers.TripleDes168": "False",
            "Microsoft.WindowsAzure.ApiManagement.Gateway.Security.Backend.Protocols.Tls10": "False",
            "Microsoft.WindowsAzure.ApiManagement.Gateway.Security.Backend.Protocols.Tls11": "False",
            "Microsoft.WindowsAzure.ApiManagement.Gateway.Security.Backend.Protocols.Ssl30": "False"
          },
          "virtualNetworkType": "None"
        },
        "resources": [],
        "sku": {
          "name": "[parameters('APIManagementSku')]",
          "capacity": "[parameters('APIManagementSkuCapacity')]"
        },
        "location": "[resourceGroup().location]",
        "tags": {},
        "scale": null
      }
    ],
    "outputs": {}
  }
|
Now commit and push these changes changes to the repository, so we can use it in our build and deployment pipeline.

Commit and push changes to repository
Go back to VSTS, and create a new build definition for our project.

Create new definition
Make sure you have selected the repository for the API Management instance, and create an empty process definition.

Select API Management instance repository

Create empty process definition
We will start by setting the trigger to enable continous integration. This will kick of the build each time we check in a change to our repository.

Enable continous integration trigger
Next go to the tasks, and add a Azure Resource Group Deployment task to your build Phase. The name of the task is somewhat misleading, as it does not just do resource group deployments, but actually deploys complete ARM templates.
Add Azure Resource Group Deployment task
Click on the task we just added, set the name of the task, and select the subscription to be used. If needed, authorize your connection. In this build pipeline we will only validate the template, so nothing will be deployed yet.
Select subscription and authorize if needed
Fill in the rest of the Azure details of the task. Keep in mind that the resource group will only be used for validation, you can use either an existing or a new resource group for this.

Set Azure details
Now fill in the template details of the task. For the Template reference, select the ARM template we created earlier on by clicking on the three dots next to the textbox. Set the deployment mode to Validation only, this will allow us to validate the ARM template without deploying it. Leave all other sections of the build task to their default values.

Set template and deployment mode
Now add a Delete an Azure Resource Group if it is empty task to the build phase. This custom task has first to be added to your VSTS account (you will need to refresh your VSTS browser screen after you added it), and will be used to clean up the resource group if it was created during the validation if it is empty. This is done, because if you created a new resource group in the previous task, it will leave an empty resource group behind.
Add Delete an Azure Resource Group if it is empty task
Open the new task, and set the Azure details. Make sure to use the same subscription and resource group as was used during the validation. You could use VSTS variables here instead as well, but for this blogpost I will just set the names manually.

Set Azure details
And now add a Publish Build Artifacts task to our build stage. This task will publish the ARM template so we can use it in our deployment pipeline.
Publish Build Artifacts task
Open the task, and select the ARM template file for Path to publish. Give a name for the artifact which will be published, and set the publish location to VSTS.

Set publish settings
We now have completed our build pipeline, so save and queue the definition. This will publish the artifact which we can then use to set up our deployment pipeline.

Save and queue the build definition

Select location to save the definition

Queue the build definition
We have finished our build pipeline, so the next step is to set up a deployment definition. Go to Releases and create a new definition.

Create new release definition
Start with an empty process, as we will set up our definition ourselves.
In this definition, two environments will be used, Test and Production. But first we will link our artifacts from our build pipeline, by clicking on the Add artifact field.

Add artifact
Select the build definition we created before, this will read the ARM template which we validated in our build pipeline.

Select build definition
And now click on the button to set a continuous deployment trigger, and enable this trigger. This will make sure our deployment process runs each time our build pipeline completes successfully.

Open continous deployment trigger

Enable continuous deployment trigger
Now that we have set up our artifacts to be published, click on the environment and set the environment name to Test.
Next click on the Tasks dropdown and select the Test environment.

Open Test environment tasks
Add an Azure Resource Group Deployment task to your phase, this will deploy the ARM template to our Azure environment.
Add Azure Resource Group Deployment task
Open the task, and edit the Azure details. Remember, this is for your test environment, so set the subscription and / or resource group accordingly.

Set Azure details for test environment
For the template, select the output from our build pipeline. If you want, you can override your template parameters here as well, but as our defaults are already prepared for the test environment, we will not do this at this time.

Use template from build pipeline
Go back to your pipeline, and click on the Clone button under the Test environment.

Clone the test environment
Rename this new environment to Production, and open the pre-deployment conditions.
Open pre-deployment conditions
As this is our production environment, we don’t want to release here until a release manager has approved the deployment. To do this, enable the Pre-deployment approvals option and select someone who is allowed to approve the deployments. Normally this will probably be a release manager.

Enable pre-deployment approvals
Open your Production tasks, click on the Azure Resource Group Deployment task, and update the subscription and / or resource group for your production environment.

Update subscription and resource group
As this is our production instance, we will want to run on the Standard tier of API Management instead of the Developer tier, so override the APIManagementSku property we had set in our ARM template.

Override sku to use Standard tier
And finally name and save your deployment definition.
To test our CI/CD process, we can now make a change to the ARM template and check it in to our repository. This will then start the build pipeline validating our template, and once it is done, kick off the deployment pipeline automatically, deploying it to Azure.

Build pipeline gets triggered automatically after check in
The first time this is done, it will take a while to create the API Management instance, and if you are on VSTS free build tier, it might show as failed on the deployment, because it will exceed the maximum of 30 minutes.

Deployment succeeded
From now on after making changes to your ARM template your API Management instance will automatically be updated through the CI/CD pipeline. And as we choose for incremental updates in our deployment process, it will only update the parts which have actually been changed, without redeploying the entire instance.
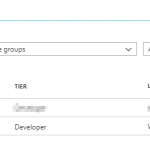
API Management instance has been created

by Sandro Pereira | Apr 17, 2018 | BizTalk Community Blogs via Syndication
Microsoft Integration, Azure, BAPI, Office 365 and much more Stencils Pack it’s a Visio package that contains fully resizable Visio shapes (symbols/icons) that will help you to visually represent On-premise, Cloud or Hybrid Integration and Enterprise architectures scenarios (BizTalk Server, API Management, Logic Apps, Service Bus, Event Hub…), solutions diagrams and features or systems that use Microsoft Azure and related cloud and on-premises technologies in Visio 2016/2013:
- BizTalk Server
- Microsoft Azure
- Azure App Service (API Apps, Web Apps, Mobile Apps and Logic Apps)
- Event Hubs, Event Grid, Service Bus, …
- API Management, IoT, and Docker
- Machine Learning, Stream Analytics, Data Factory, Data Pipelines
- and so on
- Microsoft Flow
- PowerApps
- Power BI
- PowerShell
- Infrastructure, IaaS
- Office 365
- And many more…

What’s new in this version?
With the growing number of stencils in this package, it was becoming hard to find or look for the right shape/representation and based on some feedback I received from the community and some tips, I focused most of the work in this new version in providing search capacity to this package, but it wasn’t the only one:
- Search Capabilities: Defining the correct metadata information and keywords for all the shapes for a better search functionality.

- New shapes: of course, that has happened in all other versions, new shapes were added, in particular: Generic, Microsoft Flow and PowerApps shapes


You can download Microsoft Integration, Azure, BAPI, Office 365 and much more Stencils Pack for Visio from:
 Microsoft Integration, Azure, BAPI, Office 365 and much more Stencils Pack for Visio (18,6 MB)
GitHub
Or from:
Microsoft Integration and Azure Stencils Pack for Visio 2016/2013 v3.1.0 (18,6 MB)
Microsoft | TechNet Gallery
The post New version of Microsoft Integration, Azure, BAPI, Office 365 and much more Stencils Pack for Visio is now available on GitHub appeared first on SANDRO PEREIRA BIZTALK BLOG.

by Bill Chesnut | Mar 26, 2018 | BizTalk Community Blogs via Syndication
I realize that several other of the Host form this years Global Integration Bootcamp Cities have posted recaps, mine is going to be a bit different, more about why these local events are import and valuable for the attendees and how they happen.
Again this year I organized the Melbourne, Australia city of the Global Integration Bootcamp, the biggest issue every year is finding a venue, this year we used The Cluster on Queens street in Melbourne, thanks to Mexia for sponsoring the venue, biggest issue out of the way. The other sponsorship that is need is food, we thought the Microsoft was going to come thought with the Subway offer like they did for user groups, but for whatever reason that did not happen this year, so SixPivot, came to the party and covered the food, thanks Faith.
The next thing to organize was speakers, a big thanks goes out to Paco for stepping up and organizing the morning sessions with help of his colleagues from Mexia: Prasoon and Gavin. For the remaining 3 session I went a little away from the global agenda and invited Simon Lamb from Microsoft to talk about VSTS build and release of ARM Templates, Jorge Arteiro contacted me about giving a talk about Open Service Broker for Azure with AKS, something different for the Melbourne attendees. I decided that we always have people that are using BizTalk so I decided that the final talk that I would do would be “What’s new in Azure API Management and BizTalk”, the API Management part of the talk was also BizTalk focused around BizTalk.
The recording from the talks can be found currently at SixPivot GoToWebinar site they will eventually be moved to YouTube and the links will be posted here.
The key ingredient to a successful local event is the attendees, once the registration site went up, the registrations poured in and we eventually issued all 70 tickets (venue holds between 55-60) so we typically expect a 30% to 35% no-show rate for free events, we decided to enable the waitlist feature and released an additional 20 tickets, for a total of 90 (it turns out not to be 90 there were a few duplicate registrations). So the days before the event planning everything I was a bit nervous that more than 60 people might show up, but I figure that we would just make it work.
On the day everything got started of really good, we ended up with a total attendance of 37 people including speakers. I think it was one of the most engaged audience that I have every had a pleasure to be a part of for a hand-on-day event, Thank you very much, but I was still a bit disappointed that we had over a 50% no-show rate, I need to figure out a way to help prevent this in future events, so if anyone has any suggestion please contact me.
The networking that took place during the breaks was great and I really think that it this is one of the key ingredients of a good technical event, I hope all of the attendees enjoyed this aspect of the event.
Thanks again to everyone that help may Global Integration Bootcamp 2018 Melbourne the success that it was again this year.