by community-syndication | Apr 1, 2010 | BizTalk Community Blogs via Syndication
While writing a lab for an up and coming SharePoint 2010 course I came across a few
handy things.
I’ve always been a big fan of the developer dashboard and until recently the example
code has been a little scarce.
Fortunately I’ve found a couple of gems
– one from Paul
Andrew’s blog on how to get your own text in the debug tree
using (SPMonitoredScope sc = new SPMonitoredScope(“Some timed scope”))
{
// some code in here that you think may take time
}
and for the right side of the screen:
SPCriticalTraceCounter.AddDataToScope(uCounter, “Your category”, traceLevel,
“Detailed long message”);
– and the 2nd is an extension that sits on the Dashboard page that plots the time
taken for each component to process/render in the tree (it does this client side using
jquery and an ASCX control)
http://devdashvis.codeplex.com/releases/view/36559
Check them out.
Cheers,
Mick.
by community-syndication | Mar 31, 2010 | BizTalk Community Blogs via Syndication
I have been working with Windows Server AppFabric caching lately and have found it to be very impressive. The more that I work with it the more that I can see areas that it can be utilized. One of the things that will become quite evident as you start using it is that much of the setup and configuration is done through PowerShell cmdlets.
I am in the process of putting together an application and I want the application to be able to create and pre-populate the cache. As I looked into creating the cache I knew that it could be created through PowerShell directly but I wanted to call the PowerShell cmdlets from .NET. So, lets look at what is needed to create the cache from PowerShell first and then we will look at the code to call the cmdlets from .NET.
This assumes that AppFabric has been installed and configured.
Open a PowerShell command window. The first thing that we are going to do is to import two modules and then we can start issuing commands. First, type “Import-Module DistributedCacheAdministration” (without the quotes) and hit enter. This will import the cache administration cmdlets. Next type “Import-Module DistributedCacheConfiguration” and hit enter. This will import the cache configuration cmdlets.
The next command will bring the current machines’ cluster configuration into the PowerShell session context. So, type in Use-CacheCluster and hit enter. We have now entered all that we need to start interacting with the cache. The first thing that we need to do is to ensure that the cache service is running. Type “Get-CacheHost” and hit enter. Look on the screen and see if the Service Status show UP. If it shows DOWN then issue the following commands to start it. Type “$hostinfo = Get-CacheHost” and hit enter. Then type in “Start-CacheHost $hostinfo.HostName $hostinfo.PortNo”.
At this point we are ready to create the cache using the New-Cache cmdlet. Type “New-Cache <your cache name here>” and hit enter. This will create a cache with your name that is ready to use.
If you want to see the configuration for your newly created cache type in “Get-CacheConfig <your cache name here>” and hit enter. You will see the following configuration attributes and their settings.
CacheName : MyCache
TimeToLive : 10 mins
CacheType : Partitioned
Secondaries : 0
IsExpirable : False
EvictionType : LRU
NotificationsEnabled : False
To do this all with code we need to add three references to our project. Add the System.Management.Automation assembly as well as the Microsoft.ApplicationServer.Caching.Core and Microsoft.ApplicationServer.Caching.Client assemblies. These two assemblies can be found in the Windows\System32\AppFabric directory.
To set up the environment in .NET to issue PowerShell commands we need to start with the InitialSessionState class. This will create a session with the PowerShell runspace. A PowerShell runspace is the operating environment where you can create pipelines which will run the cmdlets.
So, just as above we will need to start with importing the DistributedCacheAdministration and DistributedCacheConfiguration modules. This can be seen below in the source code with the state.ImportPSModule method. Once we have the session state created we can call the RunspaceFactory to create a new runspace. At this point we can call the Open method can now start creating commands through a pipeline.
In the code below we create two pipelines. The first is our Use-CacheCluster command. This is a command that doesn’t take or return any arguments. The next command is the New-Cache command. This takes a set of arguments so we will create this a bit different. First, we will create a Command object and then set parameters on the command object for each of the arguments we want to pass in. In this example I am providing a name as well as telling the caching system that I don’t want the cache items to expire. Next, we need to pass the command object to the pipe and lastly, call the Invoke method as shown in the code below:
private void CreateCache(string cacheName)
{
//This can also be kept in a config file
var config = new DataCacheFactoryConfiguration();
config.Servers = new List<DataCacheServerEndpoint>
{
new DataCacheServerEndpoint(Environment.MachineName, 22233)
};
DataCacheFactory dcf = new DataCacheFactory(config);
if (dcf != null)
{
var state = InitialSessionState.CreateDefault();
state.ImportPSModule(new string[] { “DistributedCacheAdministration”, “DistributedCacheConfiguration” });
state.ThrowOnRunspaceOpenError = true;
var rs = RunspaceFactory.CreateRunspace(state);
rs.Open();
var pipe = rs.CreatePipeline();
pipe.Commands.Add(new Command(“Use-CacheCluster”));
var cmd = new Command(“New-Cache”);
cmd.Parameters.Add(new CommandParameter(“Name”, cacheName));
cmd.Parameters.Add(new CommandParameter(“Expirable”, false));
pipe.Commands.Add(cmd);
var output = pipe.Invoke();
}
}
We now have a cache created for us from .NET code.

by community-syndication | Mar 30, 2010 | BizTalk Community Blogs via Syndication
This is the sixteenth in a series of blog posts I’m doing on the upcoming VS 2010 and .NET 4 release.
Today’s post is the first of a few blog posts I’ll be doing that talk about some of the important changes we’ve made to make Web Forms in ASP.NET 4 generate clean, standards-compliant, CSS-friendly markup. Today I’ll cover the work we are doing to provide better control over the “ID” attributes rendered by server controls to the client.
[In addition to blogging, I am also now using Twitter for quick updates and to share links. Follow me at: twitter.com/scottgu]
Clean, Standards-Based, CSS-Friendly Markup
One of the common complaints developers have often had with ASP.NET Web Forms is that when using server controls they don’t have the ability to easily generate clean, CSS-friendly output and markup. Some of the specific complaints with previous ASP.NET releases include:
- Auto-generated ID attributes within HTML make it hard to write JavaScript and style with CSS
- Use of tables instead of semantic markup for certain controls (in particular the asp:menu control) make styling ugly
- Some controls render inline style properties even if no style property on the control has been set
- ViewState can often be bigger than ideal
ASP.NET 4 provides better support for building standards-compliant pages out of the box. The built-in <asp:> server controls with ASP.NET 4 now generate cleaner markup and support CSS styling – and help address all of the above issues.
Markup Compatibility When Upgrading Existing ASP.NET Web Forms Applications
A common question people often ask when hearing about the cleaner markup coming with ASP.NET 4 is “Great – but what about my existing applications? Will these changes/improvements break things when I upgrade?”
To help ensure that we don’t break assumptions around markup and styling with existing ASP.NET Web Forms applications, we’ve enabled a configuration flag – controlRenderingCompatbilityVersion – within web.config that let’s you decide if you want to use the new cleaner markup approach that is the default with new ASP.NET 4 applications, or for compatibility reasons render the same markup that previous versions of ASP.NET used:

When the controlRenderingCompatbilityVersion flag is set to “3.5” your application and server controls will by default render output using the same markup generation used with VS 2008 and .NET 3.5. When the controlRenderingCompatbilityVersion flag is set to “4.0” your application and server controls will strictly adhere to the XHTML 1.1 specification, have cleaner client IDs, render with semantic correctness in mind, and have extraneous inline styles removed.
This flag defaults to 4.0 for all new ASP.NET Web Forms applications built using ASP.NET 4. Any previous application that is upgraded using VS 2010 will have the controlRenderingCompatbilityVersion flag automatically set to 3.5 by the upgrade wizard to ensure backwards compatibility. You can then optionally change it (either at the application level, or scope it within the web.config file to be on a per page or directory level) if you move your pages to use CSS and take advantage of the new markup rendering.
Today’s Cleaner Markup Topic: Client IDs
The ability to have clean, predictable, ID attributes on rendered HTML elements is something developers have long asked for with Web Forms (ID values like “ctl00_ContentPlaceholder1_ListView1_ctrl0_Label1” are not very popular). Having control over the ID values rendered helps make it much easier to write client-side JavaScript against the output, makes it easier to style elements using CSS, and on large pages can help reduce the overall size of the markup generated.
New ClientIDMode Property on Controls
ASP.NET 4 supports a new ClientIDMode property on the Control base class. The ClientIDMode property indicates how controls should generate client ID values when they render. The ClientIDMode property supports four possible values:
- AutoID-Renders the output as in .NET 3.5 (auto-generated IDs which will still render prefixes like ctrl00 for compatibility)
- Predictable (Default)– Trims any “ctl00” ID string and if a list/container control concatenates child ids (example: id=”ParentControl_ChildControl”)
- Static-Hands over full ID naming control to the developer – whatever they set as the ID of the control is what is rendered (example: id=”JustMyId”)
- Inherit-Tells the control to defer to the naming behavior mode of the parent container control
The ClientIDMode property can be set directly on individual controls (or within container controls – in which case the controls within them will by default inherit the setting):

Or it can be specified at a page or usercontrol level (using the <%@ Page %> or <%@ Control %> directives) – in which case controls within the pages/usercontrols inherit the setting (and can optionally override it):

Or it can be set within the web.config file of an application – in which case pages within the application inherit the setting (and can optionally override it):
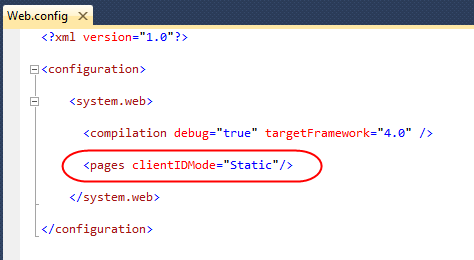
This gives you the flexibility to customize/override the naming behavior however you want.
Example: Using the ClientIDMode property to control the IDs of Non-List Controls
Let’s take a look at how we can use the new ClientIDMode property to control the rendering of “ID” elements within a page. To help illustrate this we can create a simple page called “SingleControlExample.aspx” that is based on a master-page called “Site.Master”, and which has a single <asp:label> control with an ID of “Message” that is contained with an <asp:content> container control called “MainContent”:

Within our code-behind we’ll then add some simple code like below to dynamically populate the Label’s Text property at runtime:

If we were running this application using ASP.NET 3.5 (or had our ASP.NET 4 application configured to run using 3.5 rendering or ClientIDMode=AutoID), then the generated markup sent down to the client would look like below:

This ID is unique (which is good) – but rather ugly because of the “ct100” prefix (which is bad).
Markup Rendering when using ASP.NET 4 and the ClientIDMode is set to “Predictable”
With ASP.NET 4, server controls by default now render their ID’s using ClientIDMode=”Predictable”. This helps ensure that ID values are still unique and don’t conflict on a page, but at the same time it makes the IDs less verbose and more predictable. This means that the generated markup of our <asp:label> control above will by default now look like below with ASP.NET 4:

Notice that the “ct100” prefix is gone. Because the “Message” control is embedded within a “MainContent” container control, by default it’s ID will be prefixed “MainContent_Message” to avoid potential collisions with other controls elsewhere within the page.
Markup Rendering when using ASP.NET 4 and the ClientIDMode is set to “Static”
Sometimes you don’t want your ID values to be nested hierarchically, though, and instead just want the ID rendered to be whatever value you set it as. To enable this you can now use ClientIDMode=static, in which case the ID rendered will be exactly the same as what you set it on the server-side on your control. This will cause the below markup to be rendered with ASP.NET 4:

This option now gives you the ability to completely control the client ID values sent down by controls.
Example: Using the ClientIDMode property to control the IDs of Data-Bound List Controls
Data-bound list/grid controls have historically been the hardest to use/style when it comes to working with Web Form’s automatically generated IDs. Let’s now take a look at a scenario where we’ll customize the ID’s rendered using a ListView control with ASP.NET 4.
The code snippet below is an example of a ListView control that displays the contents of a data-bound collection – in this case, airports:
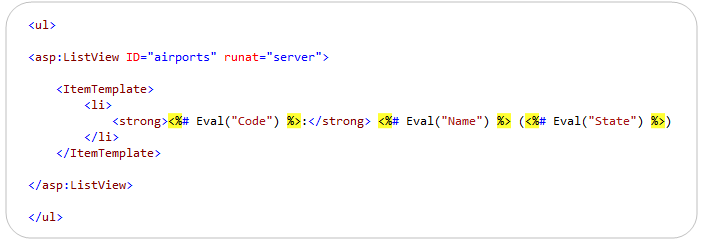
We can then write code like below within our code-behind to dynamically databind a list of airports to the ListView above:

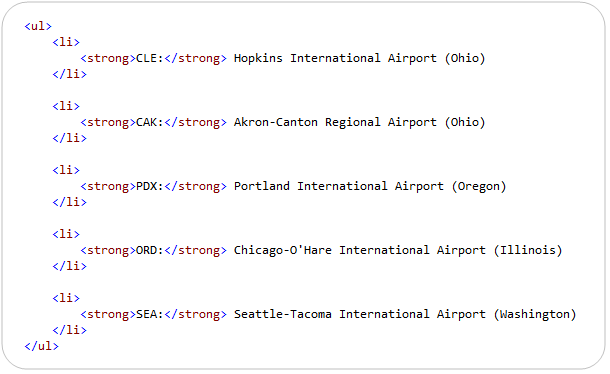
At runtime this will then by default generate a <ul> list of airports like below. Note that because the <ul> and <li> elements in the ListView’s template are not server controls, no IDs are rendered in our markup:
Adding Client ID’s to Each Row Item
Now, let’s say that we wanted to add client-ID’s to the output so that we can programmatically access each <li> via JavaScript. We want these ID’s to be unique, predictable, and identifiable.
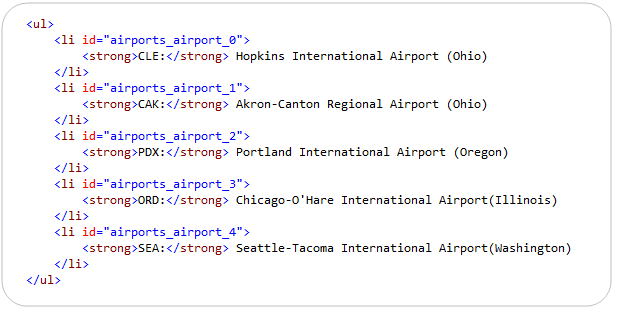
A first approach would be to mark each <li> element within the template as being a server control (by giving it a runat=server attribute) and by giving each one an id of “airport”:
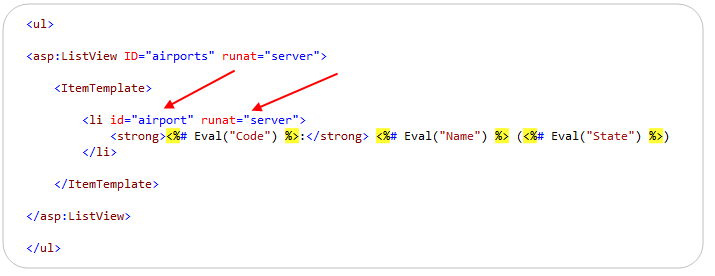
By default ASP.NET 4 will now render clean IDs like below (no ctl001-like ids are rendered):
Using the ClientIDRowSuffix Property
Our template above now generates unique ID’s for each <li> element – but if we are going to access them programmatically on the client using JavaScript we might want to instead have the ID’s contain the airport code within them to make them easier to reference. The good news is that we can easily do this by taking advantage of the new ClientIDRowSuffix property on databound controls in ASP.NET 4 to better control the ID’s of our individual row elements.
To do this, we’ll set the ClientIDRowSuffix property to “Code” on our ListView control. This tells the ListView to use the databound “Code” property from our Airport class when generating the ID:

And now instead of having row suffixes like “1”, “2”, and “3”, we’ll instead have the Airport.Code value embedded within the IDs (e.g: _CLE, _CAK, _PDX, etc):

You can use this ClientIDRowSuffix approach with other databound controls like the GridView as well. It is useful anytime you want to program row elements on the client – and use clean/identified IDs to easily reference them from JavaScript code.
Summary
ASP.NET 4 enables you to generate much cleaner HTML markup from server controls and from within your Web Forms applications.
In today’s post I covered how you can now easily control the client ID values that are rendered by server controls. In upcoming posts I’ll cover some of the other markup improvements that are also coming with the ASP.NET 4 release.
Hope this helps,
Scott


