by community-syndication | Jan 4, 2011 | BizTalk Community Blogs via Syndication
Wanted to put a couple of scripts I put together on how to start and stop host instances using WMI in a VBS file
StartAllInProcessHostInstance

const HostInstServiceState_Stopped=1

Sub StartAllInProcessHostInstance ()

   On Error Resume Next

   Dim Query, HostInstSet, Inst

   ' Enumerate all InProcess type Host Instance

   Query = "SELECT * FROM MSBTS_HostInstance WHERE HostType =1 and IsDisabled='FALSE'"

   Set HostInstSet = GetObject("Winmgmts:!root\MicrosoftBizTalkServer").ExecQuery(Query)

   For Each Inst in HostInstSet

      ' If host instance is stopped, then it'll start it

      If( Inst.ServiceState=HostInstServiceState_Stopped ) Then

         wscript.echo "Starting host instance -> " & Inst.HostName

             Inst.Start   ' Calling MSBTS_HostInstance::Start() method

         CheckWMIError

         wscript.echo Inst.HostName & " has been started successfully on server " & Inst.RunningServer & VBNewLine

      End If

   Next

end Sub

'This subroutine deals with all errors using the WbemScripting object.  Error descriptions

'are returned to the user by printing to the console.

Sub   CheckWMIError()

   If Err <> 0   Then

      On Error Resume   Next

      Dim strErrDesc: strErrDesc = Err.Description

      Dim ErrNum: ErrNum = Err.Number

      Dim WMIError : Set WMIError = CreateObject("WbemScripting.SwbemLastError")

      If ( TypeName(WMIError) = "Empty" ) Then

         wscript.echo strErrDesc & " (HRESULT: "   & Hex(ErrNum) & ")."

      Else

         wscript.echo WMIError.Description & "(HRESULT: " & Hex(ErrNum) & ")."

         Set WMIError = nothing

      End   If

      wscript.quit 0

   End If

End Sub

StopAllInProcessHostInstance

const HostInstServiceState_Started=4

Sub StopAllInProcessHostInstance ()

   On Error Resume Next

   Dim Query, HostInstSet, Inst

   ' Enumerate all InProcess type Host Instance

   Query = "SELECT * FROM MSBTS_HostInstance WHERE HostType =1 and IsDisabled='FALSE'"

   Set HostInstSet = GetObject("Winmgmts:!root\MicrosoftBizTalkServer").ExecQuery(Query)

   For Each Inst in HostInstSet

      ' If host instance is stopped, then it'll start it

      If( Inst.ServiceState=HostInstServiceState_Started ) Then

         wscript.echo "Stopping host instance -> " & Inst.HostName

             Inst.Stop   ' Calling MSBTS_HostInstance::Stop() method

         CheckWMIError

         wscript.echo Inst.HostName & " has been stopped successfully on server " & Inst.RunningServer & VBNewLine

      End If

   Next

end Sub

'This subroutine deals with all errors using the WbemScripting object.  Error descriptions

'are returned to the user by printing to the console.

Sub   CheckWMIError()

   If Err <> 0   Then

      On Error Resume   Next

      Dim strErrDesc: strErrDesc = Err.Description

      Dim ErrNum: ErrNum = Err.Number

      Dim WMIError : Set WMIError = CreateObject("WbemScripting.SwbemLastError")

      If ( TypeName(WMIError) = "Empty" ) Then

         wscript.echo strErrDesc & " (HRESULT: "   & Hex(ErrNum) & ")."

      Else

         wscript.echo WMIError.Description & "(HRESULT: " & Hex(ErrNum) & ")."

         Set WMIError = nothing

      End   If

      wscript.quit 0

   End If

End Sub
by community-syndication | Jan 4, 2011 | BizTalk Community Blogs via Syndication
Following on the heels of my last query pattern blog post, I started to dig into creating a custom data context for use with StreamInsight and LINQPad. The default contexts supplied out of box with the StreamInsight driver (including the Hitchhiker’s Guide context) are great, but don’t contain a large volume of data. I wanted to put together a much larger context to have a baseline to play with larger and more complicated query patterns. My goals for the context/data streams were:
- Contain “real” process data, around a million “real” data records with accompanying metadata.
- Be easily transferrable / downloadable
- Be (relatively) human readable
- Be performant (sustain at least 60k events read / sec on my desktop)
Building on the fun I had putting together the windchill sample, here’s what I decided on:
- Use weather data from Environment Canada, who has kindly made a great deal of information available for download in XML format.
- This includes both the “live” weather and reference data about the producing weather stations. I chose to use airport weather information, as it is a lot more granular than your average weather station.
- Create a custom data context which can pull information from compressed CSV files, and expose it as a CepStream.
|
|
If you’re already comfortable with exposing data via IEnumerable interface, check out this blog post that provides a concise summary of creating data contexts. |
|
|
Why did I choose to store the canned data set as a compressed CSV file? Based on a series of performance explorations, this turned out to be the best choice between file size (being downloadable), and performance (throughput).
For all of the gory performance exploration, check out this blog post. |
This blog post walks through the various steps of creating the custom data context:
- Preparing a canned data set (Downloading, parsing and formatting).
- Reading back the canned data set
- Creating a LINQPad data context which exposes the data set as a CepStream<T>.
If you’re comfortable with creating/accessible canned data sets, and you just want to create a custom LINQPad context for use with StreamInsight, skip directly to that section.
|
Before you start reading through the blog, download and follow along with the code samples:
- Complete package (weather context and LINQ samples)
|
Preparing a canned data set – Downloading
Environment Canada rocks. They really do (caveat: I am Canadian ). They’ve made a great deal of climatic data available for download in their National Climate Archives On-line. From the National Climate Archives site, I chose to download ten year’s worth of information for ten airports in Canada (airport weather stations tend to record and archive data in 30 minute or hourly increments – most “other” weather stations seem to record 2-3x per day). Since the goal is lots of time-series data to look at weather stations it is (hourly records gives us 8760 records per year per weather station. 10 stations times 10 years gives us 876k records.. close enough ).
You can see the available stations in a given area and timeframe by looking at their customized search. Being familiar with Canadian airport geography, I selected them by:
- Searching by province for a specific date.
- Selecting the data for an airport (I happened to know what they were).
- From the specific screen, there’s a navigation option to download data in either CSV or XML format. I chose to download in XML (this was before I had settled on using CSV as the store format of choice).
- The station code and station metadata is also available from the URL for this view (for example, the station code for St. John’s, Newfoundland is 6720.
The web URL for downloading data was of the form:
- var urlQuery = "http://www.climate.weatheroffice.gc.ca/climateData/bulkdata_e.html? timeframe=1&Prov=XX&StationID={0}&Year={1}&Month={2}&Day={3}&format={4}&type=hly";
With the following variables:
- ( 0 ) Station ID
- ( 1 ) Year
- ( 2 ) Month
- ( 3 ) Day
- ( 4 ) Format (XML, CSV)
Next step was to script up a downloader that pulled down data for 2010 for each of my target weather stations. Threw something quick together in LINQPad to accomplish this. Each invocation of this URL will return data for the given month (i.e. the day value is ignored).
|
Download the LINQ script Download_WeatherData. |
After running this script, I had available to me roughly 1.0 GB of raw XML weather data. The contents took the form:
- <stationinformation>
- <name>OTTAWA MACDONALD-CARTIER INT'LA</name>
- <province>ONTARIO</province>
- <latitude>45.32</latitude>
- <longitude>-75.67</longitude>
- <elevation>114.00</elevation>
- <climate_identifier>6106000</climate_identifier>
- <wmo_identifier>71628</wmo_identifier>
- <tc_identifier>YOW</tc_identifier>
- <note>All times are specified in Local Standard Time (LST). Add 1 hour to adjust for Daylight Saving Time where and when it is observed.</note>
- </stationinformation>
- <stationdata day="1" hour="0" minute="0" month="1" year="2010" quality=" ">
- <temp description="Temperature" units="°C">-5.30</temp>
- <dptemp description="Dew Point Temperature" units="°C">-6.00</dptemp>
- <visibility description="Visibility" units="km">4.80</visibility>
- <relhum description="Relative Humidity" units="%">95.00</relhum>
- <winddir description="Wind Direction" units="10's deg">9.00</winddir>
- <windspd description="Wind Speed" units="km/h">15.00</windspd>
- <stnpress description="Station Pressure" units="kPa">100.03</stnpress>
- <humidex description="Humidex"></humidex>
- <windchill description="Wind Chill">-11.00</windchill>
- <weather description="Weather">Snow</weather>
- </stationdata>
Note that we have both the station metadata and the “live” weather data available to us. The next step will be to render this data into two separate data sets:
- Sorted list of weather data across all of the weather stations, saved as a CSV file with headers.
- List of weather station information (one record for each station), saved as a CSV file with headers.
Note that we will also have to shift the timestamp on each data record to the appropriate DateTimeOffset. We’ll use another handy little LINQ nugget to do this (I’ve really gotten into using LINQPad as my general purpose C# scratchpad).
|
Download the LINQ script Parse_WeatherData. |
Let’s walk through the main method before diving into the two key functions, ParseWeatherData and CsvSequenceStore.WriteEvents<T>. We grab the list of files from the download directory (in this case we just take 5 to run quickly and work with a smaller amount of data for test purposes). Next, iterate over the list of files, parsing each and inserting the results into the weatherData and stations lists. The weatherData list is then sorted before being written into the output file via the CsvSequenceStore. Note how we use the GZipStream to transparently write out a compressed stream.
|
Note that the entire 1 GB worth of data is read into memory before being written out to the destination file. This isn’t the world’s best coding practice. What I should have done was:
- Written out each weather data file to a common output .CSV file
- Sorted the .CSV file.
- Compressed the .CSV file.
However, as this was a one-shot, and I have lots of memory on my desktop, I brute-forced it.
|
- void Main()
- {
- // Get a list of all of the downloaded XML files.
- var fileList = Directory.GetFiles(@"C:\temp\weatherdata\")
- .Take(5) /* Take the first 5 for testing purposes */
- .Where(d => d.EndsWith(".xml"));
-
- // Define the output file
- var outputFile = @"C:\temp\weather_data_out.csv.gz";
- var stationFile = @"C:\temp\station_data_out.csv.gz";
-
- // Create holding lists for weather data and stations
- var weatherData = new List<WeatherReading>();
- var stations = new List<StationData>();
-
- // Iterate through the file list and parse for weather data
- var fileCount = (double)fileList.ToList().Count();
- var progress = 0.0;
- fileList.ToList().ForEach(fl =>
- {
- Console.WriteLine("{0:00.0} Parsing file {1}",
- (progress / fileCount * 100.0), fl);
- ParseWeatherData(fl, weatherData, stations);
- progress++;
- });
-
- // Sort the weather data into strict ascending time order
- weatherData = weatherData.OrderBy(d => d.Timestamp).ToList();
-
- // Use the CSV store
- CsvSequenceStore store = new CsvSequenceStore();
-
- // Write the data to a compressed file using the GZipStream class.Way cool.
- Console.WriteLine("Writing {0} events to file {1}",
- weatherData.Count, outputFile);
-
- using (FileStream fs = new FileStream(outputFile, FileMode.Create))
- {
- using (GZipStream zipStream = new GZipStream(
- fs, CompressionMode.Compress))
- {
- // Write out the weather data set to the file, using the Timestamp field
- // as the event timestamp
- store.WriteEvents<WeatherReading>(zipStream, weatherData,
- e => e.Timestamp);
- }
- }
-
- using (FileStream fs = new FileStream(stationFile, FileMode.Create))
- {
- using (GZipStream zipStream = new GZipStream(
- fs, CompressionMode.Compress))
- {
- // Write out the station data set to the file, using a hard coded
- // timestamp
- store.WriteEvents<StationData>(zipStream, stations,
- e => DateTime.Parse("2010-01-01 00:00:00"));
- }
- }
- }
Now to dive into the first of the two key functions being called – ParseWeatherData.
-
- /// Parse through the file, extracting weather and station data
- void ParseWeatherData(string fileName,
- List<WeatherReading> weatherData, List<StationData> stations)
- {
- if (!System.IO.File.Exists(fileName))
- throw new ArgumentException("Could not load file" + fileName);
-
- using (StreamReader sr = new StreamReader(fileName))
- {
- var xml = XElement.Load(sr);
-
- // Parse the station information
- var q = from e in xml.Elements() where e.Name == "stationinformation" select e;
- var stationInfo = q.First();
- var stationName = GetValue<string>(stationInfo, "name");
- var stationCode = GetValue<int>(stationInfo, "wmo_identifier");
-
- var newStation = new StationData()
- {
- Name = stationName,
- Elevation = GetValue<double>(stationInfo, "elevation"),
- Latitude = GetValue<double>(stationInfo, "latitude"),
- Longitude = GetValue<double>(stationInfo, "longitude"),
- TCID = GetValue<string>(stationInfo, "tc_identifier"),
- StationCode = GetValue<int>(stationInfo, "wmo_identifier"),
- Province = GetValue<string>(stationInfo, "province")
- };
-
- // If this is a new station, add it to the list
- if (!stations.Where(s => s.Name == stationName).Any())
- stations.Add(newStation);
-
- // Parse the station data
- var sds = from e in xml.Elements() where e.Name == "stationdata" select e;
- sds.ToList().ForEach((e) =>
- {
- if (!String.IsNullOrEmpty(GetValue<string>(e, "temp")))
- {
- // Assign the core values
- var wr = new WeatherReading()
- {
- StationCode = stationCode,
- Temperature = GetValue<double>(e, "temp"),
- DewpointTemperature = GetValue<double>(e, "dptemp"),
- Humidex = GetValue<double>(e, "humidex"),
- RelativeHumidity = GetValue<double>(e, "relhum"),
- StationPressure = GetValue<double>(e, "stnpress"),
- Visibility = GetValue<double>(e, "visibility"),
- WindChill = GetValue<double>(e, "windchill"),
- WindDirection = GetValue<double>(e, "winddir"),
- WindSpeed = GetValue<double>(e, "windspd"),
- };
-
- // Convert the timestamp into universal time based
- // on the current station information (lookup based on
- // province
- var tzi = tzMap[newStation.Province];
- // Asemble the timestamp
- var dt = new DateTimeOffset(
- GetAttribute<int>(e, "year"),
- GetAttribute<int>(e, "month"),
- GetAttribute<int>(e, "day"),
- GetAttribute<int>(e, "hour"),
- GetAttribute<int>(e, "minute"),
- 0, tzi.BaseUtcOffset);
- wr.Timestamp = dt.UtcDateTime;
- // Parse weather conditions – WeatherConditions is an enum
- // flags field
- string[] conditions = GetValue<string>(e, "weather")
- .Replace(' ', '_')
- .Split(new char[] { ',' });
-
- WeatherConditions cond = WeatherConditions.None;
- WeatherConditions total = WeatherConditions.None;
- foreach (var s in conditions)
- {
- if (Enum.TryParse<WeatherConditions>(s, out cond))
- {
- total |= cond;
- }
- }
-
- // Add the data to the list
- weatherData.Add(wr);
- }
- });
- }
- }
This looks like a lot, but it’s simply an XML parser, leveraging the XElement class. After opening up the file, we pull the file into an XElement object, then pluck out the station and weather (station data) information. The GetValue<T> and GetAttribute<T> functions are simple helpers to ease extracting typed data from the various nodes and coercing the types.
|
Note that I use Convert.ChangeType in the GetValue<T> and GetAttribute<T> functions. This is a pretty slow method – I would have been better off using a switch() statement on the data type and XmlConvert for performance reasons.
However, as this is code that only runs once, I didn’t bother to add the performance optimization. I did spend a lot of time on performance optimizations for reading the data, which we’ll cover in the next section.
|
There are only two “custom” operations in ParseWeatherData, to handle two custom data parsing condtions:
- Timezone offset. Each of the timestamps in the file is in local time. In order to adjust to UTC time we need to determine the time zone (based on the province field in the stations information, which we use to look up a TimeZoneInfo object from a static dictionary I defined at the bottom of the linq file). This is used as an argument to DateTimeOffset to shift the date to UTC.
- Weather conditions. The input XML file can define weather conditions as having multiple values. To support this in StreamInsight in a relatively straightforward fashion, I defined a bitwise [Flags] enum (WeatherConditions) that I fill in on lines 72-83.
Finally, we have our friendly neighborhood public void WriteEvents<T>(Stream stream, IEnumerable<T> events, Func<T, DateTimeOffset> dtFunc) method, which writes out each event to a .CSV file. It takes as arguments:
- Stream stream. The destination stream – taking a stream rather than a file name made it easy to substitute the GZipStream writer to easily add in compression.
- IEnumerable<T> events. The list of events to write out to the file.
- Func<T,DatetimeOffset> dtFunc. In order to easily stream events into StreamInsight, we need to know the temporal properties of the event (i.e. the StartTime). Since the CsvSequenceStore is generic, we hand in a function that identifies the temporal properties (in our case, returning e.Timestamp).
- public void WriteEvents<T>(Stream stream, IEnumerable<T> events,
- Func<T, DateTimeOffset> dtFunc)
- {
- var encodingArray = new byte[16000];
- var fields = typeof(T).GetProperties();
- var lastField = fields.Last();
-
- var sb = new StringBuilder();
- var str = String.Empty;
- var byteLen = 0;
-
- foreach (var e in events)
- {
- sb.Clear(); str = String.Empty; byteLen = 0;
-
- // Write out the event kind, start time and end time
- sb.Append("Point,");
- sb.Append(dtFunc(e).Ticks);
- sb.Append(",,");
-
- foreach (var o in fields)
- {
- sb.Append(o.GetValue(e, null).ToString());
- if (o != lastField)
- sb.Append(",");
- }
- sb.AppendLine();
- str = sb.ToString();
-
- byteLen = Encoding.ASCII.GetBytes(str, 0, str.Length, encodingArray, 0);
- stream.Write(encodingArray, 0, byteLen);
- }
- }
This is a very straightforward function. Using reflection, we obtain the list of public properties for the type (via GetProperties()), and use a StringBuilder to assemble the text. Wanted to avoid using String.Join(), hence remembering lastField. Then iterate through the list of properties, and use the reflection method GetValue to write out the string representation to the line.
As a base Stream class only understands writing out bytes, we convert the line into a byte array and write it out.
|
Note that I ASCII encoding here. Really should be using Unicode encoding, but I happen to know that the data is pure ASCII (at least it is THIS time). Should a future blog feature Unicode data, this line will change
|
After executing the script, I have a compressed .CSV file containing weather data. Let’s have a look at the contents. First step will be to unzip it into a plain .csv file (via the gzip.exe utility – I could write a script to do this, but we’ll get to using GzipStream to uncompress in the next section).
Now, we crack open our .CSV files with note and have a look (not that these only have 5 weather files in them, as I left the .Take() method uncommented on line 5).
Point,633979188000000000,,71628,1/1/2010 5:00:00 AM,-5.3,-6,95,9,15,4.8,100.03,0,-11,0
|
Excellent – we now have (mostly) human-readable data in a downloadable (i.e. small) format that we can extract quickly. On to extraction!
Reading back the canned data set
We’ll stay in LINQPad for the time being (will switch over to Visual Studio when it comes time to create the actual data context – feel free to work through this code in VS.NET if it’s more comfortable). Now that we have the canned data set (as our compressed .CSV file), we need to be able to read it back out again in a form that can be turned into a CepStream<T>.
|
Download the LINQ script Read_WeatherData. |
This is very similar, yet a little simpler, than the code which we used in the last section to write the data into the compressed CSV file. The parsing code is the same (also using the CsvSequenceStore class, only now using the ReadEvent<T> method in place of the WriteEvents<T> method. The new piece that has been introduced is the assign function, which defines how we map from the CSV format into POCO (plain old CLR object) format.
|
This doesn’t seem like a terribly generic way of implementing this, and its not. The reason I’m using a function delegate, not reflection (via PropertyInfo.SetValue() and Convert.ChangeType()) is that we’re now in performance critical code and those two methods were killing performance.
I’ll write the code for dynamically generating this function in a later blog, but for now if you’re interested in the performance numbers, head on over to my performance blog on this topic.
|
- void Main()
- {
- CsvSequenceStore store = new CsvSequenceStore();
- long count = 0;
-
- Action<string[], WeatherReading> assign = (str, e) =>
- {
- e.StationCode = Int32.Parse(str[0]);
- e.Timestamp = DateTime.Parse(str[1]);
- e.Temperature = Double.Parse(str[2]);
- e.DewpointTemperature = Double.Parse(str[3]);
- e.RelativeHumidity = Double.Parse(str[4]);
-
- e.WindDirection = Double.Parse(str[5]);
- e.WindSpeed = Double.Parse(str[6]);
- e.Visibility = Double.Parse(str[7]);
- e.Humidex = Double.Parse(str[8]);
- e.WindChill = Double.Parse(str[9]);
- e.WeatherConditions = Int32.Parse(str[9]);
- };
- using (FileStream fs = new FileStream(@"C:\temp\weather_data_out.csv.gz", FileMode.Open))
- {
- using (GZipStream zipStream = new GZipStream(
- fs, CompressionMode.Decompress))
- {
- var evts2 = store.ReadEvents<WeatherReading>(zipStream, assign);
- var weatherStream = evts2.Select (e => e.Payload)
- .Take(50);
- weatherStream.Dump("weather events");
- }
- }
- }
Executing this simple main function gives us the shiny weather events (50 of them, as limited by the Take() method on line 30):
The core of this approach lies in the ReadEvents<T> method, which is remarkably simple given the amount of code we’ve written to get to this point . Remembering that each line of CSV consists of the event shape (Point, Interval), the Start and End times, then the payload. We use a wrapper object, TypedEventPayload<T> to encapsulate the payload along with the event characteristics.
- public IEnumerable<TypedEventPayload<T>> ReadEvents<T>(Stream stream,
- Action<string[], T> assign) where T : new()
- {
- StreamReader sr = new StreamReader(stream);
- String line = null;
- var fields = typeof(T).GetProperties();
- var lastField = fields.Last();
-
- while ((line = sr.ReadLine()) != null)
- {
- if (line.StartsWith("EventShape,"))
- continue;
- string[] tokens = line.Split(new char[] { ',' });
- TypedEventPayload<T> ep = new TypedEventPayload<T>();
- ep.Payload = new T();
-
- ep.Shape = (EventShape)Enum.Parse(typeof(EventShape), tokens[0]);
- ep.StartTime = new DateTimeOffset(Int64.Parse(tokens[1]), TimeSpan.FromSeconds(0));
- if (String.IsNullOrEmpty(tokens[2]))
- ep.EndTime = ep.StartTime.AddTicks(1);
- else
- ep.EndTime = new DateTimeOffset(Int64.Parse(tokens[2]), TimeSpan.FromSeconds(0));
- assign(tokens.Skip(3).ToArray(), ep.Payload);
-
- yield return ep;
- }
- }
We now have an IEnumerable<T> which we can convert into a CepStream<T> via use of the ToPointStream method.
|
|
The really critical piece here is returning the events as an IEnumerable<T>, not as an array or list. If we had to load the entire file into memory before sending a single event to StreamInsight, that wouldn’t be performant from either a memory or a latency perspective. Instead, as we pull and deserialize events from the CSV file we yield them back.
This will allow the CepStream<T> to consume events as they are raised (which we’ll do in the next step).
|
Finally, we convert the IEnumerable<T> into a CepStream<T> and run some basic queries over it:
- var evts2 = store.ReadEvents<WeatherReading>(zipStream, assign);
- var weatherStream = evts2.Select (e => e.Payload)
- .ToPointStream(Application, t =>
- PointEvent.CreateInsert(t.Timestamp, t),
- AdvanceTimeSettings.IncreasingStartTime);
- var query = from e in weatherStream
- .TumblingWindow(TimeSpan.FromDays(1000), HoppingWindowOutputPolicy.ClipToWindowEnd)
- select new
- {
- Count = e.Count()
- };
Excellent – we now have a CepStream<T> – the only remaining step to having a canned data set is simple packaging
|
Wait! You’re probably looking at the IEnumerable<UntypedEventPayload> ReadEvents method and thinking to yourself “Mark.. that’s dumb. That won’t work, because of the IEnumerable state machine, and how Dispose is handled!”. And you’d be right.
Here’s the problem:
- The method ReadEvents assumes that someone else is responsible for initializing and disposing of the stream (and any underlying resources – such as the file handle).
- IEnumerable, and the corresponding yield statement, create an internal state machine when compiled (i.e. the enumeration uses deferred execution – the behavior we want). The IEnumerable is not finished with the underlying stream until it has enumerated through all of the available values (in our case read to the end of the file).
- As such, the lifetime of the Stream needs to be tied to the lifetime of the enumerator (as only the code that manages the enumerator knows when it is complete).
- Since this design has the stream managed separately from the enumerator, the underlying stream could be closed before the enumerator even begins to evaluate.
Our current code base works, as we force the entire query to complete before exiting the using block that creates the stream. In a LINQPad context wherein we need to raise the stream from a function and have no direct control over the lifetime of a query this will have the effect of closing the underyling file before any events are read.
We need to redesign our code to encapsulate the file reading into the same class that exposes IEnumerable, and handles stream cleanup correctly.
|
Reading back the canned data set – the Right Way!
Now, to take the prototype we built out in the last section, and put it in a form suitable for embedding into a library (which the LINQPad context will leverage). We’ll create a base class, SequenceBase, which encapsulates creating streams from files (including compressed files). This will allow us to more easily plug in different types of “serializers”.
SequenceBase is very straightforward, simply providing a helper function to create a new stream upon demand (to allow the enumerator to wrap it in a using() statement).
- public abstract class SequenceBase
- {
- private string _fileName;
- private bool _compress;
- private bool _open;
-
- protected Stream GetStream()
- {
- // If opening the file,Open/read data/allow others to read
- // If writing a new file,Create/write data/deny others access
- FileMode fMode = (_open) ? FileMode.Open : FileMode.Create;
- FileAccess aMode = (_open) ? FileAccess.Read : FileAccess.Write;
- FileShare fShare = (_open) ? FileShare.Read : FileShare.None;
-
- // Set the compression mode
- CompressionMode cMode = (_open) ? CompressionMode.Decompress
- : CompressionMode.Compress;
-
- // Create the base file stream
- var fs = new FileStream(_fileName, fMode, aMode, fShare);
- Stream _stream = fs;
-
- // If using Gzip compression, wrap the file stream
- if (_compress)
- {
- var zs = new System.IO.Compression.GZipStream(fs, cMode);
- _stream = zs;
- }
- return _stream;
- }
-
- public SequenceBase(string fileName, bool compress, bool open)
- {
- _fileName = fileName;
- _compress = compress;
- _open = open;
- }
- }
With this as a foundation, our Csv reader class becomes very straightforward to implement – essentially taking the contents of the ReadEvents<T> method from the previous section, and wrapping them up in a class derived from SequenceBase.
- public class CsvSequenceReaderTyped<T> :
- SequenceBase, IEnumerable<IntervalEvent<T>>
- where T : new()
- {
- protected Action<string[], T> _assign;
-
- public CsvSequenceReaderTyped(string fileName, bool compress,
- Action<string[], T> assign) : base(fileName, compress, true)
- {
- _assign = assign;
- }
-
- public IEnumerator<IntervalEvent<T>> GetEnumerator()
- {
- using (var stream = GetStream())
- {
- using (var sr = new StreamReader(stream))
- {
- String line = null;
- var fields = typeof(T).GetProperties();
- var lastField = fields.Last();
-
- while ((line = sr.ReadLine()) != null)
- {
- if (line.StartsWith("EventShape,"))
- continue;
- string[] tokens = line.Split(new char[] { ',' });
- var shape = (EventShape)Enum.Parse(typeof(EventShape), tokens[0]);
- var startTime = new DateTimeOffset(Int64.Parse(tokens[1]), TimeSpan.FromSeconds(0));
- DateTimeOffset endTime;
-
- if (String.IsNullOrEmpty(tokens[2]))
- endTime = startTime.AddTicks(1);
- else
- endTime = new DateTimeOffset(Int64.Parse(tokens[2]), TimeSpan.FromSeconds(0));
-
- var ep = IntervalEvent<T>.CreateInsert(
- startTime, endTime, new T());
- _assign(tokens.Skip(3).ToArray(), ep.Payload);
-
- yield return ep;
- }
- }
- }
- }
-
- System.Collections.IEnumerator System.Collections.IEnumerable.GetEnumerator()
- {
- return GetEnumerator();
- }
- }
Note that we assume that the assignment Action<string[], T> is handed in when the reader is created.
|
|
The really critical piece here is creating (via GetStream()) and disposing of (via the using statement) of our underlying file resources each time (which required that the resource management code – opening and closing files – be merged with the resource using code).
|
That’s it – now that we have our IEnumerable<T> wrapped up in a class that can close out the underlying file stream on Dispose(), we are ready to wrap it up in a LINQPad data context.
Creating a LINQPad data context which exposes the data set as a CepStream<>
Creating the custom data context will be the shortest section of this blog post . With a data source (either an IEnumerable<T>, IObservable<T> or a StreamInsight adapter) ready to go, all that stands between you and LINQPad data context goodness is exposing the CepStream<T> object in a class.
Really – that’s it. Here are the steps:
- Create a class that derives from StreamInsight Context.
- StreamInsightContext is defined in StreamInsightLinqPad.Samples.dll, which is typically found in C:\ProgramData\LINQPad\Drivers\DataContext\4.0\StreamInsightLinqPad (3d3a4b0768c9178e)
- Expose the two streams (weather data and station data), based on the code we explored in the reading back the canned data section).
Or, to look at the code:
- public class WeatherContext : StreamInsightContext
- {
- private static readonly string weatherFile;
- private static readonly string stationFile;
-
- static WeatherContext()
- {
- // Look for the data files in the same directory as this assembly
- var assemblyDir = Path.GetDirectoryName(
- Assembly.GetExecutingAssembly().Location);
- weatherFile = Path.Combine(assemblyDir, @"weather_data_out.csv.gz");
- stationFile = Path.Combine(assemblyDir, @"station_data_out.csv.gz");
- }
-
- public WeatherContext(Server server)
- : base(server)
- { }
-
- public CepStream<WeatherReading> SmallWeather
- {
- get
- {
- return new CsvSequenceReaderTyped<WeatherReading>
- (weatherFile, true, WeatherReading.GetFill()).Take(50)
- .ToStream(Application, AdvanceTimeSettings.IncreasingStartTime);
- }
- }
-
- public CepStream<WeatherReading> LargeWeather
- {
- get
- {
- return new CsvSequenceReaderTyped<WeatherReading>
- (weatherFile, true, WeatherReading.GetFill())
- .ToStream(Application, AdvanceTimeSettings.IncreasingStartTime);
- }
- }
- public CepStream<StationData> Stations
- {
- get
- {
- return new CsvSequenceReaderTyped<StationData>
- (stationFile, true, StationData.GetFill())
- .ToStream(Application, AdvanceTimeSettings.IncreasingStartTime)
- .AlterEventLifetime(e => new DateTime(2000, 1, 1, 0, 0, 0, DateTimeKind.Utc),
- e => TimeSpan.MaxValue);
- }
- }
- }
There are a few changes from the last section, to clean things up a bit in a project:
- The assignment functions are returned by static functions on the data types themselves (as opposed to public properties – didn’t want to have a non-StreamInsight compatible data type in the event type definitions).
- Instead of raising a generic wrapper class and then converting into PointEvent<T>, we instead raise TypedEvent<T> directly from the file (i.e. our enumerator is now IEnumerator<IntervalEvent<T>> GetEnumerator().
- The file names are inferred to be in the same directory as the context assembly.
- In the Stations stream, we perform an AlterEventLifetime to convert the list of stations into a reference stream by extending the time from January 1st 2000 (the timestamp of the first record in the data set), to max time.
- Ordinarily, this would be done with query logic in your application, but for ease of use in LINQPad (i.e. removing an extra step) I did it in the context.
Go ahead and compile the project, to obtain the WeatherData.LinqpadContext.dll. We’ll load this into LINQPad by
- Add Connection, then select Microsoft StreamInsight from the list of drivers.
- Select Custom Context from the Context Kind dropdown.
- Click on the ellipsis for Assembly Path (…), then browse to the directory containing WeatherData.LinqpadContext.dll.
- Click OK to finish selecting the new context.
|
|
Our weather context should now be available on the connections list. Before we can start querying these streams, we will need to take our data files (weather_data_out.csv.gz and station_data_out.csv.gz from our first step) and copy them to the assembly directory (in this case, the bin directory for our project).
If you’re not sure which directory you need to place the files in, simply run a query against the data context. The exception will show you the correct directory.
|
Now that we have our custom context ready to go, let’s run some queries.
Running some Queries
With the query context loaded up, let’s go ahead and run some queries against it.
- From LINQPad, click File, New Query.
- From the Language drop-down, select C# Statements.
- From the Database drop-down, select StreamInsight: WeatherContext
Now we’re ready to run some queries. Let’s start with a couple of basic one to look at the SmallWeather and Stations streams.
Excellent! One last little query to close out our walkthrough of creating a data context – join the reference stream with the small data stream and filter for a specific airport.
|
|
Remember – you can execute just the selected text in LINQPad by highlighting it, then pressing F5 (or clicking Query -> Execute), which is why all of the screenshots show highlighted text.
|

by community-syndication | Jan 4, 2011 | BizTalk Community Blogs via Syndication
Last month we released the VS 2010 Service Pack 1 (SP1) Beta. You can learn more about the VS 2010 SP1 Beta from Jason Zander’s two blog posts about it, and from Scott Hanselman’s blog post that covers some of the new capabilities enabled with it.
You can download and install the VS 2010 SP1 Beta here.
IIS Developer Express
Earlier this summer I blogged about IIS Developer Express. IIS Developer Express is a free version of IIS 7.5 that is optimized for developer scenarios. We think it combines the ease of use of the ASP.NET Web Server (aka Cassini) currently built-into VS today with the full power of IIS. Specifically:
- It’s lightweight and easy to install (less than 5Mb download and a quick install)
- It does not require an administrator account to run/debug applications from Visual Studio
- It enables a full web-server feature set – including SSL, URL Rewrite, and other IIS 7.x modules
- It supports and enables the same extensibility model and web.config file settings that IIS 7.x support
- It can be installed side-by-side with the full IIS web server as well as the ASP.NET Development Server (they do not conflict at all)
- It works on Windows XP and higher operating systems – giving you a full IIS 7.x developer feature-set on all Windows OS platforms
IIS Express (like the ASP.NET Development Server) can be quickly launched to run a site from a directory on disk. It does not require any registration/configuration steps. This makes it really easy to launch and run for development scenarios.
Visual Studio 2010 SP1 adds support for IIS Developer Express – and you can start to take advantage of this starting with last month’s VS 2010 SP1 Beta release.
Downloading and Installing IIS Developer Express
IIS Developer Express isn’t included as part of the VS 2010 SP1 Beta. Instead it is a separate ~4MB download which you can download and install using this link (it uses WebPI to install it).
Once IIS Express is installed, VS 2010 SP1 will enable some additional IIS Developer Express commands and dialog options that allow you to easily use it.
Enabling IIS Developer Express for Existing Projects
Visual Studio today defaults to using the built-in ASP.NET Development Server (aka Cassini) when running ASP.NET Projects:
Converting your existing projects to use IIS Developer Express is really easy. You can do this by opening up the project properties dialog of an existing project, and then by clicking the “web” tab within it and selecting the “Use IIS Express” checkbox.
Or even simpler, just right-click on your existing project, and select the “Use IIS Express” menu command:

And now when you run or debug your project you’ll see that IIS Express now starts up and runs automatically as your web-server:

You can optionally right-click on the IIS Express icon within your system tray to see/browse all of sites and applications running on it:

Note that if you ever want to revert back to using the ASP.NET Development Server you can do this by right-clicking the project again and then select the “Use Visual Studio Development Server” option (or go into the project properties, click the web tab, and uncheck IIS Express). This will revert back to the ASP.NET Development Server the next time you run the project.
IIS Developer Express Properties
Visual Studio 2010 SP1 exposes several new IIS Express configuration options that you couldn’t previously set with the ASP.NET Development Server. Some of these are exposed via the property grid of your project (select the project node in the solution explorer and then change them via the property window):

For example, enabling something like SSL support (which is not possible with the ASP.NET Development Server) can now be done simply by changing the “SSL Enabled” property to “True”:

Once this is done IIS Express will expose both an HTTP and HTTPS endpoint for the project that we can use:

SSL Self Signed Certs
IIS Developer Express ships with a self-signed SSL cert that it installs as part of setup – which removes the need for you to install your own certificate to use SSL during development. Once you change the above drop-down to enable SSL, you’ll be able to browse to your site with the appropriate https:// URL prefix and it will connect via SSL.
One caveat with self-signed certificates, though, is that browsers (like IE) will go out of their way to warn you that they aren’t to be trusted:

You can mark the certificate as trusted to avoid seeing dialogs like this – or just keep the certificate un-trusted and press the “continue” button when the browser warns you not to trust your local web server.
Additional IIS Settings
IIS Developer Express uses its own per-user ApplicationHost.config file to configure default server behavior. Because it is per-user, it can be configured by developers who do not have admin credentials – unlike the full IIS. You can customize all IIS features and settings via it if you want ultimate server customization (for example: to use your own certificates for SSL instead of self-signed ones).
We recommend storing all app specific settings for IIS and ASP.NET within the web.config file which is part of your project – since that makes deploying apps easier (since the settings can be copied with the application content). IIS (since IIS 7) no longer uses the metabase, and instead uses the same web.config configuration files that ASP.NET has always supported – which makes xcopy/ftp based deployment much easier.
Making IIS Developer Express your Default Web Server
Above we looked at how we can convert existing sites that use the ASP.NET Developer Web Server to instead use IIS Developer Express.
You can configure Visual Studio to use IIS Developer Express as the default web server for all new projects by clicking the Tools->Options menu command and opening up the Projects and Solutions->Web Projects node with the Options dialog:

Clicking the “Use IIS Express for new file-based web site and projects” checkbox will cause Visual Studio to use it for all new web site and projects.
Summary
We think IIS Express makes it even easier to build, run and test web applications. It works with all versions of ASP.NET and supports all ASP.NET application types (including obviously both ASP.NET Web Forms and ASP.NET MVC applications). Because IIS Express is based on the IIS 7.5 codebase, you have a full web-server feature-set that you can use. This means you can build and run your applications just like they’ll work on a real production web-server. In addition to supporting ASP.NET, IIS Express also supports Classic ASP and other file-types and extensions supported by IIS – which also makes it ideal for sites that combine a variety of different technologies.
Best of all – you do not need to change any code to take advantage of it. As you can see above, updating existing Visual Studio web projects to use it is trivial. You can begin to take advantage of IIS Developer Express today using the VS 2010 SP1 Beta.
Hope this helps,
Scott
by community-syndication | Jan 3, 2011 | BizTalk Community Blogs via Syndication
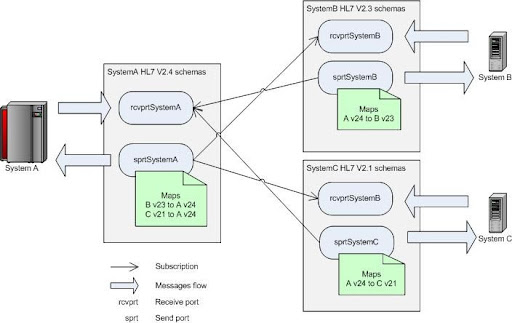
Microsoft BizTalk Accelerator for HL7 comes with multiple versions of the HL7 implementation. One of the typical integration tasks is to receive one format and transmit another. For example, system A works HL7 v2.4 messages, system B with v2.3, and system C with v2.2. The system A is exchanging messages with B and C. The logical solution is to create schemas in separate namespaces for each system and assign maps on send ports. Schematic diagram of the messaging solution is shown below:
Nothing is complex about that conceptually. On the implementation level things can get nasty though because of the elaborate nature of HL7 schemas and sheer amount of message types involved. If trying to implement maps directly in BizTalk Map Editor one would quickly get buried by thousands of links between subfields of HL7 segments. Since task is repetitive because HL7 segments are reused between message types it’s natural to take advantage of such modular structure and reduce amount of work through reuse. Here’s where it makes sense to switch from visual map editor to old plain XSLT. The implementation is done in three steps.
First, create XSL templates to map from segments of one version to another. This can be done using BizTalk Map Editor subsequently copying and modifying generated XSL code to create one xsl:template per segment. Group all segments for format mapping in one XSL file (we call it SegmentTemplates.xsl). Here’s how template for the PID segment (Patient Identification) would look like this:
<xsl:template name="PID">
    <PID_PatientIdentification>
      <xsl:if test="PID_PatientIdentification/PID_1_SetIdPatientId">
        <PID_1_SetIdPid>
          <xsl:value-of select="PID_PatientIdentification/PID_1_SetIdPatientId/text()" />
        </PID_1_SetIdPid>
      </xsl:if>
      <xsl:for-each select="PID_PatientIdentification/PID_2_PatientIdExternalId">
        <PID_2_PatientId>
          <xsl:if test="CX_0_Id">
            <CX_0_Id>
              <xsl:value-of select="CX_0_Id/text()" />
            </CX_0_Id>
          </xsl:if>
          <xsl:if test="CX_1_CheckDigit">
            <CX_1_CheckDigitSt>
              <xsl:value-of select="CX_1_CheckDigit/text()" />
            </CX_1_CheckDigitSt>
          </xsl:if>
          <xsl:if test="CX_2_CodeIdentifyingTheCheckDigitSchemeEmployed">
            <CX_2_CodeIdentifyingTheCheckDigitSchemeEmployed>
              <xsl:value-of select="CX_2_CodeIdentifyingTheCheckDigitSchemeEmployed/text()" />
            </CX_2_CodeIdentifyingTheCheckDigitSchemeEmployed>

. . . // skipped for brevity
This is the most tedious and time consuming part. Templates can be created for only those segments that are used in message interchange. Once this is done the rest goes much easier.
The next step is to create message type specific XSL that references (imports) segment templates XSL file. Inside this file simple call segment templates in appropriate places. For example, beginning of the mapping XSL for ADT_A01 message would look like this:
<xsl:importhref="SegmentTemplates_23_to_24.xslt"/>
<xsl:outputomit-xml-declaration="yes"method="xml"version="1.0"/>

<xsl:templatematch="/">
<xsl:apply-templatesselect="s0:ADT_A01_23_GLO_DEF"/>
</xsl:template>

<xsl:templatematch="s0:ADT_A01_23_GLO_DEF">
<ns0:ADT_A01_24_GLO_DEF>
<xsl:call-templatename="EVN"/>
<xsl:call-templatename="PID"/>
<xsl:for-eachselect="PD1_PatientDemographic">
<xsl:call-templatename="PD1"/>
</xsl:for-each>
<xsl:call-templatename="PV1"/>
<xsl:for-eachselect="PV2_PatientVisitAdditionalInformation">
<xsl:call-templatename="PV2"/>
</xsl:for-each>
This code simply calls segment template directly for required singular elements and in for-each loop for optional/repeating elements.
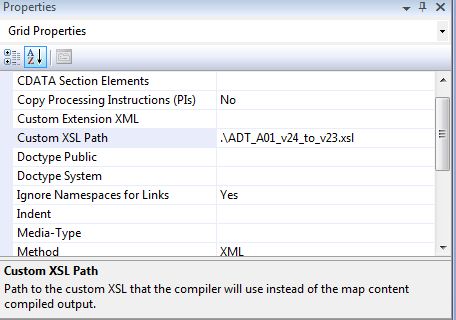
And lastly, create BizTalk map (btm) that references message type specific XSL. It is essentially empty map with Custom XSL Path set to appropriate XSL:
In the end, you will end up with one segment templates file that is referenced by many message type specific XSL files which in turn used by BizTalk maps. Once all segment maps are created they are widely reusable and all the rest work is very simple and clean.


