by Rene Brauwers | Apr 18, 2011 | BizTalk Community Blogs via Syndication
In our previous posts we’ve set up our Domain controller. This post will focus on prepping our other Servers which will be used and include:
- BizTalk Failover Servers
- SQL Server Failover Servers
- File Server
This posts will assume that you’ve already pre-installed 5 servers with Windows Server 2008R2, named your servers, assigned Fixed IP’s and hooked them up to your Domain.
Please be aware; this is a long blog-post; read it carefully and I recommend to follow the steps in the order as mentioned.
Prepping your File Server
Your File Server will fulfill a crucial part when setting up both your SQL and BizTalk Failover clusters as both of them require available storage which is to be used as:
- a witness (used to obtain majority for your clusters)
- a clustered SQL Resource
- a clustered MCDTC Resource
- a clustered MSMQ Resource
Adding the required features
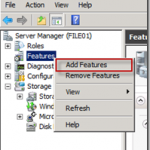
Once you’ve booted up your File Server and logged on to your domain, open up your Server Manager and ‘Right Click’ on Features and select ‘Add Features’.
A wizard will start and once you’re on the ‘Select Features’ screen, select the ‘Storage Manager for SAN’s feature and press next
On the ‘Confirmation Screen’ select ‘Install’.
Verify the installation results and click ‘Close’
Prepping your SQL Servers
Boot up one of your Servers (which will be used for SQL) and login with the domain admin account, open up your Server Manager and ‘Right Click’ on Features and select ‘Add Features’.
A wizard will start and once you’re on the ‘Select Features’ screen, select the ‘Failover Clustering’ feature and press ‘next’
On the ‘Confirmation Screen’ select ‘Install’.
Verify the installation results and click ‘Close’
Repeat the above mentioned steps for your second server which will be used for sql.
Prepping your BizTalk Servers
Boot up one of your Servers (which will be used for BizTalk) and login with the domain admin account.
Adding the required Roles and Role Services
open up your Server Manager and ‘Right Click’ on Roles and select ‘Add Roles’.
A wizard will start and once you’re on the ‘Select Server Roles’ screen, select the following Role ‘Application Server’. A message will appear informing you that some additional features are required. Select ‘Add Required Features’
Press ‘Next’ until you reach the ‘Select Role Services’ screen in order to add the ‘Application Server’ Role and the required Features
On the ‘Select Role Services’ Screen, select the ‘Web Server (IIS) Support’. A message will appear informing you that some additional features and/or role services are required. Select ‘Add Required Role Service’
Once done, ensure to select the the following Role Services as well:
- COM+ Network Access
- TCP Port Sharing
- HTTP Activation
- Message Queuing Activation
While selecting the Role Service ‘Message Queuing Activation’ a message will appear informing you that some additional features are required. Select ‘Add Required Features’
Continue with selecting the following Role Services:
- TCP Activation
- Named Pipes Activation
- Incoming Remote Transactions
- Outgoing Remote Transactions
- WS-Atomic Transactions
You should now have all Role Services selected, press ‘next’
You will asked to Choose a Server Authentication Certificate for SSL Encryption. Select the option “Choose a certificate for SSL encryption later’ and press ‘next
Now proceed until you reach the ‘Role Services’ Screen and check that all Role Services are checked with exception off the following:
- WebDav Publishing
- ASP
- CGI
- Server Side Includes
- Custom Logging
- ODBC Logging
- IIS 6 Scripting Tools
- IIS 6 Management Console
- FTP Service
- FTP Extensibility
- IIS Hostable Web Core
Press next, and conform the Installation Selections and then press Install
Check the results and click on Close
Adding the required Features (MSMQ)
Please note the following instructions (copied from : http://technet.microsoft.com/en-us/library/cc730960.aspx)
Setting Permissions in Active Directory Domain Services Before Installing the Routing Service or the Directory Service Integration Features of Message Queuing
The successful installation of the Routing Service feature on a Windows Server 2008 R2 computer that is not a domain controller, or the Directory Service Integration feature of Message Queuing on a Windows Server 2008 R2 computer that is a domain controller requires that specific permissions are set in Active Directory Domain Services. Follow these steps to grant the appropriate permissions in Active Directory Domain Services before installing these features.
To grant permissions for a computer object to the Servers object in Active Directory Domain Services before installing the Routing Service feature on a computer that is not a domain controller
- Click Start, point to Programs, point to Administrative Tools, and then click Active Directory Sites and Services to open Active Directory Sites and Services.
- Click to expand Active Directory Sites and Services, click to expand Sites, and then click to expand the site which this computer will be a member of.
- Right-click Servers and select Properties to display the Servers Properties dialog box.
- Click the Security tab of the Servers Properties dialog box.
- Click the Add button to display the Select Users, Computer, or Groups dialog box.
- Click the Object Types button to display the Object Types dialog box, click to enable Computers, and then click OK.
- Enter the name of the computer for which the Routing Service or Directory Service Integration feature will be installed, click Check Names, and then click OK.
- Enable the following permissions for this computer object:
- Allow Read
- Allow Write
- Allow Create all child objects
- After enabling these permissions, click Advanced to display the Advanced Security Settings for Servers dialog box.
- Select the computer object from the list of permission entries, and then click the Edit button.
- Select Thisobject and all descendant objects from the Apply to drop-down list, and then click OK.
- Click OK to close the Advanced Security Settings for Servers dialog box.
- Click OK to close the Server Properties dialog box.
open up your Server Manager and ‘Right Click’ on Features and select ‘Add Features’.
A wizard will start and once you’re on the ‘Select Features screen, expand the ‘Message Queuing’ Feature and ensure to select the all options with exception of:
Select ‘Next’ and confirm the Installation Selections. Once done press ‘Install’
Verify the Installation Results and then press ‘Close’
Adding the required Features (Failover Clustering)
open up your Server Manager and ‘Right Click’ on Features and select ‘Add Features’.
A wizard will start and once you’re on the ‘Select Features’ screen, select the ‘Failover Clustering’ feature and select ‘Next’
Confirm the option and select ‘Install’
Verify the Installation Results and then press ‘Close’
Repeat the above mentioned steps for your second server which will be used for BizTalk.
Adding Storage to your SQL and BizTalk Servers
At this point we will have prepped our File Server and all of of our BizTalk and SQL Servers, but we are not quite there yet.
As we are running our servers in a Virtual Environment and we don’t have dedicated storage servers we will need to ‘emulate’ this. In order to do this I’ve decided to use the iSCSI Target software which is part of the Windows Server 2008 Storage Server.
Please note that this is not part of the Windows Server 2008 .iso, you will actually need to download it from MSDN (http://msdn.microsoft.com/en-us/subscriptions/downloads/default.aspx)
Once you’ve downloaded the required iso, mount it using your favorite tool. Once you’ve mounted it you will see a self-extracting file named WSS2008R2+ISCSITarget33.exe
Click on it and within the destination folder you will find 2 iso files, one of them called iSCSI_Software_Target_33.iso .
Adding the required iSCSI software to your Servers
Hook this iSCSI_Software_Target_33 iso file up to your Virtual Machines. There are several ways to do this. Below a description on how I did this for my File Server.
Open up your Hyper-V manager, right click on your File Server and select ‘Settings’
Go to your DVD-Drive and within the media Group box select ‘image file’ and browse to the above mentioned iSCSI_Software_Target_33.iso
At this point you’ve mounted the iSCSI_Software_Target_33.iso to your server and now we can go back to our server and access the contents.
From your File Server, browse to your DVD-Drive and open up the Index.htm file
Install the iSCSI Software Target (x64)
This step only needs to be done on your File Server, and thus can be skipped for the 2 SQL Server Machines and 2 BizTalk Server Machines
On the welcome screen; press ‘Next’
Accept the End-User License Agreement
Choose a destination folder, and select ‘next’
Choose if you would like to join the Customer Experience Improvement Program
Choose if you want to use Microsoft Update
Install the iSCSI Software target
Finish the installation
Install the iSCSI Hardware Providers
Below mentioned steps, need to be executed on all servers with exception of your Domain Server.
Open the index.htm file once again and now select the VSS,VDS and HPC Hardware Providers (x64) link
On the welcome screen; press ‘Next’
Accept the End-User License Agreement
Choose ‘Typical installation’
Provide a domain user account and enter the according password
Choose if you want to use Microsoft Update
Install the Software Client Software
Finish the installation
Install the iSCSI Clients for the BizTalk and SQL Servers
Now log on to one of your SQL Machines, and go to start and type ‘iscsi initiator’ in the search box and hit enter.
You will be presented with a message stating that the iSCSI service is not running and you will be presented with the option to automatically start this service. Select ‘Yes’
At this point you will be presented with the iSCSI Initiator Properties screen.
Now go to the Configuration Tab, and make a note of the ‘Initiator Name’ (Write it down or even better Copy and Paste it into notepad, as we will use it later on)
Repeat the above mentioned steps for the other SQL Machine and both BizTalk Machines, eventually you should have made written down 4 Initiator names which should be something similar to the entries mentioned below
- iqn.1991-05.com.microsoft:sql001.lab.motion10.com
- iqn.1991-05.com.microsoft:sql002.lab.motion10.com
- iqn.1991-05.com.microsoft:bts001.lab.motion10.com
- iqn.1991-05.com.microsoft:bts002.lab.motion10.com
Adding Storage to be used
At this point we will have the required software installed on all of our servers and now it’s time to define some storage which will be made available to our BizTalk and SQL Server Machines.
In order to do this we will have to go back to our File Server; so go ahead and do this.
Creating your Virtual Disks
Once logged on. Go to the Server Manager, select Storage , expand Microsoft iSCSI Software Target and select devices and under actions select Create Virtual Disk
The Create Virtual Disk Wizard will now appear. Select ‘Next’
Now enter the path and Filename of the Virtual Disk you want to create. We will start of with creating a disk which will be used as our main database storage disk
Add the desired size
Add a description
Skip the “Access” part for now and select ‘Next’
Now complete the Wizard and once done select the ‘Finish’ button
Repeat the above mentioned steps for the following virtual disks
Eventually you should have a total of 8 virtual disks
Creating your iSCSI Targets
Now that we have created all of our virtual disks, it is time to create a dedicated BizTalk and SQL iSCSI Target and assign the designated disks to them.
In order to do this go to the Server Manager, select Storage , expand Microsoft iSCSI Software Target, select iSCSI Targets and right click and select ‘Create iSCSI Target’
The ‘Create iSCSI Target Wizard’ will pop up, select ‘Next’
Now we will have to enter the iSCSI Target Identification information. We will start with creating an Target for the BizTalk Failover Cluster. For the iSCSI Target Name enter ‘BIZTALK’ and for the description we’ll enter ‘BIZTALK TARGET’. Once done press ‘Next’
At this point in time you will be presented with the iSCSI Initiators Identifiers screen; in this screen we will be entering our previously written down initiator names; in my case the were:
- iqn.1991-05.com.microsoft:sql001.lab.motion10.com
- iqn.1991-05.com.microsoft:sql002.lab.motion10.com
- iqn.1991-05.com.microsoft:bts001.lab.motion10.com
- iqn.1991-05.com.microsoft:bts002.lab.motion10.com
Click on Advanced and then select ‘Add’
For Machine bts001 use the below mentioned information. Once done press ‘OK’
- iqn.1991-05.com.microsoft:bts001.lab.motion10.com
For Machine bts002 use the below mentioned information. Once done press ‘OK’ . Please note you will get a warning, but this warning can be ignored as we want to allow multiple initiators as we are setting up a cluster
- iqn.1991-05.com.microsoft:bts002.lab.motion10.com
Eventually you should end up with the following 2 entries:
Select ‘OK’ and then select ‘NEXT’ and then ‘FINISH’
Repeat the above mentioned steps however this time you will be creating a Target for your SQL Machines. Below the information as I have used
TARGET NAME: SQL2008
TARGET DESCRIPTION: SQL SERVER 2008 TARGET
IQN IDENTIFIERS USED:
Assigning the Virtual Disks to the correct iSCSI Targets
At this point we have defined our two targets, namely BIZTALK and SQL2008 and we’ve created our Virtual Storage Disks. The next step is to actually assign the Virtual Storage to the correct iSCSI target.
Adding the BizTalk Storage Disks to the BizTalk iSCSI Target
Open up Server Manager on your File Server. Select Storage , expand Microsoft iSCSI Software Target, select iSCSI Targets, Select the BizTalk target and right click it and select ‘Add Existing Virtual Disk to iSCSI Target’
Select all Virtual Disks which indicate that they are to be used by BizTalk and select OK. ( In my case I’ve named the Virtual disks in such a way that I can easily recognize which disks are to be used within the BizTalk Cluster as I used the term BTS)
Adding the SQL Storage Disks to the SQL2008 iSCSI Target
Open up Server Manager on your File Server. Select Storage , expand Microsoft iSCSI Software Target, select iSCSI Targets, Select the SQL2008 target and right click it and select ‘Add Existing Virtual Disk to iSCSI Target’
Select all Virtual Disks which indicate that they are to be used by SQL Server and select OK. ( In my case I’ve named the Virtual disks in such a way that I can easily recognize which disks are to be used within the SQL Cluster as I used the term SQL)
Hooking up your SQL and BizTalk machines to the intended iSCSI target
Now that we’ve created our designated Targets and assigned the designated Virtual disks to the target we need to configure the SQL and BizTalk machines such that they have access to these virtual disks.
In order to do this, log on to one of your SQL Machines open up the iSCSI Client. This is done by clicking on ‘Start’ and typing ‘iscsi initiator’ in the search box. Now hit ‘enter’.
You are now presented with the iSCSI Initiator properties screen. Go to the ‘Discovery’ tab and select the “Discover Portal… button”
Now enter the IP Address or the DNS name of your File Server; in my case this would be the EUROPOORT, and select ‘OK’
You should now see your portal in the Target Portals Group Box.
Now select the “Targets” Tab, and you should see a Discovered Target IQN which is inactive.
Select the discovered Target and click on the Connect button
A popup box will appear, just click on “OK”
At this point your first SQL Machine is connected to its dedicated SQL2008 Target
Press OK, and repeat the above mentioned steps for the other SQL Machine and the other BizTalk machines.
Closing Note
Well it has been a long read (and not to forget quite a long write ) but this sums up part 4. So far we’ve accomplished the fundamental preparations required in order for us to proceed with the actual installment and configuration of the BizTalk and SQL Cluster.
So what to expect in the near future; well part 5 will cover setting up the SQL Cluster which includes
- Clustering the DTC
- Actually Installing and Clustering SQL Server
part 6 will cover setting up the BizTalk cluster which includes
- Clustering DTC
- Clustering IIS
- Clustering MSMQ
- Installing and configuring BizTalk
- Clustering the SSO
- Clustering BizTalk
I actually hope to finish up these series this month, but I can’t make a promise as I have a few exams to prepare including 70-595 (BTS 2010) and 70-432 (SQL Server 2008)
Well I hope you enjoyed the posts so far, check back soon and feel free to leave any comments, remarks and/or suggestions with regards to Blog posts you would like to see in the future.
Cheers
René

by community-syndication | Apr 18, 2011 | BizTalk Community Blogs via Syndication
Last year I did a post on table operations on SQL Server Table with WCF-SQL Adapter from BizTalk on SQL. Now I like to do similar thing on table in Oracle 11g Express database using the Oracle Binding from BizTalk Adapter Pack 2010. Oracle 11g Express Edition is available through OTN. For downloading software you will need to have an account!
It is important that when accessing Oracle you have appropriate client installed. This can sometimes be a hassle if you do not know, which client you need. When you trying to connect to Oracle you will get error messages like:
Connecting to the LOB system has failed.
Could not load file or assembly ‘Oracle.DataAccess, Version=2.111.7.0, Culture=neutral, PublicKeyToken=89b483f429c47342’ or one of its dependencies. The system cannot find the file specified..
This can be pretty annoying, but there is documentation that can help you going the right direction. In installation documentation I read that supported versions are:
- Oracle database version 11.1,
- Oracle database version 10.2,
- Oracle database version 10.1,
- Oracle database version 9.2
And supported client versions:
- Oracle Data Access Components for Oracle Client 11.1.0.6 with Patch Set 11.1.0.7,
- Oracle Data Access Components for Oracle Client 11.1.0.7
Installing Oracle 11g Client Release 2
I basically need the Oracle 11g client and I downloaded the latest release 2 version. I installed the Oracle 11g XE and installed the 11g client release 2. The following steps describe the process of installation. First click setup in client folder after having unzipped the win32_11gR2_client.rar file.
Select InstantClient and click Next.

Select location to install the client and click next.

You’ll be presented a summary of selected options. You can click finish.

Installation of Oracle client will start.

When installation is finished you can click close. To verify if the Oracle.Database Assembly is present view the assembly cache.

As you can see I installed the x86 client and have the appropriate assemblies version 2.112.2.0.
BizTalk Project and generate schema (’s)
First, we need the XML schemas, which represent our data source. With proper installation of BizTalk Server 2010 Adapter Pack (see my post on its installation), you will have a metadata browser built into Visual Studio. NET at your disposal. Create a visual studio BizTalk project. Then you can access the metadata browser from a BizTalk project by right-clicking the project, choosing Add then Generated Items and selecting Consume Adapter Service.

Click Add. This action opens a new window that provides us the interface to connect to, browse, and select database objects for service interaction. The very first thing we need to do here is choose the oracleDBBinding as the service binding, and then configure a connection string. The simplest working connection string consists of an Initial Catalog value for the database, and a valid Server name entry. Note that the adapter now uses a connection string in the form of a URI instead of the traditional Data Source=;Initial_Catalog=;User_ Id=;Password= style.

Once a satisfactory connection string is defined, the Connect button can be clicked to establish an active connection to the target database. If the connection is successful, one see the category browser with a set of database object categories.

On the root “/” character a range of un-typed generic functions are displayed, which can be exploited. Click on tables and you will see a number of Tables, select Employee.

Click the Delete, Insert, Select and Update statement in available categories and operations. Click the Add button to add the operations.After clicking the Ok button at the bottom, schema (and a single binding file) is added to our associated BizTalk project in Visual Studio.NET.

The binding can be used later, when solution is deployed and ports have to be configured for Oracle 11g Express (i.e. Send Port).
Create message instances
Next step is to generate messages from generated schema, which can be routed from Recieve location in Receive Port to a send port with WCF-OracleDb Adapter (messaging based solution). Generating the messages is easy, by opening first OracleDBBindingHR.Table.EMPLOYEES.xsd in file-editor you can move the desired operation to top, so you can then in Visual Studio generate the next instance for an operation or you can use XML-Editor inside Visual Studio (closing schema, right click and select open with and then select XML Editor) to move elements around. In end you will have four xml instance for TableOperations, save to file as xml (type all files, encoding UTF-8!).
Select
<ns0:Select xmlns:ns0=”http://Microsoft.LobServices.OracleDB/2007/03/HR/Table/EMPLOYEES”>
<ns0:COLUMN_NAMES>COLUMN_NAMES_0</ns0:COLUMN_NAMES>
<ns0:FILTER>FILTER_0</ns0:FILTER>
</ns0:Select>
Update
<ns0:Update xmlns:ns0=”http://Microsoft.LobServices.OracleDB/2007/03/HR/Table/EMPLOYEES”>
<ns0:RECORDSET>
<ns0:EMPLOYEE_ID>70</ns0:EMPLOYEE_ID>
<ns0:FIRST_NAME>FIRST_NAMEFIRST_NAME</ns0:FIRST_NAME>
<ns0:LAST_NAME>LAST_NAMELAST_NAMELAST_NA</ns0:LAST_NAME>
<ns0:EMAIL>EMAILEMAILEMAILEMAILEMAIL</ns0:EMAIL>
<ns0:PHONE_NUMBER>PHONE_NUMBERPHONE_NU</ns0:PHONE_NUMBER>
<ns0:HIRE_DATE>1999-05-31T13:20:00.000-05:00</ns0:HIRE_DATE>
<ns0:JOB_ID>JOB_IDJOB_</ns0:JOB_ID>
<ns0:SALARY>4</ns0:SALARY>
<ns0:COMMISSION_PCT>32</ns0:COMMISSION_PCT>
<ns0:MANAGER_ID>2</ns0:MANAGER_ID>
<ns0:DEPARTMENT_ID>81</ns0:DEPARTMENT_ID>
</ns0:RECORDSET>
<ns0:FILTER>FILTER_0</ns0:FILTER>
</ns0:Update>
Insert
<ns0:Insert xmlns:ns0=”http://Microsoft.LobServices.OracleDB/2007/03/HR/Table/EMPLOYEES”>
<ns0:RECORDSET>
<ns0:EMPLOYEESRECORDINSERT>
<ns0:EMPLOYEE_ID InlineValue=”InlineValue_0″>10.4</ns0:EMPLOYEE_ID>
<ns0:FIRST_NAME InlineValue=”InlineValue_0″>FIRST_NAME_0</ns0:FIRST_NAME>
<ns0:LAST_NAME InlineValue=”InlineValue_0″>LAST_NAME_0</ns0:LAST_NAME>
<ns0:EMAIL InlineValue=”InlineValue_0″>EMAIL_0</ns0:EMAIL>
<ns0:PHONE_NUMBER InlineValue=”InlineValue_0″>PHONE_NUMBER_0</ns0:PHONE_NUMBER>
<ns0:HIRE_DATE InlineValue=”InlineValue_0″>1999-05-31T13:20:00.000-05:00</ns0:HIRE_DATE>
<ns0:JOB_ID InlineValue=”InlineValue_0″>JOB_ID_0</ns0:JOB_ID>
<ns0:SALARY InlineValue=”InlineValue_0″>10.4</ns0:SALARY>
<ns0:COMMISSION_PCT InlineValue=”InlineValue_0″>10.4</ns0:COMMISSION_PCT>
<ns0:MANAGER_ID InlineValue=”InlineValue_0″>10.4</ns0:MANAGER_ID>
<ns0:DEPARTMENT_ID InlineValue=”InlineValue_0″>10.4</ns0:DEPARTMENT_ID>
</ns0:EMPLOYEESRECORDINSERT>
</ns0:RECORDSET>
<ns0:COLUMN_NAMES>COLUMN_NAMES_0</ns0:COLUMN_NAMES>
<ns0:QUERY>QUERY_0</ns0:QUERY>
</ns0:Insert>
Delete
<ns0:Delete xmlns:ns0=”http://Microsoft.LobServices.OracleDB/2007/03/HR/Table/EMPLOYEES”>
<ns0:FILTER>FILTER_0</ns0:FILTER>
</ns0:Delete>
Build and deploy the BizTalk project
Only schemas are required for a messaging only scenario with WCF-Oracle Adapter to perform operations on Oracle 11g XE database. Therefore after assigning a strong name and application name to BizTalk project it can be build and deployed.

Configure the application
After solution has been deployed it is time to configure the ports. FILE ports are easy and focus here will be configuring the WCF-Oracle Send Port. Through BizTalk Management Console one can browse to OracleTableOperations application and right click the application and select Import Bindings and navigate to file called WcfSendPort_OracleDBBinding_Custom.bindinginfo.xml, select and click Open. You will notice that a Send Port will be created automatically.

If you look at created send port and configuration you will notice that everything is there. Although having all operations in one action mapping is not going to work. If you try to send message with select statement to BizTalk you will get following error:
The adapter failed to transmit message going to send port “WcfSendPort_OracleDBBinding_HR_Table_EMPLOYEES_Custom” with URL “oracledb://win-8bpntqktj5m:1521/XE/Dedicated”. It will be retransmitted after the retry interval specified for this Send Port. Details:”System.InvalidOperationException: An action mapping was defined but BTS.Operation was not found in the message context.
Reason that this error appears is that an action header consisting of four actions is not clear to system. It cannot determine which one the appropriate one was. So taking it down to a one line/action declaration corrected the problem.I had to create three similar send ports based on first generated send port. Other step is setting filters on WCF-Send Port and File Send Port. Configuration is as follows:
| Port Name |
Type |
Filter |
| RecvPortOracleOpsIn |
FILE |
None |
| SendPortOracleOpsOut |
FILE |
BTS.MessageType == http://Microsoft.LobServices.OracleDB/2007/03/HR/Table/EMPLOYEES#SelectResponse
Or
BTS.MessageType == http://Microsoft.LobServices.OracleDB/2007/03/HR/Table/EMPLOYEES#InsertResponse
Or
BTS.MessageType == http://Microsoft.LobServices.OracleDB/2007/03/HR/Table/EMPLOYEES#UpdateResponse
Or
BTS.MessageType == http://Microsoft.LobServices.OracleDB/2007/03/HR/Table/EMPLOYEES#DeleteResponse
|
| WcfSendPort_OracleDBBinding_HR_Table_EMPLOYEES_Custom |
WCF-Custom |
BTS.MessageType == http://Microsoft.LobServices.OracleDB/2007/03/HR/Table/EMPLOYEES#Select |
| WCFSndPort_OracleDBBinding_HR_TABLE_INSERT |
WCF-Custom |
BTS.MessageType == http://Microsoft.LobServices.OracleDB/2007/03/HR/Table/EMPLOYEES#Insert |
| WCFSndPort_OracleDBBinding_HR_TABLE_UPDATE |
WCF-Custom |
BTS.MessageType == http://Microsoft.LobServices.OracleDB/2007/03/HR/Table/EMPLOYEES#Update |
| WCFSndPort_OracleDBBinding_HR_TABLE_DELETE |
WCF-Custom |
BTS.MessageType == http://Microsoft.LobServices.OracleDB/2007/03/HR/Table/EMPLOYEES#Delete |
Next error I ran into was the following, when I tried testing with SelectStatement message:
The adapter failed to transmit message going to send port “WcfSendPort_OracleDBBinding_HR_Table_EMPLOYEES_Custom” with URL “oracledb://win-8bpntqktj5m:1521/XE/Dedicated”. It will be retransmitted after the retry interval specified for this Send Port. Details:”Microsoft.ServiceModel.Channels.Common.MetadataException: Metadata resolution failed for OperationId: “http://Microsoft.LobServices.OracleDB/2007/03/HR/Table/EMPLOYEES/Select”. —> Microsoft.ServiceModel.Channels.Common.ConnectionException: Due to an Oracle Client limitation, the adapter failed to open a connection. This is because either (a) ambient transaction is present and the TNS alias is longer than 39 characters, or (b) ambient transaction is present and a non-TNS based URI was used. To resolve this, use a TNS alias to connect to Oracle and make sure it is not more than 39 characters.
To resolve this error I had to change the following properties in the oracleDBbinding:
- “enableBizTalkCompatibilityMode” = True (for some reasons this i set to false per default)
- “useAmbientTransaction” = False
I also like to note that format of filter for instance in select statement has to be correct or you will run into this error:
The adapter failed to transmit message going to send port “WcfSendPort_OracleDBBinding_HR_Table_EMPLOYEES_Custom” with URL “oracledb://win-8bpntqktj5m:1521/XE/Dedicated”. It will be retransmitted after the retry interval specified for this Send Port. Details:”Microsoft.ServiceModel.Channels.Common.TargetSystemException: ORA-00936: missing expression —> Oracle.DataAccess.Client.OracleException: ORA-00936: missing expression
My first message looked like:
<Select xmlns=”http://Microsoft.LobServices.OracleDB/2007/03/HR/Table/EMPLOYEES”>
<COLUMN_NAMES>*</COLUMN_NAMES>
<FILTER>where LAST_NAME=’King'</FILTER>
</Select>
As I assumed the syntax would be similar to WCF-SQL, but that was not the case. It should be:
<Select xmlns=”http://Microsoft.LobServices.OracleDB/2007/03/HR/Table/EMPLOYEES”>
<COLUMN_NAMES>*</COLUMN_NAMES>
<FILTER>LAST_NAME=’King'</FILTER>
</Select>
Outcome of this message the following:

And in Oracle there are two employees with last name King.

Next thing I tried was an update using following statement:
<Update xmlns=”http://Microsoft.LobServices.OracleDB/2007/03/HR/Table/EMPLOYEES”>
<RECORDSET>
<EMAIL>JAKING</EMAIL>
</RECORDSET>
<FILTER>EMPLOYEE_ID=156</FILTER>
</Update>
Which resulted in following response:


To insert new employee I used the following message:
<Insert xmlns=”http://Microsoft.LobServices.OracleDB/2007/03/HR/Table/EMPLOYEES”>
<RECORDSET>
<EMPLOYEESRECORDINSERT>
<EMPLOYEE_ID>207</EMPLOYEE_ID>
<FIRST_NAME>Steef-Jan</FIRST_NAME>
<LAST_NAME>Wiggers</LAST_NAME>
<EMAIL>SWIGGERS</EMAIL>
<PHONE_NUMBER>0123456789</PHONE_NUMBER>
<HIRE_DATE>1999-05-31</HIRE_DATE>
<JOB_ID>IT_PROG</JOB_ID>
<SALARY>100000</SALARY>
<COMMISSION_PCT>0.35</COMMISSION_PCT>
<MANAGER_ID>100</MANAGER_ID>
<DEPARTMENT_ID>60</DEPARTMENT_ID>
</EMPLOYEESRECORDINSERT>
</RECORDSET>
</Insert>
And response message is similar to update.


Finally I deleted the previous inserted employee with delete statement:
<Delete xmlns=”http://Microsoft.LobServices.OracleDB/2007/03/HR/Table/EMPLOYEES”>
<FILTER>EMPLOYEE_ID=207</FILTER>
</Delete>
The response was:


As result no data was found. As you can see it looks pretty straight forward, but takes some effort to setup things. You can find other Oracle sample for BizTalk 2010 Adapter pack here.
Technorati: biztalk server 2010
by community-syndication | Apr 16, 2011 | BizTalk Community Blogs via Syndication
Some time back I teased about something called Round Table, and the time has come to let the lid off of the idea. Round Table is an idea that some of my friends and I are putting out there, a model which we believe in and are open to discussing with others.
Round Table’s Mission
Round Table seeks to improve the lives of our members through a focus on mentorship, accountability, and personal relationships.
We seek to live lives of constant learning through mentorship. It is our highest desire to see members grow together both by sharing knowledge, and openly discussing areas in need of growth.
We acknowledge that speaking openly about goals and challenges brings accountability. Our members should help each other to achieve dreams, and to develop the skills necessary to conquer challenges.
We hope to forge lasting personal relationships. As we support each other, we build trust and camaraderie that can last a lifetime.
Is Round Table A Group?
No, Round Table is a template for groups. Unlike most User Groups, Round Table seeks to lay out a plan based on mentorship. We expect some of you out there will either start your own group, or join one that someone else starts.
But, there isn’t anything about technology in that statement?!?
You are correct. We believe these principles transcend technology, and encourage the formation of groups under the Round Table banner which are related to any field or interest.
Are there dues, or something?
No, all we ask for now is that if you are interested in founding a Round Table group that you send an email to [email protected] and let us know about your group. If the idea takes off, we will at least have a list of groups.
Are you going to found a group Tim?
Already have!
Round Table Craftsmen is our first such group, focused on those in the software development profession. We seek to grow our skills as technologists, and share those skills with others, while achieving our professional and personal goals. We will meet monthly to work on software and discuss our goals and challenges. If you would like to join us, we encourage you to speak to one of our members:
Blog Post by: The Admin


