by community-syndication | Sep 13, 2012 | BizTalk Community Blogs via Syndication
As an BizTalk Administrator/Technical Application Engineer, I regularly need to fix problems with BizTalk that I am not able to fix easily with the out-of-the-box tools. For example, at the moment we experience an issue which leads to suspended messages on a particular receive location. To fix that issue I need easy access to these suspended messages and their content. Off course I can get to the content with the BizTalk Administration Console, but because I need to fix about 50 of those messages per day (awaiting a structural solution), I need easier access to the MessageBoxDb to save time and to prevent myself from RSI, due to so many mouse clicks.
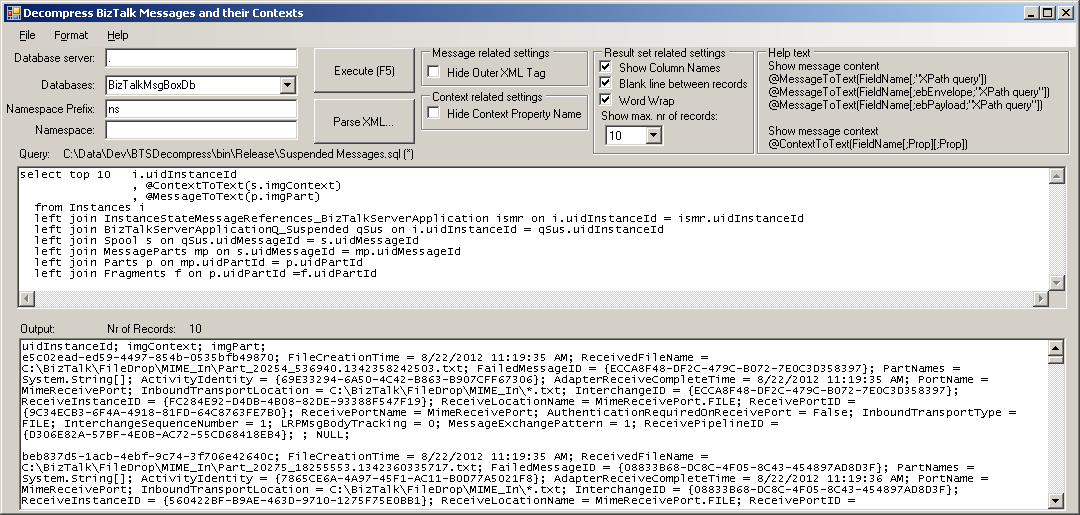
Since a couple of years I maintain BTSDecompress on CodePlex. This tool enables me to query the BizTalk databases and retrieve message content and context. Although this tool works fine for me, the main disadvantage is that, until now, it only supported BizTalk 2006. Therefore only a limited group of BizTalk users could potentially benefit of this software.
Because of the issue I mentioned in the first paragraph, lately I’ve been working a lot on that tool. It has reached version 1.5 and in this version a number of important improvements have been applied. Here follows a list of the most important changes:
Support of BizTalk releases
– BizTalk 2006
– BizTalk 2010
– BizTalk 2010 R2 CTP
I expect BTSDecompress to work with the other major BizTalk releases as well (2004, 2006 R2, 2009), but I did not (yet) test it, so I don’t mention these versions here.
Support of Windows versions
– Windows Server 2003
– Windows Server 2008 R2
– Windows 7
I expect BTSDecompress to work with the other major Windows versions as well (XP, Vista, 2008), but I did not (yet) test it, so I don’t mention these versions here.
Query maintenance
It is now possible to Create, Open, Save and Save As queries. This makes it a lot easier to maintain multiple queries.
ebXML support
It was already possible to fire XPath queries on the message content, but you can now do that as wel upon ebXML headers and envelopes.
Where to find
BTSDecompress is Open Source software and can be found here:
btsdecompress.codeplex.com
by community-syndication | Sep 13, 2012 | BizTalk Community Blogs via Syndication
We recently announced the availability of BizTalk Server 2010 R2 CTP. BizTalk Server 2010 R2 comes with a lot of features to take advantage of the whole cloud push. In the last post, we have shown how you could leverage the power of the Azure IaaS cloud to get your BizTalk deployments up and running in no time. In this post, we will talk another feature which will help you take advantage of the cloud – the Service Bus Messaging adapter. The Service Bus Messaging adapter, in a nutshell, allows BizTalk Server to read and send messages to Azure Service Bus Queues and Topics/Subscriptions.
The presence of a messaging infrastructure on the cloud has many advantages – which is not the subject of this blog, but is well documented elsewhere. Let us take a simple scenario: Our customer is an insurance company and it deals with multiple partners who help in administering insurances to the end customers. An on-premise BizTalk Server would handle insurance claims coming from multiple partners. Each of the partners submits these claims to an incoming Service Bus queue. BizTalk Server picks up these claims from the incoming queue and processes them. Once it is done, BizTalk Server would publish the status of the claims to an outgoing topic. The partners could create a subscription on the topic to receive the claim status. Such a scenario that leverages Azure Service Bus can now be easily integrated with BizTalk Server with the new Service Bus Messaging adapter. Let us have a quick walk through of this adapter.
Getting Started
In order to get started, you will need two things: A Windows Azure Service Bus namespace and BizTalk Server 2010 R2 CTP. You can get both of these on Windows Azure – sign up for a free trial here if you do not have one. Now, as outlined in this article, you can create your queue/topic. And as outlined here you can quickly create an instance of BizTalk Server 2010 R2 CTP running in a Windows Azure Virtual Machine.
Receiving messages from a Queue or a Subscription
BizTalk Server 2010 R2 provides a receive adapter to fetch messages from a Windows Azure Service Bus queue or a subscription. The receive adapter is one-way and will work with messages that you post on the queue. The adapter is simple to set up and configure. You just need to provide the URL of the Service Bus queue or subscription from where you need to pick the messages from and the credentials for authenticating with Service Bus. To set up a receive adapter for Service Bus Queue:
(1) Create a one-way receive port in your BizTalk application.
(2) Create a new receive location and select “SB-Messaging” as the Transport Type as shown below.
(3) Click on “Configure” to configure the properties of the receive location. In the transport properties General Tab, specify the URL for the queue or subscription from where BizTalk Server needs to fetch message from. You could also configure connection properties like open/close/receive timeout as well as the prefetch count. The Prefetch Count specifies the number of messages that BizTalk Server will fetch at a time. This can help increase the throughput of the adapter as well.
(4) On the Authentication Tab, you need to specify how BizTalk Server will fetch the required ACS Token for authenticating with Service Bus. You can read on how Service Bus uses Access Control Service for authentication here. In a nutshell, you will need to specify the Access Control Service URL for the service namespace. It is usually derived from the service bus namespace (suffixed with “-sb”) and you will only need to update the service namespace in the default template. You can find this in the Azure management portal as well. You also need to specify an issuer name and issuer key. You will need to ensure that the service identity has a Listen claim. If you are using the default service identity (“owner”), it will have the necessary claims.
(5) Click on “OK” or “Apply” to create the Receive Location.
You can then start your Receive Location and BizTalk Server will now start to fetch messages from the Queue or subscription. Easy!
Handling Brokered Message Properties in Receive Adapter
The SB-Messaging receive adapter understands BrokeredMessage properties. This means two things. First, BizTalk Sever 2010 R2 comes with a predefined property schema for all the standard properties of a BrokeredMessage. The adapter will also promote these properties automatically for you. Second, the adapter can write custom user-defined Brokered Message properties in the BizTalk message context. And, if you desire, you could also promote them. Promoting them will allow you to use them in your routing filters. For example, for our insurance claims applications, different applications could be routed based on who the type of insurance, the partner, the claim amount, etc. These properties could be defined as Brokered Message properties and passed on with the incoming message. These properties could be used to route the message to different backend systems or workflows/orchestrations in BizTalk Server. To promote the properties though, you need to create and add a property schema in your BizTalk application. Then, on the properties Tab of the adapter, you could specify the namespace for your schema and check the option to promote the property.
Sending messages to a Queue or a Topic
BizTalk Server 2010 R2 also provides a send side adapter for posting messages to a Service Bus Queue or Topic. This is a one-way send adapter. To set up a send port for posting messages to a Service Bus Queue or a Topic:
(1) Create a Send Port and select SB-Messaging as the Transport Type. Click Configure to configure the properties of the adapter.
(2) Click “Configure” to configure the transport properties of the send adapter. You need to specify the URL of the Service Bus Queue or Topic where the message should be posted.
(3) On the Authentication Tab, you enter the credentials for authenticating with Service Bus. This is the same as you see on the receive adapter.
(4) Click on “OK” to save the transport properties of the adapter.
(5) Specify the other properties of your Send port like pipeline, handler, Filters, etc.
(6) Click “OK” to finish creating your Send port.
Now, you can enlist and start the send port. The adapter will now post outgoing BizTalk message to the Service Bus queue or topic.
Handling Brokered Message Properties in Send Adapter
As in the case of receive adapter, the send adapter is aware of Brokered Message properties. If the outgoing BizTalk message has any of the standard Brokered Message in its context, the adapter will automatically set them as Brokered Message property. In addition, you could also specify defaults as part of the Send port properties. For custom user defined Brokered Message, you could specify a namespace as part of the adapter configuration. The adapter will take any property in that namespace and set them as Brokered Message Properties.
Finally, a note on serialization
When you start using the adapter, you may find that the message you receive in BizTalk Server is garbled – especially if you are using the Service Bus .NET API. Let me explain why this happens and what the adapter expects.
The Service Bus messaging adapter just fetches the stream in the incoming message and submits it to BizTalk Server. While sending out a BizTalk message, it simply uses the content as a stream. We preserve the message format on the wire. So, if you write or read the stream directly in your code, say using the Service Bus REST API, you would see the same data in the payload as you would expect. However, if you are using the Service Bus .NET API, you may find that there is a serialization issue if you use the default serializer (DataContractSerializer with binary XmlDictionaryWriter). This is because the default serializer in the Brokered Message .NET API uses Binary encoding. To avoid this issue, you will need to use Text by explicitly provide your own serializer, instead of the default serializer.
For sending message:
// For sending message using DataContractSerializer with Text encoding
var message = new BrokeredMessage(data, new DataContractSerializer(typeof(MyDataType)));
While reading the message:
// For receiving message using a DataContractSerializer with Text encoding
var data = message.GetBody<MyDataType>(new DataContractSerializer(typeof(MyDataType)));
You could, of course, directly read the stream as well. For a detailed write-up on the content serialization of Service Bus messages, you can refer to this blog post.
Next Steps
This post provides an overview of the new Service Bus messaging adapter in BizTalk Server 2010 R2. This is one of the new features that we have enabled with BizTalk Server 2010 R2. With this adapter, BizTalk Server can seamlessly integrate with your applications that leverage the Windows Azure Service Bus Queues and Topics. We encourage you to try out this feature and provide your comments and feedback. You can use the BizTalk forum to post your questions/queries as well.
Thanks
BizTalk Server Team
Blog Post by: BizTalk Blog

by community-syndication | Sep 13, 2012 | BizTalk Community Blogs via Syndication
Often ignored, but a really important, persistence points in Biztalk are the key issue in dealing with Orchestration Performance. Many applicative problem come from a misunderstanding of this concept. Sandro perreira (a great biztalk MVP) wrote a great article about it :http://sandroaspbiztalkblog.wordpress.com/2009/10/23/biztalk-orchestration-%E2%80%93-understanding-persistence-points/ You should read it, All BizTalk developper must be careful to those concepts […]
Blog Post by: Jeremy Ronk
by community-syndication | Sep 12, 2012 | BizTalk Community Blogs via Syndication
In my previous post I discussed ways to setup a BizTalk Server 2010 R2 CTP Virtual Machine in Azure. The post demonstrates how a VM with the BizTalk Server 2010 R2 is provisioned using CREATE CREATE. However the BizTalk Server 2010 R2 is installed on the VM, but not yet configured!
Ergo you have to do that yourself!
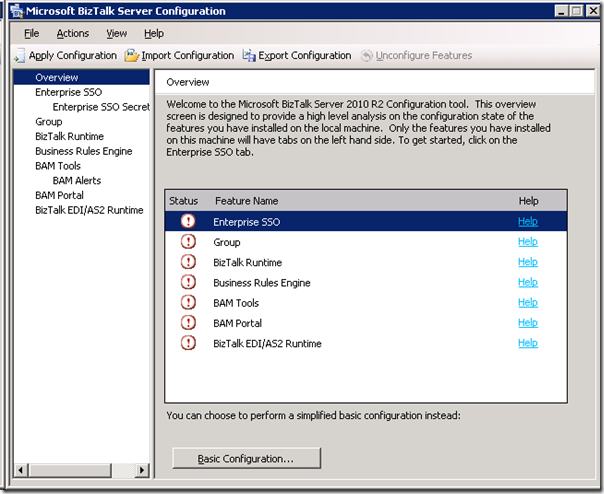
This is pointed out in Getting started with BizTalk Server 2010 R2 CTP in Windows Azure Virtual Machines post by BizTalk Server Team. However, it explains to do a basic configuration, while I choose to do a custom configuration of the all the features.
Note: On first logon, a few start up tasks will be executed. Wait until the SQL Server – Getting Started link is created on desktop.
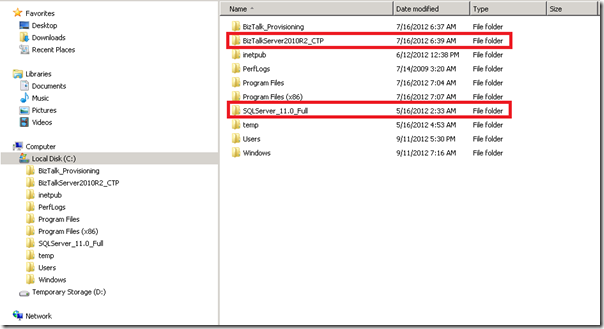
The configuration is the same as for BizTalk Server 2010 setting up SSO, Group, Runtime and so on. Some of the other BizTalk components like adapter pack are not installed on this Virtual Machine either. This explains presence of the BizTalk Server 2010 R2 CTP folder and SQLServer_11.0_Full folders with the install bits.
For configuration of BizTalk I used the administrator account that I use to login to the machine. I configured all the features, yet I can image one not configuring all the features.
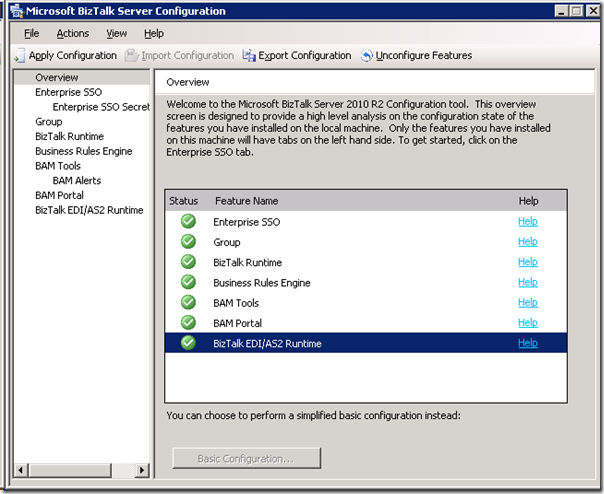
The feature I did not configure was BAM Alerts, which was greyed out and not possible. To use that feature you will need to have the prerequisites for BAM Alerts installed. To check the configuration I started the BizTalk Administration Console and look at the adapters.
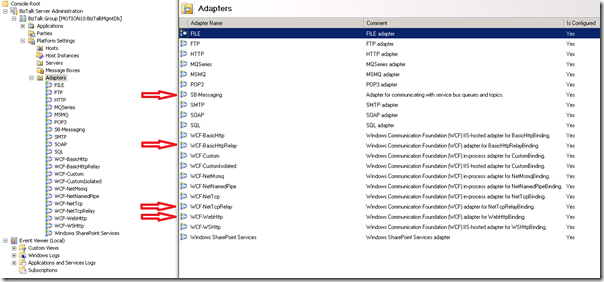
There all installed and configured. Notice the new ones like:
- WCF-WebHttp adapter, to consume REST service or expose REST service
- SB-Messaging adapter, for sending/pulling data from Service Bus Queues/Topics
- WCF-NetTCPRelay adapter, for hosting relays or sending data to NetTCPRelay end points
- WCF-BasicHttpRelay adapter, for hosting relays or sending data to BasicHttpRelay end points
The adapters are not the only new feature, see the post Announcing Microsoft BizTalk Server 2010 R2 CTP Release! from BizTalk Server Team for the other.
The Virtual Machine in Azure I have now is ready for some experimenting, developing and testing of BizTalk Server 2010 R2 CTP.
by community-syndication | Sep 12, 2012 | BizTalk Community Blogs via Syndication
First I need to apologies to my readers for couple of things. One you might have noticed lot of updates recently in your readers with old posts, that’s mainly due to the migration process and second I had to delete 100′s of comments that’s been left in the blog for over 7 years now. […]
The post Migrating your blog from any BlogML based platform to WordPress appeared first on BizTalk360 Blog.
Blog Post by: Saravana Kumar
by community-syndication | Sep 12, 2012 | BizTalk Community Blogs via Syndication
One of the benefits of my job and role as MVP is that I have the opportunity to meet a lot of BizTalk community members, MVP’s and Microsoft professionals around the world. Some of them became good friends. One of them is Sandro Pereira, who I met for the first time during MVP summit beginning 2011. He is very active in the community through for instance blogs, forums, and the TechNet Wiki. Many of you will probably recognize him through on of his contributions.
Sandro Pereira is 34 years old and lives in Crestuma, a small village in the beautiful region of Oporto in Portugal (known worldwide for its wine: Port wine and also classified as World Heritage by UNESCO). At end of this year he will begin a life together with his beautiful girlfriend L%u00edgia, a big support in his life.
Sandro started his professional career as a Java, C++ and C# developer and then as a Web project manager. In 2005 he decided it was time to accept a new challenge and joined DevScope as BizTalk consultant. Currently he is also as Project Manager with focus on systems integration using BizTalk Server and Windows Azure Service Bus. DevScope is a company specializing in business intelligence solutions, systems integration, CRM and collaborative portals based on Microsoft technology and predominantly active in the industrial, financial and public sector.
Portugal is a small country with a small community of specializing technicians in BizTalk, this allows Sandro to have the versatility to perform a bit of all BizTalk roles:
- as a BizTalk Architect he advises his clients about BizTalk infrastructure environments and design integration solutions;
- as a BizTalk Developer he implements integration scenarios (EIA, B2B and BPM);
- and often as BizTalk Administrator he performs BizTalk administration and audit environments, depending on the client in question.
Personally I consider myself more as BizTalk Architect and BizTalk Developer probably less, but I’ll always play the role of developer, because I love it!
Sandro has like many other BizTalk community members I interviewed before has an opinion/view on the product:
Like all products, BizTalk Server has its advantages and disadvantages; there are those who love the product and those who simply hates; BizTalk Server is one of the most mature and stable products from Microsoft and in my personal opinion is one of the best platforms that I know to work in integration scenarios (EIA, B2B and BPM). Of course, these platform, can still be improved and continue to grow, this is what is expected with the planned launch of the new version BizTalk Server 2010 R2.
Some of his friends say Sandro is a workaholic (or Bizaholic :)) because one of the activities he loves doing in his spare time is to write technical articles about BizTalk. He writes for his blog and contributes to a number of communities as he is member of:
Seem like too much work but I couldn’t disagree more, I just don’t consider this work, this is simply a hobby that I enjoy do it. Besides being a healthy hobby, that helps me improve day after day and it has allowed me to be awarded, since 2011, Most Valuable Professional (MVP) for BizTalk Server, travel and have the pleasure to meet excellent technicians worldwide.
To BizTalk community Sandro would like to say the following: I would like to thank all and also leave a challenge: not to restrict themselves only to consume information but also to start sharing the knowledge they have, I’m sure that they will bring additional value to the community.
Beside being a Bizaholic Sandro loves spending time with my family, going out at night for a drink with his friends, going to the cinema, traveling with his girlfriend and play a variety of sports. He is active in snowboarding, snooker, karting, biking, soccer, but his favorite is futsal (indoor soccer).
The only sport I like to watch is soccer, and to specify in more detail, only the matches of best team in the world: Futebol Clube do Porto.
I would like to thank Sandro for his contributions and time for this interview. He is a great inspiration to many, one of the most productive community members and above all a good friend.

by community-syndication | Sep 11, 2012 | BizTalk Community Blogs via Syndication
Fellow BizTalk MVP Stephen W. Thomas has created two excellent posts on setting up a BizTalk Server 2010 CTP in Azure:
- Setting Up BizTalk 2010 R2 CTP in an Azure Virtual Machine using the Gallery
- Running a Windows Azure Virtual Machine Locally with Hyper-V or VMware 8 / VMware 9
In this post I like to share my experience and do a follow up on my post BizTalk IaaS solution: Provisioning Developer Environment. Now I have an Azure subscription through my MSDN account, yet you can setup a trail subscription (see Stephen’s post) or have a paid subscription. Look at the pricing page to see the options for yourself and choose what is best fit in case you do not have an MSDN account. MSDN provides some benefits when it comes to Windows Azure.
With any subscription you can log into the portal. You can then on left hand side choose virtual machines. You can then select CREATE A VIRTUAL MACHINE.
You will then see a dialog appear as below.

You can choose to use QUICK CREATE of FROM GALLERY. The latter is described in post by Stephen. With the QUICK CREATE you need to:
- DNS Name that is available;
- Choose Image in this case the Microsoft BizTalk Server 2010 R2 CTP;
- Password
- Size (Small, Medium, Large, or Extra Large)
- Location (West US, East US, East Asia, South East Asia, North Europe, or West Europe)

After entering the required settings you can click CREATE VIRTUAL MACHINE.


Now you will see that the VM is being provisioned.This may take a few minutes. During that time you will notice that the status will change from starting to stopped, to running (provisioning) to Running. While provisioning you can click on name of VM being created and you will see a new page appear with details of the machine.

When ’Running’ status is reached you can connect to machine through Remote Desktop. You will see CONNECT in bar below being enabled. When you click CONNECT a dialog will pop up like below asking for security credentials.

Enter the password you presented earlier on during QUICK CREATE and click OK. Then the following dialog will appear.

You can click View certificate..

You can Install Certificate to install in your Certificate Store on your machine to enable trust. Then click OK and Yes. You will now enter your Virtual Machine in the Azure that contains the BizTalk Server 2010 R2 CTP and all required other software (i.e. SQL Server 2012, Visual Studio 2012, and so on).

Now you have your BizTalk Virtual Machine in the cloud. The Virtual Machine was sized as MEDIUM meaning dual core processor and 3.5 Gb of Memory.

It has C Drive of 50 Gb and D Drive (Temporary Storage) of 134 Gb. The D: drive is available to your application, but you should very careful about using it for storage. It is actually the physical storage on the rack server the VM is running on. It is NOT backed by Windows Azure storage and should be considered temporary storage only. One great use for it is the OS paging file which contains data that does not need to be persistent (this is the default behavior in Windows Azure). Source: Micheal Washam Windows Azure Virtual Machines.

You can see that 4 Gb is used and that is the paging file. To summarize you have a virtual machine ready to use that is up and running in Windows Azure. Cool, however there are costs involved. With the MSDN Subscription, you get some benefits like you see below

If you exceed any of these than you will have to pay a certain amount, which will be indicated on the account page.

From time to time you may need to watch your account to see your usage and if you are incurring any costs.With a virtual machine you will incur costs for having it hosted up in Azure, when it is running or not. To stop incurring cost you have to delete the virtual machine entirely and delete the corresponding storage (i.e. VHD containing the provisioned BizTalk Server 2010 R2 CTP). Before deleting the VHD you can decide to download it to your local drive. This is well detailed and discussed in Running a Windows Azure Virtual Machine Locally with Hyper-V or VMware 8 / VMware 9 post by Stephen W. Thomas.
My take on this is that creating VM through either QUICK CREATE or FROM GALLERY is a straight forward task. You will find enough background material around Virtual Machines in the mentioned posts by Stephen, my post back in June, Michael Wasman’s post and MSDN resources. When you want to start using Virtual Machines for BizTalk I recommend studying all there resources carefully and take all the hints/tips and warnings at heart as it can save you some headache and money.
The final release of BizTalk Server 2010 R2 will become available probably early next year, so you have time to prepare yourself with this IAAS feature. Nothing is yet known on pricing/licensing of BizTalk Server 2010 R2 on-premise of in Windows Azure. This will probably be clear when the BizTalk Server 2010 R2 is released in RTM.

by community-syndication | Sep 10, 2012 | BizTalk Community Blogs via Syndication
This week I encountered a curious situation while I was developing a new BizTalk solution. After creating my new project, I tried to add a new schema to the solution, and to my astonishment, the item "Schema" had disappeared from the Visual Studio window "Add new item" in the "BizTalk Project items -> Schema Files" […]
Blog Post by: Sandro Pereira
by community-syndication | Sep 10, 2012 | BizTalk Community Blogs via Syndication
This is a follow-up post to the Win a e-copy of the Packt MCTS BizTalk certification book post. Thank-you to all that entered. I enjoyed reading why you were interested in pursuing certification. The following people have won an e-copy of the book:
- Johan %u00c4lverdal
- Kevin Molloy
- Donie Treadaway
I have forwarded your email addresses to the publisher and they will be in touch.
by stephen-w-thomas | Sep 9, 2012 | Stephen's BizTalk and Integration Blog
This is a follow-up to my post and video on Creating a BizTalk 2010 R2 CTP Virtual Machine in Windows Azure.
I hope most of you have reviewed my earlier posts on Creating a Windows Azure Virtual Machine running BizTalk Server 2010 R2 CTP. So now what?
You can create a Syspreped image of the Virtual Machine to be used over and over again to create new BizTalk instances. This would be very handy if you wanted to role this out to 20 new developers on a project (more detail on this here) with all the required software already installed. These images show up under Virtual Machines – Images.
Another option is Windows Azure allows you to download the Virtual Machine to run locally in Hyper-V or VMware 8 (not tested this with the new VMware 9 but it should work as outlined below). This could be useful to work locally on a plane or if you do not want to pay for bandwidth and operation costs for the Virtual Machine. Just remember, once you run locally you lose some of the benefits of the cloud like using cloud computing resources and having VHD replication.
The Virtual Hard Disk created for BizTalk 2010 R2 CTP is 50 GB. When downloading this from your storage account, you will be charged (or counted against your quota) for the bandwidth.
CAUTION: With the free 3-month Trial of Windows Azure you only get 20 GB of region specific outbound bandwidth. Downloading a VHD created in Azure will take 50 GB. The download will complete (at least mine did) but soon after your account will be locked and you will need to either start paying for overages (note once you remove the spending limit cap you can not add it back) or wait until next month to keep using some Azure features. Once I removed the spending limit, I was charged $1.45 for the 32 GB of overage.
LICENSING: I am not even going to begin to speculate on the licensing terms of the Virtual Machine you download and run locally for Windows Azure.
Downing the VHD from Windows Azure
Here are the steps to download your VHD.
1. Ensure you have everything you want installed and copied to your Virtual Machine.
2. Shut down the Virtual Machine.
3. Locate the VHD storage location and disk name used by the Virtual Machine you want to download. Look under the Virtual Machine setting under Disks.
4. You can also find the VHD’s under the storage account. Drill down into the storage account created when you created the Virtual Machine. Click on Containers. You will see VHDS. Drill down into this for a list of VHDs. Make sure you know what disk you want to download if you have more than one.
5. While under the Storage Account used by the Virtual Machine, click on Manage Keys on the bottom.
6. Use the key information to connect to the Storage Account using a client tool. I used CloudXplorer by ClumsyLeaf software. You will need the Storage Account Name and Primary or Secondary Access Key.
7. Below is the view from the client once you are connected to your Storage Account.
8. Select the VHD you want to download and right-click. Save to someplace you have 50 GB of free space.
9. Wait, wait, and wait. my downloads ran at 2.5 MB/sec.
10. Six hours or so later you will have your VHD locally. Once you have the VHD, you can decide if you want to use it with Hyper-V or VMware 8+.
Using the VHD with Windows Hyper-V
Once you download the VHD, setting it up inside Hyper-V is as easy as adding the VHD to a new Virtual Machine.
1. Create a new Virtual Machine using Hyper-V. Select the amount of local RAM you want to use.
2. On the Connect Virtual Hard Disk screen, select “use an Existing Virtual Hard Disk”. Select the disk you downloaded.
3. Click Finish. It is that simple. You are now running locally with Hyper-V.
Using the VHD with VMware 8
First off, I am by no means a VMware expert. These are the steps I used to get the Windows Azure VHD to work inside VMware 8 but it is possible someone else has a better, simpler way to go about this. I will say, from my experience, the Virtual Machine experience in Hyper-V is much better than in VMware for VHD’s downloaded from Windows Azure. I keep having screen re-sizing issues in VMware for some reason.
The VHD downloaded from Windows Azure needs to be converted to VMware format, VMDK. I used a tool called WinImage for this. They offer a free 30-day evaluation.
Once converted, simply setup a new Virtual Machine in VMware and select the newly converted disk. Detailed steps are below.
1. Open VMware 8 and select File, New Virtual Machine. Select Custom (advanced) and click Next.
2. Leave the default Hardware compatibility of Workstation 8.0 selected, click Next.
3. Select “I will install the operation system later”. Click Next.
4. Select Microsoft Windows – Version Windows Server 2008 R2 x64. Click Next.
5. Name your Virtual Machine and set the Location.
6. Select the number of Processors and Cores. This will be based on your existing system resources. Click Next.
7. Select the amount of RAM, again based on your available system resources. Click Next.
8. Select your Network Type, I generally use NAT for running a local Virtual Machine. Click Next.
9. Select LSI Logic SAS as the SCSI Controller. Click Next.
10. On select a disk, select “Use an existing virtual disk”. Select the VHD you downloaded and converted from Windows Azure. Click Next.
11. Click Finish on the next screen.
12. Once you start the Virtual Machine, make sure you install the VMware Tools.