by community-syndication | Sep 16, 2012 | BizTalk Community Blogs via Syndication
Microsoft BizTalk ESB Toolkit includes a set of helper classes used by the other processes, services, and components in the toolkit. Because these helper classes are also public, you can use them in your own code as required. For example in a BizTalk Orchestration you can use the MapHelper class to perform transformations directly.
The TransformMessage method takes as parameters a string that contains the message to transform and a string that contains the fully qualified name of a map deployed in BizTalk. The method returns a string containing the transformed document.
The Transformation Web service from the ESB Toolkit enables external applications to submit a document to an ESB application and have it transformed using a deployed Microsoft BizTalk map. But is it also possible to call directly the MapHelper class from you own code? In order to test it I created an small Windows Form application that calls the MapHelper class and after some tweaking it worked!
The sample tool makes it very easy to execute a BizTalk map. It requires a XML file as input, the name of the assembly and the map name.
First enter the Source file and the fully qualified name of the map and click on Test Map
The output is stored in a file and shown on the Result tab.
How the sample works
In the sample .NET application is a reference added to the ESB.TransformServices.dll assembly, which contains the classes required to call a BizTalk map. This is located in C:\Program Files\Microsoft BizTalk ESB Toolkit 2.1\Web\ESB.TransformServices\bin\.
Download
You can download the sample tool with the source code here:
http://code.msdn.microsoft.com/Execute-a-BizTalk-map-from-26166441
by community-syndication | Sep 15, 2012 | BizTalk Community Blogs via Syndication
In my last post I provided a walkthrough that allows you to send a typed Brokered Message from a Console application to a Service Bus Queue, have BizTalk retrieve this message and then write it to disk. I am now going to expand upon that scenario and describe how we can leverage Brokered Message properties within BizTalk to route the message to different locations using BizTalk’s promoted properties.
What is a Brokered Message Property?
In many ways a Brokered Message Property is very similar to a Prompted Property within BizTalk. These properties can be used to capture meta-data outside the body of the message. We can then use these properties for routing within the Service Bus when delivering messages to different Service Bus Topics. It is important to note that we don’t have to use these properties for just routing. We can also use them as part of business logic in downstream systems if we so desire.
Why is this important for BizTalk?
As I mentioned in the previous paragraph we can use Promoted Properties within BizTalk to route messages and we can also use it to capture meta data if we want (although you should look at distinguished fields instead if that is your intent). In the BizTalk 2010 R2 CTP there is now support for transitioning Brokered Messages Properties from Service Bus Queue clients to BizTalk promoted properties. BizTalk applications themselves do not understand a Brokered Message property, but BizTalk will convert these Brokered Message Properties into BizTalk Promoted Properties where they can be used to route messages.
Scenario Walkthrough
In my previous blog post I used a Power Outage scenario. My client application would pass along customer information to a Service Bus Queue and then BizTalk would pick that message up and write it to disk. In a ’real life’ scenario I would have routed that message to a Customer Information System (CIS) or a Work Order Management (WOM) system so that a field operations team could address the power outage. In this walkthrough I am going to build upon that scenario. This difference this time around is that I am going to introduce a Brokered Message Property called isCriticalCustomer. I hate to publicly admit it but not all customers are treated equally when it comes to delivering power. An example of a Critical Customer may be a hospital. It is more important for a Power company to get their power on before yours. A patient’s respirator is more important that someone watching the latest American Idol episode.
Within my Console application this isCriticalCustomer property will be set as a Brokered Message Property. When this message is retrieved by BizTalk this property will be converted into a Promoted Property and BizTalk will then use that Promoted Property to route the message to a different destination.
Note: A person with a lot of Service Bus experience may say why don’t you just use Topics? I could have a Topic for regular customers and a Topic for Critical Customers. This is also a valid pattern but for the purposes of demonstrating BizTalk capabilities I will leave the routing to BizTalk.
Modifying Queue Client
I am not going to display all of the code required for this client to work. I am going to be adopting the code I listed in my previous post. So please refer back to that post for the starting point. I will include any areas within this post where I have made changes.
In the code below I am going to create and send two messages. In red you will discover that I am setting a Brokered Message Property called isCriticalCustomer. In the first message I am indicating that this is not a critical customer (aka a regular customer). In the second message I am saying that it will be a Critical Customer. Once we get to the BizTalk section you will see how we can use this property to route the message within BizTalk.
//Create new instance of PowerOut object
//This customer will not be a Critical Customer
PowerOut po = new PowerOut();
po.CustomerName = “Stephen Harper”;
po.PhoneNumber = “613-123-4567”;
po.Address = “24 Sussex Drive”;
BrokeredMessage message = new BrokeredMessage(po, new DataContractSerializer(typeof(PowerOut)));
message.Properties.Add(“isCriticalCustomer”, false);
myQueueClient.Send(message);
//Create new instance of PowerOut object
//This customer will be a Critical Customer
po = new PowerOut();
po.CustomerName = “Calgary General Hospital”;
po.PhoneNumber = “403-123-4567”;
po.Address = “1 Red Mile Drive”;
message = new BrokeredMessage(po, new DataContractSerializer(typeof(PowerOut)));
message.Properties.Add(“isCriticalCustomer”, true);
myQueueClient.Send(message);
BizTalk Modifications
You may recall from my previous post that my BizTalk solution was very simple as I only had a schema that represented this Customer message being sent from my client application. So in order to support our new scenario I only need to add one more artifact to my solution and that is a Property Schema. The reason why I need to add this schema is that I need an artifact within my BizTalk application to “hold” these values as they are being populated when BizTalk receives the message. This is no different than when you want take a value from one of your “regular” BizTalk schemas and turn it into a Promoted Property.
Within our BizTalk solution we need to do the following:
- Add a PropertySchema to our project. Once it has been added there will be a default property that we will rename to isCriticalCustomer and change the data type to be a boolean.
- We now need to re-deploy our application.
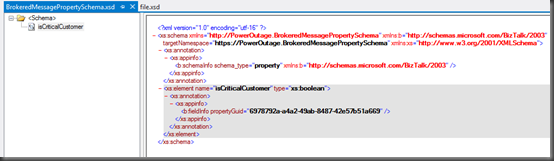
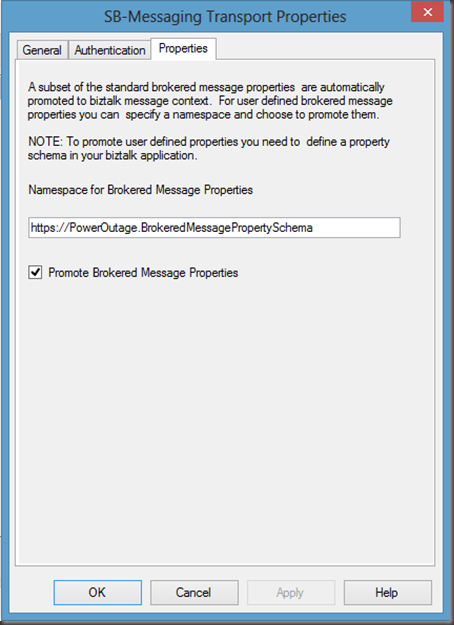
- Open up the ReceiveBMfromServiceBus Receive Location, click the Configure button. Now click on the Properties tab. Within this tab we are going to specify our namespace for our PropertySchema. If you are unsure where you can get this namespace from, look in the image above and notice the value of the targetNamespace matches the value that I have put in this text box. We also need to ensure that the Promote Brokered Message Properties checkbox is checked on.
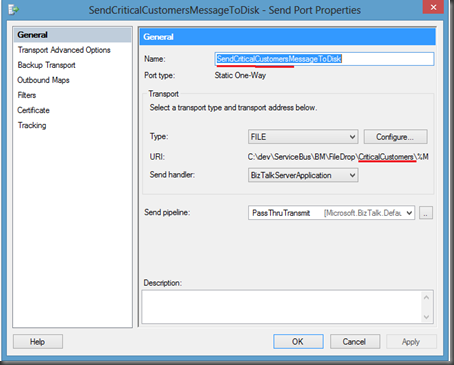
- Next we are going to remove our previous Send Port and create two new Send Ports. One send port will be for Regular Customers and the other will be created for Critical Customers.
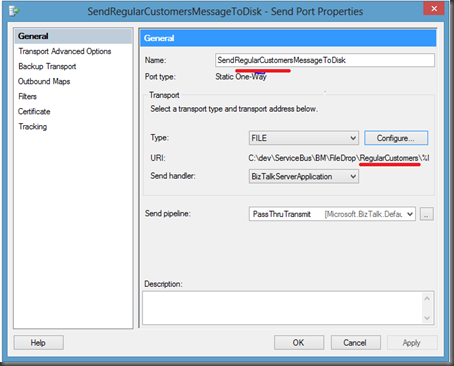
- Below is the Send Port for regular customers. Notice that a separate sub-folder called RegularCustomers has been created for these files.
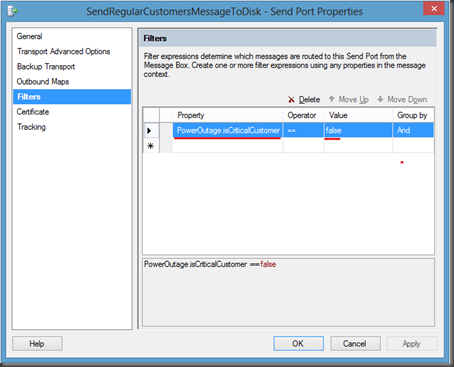
- Click on the Filters label and then add a new Property. You will notice that within the dropdown list you will find the property that we created in our PropertySchema called isCriticalCustomer. We need to select this value and then set the value to false.
Note: When you pull down the Property drop down you will also discover the Out of the Box Service Bus Brokered Message properties. These properties are out of the scope of this post but it is something that may be beneficial down the road.
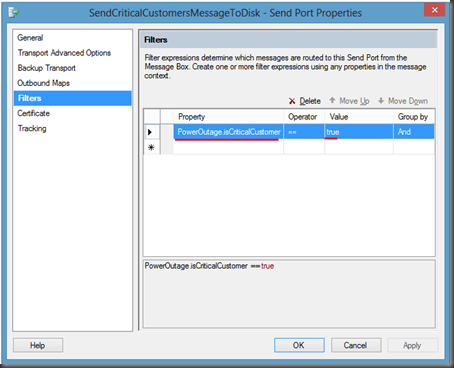
- We now want to perform similar actions to our other send Port that will be use to send our CriticalCustomer messages.
- Once again we are going to click on the Filters label. We will use the isCriticalCustomer property again but this time we will set the Value to true.
- We can now bounce any affected Host Instance(s) and start our application.
Testing our Application
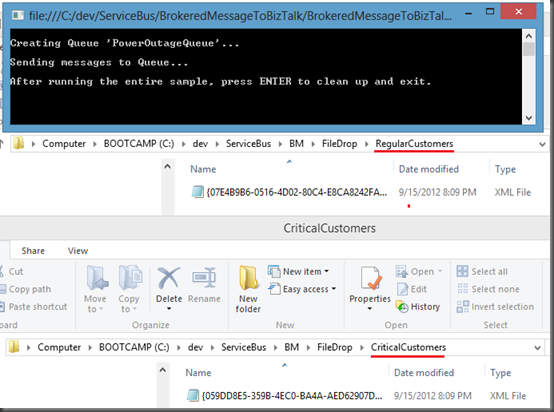
As you my recall, we modified our Console application so that it will send two messages to the same PowerOutage queue. In the first message, we set the isCriticalCustomer Brokered Message property to false. In the second message, for the hospital, we set it to true. The end result is that we should receive one message in our Regular Customers folder and one in our Critical Customers folder.
- As promised when I run the application I will find one message in each corresponding folder:
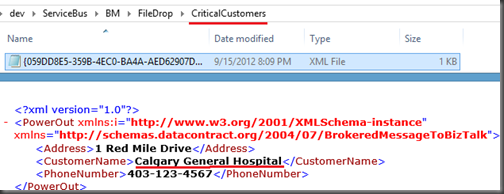
- If I open the files I will discover that the right message was delivered to the correct folder:
Conclusion
Overall it is a pretty slick, and seamless, experience. I think the BizTalk product team has done a great job in bridging the Service Bus Brokered Messaging Property with BizTalk’s Promoted Property. In my opinion, the Azure Service Bus and BizTalk Server really complement each other by providing robust Hybrid solutions. It is great to see smooth interoperability between these two technology sets.
This concludes this blog post. I am not done yet with this series as I have still just scratched the surface. I plan on writing more about my experience with Sending messages to Service Bus Queues/Topics from BizTalk and perhaps dive into some different messaging patterns.
by community-syndication | Sep 15, 2012 | BizTalk Community Blogs via Syndication
REST is getting wider adoption recently mainly due to the popularity of mobile devices and light weight rich (Ajax) web applications. In such scenarios usage of SOAP based services looks bit of overhead with lot of additional elements and attributes. Majority of the open API’s these days are exposed as REST based end points. Example […]
The post REST (WCF-WebHttp) adapter in BizTalk Server 2010 R2 appeared first on BizTalk360 Blog.
Blog Post by: Saravana Kumar
by community-syndication | Sep 15, 2012 | BizTalk Community Blogs via Syndication
Just a little note for myself this one.
At one of my customers where it is still BizTalk 2006 one of the build servers is intermittently getting issues so I wanted to run a script periodically to clean things up a little. The below script is an example of how you can stop cruise control and all of the biztalk services, then clean the biztalk databases and reset the backup process and then click everything off again.
This should keep the server a little cleaner and reduce the number of builds that occasionally fail for adhoc environmental issues.
REM Server Clean Script
REM ===================
REM This script is ran to move the build server back to a clean state
echo Stop Cruise Control
net stop CCService
echo Stop IIS
iisreset /stop
echo Stop BizTalk Services
net stop BTSSvc$<Name of BizTalk Host>
<Repeat for other BizTalk services>
echo Stop SSO
net stop ENTSSO
echo Stop SQL Job Agent
net stop SQLSERVERAGENT
echo Clean Message Box
sqlcmd -E -d BizTalkMsgBoxDB -Q “Exec bts_CleanupMsgbox”
sqlcmd -E -d BizTalkMsgBoxDB -Q “Exec bts_PurgeSubscriptions”
echo Clean Tracking Database
sqlcmd -E -d BizTalkDTADb -Q “Exec dtasp_CleanHMData”
echo Reset TDDS Stream Status
sqlcmd -E -d BizTalkDTADb -Q “Update TDDS_StreamStatus Set lastSeqNum = 0”
echo Force Full Backup
sqlcmd -E -d BizTalkMgmtDB -Q “Exec sp_ForceFullBackup”
echo Clean Backup Directory
del E:\BtsBackups\*.* /q
echo Start SSO
net start ENTSSO
echo Start SQL Job Agent
net start SQLSERVERAGENT
echo Start BizTalk Services
net start BTSSvc$<Name of BizTalk Host>
<Repeat for other BizTalk services>
echo Start IIS
iisreset /start
echo Start Cruise Control
net start CCService
by community-syndication | Sep 15, 2012 | BizTalk Community Blogs via Syndication
Back in June 2012, I had the opportunity to attend TechEd North America. At this event the BizTalk team gave us a glimpse into the next version of BizTalk and went over the Product Road map. You can read more about this Roadmap session here.
One of the areas that Microsoft wanted to address was better/seamless integration with Azure and more specifically with Service Bus Queues and Topics. The BizTalk team released a feature pack back in October 2010 that better enabled BizTalk to leverage the Service Bus Relay capabilities. This feature pack does work well but did not allow for connectivity to Service Bus Queues and Topics since they weren’t even available back then.
In the fall of 2011, the talented Paolo Salvatori wrote a very detailed article on how you can integrate BizTalk 2010 with Service Bus Queues and Topics. While Paolo’s solution does work it does require some additional effort and some people may be a little overwhelmed by the solution. But I do give credit to Microsoft and Paolo for coming up with a solution considering BizTalk 2010 was released much before Service Bus Queues and Topics were commercially available. Their solution just validates why BizTalk leveraging WCF is a good idea. When investments are made to WCF, BizTalk usually benefits. All in all, it was a good stop-gap for anyone desperate to integration BizTalk 2010 with Azure.
Fast forward to July 2012 when Microsoft released this BizTalk 2010 R2 CTP. Microsoft has delivered on making integration with Service Bus Queues and Topics very simple. The BizTalk team recently released a blog post which provides an overview of some of these new features. I thought it would be beneficial to provide a walk through for anyone interested in more details than what Microsoft included in that post.
Scenario
The scenario that we are about to explore includes a client application that will publish a typed Brokered message from a Console application to a Service Bus Queue. BizTalk will then use the new SB-Messaging adapter to retrieve the message and simply write it to the file system. As an experienced BizTalk guy, I like strongly typed messages and I am not afraid to admit it. So as part of this solution I am going to include a strongly typed BizTalk schema that I am going to deploy. For this walkthrough I am not going to transform this message but for anyone familiar with BizTalk they will be able to take this solution adapt it for their needs.
Client Application
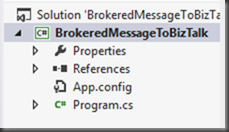
- Launch Visual Studio 2012 and create a C# Console application. I called my application BrokeredMessageToBizTalk
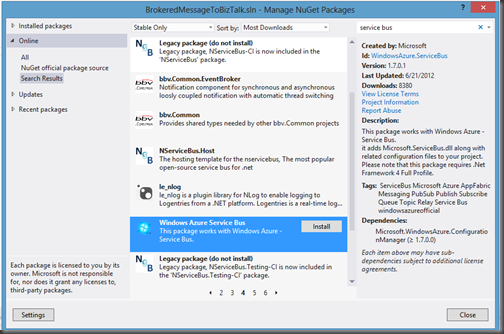
- Next I will use the Nuget Package manager and installing the Windows Azure Service Bus package. You can access Nuget by clicking the following within Visual Studio: Tools – Library Package Manager – Manage Nuget Packages for Solution.
- Since I want deal with typed messages I am going to create a class called PowerOut. Since I work in the Power Industry I will over-simplify a use case that involves a customer whose power is out. They will send a message from a client application (it could be a web page, mobile phone app etc) to a Service Bus Queue.
using System;
using System.Collections.Generic;
using System.Linq;
using System.Text;
using System.Threading.Tasks;
namespace BrokeredMessageToBizTalk
{
public class PowerOut
{
public string CustomerName;
public string PhoneNumber;
public string Address;
}
}
- Within our Program.cs file we want to include the following code:
using System;
using System.Collections.Generic;
using System.Linq;
using System.Text;
using System.Threading.Tasks;
using Microsoft.ServiceBus;
using Microsoft.ServiceBus.Messaging;
using System.Runtime.Serialization;
using System.IO;
namespace BrokeredMessageToBizTalk
{
class Sender
{
const string QueueName = “PowerOutageQueue”;
static string ServiceNamespace = “YOUR_NAMESPACE”;
static string IssuerName =”owner”;
static string IssuerKey = “YOUR_KEY”;
static void Main(string[] args)
{
//*****************************************************************************************************
// Get Credentials
//*****************************************************************************************************
TokenProvider credentials = TokenProvider.CreateSharedSecretTokenProvider(Sender.IssuerName, Sender.IssuerKey);
Uri serviceUri = ServiceBusEnvironment.CreateServiceUri(“sb”, Sender.ServiceNamespace, string.Empty);
MessagingFactory factory = null;
try
{
//***************************************************************************************************
// Management Operations
//***************************************************************************************************
NamespaceManager namespaceClient = new NamespaceManager(serviceUri, credentials);
if (namespaceClient == null)
{
Console.WriteLine(“\nUnexpected Error: NamespaceManager is NULL”);
return;
}
Console.WriteLine(“\nCreating Queue ‘{0}’…”, Sender.QueueName);
// Delete if exists
if (namespaceClient.QueueExists(Sender.QueueName))
{
namespaceClient.DeleteQueue(Sender.QueueName);
}
namespaceClient.CreateQueue(Sender.QueueName);
//***************************************************************************************************
// Runtime Operations
//***************************************************************************************************
factory = MessagingFactory.Create(serviceUri, credentials);
QueueClient myQueueClient = factory.CreateQueueClient(Sender.QueueName);
//***************************************************************************************************
// Sending messages to a Queue
//***************************************************************************************************
Console.WriteLine(“\nSending messages to Queue…”);
//Create new instance of PowerOut object
PowerOut po = new PowerOut();
po.CustomerName = “Stephen Harper”;
po.PhoneNumber = “613-123-4567”;
po.Address = “24 Sussex Drive”;
BrokeredMessage message = new BrokeredMessage(po, new DataContractSerializer(typeof(PowerOut)));
myQueueClient.Send(message);
//Uncomment this code if you want to write a sample file to disk
//using (FileStream writer = new FileStream(“c:/temp/file.xml”,FileMode.Create, FileAccess.Write))
//{
// DataContractSerializer ser = new DataContractSerializer(typeof(PowerOut));
// ser.WriteObject(writer, po);
//}
Console.WriteLine(“\nAfter running the entire sample, press ENTER to exit.”);
Console.ReadLine();
}
catch (Exception e)
{
Console.WriteLine(“Unexpected exception {0}”, e.ToString());
throw;
}
finally
{
// Closing factory close all entities created from the factory.
if(factory != null)
factory.Close();
}
}
}
}
Of the code above I want to highlight a couple different lines:
- The first one deals with the DataContractSerializer as seen below.
BrokeredMessage message = new BrokeredMessage(po, new DataContractSerializer(typeof(PowerOut)));
If you do not use a DataContractSerializer you can expect undesirable results when BizTalk retrieves the message from the queue. As mentioned in the recent BizTalk team blog post: “Brokered Message .NET API uses Binary encoding. To avoid this issue, you will need to use Text by explicitly provide your own serializer, instead of the default serializer.”
- The next deals with the few lines that have been commented out. Since I want to use typed messages within BizTalk, I can generate a sample XML message using the code below. This will allow me to generate a BizTalk schema using tools provided within Visual Studio.
//using (FileStream writer = new FileStream(“c:/temp/file.xml”,FileMode.Create, FileAccess.Write))
//{
// DataContractSerializer ser = new DataContractSerializer(typeof(PowerOut));
// ser.WriteObject(writer, po);
//}
*As a side note – wouldn’t it be nice if BizTalk supported native .Net Classes (from a messaging perspective) – hint, hint *
BizTalk Application
We can now create a BizTalk application. Since we are using the new BizTalk 2010 R2 CTP we can also use the latest version of Visual Studio 2012. As I mentioned earlier I want to process typed messages so our BizTalk solution will be very simple. It will only include a Schema. We will deploy this message to BizTalk so that when an instance of this message is published to the MessageBox that we will have a known schema deployed that will match this message type.
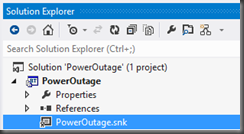
- We can now create a new BizTalk application. I have called mine PowerOutage and I have also added a Strong Name Key called PowerOutage.snk.
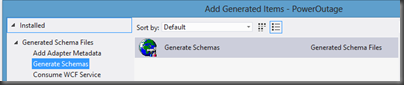
- Next I want to create a new Schema based upon the sample file that we previously generated. I can create this new schema by right mouse clicking on BizTalk project (PowerOutage) – Add – Add Generated Items.
- When prompted, click on the Generate Schemas label and then click the Add button.
- Select Well-Formed XML from the Document type dropdown and then we need to provide the name of our sample file. Click OK to proceed.
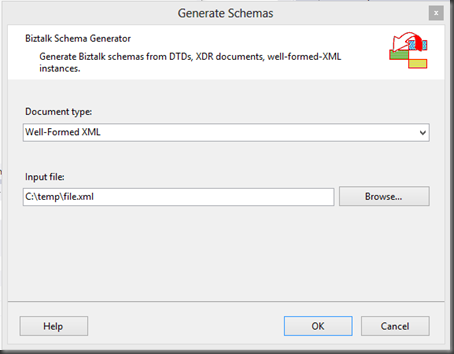
- We will now have a schema added to our solution that represents our PowerOutage class.
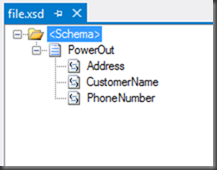
- Deploy our BizTalk Application
- When we launch the BizTalk Admin Console we will discover our PowerOutage application.
- We now need to create a Receive Port and corresponding Receive Location. In this situation we are going to use the SB-Messaging Adapter.
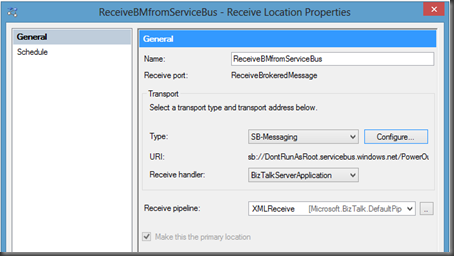
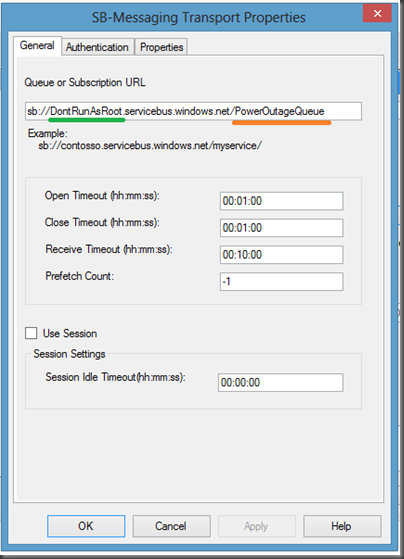
- When we click the Configure button we will have a few more properties to fill out including our URL. Our URL is going to include our Namespace (highlighted in Green) and our QueueName (highlighted in Orange)
- Next we need to click on the Authentication tab. Within this tab we will provide our Namespace as it relates to the Access Control Servers (ACS), an our Issuer Name and Key.
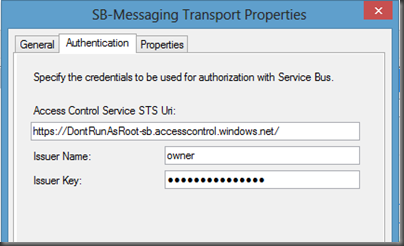
- The Properties tab is not used in this example. I will further examine it in a later post.
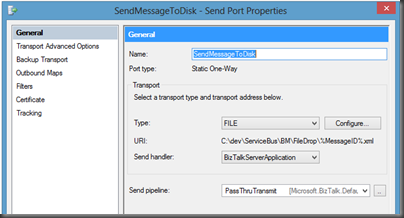
- With our Receive Port and Receive Location created we can no move on to our Send Port. For this example we are simply going to create a File Drop where we can write out the file that we have received from the Service Bus Queue.
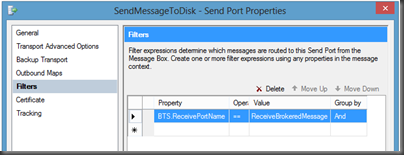
- Since we do not have any Orchestrations we do need to wire up a subscription for our inbound message. In order to do this we will simply create a “Send Port Subscription” by setting filter.
- We can now Start our BizTalk application and bounce our Host Instance(if applicable)
Testing our scenario
- Next, launch our Console Application and we will discover that our message has been sent to our Queue.

- If we check the File Drop that was specified in our Send Port we should see a newly created file. When we open this file we should recognize the content that we populated in our Console application. Since we now have typed data within BizTalk it will be easy to transform it into other message types so that we can exchange data with other systems such as Line of Business (LOB) systems.

Conclusion
Now that wasn’t so bad was it? For experienced BizTalk people this process should be a breeze. The only area that initially hung me up was the DataContractSerialzer that is specified in our console application. The other good news is that we are just scratching the surface in this blog post. Look for more posts related to BizTalk and Service Bus integration using the new BizTalk 2010 R2 CTP.

by community-syndication | Sep 14, 2012 | BizTalk Community Blogs via Syndication
I have got stung by this one again. I have created a WCF-netTCP service and tried to exposed its metadata. I tried all the usual solutions; http://rohitbiztalk.blogspot.co.nz/2011/01/exception-root-element-is-missing-for.html http://www.dotnetbase.co.uk/post/2012/01/21/Root-element-is-missing-error-when-browsing-WCF-Mex-Endpoint-in-BizTalk.aspx http://go4answers.webhost4life.com/Example/exception-root-element-missing-48916.aspx but nothing worked this time. This is very frustrating because last week on the same server one of my colleagues had deployed meta data service and […]
Blog Post by: mbrimble
by community-syndication | Sep 14, 2012 | BizTalk Community Blogs via Syndication
One of the great new features included in Visual Studio 2012 is the ability to create professional looking storyboards using Microsoft PowerPoint. Storyboards allow you to create very realistic mock-ups of an application using shape libraries designed for the particular type of application you are proposing. Examples include Windows application, Web application, Windows Phone 7 applications and more.
Microsoft has released a number of new storyboarding shapes for people wanting to create Storyboards for iOS, iPad or iPhone applications.
NOTE: To get the Storyboarding feature in PowerPoint, you must have one of the following products installed.
- Visual Studio Premium 2012 with MSDN
- Visual Studio Ultimate 2012 with MSDN
- Visual Studio Test Professional 2012 with MSDN
How to get the new shapes
- Download the Storyboard shapes you want from the Visual Studio Gallery
- Open Microsoft PowerPoint and select the Storyboarding tab
- Select Import Shapes
- Locate the “*.SBSX” file you downloaded in step 1 and click Open.
Your new storyboard shapes will appear in the Storyboard Shapes toolbox.
If you want to learn more about how to use the Storyboarding features, consider taking our Managing Projects with Team Foundation Server 2012course. We have an entire module devoted to getting up to speed quickly.

by community-syndication | Sep 14, 2012 | BizTalk Community Blogs via Syndication
It’s hard to write technical books nowadays. First off, technology changes so fast that there’s nearly a 100% chance that by the time a book is published, its subject has undergone some sort of update. Secondly, there is so much technical content available online that it makes books themselves feel downright stodgy and out-dated. So […]
Blog Post by: Richard Seroter
by community-syndication | Sep 14, 2012 | BizTalk Community Blogs via Syndication
A few days ago I received an error while restarting the BizTalk host instances on one of the BizTalk servers here after an update. Seems like changes to BizTalk config file were to blame and this article shows how to fix this error.
by community-syndication | Sep 14, 2012 | BizTalk Community Blogs via Syndication
As preparation for our 5.0 release in October we are presenting BizTalk360 in various live user group presentations this month. Here are the list of event during the month of September. Norwegian user group (NoBug), September 18th, Gothenburg, Sweden Norwegian BizTalk User group (NoBug): NoBug is community for BizTalk users and developers in the Nordic […]
The post BizTalk360 at Norwegian user group and BizTalk Innovation day appeared first on BizTalk360 Blog.
Blog Post by: Saravana Kumar



