
by stephen-w-thomas | Apr 25, 2016 | Stephen's BizTalk and Integration Blog
I am excited to be presenting at the 2016 INTEGRATE conference in London. Not only will I be able to get great pizza at Pizza Express, I will hopefully get to fill in everyone on the latest offerings in Azure IaaS.
Registration is still open for the conference. Rates are $450 pounds per person for the 3 day event. It is a super deal compared to other conferences. You can get more details on registration here.
My session title is “Azure IaaS Essentials for the BizTalk Developer”.
The abstract is below:
Azure Infrastructure as a Service consists of Virtual Networking and Virtual Machines. In this session Stephen will cover the essentials every developer should know about IaaS including on premise connectivity options, how to use virtual network with virtual machines, sizing options of virtual machines, and management options. Stephen will show you how to use PowerShell to take full control of Azure Virtual Machines and make Infrastructure almost as fun as Development! In addition, see how simple it is to build a full isolated BizTalk domain in Azure with just a few clicks.
If you are new to Azure or been out of the loop for even a few months, Michael Stephenson is putting on four “Zero-to-Cloud” sessions. Two are before the conference and 2 after. Each session is limited to 10 people and they are held at the BizTalk 360 office just outside of London (an easy 30 mina train ride from central London). While I have not attended one of his classed myself, I am sure it will not disappoint! Get more details on this even here.
Hope to see you in London in just a few week!!!

by stephen-w-thomas | Mar 20, 2016 | BizTalk Community Blogs via Syndication
BizTalk360 has recently released more details on their annual conference in London. This year there is a name change. Instead of the BizTalk Summit, the name gets altered to align with the “Integrate” brand. In case you were not aware, BizTalk360 organized the last Integrate Summit in Redmond back in December 2014 so it makes sense to carry that name forward. BizTalk360 has been working closely with the Microsoft product groups to put on a great event.
This year the summit looks to be better and bigger than ever. There are more than 20 speakers lined up over 3 days . The speakers have a variety of backgrounds including Microsoft Product Group, Consultants, Customers, System Integrators and MVPs. There is also an opportunity to hear from the Microsoft’s leadership team and get insight into their plans as it pertains to Azure App Service and Integration.
The session abstracts look great! The topics cover a broad set of technologies that will appeal to integration focused professionals. The topics include:
- BizTalk Server 2016
- Azure Logic Apps
- Azure App Service
- Azure Service Bus (Event Hubs and Messaging)
- Internet of Things (IoT)
- Azure API Management
- Azure Stream Analytics
- Power Bi
My topic will focus on some the recent learnings from an Industrial IoT project. I will talk about tag data ingestion, complex event processing (calculations, reference data, out of bounds, absence of event) and visualization. I will also throw in a little BizTalk and Logic apps for good measure.
This will be my third time speaking in London at a BizTalk360 event. I am once again looking forward to the experience as BizTalk360 always puts on a good show and it is a great opportunity to network with the excellent European Integration community.
For more details, please check out the event page. There are early bird specials so pay close attention to the dates.
See you in London!
http://www.biztalk360.com/integrate-2016/
by stephen-w-thomas | Mar 2, 2016 | BizTalk Community Blogs via Syndication
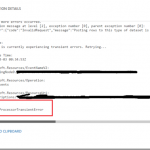
Ran into an interesting situation today. I have some real time Azure Stream Analytics (ASA) streams that feed a couple Power BI dashboards. I also took the plunge with getting enabled with Azure Multi Factor Authentication (MFA). The MFA setup was fine but I logged back into the Azure Portal later to notice that my ASA job had stopped. When I looked in the ASA Monitoring Logs I found the following Send Error:
Followed by a User authentication error:
I was able to put 2 and 2 together and the timelines aligned to when my MFA was turned on but I was still perplexed. I mean this wasn’t a Windows service that had an out of date password. My credentials were never associated to the ASA job. I did use MFA when logging into the portal so that wasn’t it. I tried to restard the ASA job multiplie times as the portal was giving me a “this is a transient error message”….it wasn’t.
It wasn’t until it clued in on me that when you set Power Bi Outputs for Stream Analytics that you need to also authenticate using your credentials. As soon as MFA was enabled, my credentials had expired and I needed to log back in which did result in an MFA challenge. I got through that and could start my job and outstanding events streamed through.
Conclusion
This isn’t a production workload so the damage was minimal. It does beg the question thought that if you are publishing events from ASA to PowerBI, what is the right way to authenticate with Power BI? Should you be creating a “system” account with no MFA and no password being reset? I am open to recommendations if you have them.
by stephen-w-thomas | Oct 14, 2015 | Stephen's BizTalk and Integration Blog
I am excited to be part of creating the cofficia Pluralsight BizTalk Learning Path.
This consists of just over 34 hours of hard core BizTalk training brought to you by Mall Milner, Mohamad Halabi, Dan Toomey, and I.
Learning path course sequence:
BizTalk 2006 Fundamentals
Advanced BizTalk Server 2010
Intro to BizTalk Server 2013 Enterprise Service Bus (ESB) Toolkit
BizTalk Server 2013 from Ground Up: An End to End Scenario
What’s New in BizTalk Server 2013
Using Functoids in the BizTalk 2013 Mapper
Total – 34h 15m
So if you find yourself not being able to sleep at night or on 3 long 12 hour flights around the world, it is well worth the 34 hours to master your BizTalk skills
Remember: you can always watch Pluralsight courses in up to 2x speed. That would cut the time down to almost 17 hours!
I still have a few no credit card required, 30-day unlimited free trial Pluralsight memberships available! If interested, just fill out the form here http://www.biztalkguru.com/30-day-pluralsight-free-trial-request/

by stephen-w-thomas | Oct 5, 2015 | Stephen's BizTalk and Integration Blog
A little over 2 years ago I released a set of PowerShell scripts for auto creating a full Multi-Server BizTalk 2013 Domain inside Azure IaaS. I spent 100’s of hours on these scripts to get them working correctly. You can view my session at TechEd 2013 US online for more details.
I have made updates to these scripts and updated them to support BizTalk 2013 R2 and SQL 2014. These scripts will automatically created a clean isolated 2 BizTalk Server 2013 R2 Domain using SQL 2014. All domain user accounts are auto created. BizTalk group and host settings are created. The only manual intervention that is needed is to log into each server and run a PowerShell script. In less than an hour you can have a fully configured BizTalk 2013 R2 Domain! And since it is scripted, you can create a clean environment from scratch anytime you need one.
Note: Running these scripts will created Virtual Machines inside Windows Azure. You will be charged for the Virtual Machines. Make sure you understand the costs before running these scripts.
Why not use an Azure Resource Manger Template for this? Great question! I tried. I spent about 40 hours trying to port these scripts into an Azure Resource Manger Template with no success. I was unable to get the BizTalk and SQL Servers to join the domain. Azure Resource Manger PowerShell has a new set of commands that I could of used, but they are in the process of changing – so for now keeping the scripts as-is seemed the best course of action.
You can review and download the updated scripts on MSDN – Automatic Multi-Server BizTalk 2013 R2 Domain Creation PowerShell Scripts for Azure IaaS. If you like the scripts please rate them with a 5-star.
To run the scripts inside Visual Studio 2013 / 2015 do the following:
- Download them from MSDN – they are inside a Visual Studio 2013 Solution
- Open Visual Studio as an Administrator and open the Solution
- Update 3 values inside variables.ps1 It is the top 3 variables in the file.
- Update the top variable inside MAIN_MASTER.ps1 It is the first variable in the script.
- Right-click on MAIN_MASTER.ps1 and select "Execute As Script". Wait about 45 minutes.
- Log into BizTalk 02, open C:\BizTalk_Provisioning\ReadMe.docx. Follow the instructions. Do not close the Remote Desktop session. The PowerShell window will open and close right away. See details below.
- Log into BizTalk 01, open C:\BizTalk_Provisioning\ReadMe.docx. Follow the instructions. Wait about 10 minutes. Note that you have to run the last command twice. See details below.
To run the scripts through PowerShell IDE dot he following:
- Download them from MSDN – they are inside a Visual Studio 2013 Solution
- Open Main_Master.ps1 and variables.ps1 inside PowerShell IDE, make sure to open PowerShell IDE as an Administrator
- Update 3 values inside variables.ps1
- Update the top variable inside MAIN_MASTER.ps1
- Run MAIN_Master.ps1 as an Administrator
- Once complete, Log into BizTalk 02, open C:\BizTalk_Provisioning\ReadMe.docx. Follow the instructions. Do not close the Remote Desktop session. The PowerShell window will open and close right away. See details below.
- Log into BizTalk 01, open C:\BizTalk_Provisioning\ReadMe.docx. Follow the instructions. Wait about 10 minutes. Note that you have to run the last command twice. See details below.
This download contains the following scripts:
- MAIN_Master.ps1 – This is the main scripts that calls all the other scripts that do all the work.
- MAIN_RemoveVM.ps1 – This script will remove and delete everything created inside the domain.
- MAIN_SaveMoney_StopAll.ps1 – This script to turn off all the VM’s in the domain. You need to update 1 value in this file to run it.
- MAIN_SpendMoney_StartAll.ps1 – This script to turn on all the VM’s in the domain. You need to update 1 value in this file to run it.
- variables.ps1 – Core variable file, you need to update 3 values in here.
- Various other helper scripts and files
Detailed Post Script Configuration Steps (this is outlined in the ReadMe.docx downloaded to each server)
On BizTalk 02:
- Once the PowerShell scripts are complete log into the BizTalk 02 server with the domain admin account.
- Open a PowerShell windows as Administrator.

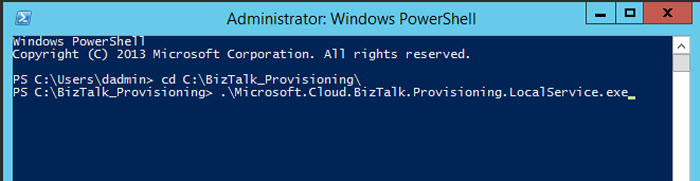
- Change directories as follows “cd c:\BizTalk_Provisioning”
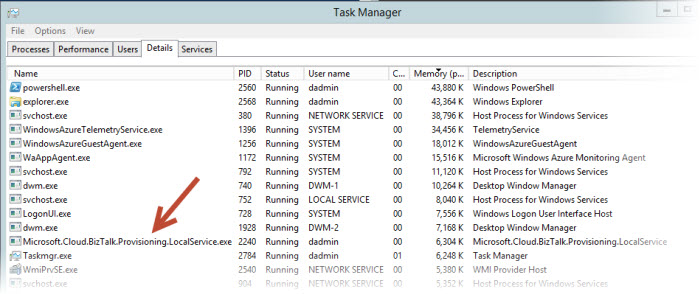
- Run the following command “MicrosoftCloudProvisioningLocalService.exe” – you should see this running as a service.
- Leave the Remote Desktop Session open and go to the BizTalk 01 Server.
On BizTalk 01:
- Once the PowerShell scripts are complete and the service is started on BizTalk 02, log into the BizTalk 01 server with the domain admin account.
- Open two PowerShell windows as Administrator.
- In the first window, change directories as follows “cd c:\BizTalk_Provisioning”
- Run the following command “MicrosoftCloudProvisioningLocalService.exe” – you should see this running as a service.
- In the second window, change directories as follows “cd c:\BizTalk_Provisioning”
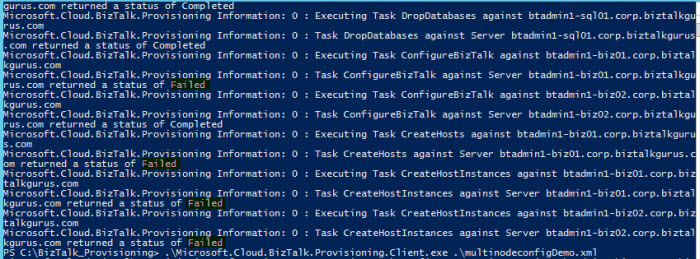
- Run the following command “.\Microsoft.Cloud.Provisioning.Client.exe .\multinodeconfigDemo.xml” – you should see several pop-up windows. This should fail.

- Run the following command again “.\Microsoft.Cloud.Provisioning.Client.exe .\multinodeconfigDemo.xml” – you should see several pop-up windows again but this time it should Complete.
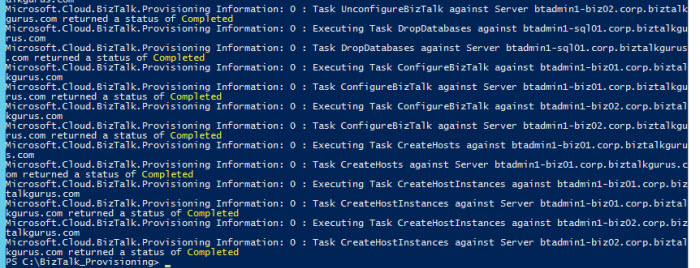
- The end result is a fully configured, multi-server BizTalk Domain inside Windows Azure!
Make sure you use the provided scripts to start, stop, and remove the artifacts created. I look forward to your feedback!
by stephen-w-thomas | Sep 22, 2015 | Stephen's BizTalk and Integration Blog
With the introduction of Azure Resource Manager (ARM) the world of Infrastructure as a Service (IaaS) inside Azure changed – for the better.
ARM introduced a new way to organize and deploy resources across various aspects of Windows Azure. Now you can create configuration scripts for complex Azure scenarios that include storage, web apps, virtual machines, networks, SQL databases, and more.
With these changes introduced the AzureResourceManager PowerShell module. I could write many posts on this along, but not to get into to many details you now have two ways to do many things in Windows Azure using PowerShell. This gets a little more complex considering additional breaking changes are coming soon when Switch-AzureMode is deprecated and the introduction of both traditional and classic versions of some Azure Artifacts like storage and virtual machines. Going forward I would recommend using AzureResourceManager based PowerShell commands for all new scripts.
Never the less, the way to create a new Virtual Machine is a little more complex now using AzureResourceManager. This is due to the greatly enhanced feature set in Azure that we just did not have a few years ago. As part of these changes, you need to call out your base image disk differently than before. Lets take a look at the two options.
Using Azure Service Manager (ASM – default module in PowerShell right now)
$imageWindows = ‘bd507d3a70934695bc2128e3e5a255ba__RightImage-Windows-2012-x64-v13.5’
$MyDC = New-AzureVMConfig -name $vmnamePDC -InstanceSize $sizePDC –ImageName $imageWindows
Using Azure Resource Manager (ARM- will be the new default)
$VirtualMachine = Set-AzureVMSourceImage -VM $VirtualMachine –PublisherName 2012-R2-Datacenter –Offer BizTalk-Server –Skus 2013-R2-Developer –Version "latest"
With Azure Service Manger you only need to supply the operating system image name and this can easily be found doing a single PowerShell query.
With Azure Resource Manger you need to specify a Publisher Name, Offer, SKU, and Version of the Operating System Azure Image you want to use. It is not as easy or straight forward to get these values.
Below I have put together a quick reference list related to BizTalk Server, SQL Server, and Windows as well as the PowerShell scripts to get these values for any other operating system image.
|
Publisher |
Offer
|
SKU
|
|
MicrosoftBizTalkServer |
BizTalk-Server |
2013-Developer |
|
MicrosoftBizTalkServer |
BizTalk-Server |
2013-Standard |
|
MicrosoftBizTalkServer |
BizTalk-Server |
2013-Enterprise
|
|
MicrosoftBizTalkServer |
BizTalk-Server |
2013-R2-Developer
|
|
MicrosoftBizTalkServer |
BizTalk-Server |
2013-R2-Standard |
|
MicrosoftBizTalkServer |
BizTalk-Server |
2013-R2-Enterprise |
|
MicrosoftSQLServer |
SQL2008R2SP3-WS2008R2SP1 |
Enterprise, Standard, Web |
|
MicrosoftSQLServer |
SQL2012SP2-WS2012 |
Enterprise, Standard, Web * |
|
MicrosoftSQLServer |
SQL2012SP2-WS2012R2 |
Enterprise, Standard, Web *
|
|
MicrosoftSQLServer |
SQL2014-WS2012R2 |
Enterprise, Standard, Web *
|
|
MicrosoftSQLServer |
SQL2014SP1-WS2012R2 |
Enterprise, Standard, Web *
|
|
MicrosoftSQLServer |
SQL2016CTP2-WS2012R2 |
Enterprise
|
|
MicrosoftWindowsServer |
WindowsServer |
2008-R2-SP1 |
|
MicrosoftWindowsServer |
WindowsServer |
2012-Datacenter |
|
MicrosoftWindowsServer |
WindowsServer |
2012-R2-Datacenter |
|
MicrosoftWindowsServer |
WindowsServer |
2016-Technical-Preview-3-with-Containers |
|
MicrosoftWindowsServer |
WindowsServer |
Windows-Server-Technical-Preview |
* some of the SQL SKUs contain other types of optimized versions.
If you want to get the Publisher Name, Offer, and SKU for other Azure Images you can use these PowerShell commands.
# Gets all Publishers in a specific datacenter
$locName="West US"
Get-AzureVMImagePublisher -Location $locName | Select PublisherName | Select * | Out-Gridview -Passthru
# Gets all Offers for a given Publisher in one location
$locName="West US"
$pubName="MicrosoftWindowsServer"
Get-AzureVMImageOffer -Location $locName -Publisher $pubName | Select Offer | Select * | Out-Gridview -Passthru
# Gets all SKUS for a giving Offer for a given Publisher in one location
$locName="West US"
$pubName="MicrosoftWindowsServer"
$offerName="WindowsServer"
Get-AzureVMImageSku -Location $locName -Publisher $pubName -Offer $offerName | Select Skus
Enjoy.
by stephen-w-thomas | Sep 14, 2015 | Stephen's BizTalk and Integration Blog
While I usually only blog about BizTalk and Windows Azure, for this post I am going for something different. This post is talking about data synchronization between different computers systems; like between a laptop and desktop.
I am sure I am like most readers who have more than one computer at home. I specifically have one main desktop and one main laptop. I use the laptop when I travel and I like to have a lot of data from home with me just in case I need it. This includes about 1 TB of pictures, movies, client data, and other files.
Below I outline two options to help you keep data in sync between multiple systems.
Option 1: Synchronization via the Cloud
Cloud based storage is the new thing. In the past few years numerous services have launched such as Dropbox, Google Drive, and Microsoft OneDrive (just to name a few). They offer much more than just storage in the cloud. They offer a whole cloud-based content management system with the ability for collaboration with per user permissions, download links, sharing large files that could not be sent via email, and more.
I currently use Dropbox for syncing frequently used and smaller files. I also use Dropbox for sharing files with Pluralsight, the training company I contract with to create online training courses like “Intro to BizTalk Server 2013 Enterprise Service Bus (ESB) Toolkit“. With Dropbox, sharing large files with my editor is as easy as drag and drop into my Dropbox folder.
Pros of using Cloud-based Synchronization:
- Automatic, real-time synchronization when all systems are online
- Typically simple and easy to use interfaces
- Ability to share large files with others through a download link
- User permission management tools
Cons Include:
- Data is in the cloud
- Upload speed is dependent on the internet connection
- Limited amount space in most free accounts
- Usually a monthly or yearly charge for more space and additional features
Option 2: Software synchronization
Software synchronization typically runs on a schedule to either copy all the data from one system to another or do a compare to ensure only new & changed files are copied over.
When looking for the best software for me needs I evaluated several different options I found online. I selected SyncBackFree by 2BrightSparks over 5 years ago and have since upgraded to a paid version. The free version is really free with no ads and packed full of features. Since it is free, it is well worth everyone giving it a try.
They offer two paid versions: SyncBackSE and SyncBackPro. The SE version includes support and the ability to copy open and locked files. The Pro version includes support for syncing with popular cloud platforms and scripting support for custom integration into your workflows. See a complete feature comparison.
I use software synchronization as my primary source of keeping data desktop and laptop data in sync. This is due to the large volume of data I want to have access to both at home and on the road. Plus I would not want client files or code exposed on the internet in the event of a hack on one of the cloud providers. It is now part of my packing routine to run the synchronization program right before I pack up my laptop and first thing when I get home from a trip.
I also use SyncBackPro to sync data between my computer and my network attached storage (NAS) for nightly scheduled backups.
Pros of using Software-based Synchronization:
- Synchronization of unlimited amounts of data
- Fast synchronization using your home network
- Secure
- Free software options available
- Can be used for NAS storage backups
Cons Include:
- Data can be out of sync until the program runs
- If not scheduled, the user needs to remember to run the program before disconnecting a device like a laptop
- No ability to share large files with others
What type of data sync do you use between systems?
by stephen-w-thomas | Sep 11, 2015 | Stephen's BizTalk and Integration Blog
I have a limited number of no credit card required, unlimited, 30-day trials for Pluralsight available.
Request your free trial at: http://www.biztalkguru.com/30-day-pluralsight-free-trial-request/
With these accounts you have full access to all 3700+ courses for 30 days.
This is a great way to boost your Tech and BizTalk skills for free.
Make sure you check out my BizTalk Learning Paths to see what areas you need to brush up on.

by stephen-w-thomas | Sep 3, 2015 | Stephen's BizTalk and Integration Blog
I have been using VMware off and on for years mostly to maintain environments for older version of BizTalk like BizTalk 2009 and BizTalk 2010. That said, I have been stuck using VMware version 9 because I did not want to keep paying the upgrade fees each year to get the latest version. With my recent upgrade to Windows 10, my VMware 9 installation ran into some issues. I was no longer able to connect to an internet connection inside the VM. I decided the time was right to migrate to Hyper-V on Windows 10.
I found a lot of articles about converting vmkd files to a vhdx but they seemed to state you needed to use Microsoft Virtual Machine Converter witch in the GUI and in the online documentation talked about only supporting VMware Server products.
The reality is Microsoft Virtual Machine Converter works for direct conversion of a single vmkd file into a vhdx. The catch is you need to use the PowerShell command and not the GUI.
If you want to convert a single VMKD file into a VHDX file do the following:
- For each Virtual Machine you want to convert, first remove the VM Tool and do a full shutdown
- Remove VMware from your computer (if you install Hyper-V first you will run into un-installation issues with VMware. You’ll have to edit the undeploy script to remove it)
- Enable Hyper-V Windows 10
- Download and install Microsoft Virtual Machine Converter 3.0 (Link)
- Open PowerShell or PowerShell ISE as an Administrator
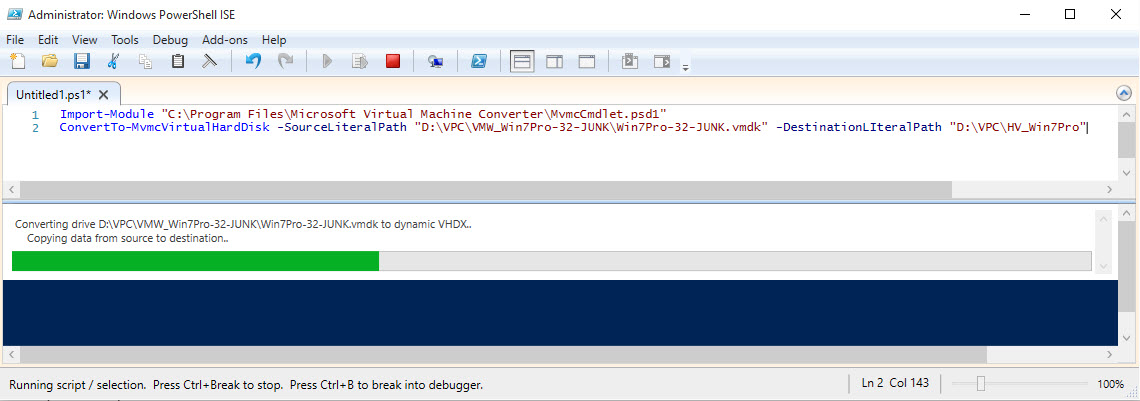
- Enter the following (update the paths and file names as needed):
Import-Module "C:\Program Files\Microsoft Virtual Machine Converter\MvmcCmdlet.psd1"
ConvertTo-MvmcVirtualHardDisk -SourceLiteralPath "D:\YourPathToVMKD\ZZZZ.vmdk" -DestinationLIteralPath "C:\PathToVHDX"
- This process will take about an hour for a 50 GB disk. See the image below.
- Once complete, create a new Generation1 Hyper-V virtual machine using the newly created vhdx image
PS: While this post is targeted toward virtual machines running locally, at this point 90% of my virtual machines are hosted in Azure using BizTalk 2013 / BizTalk 2013 R2. I only use virtual machines for maintaining legacy environments.
Hope this helps someone out!

by stephen-w-thomas | Sep 1, 2015 | Stephen's BizTalk and Integration Blog
I have revamped and updated my site: http://www.whats-new-in-biztalk-2013.com/ This site is dedicated to my course at Pluralsight with the same name. While this course was geared to BizTalk 2013, a lot of the content is still relevant for BizTalk 2013 R2.
This course has 6 modules:
BizTalk Server 2013 Overview
Using Windows Azure Service Bus with BizTalk 2013
REST Adapter Deep Dive
SharePoint Adapter Enhancements
Using BizTalk 360 with BizTalk 2013
Setting up BizTalk 2013 in Windows Azure IaaS
Of these, the module on the BizTalk REST Adapter is one of the best in the course! It is a great resources for anyone working with the REST Adapter in any version of BizTalk.
In the SharePoint chapter, I walk through integration with SharePoint Online in Office 365.
Check out the http://www.whats-new-in-biztalk-2013.com/ to see a 7-minute sample video.
As always, anyone can get a free 7 day, 200 minute trial of Pluralsight.
