by Eldert Grootenboer | Apr 23, 2016 | BizTalk Community Blogs via Syndication
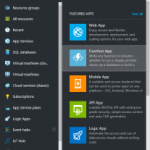
In my my previous post, I showed how we can use a WebJob to process a Service Bus queue and store the data in an Azure SQL database. This was pretty simple to set up, but it did require a good understanding of how to connect with these and process the data. Sometimes however we just want to do a quick integration without needing to set up all this plumbing. Recently Microsoft announced a new feature called Azure Functions, with now makes this possible. Azure functions can be used to create a small function which can run stand-alone, or be called from other applications, for example from a logic app, as has been described here by Sandro Pereira. Azure Functions provide out of the box connections for triggers, input and output to a lot of other Azure features, including Event Hubs, Service Bus, Azure Storage and DocumentDB. In this post I will show how we can process our message from the queue we created in this blogpost, and store it in an Azure Storage table. We will start by creating a new Function App in the portal.
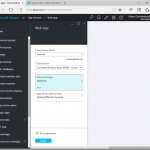
Fill out the fields as specified. In case we allready have other App Services, we can run the Function in the same App Service Plan we are using for these by choosing Classic App Service Plan. However if we want the true cloud experience, it can also be run in a Dynamic App Service Plan, in which case Azure will provide all of the necessary resources when needed, and it will only cost us when our code is actually running.
Once the Function has been deployed, we can find it under App Services. Let’s create a new function in our Function App we just created. There’s either the possibility to start from scratch, or to use one of the premade templates.
We will create a function from scratch for this demo. Click on New Function, and select the ServiceBusQueueTrigger – C# template.
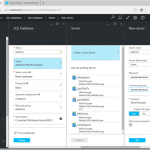
Now we can set up our function. We can either choose to use an existing queue, or if we specify a name for a queue which is not in the selected namespace yet, it will be created for us. We will select the queue we created earlier. When creating the connection to our Service Bus namespace, we have to use credentials with Manage permissions.
Once this simple setup has been done, click Create and we will see a Code editor in our browser with the outline for our function. As you will see, by default this function expects a string from our queue, however we are sending in a BrokeredMessage. Luckily, we can reference any namespace from our function as well. There are a couple of options to import namespaces. In our function, we will want to import the Microsoft.ServiceBus.Messaging namespace, which is part of the WindowsAzure.ServiceBus package. As this package is available from NuGet, we will use this to add the reference. Start by creating a project.json file, and add the following code, which will add a reference to version 2.7.6 of the package.
{
    "frameworks": {
        "net46":{
            "dependencies": {
                "WindowsAzure.ServiceBus": "2.7.6"
            }
        }
    }
}
|
Now we will use Kudu to upload the project.json file. The Kudu for our Function App can be reached on https://YOURAPP.scm.azurewebsites.net/. Go to the CMD Debug Console, and navigate to D:homesitewwwroot. Now we can drag and drop our project.json file here to upload it.
Going back to our Function App’s console, we will now see that the NuGet package we just added is being restored.
Now that we have added this NuGet package, we can reference the Microsoft.ServiceBus.Messaging from our code, and use the BrokeredMessage class in our incoming parameters.
Now that we have our input set up, we will add our output. Open the Integrate tab, and click New Output. Select Azure Storage Table as output, and set up the properties. We will let the function create a table for us, and we will use the shipname as a partition key.
To save our object to the Azure Storage Table, we have to create a class which will be used to map the data. Add the following class after the function. Be sure to include the PartitionKey and RowKey fields, as these are required when writing to Azure Table Storage. The other fields will hold the data we receive from our queue.
public class ErrorWarning
{
    public string PartitionKey { get; set; } // Required for writing to table storage
    public string RowKey { get; set; } // Required for writing to table storage
    public string CreatedDateTime { get; set; }
    public string ShipName { get; set; }
    public string Message { get; set; }
}
|
We also have to add a parameter to the function’s input parameters. When working with Azure Table Storage, this has to be an ICollector holding instances of the class we just created. Make sure to use the Table parameter name we just specified as name of the parameter. Once this is done, we can start implementing our function’s body. We will start by writing the data to the log, followed by creating an instance of our ErrorWarning class with the data we just received from the queue. We will then add this data to the Azure Table Storage.
public static void Run(BrokeredMessage myQueueItem, ICollector<ErrorWarning> queuesAndWarningsStorageTable, TraceWriter log)
{
    log.Verbose($"C# ServiceBus queue trigger function processed message: {myQueueItem.Properties["time"]}, {myQueueItem.Properties["ship"]}, {myQueueItem.Properties["exceptionMessage"]}");

    var item = new ErrorWarning {
        PartitionKey = myQueueItem.Properties["ship"].ToString(),
        RowKey = Guid.NewGuid().ToString(),
        CreatedDateTime = myQueueItem.Properties["time"].ToString(),
        ShipName = myQueueItem.Properties["ship"].ToString(),
        Message = myQueueItem.Properties["exceptionMessage"].ToString()
    };

    queuesAndWarningsStorageTable.Add(item);

    log.Verbose($"Added item {item.PartitionKey} to the table");
}
|
Now click Save and we will see our function is being compiled.
Now whenever a message is being placed on the queue, our Azure Function will pick it up, process the data, and place it into our Table Storage.

by Eldert Grootenboer | Apr 23, 2016 | BizTalk Community Blogs via Syndication
In my my previous post, I showed how we can use a WebJob to process a Service Bus queue and store the data in an Azure SQL database. This was pretty simple to set up, but it did require a good understanding of how to connect with these and process the data. Sometimes however we just want to do a quick integration without needing to set up all this plumbing. Recently Microsoft announced a new feature called Azure Functions, with now makes this possible. Azure functions can be used to create a small function which can run stand-alone, or be called from other applications, for example from a logic app, as has been described here by Sandro Pereira. Azure Functions provide out of the box connections for triggers, input and output to a lot of other Azure features, including Event Hubs, Service Bus, Azure Storage and DocumentDB. In this post I will show how we can process our message from the queue we created in this blogpost, and store it in an Azure Storage table. We will start by creating a new Function App in the portal.
Fill out the fields as specified. In case we allready have other App Services, we can run the Function in the same App Service Plan we are using for these by choosing Classic App Service Plan. However if we want the true cloud experience, it can also be run in a Dynamic App Service Plan, in which case Azure will provide all of the necessary resources when needed, and it will only cost us when our code is actually running.
Once the Function has been deployed, we can find it under App Services. Let’s create a new function in our Function App we just created. There’s either the possibility to start from scratch, or to use one of the premade templates.
We will create a function from scratch for this demo. Click on New Function, and select the ServiceBusQueueTrigger – C# template.
Now we can set up our function. We can either choose to use an existing queue, or if we specify a name for a queue which is not in the selected namespace yet, it will be created for us. We will select the queue we created earlier. When creating the connection to our Service Bus namespace, we have to use credentials with Manage permissions.
Once this simple setup has been done, click Create and we will see a Code editor in our browser with the outline for our function. As you will see, by default this function expects a string from our queue, however we are sending in a BrokeredMessage. Luckily, we can reference any namespace from our function as well. There are a couple of options to import namespaces. In our function, we will want to import the Microsoft.ServiceBus.Messaging namespace, which is part of the WindowsAzure.ServiceBus package. As this package is available from NuGet, we will use this to add the reference. Start by creating a project.json file, and add the following code, which will add a reference to version 2.7.6 of the package.
{
    "frameworks": {
        "net46":{
            "dependencies": {
                "WindowsAzure.ServiceBus": "2.7.6"
            }
        }
    }
}
|
Now we will use Kudu to upload the project.json file. The Kudu for our Function App can be reached on https://YOURAPP.scm.azurewebsites.net/. Go to the CMD Debug Console, and navigate to D:homesitewwwroot. Now we can drag and drop our project.json file here to upload it.
Going back to our Function App’s console, we will now see that the NuGet package we just added is being restored.
Now that we have added this NuGet package, we can reference the Microsoft.ServiceBus.Messaging from our code, and use the BrokeredMessage class in our incoming parameters.
Now that we have our input set up, we will add our output. Open the Integrate tab, and click New Output. Select Azure Storage Table as output, and set up the properties. We will let the function create a table for us, and we will use the shipname as a partition key.
To save our object to the Azure Storage Table, we have to create a class which will be used to map the data. Add the following class after the function. Be sure to include the PartitionKey and RowKey fields, as these are required when writing to Azure Table Storage. The other fields will hold the data we receive from our queue.
public class ErrorWarning
{
    public string PartitionKey { get; set; } // Required for writing to table storage
    public string RowKey { get; set; } // Required for writing to table storage
    public string CreatedDateTime { get; set; }
    public string ShipName { get; set; }
    public string Message { get; set; }
}
|
We also have to add a parameter to the function’s input parameters. When working with Azure Table Storage, this has to be an ICollector holding instances of the class we just created. Make sure to use the Table parameter name we just specified as name of the parameter. Once this is done, we can start implementing our function’s body. We will start by writing the data to the log, followed by creating an instance of our ErrorWarning class with the data we just received from the queue. We will then add this data to the Azure Table Storage.
public static void Run(BrokeredMessage myQueueItem, ICollector<ErrorWarning> queuesAndWarningsStorageTable, TraceWriter log)
{
    log.Verbose($"C# ServiceBus queue trigger function processed message: {myQueueItem.Properties["time"]}, {myQueueItem.Properties["ship"]}, {myQueueItem.Properties["exceptionMessage"]}");

    var item = new ErrorWarning {
        PartitionKey = myQueueItem.Properties["ship"].ToString(),
        RowKey = Guid.NewGuid().ToString(),
        CreatedDateTime = myQueueItem.Properties["time"].ToString(),
        ShipName = myQueueItem.Properties["ship"].ToString(),
        Message = myQueueItem.Properties["exceptionMessage"].ToString()
    };

    queuesAndWarningsStorageTable.Add(item);

    log.Verbose($"Added item {item.PartitionKey} to the table");
}
|
Now click Save and we will see our function is being compiled.
Now whenever a message is being placed on the queue, our Azure Function will pick it up, process the data, and place it into our Table Storage.
by Eldert Grootenboer | Apr 19, 2016 | BizTalk Community Blogs via Syndication
This is the fifth post in my series on Integration of Things. In this post I showed how you can send messages from a Raspberry Pi 2 into a Service Bus Queue, and in our previous blogpost we have set up a library for connecting to an Azure SQL database. Today I will explain how we can use a WebJob to retrieve the messages from the queue and send them to our database. The code for this blogpost can be found here.
A WebJob is a simple way to set up a background job, which can process continuously or on a schedule. WebJobs differ from a cloud service (which we discussed in this blogpost) as it gives you get less fine-grained control over your processing environment, making it a more true PaaS service.
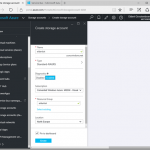
We will need a Web App to host our WebJob, so lets create one in the Azure Portal. You can create a new Web App by going to App Services, and selecting New.
To simplify our deployment later on, we will download the publish profile for our Web App once it has been created.
Next we will create a new project for our WebJob, so be sure to install the Azure WebJob SDK if you don’t have it yet.
Once the project has been created, start by going to the App.Config, and setting the connection strings for the dashboard and storage. This should both be set to the connection string for the Azure Storage account we created in this blogpost, and should be in the format DefaultEndpointsProtocol=https;AccountName=NAME;AccountKey=KEY. Both the name and the key can be found in the settings of the storage account.
We will also need to set the connection string for our Service Bus Queue, for which we will need a Shared Access Key with Manage permissions, as as required by the WebJob’s job host.
And finally, we will also need to add the connection string to our Azure SQL database, which we will use from our Entity Framework library to communicate with the database.
<connectionStrings>
<add name="AzureWebJobsDashboard" connectionString="DefaultEndpointsProtocol=https;AccountName=eldertiot;AccountKey=xxxxxxxxxxxxxxxxxxxxxxxxxxxxx" />
<add name="AzureWebJobsStorage" connectionString="DefaultEndpointsProtocol=https;AccountName=eldertiot;AccountKey=xxxxxxxxxxxxxxxxxxxxxxxxxxxxx" />
<add name="AzureWebJobsServiceBus" connectionString="Endpoint=sb://eldertiot.servicebus.windows.net/;SharedAccessKeyName=administrationconsole;SharedAccessKey=xxxxxxxxxxxxxxxxxxxxxxxxxxxxx" />
<add name="IoTDatabaseContext" connectionString="Server=tcp:eldertiot.database.windows.net,1433;Database=eldertiot;User ID=Eldert@eldertiot;Password=xxxxxxxxxxxxxxx;Encrypt=True;TrustServerCertificate=False;Connection Timeout=30;" providerName="System.Data.SqlClient"/>
</connectionStrings>
|
We also have to add the AzureWebJobsDashboard connection string to the Application settings of the Web App in the Azure portal, so the logs can be stored in your storage.
By default a trigger is added to the WebJob for storage queues, however as we want to work with a Service Bus Queue, we will need to add the Microsoft.Azure.WebJob.ServiceBus NuGet package to our project.
Now that we have all configuration in place, we’ll go and implement the code in our WebJob. Open up the Functions class which was created with inside your WebJob project. We will change the trigger type to ServiceBusTrigger so we can get triggers from our Service Bus Queue, using the queue we created in this blogpost. As we are using a Service Bus trigger, we will also need to change the type of the message to be a BrokeredMessage instead of a string. When we have received the message, we will save its contents to the database, using the library we created in my previous blogpost.
using System;
using System.IO;

using Eldert.IoT.Data.DataTypes;

using Microsoft.Azure.WebJobs;
using Microsoft.ServiceBus.Messaging;

namespace Eldert.IoT.Azure.ServiceBusQueueProcessor
{
    public class Functions
    {
        private static readonly IoTDatabaseContext database = new IoTDatabaseContext();

        /// <summary>
        /// This function will get triggered/executed when a new message is written on an Azure Service Bus Queue.
        /// </summary>
        public static void ProcessQueueMessage([ServiceBusTrigger("queueerrorsandwarnings")] BrokeredMessage message, TextWriter log)
        {
            try
            {
                log.WriteLine($"Processing message: {message.Properties["exceptionmessage"]} Ship: {message.Properties["ship"]}");

                // Add the message we received from our queue to the database
                database.ErrorAndWarningsEntries.Add(new ErrorAndWarning()
                {
                    CreatedDateTime = DateTime.Parse(message.Properties["time"].ToString()),
                    ShipName = message.Properties["ship"].ToString(),
                    Message = message.Properties["exceptionmessage"].ToString()
                });

                // Save changes in the database
                database.SaveChanges();
            }
            catch (Exception exception)
            {
                log.WriteLine($"Exception in ProcessQueueMessage: {exception}");
            }
        }
    }
}
|
Next we will update the Program class, as we will need to register our Service Bus extension in the configuration of our job host.
using Microsoft.Azure.WebJobs;

namespace Eldert.IoT.Azure.ServiceBusQueueProcessor
{
    // To learn more about Microsoft Azure WebJobs SDK, please see http://go.microsoft.com/fwlink/?LinkID=320976
    class Program
    {
        // Please set the following connection strings in app.config for this WebJob to run:
        // AzureWebJobsDashboard and AzureWebJobsStorage
        static void Main()
        {
            // Create job host configuration
            var config = new JobHostConfiguration();

            // Tell configuration we want to use Azure Service Bus
            config.UseServiceBus();

            // Add the configuration to the job host
            var host = new JobHost(config);

            // The following code ensures that the WebJob will be running continuously
            host.RunAndBlock();
        }
    }
}
|
Now that our code is completed, we can publish the WebJob to Azure. Right-click the project, and select Publish as Azure WebJob.
Provide a name for the WebJob, and make sure it’s set to run continuously, as we will want to process messages as soon as they come into our queue.
We will use the publish profile we exported earlier to set up publishing.
Review the settings, but as we are using a publish profile, these should allready be correct.
Wait for the application to be published, you can check the activity monitor to keep track of its progress.
When it’s done, we can see the WebJob in our Azure Portal.
By clicking on the Logs URI we will be able to check the logging for our WebJob. Here you will find the invocations of our function, as well as output of the status of our WebJob. To check if our job is actually working, we will create an exception message using Service Bus Explorer. Open up the application, and connect to our Service Bus Namespace (remember to use the RootManageAccessKey). Now right-click on the queue, and select Send Messages. A composer will now open up, where we can set the message to be sent. As we sent everything in our properties, we can set a random message in the Message Text (can not be empty, as it will give issues when sending, this is a restriction of Service Bus Explorer), and add Message properties for the exceptionmessage, ship and time.
Click Start to send the message, when the message has been sent we will go back to the portal. We will now see the invocation we just did, and can open it to show the output.
Lets open up the SQL Server Object Explorer in Visual Studio and connect to our database we created in the previous blogpost. We will now see the table for errors and warnings has indeed been automatically created by our migration, and the data we just sent to it is in the table.
Code
by Eldert Grootenboer | Apr 9, 2016 | BizTalk Community Blogs via Syndication
This is the fourth post in my series on Integration of Things. In this post, we will use Entity Framework Code First to set up an Azure Sql database, which will later on be filled with the data we receive from our Service Bus Queue. As we will want to access this database from multiple projects, we will add it to the DataTypes Class Library we created in the previous blogpost. The code for this blogpost can be found here.
First we will create an empty database in Azure.
As we will be using Entity Framework Code First we need to install the NuGet package for this library.
Using code first we define the layout of our tables in our code, so let’s add a class in the DataTypes project representing the table which will hold the error and warning data we are going to receive from the Service Bus Queue. Note the data annotations, this will specify the schema for our database.
using System;
using System.ComponentModel.DataAnnotations;
using System.ComponentModel.DataAnnotations.Schema;

namespace Eldert.IoT.Data.DataTypes
{
    [Table("ErrorAndWarning")]
    public class ErrorAndWarning
    {
        // By specifying the name ID, entity framework will know this should be an auto-incrementing PK
        public int ID { get; set; }

        [StringLength(50)]
        public string ShipName { get; set; }

        public string Message { get; set; }

        public DateTime CreatedDateTime { get; set; }
    }
}
|
The next step is to create a class which inherits from the DbContext class, which will be used as the context for communication with our database.
using System.Data.Entity;

namespace Eldert.IoT.Data.DataTypes
{
    public class IoTDatabaseContext : DbContext
    {
        public IoTDatabaseContext() : base("name=IoTDatabaseContext")
        {
        }

        public virtual DbSet ErrorAndWarningsEntries { get; set; }
    }
}
|
To be able to communicate with the database in Azure we will have to add a connection string to the App.config. The connection string to be used can be found in the Azure portal in the properties of the database we just created.
<connectionStrings>
  <add name="IoTDatabaseContext" connectionString="Server=tcp:yourserver.database.windows.net,1433;Database=yourdatabase;User ID=yourname@yourserver;Password={your_password_here};Encrypt=True;TrustServerCertificate=False;Connection Timeout=30;" providerName="System.Data.SqlClient">
</connectionStrings>
|
All code we need is now in place, we will now go and enable migrations on our project. Migrations are the way of EF Code First to update our database when we make changes to our code. Open the Package Manage Console in Visual Studio (can be found under View, Other Windows), make sure the current project is set as default project, and enter the command Enable-Migrations.
After enabling the migrations, we have to create an initial migration which will scaffold the setup of the table we just created. On the Package Manager Console, enter the command Add-Migration CreateErrorAndWarningTable, and wait for scaffolding to be finished. Once done, you will find a new class in the Migrations folder with the code which will create our database.
We now have set up our connection to our database, the first time an application uses this library to access the database the table will be created. In my next blogpost I will show how we can use an Azure WebJob to process data from Service Bus Queues and use this library to save the data to our Azure SQL database.
Code

by Eldert Grootenboer | Mar 8, 2016 | BizTalk Community Blogs via Syndication
A while ago I created a post on using the BizTalk Deployment Framework for automated build and deployment. Since then I have worked this out to be more easy and maintainable using PowerShell, which I will show in this post. BizTalk Deployment Framework is one of those pearls for BizTalk developers, allowing complex BizTalk solutions to be deployed easily, having all our artifacts and dependencies together in one MSI. The code with this post can be downloaded from here.
Using PowerShell we will make scripts which will handle all steps of the build and deployment process for us. This will make sure our applications are always deployed in the correct order, using the right versions, and with minimal effort. We have some general helper functions, which will help us clear log files, wait for user input, iterate through directories, etc. We assume you have are using some of the BTDF best practices for these scripts, where it comes to naming conventions and folder structure. Of course, in case anything differs in your environment, you can easily adjust the scripts to meet your requirements.
We will first create the PowerShell scripts which will help us build our applications. To be able to share these scripts along your different developers, where there might be some differences in the environments in how directories are set up, we will make use of a small csv file to hold our build environment settings.
Name;Value
projectsBaseDirectory;F:tfs
installersOutputDirectory;F:Deployment
visualStudioDirectory;F:Program Files (x86)Microsoft Visual Studio 11.0
|
We will load these settings in our script and assign them to specific parameters.
$settings = Import-Csv Settings_BuildEnvironment.csv
foreach($setting in $settings)
{
    # The directory where the BizTalk projects are stored
    if($setting.'Name;Value'.Split(";")[0].Trim() -eq "projectsBaseDirectory") { $projectsBaseDirectory = $setting.'Name;Value'.Split(";")[1].Trim() }

    # The directory where the MSI's should be saved to
    if($setting.'Name;Value'.Split(";")[0].Trim() -eq "installersOutputDirectory") { $installersOutputDirectory = $setting.'Name;Value'.Split(";")[1].Trim() }

    # Directory where Visual Studio resides
    if($setting.'Name;Value'.Split(";")[0].Trim() -eq "visualStudioDirectory") { $visualStudioDirectory = $setting.'Name;Value'.Split(";")[1].Trim() }
}
|
Now that we have our environment specific parameters set, we can create a function which will build our BizTalk application. We will assume you have several projects, which are in folders under a common directory ($projectsBaseDirectory), which is probably your source control root directory. Your application’s directories should be under these project’s directories. We will building the application by calling Visual Studio, and using the log to check if the build was successful.
function BuildBizTalkApplication([string]$application, [string]$project)
{
    # Set directory where the BizTalk projects for the current project are stored
    $projectsDirectory = "$projectsBaseDirectory$project"

    # Clear log files and old installers
    ClearLogFiles $application

    # Build application
    Write-Host "Building $application" -ForegroundColor Cyan
    $exitCode = (Start-Process -FilePath "$visualStudioDirectoryCommon7IDEdevenv.exe" -ArgumentList """$projectsDirectory$application$application.sln"" /Build Release /Out $application.log" -PassThru -Wait).ExitCode

    # Check result
    if($exitCode -eq 0 -and (Select-String -Path "$application.log" -Pattern "0 failed" -Quiet) -eq "true")
    {
        Write-Host "$application built succesfully" -ForegroundColor Green
    }
    else
    {
        Write-Host "$application not built succesfully" -ForegroundColor Red
        WaitForKeyPress
    }
}
|
Once the applications are built, we will also need to create MSI’s for them, which is where the BTDF comes in. This can be done by calling MSBuild, and passing in the .btdfproj file. Finally we copy the MSI to a folder, so all our MSI’s are together in one location and from there can be copied to the BizTalk server.
function BuildBizTalkMsi([string]$application, [string]$project)
{
    # Set directory where the BizTalk projects for the current project are stored
    $projectsDirectory = "$projectsBaseDirectory$project"

    # Build installer
    $exitCode = (Start-Process -FilePath """$env:windirMicrosoft.NETFrameworkv4.0.30319MSBuild.exe""" -ArgumentList "/t:Installer /p:Configuration=Release ""$projectsDirectory$applicationDeploymentDeployment.btdfproj"" /l:FileLogger,Microsoft.Build.Engine;logfile=$application.msi.log" -PassThru -Wait).ExitCode

    # Check result
    if($exitCode -eq 0)
    {
        Write-Host "MSI for $application built succesfully" -ForegroundColor Green
    }
    else
    {
        Write-Host "MSI for $application not built succesfully" -ForegroundColor Red
        WaitForKeyPress
    }

    # Copy installer
    copy "$projectsDirectory$applicationDeploymentbinRelease*.msi" "$installersOutputDirectory"
}
|
Once the MSI’s have been created we can copy them to our BizTalk server, and start the deployment process. This process consists of 4 steps, starting with undeploying the old applications, uninstalling the old MSI’s, installing the new MSI’s and deploying the new applications. If your applications have dependencies on other applications, it’s also important to undeploy and deploy them in the correct order. We will want to use one set of scripts for all our OTAP environments, so we will be using another csv file here to keep track of the environment specific settings, like directories and config files to use.
Undeploy
We will start by loading the environment specific parameters.
$settings = Import-Csv Settings_DeploymentEnvironment.csv
foreach($setting in $settings)
{
    # Program Files directory where application should be installed
    if($setting.'Name;Value'.Split(";")[0].Trim() -eq "programFilesDirectory") { $programFilesDirectory = $setting.'Name;Value'.Split(";")[1].Trim() }

    # Suffix as set in in the ProductName section of the BTDF project file. By default this is " for BizTalk".
    if($setting.'Name;Value'.Split(";")[0].Trim() -eq "productNameSuffix") { $productNameSuffix = $setting.'Name;Value'.Split(";")[1].TrimEnd() }

    # Indicator if we should deploy to the BizTalkMgmtDB database from this server. In multi-server environments this should be true on 1 server, and false on the others
    if($setting.'Name;Value'.Split(";")[0].Trim() -eq "deployBizTalkMgmtDB") { $deployBizTalkMgmtDB = $setting.'Name;Value'.Split(";")[1].Trim() }
}
|
Now we can write our function for undeploying. We will also be using MSBuild in conjuntion with BTDF here, by passing in the .btdfproj file location with the Undeploy switch. To do so, we will call the following function for each application to be undeployed. Remember to do the undeployment in the correct order.
function UndeployBizTalkApplication([string]$application, [string]$version)
{
    # Execute undeployment
    $exitCode = (Start-Process -FilePath "$env:windirMicrosoft.NETFrameworkv4.0.30319MSBuild.exe" -ArgumentList """$programFilesDirectory$application$productNameSuffix$versionDeploymentDeployment.btdfproj"" /t:Undeploy /p:DeployBizTalkMgmtDB=$deployBizTalkMgmtDB /p:Configuration=Server" -Wait -Passthru).ExitCode

    if($exitCode -eq 0)
    {
        Write-Host "$application undeployed successfully" -ForegroundColor Green
    }
    else
    {
        Write-Host "$application not undeployed successfully" -ForegroundColor Red
    }
}
|
Uninstall
Once all the applications for our project have been undeployed, we will uninstall the old MSI’s. To do this, we will iterate through the MSI’s in the specified directory, where we will pass in the directory with the last used installers.
function UninstallBizTalkApplications($msiDirectory)
{
    # Get MSI's to be installed
    $files = GetMsiFiles $msiDirectory

    # Loop through MSI files
    foreach($file in $files)
    {
        UninstallBizTalkApplication $file
    }
}
|
This will call the uninstall command. We will assume our MSI’s are named according to BTDF defaults, which is applicationname-version, so for example MyApplication-1.0.0.msi.
function UninstallBizTalkApplication([System.IO.FileInfo]$fileInfo)
{
    # Get application name
    $applicationName = $fileInfo.BaseName.Split("-")[0]

    # Set installer path
    $msiPath = $fileInfo.FullName

    # Uninstall application
    $exitCode = (Start-Process -FilePath "msiexec.exe" -ArgumentList "/x ""$msiPath"" /qn" -Wait -Passthru).ExitCode

    # Check if uninstalling was successful
    if($exitCode -eq 0)
    {
        Write-Host "$applicationName uninstalled successfully" -ForegroundColor Green
    }
    else
    {
        Write-Host "$applicationName not uninstalled successfully" -ForegroundColor Red
    }
}
|
Install
The next step will be to install all the new MSI’s we have just built. Here we will once again iterate through the specified directory, where we will now pass in the directory with the new installers.
function InstallBizTalkApplications([string]$msiDirectory)
{
    # Clear log files
    ClearLogFiles $msiDirectory

    # Get MSI's to be installed
    $files = GetMsiFiles $msiDirectory

    # Loop through MSI files
    foreach($file in $files)
    {
        # Install application
        InstallBizTalkApplication $file
    }
}
|
We will also have to load the environment specific parameters here.
$settings = Import-Csv Settings_DeploymentEnvironment.csv
foreach($setting in $settings)
{
    # Program Files directory where application should be installed
    if($setting.'Name;Value'.Split(";")[0].Trim() -eq "programFilesDirectory") { $programFilesDirectory = $setting.'Name;Value'.Split(";")[1].Trim() }

    # Suffix as set in in the ProductName section of the BTDF project file. By default this is " for BizTalk".
    if($setting.'Name;Value'.Split(";")[0].Trim() -eq "productNameSuffix") { $productNameSuffix = $setting.'Name;Value'.Split(";")[1].TrimEnd() }
}
|
And now we can install the MSI. As mentioned before, we will assume our MSI’s are named according to BTDF defaults (applicationname-version.msi).
function InstallBizTalkApplication([System.IO.FileInfo]$fileInfo)
{
    # Get application name and version
    # We assume msi file name is in the format ApplicationName-Version
    $application = $fileInfo.BaseName.Split("-")[0]
    $version = $fileInfo.BaseName.Split("-")[1]

    # Directory where MSI resides
    $msiDirectory = $fileInfo.Directory

    # Set log name
    $logFileName = "$msiDirectory$application.log"

    # Set installer path
    $msiPath = $fileInfo.FullName

    # Install application
    Start-Process -FilePath "msiexec.exe" -ArgumentList "/i ""$msiPath"" /passive /log ""$logFileName"" INSTALLDIR=""$programFilesDirectory$application$productNameSuffix$version""" -Wait -Passthru | Out-Null

    # Check if installation was successful
    if((Select-String -Path $logFileName -Pattern "success or error status: 0" -Quiet) -eq "true")
    {
        Write-Host "$application installed successfully" -ForegroundColor Green
    }
    else
    {
        Write-Host "$application not installed successfully" -ForegroundColor Red
    }
}
|
Deploy
The last step is to deploy the applications we just installed. First we again have to load the environment specific parameters.
$settings = Import-Csv Settings_DeploymentEnvironment.csv
foreach($setting in $settings)
{
    # Program Files directory where application should be installed
    if($setting.'Name;Value'.Split(";")[0].Trim() -eq "programFilesDirectory") { $programFilesDirectory = $setting.'Name;Value'.Split(";")[1].Trim() }

    # Suffix as set in in the ProductName section of the BTDF project file. By default this is " for BizTalk".
    if($setting.'Name;Value'.Split(";")[0].Trim() -eq "productNameSuffix") { $productNameSuffix = $setting.'Name;Value'.Split(";")[1].TrimEnd() }

    # Indicator if we should deploy to the BizTalkMgmtDB database from this server. In multi-server environments this should be true on 1 server, and false on the others
    if($setting.'Name;Value'.Split(";")[0].Trim() -eq "deployBizTalkMgmtDB") { $deployBizTalkMgmtDB = $setting.'Name;Value'.Split(";")[1].Trim() }

    # Name of the BTDF environment settings file for this environment.
    if($setting.'Name;Value'.Split(";")[0].Trim() -eq "environmentSettingsFileName") { $environmentSettingsFileName = $setting.'Name;Value'.Split(";")[1].Trim() }
}
|
Deploying is also done by using MSBuild with BTDF, by specifying the Deploy flag. For this we will be calling the following function for each application to be deployed, which of course should be done in the correct order.
function DeployBizTalkApplication([string]$application, [string]$version)
{
    # Set log file
    $logFileName = "$programFilesDirectory$application$productNameSuffix$versionDeployResultsDeployResults.txt"

    # Execute deployment
    $exitCode = (Start-Process -FilePath "$env:windirMicrosoft.NETFrameworkv4.0.30319MSBuild.exe" -ArgumentList "/p:DeployBizTalkMgmtDB=$deployBizTalkMgmtDB;Configuration=Server;SkipUndeploy=true /target:Deploy /l:FileLogger,Microsoft.Build.Engine;logfile=""$programFilesDirectory$application$productNameSuffix$versionDeployResultsDeployResults.txt"" ""$programFilesDirectory$application$productNameSuffix$versionDeploymentDeployment.btdfproj"" /p:ENV_SETTINGS=""$programFilesDirectory$application$productNameSuffix$versionDeploymentEnvironmentSettings$environmentSettingsFileName.xml""" -Wait -Passthru).ExitCode

    # Check if deployment was successful
    if($exitCode -eq 0 -and (Select-String -Path $logFileName -Pattern "0 Error(s)" -Quiet) -eq "true")
    {
        Write-Host "$application deployed successfully" -ForegroundColor Green
    }
    else
    {
        Write-Host "$application not deployed successfully" -ForegroundColor Red
    }
}
|
From the same location where we call this function, we will also do some additional checks. Sometimes you will want to import some registry files or execute a SQL script, which you might not want to include in your BTDF MSI for any reason. Also, once everything has been deployed, you might want to restart your host instances and IIS, which can also be handled here.
function DeployBizTalkApplications([string[]]$applicationsInOrderOfDeployment, [string[]]$versions, [string]$scriptsDirectory)
{
    # Check which restarts should be done
    $resetIIS = CheckIfIISShouldBeReset
    $restartHostInstances = CheckIfHostinstancesShouldBeRestarted

    # Loop through applications to be deployed
    for($index = 0; $index -lt $applicationsInOrderOfDeployment.Length; $index++)
    {
        # Deploy application
        DeployBizTalkApplication $applicationsInOrderOfDeployment[$index] $versions[$index]
    }

    # Get SQL files to be executed
    $sqlFiles = GetSQLFiles $scriptsDirectory

    # Loop through SQL files
    foreach($sqlFile in $sqlFiles)
    {
        # Execute SQL file
        ExecuteSqlFile $sqlFile
    }

    # Get registry files to be imported
    $registryFiles = GetRegistryFiles $scriptsDirectory

    # Loop through registry files
    foreach($registryFile in $registryFiles)
    {
        # Import registry file
        ImportRegistryFile $registryFile
    }

    # Do restarts
    if($resetIIS)
    {
        DoIISReset
    }
    if($restartHostInstances)
    {
        DoHostInstancesRestart
    }
}
|
Finally, we have to stitch it all together. When you have downloaded the complete set of functions from this article, you can specify your build scripts as following, where you will only have to change the project name and applications to be built.
# Project specific settings
$projectName = "OrderSystem"
$applications = @("Contoso.OrderSystem.Orders", "Contoso.OrderSystem.Invoices", "Contoso.OrderSystem.Payments")

# Import custom functions
. .Functions_Build.ps1

# Build the applications
BuildAndCreateBizTalkInstallers $applications $projectName

# Wait for user to exit
WaitForKeyPress
|
As for deployment, all those steps can also be called from one single script as following. Once again, the only thing to change is the project specific settings.
# Project specific settings
$oldInstallersDirectory = "F:tmpR9"
$newInstallersDirectory = "F:tmpR10"
$newApplications = @("Contoso.OrderSystem.Orders", "Contoso.OrderSystem.Invoices", "Contoso.OrderSystem.Payments")
$oldApplications = @("Contoso.OrderSystem.Payments", "Contoso.OrderSystem.Invoices", "Contoso.OrderSystem.Orders")
$oldVersions = @("1.0.0", "1.0.0", "1.0.0")
$newVersions = @("1.0.0", "1.0.1", "1.0.0")

# Import custom functions
. .Functions_Deploy.ps1
. .Functions_Undeploy.ps1
. .Functions_Install.ps1
. .Functions_Uninstall.ps1

# Undeploy the applications
UndeployBizTalkApplications $oldApplications $oldVersions

# Wait for user to continue
WaitForKeyPress

# Uninstall the applications
UninstallBizTalkApplications $oldInstallersDirectory

# Wait for user to continue
WaitForKeyPress

# Install the applications
InstallBizTalkApplications $newInstallersDirectory

# Wait for user to continue
WaitForKeyPress

# Deploy the applications
DeployBizTalkApplications $newApplications $newVersions $newInstallersDirectory

# Wait for user to exit
WaitForKeyPress
|
As you can see, using these PowerShell scripts you can setup scripts for your build and deployment processes very quickly. And by automating all these steps, we will have to spend much less time on builds and deployments, as we will only have to start our scripts, and the rest just goes automatically.
Code

by Eldert Grootenboer | Mar 2, 2016 | BizTalk Community Blogs via Syndication
Everyone who has been working with BizTalk knows how powerful this product can be. It will allow you to tackle a lot of integration scenarios out of the box, but sometimes you will run into a requirement which can not be handled using just the standard BizTalk components. Luckily BizTalk can be extended on many points, giving you the power to handle all your scenarios. Some of these extensibility points are:
- Ports (Custom behaviors and adapters)
- Pipelines (Pipeline components)
- Mappings (XSLT, Functoids, XPATH)
- Orchestration (XPATH, Helper classes)
- Configuration (SSO Helper)
- Deployment (Deployment Framework)
- Testing (BizUnit, Visual Studio Test, Custom clients)
- Monitoring (BAM, BizTalk assemblies)
- Rules (BRE)
During my time working with the product, I have come to know and love these extensibility points, so when Steef-Jan contacted me to work with him and Johann Cooper on an e-book on this subject I was immediately on board. And today, after a lot of hard work, the e-book has been officially released, and can be downloaded from our friends at BizTalk360 for free. I hope anyone working with BizTalk will find this book to be a great resource.
I want to thank everyone Steef-Jan and Johann for co-authoring the e-book. I also want to thank Sandro Pereira, Mark Brimble and James Corbould for reviewing and helping us revise it into its final state. And last but not least, thanks to Saravana Kumar for publishing it. I had a really great time working with all of you.
by Eldert Grootenboer | Feb 24, 2016 | BizTalk Community Blogs via Syndication
This is the third post in my series on Integration of Things. In my previous post I explained how you could send and receive data on a Raspberry Pi 2 to Azure. Today I will explain how you can use an Azure cloud service as a worker role for retrieving the data from Event Hubs using the Event Processor Host library. We will save the retrieved data in an Azure Table Storage, which is a great service for working with large amounts of structured, non-relational data. Azure Table Storage is very fast, and cost efficient especially when working with lots of data, which makes it ideal for our scenario. The code for this blogpost can be found here.
The Event Processor Host library will be used to retrieve the data from our event hub, and load it into Azure Table Storage. This library will distribute Event Hubs partitions accross our instances of the worker role, keeping track of leases and snapshots. This library really makes working with Event Hubs from .NET code a breeze to go through. We will need a blob storage for for the table and for the library to store its data, so let’s start by setting one up via the Azure Portal.
Our application will read from the event hub we created in the previous blogpost. To be able to access it, we need create a Shared Access Policy for this application with Listen permissions.
When working with Azure Table Storage, we need a class which represents the object which will be saved to the table. This class should derive from the TableEntity class, so it can be mapped into Table Storage. As we will be using this object in multiple project, we will create a new Class Library project for it.
We will need to add a reference to the WindowsAzure.Storage NuGet package in order to work with Azure Storage.
Add the class to the project which holds our object to be inserted into the table. We’ll use a method to set the partition and row key, which are used to shard the data and query the data. We use the same fields as we defined in the EngineInformation class used in the fieldhub project, so we can deserialize the objects we receive in the event hub directly into an object for the database. Unfortunatly it’s not possible to create a shared class library which can be used both by our worker role and the fieldhub UWP application, due to the incompatibility between Win32 and WinRT class libraries.
using System;

using Microsoft.WindowsAzure.Storage.Table;

namespace Eldert.IoT.Data.DataTypes
{
    /// <summary>
    /// Represents an engine information object for Azure Table Storage.
    /// </summary>
    public class EngineInformation : TableEntity
    {
        public Guid Identifier { get; set; }

        public string ShipName { get; set; }

        public string EngineName { get; set; }

        public double Temperature { get; set; }

        public double RPM { get; set; }

        public bool Warning { get; set; }

        public int EngineWarning { get; set; }

        public DateTime CreatedDateTime { get; set; }

        public void SetKeys()
        {
            PartitionKey = ShipName;
            RowKey = Identifier.ToString();
        }
    }
}
|
Next we are going to create a Cloud Service project containing a worker role, which we’re going to publish to Azure later on.
When the project is created, we will have two projects, one for the worker role, the other for the cloud service itself. Let’s start by setting up our worker role. As mentioned, we will implement the event processor library, for which we need to add the EventProcessorHost NuGet package to our project, as well as the WindowsAzure.Storage NuGet package for working with the table.
For this we will create a new class, which implements the IEventProcessor interface.
using System;
using System.Collections.Generic;
using System.Diagnostics;
using System.Text;
using System.Threading.Tasks;

using Eldert.IoT.Data.DataTypes;

using Microsoft.Azure;
using Microsoft.ServiceBus.Messaging;
using Microsoft.WindowsAzure.Storage;
using Microsoft.WindowsAzure.Storage.Table;

internal class ShipEventProcessor : IEventProcessor
{


}
|
This interface implements three methods. The first is OpenAsync, which gets called when the event processors are started for the partitions in our event hub. In this call we will also create the table to which we want to save our data in case it does not yet exist.
public Task OpenAsync(PartitionContext context)
{
        // Create the table if it doesn't exist yet
        if (_table.CreateIfNotExists())
        {
                Trace.TraceInformation("Table for EngineInformation has been created.");
        }

        Trace.TraceInformation($"EventProcessor started.  Partition: {context.Lease.PartitionId}, Current offset: {context.Lease.Offset}");

        return Task.FromResult<object>(null);
}
|
The second one is CloseAsync, which is called when the event processor is being shutdown. We will set a checkpoint here in case we are shutting down, so next time the event processor is started up for this partition, processing will resume from the last processed message.
public async Task CloseAsync(PartitionContext context, CloseReason reason)
{
    Trace.WriteLine($"EventProcessor is shutting down: Partition: {context.Lease.PartitionId} Reason: {reason}");

    // Place a checkpoint in case the event processor is shutting down
    if (reason == CloseReason.Shutdown)
    {
        await context.CheckpointAsync();
    }
}
|
The last method is ProcessEventsAsync, which is where the processing of the messages that are being received is done. As the messages were UTF8 serialized JSON strings, we will use the JSON library from Newtonsoft to deserialize the messages. To do so, we first need to install its NuGet package.
Now we will loop through the messages we received from our event hub, get the message string, and deserialize it to an EngineInformation object. Because event hubs works in a streaming manner, where we set checkpoints every x messages, we could receive messages more then once. To handle this, we will have to have some idempotency in place. I choose to just replace the existing object in the database, but for different scenarios this is something to think about. The reason we don’t place a checkpoint every message is due to performance reasons. Event Hubs are meant for large loads of messages, so it would be unwise to checkpoint every message. The storage account used for checkpointing probably wouldn’t handle this load, but more importantly checkpointing every single event indicates of a queued messaging pattern for which a Queue may be a better option than an Event Hub. The idea behind Event Hubs is that you will get at least once delivery at great scale. We therefor make our application idempotent so we can easily recover from failures or restarts that result in the same events being received multiple times.
/// <summary>
/// Processing of the messages received on the event hub.
/// </summary>
public async Task ProcessEventsAsync(PartitionContext context, IEnumerable<EventData> messages)
{
        try
        {
                // Gather the table operations to be performed
                var tableOperations = new TableBatchOperation();

                // Loop through received messages
                foreach (var eventData in messages)
                {
                        // Get the message received as a JSON string
                        var message = Encoding.UTF8.GetString(eventData.GetBytes());
                        Trace.TraceInformation($"Message received - Partition: {context.Lease.PartitionId} - Machine: {Environment.MachineName} Message: {message}");

                        try
                        {
                                // Deserialize the JSON message to an engine information object
                                var engineInformation = JsonConvert.DeserializeObject<EngineInformation>(message);
                                engineInformation.SetKeys();

                                // We have to take care of idempotency ourself, as we might get the same message multiple times
                                // To do so, we will insert new items, and replace existing items (which will replace the item with the same item)
                                // For extra performance we gather the table operations here, and will apply them later on in a batch
                                Trace.TraceInformation($"Adding {engineInformation.Identifier} to table");
                                tableOperations.Add(TableOperation.InsertOrReplace(engineInformation));
                        }
                        catch (Exception)
                        {
                                Trace.TraceWarning("Could not deserialize as EngineInformation object");
                        }
                }

                // Apply table operations if needed
                if (tableOperations.Count > 0)
                {
                        await _table.ExecuteBatchAsync(tableOperations);
                        Trace.TraceInformation("Saved data to database");
                }

                // Keep track of number of received messages, place a checkpoint after having processed 50 messages.
                // Make sure the messages are persisted in the table before placing the checkpoint
                if (++_messageCounter > 50)
                {
                        Trace.TraceInformation("Checkpoint placed");
                        await context.CheckpointAsync();
                        _messageCounter = 0;
                }
        }
        catch (Exception exception)
        {
                Trace.TraceError(exception.ToString());
                throw;
        }
}
|
We are now done with implementing the interface, the next step is to hook it into our WorkerRole class. Start by adding a reference to the ServiceBus Messaging namespace, which is used to work with the Event Processor Host, and adding a field for its instance. We will also need a reference to the Azure library, which will be used to retrieve our settings from the configuration we specify on our cloud service.
using System;
using System.Diagnostics;
using System.Net;
using System.Threading;
using System.Threading.Tasks;

using Microsoft.Azure;
using Microsoft.WindowsAzure.ServiceRuntime;

using Microsoft.ServiceBus.Messaging;

namespace Eldert.IoT.Azure.EventHubsProcessor.WorkerRole
{
    public class WorkerRole : RoleEntryPoint
    {
        private EventProcessorHost _eventProcessorHost;
        .
        .
        .
    }
}
|
Now we are going to add the settings we need to connect to our event hub and storage. We will store these in the settings of our cloud service, so that once it’s deployed, we can change these settings from the Azure Portal. Open the Cloud Service project, expand the Roles and double-click on the WorkerRole. Go to the settings tab, and add settings for the consumer group name, event hub name, storage connection string and event hubs connection string. Note that the settings only allow you to specify storage connection string as a connection string type, so for the event hubs connection string just use type string.
Back to our worker role project, when the worker role starts, we want the Event Processor Host to be initialized, so we will add this to the OnStart method. We need to set an identifier for the host, which will be used by the library to keep track which host is handling each partition. This will be used in loadbalancing the processing of the partitions, as each partition can be handled by a different host. We also need to specify the connection settings, which we just stored in the settings of the cloud service. Using CloudConfigurationManager.GetSetting() we can retrieve the settings to create an instance of the event processor host.
public override bool OnStart()
{
        // Create the event processor host
        // Create a unique identifier, which will be used to determine which partitions this processor is handling
        _eventProcessorHost = new EventProcessorHost(Guid.NewGuid().ToString(), CloudConfigurationManager.GetSetting("EventHub"), CloudConfigurationManager.GetSetting("ConsumerGroup"),
                CloudConfigurationManager.GetSetting("EventHubsConnectionString"), CloudConfigurationManager.GetSetting("IoTStorageConnectionString"));

        // Set the maximum number of concurrent connections
        ServicePointManager.DefaultConnectionLimit = 12;
        var result = base.OnStart();
        Trace.TraceInformation("Eldert.IoT.Azure.EventHubsProcessor.WorkerRole has been started");
        return result;
}
|
When the application starts running, we have to register the ShipEventProcessor we created earlier with the Event Processor Host, so it knows what actions to take on the messages. We’ll add this to the Run method.
public override void Run()
{
    Trace.TraceInformation("Eldert.IoT.Azure.EventHubsProcessor.WorkerRole is running");

    try
    {
        // Register the processor, at this point one or more partitions will be registered with the client, and it will start processing
        _eventProcessorHost.RegisterEventProcessorAsync<shipeventprocessor>().Wait();

        RunAsync(_cancellationTokenSource.Token).Wait();
    }
    finally
    {
        _runCompleteEvent.Set();
    }
}
|
And finally, when the application is being stopped, we have to unregister the event processor, to let it clean up and make the necesarry checkpoints. This should be added in the OnStop method.
public override void OnStop()
{
    Trace.TraceInformation("Eldert.IoT.Azure.EventHubsProcessor.WorkerRole is stopping");
    _cancellationTokenSource.Cancel();
    _runCompleteEvent.WaitOne();

    // Unregister the processor
    _eventProcessorHost.UnregisterEventProcessorAsync().Wait();

    base.OnStop();
    Trace.TraceInformation("Eldert.IoT.Azure.EventHubsProcessor.WorkerRole has stopped");
}
|
Now that all is in place, we can setup the application for publishing. As you have noticed, we use Trace to log information about our progress. As this application will be running in Azure, we will want to make this information accessible. Luckily this can be done easily by opening the worker role in our cloud service project, opening Configure for the diagnostics and setting the Log level to All in the Application logs tab, or a different setting if we would like less information to be logged, f.e. just errors.
We will also need to set a storage account where we want to log to. The logging will be stored in an Azure Table called in this WADLogsTable under this storage account. Currently this just the classic storage accounts, so create a new storage account for this.
Finally make sure to set the number of instances and VM size you will want to use.
Now we can go and publish our cloud service with the worker role to Azure. Right click on your cloud service project, and select Publish. Select the subscription to which you want to deploy.
Set the name of your service, along with the properties for it’s region and replication.
Next choose the storage account you just created for your logging.
And finally review your settings, and if all is ok, publish your service.
The Azure activity log will now open, where you can check on the progress of your deployment, and also will see if anything is not going right.
Once the deployment is done, you can use the Cloud Explorer from Visual Studio to check the logging in the WADLogsTable.
And the same can be used to check our data in the Azure Storage Table, remember to switch to the correct storage account. As you will see, the table was automatically created, and data is filled according to the format we set in our EngineInformation object.
We have now finished our worker role which retrieves the data from the event hub, and stores it in the database. In my next blogpost I will show how you can use Entity Framework to setup a Azure SQL database.
Code