In this post I will explain you can you use Microsoft Flow to easily extend any existing product, in my case, how I was able to easily extend SmartDocumentor OCR without me being an expert on that product – this DevScope team is super busy to spend to much time with me explaining me everything – jokes apart, I intension don’t want there help the product should be easy to use without requiring too much knowledge and I also want to see and try how people can easily extend and interact with the product in different ways.
For example, in this particular case we actually didn’t need any Flow because SmartDocumentor has the capability to listen to an Email but in that case, I confess that my knowledge of SmartDocumentor product and its tools are a little reduce and I will probably need the help for my coworkers to teach me how to do it. Nevertheless, I had my demo working in two different receive processing points (or locations):
Directly from the Scan device that I used on all my presentation demos;
Or thru a receiving folder.
I knew how to change that receive folder, I knew how I can easily connect and extract attachments using Microsoft Flow and I knew a very stupid and simple way to send that file to an “On-premise” folder using Flow… so, for me, it was a simple math operation: 1+1+1=solution!
As Logic Apps, the beauty of using Microsoft Flow’s is that provides almost all Logic Apps capabilities, once it runs on top of Logic Apps, it is part of my Office365 subscription and there for it provides a very simplify and robust way to also extend the capabilities of my OCR software but also by being very cheaper and fast to implement without requiring too much technical knowledge.
Flow’s to the help: The Solution
In order to be able to extend SmartDocumentor OCR receive processing points (or locations) with Microsoft Flow, we need to create a Flow and for that, we need to:
In flow.microsoft.com, select “My flows” in the top navigation bar, and then select “+ Create from blank” to create a Flow from scratch.
On the “Create a flow from blank”, select “Create from blank” to start the process of creating an empty Flow
On the Flow designer, on the Trigger event enter “Gmail” and select the option “Gmail – When a new email arrives”
We want that all the email received with the “Subject: SmartDocumentorSurvey” will trigger this flow, so on the Gmail Trigger configuration:
Confirm that “Inbox” is configured in the “Label” property
Specify the filter, in my case all email that has the “Subject” equal to “SmartDocumentorSurvey”
And confirm that “Include Attachments” property is set to “Yes”
Add the next step by clicking “+New step” button and then choose the “Add an action” option
After we receive the email we want to store/save the Survey attachment file on a specific folder where SmartDocumentor is listening, and there are several ways to archive this:
The most common will be using the File System connector that allows you to connect to any File Systems on your local or network machines using the On-Premises Data Gateway but this is also the most technical option which needs you to configure an On-Premises Data Gateway
Another option is to make use of Dropbox desktop client, that runs on Windows, Mac, or Linux operating systems and gives you access to your Dropbox directly through a folder on your hard drive. The advantages of this approach are that:
You don’t need any technical skills (no need to configure an On-Premises Data Gateway) and all users knows or are familiar will Dropbox;
We can easily store files in Dropbox using Flow;
And once synchronize to your local machine running SmartDocumentor, SmartDocumentor will peak that file and process it (deleting that file from the folder and from Dropbox) – and there isn’t too much latency on the file synchronization, Dropbox client is actually really good.
Because we want to keep this really simple and familiar to Business users we will go with the Dropbox approach, so for that, we will need to:
On the “Choose an action” window, enter “Dropbox” and select the trigger “Dropbox – Create file”
On the Dropbox action configuration:
Specify the folder in with you want to store the file, in my case: “/publicdemos/smartdocumentorsurvey”
On the “File Name” property, select from the list of tokens the “Name” token from the “When a new email arrives” trigger
On the “File Name” property, select from the list of tokens the “Content” token from the “When a new email arrives” trigger
Because we can have multiple attachments on a specific email, the Flow designer will automatically place this “Dropbox – Create file” inside a Loop that will iterate thru each attachment.
The last step we want is to notify the user that is testing the SmartDocumentor Survey solution that his email was received and is being processed, to do that we need to:
Add the next step by clicking “+New step” button and then choose the “Add an action” option
On the “Choose an action” window, enter “Gmail” and select the trigger “Gmail – Send email”
On the Gmail action configuration:
On the “To” property, select from the list of tokens the “From” token from the “When a new email arrives” trigger
On the “Subject” property, specify the email subject, in my case: “SmartDocumentor submitted document”
On the “Body” property, we will specify the name of the file we are processing as well as the URL where you can consult the Survey Report. So, we are combining static text with some tokens provide from previous actions as you will see in the picture below.
Again, because we can have multiple attachments on a specific email, the Flow designer will again automatically place this “Gmail – Send email” action inside a Loop that will iterate thru each attachment.
At the end the flow will look like this:
And once is triggered:
It will copy the attachment to a Dropbox folder that is being synchronized, with the use of the Dropbox desktop client, to our local SmartDocumentor server;
SmartDocumentor OCR will process this survey picture and it will do the process that was described in my previous post;
And finally, will send an email to the user that is testing this SmartDocumentor OCR solution
I intentional want to keep this a first simple as possible, so there are some limitations in current approach:
You can send multiple form pictures in attach but you shouldn’t send any other type of pictures in attach (that aren’t surveys). Again, I can easily create some flow rules to validate but I didn’t implement nothing like that.
Avoid sending email signature with pictures, the process will work but it ends up having some SmartDocumentor and Logic Apps runs with failure (didn’t implement these type of validations but it is possible)
I will improve this approach in the future, stay tuned!
Author: Sandro Pereira
Sandro Pereira lives in Portugal and works as a consultant at DevScope. In the past years, he has been working on implementing Integration scenarios both on-premises and cloud for various clients, each with different scenarios from a technical point of view, size, and criticality, using Microsoft Azure, Microsoft BizTalk Server and different technologies like AS2, EDI, RosettaNet, SAP, TIBCO etc. He is a regular blogger, international speaker, and technical reviewer of several BizTalk books all focused on Integration. He is also the author of the book “BizTalk Mapping Patterns & Best Practices”. He has been awarded MVP since 2011 for his contributions to the integration community. View all posts by Sandro Pereira
For years, paper forms have been the preferred way for people, enterprises and/or event organizers to collect data in their offices (coffee breaks or launch), in the field (inventory, equipment inspections,…) or in events. Although we are entering a Paperless era, in which the use of paper is progressively being eliminated, there are several situations in which the use of paper is still the best or a good option. Either because it is still a requirement or obligation (by legal documents) or just cheaper and more practical.
One of these scenarios can be found at Events Feedback Evaluations forms and, although it is quite simple and quick to create this kind of forms using, for example, Microsoft Forms or alternatively services like SurveyMonkey, let us be honest and analyze the facts:
Internet access at events is usually very poor or limited and despite almost all our mobile devices have data access, if we are outside our country, in my case outside Europe, data roaming it is still quite expensive;
Alternatively, we can send/receive an email later to evaluate the event but more likely most of the attendees will ignore it and we will end up receiving little or no feedback at all.
So, at least in my opinion, paper is still one of the best options to perform Evaluations forms and I already used this strategy in some of my last events that I organized: Oporto Global Integration Bootcamp inserted into the Global Integration Bootcamp initiative created by the Microsoft Community and supported by Microsoft, TUGA IT 2017, … and and if they are a little tired or sleepy – let be honest, it happens in all events – you can always distract a little and wake up again by filling the form
The main problem in having Evaluations forms in a physical paper is: How can we easily convert paper in data to generate additional value?How can we perform operations on it and easily gain insights?
There are plenty of OCR solutions/software’s in the market – most of them are still very expensive – that can easily scan the documents from different devices and process them using algorithms to analyze and extract the data with high confidence. Some even allow the users to manually review the extracted data from the documents before they are integrated into different information systems that normally tend to be the file system or databases.
However, neither of them is prepared to connect and integrate with all of the new technologies/SaaS products/data analysis platforms that appear at today’s frantic pace, like Power BI. If you are lucky, some of these products may also allow you to “easily” extend the product to connect to another system through their custom extensibility model systems but that normally means costs and time to develop some additional connector.
In order to solve these problems for my previous events, in which I wanted to have the evaluations forms to be processed in real-time, i.e., as the attendees handed in the forms, the results were presented in a public Power BI dashboard in a matter of seconds. I end up creating a solution composed of several products and technologies (choosing what I think to be the best tool for a particular problem) composed by:
DevScope SmartDocumentor OCR that, not also allowed me to extract the data from my Survey documents (actually it can process any king do documents like Invoices or Expenses) and easily integrate with other systems, but also to intelligently set my OCR streams (flows), defining:
Different receive processing points (or locations), like Email, FTP, File Share or directly from scanner devices;
Create/test my recognition templates and review/ validate the data which is gathered;
By default, SmartDocumentor exports data and documents to multiple Enterprise Resource Planning (ERP), Customer Management (CRM) or Document Management (ECM) like Windows system files, SharePoint, Office 365, Azure and/or SQL Server. But also, enabled me to connect and send the metadata, XML or JSON, through any kind of HTTP service, and we can delegate this process/tasks to other more smart, powerful and easy to change services like Logic Apps. Of course we can connect to any other system through its extensibility model systems, for example, I could even extend SmartDocumentor by using a PowerShell provider that would enable me to execute PowerShell scripts.
Azure Logic Apps that provided a very simple, fast and powerful way to implement scalable integrations workflows in the cloud with an uncounted number of connectors across the cloud and on-premises, the list is growing day by day. This will allow us to quickly integrate across different services and protocols but also modify and change quickly the integration flows without requiring to modify and deploy traditional custom code – which normally require having technical human resources (like C# developer) and probably additional costs involved – not anymore with Logic Apps – changes can be performed in a matter of seconds without worrying about if your custom extension broke some product compatibility or affecting other existing OCR processes;
Azure Functions to run custom snippets of C# to support Logic Apps flow and perform advanced JSON to JSON transformations;
And finally, Power BI to create interactive data visualization (dashboards and reports)
The solution
SmartDocumentor: to process and extract metadata from paper
Well, I am not going to explain in details how the solution is implemented inside DevScope’s SmartDocumentor for it is not the point of this article, and if you want to know more about it, you can always contact me. However, let me contextualize you in other for you to have the full picture of the problem and the solution:
SmartDocumentor OCR flow will be listening in two receive processing points (or locations):
Share Folder – for testing purposes without having the need to have a scanner device;
and directly from the scanner device – real case scenario.
We can then specify if:
We want to review any documents that are being processed to see if the data recognition is performed according to what we intended;
Or we can create rules based on SmartDocumentor confidence recognition rate, for example:
If there is a >=90% confidence that the data from the Survey where correctly recognize, skip the review process and integrate directly the document;
Otherwise, if recognition confidence rate is <90% deliver the document to the review station for a person to validate and them Integrate the document;
Or, in my case, because I already have confidence in the process, and is quite tested, we can configure the process to skip the review station step and directly integrate the document. This will also allow you… yes you, the reader, to test this implementation as you will see at the end of this article.
After receiving and extract the data from the documents (paper), SmartDocumentor will send the metadata to a Logic App HTTP endpoint.
Power BI to deliver interactive data visualization (dashboards and reports)
Regarding Power BI, Logic Apps Power BI connector only accepts you to use streaming datasets (this has advantages and some disadvantages that we will see further on), that allows you to easily build real-time dashboards by pushing data into the REST API endpoint. To create your streaming datasets, you should access to Power BI with your account:
Select your ‘Workspace à Datasets’, and then on the top right corner click ‘+ Create’ and then ‘Streaming dataset’
In the ‘New streaming dataset’, select ‘API’ and then click ‘Next’
In the second ‘New streaming dataset’, give a name to your dataset: “FeedbackForm” and then add the following elements:
SpeakerName (Text) – represents the name of the speaker that is obtained in the evaluation form according to the session.
ContentMatureFB (Number) – a value between 1 and 9 that is obtained in the evaluation form
GoodCommunicatorFB (Number) – a value between 1 and 9 that is obtained in the evaluation form
EnjoySessionFB (Number) – a value between 1 and 9 that is obtained in the evaluation form
MetExpectationsFB (Number) – a value between 1 and 9 that is obtained in the evaluation form
SpeakerAvrg (Number) – A simple average calculation (sum all the above metrics divide by 4)
WhoAmI (Text) – represents the type of attendee you are (developer, architect, …) that is obtained in the evaluation form
SpeakerPicture (Text) – picture of the speaker according to the session that is that is obtained in the evaluation form.
And because we want to create interactive reports in order to have more insights from the event. We need to enable ‘Historic data analysis’ and then click ‘Create’
Limitations: Unfortunately, streaming dataset is meant to be used for real-time streaming and is a little limited in terms of want we can do with it. For example, it doesn’t allow you to combine different sources, like a “table” that can correlate speaker to get their pictures, or to make aggregations of metrics like “Speaker average”. Which means that we need to send all of this information from Logic Apps.
Azure Function to apply JSON transformations (Content Enricher, Content Filter & Name-Value Transformation Patterns)
To solve and bypass these streaming dataset limitations we use an Azure Function inside Logic App that not only transforms the JSON message received from SmartDocumentor with the Evaluation metadata but also add missing information – Content Enricher Pattern. It is very common when we want to exchange messages between different systems or applications, that the target system requires more information than the source system can provide. In this case, the source system (paper) will not send the Name of the speaker, the speaker average metric and the picture of the speaker, but our target system (Power BI) expects that information.
But also, to apply a transformation pattern – Content Filter – that not only removes unnecessarily data elements but it is also used to simplify the structure of the message, i.e., ‘flattens’ the hierarchy into a simple list of elements that can be more easily understood and processed by other systems.
And finally transform a name-value pair(NVP),key-value pair(KVP),field–value pair, attribute–value pair or even Entity-Attribute-Value model (EAV) data representation that is widely used into a to more Hierarchical Schema.
To do that we create a “GenericWebHook-CSharp” function that accepts the name-value pair JSON message, which was originally sent by SmartDocumentor OCR, and generate a friendlier message.
#r "Newtonsoft.Json"
using System;
using System.Net;
using Newtonsoft.Json;
using Newtonsoft.Json.Linq;
public static async Task&lt;object&gt; Run(HttpRequestMessage req, TraceWriter log)
{
log.Info($"Webhook was triggered!");
string jsonContent = await req.Content.ReadAsStringAsync();
dynamic data = JsonConvert.DeserializeObject(jsonContent);
string speakerName = string.Empty;
string speakerPicture = string.Empty;
int pos = 0;
for (int i = 5; i &lt;= 8; i++)
{
if (!String.IsNullOrEmpty(data[i]["Value"].Value))
{
pos = i;
break;
}
}
switch (pos)
{
case 5:
speakerName = "Ricardo Torre";
speakerPicture = "http://blog.sandro-pereira.com/wp-content/uploads/2017/03/RicardoTorre.png";
break;
case 6:
speakerName = "José António Silva e Pedro Sousa";
speakerPicture = "http://blog.sandro-pereira.com/wp-content/uploads/2017/03/JosePedro.png";
break;
case 7:
speakerName = "João Ferreira";
speakerPicture = "http://blog.sandro-pereira.com/wp-content/uploads/2017/03/JoaoFerreira.png";
break;
case 8:
speakerName = "Sandro Pereira";
speakerPicture = "http://blog.sandro-pereira.com/wp-content/uploads/2017/03/Sandro-Pereira.png";
break;
default:
speakerName = "Unknown";
speakerPicture = "http://blog.sandro-pereira.com/wp-content/uploads/2017/03/devscope.png";
break;
}
int result = 0;
decimal avrg = (decimal)((int.TryParse(data[9]["Value"].Value, out result) ? result : 0) + (int.TryParse(data[10]["Value"].Value, out result) ? result : 0) + (int.TryParse(data[11]["Value"].Value, out result) ? result : 0) + (int.TryParse(data[12]["Value"].Value, out result) ? result : 0)) / 4;
JObject eval =
new JObject(
new JProperty("SpeakerName", speakerName),
new JProperty("SpeakerPicture", speakerPicture),
new JProperty("ContentMatureFB", data[9]["Value"].Value),
new JProperty("GoodCommunicatorFB", data[10]["Value"].Value),
new JProperty("EnjoySessionFB", data[11]["Value"].Value),
new JProperty("MetExpectationsFB", data[12]["Value"].Value),
new JProperty("SpeakerAvrg", avrg),
new JProperty("WhoAmI", data[30]["Value"].Value));
log.Info($"Webhook was Complete!");
return req.CreateResponse(HttpStatusCode.OK, new
{
MsgEval = eval
});
}
Notice that for example in the following transformation rule:
We are transforming the selected session in the Evaluation form to the name of the speaker and his picture. Why the picture URL? Well, as mentioned before, Power BI streaming dataset has some limitation in what we can do by default. So, in order for us to be able to present the speaker picture in the Power BI report and/or dashboard, we are forced to send a public picture URL (in this case it is stored in my blog) as an input of our dataset.
For the same reason, because we cannot make a new measure derived from the others when using streaming dataset, instead we need to send it as an input of our dataset and in order for us to calculate the average performance of a speaker, we will be using this basic formula:
...
decimal avrg = (decimal)((int.TryParse(data[9]["Value"].Value, out result) ? result : 0) + (int.TryParse(data[10]["Value"].Value, out result) ? result : 0) + (int.TryParse(data[11]["Value"].Value, out result) ? result : 0) + (int.TryParse(data[12]["Value"].Value, out result) ? result : 0)) / 4;
...
The output of the function will be again another JSON message this time something like this:
The missing piece: Logic App! The tool that allows us to transform a product – in this case, SmartDocumentor OCR software – that in principle like all product seemed closed and limited in terms of features into a product without frontiers/fences. Again, we all know that normally these type of products (OCR) have extensibility model systems that allow you to extend the product with your personal requirements – like SmartDocumentor also does – but this normally means you need to have developer skills that probably will cost you time and money, or additional cost to customize the product according to your needs, something we want to avoid and we will be able to archive using Logic Apps or similar tools/products.
The beauty of using Logic App is that provides us a very simplified, robust, scalable, not expensive and fast way to extend the capabilities of my SmartDocumentor OCR software and integrate with an uncounted number of Cloud and on-premises applications or/and systems.
In order to integrate SmartDocumentor OCR with Power BI, we need to create a Logic App that:
Accept a JSON through an HTTP Post. For that, we use a ‘Request / Response – Manual’ trigger. And in this case, because we don’t need to have friendly tokens to access the elements of the message, we don’t specify a JSON Schema.
Call an Azure Function to transform the original SmartDocumetor OCR JSON message to the expected JSON message to send to Power BI. For that, we use an ‘Azure Functions’ action, specifying the function that we created previously.
After that, we use a ‘Parse JSON’ action, only to allow us to parse JSON content into friendly tokens (something like a quick alias to the fields) for being easily consumed in other actions of the process.
In the last step of the Logic App: we push the data into the Power BI streaming dataset created earlier by using the new ‘Power BI’ Connector. To do this we need to:
Add a ‘+New step’, ‘Add an action’, and then enter ‘Power BI’ into the search box. Select “Add row to streaming dataset” from the actions list.
Select the name of the workspace and then the name of the streaming dataset
The next step is to select the Table titled “RealTimeData”
And finally, map the input data fields with the friendly tokens generated in the ‘Parse JSON’ action
Of course, we could have more logic inside, for example, validate if you attendees, or you guys while testing, are filling all the required element and based on that rules perform some actions, but my intention, in this case, was to make and keep the process as simple as possible, normally as we explain earlier we could perform validation on the SmartDocumentor review station but again we can easily add additional validation in the Logic App without any problem.
The final result
After saving the Logic App and process the Evaluation forms with SmartDocumentor OCR directly from the scanner or thru the file system, the result is this beautiful and interactive report that we can present in a monitor during the breaks of our events:
You may now under, “What do we need to do to extend the process for archiving the messages?”
That is extremely simple, just edit and change the Logic App by adding, for example, a Dropbox, OneDrive or File Connector into your process, configure it and save it! It is that easy!
How can you test the solution?
Of course, it is impossible for you to test the entire process, unfortunately, we cannot submit the paper via web… at least yet. But you can try part of this solution because by assuming that we already have the paper digitalized/scanned and we only want to try the SmartDocumentor OCR and the integration process.
Open the form picture in your favorite image editor (Paint or Paint.NET) and just paint your choices, something like this.
Again, be sure you fill all the necessary fields: session, each rate (only on time) and about you because I didn’t add any type of validation and I’m skyping the Review Sation step
You don’t need to fill your name, email, company or phone
You can send multiple form pictures in attach but don’t send any other type of pictures in attach. Again, I can easily create some flow rules to validate but I didn’t implement nothing like that.
Avoid sending email signature with pictures, the process will work but it end up having some Logic Apps runs with failure (didn’t implement these type of validations but it is possible)
Email your form attached to [email protected] with the following subject “SmartDocumentorSurvey“
Wait a few minutes, because I have a very simple Microsoft Flow (we will address this process later on in another blog post) listening to this mailbox that:
Unfortunately, due cache policies, updates to reports or visuals to which a Publish to web link points can take approximately half an hour to be visible to users – this is a Power BI limitation/cache policy – because the link is for a public Power BI report you may only see the results reflected, in the worst scenario, after more or less half an hour.
Author: Sandro Pereira
Sandro Pereira lives in Portugal and works as a consultant at DevScope. In the past years, he has been working on implementing Integration scenarios both on-premises and cloud for various clients, each with different scenarios from a technical point of view, size, and criticality, using Microsoft Azure, Microsoft BizTalk Server and different technologies like AS2, EDI, RosettaNet, SAP, TIBCO etc. He is a regular blogger, international speaker, and technical reviewer of several BizTalk books all focused on Integration. He is also the author of the book “BizTalk Mapping Patterns & Best Practices”. He has been awarded MVP since 2011 for his contributions to the integration community. View all posts by Sandro Pereira
Trigger your Microsoft Flows by pressing a physical button, known as a Flic Button or Flic Smart Button provide by Shortcut Labs is quite a simple task. I was impressed by how easy and fast it was to set up and put it working, it was literally 5 minutes!
And then you can use it for fun: “Wake Up Kent Weare” (the example we will be using here) or for more realistic and interested scenarios like pressing a Flic button to track your working hours (1 click to start tracking, double-click to stop tracking), block your calendar for next next hour, count visitors at an event, notify me if I have a visitor, save geographical locations, or how is your day/are you happy with the service (one click for happy, double-click for unhappy – if you have only one button)
Of course, to do that we need to have:
A physical Flic Smart Button
And downloaded Flic’s Android or iOS mobile app, that you will need to use it to pair one or more Flic Buttons.
After you download the Flic mobile app, to configure the Flic Button you need to:
Make sure that your mobile has Bluetooth activated;
Open the Flic mobile app from your mobile phone, sign in with your credentials using Facebook, or by creating your Flic Account;
Once you login in the app, on the phone tab, click “Add Flic to Phone” at the bottom of the screen
Once the “Searching for Flics” screen appears, take or physical button an click it once to pair it with the mobile application
Once the “Pairing complete!” screen appears, your button will be successfully paired with your phone. Click “Finish” to complete.
And a button will be added to the “Phone” tab
Now that the physical button is pair with our mobile phone, we need to configure the Flic’s events that the button will be triggering. For each button we can specify 3 types of events:
click (one quick press)
double-click (two quick presses)
hold (one long press)
To accomplish that you need to:
Press the “My Flic” button present in the “Phone” tab
This will open the button configuration screen, there you should:
Change the button name
And then configure one or all the 3 trigger events
In our case, we will configure the “Click” trigger event to be able to trigger a Microsoft Flow. For that, we need to click on the “Click” option
On the “Click” trigger event list screen, select “Tools” category option
And on the “Tools” category list screen, select “Flow” option
On the Flow screen you may or may not select to include GPS location and then you need to click “SAVE ACTION” button
And our button will now be properly configured to trigger a Microsoft Flow once someone click (one time) the physical button
Now the only thing that is missing is for us to create a Flow that will be associated with this trigger event to fire up a Flow process.
Once again, this demo is entitled “Wake Up Kent Weare” and will be just for fun to try to annoy the dear friend Kent Weare and try to wake him up at 4 AM US (9 AM Portugal), if he didn’t forget to disable email notifications at night, simply by clicking on a button. To do that we need to:
or by typing “flic” into the search box and select one of the several templates provided by Flow team.
Click “My flows” option on the menu and then click “+ Create from blank” to create a Flow from scratch.
On the “Create a flow from blank”, click “Create from blank” to start the process of creating an empty Flow
On the Flow designer, on the Trigger event enter “Flic” and select the option “Flic – When a Flic is pressed”
On the Flic Trigger configuration
On “the Flic button” combo box, select the button we add create on the Mobile App earlier
And on the “Events” combo box, select “click” event that was the only one that we have configured
(of course, the first time you use this trigger, it will ask for permissions and you need to provide the authentication to your Flic account)
Add the next step by clicking “+New step” button and then choose the “Add an action” option
On the “Choose an action” window, enter “Outlook” and select the trigger “Office 365 Outlook – Send an email”
On the Send an email action configuration, you need to specify
The address of the recipient on the “To” property field
The subject of the email on the “Subject” property field
And the body of the email on the “Body” property field
Be sure you give a proper name to your Flow, mine will be “Wake Up Kent Weare” and save it
Now… PRESS THE BUTTON! PRESS THE BUTTON!
The Flow was successfully triggered once I press the button
However, the result was not what I expected 🙂
Author: Sandro Pereira
Sandro Pereira lives in Portugal and works as a consultant at DevScope. In the past years, he has been working on implementing Integration scenarios both on-premises and cloud for various clients, each with different scenarios from a technical point of view, size, and criticality, using Microsoft Azure, Microsoft BizTalk Server and different technologies like AS2, EDI, RosettaNet, SAP, TIBCO etc. He is a regular blogger, international speaker, and technical reviewer of several BizTalk books all focused on Integration. He is also the author of the book “BizTalk Mapping Patterns & Best Practices”. He has been awarded MVP since 2011 for his contributions to the integration community. View all posts by Sandro Pereira
One of the tools which come with BizTalk Server is the Enterprise Service Bus (ESB) Toolkit. Although the ESB Toolkit is a collection of tools that extend the service-oriented capabilities of BizTalk, the Exception Management capability is one of the most widely used features of the ESB Toolkit. This feature allows you to perform Exception Management in a centralized manner, which can be a great benefit.
What are the current challenges?
See below for a list of challenges while using the out-of-the-box ESB Toolkit portal, which comes with BizTalk Server:
Bad quality portal
Lack of statistic information
No security/auditing
No monitoring
Bad quality portal
Even though the Exception Management framework is very robust and strong, the Exception Management Portal that comes out of BizTalk Server is not that easy to configure (takes about 1 or 2 days to configure the default portal successfully).
Besides the quality of the portal, the ESB portal is yet another portal, users need to be aware of in their day to day operations with BizTalk Server.
Lack of statistic information
Further, the ESB Toolkit gives no overview of for example the amount of ESB Exceptions that occurred, the number of itineraries processed or the number of resubmissions. This kind of information can be of vital value to know if the processes are all in a healthy state.
No security/auditing
Also, no security and auditing is in place for this portal. Anybody with access to the portal can view the exceptions, edit messages and resubmit them, which exposes its own risks.
No Monitoring
To be able to keep an eye on the ESB processes, it is handy to monitor these processes. Unfortunately, with the ESB Toolkit, no such capability exists.
How BizTalk360 solves this problem?
BizTalk360 addresses these challenges in a number of ways. Firstly, the portal from the ESB Toolkit is replaced with a portal within BizTalk360. As with all features within BizTalk360, this portal is protected with security and auditing. The following policies are available:
Using the portal
Being able to resubmit messages
To be able to repair ESB Faults, there is an Edit and Resubmit feature. To make repair even easier, you can write and associate Knowledge Base articles to the ESB Faults. So in case of recurring problems, you can simply document the solution in such a KB article and associate it with the ESB Fault, thereby making repairs in the future easier.
For having a good overview of the ESB processes, BizTalk360 provides a customizable ESB Dashboard. You can create dashboards based on different categories of widgets, which are:
ESB Fault count
ESB Resubmission
ESB Itineraries
Besides the ESB Dashboard, there is also the Data Monitoring feature in BizTalk360. In case of ESB, this will help you in making sure all the ESB processes run like expected.
With the ESB Exception Portal and all the other ESB focussed features, we think that we have brought another good feature to the product, taking away the need to use the out-of-the box features, while empowering the users with relevant other features.
Author: Lex Hegt
Lex Hegt works in the IT sector for more than 25 years, mainly in roles as developer and administrator. He works with BizTalk since BizTalk Server 2004. Currently he is a Technical Lead at BizTalk360. View all posts by Lex Hegt
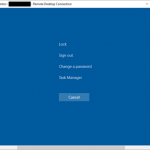
This post is just for sake of my mental sanity because I’m always forgetting the keystroke combination to perform a CTRL-ALT-DEL thru Remote Desktop on an Azure Virtual Machine because if you press a CTRL-ALT-DEL key combination it will perform that command in your local machine – maybe now next time I will remember it, otherwise I know were to look.
To bring up the Windows Security dialog box for the Remote Desktop Session Host (RD Session Host) (provides the same functionality as pressing CTRL+ALT+DEL on the local computer) you need to use the following keystroke combination: CTRL + ALT + END.
While researching, once again, I found out another very useful shortcut:
ALT+PRINT SCREEN will place a snapshot of the active window, within the client, on the clipboard
Sandro Pereira lives in Portugal and works as a consultant at DevScope. In the past years, he has been working on implementing Integration scenarios both on-premises and cloud for various clients, each with different scenarios from a technical point of view, size, and criticality, using Microsoft Azure, Microsoft BizTalk Server and different technologies like AS2, EDI, RosettaNet, SAP, TIBCO etc. He is a regular blogger, international speaker, and technical reviewer of several BizTalk books all focused on Integration. He is also the author of the book “BizTalk Mapping Patterns & Best Practices”. He has been awarded MVP since 2011 for his contributions to the integration community. View all posts by Sandro Pereira
Recently I have been looking at some opportunities to utilise the new Model-Driven capabilities in Power Apps. I spent some time at Integrate 2018 chatting to Kent Weare about some of its capabilities and realised it was a great fit for some of the architecture challenges we have. Before I go into some of the opportunities in a sample architecture lets consider an existing setup.
Existing Architecture
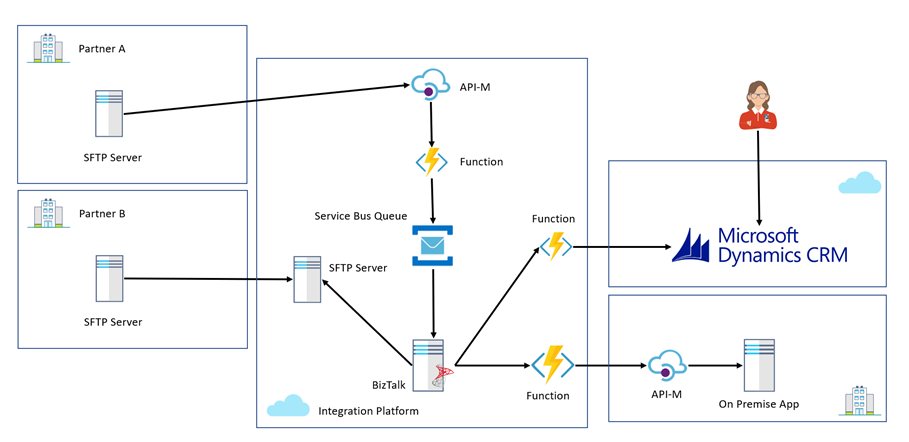
In the existing architecture we have a cloud hosted integration platform which the company uses to integrate partners into Dynamics CRM Online and some existing on premise line of business applications. The cloud integration platform is able to support partners submitting data via multiple channels. In this case we have a traditional SFTP and batch based mechanism which old school partners still use. With this pattern we use BizTalk where it excels on the IaaS part of the platform to manage multiple partners submitting different file formats all being converted to a canonical format and then messages are loaded into systems via helper functions on Azure which implement the service façade pattern.
You can see this in the diagram below represented by Partner B.
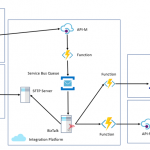
We also have partners who use more modern approaches to integration where we expose an API via Azure APIM which allows them to submit data which is saved to a queue. BizTalk will process the queue and reuse the existing functionality to load data into our core systems.
The Challenge
While we support 2 example channels in this architecture, we have a massive partner network with different capabilities and some partners even use a person to person and email based interactions. If you imagine a person in a call centre is sent an email with some data or a form in the post and they will type the data into systems manually.
As the application architecture expanded there were more systems these users would need to work with and we needed to find efficiencies to optimise the user entering data. The more records a user can enter in 1 day the bigger the potential cost savings.
The challenge with this was to provide a new form to enter data that was simple and quick. We initially looked at options like Microsoft Forms and Cognitio Forms which could allow us to create forms to capture data but they missed ticking boxes on some of the key non functional requirements such as security and authentication. We needed something which had more features than these options which were good but too simple.
Above we do have Dynamics CRM but the key problem with that like our other applications is that it is tied to a product backlog which means our changes and optimisations would need to fit within an agile release process which was delivering change in a complex system. What we really needed was a sandbox type application where we could build a simple App without many dependencies which would then integrate with our processes.
Proposed Architecture
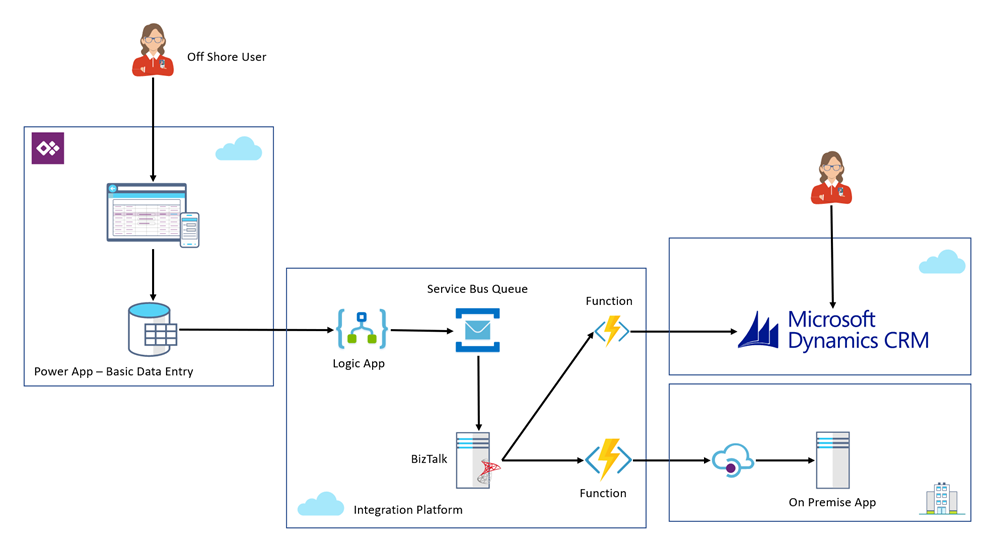
Coming back to the discussion with Kent, I could see that model driven Power Apps is really like a cut down version of Dynamics and looking at some of the apps in the samples and that people are building you could see straightaway this could be a great opportunity. The Power Apps environment allowed us to build some forms and a data model very quickly to model the data we need users to capture.
We then implemented a logic app which would fire on the update of a record which would check for a field being set to indicate that the record was ready to be published. The logic app would extract the data from the Power App. The really cool bit was that I can use the Dynamics connectors in Logic Apps because the Power App is really just a Dynamics instance. The Logic App puts a message on a queue which is then used to reuse our existing integration.
The below picture represents the architecture from the perspective of the new Power App. Please note that to keep the diagram simple I have omitted the existing B2B SFTP and API integrations so that we can focus on the Power Apps bit.
From this point I now have a pretty simple Power App which can allow these users to input data manually into our process which we think can save a few minutes per record based on manually keying the record in the old ways.
The benefits of Power Apps though are way beyond just this, first off the key to empowering rapid change is that its in an isolated app focusing on just this use case. I don’t have to worry about all of the many features within a bigger CRM implementation. When it comes to implementing changes and regression testing things are much simpler.
At the same time the licensing is slightly different with Power Apps our users are using P1 licenses which aren’t that expensive and good for users who just run the Power App. we use P2 Power Apps licenses for those users who need to admin and develop the Power App.
We also get for free the integration with Azure AD so that our users have a good authentication story. This was one of the challenges with our previous considered options. The products we looked at which provided out of the box forms capability seemed to lack the ability to authenticate then restrict the users to just certain users and to then know who filled in which form. This is a key requirement.
When it comes to many of the other security scenarios as existing Dynamics users we have already gone through the governance around what Dynamics is, how it works, its security, etc. The model driven Power App seems to be just the same in terms of capabilities.
At one time we were considering building an ASP.net app for our users and when you consider everything PaaS on Azure offers for very little cost it would seem an attractive option, but compared to these new more powerful Power Apps I think removing the considerations about hosting, security, custom coding, design experience, etc you get so much out of the box that it’s a compelling argument to try the Power App.
At this point Power Apps seems to be offering a great opportunity for us to build those utility applications and system of engagement applications on an enterprise ready platform but without lots of custom development. Really focusing on delivering business value there seems to be loads of places we could use this.
Hopefully we can provide more info about Power Apps as our journey progresses.
Do you feel difficult to keep up to date on all the frequent updates and announcements in the Microsoft Integration platform?
Integration weekly update can be your solution. It’s a weekly update on the topics related to Integration – enterprise integration, robust & scalable messaging capabilities and Citizen Integration capabilities empowered by Microsoft platform to deliver value to the business.
If you want to receive these updates weekly, then don’t forget to Subscribe!
Feedback
Hope this would be helpful. Please feel free to reach out to me with your feedback and questions.
At the recent Integrate 2018 summit the Q&A drew some contentious questions from the audience about the next version of BizTalk and when it is going to be. What was clear is that the product teams new approach of having a customer feedback driven back log means they have been busy and successful in delivering changes to Logic Apps and also the BizTalk feature pack and having just completed those they have not planned the next major release of BizTalk.
Now that being said, the team should have expected these questions because they always come up and I think an answer of “we aren’t ready to talk about that yet and we will get back to you” would have been fine, but there was a bit of fluff around the answers given which resulted in the audience drawing their own conclusions in a negative way. After such a great conference I found myself wishing the Q&A had never taken place as this miscommunication at the end sent a lot of people away with a degree of confusion.
With that said in the pub later we were talking about the idea of product support lifecycles and I have always felt the problem around Microsoft tech was that there is too much info out there on the subject and that is actually detrimental to the intention. I decided to test this idea by looking at the support lifecycle for some other vendors. First off lets recap Microsoft’s position.
Microsoft BizTalk Server
Lets start by using the link below where community members have a nice easy to follow interpretation of the Microsoft Support Lifecycle for BizTalk.
You can see from the above table there is still some kind of support available for 5 versions of BizTalk covering up to 9 years from now. Even a 9 year old version of BizTalk is still available under extended support for over 1 more year.
Now we have a picture of the Microsoft position, lets take a look at some of the other vendors out there.
MuleSoft provides Standard Support for the latest released minor version of the Mule runtime.
Once a new minor version for a major version is released, the previous minor version will receive Standard Support for an additional 18 months. All minor versions for a major version will receive Standard Support for a minimum of 2 years.
Starting with Mule 3.7 and later, after Standard Support ends, MuleSoft will offer Extended Support for an additional 2 years. Mule 3.5 and 3.8 will receive Extended Support for a total of 3 years.
Extended Support versions are only available on CloudHub for applications already deployed on it
Once a new major version is released, MuleSoft will continue to offer Standard Support for at least one minor version of the previous major version for a minimum of 3 years.
Once a minor version is outside the Standard Support and Extended Support windows, MuleSoft will provide End of Life Support.
My interpretation of the Mulesoft position compared to BizTalk is that the current version of Mulesoft has committed support for 2 years less than the current version of BizTalk and extended support for 5 years less than the current version of BizTalk.
Jitterbit
If we take a look at Jitterbit, their documentation states, “Jitterbit is committed to supporting a version for 12 months from the release date”. So effectively each release is under support for a committed 12 months only. It may be longer in reality but if we look at the example of their last version to end of life you can see below it was only supported for 1 year which seems fairly consistent.
My interpretation of the comparison of BizTalk vs Jitterbit is that Jitterbit are only committing to year on year support versus long term commitments from Microsoft.
Oracle Fusion Middleware
From the below link I was able to findout some basic info about Oracle Fusion.
I could not find any information online about support life cycle commitments or versions released. I did find some information on the release notes for each release which is available below to give an idea of how often change occurs.
Interestingly I can not find any public information about the public position on the support life cycle for Logic Apps.
Conclusion
The simple fact is that Microsoft have a publicly stated duration of support for the current version of BizTalk which is 5 years longer than any other vendor I am able to find information on! That means if “BizTalk is dead”, based on info in the public domain all of the other vendors are going to be dead well before it.
With that said it is important to consider that iPaaS products may mean we need to think about the lifecycle in a different way because the idea of upgrading is not really the same thing, but with that in mind we do need to consider that the example of MABS from Microsoft was an iPaaS product which some customers bet on and was then deprecated. With the volatility in the iPaaS market and the expected consolidation of vendors with things such as the recent acquisition of Mulesoft by SalesForce it may be worth considering if the absence of a communicated lifecycle on iPaaS is a good thing for customers.
I would draw the conclusion that at this stage the recent discussions around BizTalk product lifecycle are really just a case of under par communications and marketing on the Microsoft side which allow the myth to be created that BizTalk product lifecycle is a problem. If you look at the hard facts actually it has by far the strongest story I can find.
If we compare the 2 biggest competitors, with BizTalk we are 4 years from the end of support of the current version, that’s 2 year more than a brand new release of Mule gets so maybe things aren’t so bad after all.
0815 — Once again, it was an early start but a good number of attendees were ready to listen to Richard Seroter’s session.
Architecting Highly available cloud integrations
Richard Sereter started his talk about building a highly available cloud integrations. He clearly conveyed the message that if there is any problem with the solution with multiple cloud services, it is not the responsibility of the services itself but a responsibility of solution architecture. He suggested to follow the practices such as chaos testing in which one randomly turn off few services and see how the solution behaves.
Core patterns
Richard started off with some of the core patterns for a highly available solution.
Handling Transient failures — It is quite common that services will have temporary hiccups such as network issues, database issues etc. Our solution need to be designed to handle such scenarios.
Load balancing — scale out Via more instances. Redundancy applies to compute, messaging , event streaming, data and networking, and auto scale.
Replicate your Data — Both transactional and metadata. Consider read and write. Cross regional replication and Disaster recovery
Throttle some of your users — one user’s load can impact all other integration tenants. Reject or return low quality results, and do it in a transparent way.
Introduce load leveling
Secure with least privilege, encryption, and anti-DDOS
access should be as restrictive as possible
turn on encryption with every possible ways
Configure for availability
What Azure storage serviceProvides
Get file , disk , blob storage
Four replication options
Encryption at rest
What we have to do
Set replication option
Create strategy for secondary storage
Consider server or client side encryption
What SQL TableProvides
Highly available storage
Ability to scale up or out
Easily create read replicas
Built in backup and restore
Includes threat detection
What we have to do
Create replicas
Decide when to scale horizontally or vertically
Restore database from back up
Turn on threat detection
What Azure Cosmos DBProvides
99.999% availablity for reads
Automatically partitions data and replicates it
Supports for multiple consistency levels
Automatic and manual failover
WHAT WE HAVE TO DO
Define partition key , through put, replication policies
Configure regions for read , write
Choose consistancy for DB
Decide to trigger a manual failover
What Azure service busProvides
Resilience within a region
Initiates throttling to prevent overload
Automatic partitioning
Offers geo-disaster recovery
WHAT WE HAVE TO DO
Select message retention time
Choose to use partitioning
Configure geo-disaster recovery
What Azure EVENT HUBSProvides
Handles massive ingest load
Auto-inflate adds throughput units to meet need
Supports geo-disaster recovery
What Azure logic appsProvides
In region HA is built in
Impose limits on timeout , message size
Supports synchronizing B2B resources to another region
WHAT WE HAVE TO DO
Configure B2B resource synchronization
Configure integration to highly available endpoints
Duplicate logic app in other regions
What Azure FUNCTIONsProvides
Scale underlying resources with consumption plan
Scales VM’s automatically
Basic uptime SLA at this time
WHAT WE HAVE TO DO
Choose plan type
Set scaling policies while using app service plan
Replicate functions to other regions
What VPN GATEWAYProvides
Deploys active-standby instances by default
Run as a managed service and your never access underlying virtual machines
WHAT WE HAVE TO DO
Resize as needed
Configure redundant on prem VPNdevices
Create active-active VPNgateway configuration
To sum it all
Richard finished his talk with few points —
Only integrate with highly available endpoints
Clearly understand what services failover together
Regularly perform chaos testing
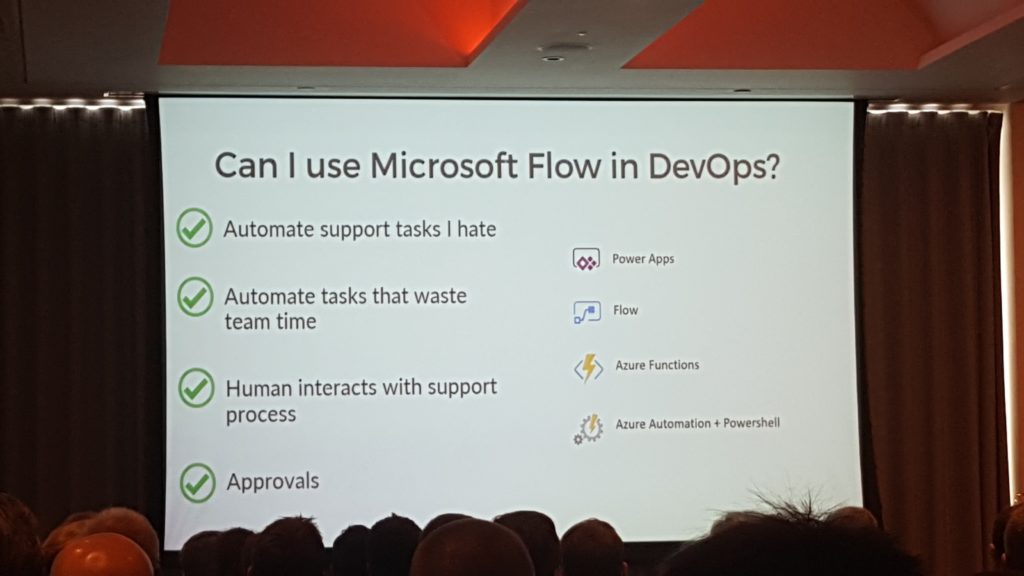
0900 — DevOps empowered by Microsoft Flow
During the second session of the day Michael Stephenson explained how Microsoft flow can be used to simplify tasks that can be tedious in execution and bring very little business value e.g. User Onboarding.
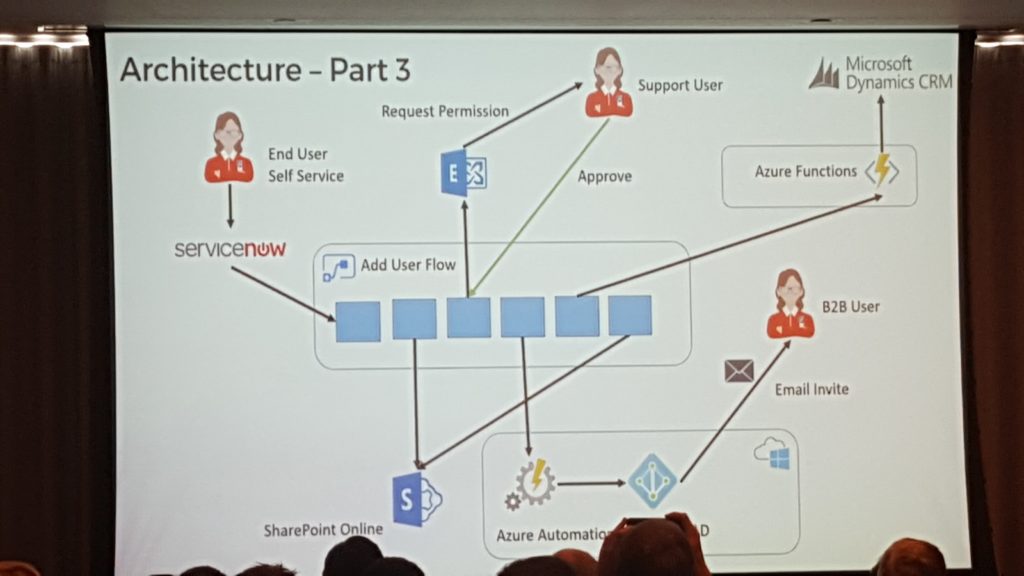
The presentation was based on a big multi-business multi-geo CRM Implementation where multiple parties were involved to create a new B2B User. The process consisted of sending a CSV file through PowerShell to create the user in Azure AD and then in Dynamics CRM.
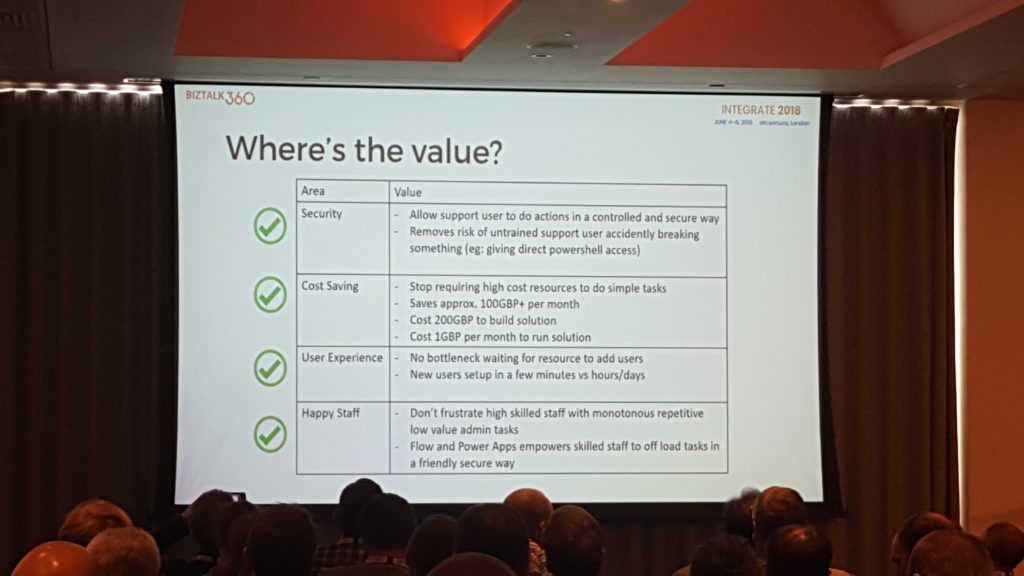
The problem was cross team friction:
Support user does not have enough skills to execute this process and on top of that this kind of scripts require elevated permissions
Admin – does not have enough time to perform this task due to basic daily admin tasks and does not want the support user to accidently delete the system.
Michael then explained how Microsoft flow can be used to create a black box on top of the entire on boarding process and allow the support user to easily execute it without any permissions to the system.
Then Michael together with Steef-Jan, demonstrated the Microsoft flow in action within Minecraft. It looks like the audience really liked the other demo he did from few years back and everyone wanted more.
Next, he showed a diagram on how easily this process can be extended to eliminate the support user from the execution and fully automate it, by extracting relevant information from the request email of the end user.
Lastly, Michael emphasised the importance of automating repetitive tasks within the organisation to improve efficiency and reduce the costs of performing tasks that do not bring business value.
0940 — Using VSTS to deploy to a BizTalk Server, what you need to know
In this session, Johan Hedberg showed us how easy it is to setup the CI and CD for your BizTalk projects using VSTS using the BizTalk Server 2016 Feature pack 1. He showed us how to configure the BizTalk build project and how to create a build definition in VSTS to run the build whenever a developer tries to check in the code.
He stressed the importance of having automated unit tests and how to run it as part of your build pipeline. He also mentioned the advantages of using a custom agent instead of hosted agent. Overall the session was well received by the audience.
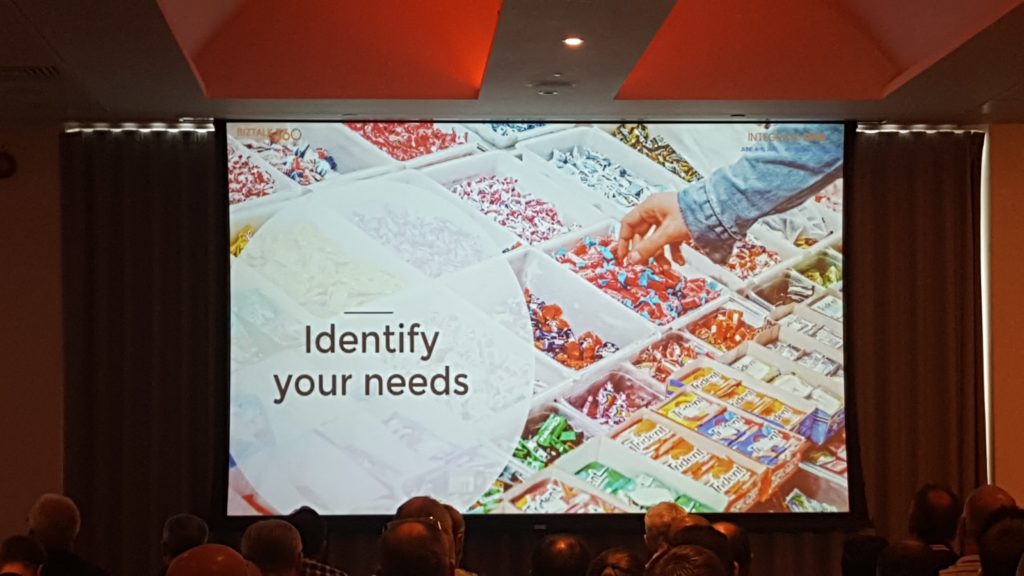
1050 — Exposing BizTalk Server to the World
During this session Wagner explained and demonstrated how you can unlock your BizTalk endpoints to the outside world using Azure Services. Wagner emphasised that there are options such as email, queues and file exchange, but his session focused more on the HTTP endpoints.
The options which were demoed during the session included:
Azure Relays
Logic Apps
Azure Function Proxies
Azure API Management
Each of the available options were clearly explained and Wagner provided detailed information on various aspects such as security, message format and ease of implementation.
“Identify your needs” – was the key to the session. Wagner clearly explained that not every option will suite your requirements, as it all depends on what you want to achieve. For example, Logic Apps is a perfect option to extend your workflows, on the other hand, relays are perfect to securely expose on premise services without the need to punch through your firewall.
1130 — Anatomy of an Enterprise Integration Architecture
In this session, Dan Toomey talked about complexity of the integration process especially when it comes to integration large number applications together. He talked about how are we doing the integration currently and what problems are we trying to solve using integration and where are all the areas in the integration space where we can do it better.
He further went on to explain how we can use Gartner’s pace layers which includes Systems of records, System of differentiation and System of innovation to create a technology characteristics for the integration scenarios.
For this work we need a solid system of record layer which includes things like Security, API’s, service fabric etc. We should limit the customization in this layer. On top that in the differentiation layer we need systems like Logic Apps which are loosely coupled inter-layer communication systems to take care of the integration needs.
On top of the differentiation layer we need to allow room for innovation for examples things like cognitive services, power apps, Microsoft Flow etc.
1210 — Unlock the power of hybrid integration with BizTalk Server and webhooks!
Toon started out his session by showing the difference between polling and using Webhooks. He pointed out that while polling, you are actually hammering an endpoint, which might not (yet) have the data you requested for. In many scenarios it might be that using Webhooks is more efficient, than using polling. Toon gave an overview of both the advantages and the disadvantages of using Webhooks.
Advantages
more efficient
faster
no client side state
provides extensibility
Disadvantages
not standardized
extra responsibilities for both client and server
considered as a black box
After giving few examples of solutions which are using Webhook (GitHub, TeamLeader, Azure Monitoring), Toon continued by giving a number of design considerations for Webhooks, which contained that it’s best to give your Webhooks a clear and descriptive name and use a consistent name convention for easy of use. Also make sure that consumers are able to register and unregister your Webhook via a user interface or via an API.
From a Publisher perspective, you should take care of the following:
reliability (asynchronously, not synchronously)
security (use HTTPS)
validity (check accessibility at registration)
Also Consumers of Webhooks should be aware of reliability and security, but they should also keep high availability, scalability and sequencing of Webhooks.
Toon also showed some demos on how to manage Webhooks with BizTalk and Event Grid and how to synchronize contacts and documents.
1340 — Refining BizTalk implementations
The last session of the event was done by Mattias Logdberg. By taking a user case he explained how you could start with a basic BizTalk scenario in which a web shop was integrated with an ERP by using BizTalk, but based on business needs all kind of Azure technologies were introduced to end up with an innovative solution which enabled for much more possibilities.
He mentioned that Business needs often conflict with IT needs; where the business often needs more and more capabilities, it can be hard for IT departments to keep up with the pace.
Mattias started drawing that basic scenario, which involved that web shop, BizTalk and that ERP system and showed how this scenario could greatly be improved by using Azure technologies like Service Bus topics, API Management, DocumentDb, etc. That monolithic application was turned in a loosely coupled solution with many more capabilities. Bottom line was that by going through this process, Mattias pointed out that unnecessary complexity was removed and the earlier existing complex framework was replaced by a set of micro functions, thereby giving the business more flexibility to further develop their needs.
After the last session, it was time for an open Q&A session with the Microsoft Product Group. The discussion spanned across different areas such as BizTalk Server, Logic Apps, Microsoft Flow and was an engaging one.
With that, it was time to wrap up what was a great 3 days at INTEGRATE 2018.
Check out the pictures captured by our event photographer Tariq Sheikh here —
Thanks to the following people for helping me to collate this blog post—
Umamaheswaran Manivannan
Lex Hegt
Srinivasa Mahendrakar
Daniel Szweda
Author: Sriram Hariharan
Sriram Hariharan is the Senior Technical and Content Writer at BizTalk360. He has over 9 years of experience working as documentation specialist for different products and domains. Writing is his passion and he believes in the following quote – “As wings are for an aircraft, a technical document is for a product — be it a product document, user guide, or release notes”. View all posts by Sriram Hariharan
Many customers use their BizTalk platform to exchange EDI (Electronic Data Interchange) messages with their partners. BizTalk Server contains a number of features for EDI like Interchange processing, Batch processing and Trading Partner Management.
From an operational viewpoint, all kind of features exist in BizTalk Server and many have found their way to BizTalk360 as well. However, besides querying for running processes, there is no feature which shows the EDI processes from a statistical viewpoint.
What are the current challenges?
Often, BizTalk Server is considered as a black box and organizations with little knowledge of the product, sometimes prefer not to touch it. This behaviour can be quite dangerous as the (EDI) processes in BizTalk Server might not run as expected. So, insight into these processes is required to be able to guarantee everything is okay. Information like the number of AS2 messages or the transaction count by transaction type or by partner id over a certain period is very useful to determine the well-being of the processes, but cannot be revealed from BizTalk Server.
How BizTalk360 solves this problem?
BizTalk360 tries to breach this black box behaviour by bringing a platform which makes BizTalk Server environments easier to understand and safe to operate on.
Related to EDI, we bring a couple of features:
EDI Dashboards
EDI Status Reports
Reporting Manager
Parties and Agreements
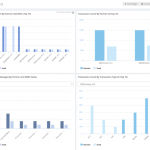
EDI Dashboards
The EDI Dashboard is one of the features which enables the BizTalk user to get insight in what’s going in BizTalk. As the other dashboards in BizTalk360, also the EDI Dashboard is customizable and consists of widgets from different categories. In case of the EDI Dashboard, the following categories exist:
EDI Interchanges – widgets exist for
Interchange count by Partner Id/Name
Agreement
Encoding (X12/EDIFACT)
EDI Transaction Sets – widgets exist for
Transaction count by Partner Id/Name
Transaction type (filtered by Partner Id)
ACK Status (filtered by Partner Id)
EDI AS – widgets exist for
Number of messages by Partner Id
Number of messages by Partner Id and MDN status
Number of messages by MDN status
Below you can view some examples of EDI Dashboards you can create in BizTalk360.
EDI Reports
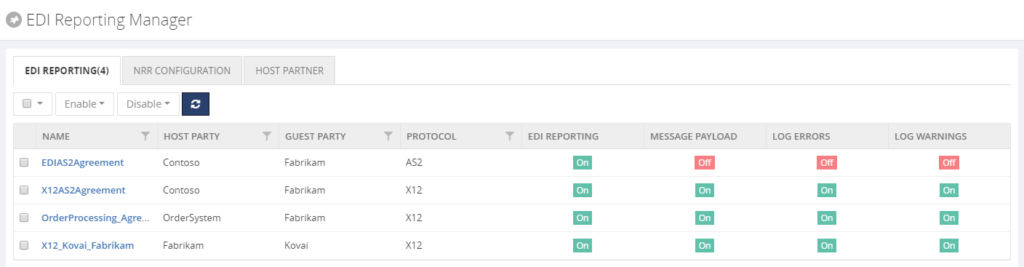
Comparable to the EDI query features in the BizTalk Administration Console, BizTalk360 brings a Reporting feature. On top of the set of queries you might know from the Admin console, BizTalk360 also provides a Functional ACK Status report.
EDI Reporting Manager
For easy configuration of your EDI reports, BizTalk360 brings the EDI Reporting Manager. See below for a screen print of that feature.
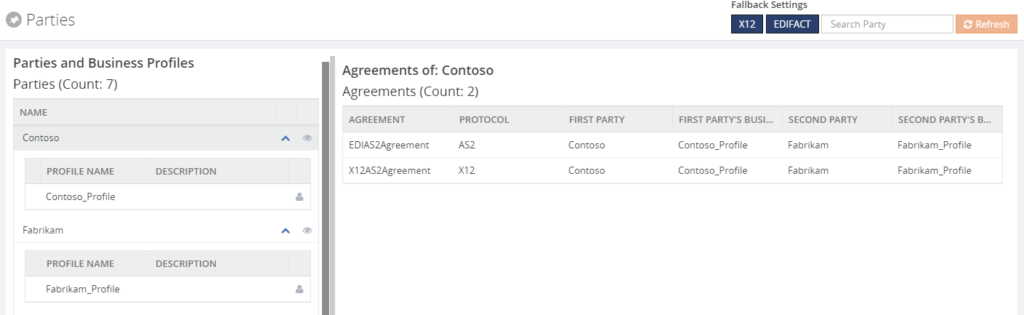
Parties and Agreements
Also the parties and agreements can be viewed in BizTalk360. See below for a screen print of that feature.
By bringing all these features, BizTalk360 gives good visibility of the EDI processes.
Author: Lex Hegt
Lex Hegt works in the IT sector for more than 25 years, mainly in roles as developer and administrator. He works with BizTalk since BizTalk Server 2004. Currently he is a Technical Lead at BizTalk360. View all posts by Lex Hegt


 For having a good overview of the ESB processes, BizTalk360 provides a customizable ESB Dashboard. You can create dashboards based on different categories of widgets, which are: