by stephen-w-thomas | May 6, 2013 | Stephen's BizTalk and Integration Blog
I was doing some BizTalk installations this weekend with BizTalk Server 2013 on Windows Server 2012 VM’s.
I have done this before without any issues but in each case I already had Visual Studios 2012 installed on the server.
This time I was doing a Runtime Only installation. I received an error when trying to install the Enterprise Single Sign-on component.
The error I received was: The program can’t start because MSVCP100.dll is missing from your computer. Try reinstalling the program to fix the problem.
Followed by: The following platform components failed to install and will need to be manually installed before setup can proceed: Enterprise Single Sign-On Server. Unspecified error.
The error is saying it is missing the C++ Runtime components (probably why I did not see this error when I already had Visual Studios installed). After trial and error, it seems that it is only missing the 32-bit C++ Runtime. It seems that this does not get installed with the BizTalk CAB file.
The fix is simple, just download the 32-bit C++ Runtime and re-run the installation of BizTalk. You can find them here. If you still have issues, ensure you have the 64-bit version installed as well. That can be found here.
The BizTalk 2013 Hardware and Software Requirements states that this is a requirement to install BizTalk Server 2013. I did not even think to look at the Software List until I ran into issues with some else. The documentation says:
“Microsoft Visual C++ 2010 Redistributable Package: On an x86 computer, install only the x86 version of the package. On an x64 computer, install both x86 and x64 versions of the package. The installer is available as part of the BizTalk Server installation media under \Platform\SSO\Platform.”
Hope this helps.

by community-syndication | May 6, 2013 | BizTalk Community Blogs via Syndication
In my latest Pluralsight video training course – Patterns of Cloud Integration – I addressed application and data integration scenarios that involve cloud endpoints. In the “shared database” module of the course, I discussed integration options where parties relied on a common (cloud) data repository. One of my solutions was inspired by Amazon CTO Werner […]
Blog Post by: Richard Seroter

by community-syndication | May 5, 2013 | BizTalk Community Blogs via Syndication
BizTalk Server Installation Scenario This article explains how to install and configure Microsoft BizTalk Server 2013 on a single computer (development standalone machine) running Windows Server 2012. This information will help you plan the installation and configuration of BizTalk Server 2013, applications and components on which it depends. We will assume that the machine already […]
Blog Post by: Sandro Pereira
by community-syndication | May 5, 2013 | BizTalk Community Blogs via Syndication
So you want to send Toast-Notification to the Windows Azure Service Bus Notification Hub using BizTalk Server 2013? Well here’s the bad news You can’t use the SB-Messaging adapter. You might wonder why? The answer is quite simple: The… Read more ›
Blog Post by: Ren%u00e9 Brauwers
by Rene Brauwers | May 5, 2013 | BizTalk Community Blogs via Syndication
So you want to send Toast-Notification to the Windows Azure Service Bus Notification Hub using BizTalk Server 2013?
You can’t use the SB-Messaging adapter. You might wonder why? The answer is quite simple: The SB-Messaging adapter (Microsoft.BizTalk.Adapter.ServiceBus.dll) contains a reference to the Microsoft.Servicebus.dll (1.8 version) and this version does not include the Notification Hub bits and pieces. This is of course not strange at all, as the Windows Azure Service Bus Notification Hubs functionality is currently still in preview and therefore not part of the 1.8 version.
Well you might currently not be able to leverage the SB-Messaging adapter out-of-the-box functionality to send toast-notifications to windows azure service bus notification hubs; but nothing can withhold you of using the Wcf-WebHttp Adapter in combination with a custom endpoint behavior , and well in this post I will briefly show how I put it all together and was able to use BizTalk to send out Notification requests to the Windows Azure Service Bus Notification Hub.
- A ready to use : Windows Azure Service Bus Notification Hub and an application (Windows Store or Windows Phone) which is subscribed to the Notification Hub (see tutorial here)
- Up and Running BizTalk Server 2013 Development Environment (including VS.Net 2012 update 2)
- Read & Watch
- Read the rest of this blog post.
A message received by BizTalk is sent to a pre-defined Windows Azure Service Bus Notification Hub called “contactcenter”; subsequently the hub will ensure that the message received is being ‘broadcasted’ to all registered applications, in my case a simple Windows Store applications. But in theory this message could have been sent to hundreds and thousands of devices as long as they would have registered themselves to receive notifications.
Please note the following: the windows store application I created and used for this scenario creates a template registration with the Windows Azure Service Bus Notification Hub. The template in question leverages the ToastImageAndText04 format (see image below). Complete Toast Template Catalog Listing can be found here
The registered template translates to the following xml
Below a mapping, showing the link between the ToastImageAndText04 template and the Schema used in the scenario by BizTalk
Below a short demo, showing the creation of a simple BizTalk Application and it’s subsequent configuration; followed by a notification request message to be send to BizTalk, which then delivers it to the Windows Azure Service Bus Notification Hub.
As I mentioned earlier; unfortunately we can not use the SB-Messaging adapter, so that’s why I had to resort to a different approach. This approach consisted of creating a custom endpoint behavior which in short performs the following logic.
<img title=”image” style=”border-top: 0px; border-right: 0px; background-image: none; border-bottom: 0px; padding-top: 0px; padding-left: 0px; margin: 0px; border-left: 0px; display: inline; padding-right: 0px” border=”0″ alt=”image” src=”http://blog.brauwers prix viagra pharmacie france.nl/wp-content/uploads/2013/05/image_thumb4.png” width=”244″ height=”223″>
Well it is fairly simple, although it requires some coding, to invoke the Windows Azure Service Bus Notification Hub using BizTalk Server and this opens up some additional ‘notification’ possibilities, however it might be a bit over-the-top to use BizTalk Server for this . Ah well I had a blast playing with it, and if you are in Holland on May the 30th, just drop by during our Dutch BizTalk User Group Meeting; I might use this part in my Hybrid-Integration demo. You can register here : http://btugnl20130530.eventbrite.nl/#
As always; please contact me if you want a copy of the custom-behavior.
by community-syndication | May 5, 2013 | BizTalk Community Blogs via Syndication
Last year I created a sample tool to execute or test BizTalk maps. (See the post: Execute a BizTalk 2010 map from .NET) The sample was downloaded over 300 times so I thought maybe it would be nice to add some features to the tool and port it to BizTalk 2013!
The following changes are made:
- The sample project ported to the .NET framework 4.5 with Visual Studio 2012.
BizTalk 2010 uses System.Xml.Xsl.XslTransform to transform a message. BizTalk 2013 uses the XslCompiledTransform class that significantly outperforms the XslTransform class.
- A new wizard to create an envelope message to wrap multiple input messages.
In the old version you also can test a map with multiple input messages but it’s not very easy because when you create a transformation map with multiple source documents, BizTalk uses an envelope to wrap the individual input messages. When you want to test the map you have to create the envelope manually or generate the envelope in Visual Studio. Then you still need to adjust the envelope because Visual Studio cannot create an envelope with real data from multiple input messages.
- Custom MapHelper class to perform BizTalk transformations directly from .NET.
In old version a reference was added to the ESB.TransformServices.dll assembly, which contains the classes required to call a BizTalk map. I’ve extracted the code with Reflector and created a custom MapHelper class to perform BizTalk transformations directly. Now the MapTester tool is no longer dependent on the ESB Toolkit.
- Measure the execution time of the map.
Elapsed time in milliseconds.
- User experience changes.
Some small changes in the user interaction.
Using the tool
Follow the next steps to test a map with real data from multiple input messages:
| Click in the File menu on the menu item “Create envelope with multiple input messages”. |
|
| |
| In the Wizard pop-up click on the “Add File” button to select a XML file to add to the envelope. You can select multiple input messages. Click on “Finish” to create the envelope. |
|
| |
| Enter the filename of the envelope in the “Save As” pop-up and click on the “Save” button. |
|
| |
| Enter the fully qualified name of the map and click on the “Test Map” button to test the map. |
|
| |
| In the Result tab is the transformed message shown. In the Info screen is the execution time shown and the name of the transformed file. |
|
| |
Conclusion
It is always nice to create something that is really used so I hope that the new version is also going to be downloaded many times! 😉 If you have suggestions or a remark please comment!
Note:
The sample is designed for BizTalk 2013 but if you want to use it for BizTalk 2010 you can change the target framework and remove the custom MapHelper class that performs the BizTalk transformations. Add a reference again to the ESB.TransformServices.dll assembly from the ESB Toolkit and use these classes to call a BizTalk map.
You can download the sample tool with the source code here:
Execute a BizTalk 2013 map with multiple input messages from .NET

by community-syndication | May 4, 2013 | BizTalk Community Blogs via Syndication
BizTalk 2013 supports an in place upgrade from BizTalk 2010 and we planned to do this on one of the BizTalk 2010 Servers that we support . We had used the ESB Toolkit 2.1 and a customized version of the ESB Exception Management Portal on this BizTalk 2010 server as well. What would happen if […]
Blog Post by: mbrimble

by community-syndication | May 2, 2013 | BizTalk Community Blogs via Syndication
A couple months back, the folks at Salesforce.com reached out to me and asked if I’d be interested in helping them beef up their .NET-oriented content. Given that I barely say “no” to anything – and this sounded fun – I took them up on the offer. I ended up contributing three articles that covered: […]
Blog Post by: Richard Seroter

by community-syndication | May 2, 2013 | BizTalk Community Blogs via Syndication
It%u00b4s a common factor that before users can view data from a BAM model in the BAM Portal website, they must be granted access to the views. However, and contrary to what I thought, the user that makes the deploy of the BAM Definition don’t necessarily have access to this particular view in the BAM […]
Blog Post by: Sandro Pereira

by community-syndication | May 2, 2013 | BizTalk Community Blogs via Syndication
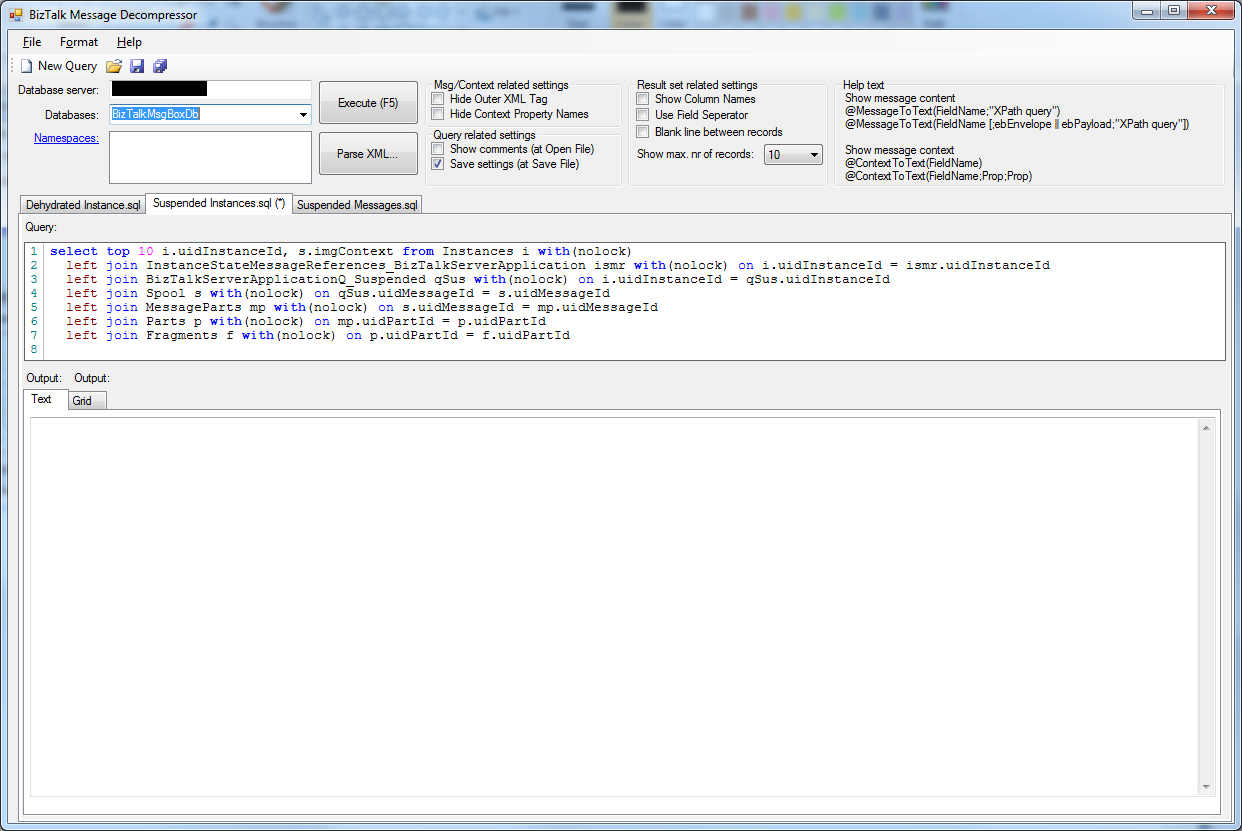
To make my job easier I’m still improving BTSDecompress. Here’s an overview of the latest updates:
- Addition of Tab Pages to be able to open more than 1 query
- Addition of a Button bar to have easy access to some of the most used functions
- Addition of a dialog screen for maintenance of namespaces
- Addition of a beter query editor
- Addition of a Grid View for presenting the output
- Addition of a command-line version
These updates are described in more detail below the following screen print.
Addition of Tab Pages
This enables you to be able to open more than one query at the same time. Most of the times I use BTSDecompress, I need 2 different queries. So I needed to open 2 instances of BTSDecompress. With the addition of Tab Pages, it’s enough to start BTSDecompress just once and open all the queries I need.
Globally it works as follows:
-
BTSDecompress always starts up with one Tab Page and an empty query window
-
when you create a new query or open an existing one, it always shows up in a new Tab Page
-
the Tab of the Tab Page contains the file name of the query you opened. If you made changes to the query an asterisk is added to the Tab Page (see screen print)
-
you can close the currently selected Tab Page by pressing Ctrl-F4 or by clicking the right mouse button of the Tab Page and choose ‘Close Tab’. In case the query has changed and might need to be saved, you are notified.
-
when you have opened multiple queries and you switch between Tab Pages (with Ctrl-Tab or mouse click), the settings which appear above the Tab Pages (Database Server, Database etc.) are also switched, making sure they reflect the settings of the currently active Tab Page/query
Addition of a Button Bar
For easy access to some of the most used functions a Button Bar is added. Currently it contains the following buttons:
-
New Query – open a new Tab Page with an new query
-
Open Query – open an existing query in a new Tab Page
-
Save Query – save the query in the active Tab Page
-
Save All – save all opened queries
It is likely that more buttons will become added in future releases.
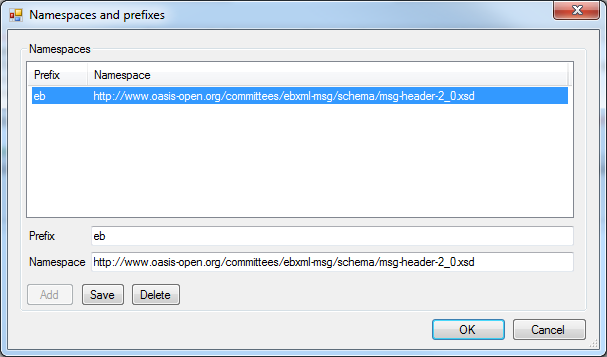
Addition of a dialog screen for maintenance of namespaces
After you have executed a query, the results will show up in the output frame. In most cases the output consists of XML messages. One of the nice capabilities of BTSDecompress, is that it is possible to add XPath queries, enabling you to view exactly that part of the message that you are interested in.
In many cases you might need namespaces to get to the part of your interest. In earlier releases of BTSDecompress, it was possible to add only 1 namespace. Since your message might contain more namespaces, it is now possible to add multiple namespaces. Maintenance (adding, editing, deleting) of these namespaces can be done with the new ‘Namespaces and prefixes’ dialog screen.
Of course the namespaces you entered are stored along with the query. This screen can be accessed by clicking the Namespaces hyperlink in the upper left corner of BTSDecompress.
Addition of a beter query editor
The query editor in the previous releases of BTSDecompress was nothing more than a multi line Text Box and did not have many features. I have to admit that I often created my queries in SQL Server Management Studio and copied them to BTSDecompress. So it was about time that BTSDecompress would get a richer query editor. I decided to use Pavel Torgashov’s
FastColoredTextBox, which is a nice and very rich Text Box!
Although currently I’m not using all of the capabilities of this Text Box, using this Text Box already makes using BTSDecompress much more attractive. This editor supports amongst others color recognition for T-SQL statements and line numbers.
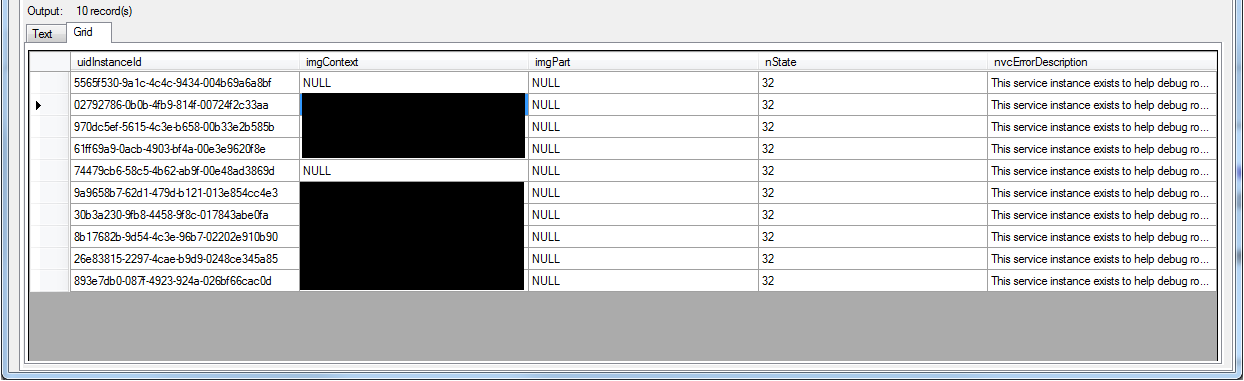
Addition of a Grid View for presenting the output
As of this release BTSDecompress not only shows the results in a Text View, but also in a nice Grid View for better readability. In contrast with SQL Server Management Studio, both Views are filled directly after executing your query.
Addition of a command-line version
This enables you to create batch jobs and have the output stored in a Text file. You can use the same queries as the ones you use for the GUI version of BTSDecompress. The command-line version of BTSDecompress is called BTSDecompress_cmd.exe and has the following parameters:
- -s: Database server
- -d: Database
- -SQLFile: Query which will be executed
- -OutputFile: Location and name of the output file
- -OverwriteOutputFile: Overwrite the output file if it already exists
- -Namespace: Add (prefix and) namespace
- -HideOuterXMLTag: Show just the content of a XML tag, without the tag itself
- -HideContextPropertyNames: Hide the Context Property Names in the result
- -ShowColumnNames: Show the field names in the result
- -UseFieldSeperator: Show a Field Seperator (‘;’) between the fields (and values) in the output
- -BlankLineBetweenRecords: Add an extra blank line between the records in the output, for better readability
- -?: Show Parameter Help
A couple of parameters can also be set in the query file, from the GUI version of BTSDecompress. By adding them as a parameter to BTSDecompress_cmd.exe, the value which is set in the query file will be overruled.
More information
Where to find
BTSDecompress is Open Source software and can be found here: btsdecompress.codeplex.com.
Hopefully this tool is helpful to others as well.