by community-syndication | Mar 1, 2011 | BizTalk Community Blogs via Syndication
Lately, a lot of CTP’s came available on the Windows Azure platform. My goal is to try them all out. I blogged on two of these technologies already:
- Using Windows Azure VM Role
- Azure connect – VPN as a service
This time, we’re getting on the data side, with SQL Azure Data Sync. This data synchronization service is built on the Microsoft Sync Framework technologies. It provides bi-directional data synchronization and data management capabilities allowing data to be easily shared across SQL Azure databases within multiple data centers.
A very good and detailed overview on Data Sync can be found on the TechNet Wiki: http://social.technet.microsoft.com/wiki/contents/articles/sql-azure-data-sync-overview.aspx
Scenarios
This SQL Azure Data Sync service is a very promising and interesting feature that opens a lot of great scenarios:
- For development/testing purposes: provide data in your local database (on development) and synchronize with the Azure database to feed the cloud instances.
- Synchronizing configuration or master data across databases in a very easy way.
- Use SQL Azure Reporting Services on ’local’ data.
Registration for CTP
Since this feature is still in CTP, you need to register first to get an invitation code. To do all this, just browse to http://datasync.azure.com and sign in with your live id. After this, you can enter your e-mail and other details and you should receive an invitation code some time later. With that registration code, you can log on to the full features.
Concepts
The following concepts are important in setting up Data Sync:
- Sync group: a sync group is a group of databases that can be synchronized together
- Database: a database that gets registered for SQL Azure Data Sync
- Agent: an agent is a Windows Service that performs and orchestrates the actual synchronization
Configuring data synchronization
Step 1: download the Sync Agent
A Sync agent is only required when synchronizing data from an on-premise database. If the synchronization is set up from Cloud to Cloud, then it is not required to download the Agent, since the synchronization logic will be run in the Cloud.
For this example, I will synchronize a local database with a SQL Azure database.
On the Data Sync portal, click the Agents tab page and download the Agent installer at the bottom of the page. After running the installer (and providing credentials for the Data Sync windows service), you can open a local configuration tool, through the Start menu: SQL Azure Data Sync Agent CTP2.
This tool allows you to configure local databases for synchronization. The following screenshot shows the default configuration window, after installation. To join this agent to a Windows Azure subscription, it is important to configure the Agent Key first. This can be done by clicking the Edit Agent Key button and providing the key that can be copied from the Data Sync Portal.
Once this is configured, it should be possible to Ping the Azure Sync Service, by clicking the Ping Sync Service button.
Step 2: Add your local database
Now we have the local agent installed, we will add a local (on premise) database to the configuration tool, so that it can be synchronized later.
In this example, I am using a custom database with 3 tables: Customer, OrderLines, OrderEvents.
- I will add this database in the SQL Azure Data Sync Agent tool, by clicking the ’Add Member’ button at the left. This pops up a configuration window where the server, database and the authentication method need to be selected. (1)
- The Data Sync services have some limitations on supported data types, etc. It is possible to check the database for issues, by clicking the ’Check Member Schema’ button. (2).
- I added a field with an unsupported data type (geography) to the customer table and the Schema validation provided a warning that indicated that this column would be skipped. (3) This is because geography is not supported in Windows Azure at this point in time.
- It is very important to start the Windows Service of the Azure Data Sync Agent, in order to register the client database with the Windows Azure subscriptions.
Step 3: Add the SQL Azure database
Adding a SQL Server database to the Data Sync subscription is much easier and can be done on the Data Sync management portal, by clicking the Databases tab and clicking the Add button. In the pop up, you just need to provide the server, database and credentials, before saving.
In my example, I am just adding a new empty database, here.
Step 4: Set up the synchronization, through a Sync Group
- In the management portal, click the New Sync Group button in the Sync Groups tab. And add all the databases you want to synch together to the database list(1) and click Next.
- In the next screen, you can add the tables, per database that you want to synchronize. For this demo, I want to synchronize everything, except the events table. (2) You can also enable a schedule for the synchronization (expressed in minutes).
- Once the group is created, you can synchronize the group easily.
Testing the data synchronization
Now I have the databases configured for synchronization, it’s time to play around with it a bit. To execute the synchronization, you can either rely on the synchronization schedule , when configured on the Sync group, or you can manually trigger the synchronization.
1st synchronization: Creating tables in the cloud.
The first synchronization I did created the two synchronized tables on my empty Cloud database and added the data there. One thing to notice is that the Location column (with the spatial data type) was not created on the SQL Azure database.
2nd synchronization: Adding data locally, synchronizing to the cloud.
In this test, I added two customers and some order lines to the local database and synchronized with the Cloud database, to find out that everything was copied without problems.
3rd synchronization: Adding data in the cloud, synchronizing locally.
In this test, I added a customer to the cloud database and synchronized with the on premise database, to find out that everything was copied without problems.
4th synchronization: Adding data on premise and in the cloud, synchronizing bi-directionally
In this test, I added customers in both databases before synchronization to find out that the data was synchronized correctly.
Data conflicts
Now, I wanted to simulate some conflicts to find out how the Data Sync would handle them.
Adding or updating data in both databases, with the same primary key.
I added two different customers, but with the same primary key in both databases. But, surprisingly, the synchronization happened without any issue, but my local customer was overridden by the cloud customer, resulting in lost data.
- Both records (local + cloud) were normally marked as new, so it should be possible to detect this.
- I was looking to find out if the ’most recent’ record won, but in all scenarios, the data from the cloud database survived the synchronization. (probably, because this database was added first)
Maybe something for a next CTP?
Deleting data that is being referenced by a non-synchronized table
Another interesting test was to delete an order line on my cloud database. But this order line was being referenced by a record in my local database (OrderEvent). Knowing that the OrderEvent table is not being synchronized, this should result in a conflict.
Here I did not receive an exception, but I also noticed that my record on my local database still existed, where my cloud record was deleted. So here my data was out of synch.
Maybe something for a next CTP?
Adding a third database
The last test I did, was adding a new empty (cloud) database to the sync group and after the synchronization, everything seemed to work automagically. Great!
Underlying design
- When configuring a table for synchronization, triggers are being created for the three actions: insert, update, delete. They have the following name structure: [TableName]_dss_[action]_trigger.
- These triggers add the data in new tables that are being created during configuration of the sync group. For every data table, a sync table is being added with the following name: DataSync.[TableName]_dss_tracking
- Next to that, we can also see that a lot of new stored procedures are getting created
Conclusion
This CTP looks already very stable and the sychronization (between multiple databases) is very smooth. I am just hoping that there will be a better view or configuration for synchronization exceptions (like explained in the conflicts section).
Sam Vanhoutte, Codit
by community-syndication | Mar 1, 2011 | BizTalk Community Blogs via Syndication
As BizTalk developers we all know that one of the common challenges is how to test your BizTalk solution once it is deployed to BizTalk. Hopefully most of us are using the BizUnit framework for testing, but we still have the limitation that it’s a very Black Box test.
I have put together a sample and video to show a technique where I’m using the Logging Framework from the BizTalk CAT Team at Microsoft and where by BizUnit test is able to make assertions against the instrumentation going through the framework. This means that I can test for things happening such as the fact a component was executed or which branch of an orchestration was executed by simply using my normal instrumented code.
I’ve put the sample and video for this on the following codeplex site:
http://btsloggingeventsinbi.codeplex.com/
The video should also be on cloud casts fairly soon too.
by community-syndication | Feb 27, 2011 | BizTalk Community Blogs via Syndication
[See Sample: Context routing and throttling with orchestration]
Imagine the project where most of the routing happens between orchestrations. I.e. routing is mostly between the MessageBox and orchestration with direct endpoints.
Imagine also the most of the messages are with the same Message type.
Usually in this case messages got the special node only for the routing. For example, the field can be the “Originator” or “Recipient” or “From” or “To”.
What wrong is with this approach, it creates the dependency between the message and the message processing. Message “knows” something about Originator or Recipient.
So what we can do with it? How can we “colorize” the same message to route it to the different places without changing the message itself?
One of the decisions is to use the message context.
BizTalk uses the promoted properties for routing. There are two kinds of the properties: the content properties and the context properties. The
content property extracts its value from inside the message, it is a value of the element or attribute. [See
MSDN] The
context property gets its value from the message environment. It can be the port name that receive this message, it can be the message Id, created by the BizTalk. Context properties look like the headers in the SOAP message. Actually they are not the headers but behave like headers. The context properties are the good match for our case.
First, we don’t have to change the message itself to set or change the routing property. The context is stored outside the message body.
The main purpose of the context properties is working on behalf of the BizTalk internals. But we can read, create and change them. Just do not interfere with BizTalk internals on this way.
by community-syndication | Feb 27, 2011 | BizTalk Community Blogs via Syndication
The sample demonstrates using orchestration for throttling and using context routing.
Usually throttling is implemented on the host level (in BizTalk 2010 we can also using the host instance level throttling). Here is demonstrated the throttling with orchestration convoy that slows down message flow from some customers. Sample implements sort of quality service agreement layer for different kind of customers.
The sample demonstrates the context routing between orchestrations. It has several advantages over the content routing. For example, we don’t have to create the property schema and promote properties on the schemas; we don’t have to change the message content to change routing.
Use case:
The BizTalk application has a main processing orchestration that process all input messages. The application usually works as an OLTP application. Input messages came in random order without peaks, typical scenario for the on-line users.
But sometimes the big data batch payloads come. These batches overload processing orchestrations. All processes, activated by on-line users after the payload, come to the same queue and are processed only after the payload. Result is on-line users can see significant delay in processing. It can be minutes or hours, depending of the batch size.
Requirements:
On-line user’s processing should work without delays. Big batches cannot disturb on-line users. There should be higher priority for the on-line users and the lower priority for the batches.
Design:
Decision is to divide the message flow in two branches, one for on-line users and second for batches. Branch with batches provides messages to the processing line with low priority, and the on-line user’s branch – with high priority.
All messages are provided by hi-speed receive port.
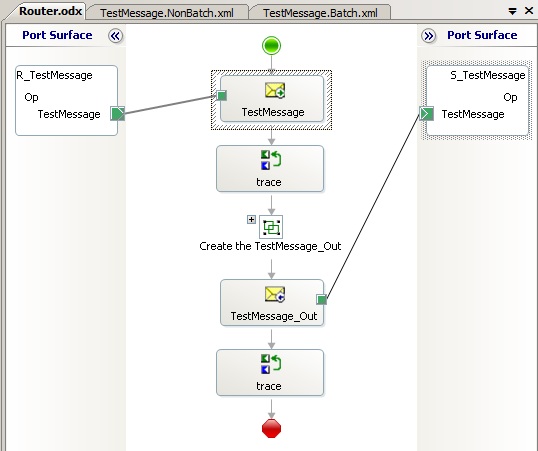
BTS.ReceivePortName context property is used for routing. The Router orchestration separates messages sent from on-line users and from the batch messages.
But the Router does not use the BizTalk provided value of this property, the Router set up this value by itself. Router uses the content of the messages to decide if it is from on-line users or from batches.
The message context property the BTS.ReceivePortName is changed respectively, its value works as a recipient address, as the “To” address for the next recipient orchestrations.
Those next orchestrations are the BatchBottleneck and the MainProcess orchestrations.
Messages with context equal “ToBatch” are filtered up by the BatchBottleneck orchestration. It is a unified convoy orchestration and it throttles the message flow, delaying the message delivery to the MainProcess orchestration.
The BatchBottleneck orchestration changes the message context to the “ToProcess” and sends messages one after another with small delay in between. Delay can be configured in the BizTalk config file as:
<appSettings>
<add key=”GLD_Tests_TwoWayRouting_BatchBottleneck_DelayMillisec” value=”100″/>
</appSettings>
Of course, messages with context equal “ToProcess” are filtered up by the MainProcess orchestration.
NOTES:
- Filters with string values: In Orchestrations (the first Receive shape in orchestration) use string values WITH quotes; in Send Ports use string values WITHOUT quotes.
- Filters on the Send Ports are dynamic; we can change them in run-time. Filters on the Orchestrations are static; we can change them only in design-time.
- To check the existence of the promoted property inside orchestration use the Expression shape with construction like this:
if (BTS.ReceivePortName exists myMessage) { …; }
It is not possible in the Message Assignment shape because using the “if” statement inside Message Assignment is prohibited.
- Several predefined context properties can behave in specific way. Say MessageTracking.OriginatingMessage or XMLNORM.DocumentSpecName, they are required some internal rules should be applied to the format or usage of this properties. MessageTracking.* parameters require you have to use tracking and you can get unexpected run-time errors in some cases. My recommendation is – use very limited set of the predefined context properties.
- To “attach” the new promoted property to the message, we have to use correlation. The correlation type should include this property. [Here is a good explanation by Saravana ]
The sample code is here [sorry, temporary trubles with CodePlex].

by community-syndication | Feb 26, 2011 | BizTalk Community Blogs via Syndication
Hey folks, Alan Smith and myself (much more Alan this time 🙂 have brought the series back for another version and another year!
Myself and many other Biztalk MVPs and some great BizTalk-ers with fantastic real world experience share their knowledge.
As always the webcast series is designed to be an easy watch, level 200 ish and I’ve even had some folks reporting they watched the needy webcast on the way to clients to talk about for e.g. an EDI solution.
BizTalk 2010 Light And Easy Series – here’s where you’ll find the series http://www.cloudcasts.net/Default.aspx?category=BizTalk+Light+and+Easy
(Alan is in the process of uploading them)
integration with BizTalk 2010 using the BizTalk WSS Adapter.
I created a 2 part episode – the first one deals with explaining the SharePoint 2010 environment, and the 2nd one deals with integration from BizTalk.
Here’s my recordings, PPTs and sample files.
| Title |
WebCast |
PPT |
| Integration to SharePoint Part 1 |
Part 1 (110MB) |
(2MB) |
| Integration to SharePoint Part 2 |
Part 2 (60MB) |
(2MB) |
| Sample Code |
|
|
| |
|
|
Enjoy!