by community-syndication | Dec 14, 2010 | BizTalk Community Blogs via Syndication
This whitepaper describes several best practices for building scalable, highly efficient and cost effective queue-based messaging solutions on the Windows Azure platform. The intended audience for this whitepaper includes solution architects and developers designing and implementing cloud-based solutions which leverage the Windows Azure platform’s queue storage services.
Introduction
A traditional queue-based messaging solution utilizes the concept of a message storage location known as a message queue, which is a repository for data that will be sent to or received from one or more participants, typically via an asynchronous communication mechanism.
The queue-based data exchange represents the foundation of a reliable and highly scalable messaging architecture capable of supporting a range of powerful scenarios in the distributed computing environment. Whether it’s high-volume work dispatch or durable messaging, a message queuing technology can step in and provide first-class capabilities to address the different requirements for asynchronous communication at scale.
The purpose of this whitepaper is to examine how developers can take advantage of particular design patterns in conjunction with capabilities provided by the Windows Azure platform to build optimized and cost-effective queue-based messaging solutions. The whitepaper takes a deeper look at most commonly used approaches for implementing queue-based interactions in Windows Azure solutions today and provides recommendations for improving performance, increasing scalability and reducing operating expense.
The underlying discussion is mixed with relevant best practices, hints and recommendations where appropriate. The scenario described in this whitepaper highlights a technical implementation that is based upon a real-world customer project.
Customer Scenario
For the sake of a concrete example, we will generalize a real-world customer scenario as follows.
A SaaS solution provider launches a new billing system implemented as a Windows Azure application servicing the business needs for customer transaction processing at scale. The key premise of the solution is centered upon the ability to offload compute-intensive workload to the cloud and leverage the elasticity of the Windows Azure infrastructure to perform the computationally intensive work.
The on-premises element of the end-to-end architecture consolidates and dispatches large volumes of transactions to a Windows Azure hosted service regularly throughout the day. Volumes vary from a few thousands to hundreds of thousands transactions per submission, reaching millions of transactions per day. Additionally, assume that the solution must satisfy a SLA-driven requirement for a guaranteed maximum processing latency.
The solution architecture is founded on the distributed map-reduce design pattern and is comprised of a multi-instance Worker role-based cloud tier using the Windows Azure queue storage for work dispatch. Transaction batches are received by Process Initiator Worker role instance, decomposed (de-batched) into smaller work items and enqueued into a range of Windows Azure queues for the purposes of load distribution.
Workload processing is handled by multiple instances of the Processing Worker role fetching work items from queues and passing them through computational procedures. The processing instances employ multi-threaded queue listeners to implement parallel data processing for optimal performance.
The processed work items are routed into a dedicated queue from which these are dequeued by the Process Controller Worker role instance, aggregated and persisted into a data store for data mining, reporting and analysis.
The solution architecture can be depicted as follows:
The diagram above depicts a typical architecture for scaling out large or complex compute workloads. The queue-based message exchange pattern adopted by this architecture is also very typical for many other Windows Azure applications and services which need to communicate with each other via queues. This enables taking a canonical approach to examining specific fundamental components involved in a queue-based message exchange.
Queue-Based Messaging Fundamentals
A typical messaging solution that exchanges data between its distributed components using message queues includes publishers depositing messages into queues and one or more subscribers intended to receive these messages. In most cases, the subscribers, sometimes referred to as queue listeners, are implemented as single- or multi-threaded processes, either continuously running or initiated on demand as per a scheduling pattern.
At a higher level, there are two primary dispatch mechanisms used to enable a queue listener to receive messages stored on a queue:
-
Polling (pull-based model): A listener monitors a queue by checking the queue at regular intervals for new messages. When the queue is empty, the listener continues polling the queue, periodically backing off by entering a sleep state.
-
Triggering (push-based model): A listener subscribes to an event that is triggered (either by the publisher itself or by a queue service manager) whenever a message arrives on a queue. The listener in turn can initiate message processing thus not having to poll the queue in order to determine whether or not any new work is available.
It is also worth mentioning that there are different flavors of both mechanisms. For instance, polling can be blocking and non-blocking. Blocking keeps a request on hold until a new message appears on a queue (or timeout is encountered) whereas a non-blocking request completes immediately if there is nothing on a queue. With a triggering model, a notification can be pushed to the queue listeners either for every new message, only when the very first message arrives to an empty queue or when queue depth reaches a certain level.
Note The dequeue operations supported by Windows Azure Queue Service API are non-blocking. This means that the API methods such as GetMessage or GetMessages will return immediately if there is no message found on a queue. That is one of the primary reasons why queue polling is often required in Windows Azure solutions today. By contrast, the Durable Message Buffers (DMB) provided by Windows Azure AppFabric Service Bus accommodate blocking receive operations which block the calling thread until a message arrives on a DMB queue or a specified timeout period has elapsed.
|
The most common approach to implementing queue listeners in Windows Azure solutions today can be summarized as follows:
-
A listener is implemented as an application component that is instantiated and executed as part of a worker role instance.
-
The lifecycle of the queue listener component would often be bound to the run time of the hosting role instance.
-
The main processing logic is comprised of a loop in which messages are dequeued and dispatched for processing.
-
Should no messages be received, the listening thread enters a sleep state the duration of which is often driven by an application-specific back-off algorithm.
-
The receive loop is being executed and a queue is being polled until the listener is notified to exit the loop and terminate.
The following flowchart diagram depicts the logic commonly used when implementing a queue listener with a polling mechanism in Windows Azure applications:
|
Note
For purposes of this whitepaper, more complex design patterns, for example those that require the use of a central queue manager (broker) are not used.
|
The use of a classic queue listener with a polling mechanism may not be the optimal choice when using Windows Azure queues because the Windows Azure pricing model measures storage transactions in terms of application requests performed against the queue, regardless of if the queue is empty or not. While application costs for this model can be reduced by simply increasing the polling interval using an appropriate back-off factor, this approach has the side effect of increasing latency. The longer the interval, the higher the processing latency of the very first message that arrives into a queue. For example, when a polling interval is backing off to 30 seconds, there could be a delay of up to 30 seconds before a message is picked up from a queue and dispatched for processing.
The purpose of the next sections is to discuss some techniques for maximizing performance and minimizing the cost of queue-based messaging solutions on the Windows Azure platform.
Best Practices for Performance, Scalability & Cost Optimization
The previous section highlighted some potential downsides of the classic approach to developing queue-based messaging solutions on the Windows Azure platform. Therefore, we must examine how to improve the relevant design aspects to achieve higher performance, better scalability and cost efficiency.
Perhaps, the easiest way of qualifying an implementation pattern as a “more efficient solution” would be through the design which meets the following goals:
- Reduces operational expenditures by removing a significant portion of storage transactions that don’t derive any usable work.
- Eliminates excessive latency imposed by a polling interval when checking a queue for new messages.
- Scales up and down dynamically by adapting processing power to volatile volumes of work.
The implementation pattern should also meet these goals without introducing a level of complexity that effectively outweighs the associated benefits.
Best Practices for Optimizing Storage Transaction Costs
When evaluating the total cost of ownership (TCO) and return on investment (ROI) for a solution deployed on the Windows Azure platform, the volume of storage transactions is one of the main variables in the TCO equation. Reducing the number of transactions against Windows Azure queues decreases the operating costs as it relates to running solutions on Windows Azure.
In the context of a queue-based messaging solution, the volume of storage transactions can be reduced using a combination of the following methods:
-
When putting messages in a queue, group related messages into a single larger batch, compress and store the compressed image in a blob storage and use the queue to keep a reference to the blob holding the actual data.
-
When retrieving messages from a queue,
batch multiple messages together in a single storage transaction. The
GetMessages method in the Queue Service API enables de-queuing the specified number of messages in a single transaction (see the note below).
-
When checking the presence of work items on a queue, avoid aggressive polling intervals and implement a back-off delay that increases the time between polling requests if a queue remains continuously empty.
-
Reduce the number of queue listeners – when using a pull-based model, use only 1 queue listener per role instance when a queue is empty. To further reduce the number of queue listeners per role instance to 0, use a notification mechanism to instantiate queue listeners when the queue receives work items.
-
If working queues remain empty for most of the time, auto-scale down the number of role instances and continue monitoring relevant system metrics to determine if and when the application should scale up the number of instances to handle increasing workload.
Most of the above recommendations can be translated into a fairly generic implementation that handles message batches and encapsulates many of the underlying queue/blob storage and thread management operations. Later in this whitepaper, we will examine how to do this.
Important When retrieving messages via the GetMessages method, the maximum batch size supported by Queue Service API in a single dequeue operation is limited to 32. Exceeding this limit will cause a runtime exception.
|
Generally speaking, the cost of Windows Azure queue transactions increases linearly as the number of queue service clients increases, such as when scaling up the number of role instances or increasing the number of dequeue threads. To illustrate the potential cost impact of a solution design that does not take advantage of the above recommendations; we will provide an example backed up by concrete numbers.
The Cost Impact of Inefficient Design
If the solution architect does not implement relevant optimizations, the billing system architecture described above will likely incur excessive operating expenses once the solution is deployed and running on the Windows Azure platform. The reasons for the possible excessive expense are described in this section.
As noted in the scenario definition, the business transaction data arrives at regular intervals. However, let’s assume that the solution is busy processing workload just 25% of the time during a standard 8-hour business day. That results in 6 hours (8 hours * 75%) of “idle time” when there may not be any transactions coming through the system. Furthermore, the solution will not receive any data at all during the 16 non-business hours every day.
During the idle period totaling 22 hours, the solution is still performing attempts to dequeue work as it has no explicit knowledge when new data arrives. During this time window, each individual dequeue thread will perform up to 79,200 transactions (22 hours * 60 min * 60 transactions/min) against an input queue, assumed a default polling interval of 1 second.
As previously mentioned, the pricing model in the Windows Azure platform is based upon individual “storage transactions”. A storage transaction is a request made by a user application to add, read, update or delete storage data. As of the writing of this whitepaper, storage transactions are billed at a rate of $0.01 for 10,000 transactions (not taking into account any promotional offerings or special pricing arrangements).
Important When calculating the number of queue transactions, keep in mind that putting a single message on a queue would be counted as 1 transaction, whereas consuming a message is often a 2-step process involving the retrieval followed by a request to remove the message from the queue. As a result, a successful dequeue operation will attract 2 storage transactions. Virtually all methods exposed by the CloudQueue class in the Queue Service API (except those which are inherited from System.Object or involved in completion of asynchronous operations) are “billable”. Please note that even if a dequeue request results in no data being retrieved; it still counts as a billable transaction.
|
The storage transactions generated by a single dequeue thread in the above scenario will add approximately $2.38 (79,200 / 10,000 * $0.01 * 30 days) to a monthly bill. In comparison, 200 dequeue threads (or, alternatively, 1 dequeue thread in 200 Worker role instances) will push the cost to $457.20 per month. That is the cost incurred when the solution was not performing any computations at all, just checking on the queues to see if any work items are available.
Best Practices for Eliminating Excessive Latency
To maximize performance of queue-based messaging solutions on the Windows Azure platform it is recommended that judicious application of the classic polling mechanism is used in conjunction with the publish/subscribe messaging layer provided with the Windows Azure AppFabric Service Bus, as described in this section.
In order to remove or at least significantly reduce the polling latency in non-blocking dequeue operations, queue listeners should implement an alternative from a pure poll-based message delivery model. Instead, development efforts should focus on creating a combination of polling and real-time push-based notifications, enabling the listeners to subscribe to a notification event (trigger) that is raised upon certain conditions to indicate that a new workload is put on a queue. This approach enhances the traditional queue polling loop with a publish/subscribe messaging layer for dispatching notifications.
In a complex distributed system, this approach would necessitate the use of a “message bus” or “message-oriented middleware” to ensure that notifications can be reliably relayed to one or more subscribers in a loosely coupled fashion. Windows Azure AppFabric Service Bus is a natural choice for addressing messaging requirements between loosely coupled distributed application services running on Windows Azure and running on-premises. It is also a perfect fit for a “message bus” architecture that will enable exchanging notifications between processes involved in queue-based communication.
The processes engaged in a queue-based message exchange could employ the following pattern:
Specifically, and as it relates to the interaction between queue service publishers and subscribers, the same principles that apply to the communication between Windows Azure role instances would meet the majority of requirements for push-based notification message exchange. We have already covered these fundamentals in one of our previous posts.
|
Important
The usage of the Windows Azure AppFabric Service Bus is subject to a billing scheme that takes into account 2 major elements. First, there are ingress and egress charges related to data transfer in and out of the hosting datacenter. Second, there are charges based on the volume of connections established between an application and the Service Bus infrastructure. It is therefore important to perform a cost-benefit analysis to assess the pros and cons of introducing the AppFabric Service Bus into a given architecture.
For instance, 20 processing worker role instances in the above example will consume 20 concurrent connections to the AppFabric Service Bus. At present, a pack of 25 Service Bus connections is priced at $49.75 per month. The cost savings associated with elimination of 200 worker threads polling an empty queue every 10 seconds 22 hours a day will be computed as $47.52 per month. Consequently, it is worth evaluating whether or not the introduction of the notification dispatch layer based on the Service Bus would, in fact, lead to tangible cost reduction that can justify the investments and additional development efforts.
|
While the impact on latency is fairly easy to address with a publish/subscribe messaging layer, a further cost reduction could be realized by using dynamic (elastic) scaling, as described in the next section.
Best Practices for Dynamic Scaling
The Windows Azure platform makes it possible for customers to scale up and down faster and easier than ever before. The ability to adapt to volatile workloads and variable traffic is one of the primary value propositions of the Cloud platform. This means that “scalability” is no longer an expensive IT vocabulary term, it is now an out-of-the-box feature that can be programmatically enabled on demand in a well-architected cloud solution.
Dynamic scaling is the technical capability of a given solution to adapt to fluctuating workloads by increasing and reducing working capacity and processing power at runtime. The Windows Azure platform natively supports dynamic scaling through the provisioning of a distributed computing infrastructure on which compute hours can be purchased as needed.
It is important to differentiate between the following 2 types of dynamic scaling on the Windows Azure platform:
Dynamic scaling in a queue-based messaging solution would attract a combination of the following general recommendations:
-
Monitor key performance indicators including CPU utilization, queue depth, response times and message processing latency.
-
Dynamically increase or decrease the number of worker role instances to cope with the spikes in workload, either predictable or unpredictable.
-
Programmatically expand and trim down the number of processing threads to adapt to variable load conditions.
-
Partition and process fine-grained workloads concurrently using the
Task Parallel Library in the .NET Framework 4.
-
Maintain a viable capacity in solutions with highly volatile workload in anticipation of sudden spikes to be able to handle them without the overhead of setting up additional instances.
The Service Management APIs make it possible for a Windows Azure hosted service to modify the number of its running role instances by changing deployment configuration at runtime.
|
Note
The maximum number of Windows Azure compute instances in a typical subscription is limited to 20 by default. This is intended to prevent Windows Azure customers from receiving an unexpectedly high bill if they accidentally request a very large number of role instances. This is a “soft” limit. Any requests for increasing this quota should be raised with the Windows Azure Support team.
|
Dynamic scaling of the role instance count may not always be the most appropriate choice for handling load spikes. For instance, a new VM instance can take a few seconds to spin up and there are currently no SLA metrics provided with respect to VM spin-up duration. Instead, a solution may need to simply increase the number of worker threads to deal with temporary workload increase. While workload is being processed, the solution will monitor the relevant load metrics and determine whether it needs to dynamically reduce or increase the number of worker processes.
Important At present, the scalability target for a single Windows Azure queue is “constrained” at 500 transactions/sec. If an application attempts to exceed this target, for example, through performing queue operations from multiple role instance running hundreds of dequeue threads, it may result in HTTP 503 “Server Busy” response from the storage service. When this occurs, the application should implement a retry mechanism using exponential back-off delay algorithm. However, if the HTTP 503 errors are occurring regularly, it is recommended to use multiple queues and implement a sharding-based strategy to scale across them.
|
In most cases, auto-scaling the worker processes is the responsibility of an individual role instance. By contrast, role instance scaling often involves a central element of the solution architecture that is responsible for monitoring performance metrics and taking the appropriate scaling actions. The diagram below depicts a service component called Dynamic Scaling Agent that gathers and analyzes load metrics to determine whether it needs to provision new instances or decommission idle instances.
It is worth noting that the scaling agent service can be deployed either as a worker role running on Windows Azure or as an on-premises service. Irrespectively of the deployment topology, the service will be able to access the Windows Azure queues.
Now that we have covered the latency impact, storage transaction costs and dynamic scale requirements, it is a good time to consolidate our recommendations into a technical implementation.
Technical Implementation
In the previous sections, we have examined the key characteristics attributed to a well-designed messaging architecture based on the Windows Azure queue storage services. We have looked at 3 main focus areas that help reduce processing latency, optimize storage transaction costs and improve responsiveness to fluctuating workloads.
This section is intended to provide a starting point to assist Windows Azure developers with visualizing some of the patterns referenced in this whitepaper from a programming perspective.
Note This section will focus on building an auto-scalable queue listener that supports both pull-based and push-based models. For advanced techniques in dynamic scaling at the role instance level, please refer to the community projects on the MSDN Code Gallery.
For the sake of brevity, we will only focus on some core functional elements and avoid undesired complexity by omitting much of the supporting infrastructure code from the code samples below. For the purposes of clarification, it’s also worth pointing out that the technical implementation discussed below is not the only solution to a given problem space. It is intended to serve the purpose of a starting point upon which developers may piggyback their own more elegant solutions.
|
From this point onwards, this whitepaper will focus on the source code required to implement the patterns discussed.
Building Generic Queue Listener
First, we define a contract that will be implemented by a queue listener component that is hosted by a worker role and listens on a Windows Azure queue.
/// Defines a contract that must be implemented by an extension responsible for listening on a Windows Azure queue.
public interface ICloudQueueServiceWorkerRoleExtension
{
    /// Starts a multi-threaded queue listener that uses the specified number of dequeue threads.
    void StartListener(int threadCount);

    /// Returns the current state of the queue listener to determine point-in-time load characteristics.
    CloudQueueListenerInfo QueryState();

    /// Gets or sets the batch size when performing dequeue operation against a Windows Azure queue.
    int DequeueBatchSize { get; set; }

    /// Gets or sets the default interval that defines how long a queue listener will be idle for between polling a queue.
    TimeSpan DequeueInterval { get; set; }

    /// Defines a callback delegate which will be invoked whenever the queue is empty.
    event WorkCompletedDelegate QueueEmpty;
}
The QueueEmpty event is intended to be used by a host. It provides the mechanism for the host to control the behavior of the queue listener when the queue is empty. The respective event delegate is defined as follows:
/// <summary>
/// Defines a callback delegate which will be invoked whenever an unit of work has been completed and the worker is
/// requesting further instructions as to next steps.
/// </summary>
/// <param name="sender">The source of the event.</param>
/// <param name="idleCount">The value indicating how many times the worker has been idle.</param>
/// <param name="delay">Time interval during which the worker is instructed to sleep before performing next unit of work.</param>
/// <returns>A flag indicating that the worker should stop processing any further units of work and must terminate.</returns>
public delegate bool WorkCompletedDelegate(object sender, int idleCount, out TimeSpan delay);
Handling queue items is easier if a listener can operate with generics as opposed to using “bare metal” SDK classes such as CloudQueueMessage. Therefore, we define a new interface that will be implemented by a queue listener capable of supporting generics-based access to queues:
/// <summary>
/// Defines a contract that must be supported by an extension that implements a generics-aware queue listener.
/// </summary>
/// <typeparam name="T">The type of queue item data that will be handled by the queue listener.</typeparam>
public interface ICloudQueueListenerExtension<T> : ICloudQueueServiceWorkerRoleExtension, IObservable<T>
{
}
Note that we also enabled the generics-aware listener to push queue items to one or more subscribers through the implementation of the Observer design pattern by leveraging the IObservable<T> interface available in the .NET Framework 4.
We intend to keep a single instance of a component implementing the ICloudQueueListenerExtension<T> interface. However, we need to be able to run multiple dequeue threads (tasks). Therefore, we add support for multi-threaded dequeue logic in the queue listener component. This is where we take advantage of the Task Parallel Library (TPL). The StartListener method will be responsible for spinning up the specified number of dequeue threads as follows:
/// <summary>
/// Starts the specified number of dequeue tasks.
/// </summary>
/// <param name="threadCount">The number of dequeue tasks.</param>
public void StartListener(int threadCount)
{
    Guard.ArgumentNotZeroOrNegativeValue(threadCount, "threadCount");

    // The collection of dequeue tasks needs to be reset on each call to this method.
    if (this.dequeueTasks.IsAddingCompleted)
    {
        this.dequeueTasks = new BlockingCollection<Task>(this.dequeueTaskList);
    }

    for (int i = 0; i < threadCount; i++)
    {
        CancellationToken cancellationToken = this.cancellationSignal.Token;
        CloudQueueListenerDequeueTaskState<T> workerState = new CloudQueueListenerDequeueTaskState<T>(Subscriptions, cancellationToken, this.queueLocation, this.queueStorage);

        // Start a new dequeue task and register it in the collection of tasks internally managed by this component.
        this.dequeueTasks.Add(Task.Factory.StartNew(DequeueTaskMain, workerState, cancellationToken, TaskCreationOptions.LongRunning, TaskScheduler.Default));
    }

    // Mark this collection as not accepting any more additions.
    this.dequeueTasks.CompleteAdding();
}
The DequeueTaskMain method implements the functional body of a dequeue thread. Its main operations are the following:
/// <summary>
/// Implements a task performing dequeue operations against a given Windows Azure queue.
/// </summary>
/// <param name="state">An object containing data to be used by the task.</param>
private void DequeueTaskMain(object state)
{
    CloudQueueListenerDequeueTaskState<T> workerState = (CloudQueueListenerDequeueTaskState<T>)state;

    int idleStateCount = 0;
    TimeSpan sleepInterval = DequeueInterval;

    try
    {
        // Run a dequeue task until asked to terminate or until a break condition is encountered.
        while (workerState.CanRun)
        {
            try
            {
                var queueMessages = from msg in workerState.QueueStorage.Get<T>(workerState.QueueLocation.QueueName, DequeueBatchSize, workerState.QueueLocation.VisibilityTimeout).AsParallel() where msg != null select msg;
                int messageCount = 0;

                // Process the dequeued messages concurrently by taking advantage of the above PLINQ query.
                queueMessages.ForAll((message) =>
                {
                    // Reset the count of idle iterations.
                    idleStateCount = 0;

                    // Notify all subscribers that a new message requires processing.
                    workerState.OnNext(message);

                    // Once successful, remove the processed message from the queue.
                    workerState.QueueStorage.Delete<T>(message);

                    // Increment the number of processed messages.
                    messageCount++;
                });

                // Check whether or not we have done any work during this iteration.
                if (0 == messageCount)
                {
                    // Increment the number of iterations when we were not doing any work (e.g. no messages were dequeued).
                    idleStateCount++;

                    // Call the user-defined delegate informing that no more work is available.
                    if (QueueEmpty != null)
                    {
                        // Check if the user-defined delegate has requested a halt to any further work processing.
                        if (QueueEmpty(this, idleStateCount, out sleepInterval))
                        {
                            // Terminate the dequeue loop if user-defined delegate advised us to do so.
                            break;
                        }
                    }

                    // Enter the idle state for the defined interval.
                    Thread.Sleep(sleepInterval);
                }
            }
            catch (Exception ex)
            {
                if (ex is OperationCanceledException)
                {
                    throw;
                }
                else
                {
                    // Offload the responsibility for handling or reporting the error to the external object.
                    workerState.OnError(ex);

                    // Sleep for the specified interval to avoid a flood of errors.
                    Thread.Sleep(sleepInterval);
                }
            }
        }
    }
    finally
    {
        workerState.OnCompleted();
    }
}
A couple of points are worth making with respect to the DequeueTaskMain method implementation.
First, we are taking advantage of the Parallel LINQ (PLINQ) when dispatching messages for processing. The main advantage of PLINQ here is to speed up message handling by executing the query delegate on separate worker threads on multiple processors in parallel whenever possible.
Note
Since query parallelization is internally managed by PLINQ, there is no guarantee that PLINQ will utilize more than a single core for work parallelization. PLINQ may run a query sequentially if it determines that the overhead of parallelization will slow down the query. In order to benefit from PLINQ, the total work in the query has to be sufficiently large to benefit from the overhead of scheduling the work on the thread pool.
|
Second, we are not fetching a single message at a time. Instead, we ask the Queue Service API to retrieve a specific number of messages from a queue. This is driven by the DequeueBatchSize parameter that is passed to the Get<T> method. When we enter the storage abstraction layer implemented as part of the overall solution, this parameter is handed over to the Queue Service API method. In addition, we run a safety check to ensure that the batch size doesn’t exceed the maximum size supported by the APIs. This is implemented as follows:
/// This class provides reliable generics-aware access to the Windows Azure Queue storage.
public sealed class ReliableCloudQueueStorage : ICloudQueueStorage
{
    /// The maximum batch size supported by Queue Service API in a single Get operation.
    private const int MaxDequeueMessageCount = 32;

    /// Gets a collection of messages from the specified queue and applies the specified visibility timeout.
    public IEnumerable<T> Get<T>(string queueName, int count, TimeSpan visibilityTimeout)
    {
        Guard.ArgumentNotNullOrEmptyString(queueName, "queueName");
        Guard.ArgumentNotZeroOrNegativeValue(count, "count");

        try
        {
            var queue = this.queueStorage.GetQueueReference(CloudUtility.GetSafeContainerName(queueName));

            IEnumerable<CloudQueueMessage> queueMessages = this.retryPolicy.ExecuteAction<IEnumerable<CloudQueueMessage>>(() =>
            {
                return queue.GetMessages(Math.Min(count, MaxDequeueMessageCount), visibilityTimeout);
            });

            // ... There is more code after this point ...
And finally, we are not going to run the dequeue task indefinitely. We provisioned an explicit checkpoint implemented as a QueueEmpty event which is raised whenever a queue becomes empty. At that point, we consult to a QueueEmpty event handler to determine whether or not it permits us to finish the running dequeue task. A well-designed implementation of the QueueEmpty event handler allows supporting the “auto scale-down” capability as explained in the following section.
Auto Scaling Down Dequeue Tasks
The purpose of QueueEmpty event handler is a two-fold. First, it is responsible for providing feedback to the source dequeue task instructing it to enter a sleep state for a given time interval (as defined in the delay output parameter in the event delegate). Secondly, it indicates to the dequeue task whether or not it must gracefully shut itself down (as prescribed by the Boolean return parameter).
The following implementation of the QueueEmpty event handler solves the two challenges highlighted earlier in this whitepaper. It calculates a random exponential back-off interval and tells the dequeue task to exponentially increase delay between queue polling requests. In addition, it queries the queue listener state to determine the number of active dequeue tasks. Should this number be in excess of 1, the event handler advise the originating dequeue task to complete its polling loop provided the back-off interval has also reached its specified maximum. Otherwise, the dequeue task will not be terminated, leaving exactly 1 polling thread running at a time per a single instance of the queue listener. This approach helps reduce the number of storage transactions and therefore decrease the transaction costs as explained earlier.
private bool HandleQueueEmptyEvent(object sender, int idleCount, out TimeSpan delay)
{
    // The sender is an instance of the ICloudQueueServiceWorkerRoleExtension, we can safely perform type casting.
    ICloudQueueServiceWorkerRoleExtension queueService = sender as ICloudQueueServiceWorkerRoleExtension;

    // Find out which extension is responsible for retrieving the worker role configuration settings.
    IWorkItemProcessorConfigurationExtension config = Extensions.Find<IWorkItemProcessorConfigurationExtension>();

    // Get the current state of the queue listener to determine point-in-time load characteristics.
    CloudQueueListenerInfo queueServiceState = queueService.QueryState();

    // Set up the initial parameters, read configuration settings.
    int deltaBackoffMs = 100;
    int minimumIdleIntervalMs = Convert.ToInt32(config.Settings.MinimumIdleInterval.TotalMilliseconds);
    int maximumIdleIntervalMs = Convert.ToInt32(config.Settings.MaximumIdleInterval.TotalMilliseconds);

    // Calculate a new sleep interval value that will follow a random exponential back-off curve.
    int delta = (int)((Math.Pow(2.0, (double)idleCount) - 1.0) * (new Random()).Next((int)(deltaBackoffMs * 0.8), (int)(deltaBackoffMs * 1.2)));
    int interval = Math.Min(minimumIdleIntervalMs + delta, maximumIdleIntervalMs);

    // Pass the calculated interval to the dequeue task to enable it to enter into a sleep state for the specified duration.
    delay = TimeSpan.FromMilliseconds((double)interval);

    // As soon as interval reaches its maximum, tell the source dequeue task that it must gracefully terminate itself
    // unless this is a last deqeueue task. If so, we are not going to keep it running and continue polling the queue.
    return delay.TotalMilliseconds >= maximumIdleIntervalMs && queueServiceState.ActiveDequeueTasks > 1;
}
At a higher level, the “auto scale-down” capability can be explained as follows:
-
Whenever there is anything in the queue, the dequeue tasks will ensure that the workload will be processed as soon as possible. There will be no delay between requests to dequeue message batches from a queue.
-
As soon as the source queue becomes empty, each dequeue task will raise a QueueEmpty event.
-
The QueueEmpty event handler will calculate a random exponential backoff delay and instruct the dequeue task to suspend its activity for a given interval.
-
The dequeue tasks will continue polling the source queue at defined random intervals until the idle duration exceeds its allowed maximum.
-
Upon reaching the maximum idle interval, and provided that the source queue is still empty, all active dequeue tasks will start shutting themselves down – this will not occur all at once, since the dequeue tasks are backing off at different points in the backoff algorithm.
-
At some point in time, there will be only 1 active dequeue task waiting for work. As the result, no idle polling transactions will occur against a queue except only by that single task.
To elaborate on the process of collecting point-in-time load characteristics, it is worth mentioning the relevant source code artifacts. First, there is a structure holding the relevant metrics that measure the result of the load that is being applied to the solution. For the purposes of simplicity, we included a small subset of metrics that will be used further in the sample code.
/// Implements a structure containing point-in-time load characteristics for a given queue listener.
public struct CloudQueueListenerInfo
{
    /// Returns the approximate number of items in the Windows Azure queue.
    public int CurrentQueueDepth { get; internal set; }

    /// Returns the number of dequeue tasks that are actively performing work or waiting for work.
    public int ActiveDequeueTasks { get; internal set; }

    /// Returns the maximum number of dequeue tasks that were active at a time.
    public int TotalDequeueTasks { get; internal set; }
}
Secondly, there is a method implemented by a queue listener which returns its load metrics as depicted in the following example:
/// Returns the current state of the queue listener to determine point-in-time load characteristics.
public CloudQueueListenerInfo QueryState()
{
    return new CloudQueueListenerInfo()
    {
        CurrentQueueDepth = this.queueStorage.GetCount(this.queueLocation.QueueName),
        ActiveDequeueTasks = (from task in this.dequeueTasks where task.Status != TaskStatus.Canceled && task.Status != TaskStatus.Faulted && task.Status != TaskStatus.RanToCompletion select task).Count(),
        TotalDequeueTasks = this.dequeueTasks.Count
    };
}
Auto Scaling Up Dequeue Tasks
In the previous section, we introduced the ability to reduce the number of active dequeue tasks to a single instance in order to minimize the impact of idle transactions on the storage operation costs. In this section, we are going to walk through a contrast example whereby we implement the “auto scale-up” capability to bring the processing power back when it’s needed.
We define an event delegate that will help track state transitions from an empty to a non-empty queue for the purposes of triggering relevant actions such as auto-scaling:
/// <summary>
/// Defines a callback delegate which will be invoked whenever new work arrived to a queue while the queue listener was idle.
/// </summary>
/// <param name="sender">The source of the event.</param>
public delegate void WorkDetectedDelegate(object sender);
We then extend the original definition of the ICloudQueueServiceWorkerRoleExtension interface to include a new event that will be raised every time a queue listener detects new work items, essentially when queue depth changes from zero to any positive value:
public interface ICloudQueueServiceWorkerRoleExtension
{
    // ... The other interface members were omitted for brevity. See the previous code snippets for reference ...

    // Defines a callback delegate to be invoked whenever a new work has arrived to a queue while the queue listener was idle.
    event WorkDetectedDelegate QueueWorkDetected;
}
Also, we determine the right place in the queue listener’s code where such an event will be raised. We are going to fire the QueueWorkDetected event from within the dequeue loop implemented in the DequeueTaskMain method which needs to be extended as follows:
public class CloudQueueListenerExtension<T> : ICloudQueueListenerExtension<T>
{
    // An instance of the delegate to be invoked whenever a new work has arrived to a queue while the queue listener was idle.
    public event WorkDetectedDelegate QueueWorkDetected;

    private void DequeueTaskMain(object state)
    {
        CloudQueueListenerDequeueTaskState<T> workerState = (CloudQueueListenerDequeueTaskState<T>)state;

        int idleStateCount = 0;
        TimeSpan sleepInterval = DequeueInterval;

        try
        {
            // Run a dequeue task until asked to terminate or until a break condition is encountered.
            while (workerState.CanRun)
            {
                try
                {
                    var queueMessages = from msg in workerState.QueueStorage.Get<T>(workerState.QueueLocation.QueueName, DequeueBatchSize, workerState.QueueLocation.VisibilityTimeout).AsParallel() where msg != null select msg;
                    int messageCount = 0;

                    // Check whether or not work items arrived to a queue while the listener was idle.
                    if (idleStateCount > 0 && queueMessages.Count() > 0)
                    {
                        if (QueueWorkDetected != null)
                        {
                            QueueWorkDetected(this);
                        }
                    }

                    // ... The rest of the code was omitted for brevity. See the previous code snippets for reference ...
In the last step, we provide a handler for the QueueWorkDetected event. The implementation of this event handler will be supplied by a component which instantiates and hosts the queue listener. In our case, it’s a worker role. The code responsible for instantiation and implementation of event handler is comprised of the following:
public class WorkItemProcessorWorkerRole : RoleEntryPoint
{
    // Called by Windows Azure to initialize the role instance.
    public override sealed bool OnStart()
    {
        // ... There is some code before this point ...

        // Instantiate a queue listener for the input queue.
        var inputQueueListener = new CloudQueueListenerExtension<XDocument>(inputQueueLocation);

        // Configure the input queue listener.
        inputQueueListener.QueueEmpty += HandleQueueEmptyEvent;
        inputQueueListener.QueueWorkDetected += HandleQueueWorkDetectedEvent;
        inputQueueListener.DequeueBatchSize = configSettingsExtension.Settings.DequeueBatchSize;
        inputQueueListener.DequeueInterval = configSettingsExtension.Settings.MinimumIdleInterval;

        // ... There is more code after this point ...
    }

    // Implements a callback delegate to be invoked whenever a new work has arrived to a queue while the queue listener was idle.
    private void HandleQueueWorkDetectedEvent(object sender)
    {
        // The sender is an instance of the ICloudQueueServiceWorkerRoleExtension, we can safely perform type casting.
        ICloudQueueServiceWorkerRoleExtension queueService = sender as ICloudQueueServiceWorkerRoleExtension;

        // Get the current state of the queue listener to determine point-in-time load characteristics.
        CloudQueueListenerInfo queueServiceState = queueService.QueryState();

        // Determine the number of queue tasks that would be required to handle the workload in a queue given its current depth.
        int dequeueTaskCount = GetOptimalDequeueTaskCount(queueServiceState.CurrentQueueDepth);

        // If the dequeue task count is less than computed above, start as many dequeue tasks as needed.
        if (queueServiceState.ActiveDequeueTasks < dequeueTaskCount)
        {
            // Start the required number of dequeue tasks.
            queueService.StartListener(dequeueTaskCount - queueServiceState.ActiveDequeueTasks);
        }
    }

    // ... There is more code after this point ...
In light of the above example, the GetOptimalDequeueTaskCount method is worth taking a deeper look at. This method is responsible for computing the number of dequeue tasks that would be considered optimal for handling the workload in a queue. When invoked, this method should determine (through any appropriate decision-making mechanisms) how much “break horsepower” the queue listener needs in order to process the volume of work either awaiting or expected in a given queue.
For instance, the developer could take a simplistic approach and embed a set of static rules directly into the GetOptimalDequeueTaskCount method. Using the known throughput and scalability characteristics of the queuing infrastructure, average processing latency, payload size and other relevant inputs, the ruleset could take an optimistic view and decide on an optimal dequeue task count.
In the example below, an intentionally over-simplified technique is being used for determining the optimal number of dequeue tasks:
/// <summary>
/// Returns the number of queue tasks that would be required to handle the workload in a queue given its current depth.
/// </summary>
/// <param name="currentDepth">The approximate number of items in the queue.</param>
/// <returns>The optimal number of dequeue tasks.</returns>
private int GetOptimalDequeueTaskCount(int currentDepth)
{
    if (currentDepth < 100) return 10;
    if (currentDepth >= 100 && currentDepth < 1000) return 50;
    if (currentDepth >= 1000) return 100;

    // Return the minimum acceptable count.
    return 1;
}
It is worth reiterating that the example code above is not intended to be a “one size fits all” approach. A more ideal solution would be to invoke an externally configurable and manageable rule which performs the necessary computations.
At this point, we have a working prototype of a queue listener capable of auto-scaling itself up and down as per fluctuating workload. Perhaps, as a final touch, it needs to be enriched with the ability to adapt itself to variable load while it’s being processed. This capability can be added by applying the same pattern as it was being followed when adding support for the QueueWorkDetected event.
Now, let’s switch focus to another important optimization that will help reduce latency in the queue listeners.
Implementing Publish/Subscribe Layer for Zero-Latency Dequeue
In this section, we are going to enhance the above implementation of a queue listener with a push-based notification mechanism built on top of the AppFabric Service Bus one-way multicast capability. The notification mechanism is responsible for triggering an event telling the queue listener to start performing dequeue work. This approach helps avoid polling the queue to check for new messages and therefore eliminate the associated latency.
First, we define a trigger event that will be received by our queue listener in case a new workload is deposited into a queue:
/// Implements a trigger event indicating that a new workload was put in a queue.
[DataContract(Namespace = WellKnownNamespace.DataContracts.Infrastructure)]
public class CloudQueueWorkDetectedTriggerEvent
{
    /// Returns the name of the storage account on which the queue is located.
    [DataMember]
    public string StorageAccount { get; private set; }

    /// Returns a name of the queue where the payload was put.
    [DataMember]
    public string QueueName { get; private set; }

    /// Returns a size of the queue's payload (e.g. the size of a message or the number of messages in a batch).
    [DataMember]
    public long PayloadSize { get; private set; }

    // ... The constructor was omitted for brevity ...
}
Next, we enable the queue listener implementations to act as subscribers to receive a trigger event. The first step is to define a queue listener as an observer for the CloudQueueWorkDetectedTriggerEvent event:
/// Defines a contract that must be implemented by an extension responsible for listening on a Windows Azure queue.
public interface ICloudQueueServiceWorkerRoleExtension : IObserver<CloudQueueWorkDetectedTriggerEvent>
{
    // ... The body is omitted as it was supplied in previous examples ...
}
The second step is to implement the OnNext method defined in the IObserver<T> interface. This method gets called by the provider to notify the observer about a new event:
public class CloudQueueListenerExtension<T> : ICloudQueueListenerExtension<T>
{
    // ... There is some code before this point ...

    /// <summary>
    /// Gets called by the provider to notify this queue listener about a new trigger event.
    /// </summary>
    /// <param name="e">The trigger event indicating that a new payload was put in a queue.</param>
    public void OnNext(CloudQueueWorkDetectedTriggerEvent e)
    {
        Guard.ArgumentNotNull(e, "e");

        // Make sure the trigger event is for the queue managed by this listener, otherwise ignore.
        if (this.queueLocation.StorageAccount == e.StorageAccount && this.queueLocation.QueueName == e.QueueName)
        {
            if (QueueWorkDetected != null)
            {
                 QueueWorkDetected(this);
            }
        }
    }

    // ... There is more code after this point ...
}
At it can be seen in the above example, we purposefully invoke the same event delegate as it is used in the previous steps. The QueueWorkDetected event handler already provides the necessary application logic for instantiating optimal number of dequeue tasks. Therefore, the same event handler is reused when handling the CloudQueueWorkDetectedTriggerEvent notification.
As noted in the previous sections, we don’t have to maintain a continuously running dequeue task when a push-based notification is employed. Therefore, we can reduce the number of queue tasks per a queue listener instance to zero and use a notification mechanism to instantiate dequeue tasks when the queue receives work items. In order to make sure that we are not running any idle dequeue tasks, the following straightforward modification in the QueueEmpty event hander is required:
private bool HandleQueueEmptyEvent(object sender, int idleCount, out TimeSpan delay)
{
    // ... There is some code before this point ...

    // As soon as interval reaches its maximum, tell the source dequeue task that it must gracefully terminate itself.
    return delay.TotalMilliseconds >= maximumIdleIntervalMs;
}
In summary, we are no longer detecting whether or not there is a single active dequeue task. The result of the revised QueueEmpty event hander only takes into account the fact of exceeding the maximum idle interval upon which all active dequeue tasks will be shut down.
To receive the CloudQueueWorkDetectedTriggerEvent notifications, we leverage the Publish/Subscribe model that is implemented as loosely coupled messaging between Windows Azure role instances. In essence, we hook on the same inter-role communication layer and handle the incoming events as follows:
public class InterRoleEventSubscriberExtension : IInterRoleEventSubscriberExtension
{
    // ... Some code here was omitted for brevity. See the corresponding guidance on AppFabric CAT team blog for reference ...

    public void OnNext(InterRoleCommunicationEvent e)
    {
        if (this.owner != null && e.Payload != null)
        {
            // ... There is some code before this point ...

            if (e.Payload is CloudQueueWorkDetectedTriggerEvent)
            {
                HandleQueueWorkDetectedTriggerEvent(e.Payload as CloudQueueWorkDetectedTriggerEvent);
                return;
            }

            // ... There is more code after this point ...
        }
    }

    private void HandleQueueWorkDetectedTriggerEvent(CloudQueueWorkDetectedTriggerEvent e)
    {
        Guard.ArgumentNotNull(e, "e");

        // Enumerate through registered queue listeners and relay the trigger event to them.
        foreach (var queueService in this.owner.Extensions.FindAll<ICloudQueueServiceWorkerRoleExtension>())
        {
            // Pass the trigger event to a given queue listener.
            queueService.OnNext(e);
        }
    }
}
Multicasting a trigger event defined in the CloudQueueWorkDetectedTriggerEvent class is the ultimate responsibility of a publisher, namely, the component depositing work items on a queue. This event can be triggered either before the very first work item is enqueued or after last item is put in a queue. In the example below, we publish a trigger event upon completing putting work items into the input queue:
public class ProcessInitiatorWorkerRole : RoleEntryPoint
{
    // The instance of the role extension which provides an interface to the inter-role communication service.
    private volatile IInterRoleCommunicationExtension interRoleCommunicator;

    // ... Some code here was omitted for brevity. See the corresponding guidance on AppFabric CAT team blog for reference ...

    private void HandleWorkload()
    {
        // Step 1: Receive compute-intensive workload.
        // ... (code was omitted for brevity) ...

        // Step 2: Enqueue work items into the input queue.
        // ... (code was omitted for brevity) ...

        // Step 3: Notify the respective queue listeners that they should expect work to arrive.
        // Create a trigger event referencing the queue into which we have just put work items.
        var trigger = new CloudQueueWorkDetectedTriggerEvent("MyStorageAccount", "InputQueue");

        // Package the trigger into an inter-role communication event.
        var interRoleEvent = new InterRoleCommunicationEvent(CloudEnvironment.CurrentRoleInstanceId, trigger);

        // Publish inter-role communication event via the Service Bus one-way multicast.
        interRoleCommunicator.Publish(interRoleEvent);
    }
}
Now that we have built a queue listener that is capable of supporting multi-threading, auto-scaling and push-based notifications, it’s time to consolidate all recommendations pertaining to the design of queue-based messaging solutions on the Windows Azure platform.
Conclusion
To maximize the efficiency and cost effectiveness of queue-based messaging solutions running on the Windows Azure platform, solution architects and developers should consider the following recommendations.
As a solution architect, you should:
-
Provision a queue-based messaging architecture that uses the Windows Azure queue storage service for high-scale asynchronous communication between tiers and services in cloud-based or hybrid solutions.
-
Recommend sharded queuing architecture to scale beyond 500 transactions/sec.
-
Understand the fundamentals of Windows Azure pricing model and optimize solution to lower transaction costs through a series of best practices and design patterns.
-
Consider dynamic scaling requirements by provisioning an architecture that is adaptive to volatile and fluctuating workloads.
-
Employ the right auto-scaling techniques and approaches to elastically expand and shrink compute power to further optimize the operating expense.
-
Evaluate the cost-benefit ratio of reducing latency through taking dependency on Windows Azure AppFabric Service Bus for real-time push-based notification dispatch.
As a developer, you should:
-
Design a messaging solution that employs batching when storing and retrieving data from Windows Azure queues.
-
Implement an efficient queue listener service ensuring that queues will be polled by a maximum of 1 dequeue thread when empty.
-
Dynamically scale down the number of worker role instances when queues remain empty for a prolonged period of time.
-
Implement an application-specific random exponential back-off algorithm to reduce the effect of idle queue polling on storage transaction costs.
-
Adopt the right techniques that prevent from exceeding the scalability targets for a single queue when implementing highly multi-threaded multi-instance queue publishers and consumers.
-
Employ a robust retry policy framework capable of handling a variety of transient conditions when publishing and consuming data from Windows Azure queues.
-
Use the one-way multicast eventing capability provided by Windows Azure AppFabric Service Bus to support push-based notifications in order to reduce latency and improve performance of the queue-based messaging solution.
-
Explore the new capabilities of the .NET Framework 4 such as TPL, PLINQ and Observer pattern to maximize the degree of parallelism, improve concurrency and simplify the design of multi-threaded services.
A link to sample code which implements most of the patterns discussed in this whitepaper will be made available in the upcoming weeks as part of a larger reference application. The sample code will also include all the required infrastructure components such as generics-aware abstraction layer for the Windows Azure queue service which were not supplied in the above code snippets.
Additional Resources/References
For more information on the topic discussed in this whitepaper, please refer to the following:
- “Implementing Reliable Inter-Role Communication Using Windows Azure AppFabric Service Bus” post on the Windows AppFabric CAT blog.
- “Understanding Windows Azure Storage Billing – Bandwidth, Transactions, and Capacity” post on the Windows Azure Storage team blog.
- "Windows Azure Billing Basics" article in the MSDN Library.
- “Scaling Down Azure Roles” video published on Windows Azure Platform website.
- "Service Management API" article in the MSDN Library.
- “Service Management API in Windows Azure” post on Neil Mackenzie’s blog.
- “Windows Azure Service Management CmdLets” project on the MSDN Code Gallery.
- "Windows Azure Dynamic Scaling Sample" project on the MSDN Code Gallery.
- “Windows Azure Role Instance Limits Explained” post on Toddy Mladenov’s blog.
- “Comparing Azure Queues With Azure AppFabric Labs Durable Message Buffers” post on Neil Mackenzie’s blog.
- “Windows Azure Storage Abstractions and their Scalability Targets” post on the Windows Azure Storage team blog.
- "Queue Read/Write Throughput" study published by eXtreme Computing Group at Microsoft Research.
- “Transient Fault Handling Framework for Azure Storage, Service Bus & SQL Azure” project on the MSDN Code Gallery.
Authored by: Valery Mizonov
Reviewed by: Christian Martinez, Paolo Salvatori, Curt Peterson, Steve Marx, Trace Young
by community-syndication | Dec 11, 2010 | BizTalk Community Blogs via Syndication
Earlier today the ASP.NET team shipped the final release candidate (RC2) for ASP.NET MVC 3. You can download and install it here.
Almost there
Today’s RC2 release is the near-final release of ASP.NET MVC 3, and is a true “release candidate” in that we are hoping to not make any more code changes with it. We are publishing it today so that people can do final testing with it, let us know if they find any last minute “showstoppers”, and start updating their apps to use it. We will officially ship the final ASP.NET MVC 3 “RTM” build in January.
Works with both VS 2010 and VS 2010 SP1 Beta
Today’s ASP.NET MVC 3 RC2 release works with both the shipping version of Visual Studio 2010 / Visual Web Developer 2010 Express, as well as the newly released VS 2010 SP1 Beta.
This means that you do not need to install VS 2010 SP1 (or the SP1 beta) in order to use ASP.NET MVC 3. It works just fine with the shipping Visual Studio 2010. I’ll do a blog post next week, though, about some of the nice additional feature goodies that come with VS 2010 SP1 (including IIS Express and SQL CE support within VS) which make the dev experience for both ASP.NET Web Forms and ASP.NET MVC even better.
Bugs and Perf Fixes
Today’s ASP.NET MVC 3 RC2 build contains many bug fixes and performance optimizations. Our latest performance tests indicate that ASP.NET MVC 3 is now faster than ASP.NET MVC 2, and that existing ASP.NET MVC applications will experience a slight performance increase when updated to run using ASP.NET MVC 3.
Final Tweaks and Fit-N-Finish
In addition to bug fixes and performance optimizations, today’s RC2 build contains a number of last-minute feature tweaks and “fit-n-finish” changes for the new ASP.NET MVC 3 features. The feedback and suggestions we’ve received during the public previews has been invaluable in guiding these final tweaks, and we really appreciate people’s support in sending this feedback our way.
Below is a short-list of some of the feature changes/tweaks made between last month’s ASP.NET MVC 3 RC release and today’s ASP.NET MVC 3 RC2 release:
jQuery updates and addition of jQuery UI
The default ASP.NET MVC 3 project templates have been updated to include jQuery 1.4.4 and jQuery Validation 1.7.
We are also excited to announce today that we are including jQuery UI within our default ASP.NET project templates going forward. jQuery UI provides a powerful set of additional UI widgets and capabilities. It will be added by default to your project’s \scripts folder when you create new ASP.NET MVC 3 projects.
Improved View Scaffolding
The T4 templates used for scaffolding views with the Add-View dialog now generates views that use Html.EditorFor instead of helpers such as Html.TextBoxFor. This change enables you to optionally annotate models with metadata (using data annotation attributes) to better customize the output of your UI at runtime.
The Add View scaffolding also supports improved detection and usage of primary key information on models (including support for naming conventions like ID, ProductID, etc). For example: the Add View dialog box uses this information to ensure that the primary key value is not scaffold as an editable form field, and that links between views are auto-generated correctly with primary key information.
The default Edit and Create templates also now include references to the jQuery scripts needed for client validation. Scaffold form views now support client-side validation by default (no extra steps required). Client-side validation with ASP.NET MVC 3 is also done using an unobtrusive javascript approach – making pages fast and clean.
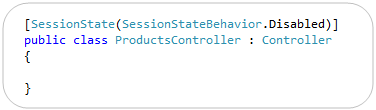
[ControllerSessionState] -> [SessionState]
ASP.NET MVC 3 adds support for session-less controllers. With the initial RC you used a [ControllerSessionState] attribute to specify this. We shortened this in RC2 to just be [SessionState]:
Note that in addition to turning off session state, you can also set it to be read-only (which is useful for webfarm scenarios where you are reading but not updating session state on a particular request).
[SkipRequestValidation] -> [AllowHtml]
ASP.NET MVC includes built-in support to protect against HTML and Cross-Site Script Injection Attacks, and will throw an error by default if someone tries to post HTML content as input. Developers need to explicitly indicate that this is allowed (and that they’ve hopefully built their app to securely support it) in order to enable it.
With ASP.NET MVC 3, we are also now supporting a new attribute that you can apply to properties of models/viewmodels to indicate that HTML input is enabled, which enables much more granular protection in a DRY way. In last month’s RC release this attribute was named [SkipRequestValidation]. With RC2 we renamed it to [AllowHtml] to make it more intuitive:

Setting the above [AllowHtml] attribute on a model/viewmodel will cause ASP.NET MVC 3 to turn off HTML injection protection when model binding just that property.
Html.Raw() helper method
The new Razor view engine introduced with ASP.NET MVC 3 automatically HTML encodes output by default. This helps provide an additional level of protection against HTML and Script injection attacks.
With RC2 we are adding a Html.Raw() helper method that you can use to explicitly indicate that you do not want to HTML encode your output, and instead want to render the content “as-is”:

ViewModel/View -> ViewBag
ASP.NET MVC has (since V1) supported a ViewData[] dictionary within Controllers and Views that enables developers to pass information from a Controller to a View in a late-bound way. This approach can be used instead of, or in combination with, a strongly-typed model class. The below code demonstrates a common use case – where a strongly typed Product model is passed to the view in addition to two late-bound variables via the ViewData[] dictionary:

With ASP.NET MVC 3 we are introducing a new API that takes advantage of the dynamic type support within .NET 4 to set/retrieve these values. It allows you to use standard “dot” notation to specify any number of additional variables to be passed, and does not require that you create a strongly-typed class to do so.
With earlier previews of ASP.NET MVC 3 we exposed this API using a dynamic property called “ViewModel” on the Controller base class, and with a dynamic property called “View” within view templates. A lot of people found the fact that there were two different names confusing, and several also said that using the name ViewModel was confusing in this context – since often you create strongly-typed ViewModel classes in ASP.NET MVC, and they do not use this API.
With RC2 we are exposing a dynamic property that has the same name – ViewBag – within both Controllers and Views. It is a dynamic collection that allows you to pass additional bits of data from your controller to your view template to help generate a response. Below is an example of how we could use it to pass a time-stamp message as well as a list of all categories to our view template:

Below is an example of how our view template (which is strongly-typed to expect a Product class as its model) can use the two extra bits of information we passed in our ViewBag to generate the response. In particular, notice how we are using the list of categories passed in the dynamic ViewBag collection to generate a dropdownlist of friendly category names to help set the CategoryID property of our Product object.

The above Controller/View combination will then generate an HTML response like below.

Output Caching Improvements
ASP.NET MVC 3’s output caching system no longer requires you to specify a VaryByParam property when declaring an [OutputCache] attribute on a Controller action method. MVC3 now automatically varies the output cached entries when you have explicit parameters on your action method – allowing you to cleanly enable output caching on actions using code like below:

In addition to supporting full page output caching, ASP.NET MVC 3 also supports partial-page caching – which allows you to cache a region of output and re-use it across multiple requests or controllers. The [OutputCache] behavior for partial-page caching was updated with RC2 so that sub-content cached entries are varied based on input parameters as opposed to the URL structure of the top-level request – which makes caching scenarios both easier and more powerful than the behavior in the previous RC.
@model declaration does not add whitespace
In earlier previews, the strongly-typed @model declaration at the top of a Razor view added a blank line to the rendered HTML output. This has been fixed so that the declaration does not introduce whitespace.
Changed "Html.ValidationMessage" Method to Display the First Useful Error Message
The behavior of the Html.ValidationMessage() helper was updated to show the first useful error message instead of simply displaying the first error.
During model binding, the ModelState dictionary can be populated from multiple sources with error messages about the property, including from the model itself (if it implements IValidatableObject), from validation attributes applied to the property, and from exceptions thrown while the property is being accessed.
When the Html.ValidationMessage() method displays a validation message, it now skips model-state entries that include an exception, because these are generally not intended for the end user. Instead, the method looks for the first validation message that is not associated with an exception and displays that message. If no such message is found, it defaults to a generic error message that is associated with the first exception.
RemoteAttribute “Fields” -> “AdditionalFields”
ASP.NET MVC 3 includes built-in remote validation support with its validation infrastructure. This means that the client-side validation script library used by ASP.NET MVC 3 can automatically call back to controllers you expose on the server to determine whether an input element is indeed valid as the user is editing the form (allowing you to provide real-time validation updates).
You can accomplish this by decorating a model/viewmodel property with a [Remote] attribute that specifies the controller/action that should be invoked to remotely validate it. With the RC this attribute had a “Fields” property that could be used to specify additional input elements that should be sent from the client to the server to help with the validation logic. To improve the clarity of what this property does we have renamed it to “AdditionalFields” with today’s RC2 release.
ViewResult.Model and ViewResult.ViewBag Properties
The ViewResult class now exposes both a “Model” and “ViewBag” property off of it. This makes it easier to unit test Controllers that return views, and avoids you having to access the Model via the ViewResult.ViewData.Model property.
Installation Notes
You can download and install the ASP.NET MVC 3 RC2 build here. It can be installed on top of the previous ASP.NET MVC 3 RC release (it should just replace the bits as part of its setup).
The one component that will not be updated by the above setup (if you already have it installed) is the NuGet Package Manager. If you already have NuGet installed, please go to the Visual Studio Extensions Manager (via the Tools -> Extensions menu option) and click on the “Updates” tab. You should see NuGet listed there – please click the “Update” button next to it to have VS update the extension to today’s release.
If you do not have NuGet installed (and did not install the ASP.NET MVC RC build), then NuGet will be installed as part of your ASP.NET MVC 3 setup, and you do not need to take any additional steps to make it work.
Summary
We are really close to the final ASP.NET MVC 3 release, and will deliver the final “RTM” build of it next month. It has been only a little over 7 months since ASP.NET MVC 2 shipped, and I’m pretty amazed by the huge number of new features, improvements, and refinements that the team has been able to add with this release (Razor, Unobtrusive JavaScript, NuGet, Dependency Injection, Output Caching, and a lot, lot more). I’ll be doing a number of blog posts over the next few weeks talking about many of them in more depth.
Hope this helps,
Scott
P.S. In addition to blogging, I am also now using Twitter for quick updates and to share links. Follow me at: twitter.com/scottgu


