by community-syndication | Dec 16, 2010 | BizTalk Community Blogs via Syndication
Andrew Zhu works for Microsoft in Shanghai and has been using WF4 since the very early days. He frequently answers questions on our internal mailing list and on the WF Forums so when I heard that he was writing a book about WF4 I knew it would be a good one.
I just got my electronic copy and I have to say it looks great. Of course it covers the basics but also gets into great detail especially in the chapter on rehosting the WF designer, it’s definitely on my recommended list.
Check it out – Windows Workflow Foundation 4 Cookbook
by community-syndication | Dec 16, 2010 | BizTalk Community Blogs via Syndication
This is another in a series of posts I’m doing that cover some of the new ASP.NET MVC 3 features:
In today’s post I’m going to discuss two useful syntactical features of the new Razor view-engine – the @: and <text> syntax support.
Fluid Coding with Razor
ASP.NET MVC 3 ships with a new view-engine option called “Razor” (in addition to the existing .aspx view engine). You can learn more about Razor, why we are introducing it, and the syntax it supports from my Introducing Razor blog post.
Razor minimizes the number of characters and keystrokes required when writing a view template, and enables a fast, fluid coding workflow. Unlike most template syntaxes, you do not need to interrupt your coding to explicitly denote the start and end of server blocks within your HTML. The Razor parser is smart enough to infer this from your code. This enables a compact and expressive syntax which is clean, fast and fun to type.
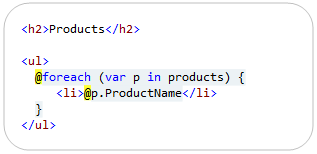
For example, the Razor snippet below can be used to iterate a list of products:
When run, it generates output like:

One of the techniques that Razor uses to implicitly identify when a code block ends is to look for tag/element content to denote the beginning of a content region. For example, in the code snippet above Razor automatically treated the inner <li></li> block within our foreach loop as an HTML content block because it saw the opening <li> tag sequence and knew that it couldn’t be valid C#.
This particular technique – using tags to identify content blocks within code – is one of the key ingredients that makes Razor so clean and productive with scenarios involving HTML creation.
Using @: to explicitly indicate the start of content
Not all content container blocks start with a tag element tag, though, and there are scenarios where the Razor parser can’t implicitly detect a content block.
Razor addresses this by enabling you to explicitly indicate the beginning of a line of content by using the @: character sequence within a code block. The @: sequence indicates that the line of content that follows should be treated as a content block:

As a more practical example, the below snippet demonstrates how we could output a “(Out of Stock!)” message next to our product name if the product is out of stock:

Because I am not wrapping the (Out of Stock!) message in an HTML tag element, Razor can’t implicitly determine that the content within the @if block is the start of a content block. We are using the @: character sequence to explicitly indicate that this line within our code block should be treated as content.
Using Code Nuggets within @: content blocks
In addition to outputting static content, you can also have code nuggets embedded within a content block that is initiated using a @: character sequence.
For example, we have two @: sequences in the code snippet below:

Notice how within the second @: sequence we are emitting the number of units left within the content block (e.g. – “(Only 3 left!”). We are doing this by embedding a @p.UnitsInStock code nugget within the line of content.
Multiple Lines of Content
Razor makes it easy to have multiple lines of content wrapped in an HTML element. For example, below the inner content of our @if container is wrapped in an HTML <p> element – which will cause Razor to treat it as content:

For scenarios where the multiple lines of content are not wrapped by an outer HTML element, you can use multiple @: sequences:

Alternatively, Razor also allows you to use a <text> element to explicitly identify content:

The <text> tag is an element that is treated specially by Razor. It causes Razor to interpret the inner contents of the <text> block as content, and to not render the containing <text> tag element (meaning only the inner contents of the <text> element will be rendered – the tag itself will not). This makes it convenient when you want to render multi-line content blocks that are not wrapped by an HTML element.
The <text> element can also optionally be used to denote single-lines of content, if you prefer it to the more concise @: sequence:

The above code will render the same output as the @: version we looked at earlier. Razor will automatically omit the <text> wrapping element from the output and just render the content within it.
Summary
Razor enables a clean and concise templating syntax that enables a very fluid coding workflow. Razor’s smart detection of <tag> elements to identify the beginning of content regions is one of the reasons that the Razor approach works so well with HTML generation scenarios, and it enables you to avoid having to explicitly mark the beginning/ending of content regions in about 95% of if/else and foreach scenarios.
Razor’s @: and <text> syntax can then be used for scenarios where you want to avoid using an HTML element within a code container block, and need to more explicitly denote a content region.
Hope this helps,
Scott
P.S. In addition to blogging, I am also now using Twitter for quick updates and to share links. Follow me at: twitter.com/scottgu
by community-syndication | Dec 15, 2010 | BizTalk Community Blogs via Syndication
I am happy to announce that we have released the December 2010 update to the Windows Azure Platform Training Kit. The Windows Azure Platform Training Kit includes a comprehensive set of technical content including hands-on labs, presentations, and demos that are designed to help you learn how to use the Windows Azure platform including: Windows […]
by community-syndication | Dec 15, 2010 | BizTalk Community Blogs via Syndication
This is the first of a series of posts on which I am hoping to detail some of the most common SOA governance scenarios in the real world, their challenges and the approach we’ve taken to address them in SO-Aware. This series does not intend to be a marketing…(read more)
by community-syndication | Dec 15, 2010 | BizTalk Community Blogs via Syndication
I caught a pretty awesome tip over Twitter today.
One of the annoying things about using the “Package Manager Console” in NuGet is that you’re constantly scrolling up and down the list of results. If you’re like me, and you keep your console in the lower panel in VS2010, it’s not exactly easy to see a […]
by community-syndication | Dec 14, 2010 | BizTalk Community Blogs via Syndication
There I was the other day slowly building up a new bts project in VS.NET.
You know the way it goes, add some schemas, maybe maps and before long you have a
couple of helper assemblies and maybe a custom pipeline component or 2.
The problem is that the C# Assemblies don’t automatically get added to your BTS Application
in the BTS Admin console.
Usually I’ll drag down one of my mammoth powershell ‘build all’ scripts from a previous
project and customise this for the current project. 2 days later I usually stick my
head up to see which day it is, and typically as we developers do, build a ferrari
for something that a skateboard would do.
So simply put – add the following line to your Post Build Events section
on your project in VS.NET.
btstask AddResource -ApplicationName:”Micks Demo App” -Type:System.BizTalk:Assembly
-Overwrite -Options:GacOnInstall,GacOnAdd -Source:”$(TargetPath)” -Destination:”%BTAD_InstallDir%\$(TargetFileName)”
Ahhh…too easy.
Enjoy only a few more sleeps till Santa!
Mick.
by community-syndication | Dec 14, 2010 | BizTalk Community Blogs via Syndication
Introduction
In the first article of the series we discussed how to exchange messages with an orchestration via a two-way WCF Receive Location using the Duplex Message Exchange Pattern. This form of bi-directional communication is characterized by the ability of both the service and the client to send messages to each other independently either using one-way or request/reply messaging. In a service-oriented architecture or a service bus composed of multiple, heterogeneous systems, interactions between autonomous client and service applications are asynchronous and loosely-coupled. All communications require published and discoverable service contracts, well-known data formats and a shared communication infrastructure. In this context, the use of asynchronous message patterns allows to increase the agility, scalability and flexibility of the overall architecture and helps decreasing the loose coupling of individual systems. In the second part of the article I’ll show you how to implement an asynchronous communication between a client application and a WCF Workflow Service running within IIS\AppFabric Hosting Services using the Durable Duplex Correlation provided by WF 4.0. Besides, I’ll demonstrate how to create a custom Activity for extending AppFabric Tracking with user-defined events and how to exploit the XML-based data transformation capabilities provided by the new BizTalk Server Mapper directly in a WF project thanks to the new Mapper Activity contained in the AppFabric Connect. The latter combines rich proven features of BizTalk Server 2010 with the flexible development experience of .NET to allow users to easily develop simple integration applications. Besides, AppFabric Connect allows you to extend the reach of your on-premise applications and services into Windows Azure AppFabric. In the future I’ll show you how to get advantage of the functionality offered by the AppFabric Connect to expose or move your BizTalk applications to the cloud using the Windows Azure AppFabric Service Bus. If you are interested in this subject, you can read the following articles:
-
“BizTalk AppFabric Connect: An Introduction” on the BizTalk Server Team Blog.
-
“Introducing BizTalk Server 2010 AppFabric Connect” article on TechNet.
-
“Exposing BizTalk Applications on the Cloud using AppFabric Connect for Services” article on TechNet.
-
“Exposing LOB Services on the Cloud Using AppFabric Connect for Services” article on TechNet
Before explaining the architecture of the demo, let me briefly introduce and discuss some of the techniques that I used to implement my solution.
Correlation in WF 4.0
If you are a WF or a BizTalk developer, you are surely familiar with the concept of correlation. Typically, at runtime workflows or orchestrations have multiple instances executing simultaneously. Therefore, when a workflow service implements an asynchronous communication pattern to exchange messages with other services, correlation provides the mechanism to ensure that messages are sent to the appropriate workflow instance. Correlation enables relating workflow service messages to each other or to the application instance state, such as a reply to an initial request, or a particular order ID to the persisted state of an order-processing workflow. Workflow Foundation 4.0 provides 2 different categories of correlation called, respectively, Protocol-Based Correlation and Content-Based Correlation. Protocol-based correlations use data provided by the message delivery infrastructure to provide the mapping between messages. Messages that are correlated using protocol-based correlation are related to each other using an object in memory, such as a RequestContext, or by a token provided by the transport protocol. Content-based correlations relate messages to each other using application-specified data. Messages that are correlated using content-based correlation are related to each other by some application-defined data in the message, such as a customer number.
Protocol-Based Correlation
Protocol-based correlation uses the transport mechanism to relate messages to each other and the appropriate workflow instance. Some system-provided protocol correlation mechanisms include Request-Reply correlation and Context-Based correlation. A Request-Reply correlation is used to correlate a single pair of messaging activities to form a two-way synchronous inbound or outbound operation, such as a Send paired with a ReceiveReply, or a Receive paired with a SendReply. The Visual Studio 2010 Workflow Designer also provides a set of activity templates to quickly implement this pattern. A context-based correlation is based on the context exchange mechanism described in the .NET Context Exchange Protocol Specification. To use context-based correlation, a context-based binding such as BasicHttpContextBinding, WSHttpContextBinding or NetTcpContextBinding must be used on the endpoint.
For more information about protocol correlation, see the following topics on MSDN:
For more information about using the Visual Studio 2010 Workflow Designer activity templates, see Messaging Activities. For sample code, see the Durable Duplex and NetContextExchangeCorrelation samples.
Content-Based Correlation
Content-based correlation uses data in the message to associate it to a particular workflow instance. Unlike protocol-based correlation, content-based correlation requires the application developer to explicitly state where this data can be found in each related message. Activities that use content-based correlation specify this message data by using a MessageQuerySet. Content-based correlation is useful when communicating with services that do not use one of the context bindings such as BasicHttpContextBinding. For more information about content-based correlation, see Content Based Correlation. For sample code, see the Content-Based Correlation and Correlated Calculator samples.
In my demo I used 2 different types of protocol-based correlation, respectively, the Request-Reply Correlation and the Durable Duplex Correlation. In the third part of this article I’ll show you how to use the Content-Based Correlation to implement an asynchronous communication between the WF workflow service and the underlying BizTalk orchestration.
AppFabric Monitoring and User-Defined Events
AppFabric provides new options and tools to monitor and troubleshoot the health of WCF and WF services running on IIS. The monitoring features support centralized event collection and analysis for WCF and WF services running on a single server. The monitoring features include the following:
-
A monitoring infrastructure that collects events from WCF and WF services and stores them in a Monitoring database.
-
A Monitoring database schema for instrumentation data. The Monitoring database stores tracked events from WCF and WF services in one unified data store.
-
A Windows Service called AppFabric Event Collection Service that, acting as an ETW consumer, collects and stores track events to the AppFabric Monitoring database.
-
An ApplicationServer module for Windows PowerShell that exposes monitoring cmdlets used to manage the Monitoring database and event collector sources.
An ApplicationServer module for Windows PowerShell that exposes tracing cmdlets, which you can use to configure tracing profiles, enable or disable tracing, and query trace logs.
A Monitoring Dashboard and other extensions to the IIS Manager console. You can use the Monitoring Dashboard to view selected metrics from the Monitoring database. You can use the IIS Manager extensions to manage monitoring databases, set the monitoring level, and query and analyze tracked events.
In a nutshell, here’s how AppFabric Monitoring works: event data is emitted from WCF and WF services and is sent to a high-performance Event Tracing for Windows (ETW) session. The data sent to an ETW session includes WCF analytic trace events and WF tracking record events emitted by using the ETW Tracking Participant. The AppFabric Event Collector Service harvests this event data from the above ETW session and stores this information in the Monitoring database. AppFabric monitoring tools can be used to analyze these events when they are persisted in the database. The AppFabric Monitoring features are fully documented on MSDN, so I will not cover this subject in detail. For more information on AppFabric Monitoring and ETW, see the following articles:
AppFabric Monitoring and Windows Workflow Tracking provide visibility into workflow execution. They provide the necessary infrastructure to track the execution of a workflow instance. The WF tracking infrastructure transparently instruments a workflow to emit records reflecting key events during the execution. In particular, AppFabric allows to configure, at a service level, a built-in or custom Tracking Profile to filter tracked data. Besides, WF provides the infrastructure and components to emit user-defined events to track custom application data. This brings us to the next topic.
Custom Activity for tracking User-Defined Events
While the base activity library includes a rich palette of activities for interacting with services, objects, and collections, it does not provide any activities for tracking user-defined events. Therefore, I decided to create a reusable WF custom activity to track user-defined events within any WF workflow service. This allows me to use the AppFabric Dashboard to analyze user events emitted at runtime by my WF services using my component. WF 4.0 provides a hierarchy of activity base classes from which you can choose from when building a custom activity. At a high level, the four base classes can be described as follows:
-
Activity – used to model activities by composing other activities, usually defined using XAML.
-
CodeActivity – a simplified base class when you need to write some code to get work done.
-
-
NativeActivity – when your activity needs access to the runtime internals, for example to schedule other activities or create bookmarks
For more information on WF and custom activities, see the following article:
The following table shows the code of my CustomTrackingActivity class.
#region Using Directives
using System;
using System.Collections.Generic;
using System.Linq;
using System.Text;
using System.Diagnostics;
using System.Activities;
using System.Activities.Tracking;
using System.ComponentModel;
#endregion

namespace Microsoft.AppFabric.CAT.Samples.DuplexMEP.WorkflowActivities
{
    /// <summary>
    /// This class can be used in any WF workflow to track
    /// user-defined events to any registered tracking providers
    /// </summary>
    [Designer(typeof(CustomTrackingActivityDesigner))]
    public sealed class CustomTrackingActivity : CodeActivity
    {
        #region Activity Arguments
        // Text Argument
        [DefaultValue(null)]
        public InArgument<string> Text { get; set; }

        // TraceLevel Property
        public TraceLevel TraceLevel { get; set; }
        #endregion

        #region Protected Methods
        /// <summary>
        /// Tracks the text message contained in the Text argument.
        /// </summary>
        /// <param name="context">The execution context under which the activity executes.</param>
        protected override void Execute(CodeActivityContext context)
        {
            // Obtain the runtime value of the Text and TraceLevel input arguments
            string text = context.GetValue(this.Text);

            // Create and initialize a custom tracking record
            CustomTrackingRecord record = new CustomTrackingRecord(text, this.TraceLevel);

            // Sends the specified custom tracking record to any registered tracking providers
            context.Track(record);
        }
        #endregion
    }
}
|
The CustomTrackingActivity class is derived from the CodeActivity base class and overrides the Execute. The latter has a single parameter of type CodeActivityContext which represents the execution context under which the activity executes. In particular, the context object exposes a method called Track that can be used to send a custom tracking record to any registered tracking providers. The tracking provider used by AppFabric is the EtwTrackingParticipant. For more information, see the following article:
The CustomTrackingActivity class exposes 2 properties:
The code of the custom activity is very straightforward and self-explaining. First, the method invokes the GetValue method exposed by the context to retrieve the value of the Text property, next it creates a new instance of the CustomTrackingRecord class and finally it calls the Track method on the context object to track the user-defined event. This activity can surely be extended to extract and track business relevant data associated with the workflow variables.
To control the look and feel of the custom Activity, I added an Activity Designer item to my project. In particular, this allowed me to perform the following customizations:
- Specify a custom icon in the top-left corner of the Activity
- Create an ExpressionTextBox control and bind it to the Text property of the custom activity.
- Create a ComboBox control and bind it to the TraceLevel property of the custom activity.
Note
To associate the Activity Designer with the custom activity I decorated this with a DesignerAttribute and I specified the type of the Designer class as argument. |
The following table contains the XAML code for the designer. I’m certainly not a WPF expert, so even if there’s probably a better way to achieve the same result, the code below perfectly fits my needs.
<sap:ActivityDesigner x:Class="Microsoft.AppFabric.CAT.Samples.DuplexMEP.WorkflowActivities.CustomTrackingActivityDesigner"
    xmlns="http://schemas.microsoft.com/winfx/2006/xaml/presentation"
    xmlns:sys="clr-namespace:System;assembly=mscorlib"
    xmlns:diag="clr-namespace:System.Diagnostics;assembly=system"
    xmlns:x="http://schemas.microsoft.com/winfx/2006/xaml"
    xmlns:sap="clr-namespace:System.Activities.Presentation;assembly=System.Activities.Presentation"
    xmlns:sapv="clr-namespace:System.Activities.Presentation.View;assembly=System.Activities.Presentation">
    <sap:ActivityDesigner.Resources>
        <ObjectDataProvider MethodName="GetValues"
                        ObjectType="{x:Type sys:Enum}"
                        x:Key="TraceLevelValues">
            <ObjectDataProvider.MethodParameters>
                <x:Type TypeName="diag:TraceLevel" />
            </ObjectDataProvider.MethodParameters>
        </ObjectDataProvider>
    </sap:ActivityDesigner.Resources>
    <sap:ActivityDesigner.Icon>
        <DrawingBrush>
            <DrawingBrush.Drawing>
                <ImageDrawing>
                    <ImageDrawing.Rect>
                        <Rect Location="0,0" Size="25,25" ></Rect>
                    </ImageDrawing.Rect>
                    <ImageDrawing.ImageSource>
                        <BitmapImage UriSource="Resources/ActivityIcon.gif"/>
                    </ImageDrawing.ImageSource>
                </ImageDrawing>
            </DrawingBrush.Drawing>
        </DrawingBrush>
    </sap:ActivityDesigner.Icon>
    <Grid Margin="10">
        <Grid.RowDefinitions>
            <RowDefinition Height="30"/>
            <RowDefinition Height="30"/>
        </Grid.RowDefinitions>
        <Grid.ColumnDefinitions>
            <ColumnDefinition/>
            <ColumnDefinition/>
        </Grid.ColumnDefinitions>
        <Label Grid.Row="0"
               Grid.Column="0"
               VerticalAlignment="Center">Text:</Label>
        <sapv:ExpressionTextBox Grid.Row="0"
                                Grid.Column="1"
                                x:Name="expText"
                                OwnerActivity="{Binding Path=ModelItem, Mode=TwoWay}"
                                Expression="{Binding Path=ModelItem.Text.Expression, Mode=TwoWay}"
                                ExpressionType="{x:Type TypeName=sys:String}"
                                HintText="Message Text"
                                VerticalAlignment="Center"
                              />
        <Label Grid.Row="1"
               Grid.Column="0"
               VerticalAlignment="Center">TraceLevel:</Label>
        <ComboBox Grid.Row="1"
                  Grid.Column="1"
                  VerticalAlignment="Center"
                  Name="myComboBox"
                  ItemsSource="{Binding Source={StaticResource TraceLevelValues}}"
                  SelectedValue="{Binding Path=ModelItem.TraceLevel, Mode=TwoWay}"/>
    </Grid>
</sap:ActivityDesigner>
|
To develop my custom activity, I used the following resources:
If you are interested in how to track user-defined events in a WCF service running within AppFabric, you can review the following article:
- “Getting the most out of user events and Windows Server AppFabric Monitoring” by Emil Velinov on the AppFabric CAT blog.
Transforming Messages within a WF Workflow using the Mapper Activity
As you will see in the next section, my demo is composed of 3 major tiers:
-
A Windows Forms client application.
-
A WCF Workflow Service running in Windows Server AppFabric.
-
A BizTalk Application composed of an orchestration and a request-response WCF Receive Location.
In a few words, the WCF Workflow Service receives a request from the client application and invokes the downstream orchestration via a WCF Receive Location. The format of the request and response messages exchanged by the WCF workflow service, respectively, with the client and BizTalk applications is obviously different to reflect real-world EAI scenarios where heterogeneous systems use different schemas to represent the same entities. Now, in this case, message transformation could be configured in a declarative way to run on the BizTalk receive location that receives requests and returns related responses. Nevertheless, since one of the objectives of this article was introducing the new Mapper activity available in AppFabric Connect, I decided to implement message transformation within my WCF workflow service. AppFabric Connect provides WF developers access to both the BizTalk Mapper and the BizTalk Adapter Pack 2010. Utilizing the Mapper activity, developers can exploit the features supplied by the BizTalk Server 2010 Mapper to design and use transformation maps in a WF workflow service hosted in IIS\AppFabric.
Using the Mapper activity in a WF workflow is quite straightforward: first of all, you have to define the WCF data contract classes that model the source and destination messages. Thus, in my solution I created 5 data contract classes to model the messages exchanged by WCF workflow service, respectively, with the client and BizTalk applications:
-
WFRequest: defines the request message sent by the client application to the WCF workflow service.
-
WFAck: specifies the structure of the acknowledgement message sent by the WCF workflow service to the client application.
-
WFResponse: represents the the response message returned by the WCF workflow service to the client application.
-
BizTalkRequest: defines the request message sent by the WCF workflow service to the BizTalk application.
-
BizTalkResponse: represents the the response message returned by the BizTalk application to the WCF workflow service
These 5 data classes belong to the same Class Library project called DataContracts. For your convenience, below I included the code of these components.
WFRequest Class
namespace Microsoft.AppFabric.CAT.Samples.DuplexMEP.DataContracts
{
    [DataContract(Name="Request", Namespace="http://microsoft.appfabric.cat/10/samples/duplexmep/wf")]
    public class WFRequest : IExtensibleDataObject
    {
        #region Private Fields
        private ExtensionDataObject extensionData;
        private string id;
        private string question;
        private int delay;
        #endregion

        #region Public Constructors
        public WFRequest()
        {
            this.id = null;
            this.question = null;
            this.delay = 0;
        }

        public WFRequest(string question, int delay)
        {
            this.id = Guid.NewGuid().ToString();
            this.question = question;
            this.delay = delay;
        }
        #endregion

        #region Public Properties
        public ExtensionDataObject ExtensionData
        {
            get
            {
                return this.extensionData;
            }
            set
            {
                this.extensionData = value;
            }
        }

        [DataMember(Name = "Id", IsRequired = true, Order = 1, EmitDefaultValue = true)]
        public string Id
        {
            get
            {
                return this.id;
            }
            set
            {
                this.id = value;
            }
        }

        [DataMember(Name = "Question", IsRequired = true, Order = 2, EmitDefaultValue = true)]
        public string Question
        {
            get
            {
                return this.question;
            }
            set
            {
                this.question = value;
            }
        }

        [DataMember(Name = "Delay", IsRequired = true, Order = 3, EmitDefaultValue = true)]
        public int Delay
        {
            get
            {
                return this.delay;
            }
            set
            {
                this.delay = value;
            }
        }
        #endregion
    }
}
|
WFAck
namespace Microsoft.AppFabric.CAT.Samples.DuplexMEP.DataContracts
{
    [DataContract(Name = "Ack", Namespace = "http://microsoft.appfabric.cat/10/samples/duplexmep/wf")]
    public class WFAck : IExtensibleDataObject
    {
        #region Private Fields
        private ExtensionDataObject extensionData;
        private string id;
        private string ack;
        #endregion

        #region Public Constructors
        public WFAck()
        {
            this.id = null;
            this.ack = null;
        }

        public WFAck(string id, string question)
        {
            this.id = id;
            this.ack = question;
        }
        #endregion

        #region Public Properties
        public ExtensionDataObject ExtensionData
        {
            get
            {
                return this.extensionData;
            }
            set
            {
                this.extensionData = value;
            }
        }

        [DataMember(Name = "Id", IsRequired = true, Order = 1, EmitDefaultValue = true)]
        public string Id
        {
            get
            {
                return this.id;
            }
            set
            {
                this.id = value;
            }
        }

        [DataMember(Name = "Ack", IsRequired = true, Order = 2, EmitDefaultValue = true)]
        public string Ack
        {
            get
            {
                return this.ack;
            }
            set
            {
                this.ack = value;
            }
        }
        #endregion
    }
}
|
WFResponse
namespace Microsoft.AppFabric.CAT.Samples.DuplexMEP.DataContracts
{
    [DataContract(Name = "Response", Namespace = "http://microsoft.appfabric.cat/10/samples/duplexmep/wf")]
    public class WFResponse : IExtensibleDataObject
    {
        #region Private Fields
        private ExtensionDataObject extensionData;
        private string id;
        private string answer;
        #endregion

        #region Public Constructors
        public WFResponse()
        {
            this.id = null;
            this.answer = null;
        }

        public WFResponse(string id, string question)
        {
            this.id = id;
            this.answer = question;
        }
        #endregion

        #region Public Properties
        public ExtensionDataObject ExtensionData
        {
            get
            {
                return this.extensionData;
            }
            set
            {
                this.extensionData = value;
            }
        }

        [DataMember(Name = "Id", IsRequired = true, Order = 1, EmitDefaultValue = true)]
        public string Id
        {
            get
            {
                return this.id;
            }
            set
            {
                this.id = value;
            }
        }

        [DataMember(Name = "Answer", IsRequired = true, Order = 2, EmitDefaultValue = true)]
        public string Answer
        {
            get
            {
                return this.answer;
            }
            set
            {
                this.answer = value;
            }
        }
        #endregion
    }
}
|
BizTalkRequest
namespace Microsoft.AppFabric.CAT.Samples.DuplexMEP.DataContracts
{
    [DataContract(Name="Request", Namespace="http://microsoft.appfabric.cat/10/samples/duplexmep")]
    public partial class BizTalkRequest : IExtensibleDataObject
    {
        #region Private Fields
        private ExtensionDataObject extensionData;
        private string id;
        private string question;
        private int delay;
        #endregion

        #region Public Constructors
        public BizTalkRequest()
        {
            this.id = Guid.NewGuid().ToString();
            this.question = null;
            this.delay = 0;
        }

        public BizTalkRequest(string question, int delay)
        {
            this.id = Guid.NewGuid().ToString();
            this.question = question;
            this.delay = delay;
        }
        #endregion

        #region Public Properties
        public ExtensionDataObject ExtensionData
        {
            get
            {
                return this.extensionData;
            }
            set
            {
                this.extensionData = value;
            }
        }

        [DataMemberAttribute(IsRequired = true, Order = 1)]
        public string Id
        {
            get
            {
                return this.id;
            }
            set
            {
                this.id = value;
            }
        }

        [DataMemberAttribute(IsRequired = true, Order = 2)]
        public string Question
        {
            get
            {
                return this.question;
            }
            set
            {
                this.question = value;
            }
        }

        [DataMemberAttribute(IsRequired = true, Order = 3)]
        public int Delay
        {
            get
            {
                return this.delay;
            }
            set
            {
                this.delay = value;
            }
        }
        #endregion
    }
}
|
BizTalkResponse
namespace Microsoft.AppFabric.CAT.Samples.DuplexMEP.DataContracts
{
    [DataContract(Name = "Response", Namespace = "http://microsoft.appfabric.cat/10/samples/duplexmep")]
    public partial class BizTalkResponse : IExtensibleDataObject
    {
        #region Private Fields
        private ExtensionDataObject extensionData;
        private string id;
        private string answer;
        #endregion

        #region Public Properties
        public ExtensionDataObject ExtensionData
        {
            get
            {
                return this.extensionData;
            }
            set
            {
                this.extensionData = value;
            }
        }

        [DataMemberAttribute(IsRequired = true, Order = 1)]
        public string Id
        {
            get
            {
                return this.id;
            }
            set
            {
                this.id = value;
            }
        }

        [DataMemberAttribute(IsRequired = true, Order = 2)]
        public string Answer
        {
            get
            {
                return this.answer;
            }
            set
            {
                this.answer = value;
            }
        }
        #endregion
    }
}
|
The next step was to define a variable for each of the messages exchanged by the WCF workflow service with the client and the BizTalk application. The picture below shows the 5 data contract variables that I created within the outermost Sequential activity within my WCF workflow service. This activity contains also the correlation handle used by the workflow to correlate the request message sent by the client application with the corresponding response message. We will expand on this point later.
Then I created a map to transform a WFRequest object into a BizTalkRequest object and another map to transform a BizTalkResponse object into an instance of the WFResponse class. In a nutshell, these are the steps I followed to create the first of the 2 transformation maps. After installing the BizTalk Server 2010 developer tools and the WCF LOB Adapter SDK, you can see the Mapper activity on the Windows Workflow Activity Palette under a tab called BizTalk, shown in the picture below.
When you drag the Mapper activity onto a workflow, it prompts you for the data types of the source and destination message. The dialog allows you to choose primitive types, or custom types. To create the first map, I chose the WFRequest type as InputDataContractType and the BizTalkRequest as OutputDataContractType as shown in the picture below.
When I clicked the OK button, an un-configured Mapper activity appeared in my workflow. After setting the explicit names of my source (WFRequest) and destination variables (BizTalkRequest) in the Mapper activity’s Property window, I clicked the Edit button and chose to create a new map.
The Select a map dialog allows to create a new map or select an existing one based on data contract types chosen at the previous step. If you are creating a new map, the activity will generate the XML schemas for the selected input and output data contract types and a new BizTalk map (.btm) file. Differently than in BizTalk Server, XML schemas and map files don’t need to published to a centralized database, but they become an integral part of the project. You can eventually define your maps in a separate project from your workflows to increase the reusability and maintenance level of these artifacts.
Upon clicking the OK button, the BizTalk Mapper Designer appeared and I could create my transformation map as shown in the picture below. When using the BizTalk Mapper Designer within a WF workflow application, you have full access to all the features and functoids that BizTalk developers normally use in their solution.
At runtime, the input data is first serialized into XML and then transformed using the XSLT generated from the map file. The message resulting from the transformation is finally de-serialized back into an object of the output type. At this regard, the Mapper activity decides to use the XmlSerializer only if the type is annotated with the XmlTypeAttribute or XmlRootAttribute. If the activity is an array type, the attribute check will be performed on the array element type as well. In all other cases, DataContractSerializer is used.
|
Note
When creating a map it is possible to use Advanced Options to change the Serializer to use for Input and the Serializer to use for Result from Auto to DataContractSerializer or XMLSerializer. Manually setting the serializer is not recommended however and extreme caution should be exercised when doing this because specifying the wrong serializer will cause serialization to fail at runtime.
|
For more information on the Mapper Activity, see the following articles by Trace Young:
After stacking the necessary (LEGO) bricks, we are now ready to build our solution, so let’s get started.
Using a Durable Duplex Correlation to communicate with a WF Workflow
The following picture depicts the architecture of the use case. The idea behind the application is quite straightforward: a Windows Forms application submits a question to a WCF workflow service hosted in IIS\AppFabric and asynchronously waits for the related answer. The WCF workflow service uses the Mapper activity to transform the incoming request in a format suitable to be consumed by the underlying BizTalk application and synchronously invokes the SyncMagic8Ball orchestration via a WCF-NetTcp Receive Location. The orchestration is a BizTalk version of the notorious Magic 8 Ball toy and it randomly returns one of 20 standardized answers. Upon receiving the response message from BizTalk, the WCF workflow service applies another map using the Mapper activity and returns the resulting message to the client application. In this version, the client application communicates with the WCF workflow service using a pattern called Durable Duplex Correlation, whereas the WCF workflow service communicates with the BizTalk application using a synchronous message exchange pattern. In the next and final article of the series, I’ll show you how to use the Content-Based Correlation to implement an asynchronous message exchange between the WCF workflow service and the downstream BizTalk orchestration.
Message Flow
-
The Windows Forms Client Application enables a user to specify a question and a delay in seconds. When the user presses the Ask button, a new request message containing the question and the delay is created and sent to a the WCF workflow service. Before sending the first message, the client application creates and opens a service host to expose a callback endpoint that the workflow can invoke to return the response message. In particular, the binding used to expose this callback contract is the NetTcpBinding, whereas the binding used to send the request message to the WCF workflow service is the NetTcpContextBinding. We will expand on this point in the next sections when we’ll analyze the client-side code.
-
The WCF workflow service receives the request message of type
WFRequest using the
Receive activity of a
ReceiveAndSendReply composed activity. Then it uses this activity to initialize the
callback correlation handle.
-
The WCF workflow service uses the CustomTrackingActivity to keep track of individual processing steps and uses an instance of the Mapper activity to transform the WFRequest object into an instance of the BizTalkRequest class.
-
The WCF workflow service uses a WCF proxy activity to send the BizTalkRequest message to the WCF-NetTcp receive location exposed by the BizTalk application.
-
The WCF receive location receives the request message and the XmlReceive pipeline promotes the MessageType context property.
-
The Message Agent submits the request message to the MessageBox (BizTalkMsgBoxDb).
-
A new instance of the SyncMagic8Ball orchestration receives the request message via a two-way logical port and uses a custom helper component called XPathHelper to read the value of the Question and Delay elements from the inbound message.
-
The SyncMagic8Ball orchestration invokes the SetResponse static method exposed by the ResponseHelper class to build the response message containing the answer to this question contained in the request message. The response message is then published to the MessageBox (BizTalkMsgBoxDb) by the Message Agent.
-
The response message is retrieved by the WCF-NetTcp Receive Location.
-
The PassThruTransmit send pipeline is executed by the WCF-NetTcp Receive Location.
-
The response message is returned to the WCF workflow service.
-
The WCF workflow service uses a Mapper activity to transform the BizTalkResponse object into an instance of the WFRequest class.
-
The WCF workflow service uses a Send activity to send back the response message to the client application. The Send activity is configured to use the callback correlation that contains the URI of the callback endpoint exposed by the client application.
Durable Duplex
One of the objective of this post is demonstrating how to use a duplex communication pattern to exchange messages between a client application and a WCF workflow service running within IIS\AppFabric. However, WF 4.0 doesn’t directly support WCF Duplex communication, but it supports a different pattern called Durable Duplex. This pattern requires the client and server applications to use a separate WCF channel to exchange, respectively, the request and response message and this enables them to use a different binding on the callback channel than the one used to send the original request. Since the channels used to exchange the request and response message are independent, the callback can happen at any time in the future. The only requirement for the caller is to have an active endpoint listening for the callback message. The Durable Duplex pattern allows a client application to communicate with a WCF workflow service in a long-running conversation.
To use durable duplex correlation, the client application and the WCF workflow service must use a context-enabled binding that supports two-way operations, such as NetTcpContextBinding or WSHttpContextBinding. This requirement applies only to the WCF channel used to exchange the initial request, whereas any binding can be used by the WCF channel used by the callback. Before sending a request message, the client application registers a ClientCallbackAddress with the URI of the callback Endpoint. The WCF workflow service receives this data with a Receive activity and then uses it on its own Endpoint in the Send activity to send a response or a notification message back to the caller. For more information on the Durable Duplex Correlation, see the following topic on MSDN:
Client Code
The following table contains code used by the client application to invoke the WCF workflow service using the Durable Duplex communication pattern.
private void btnAsk_Click(object sender, EventArgs e)
{
    try
    {
        int delay = 0;
        //  Question Validation
        if (string.IsNullOrEmpty(txtQuestion.Text))
        {
            WriteToLog(QuestionCannotBeNull);
            txtQuestion.Focus();
            return;
        }
        //  Delay Validation
        if (string.IsNullOrEmpty(txtDelay.Text) ||
            !int.TryParse(txtDelay.Text, out delay))
        {
            WriteToLog(DelayMustBeANumber);
            txtDelay.Focus();
            return;
        }
        // Endpoint Validation
        if (string.IsNullOrEmpty(cboEndpoint.Text))
        {
            WriteToLog(NoEndpointsFound);
        }

        if (serviceHost == null)
        {
            try
            {
                // Find a free TCP port
                int port = FreeTcpPort();
                // Set the value of the static MainForm property
                Magic8BallWFCallback.MainForm = this;
                // Create the service host that will be used to
                // receive the response from the WCF Workflow Service
                serviceHost = new ServiceHost(typeof(Magic8BallWFCallback));
                if (serviceHost.Description.Endpoints.Count > 0)
                {
                    // Read the URI from the configuration file and
                    // change it to use the TCP port found at the previous step
                    Uri oldUri = serviceHost.Description.Endpoints[0].Address.Uri;
                    listenUri = new Uri(string.Format(URIFormat, oldUri.Scheme,
                                                        oldUri.Host, port,
                                                        oldUri.AbsolutePath));
                    serviceHost.Description.Endpoints[0].Address = new EndpointAddress(listenUri);
                    serviceHost.Open();
                    // Log the URI
                    WriteToLog(string.Format(Magic8BallWFCallbackServiceOpened, listenUri.AbsoluteUri));
                }
                else
                {
                    // Log error message
                    WriteToLog(NoValidEndpointsForMagic8BallWFCallbackServiceOpened);
                }
            }
            catch (Exception ex)
            {
                // Log Exception and InnerException
                WriteToLog(ex.Message);
                WriteToLog(ex.InnerException.Message);
            }
        }
        Magic8BallWFClient proxy = null;
        try
        {
            if (serviceHost != null && serviceHost.State == CommunicationState.Opened)
            {
                // Create the client proxy to send the question to the WCF Workflow Service
                proxy = new Magic8BallWFClient(cboEndpoint.Text);
                // Create a new request message
                WFRequest request = new WFRequest();
                request.Id = Guid.NewGuid().ToString();
                request.Question = txtQuestion.Text;
                request.Delay = delay;
                WriteToLog(string.Format(CultureInfo.CurrentCulture,
                                            RequestFormat,
                                            cboEndpoint.Text,
                                            request.Id,
                                            request.Question));
                using (new OperationContextScope((IContextChannel)proxy.InnerChannel))
                {
                    // You can use the context to send pairs of keys and values,
                    // stored implicitly in the message headers,
                    IDictionary<string, string> dictionary = new Dictionary<string, string>();
                    dictionary["MachineName"] = Environment.MachineName;

                    // Add the URI of the callback endpoint to the callback context
                    // This information is used by the WCF workflow service to initialize
                    // the callback correlation handle used to implement the Durable Duplex pattern.
                    var context = new CallbackContextMessageProperty(listenUri, dictionary);
                    OperationContext.Current.OutgoingMessageProperties.Add(CallbackContextMessageProperty.Name,
                                                                           context);
                    // Invoke the WF Workflow Service
                    WFAck ack = proxy.AskQuestion(request);
                    if (ack != null &&
                        !string.IsNullOrEmpty(ack.Ack))
                    {
                        WriteToLog(string.Format(AckFormat, ack.Id, ack.Ack));
                    }
                }
            }
        }
        catch (FaultException ex)
        {
            WriteToLog(ex.Message);
            if (proxy != null)
            {
                proxy.Abort();
            }
        }
        catch (CommunicationException ex)
        {
            WriteToLog(ex.Message);
            if (proxy != null)
            {
                proxy.Abort();
            }
        }
        catch (TimeoutException ex)
        {
            WriteToLog(ex.Message);
            if (proxy != null)
            {
                proxy.Abort();
            }
        }
        catch (Exception ex)
        {
            WriteToLog(ex.Message);
            if (proxy != null)
            {
                proxy.Abort();
            }
        }
    }
    catch (Exception ex)
    {
        WriteToLog(ex.Message);
    }
}
|
In detail, the code performs the following steps:
-
Upon the dispatch of the first message, the client application creates the service host that will be used to asynchronously receive the response message from the WCF workflow service. In particular, it individuates a free TCP port, then reads the configuration of the callback service endpoint from the configuration file and finally modifies the URI of the endpoint to use the TCP port found. The WCF callback service exposed by the client application is defined by the Magic8BallWFCallback class that implements the IMagic8BallWFCallback service interface.
-
Creates a new instance of the Magic8BallWFClient proxy class.
-
Creates and initializes a new WFRequest object.
-
-
Uses the current
OperationContext and an object of type CallbackContextMessageProperty to initialize the
wsc:CallbackContext message header with the URI of the callback service endpoint.
-
Invokes the WCF workflow service.
The following table reports the code of the Magic8BallWFCallback service class contained in the Client project and the code of the IMagic8BallWFCallback service interface contained in the ServiceContracts project.
namespace Microsoft.AppFabric.CAT.Samples.DuplexMEP.ServiceContracts
{
    [ServiceContract(Namespace = http://microsoft.appfabric.cat/10/samples/duplexmep/wf,
                     ConfigurationName = "IMagic8BallWFCallback")]
    public interface IMagic8BallWFCallback
    {
        [OperationContract(Action = "AskQuestionResponse", IsOneWay = true)]
        void AskQuestionResponse(WFResponseMessage responseMessage);
    }
}

namespace Microsoft.AppFabric.CAT.Samples.DuplexMEP.Client
{
    [ServiceBehavior]
    public class Magic8BallWFCallback : IMagic8BallWFCallback
    {
        #region Private Constants
        private const string ResponseFormat = "Response:\n\tId: {0}\n\tAnswer: {1}";
        #endregion

        #region Private Static Fields
        private static MainForm form = null;
        #endregion

        #region Private Static Fields
        public static MainForm MainForm
        {
            get
            {
                return form;
            }
            set
            {
                form = value;
            }
        }
        #endregion

        #region IMagic8BallCallback Members
        [OperationBehavior]
        public void AskQuestionResponse(WFResponseMessage responseMessage)
        {
            if (responseMessage != null &&
                responseMessage.Response != null &&
                !string.IsNullOrEmpty(responseMessage.Response.Id) &&
                !string.IsNullOrEmpty(responseMessage.Response.Answer))
            {
                form.WriteToLog(string.Format(CultureInfo.CurrentCulture,
                                              ResponseFormat,
                                              responseMessage.Response.Id,
                                              responseMessage.Response.Answer));
            }
        }
        #endregion
    }
}

namespace Microsoft.AppFabric.CAT.Samples.DuplexMEP.Client
{
    public partial class MainForm : Form
    {
        ...
        public void WriteToLog(string message)
        {
            if (InvokeRequired)
            {
                Invoke(new Action<string>(InternalWriteToLog), new object[] { message });
            }
            else
            {
                InternalWriteToLog(message);
            }
        }

        private void InternalWriteToLog(string message)
        {
            if (message != null &&
                message != string.Empty)
            {
                string[] lines = message.Split('\n');
                DateTime objNow = DateTime.Now;
                string space = new string(' ', 19);
                string line;

                for (int i = 0; i < lines.Length; i++)
                {
                    if (i == 0)
                    {
                        line = string.Format(DateFormat,
                                             objNow.Hour,
                                             objNow.Minute,
                                             objNow.Second,
                                             lines[i]);
                        lstLog.Items.Add(line);
                    }
                    else
                    {
                        lstLog.Items.Add(space + lines[i]);
                    }
                }
                lstLog.SelectedIndex = lstLog.Items.Count - 1;
            }
        }
        ...
    }
}
|
The AskQuestionResponse operation exposed by the callback contract validates and logs the content of the response message returned by the WCF workflow service. The following table shows the content of the configuration file of the client application.
<?xml version="1.0"?>
<configuration>
  <system.serviceModel>
    <bindings>
      <netTcpBinding>
        <binding name="netTcpBinding">
          <security mode="Transport">
            <transport protectionLevel="None" />
          </security>
        </binding>
      </netTcpBinding>
      <netTcpContextBinding>
        <binding name="netTcpContextBinding">
          <security mode="Transport">
            <transport protectionLevel="None" />
          </security>
        </binding>
      </netTcpContextBinding>
    </bindings>
    <services>
      <service name="Microsoft.AppFabric.CAT.Samples.DuplexMEP.Client.Magic8BallWFCallback">
        <endpoint address="net.tcp://localhost:15001/magic8ballwfcallback"
                  binding="netTcpBinding"
                  bindingConfiguration="netTcpBinding"
                  contract="IMagic8BallWFCallback"/>
      </service>
    </services>
    <client>
      <clear />
      <endpoint address="net.tcp://localhost/magic8ballwf/syncmagic8ball.xamlx"
                binding="netTcpContextBinding"
                bindingConfiguration="netTcpContextBinding"
                contract="IMagic8BallWF"
                name="NetTcpEndpointSyncWF" />
    </client>
  </system.serviceModel>
  <startup>
    <supportedRuntime version="v4.0" sku=".NETFramework,Version=v4.0"/>
  </startup>
</configuration>
|
As you can easily notice, the client endpoint uses the NetTcpContextBinding, whereas the callback service endpoint uses the NetTcpBinding. The context bindings were introduced in the .NET Framework 3.5 and are typically used the same way as their base bindings. However, they add support for a dedicated context management protocol. These bindings can be used with or without a context. The context protocol lets you pass as a custom context a collection of strings in the form of key-value pairs, stored implicitly in the message headers. In our context, the use of a context binding is mandatory to initialize the Durable Duplex Correlation. This brings us to the next topic.
WCF Workflow Service
WCF workflow services provide a productive environment for authoring long-running, durable operations or services. Workflow services are implemented using WF activities that can make use of WCF for sending and receiving data. Explaining in detail how to build a WCF workflow service is out of the scope of the present article. For more information on WCF workflow services, see the following articles:
In this section I will focus my attention on how the WCF workflow service implements communications with both the client application and the BizTalk orchestration. When I created the WCF Workflow Service, the initial workflow just contained a Sequence activity with a Receive activity followed by a SendReply activity as shown in the following illustration.I selected the Sequential activity and I clicked the Variables button to display the corresponding editor. I created a variable for each message to exchange with the client and BizTalk application and then I created a CorrelationHandle variable to hold the callback correlation.
In order to expose a NetTcpContextBinding endpoint I configured the Receive activity as shown in the following picture:
In particular, I used the ServiceContractName property of the Receive activity to specify the target namespace and the contract interface of the service endpoint and I used the Action property to specify the action header of the request message. To initialize the callback correlation handle, I selected the Receive activity and then I clicked the ellipsis button next to the (Collection) text for the CorrelationInitializers property in the property grid for the Add Correlation Initializers dialog box to appear.
On the left panel of the dialog, I selected the correlation handle variable previously created, and I then chose Callback correlation initializer in the combobox containing the available correlation type initializers. Before invoking the downstream BizTalk application, the WCF workflow service immediately returns an ACK message to the caller. Therefore, I configured the SendReply activity, bound to the initial Receive activity, to return a WFAck message, as shown in the picture below.
As you can notice, the workflow uses a CustomTrackingActivity to emit a user-defined event. This pattern is used throughout the workflow. Custom tracking records generated at runtime by the WCF workflow service can be analyzed using the AppFabric Dashboard.
At this point, I had two option to invoke the WCF-NetTcp receive location exposed by the BizTalk application : the first choice was generating a custom WCF proxy activity, whereas the second alternative was using the messaging activities provided out-of-the-box by WF. In this case I opted for the first option, but in the next article I’ll show you how using the messaging activities and the Content-Based Correlation to implement an asynchronous communication between the WCF workflow service and the underlying orchestration. To create the WCF proxy activity I performed the following steps:
In general, this operation generates a custom activity for each operation exposed by the referenced service. As shown in the picture below, in my case this action created a single activity named AskQuestion to invoke the request-response WCF receive location exposed by the BizTalk application.
The following picture depicts the central part of the SyncMagic8Ball WCF workflow service.
This section of the workflow executes the following actions:
- Tracks a user-defined event using the CustomTrackingActivity.
- Uses the Mapper activity to transform the WFRequest message into a BizTalkRequest message.
- Tracks a user-defined event using the CustomTrackingActivity.
- Invokes the WCF receive location exposed by the BizTalk application.
- Tracks a user-defined event using the CustomTrackingActivity.
- Uses the Mapper activity to transform the BizTalkResponse message into a WFResponse message.
- Tracks a user-defined event using the CustomTrackingActivity.
The last part of the WCF workflow invokes the callback endpoint exposed by the client application to return the response to the initial request. In particular, the latter contains the Id of the original request, and this allows the client application to correlate the response to the corresponding request, especially when the client has multiple in-flight requests.
This portion of the workflow performs just 2 steps:
- Uses a Send activity to send the response message to the caller. This activity is configured to use the callback handle correlation.
- Tracks a user-defined event using the CustomTrackingActivity.
The following figure shows how I configured the Send activity used to transmit the response message back to the caller.
As highlighted above, I assigned to the CorrelatesWith property the callback correlation handle that I previously initialized on the Receive activity. Then I properly set the other properties like OperationName, Action, and ServiceContractName to match the characteristics of the callback service endpoint exposed by the client application.
BizTalk Application
The DuplexMEP application is composed of 2 artifacts, the SyncMagic8Ball orchestration and the DuplexMEP.Sync.WCF-NetTcp.ReceiveLocation. As mentioned earlier, the orchestration is a BizTalk version of the notorious Magic 8 Ball toy: it receives a request message containing a question, waits for a configurable number of seconds and then it randomly returns one of 20 standardized answers.
The following picture shows the receive location within the BizTalk Administration Console.
The following picture shows the structure of the SyncMagic8Ball orchestration.
If you are interested in more details about the DuplexMEP BizTalk application, you can read the first part of this article.
AppFabric Configuration
This section contains the steps I followed to configure the WCF workflow service in the IIS\AppFabric environment.
-
Using the IIS Manager Console, I created a web application called Magic8BallWF that points to the folder containing the project for my SyncMagic8Ball WCF workflow service.
-
Then I right-clicked the Magic8BallWF application, as shown in the picture below, I selected Manage WCF and WF Services from the context menu and then Configure.
-
On the Monitoring tab of the Configure WCF and WF for Application dialog, I enabled event collection to the AppFabric Monitoring database, I selected the connection string for the monitoring database and I chose an appropriate monitoring level.
|
Note
For data protection and performance reasons, WCF and WF services running on the same AppFabric environment can be configured to use separate monitoring and persistence stores. This solution is particularly suitable for a multi-tenant hosted environment running several applications that are managed by different companies or different divisions within the same company. For more information on this topic, you can read the following articles:
-
“Windows Server AppFabric Monitoring – Tracking Bottlenecks and Mitigation Techniques” post on the AppFabric CAT blog.
-
“Windows Server AppFabric How-To: Adding multiple persistence stores to an AppFabric installation” post on the AppFabric CAT blog.
-
“AppFabric Architecture and Deployment Topologies guide” on the Microsoft Download Center.
|
|
Note
To manage a durable workflow service within the AppFabric runtime environment, the net.pipe binding must be configured for the website containing that application, and the net.pipe protocol must be enabled for the application. This is required because the Workflow Management Service (WMS), which works with the workflow persistence store to provide reliability and instance control, communicates with the Workflow Control standard endpoint of workflow services via the net.pipe protocol. If the net.pipe protocol is not set for a durable workflow application, when you attempt to configure the application, you will receive the following error message: “Workflow persistence is not fully functional because the net.pipe protocol is missing from the application’s list of enabled protocols.” To enable the net.pipe protocol for an application, right-click the application, point to Manage Application, and then click Advanced Settings. Add “,net.pipe” to “http” in the Enabled Protocols line (with no space between “http” and the comma), and then click OK. For more information on this topic, see “AppFabric Configuration Issues: .NET 4, net.pipe, and Role Services” on TechNet.
|
-
On the Auto-Start tab, I enabled the auto-start feature for my web application. When auto-start is enabled, hosted WF or WCF services within an application are instantiated automatically when the IIS service is started by the operating system. The services within the application will automatically start when the server is started. You can configure all services within an application to start, or a subset of services within an application. If you enable auto-start for an application, the auto-start feature will work only if you also enable auto-start for the application pool used by the application. The auto-start feature of AppFabric is built on top of the auto-start feature of Internet Information Services (IIS) 7.5, which is included in Windows 7 and Windows Server 2008 R2. In IIS, you can configure an application pool and all or some of its applications to automatically start when the IIS service starts. The AppFabric auto-start feature extends this functionality so that you can configure all or some of the services within an application to automatically start when the application starts.
For more information on this topic, see the following articles:
-
“Auto-Start Feature” topic in the Windows Server AppFabric documentation.
-
“Configure Auto-Start Using IIS Manager” topic in the Windows Server AppFabric documentation.
-
“Configure Auto-Start Using Windows Server AppFabric Cmdlets” topic in the Windows Server AppFabric documentation.
|
Note
The default values for the properties MaxConcurrentCalls, MaxConcurrentInstances, MaxConcurrentSessions exposed by the ServiceThrottlingBehavior have been increased and made more dynamic as they are based on the number of processors seen by Windows.
| Property |
.NET 4.0 Default |
Previous Default |
| MaxConcurrentCalls |
16 * ProcessorCount |
16 |
| MaxConcurrentInstances |
116 * ProcessorCount |
26 |
| MaxConcurrentSessions |
100 * ProcessorCount |
10 |
For more information on this topic, see “Less tweaking of your WCF 4.0 apps for high throughput workloads” post on the AppFabric CAT blog.
|
Then, I opened the Services page, I right-clicked the SyncMagic8Ball and I selected Configure from the context menu. On the Monitoring tab, I clicked the Configure button on the right panel and selected the Troubleshooting Tracking Profile. This tracking profile is quite verbose and therefore is particularly helpful when debugging a WF service in testing environment, but it is not recommended in a production, unless you have to investigate and troubleshoot a problem.
The following table contains the configuration file of the WCF workflow service after completing these steps.
<?xml version="1.0" encoding="utf-8"?>
<configuration>
  <system.web>
    <compilation debug="true" targetFramework="4.0" />
  </system.web>
  <system.serviceModel>
    <bindings>
      <netTcpBinding>
        <binding name="netTcpBinding">
          <security mode="Transport">
            <transport protectionLevel="None" />
          </security>
        </binding>
      </netTcpBinding>
      <netTcpContextBinding>
        <binding name="netTcpContextBinding">
          <security mode="Transport">
            <transport protectionLevel="None" />
          </security>
        </binding>
      </netTcpContextBinding>
    </bindings>
    <client>
      <!-- This client endpoint is used by the WCF workflow service
           to incoke the WCF receive location exposed by the BizTalk -->
      <endpoint address="net.tcp://localhost:7171/Magic8BallBizTalk/Sync"
                binding="netTcpBinding"
                bindingConfiguration="netTcpBinding"
                contract="Magic8Ball"
                name="bizTalkSyncNetTcpBinding"/>
    </client>
    <services>
      <service name="SyncMagic8Ball">
        <endpoint address=""
                  binding="basicHttpContextBinding"
                  contract="IMagic8BallWF"
                  name="basicHttpBinding_SyncMagic8Ball" />
        <endpoint address=""
                  binding="netTcpContextBinding"
                  bindingConfiguration="netTcpContextBinding"
                  contract="IMagic8BallWF"
                  name="netTcpBinding_SyncMagic8Ball" />
      </service>
    </services>
    <behaviors>
      <serviceBehaviors>
        <behavior>
          <!-- To avoid disclosing metadata information, set
               the value below to false and remove the metadata
               endpoint above before deployment -->
          <serviceMetadata httpGetEnabled="true" />
          <!-- To receive exception details in faults for debugging purposes,
               set the value below to true. Set to false before deployment to
               avoid disclosing exception information -->
          <serviceDebug includeExceptionDetailInFaults="true" />
          <!-- Added by AppFabric Admin Console -->
          <workflowInstanceManagement authorizedWindowsGroup="AS_Administrators" />
          <workflowUnhandledException action="AbandonAndSuspend" />
          <workflowIdle timeToPersist="00:01:00" timeToUnload="00:01:00" />
          <serviceThrottling maxConcurrentCalls="200" maxConcurrentSessions="200" maxConcurrentInstances="200" />
          <etwTracking profileName="Troubleshooting Tracking Profile" />
        </behavior>
      </serviceBehaviors>
    </behaviors>
    <serviceHostingEnvironment multipleSiteBindingsEnabled="true" />
  </system.serviceModel>
  <system.webServer>
    <modules runAllManagedModulesForAllRequests="true" />
  </system.webServer>
</configuration>
|
It’s probably worth noting that you can manually modifies the configuration file without using the administration extensions provided by AppFabric. However, AppFabric offers a convenient and handy way to accomplish this task.
Testing the Application
To test the application, you can proceed as follows:
- Makes sure to start the DuplexMEP BizTalk application.
- Open a new instance of the Client Application, as indicated in the picture below.
- Enter an existential question like “Why am I here?”, “What’s the meaning of like?” or “Will the world end in 2012?” in the Question textbox.
- Select one of NetTcpEndpointSyncWF in the Endpoint drop down list.
- Specify a Delay in seconds in the corresponding textbox.
- Press the Ask button.
Now, if you press the Ask button multiple times in a row, you can easily notice that the client application is called back by the WCF workflow service in an asynchronous way. Therefore, the client application doesn’t need to wait for the response to the previous question before posing a new request.
Make some calls and then open the AppFabric Dashboard. This page is composed of three detailed metrics sections: three detailed metrics sections: Persisted WF Instances, WCF Call History, and WF Instance History. These sections display monitoring and tracking metrics for instances of .NET Framework 4 WCF and WF services. Let’s focus our attention on the WF Instance History section, highlighted in red in the figure below. The latter displays historical statistics derived from tracked workflow instance events stored in one or more Monitoring databases. It can draw data from several monitoring databases, if the server or farm uses more than one monitoring database for services deployed at the selected scope.
If you click the Completions link you can review WF instances that completed in the selected period of time. You can use the Query control on the Tracked WF Instances Page to run a simple query and restrict the number of rows displayed in the grid below.
Finally, you can right-click one of the completed WF instances and select View Tracked Events to access the Tracked Events Page where you can examine events generated by WCF and WF services. Here, you can group events by Event Type, as shown in the figure below, and analyze the user-defined events emitted by the current WCF instance using the CustomTrackingActivity that we saw at the beginning of this article.
In particular, you can quickly investigate the details of a selected event in the Details pane, as highlighted in red in the figure above.
Conclusions
In this article we have seen how to exchange messages with a WCF workflow service running in IIS\AppFabric using the Durable Duplex Correlation and a context binding. We have also seen how to create a custom activity to emit user-defined events and how to to use the using the AppFabric Dashboard to monitor custom tracking events generated by WF services. Finally we have seen how the Mapper activity provided by AppFabric Connect to implement message transformations in a WCF workflow service. This component not only allows to implement message transformations in a easy way in any WF project, but it allows developers to reuse maps from existing BizTalk application in an AppFabric solution. In the final part of this article, we’ll see how to implement an asynchronous communication between a WCF Workflow Service and an Orchestration using WS-Addressing and Content-Based Correlation. In the meantime, here you can download the companion code for this article. As always, your feedbacks are more than welcome!
by community-syndication | Dec 14, 2010 | BizTalk Community Blogs via Syndication
This blog entry is a sequel to the October 30th Blog “Securing WCF Services hosted in Windows Server AppFabric with Windows Identity Foundation (WIF)” where we demonstrated how to use WIF to secure Services hosted in AppFabric. And in this blog post we extend the same scenario to demonstrate how you can leverage Active Directory Federation Services 2.0 (AD FS 2.0) to provide you a solution for your ‘federated identity’ needs. The AD FS approach also provides you the solution that mitigates security risks (by using ActAs delegation) and authorizes access through all three tiers: the client, the middle tier (e.g., AppFabric hosted Services) to the data tier (e.g., databases) – we will cover this too.
This blog is targeted towards both the architect and developer community. The blog demonstrates how you can apply AD FS 2.0 into your architecture to provide federated identity solution and provides adequate details for you to attempt it in your project.
AD FS 2.0
AD FS 2.0 is a Server Role within Windows Server that provides support for WS-Federation, WS-Trust and SAML, with an easy to use management UI and a powerful claims processing rules engine. In a nutshell, it allows you to register your applications (Relying Parties), Claims Providers (e.g., other STS’s) and Attribute Stores (Identity Providers like Active Directory), and define the rules that govern how incoming claims are mapped to claims your application expects. The Figure 1 below illustrates these major features.
Figure 1: Major Features of AD FS 2.0 (Source MSDN.com)
One the biggest advantages you’ll notice almost immediately when getting started with AD FS is that you now have that “missing UI” for Security Token Service (STS) configuration that you don’t get when using the STS templates provided by Visual Studio.
Build Out
You can download AD FS 2.0 from here. In order to make use of AD FS 2.0 for our scenario, you will also need the following (see the Additional Resources for links):
· Active Directory
· WIF – Windows Identity Foundation and WIF .NET 4 SDK.
· Visual Studio 2010
To set up a test lab environment for this, the easiest approach is to have two VPC’s. One that only runs your Active Directory and the other that is joined to the former’s domain, and has AD FS 2.0, WIF, and VS2010 installed.
Lab Setup
In authoring this blog entry, we used a lab environment configured with two VPC’s. Step-by-step guidance on setting up the AD FS 2.0 test lab is available in the ‘references’ – the last section on this blog. Both these VPCs use a base Windows Server 2008 with Service Pack 2; details around these VPCs along with some major ‘steps’ are below:
Scenario
This blog builds upon the scenario presented in the previous blog (Securing WCF Services hosted in Windows Server AppFabric with Windows Identity Foundation (WIF)) which used a custom STS solution; this current blog will use AD FS 2.0 as the enterprise-grade STS. Figure 2 below provides a quick comparison of the scenarios in both the blogs –you will notice the big difference is previously we used a custom STS and this time around we used AD FS 2.0. With the release of AD FS2.0, we expect larger number of deployments taking a dependency on AD FS 2.0.
The coolest part about swapping in AD FS 2.0 from the previous scenario is that there are no have no code changes to make – all that was needed was a bit of configuration and this is what we will demonstrate in this blog.
Figure 2 a and b: Contrast scenarios using Custom STS (top) with current scenario of using AD FS 2.0 (bottom).
For this blog scenario we will update our architecture so that it leverages AD FS 2.0 as the STS, so that you are able to learn how to abstract usage of Identity Stores (referred to as Attribute Stores in AD FS interfaces) behind the STS using AD FS 2.0. Identity Stores could be Active Directory, MS SQL, LDAP, or any other custom provider. Subsequently in this blog posting we will also enhance the scenario presented to demonstrate integration of Microsoft SQL Server with Active Directory to append other identity related information to the claims.
The blog will also show to configure AD FS using its management MMC UI to configure the claims issuance rules for our applications, as well enabling ActAs delegation.
Implementation
In showing how to implement the scenario, we will start with the finished version of the Visual Studio solution we described in the previous blog posting and show how we can enhance it to leverage federated security, delegation and AD FS 2.0. To accomplish this we need will setup RulesEngine to use AD FS and configure AD FS to secure it; repeat this for the ComputationWorkflows project; and update the service references and related configuration in the RulesEngine and the DataWizApp. Figure 3, below shows our new implementation approach.
Figure 3: Using AD FS 2.0 STS to secure Services
Securing the RulesEngine with AD FS
To enable RulesEngine to use AD FS instead of the development STS, we run FedUtil, via Add STS Reference again. The key difference this time is the address we use for the federation metadata is on the Security Token Service screen we use the address of AD FS instead of the development STS. The following screens show the entire process.
Figure 4 to 9: Configuration Changes
The above configuration changes will take care of updating the RulesEngine web.config so that it calls AD FS during authentication.
Modifications to Web.Config files
We have two more modifications to make in web.config. We need to configure service clients (like DataWiz and RulesEngine) to request the desired claims; these claims are expressed in web.config. AD FS will only provide requested tokens, unlike our Dev STS which doesn’t care and always sends the same set of tokens. In our scenario, FedUtil by default requests Name and Role, but we must manually request CanLoadData. This amounts to editing the custom binding added by FedUtil, and adding that claim to system.serviceModel\bindings\customBinding\binding\security\secureConversationBootstrap\issuedTokenParameters\additionalRequestParameters\SecondaryParamaters\Claims as shown below:
<issuedTokenParameters keySize=“256“ keyType=“SymmetricKey“ tokenType=“”>
<additionalRequestParameters>
<trust:SecondaryParameters xmlns:trust=“http://docs.oasis-open.org/ws-sx/ws-trust/200512“>
<trust:KeyType xmlns:trust=“http://docs.oasis-open.org/ws-sx/ws-trust/200512“>http://docs.oasis-open.org/ws-sx/ws-trust/200512/SymmetricKey</trust:KeyType>
<trust:KeySize xmlns:trust=“http://docs.oasis-open.org/ws-sx/ws-trust/200512“>256</trust:KeySize>
<trust:Claims Dialect=“http://schemas.xmlsoap.org/ws/2005/05/identity“
xmlns:trust=“http://docs.oasis-open.org/ws-sx/ws-trust/200512“>
<wsid:ClaimType Uri=“http://schemas.xmlsoap.org/ws/2005/05/identity/claims/name“
Optional=“true“ xmlns:wsid=“http://schemas.xmlsoap.org/ws/2005/05/identity“ />
<wsid:ClaimType Uri=“http://schemas.microsoft.com/ws/2008/06/identity/claims/role“
Optional=“true“ xmlns:wsid=“http://schemas.xmlsoap.org/ws/2005/05/identity“ />
<wsid:ClaimType
Uri=“http://contoso.com/claims/canloaddata“
Optional=“true“
xmlns:wsid=“http://schemas.xmlsoap.org/ws/2005/05/identity“ />
</trust:Claims>
<trust:KeyWrapAlgorithm xmlns:trust=“http://docs.oasis-open.org/ws-sx/ws-trust/200512“>http://www.w3.org/2001/04/xmlenc#rsa-oaep-mgf1p</trust:KeyWrapAlgorithm>
<trust:EncryptWith xmlns:trust=“http://docs.oasis-open.org/ws-sx/ws-trust/200512“>http://www.w3.org/2001/04/xmlenc#aes256-cbc</trust:EncryptWith>
<trust:SignWith xmlns:trust=“http://docs.oasis-open.org/ws-sx/ws-trust/200512“>http://www.w3.org/2000/09/xmldsig#hmac-sha1</trust:SignWith>
<trust:CanonicalizationAlgorithm xmlns:trust=“http://docs.oasis-open.org/ws-sx/ws-trust/200512“>http://www.w3.org/2001/10/xml-exc-c14n#</trust:CanonicalizationAlgorithm>
<trust:EncryptionAlgorithm xmlns:trust=“http://docs.oasis-open.org/ws-sx/ws-trust/200512“>http://www.w3.org/2001/04/xmlenc#aes256-cbc</trust:EncryptionAlgorithm>
</trust:SecondaryParameters>
</additionalRequestParameters>
<issuer address=“https://fsweb.contoso.com/adfs/services/trust/13/kerberosmixed“ bindingConfiguration=“https://fsweb.contoso.com/adfs/services/trust/13/kerberosmixed“ binding=“customBinding“ />
<issuerMetadata address=“https://fsweb.contoso.com/adfs/services/trust/mex“ />
</issuedTokenParameters>
In addition, AD FS exposes multiple service endpoints and when FedUtil runs, it basically chooses the first endpoint which is a certificate based one. Since we are using Windows domain credentials, we need to use a Kerberos endpoint. These endpoints are all listed in the web.config commented out under an alternativeIssuedTokenParameters section, you just need to remove the one that’s within the issuedTokenParameters section and replace it with one of the others from the commented region. The second highlighted line in the config above shows the updated endpoint in place.
Configuring AD FS for Securing the Solution
Now that we’ve configured the RulesEngine to use ADFS, we need to tell ADFS about the RulesEngine. To do this we open the AD FS 2.0 Management Snap-in from Start Menu->Administrative Tools->AD FS 2.0 Management. In the tree view we expand the Trust Relationships node and then right-click the Relying Party Trusts node, selecting Add Relying Party Trust… which loads wizard of the same name. We click Start past the welcome screen:
On the Select Data Source screen, we can simply import the Federation Metadata requirements of the RulesEngine from a file (since we are not using HTTPS to host the RulesEngine, the first radio is not an option). As you can see in the screenshot, the FederationMetadata.xml documentforRulesEngine is located under the RulesEngine project.
Next you enter a user friendly display name and any notes.
Then, by default we don’t want to perform any authorization at the ADFS STS, so we just leave the Permit all option selected.
You can review the various settings pulled in from the FederationMetadata and your selections on the following screen.
You will then be prompted with the Edit Claims Rules screen, which you’ll want to display to configure how claims are issued from ADFS for the RulesEngine. In our scenario, we need to define rules to issue three claims: Name, Role and CanLoadData. We will also define a fourth, DOB, to show how we can obtain values from claims from attribute stores other than Active Directory. The following screenshot shows our Issuance Transform Rules with all claims added; we will then see how we configure the Name, Role and CanLoadData claims (the first three in the screenshot). We’ll return to showing how we add the DOB claim at the end of this blog post.
Let’s start with the Name claim. Here we receive the name via the presented Windows credentials, so we just need to pass it through. To create such a rule, click Add Rule… and the in the Claim rule template select Pass Through or Filter and Incoming Claim.
Click Next. Enter a user friendly description for the rule. Because we are after the incoming Name claim, select that in the first drop down and leave Pass through all claim values selected. Your screen should look as follows:
Clicking Finish will add the rule to the Issuance Transform Rules listing, but more importantly results in the Name claim being properly forwarded from the AppWiz client to the RulesEngine.
Next, let’s see how we add the Role claim that always provides a value of “AuthenticatedUsers”. Again, we click Add Rule… here we simply want to issue a new Role claim (we don’t want to pass through or transform the existing one). The only way to issue a completely new claim is to use a Custom Rule. So in the Claim rule template, select Send Claims Using a Custom Rule and click next.
All rules that you configure through the rule templates are ultimately expressed in this rule syntax (see the Additional References section for details on the syntax).
Note: A quick point, for any rule you’ve configured that’s not a Custom Rule, you can edit it and click View Rule Language… to see it- this is a great way to bootstrap your custom rule authoring.
Here we write a custom rule, that basically reads irrespective of any incoming claim (the condition that would normally be to the left of the => is empty means this), create and output to the claimset a new claim with the “role” type and a value of “AuthenticatedUsers”. Clicking Finish adds this rule and now we have our second claim being issued.
The third claim we add is for CanLoadData. Recall users who belong to the SeniorManagers Windows group should get this claim with a value of true. To add this rule, again we begin by clicking Add Rule… this time selecting Send Group Membership as a Claim as and clicking Next.
Now we give the rule a friendly name, select the SeniorManager group from AD, specify that the outgoing claim type is canloaddata and give it a value of true as follows:
After clicking Finish, we have our third rule in place. Now SeniorManagers will automatically get the canloaddata claim as expected by our scenario.
Back on the Edit Claims Rules for RulesEngine screen, if you click the Issuance Authorization Rules tab you should see this single rule called Permit Access to All Users. This is what we want, as we don’t want to perform any authorization at the STS in our scenario (we just want it to authenticate). We could add similar rules here that control if a user is even granted tokens to present to the RulesEngine.
Securing the ComputationWorkflows with AD FS
Securing the ComputationWorkflows project happens in a way similar to what we did for the RulesEngine. We add an STS Reference to AD FS from the ComputationWorkflows project, this time using the address for the LoadService.xamlx as the value of the Application URI in the first screen of FedUtil. Incidentally, this actually ends up taking care of both services because the service endpoints are not explicitly described in the web.config as it uses a protocolMapping. We run through the rest of FedUtil following exactly the same steps as we did for RulesEngine.
Next, we need to register the ComputationWorkflows application with ADFS. We add the Relying Party Trust as previously described, but this time use the FederationMetada.xml located under the ComputationWorkflows project. We then create the following issuance rules:
The first three are exactly the same as those we added to RulesEngine. The fourth one is new. This one is responsible for taking the CanLoadData claim acquired and passed down by the RulesEngine and passing it thru to the ComputationWorkflows when it performs the ActAs delegated call. This rule uses the Pass Through or Filter an Incoming Claim rule template and is configured as follows:
Just as for the RulesEngine, we don’t specify any authorization at the STS, so our Issuance Authorization Rules tab contains just the single Permit Access to All Users entry.
Now, the ComputationWorkflow has a unique requirement because it is the target of invocations that use delegated, ActAs credentials. By default, delegation is disabled. In order to allow it, on the Delegation Authorization Rules tab, we click Add Rule… and select Permit All Users in the drop down and click Next.
Clicking Finish will allow any callers to use delegated credentials. In the real world, you will likely choose a specific account that is allowed to perform delegation (such as NETWORK SERVICE) and then specify a Permit or Deny Users Based on an Incoming Claim rule template that checks for that account name.
With that we have fully configured AD FS for both services, now we just need to update the service references so the clients know to authenticate against AD FS.
Update the Service References in the RulesEngine
First, in Visual Studio, from the RulesEngine project update the service reference to the Load service so that it gets the new federation settings. We need to adjust web.config so that the Download endpoint uses the same settings as were automatically applied to Load when we updated the service reference. Open web.config and update the client endpoint for the Download service. Change the binding to custom and the bindingConfiguration value so it uses the same configuration name as Load. Here’s an example:
<system.serviceModel>
<client>
<endpoint address=“http://localhost/ComputationWorkflows/DownloadService.xamlx“
binding=“customBinding“ bindingConfiguration=“WS2007FederationHttpBinding_IService2“
contract=“Download.IService“ name=“WS2007FederationHttpBinding_IService“>
<identity>
<certificate encodedValue=“…“ />
</identity>
</endpoint>
<endpoint address=“http://localhost/ComputationWorkflows/LoadService.xamlx“
binding=“customBinding“ bindingConfiguration=“WS2007FederationHttpBinding_IService2“
contract=“Load.IService“ name=“WS2007FederationHttpBinding_IService1“>
<identity>
<certificate encodedValue=“…“ />
</identity>
</endpoint>
</client>
Update the DataWizApp client’s Service Reference
Simply update service reference on Contoso (rules engine) and the app.config is updated for federation with AD FS.
Because this client will need to also request CanLoadData, add the canloaddata claim to the requested claims and select the Kerberos ADFS endpoint(by modifying the SecondaryParameters Claims collection in the custom binding as we had shown previously when we configured the RulesEngine to use AD FS).
Integrating AD FS with other data stores: Provide additional claim information in the form of attributes acquired from Microsoft SQL Server. Extra Credit J
While Active Directory might store organization and contact information, it would not likely store other user information such as preferences, favorites, authorized working hours or similar items useful to the application. Here we show how we can leverage multiple attribute stores simultaneously (e.g., Active Directory & SQL) from ADFS to provide richer claims about the identity.
For simplicity we will use the following database create in our local copy of SQL Express. It contains a single table called Users, which itself has three columns: Id, Name and DOB:
/****** Object: Table [dbo].[Users] Script Date: 12/11/2010 14:27:05 ******/
IF EXISTS (SELECT * FROM sys.objects WHERE object_id = OBJECT_ID(N'[dbo].[Users]’) AND type in (N’U’))
DROP TABLE [dbo].[Users]
GO
/****** Object: Table [dbo].[Users] Script Date: 12/11/2010 14:27:05 ******/
SET ANSI_NULLS ON
GO
SET QUOTED_IDENTIFIER ON
GO
IF NOT EXISTS (SELECT * FROM sys.objects WHERE object_id = OBJECT_ID(N'[dbo].[Users]’) AND type in (N’U’))
BEGIN
CREATE TABLE [dbo].[Users](
[Id] [int] IDENTITY(1,1) NOT NULL,
[Name] [varchar](255) COLLATE SQL_Latin1_General_CP1_CI_AS NOT NULL,
[DOB] [date] NOT NULL
)
END
GO
SET IDENTITY_INSERT [dbo].[Users] ON
INSERT [dbo].[Users] ([Id], [Name], [DOB]) VALUES (3, N’CONTOSO\John Doe’, CAST(0xDF080B00 AS Date))
INSERT [dbo].[Users] ([Id], [Name], [DOB]) VALUES (4, N’CONTOSO\Jane Doe’, CAST(0x3F080B00 AS Date))
SET IDENTITY_INSERT [dbo].[Users] OFF
You may want to add additional records that match the names of users you will test with.
After creating the database, you need to create a login for Network Service (or the account under which AD FS is running) and give it database owner permissions (a little overkill, but for simplicities sake).
Now we can look at what it takes to configure AD FS to query the Users table. First we need to register the database by adding a SQL Attribute Store. Within the AD FS 2.0 MMC, right-click the Attribute Stores folder and select Add Attribute Store… in the dialog that appear provide a user friendly display name, select SQL as the Attribute store type and enter the connection string and click OK:
Now we can access this DB for querying from our claims issuance rules, so let’s add a rule that adds the DOB value queried for the user from the Users table to the set of emitted claims. For RulesEngine, add custom rule that looks up DateOfBirth DOB. To do this, go to the Relying Party Trusts folder. Right-click on the RulesEngine entry and select Edit claims rules… on the Issuance Transform Rules tab click Add Rule… IN the first dialog, select the Send Claims Using a Custom Rule template (queries to other Attribute Stores always use custom rules) and click Next. Define the rule as follows:
Notice the syntax for the query parameter in the issue statement is parameterized to use the value of the incoming Name claim in an approach similar to String.Format(). Note that the parameter {0} is not surrounded by single quotes as you might be inclined to do…adding these quotes will generate an error.
There are a few items to point out when writing a custom rule for this. First, in the select statement a column maps to a claim type (where the types parameter in the rule lists out the types in order). Returning multiple rows results in multiple claim values for that claim type. In our case, we have only one column and one row, so we emit exactly one claim of the DOB type with the value of the DOB field in the database. The second gotcha, is that all values must of a string form (e.g., varchar, char, text, etc) which is why in the above we needed to cast DOB because in the database is stored as a Date. Finally, the value set for the store parameter is the Display Name you entered when you registered the new Attribute Store.
With this rule in place, you can access the DOB claim in service code as you would any other (e.g., Service.svc.cs), even within a workflow service (following the steps we showed in the first blog entry)!
Conclusion
In conclusion, you saw how it was possible to replace a custom STS solution with AD FS 2.0 that that was needed to do so was configuration changes. And more importantly we also demonstrated how easy it is to integrate data from other stores to provide other claim data/attributes. I do hope this blog post series helped you with your architectural decisions around securing Services hosted by Windows Server AppFabric.
Additional Resources
-
Prequel Blog – Securing WCF Services hosted in Windows Server AppFabric with Windows Identity Foundation (WIF): http://blogs.msdn.com/b/appfabriccat/archive/2010/10/30/securing-wcf-services-hosted-in-windows-server-appfabric-with-windows-identity-foundation-wif.aspx
-
ADFS 2.0: http://www.microsoft.com/downloads/en/details.aspx?FamilyID=118c3588-9070-426a-b655-6cec0a92c10b&displaylang=en
-
WIF Runtime: http://www.microsoft.com/downloads/en/details.aspx?FamilyID=eb9c345f-e830-40b8-a5fe-ae7a864c4d76&displaylang=en
-
WIF SDK: http://www.microsoft.com/downloads/en/details.aspx?FamilyID=c148b2df-c7af-46bb-9162-2c9422208504&displaylang=en
-
-
Acknowledgement
Acknowledge contributions from Mark Simms and Paolo Salvatori
Namaste!
by community-syndication | Dec 14, 2010 | BizTalk Community Blogs via Syndication
The following is a good place to get started with how to go about collecting basic information for monitoring and/or troubleshooting an App Fabric (AF) cache setup (Host/Cluster and clients). It starts by pointing to some resources on the different available logging features and then, via a sample scenario, goes over the decision taken to implement a logging solution. Additionally, it answers a frequent customer question on what are the basic recommended performance counters to collect.
What App Fabric Cache offers
Here is a quick walk through on how to better format and generate the log generation for ease of management, some of the links within are pre-release so you may refer to the following more updated ones, server log sink settings and client log sink settings. These should give a fairly good idea on the logging capabilities offered in AF Cache, please review the given links, as its knowledge will help further reading. With these concepts, the discussion and planning on what is the best suitable logging solution for your specific implementation can start.
A Sample Scenario
Assuming that memory pressure issues are a concern on the host side. The default event trace level of ERROR would not be enough as it would be necessary to have a more detailed sense of what objects are being cached on the host. This can be done by overriding the default host log sink to collect information level logs, enabling more detailed log analysis in the case of memory related errors. 5 different levels are given: No Tracing (-1), Error (0), Warning (1), Information(2), Verbose(3). In this sample, the Information level will be taken.
At that point the next decision will be to determine if the configuration setting should be performed via code or XML. In this sample, the organization decides that their Infrastructure personnel can handle the required changes via XML and no programmers will be required (no code needed) and hence the XML route is the simplest.
Next is the type of logging – as the same infrastructure team will also be analyzing the logs, a file-based log sink is agreed upon (versus console or ETW). ETW could also work but the simplicity of the AF Cache login was chosen instead (for the sake of this sample). Since the logs will be written into an existing central shared location on the network, the NETWORK SERVICE account is given rights to the share (in the case of a cluster, each host NETWORK SERVICE account will have to be added to have write access to this share). NOTE that at this point AF Cache cannot run as a Network account and access errors will be raised in the case the logs cannot be written.
In the case of a crash causing the logs to be overwritten, the process-specific character ($) is agreed upon and it is to be used within the log name. Also, the log generation interval is settled for every hour (dd-hh).
Similarly, since memory pressure on the webservers (AF cache client) is also a concern, the client logs sink needs similar changes. The final custom type attribute for client and host for the fabric object will then look similar to the following:
<customType
className=”System.Data.Fabric.Common.EventLogger,FabricCommon”
sinkName=”System.Data.Fabric.Common.FileEventSink,FabricCommon”
sinkParam=\\CentralLogs\\AFCache\\Server1-$/dd-hh
<!– For the client machines the log name are modified: sinkParam=”\\CentralLogs\\AFCache\\Client1-$/dd-hh” –>
defaultLevel=”2″
/>
Logs are a good way to collect application specific or, as in the case above, scenario specific information that will allow ad-hoc or error-driven analysis. Similarly, collecting performance counters can give a window in the internal operations of not just the particular application (AF cache) but also the overall system.
Performance Counters
As such, customers often ask if there is a recommended set of counters that will help analyze the most common problems. The following is a list of the recommended performance counters to collect – the simplest way to use it:
1. Export an empty performance monitor (PerfMon) data collection set
2. Edit the resulting XML file with the list below on the counter and counterdisplayname object
3. Re-importing it into a Data Collector set template (see here for details on this operations)
Here is a link to further detail on the available performance counters for AF Cache
<Counter>\AppFabric Caching:Host\Cache Miss Percentage</Counter>
<Counter>\AppFabric Caching:Host\Total Client Requests</Counter>
<Counter>\AppFabric Caching:Host\Total Client Requests /sec</Counter>
<Counter>\AppFabric Caching:Host\Total Data Size Bytes</Counter>
<Counter>\AppFabric Caching:Host\Total Evicted Objects</Counter>
<Counter>\AppFabric Caching:Host\Total Eviction Runs</Counter>
<Counter>\AppFabric Caching:Host\Total Expired Objects</Counter>
<Counter>\AppFabric Caching:Host\Total Get Requests</Counter>
<Counter>\AppFabric Caching:Host\Total Get Requests /sec</Counter>
<Counter>\AppFabric Caching:Host\Total GetAndLock Requests</Counter>
<Counter>\AppFabric Caching:Host\Total GetAndLock Requests /sec</Counter>
<Counter>\AppFabric Caching:Host\Total Memory Evicted</Counter>
<Counter>\AppFabric Caching:Host\Total Notification Delivered</Counter>
<Counter>\AppFabric Caching:Host\Total Object Count</Counter>
<Counter>\AppFabric Caching:Host\Total Read Requests</Counter>
<Counter>\AppFabric Caching:Host\Total Read Requests /sec</Counter>
<Counter>\AppFabric Caching:Host\Total Write Operations</Counter>
<Counter>\AppFabric Caching:Host\Total Write Operations /sec</Counter>
<Counter>\.NET CLR Memory(DistributedCacheService)\# Gen 0 Collections</Counter>
<Counter>\.NET CLR Memory(DistributedCacheService)\# Gen 1 Collections</Counter>
<Counter>\.NET CLR Memory(DistributedCacheService)\# Gen 2 Collections</Counter>
<Counter>\.NET CLR Memory(DistributedCacheService)\# of Pinned Objects</Counter>
<Counter>\.NET CLR Memory(DistributedCacheService)\% Time in GC</Counter>
<Counter>\.NET CLR Memory(DistributedCacheService)\Large Object Heap size</Counter>
<Counter>\.NET CLR Memory(DistributedCacheService)\Gen 0 heap size</Counter>
<Counter>\.NET CLR Memory(DistributedCacheService)\Gen 1 heap size</Counter>
<Counter>\.NET CLR Memory(DistributedCacheService)\Gen 2 heap size</Counter>
<Counter>\Memory\Available MBytes</Counter>
<Counter>\Process(DistributedCacheService)\% Processor Time</Counter>
<Counter>\Process(DistributedCacheService)\Thread Count</Counter>
<Counter>\Process(DistributedCacheService)\Working Set</Counter>
<Counter>\Processor(_Total)\% Processor Time</Counter>
<Counter>\Network Interface(*)\Bytes Received/sec</Counter>
<Counter>\Network Interface(*)\Bytes Sent/sec</Counter>
<Counter>\Network Interface(*)\Current Bandwidth</Counter>
<CounterDisplayName>\AppFabric Caching:Host\Cache Miss Percentage</CounterDisplayName>
<CounterDisplayName>\AppFabric Caching:Host\Total Client Requests</CounterDisplayName>
<CounterDisplayName>\AppFabric Caching:Host\Total Client Requests /sec</CounterDisplayName>
<CounterDisplayName>\AppFabric Caching:Host\Total Data Size Bytes</CounterDisplayName>
<CounterDisplayName>\AppFabric Caching:Host\Total Evicted Objects</CounterDisplayName>
<CounterDisplayName>\AppFabric Caching:Host\Total Eviction Runs</CounterDisplayName>
<CounterDisplayName>\AppFabric Caching:Host\Total Expired Objects</CounterDisplayName>
<CounterDisplayName>\AppFabric Caching:Host\Total Get Requests</CounterDisplayName>
<CounterDisplayName>\AppFabric Caching:Host\Total Get Requests /sec</CounterDisplayName>
<CounterDisplayName>\AppFabric Caching:Host\Total GetAndLock Requests</CounterDisplayName>
<CounterDisplayName>\AppFabric Caching:Host\Total GetAndLock Requests /sec</CounterDisplayName>
<CounterDisplayName>\AppFabric Caching:Host\Total Memory Evicted</CounterDisplayName>
<CounterDisplayName>\AppFabric Caching:Host\Total Notification Delivered</CounterDisplayName>
<CounterDisplayName>\AppFabric Caching:Host\Total Object Count</CounterDisplayName>
<CounterDisplayName>\AppFabric Caching:Host\Total Read Requests</CounterDisplayName>
<CounterDisplayName>\AppFabric Caching:Host\Total Read Requests /sec</CounterDisplayName>
<CounterDisplayName>\AppFabric Caching:Host\Total Write Operations</CounterDisplayName>
<CounterDisplayName>\AppFabric Caching:Host\Total Write Operations /sec</CounterDisplayName>
<CounterDisplayName>\.NET CLR Memory(DistributedCacheService)\# Gen 0 Collections</CounterDisplayName>
<CounterDisplayName>\.NET CLR Memory(DistributedCacheService)\# Gen 1 Collections</CounterDisplayName>
<CounterDisplayName>\.NET CLR Memory(DistributedCacheService)\# Gen 2 Collections</CounterDisplayName>
<CounterDisplayName>\.NET CLR Memory(DistributedCacheService)\# of Pinned Objects</CounterDisplayName>
<CounterDisplayName>\.NET CLR Memory(DistributedCacheService)\% Time in GC</CounterDisplayName>
<CounterDisplayName>\.NET CLR Memory(DistributedCacheService)\Large Object Heap size</CounterDisplayName>
<CounterDisplayName>\.NET CLR Memory(DistributedCacheService)\Gen 0 heap size</CounterDisplayName>
<CounterDisplayName>\.NET CLR Memory(DistributedCacheService)\Gen 1 heap size</CounterDisplayName>
<CounterDisplayName>\.NET CLR Memory(DistributedCacheService)\Gen 2 heap size</CounterDisplayName>
<CounterDisplayName>\Memory\Available MBytes</CounterDisplayName>
<CounterDisplayName>\Process(DistributedCacheService)\% Processor Time</CounterDisplayName>
<CounterDisplayName>\Process(DistributedCacheService)\Thread Count</CounterDisplayName>
<CounterDisplayName>\Process(DistributedCacheService)\Working Set</CounterDisplayName>
<CounterDisplayName>\Processor(_Total)\% Processor Time</CounterDisplayName>
<CounterDisplayName>\Network Interface(*)\Bytes Received/sec</CounterDisplayName>
<CounterDisplayName>\Network Interface(*)\Bytes Sent/sec</CounterDisplayName>
<CounterDisplayName>\Network Interface(*)\Current Bandwidth</CounterDisplayName>
In summary
Both logs and performance counters collected together are the first step in being ready to analyze errors or monitor for specific concerns or conditions (i.e. memory pressure) for AppFabric Caching. Since this is a big subject, I will look into further exploring the reasons behind the performance counters recommendation in a future blog.
Author: Jaime Alva Bravo
Reviewers: Mark Simms, James Podgorski

by community-syndication | Dec 14, 2010 | BizTalk Community Blogs via Syndication
Last week we published the RC2 build of ASP.NET MVC 3. I blogged a bunch of details about it here.
One of the reasons we publish release candidates is to help find those last “hard to find” bugs. So far we haven’t seen many issues reported with the RC2 release (which is good) – although we have seen a few reports of a metadata caching bug that manifests itself in at least two scenarios:
- Nullable parameters in action methods have problems: When you have a controller action method with a nullable parameter (like int? – or a complex type that has a nullable sub-property), the nullable parameter might always end up being null – even when the request contains a valid value for the parameter.
- [AllowHtml] doesn’t allow HTML in model binding: When you decorate a model property with an [AllowHtml] attribute (to turn off HTML injection protection), the model binding still fails when HTML content is posted to it.
Both of these issues are caused by an over-eager caching optimization we introduced very late in the RC2 milestone. This issue will be fixed for the final ASP.NET MVC 3 release. Below is a workaround step you can implement to fix it today.
Workaround You Can Use Today
You can fix the above issues with the current ASP.NT MVC 3 RC2 release by adding one line of code to the Application_Start() event handler within the Global.asax class of your application:
The above code sets the ModelMetaDataProviders.Current property to use the DataAnnotationsModelMetadataProvider. This causes ASP.NET MVC 3 to use a meta-data provider implementation that doesn’t have the more aggressive caching logic we introduced late in the RC2 release, and prevents the caching issues that cause the above issues to occur.
You don’t need to change any other code within your application. Once you make this change the above issues are fixed. You won’t need to have this line of code within your applications once the final ASP.NET MVC 3 release ships (although keeping it in also won’t cause any problems).
Hope this helps – and please keep any reports of issues coming our way,
Scott
P.S. In addition to blogging, I am also now using Twitter for quick updates and to share links. Follow me at: twitter.com/scottgu


