by community-syndication | Nov 29, 2006 | BizTalk Community Blogs via Syndication
There are two interesting BizTalk 2006 bugs to be aware of – it seems like they would
be encountered fairly often, so I’m a little surprised that I haven’t seen more newsgroup/forum
activity around these.
The first bug is encountered when you attempt to start a BizTalk 2006 application
definition with orchestrations that have been bound to different hosts. (Say,
OrchA in HostA, and OrchB in HostB.) After the application has been deployed,
the first time the application is started (and ‘orchestration start/enlist’
is included in the start options) you will receive an error that looks something like
this:
 Microsoft.BizTalk.ExplorerOM.BtsException: Could not enlist orchestration 'BizTalkSample.Orchestrations.Echo,BizTalkSample.Orchestrations,

   Version=1.0.0.0, Culture=neutral, PublicKeyToken=05a4a8d4071035d9'. Could not enlist

   orchestration 'BizTalkSample.Orchestrations.Echo,BizTalkSample.Orchestrations, Version=1.0.0.0,

   Culture=neutral, PublicKeyToken=05a4a8d4071035d9'. Value does not fall within the

   expected range.
You can work around this error by manually starting your orchestrations in the MMC,
either one-at-a-time or grouped by host. The error only occurs the first time
you attempt to start – all future attempts will succeed. This is because the
underlying bug has to do with the creation of subscriptions for the orchestrations.
This is actually a regression from BizTalk 2004 – where you could in fact change multiple
orchestrations (across differing hosts) to a started state via the BtsOrchestration
‘Explorer OM’ class in a single transaction (i.e. before calling SaveChanges.)
In addition to the behavior just described with BizTalk 2006, you can’t do this kind
of Explorer OM work once multiple hosts are involved in BizTalk 2006.
But hey, there is a hotfix. Contact PSS and ask about KB927052.
The second bug is encountered when you have a BizTalk 2006 application with multiple
MSMQ receive locations. You will find that restarting your host instances takes
an excessively long period of time. This is due to a bug in the adapter which
was not allowing the host service to stop correctly (the Service Control Manager would
eventually just terminate the service…) Contact PSS and ask about KB928222.
by community-syndication | Nov 29, 2006 | BizTalk Community Blogs via Syndication
ROLLBACKs create the interesting events.
I’ve spent a time trying to understand them.
When I’ve tried to use
BEGIN TRAN MAIN
…
ROLLBACK TRAN MAIN
inside of the SP, that is started by BizTAlk SQL port,
And I’ve got couple events: (they are bellow)
It was interesting as this SP has done ROLLBACK if I test it without BizTalk.
I’ve got the description of this situation in the BizTalk 2006 Help:
“Save Tran and RollBack tran in stored procedures will cause an error event from the SQL adapter, but the transaction does roll back.”
Matt Meleski gave me the decision:
“…A simple trick that you could try would be to test for an exisitance of a
transaction before starting a new one in the proc. But this would require
minor modifications to your stored procedure. For example:
At the top of the proc,
Declare @MyTran bit
— If Caller Started the Transaction, let the caller handle it
— otherwise control it in the proc.
If @@Trancount = 0
Begin
Begin Transaction
Set @MyTran = 1
End
At the bottom of your proc, to rollback or commit:
If @MyTran = 1 and @@Trancount > 0
Begin
Rollback Transaction — Or Commit Transaction
End
…”
It works!!!
Thanks Matt!
As I can understand the SQL Port create the wrapping transaction and…
in result I cannot properly use the ROLLBACK feature.
No problem. But the text of the events could be more accurate, doesn’t it?
========================================================================
There are the text of those events:
———————————————————–
Event Type: Warning
Event Source: BizTalk Server 2004
Event Category: BizTalk Server 2004
Event ID: 5740
Date: 11/28/2006
Time: 4:21:07 PM
User: N/A
Computer: CORPBTS1
Description:
The adapter “SQL” raised an error message. Details “HRESULT=”0x80004005”
Description=”Cannot roll back MAIN. No transaction or savepoint of that name
was found.”
“.
AND then the second event
Event Type: Warning
Event Source: BizTalk Server 2004
Event Category: BizTalk Server 2004
Event ID: 5743
Date: 11/28/2006
Time: 4:21:07 PM
User: N/A
Computer: CORPBTS1
Description:
The adapter failed to transmit message going to send port
“SQL://CORPNT5/Prod/”. It will be retransmitted after the retry interval
specified for this Send Port. Details:”HRESULT=”0x80004005″
Description=”Cannot roll back MAIN. No transaction or savepoint of that name
was found.”
“.
———————————————————–
When I change the
ROLLBACK TRAN MAIN
to
ROLLBACK WORK
the event changed to:
———————————————————–
Event Type: Warning
Event Source: BizTalk Server 2004
Event Category: BizTalk Server 2004
Event ID: 5740
Date: 11/28/2006
Time: 4:16:09 PM
User: N/A
Computer: CORPBTS1
Description:
The adapter “SQL” raised an error message. Details “HRESULT=”0x80040e14”
Description=”Distributed transaction completed. Either enlist this session
in a new transaction or the NULL transaction.”
“.
AND then the second event
Event Type: Warning
Event Source: BizTalk Server 2004
Event Category: BizTalk Server 2004
Event ID: 5743
Date: 11/28/2006
Time: 4:16:09 PM
User: N/A
Computer: CORPBTS1
Description:
The adapter failed to transmit message going to send port
“SQL://CORPNT5/Prod/”. It will be retransmitted after the retry interval
specified for this Send Port. Details:”HRESULT=”0x80040e14″
Description=”Distributed transaction completed. Either enlist this session
in a new transaction or the NULL transaction.”
“.
by community-syndication | Nov 28, 2006 | BizTalk Community Blogs via Syndication
Eilene Hao, Program Manager, SharePoint has been writing series of posts about SharePoint Services Workflow. You can check out the entire series in the SharePoint team weblog.

by stephen-w-thomas | Nov 28, 2006 | Stephen's BizTalk and Integration Blog
Deployment in BizTalk 2006 is a greatly improved process over that of BizTalk 2004. The typical deployment process in BizTalk 2006 goes something like this:
1. Export the MSI using BizTalk Administration
2. Move to target computer
3. Import MSI through BizTalk Administration or BTSTASK
4. Run the MSI to GAC the DLL’s
Simple and straight forward. But why do we need to run the MSI after we import it?
This accomplishes a few things, mostly to GAC the DLL’s and to have the MSI package show up under Add/Remove programs. This makes is easy to see what has been deployed to the target computer.
But what if you only wanted to move the code to one target computer and you did not care about seeing the items under Add/Remove programs?
Well, then you could change the DLL properties (a.k.a. Resources) inside BizTalk Administration to
actually GAC your DLLs on MSI import.
How to change the Resource properties in BizTalk 2006
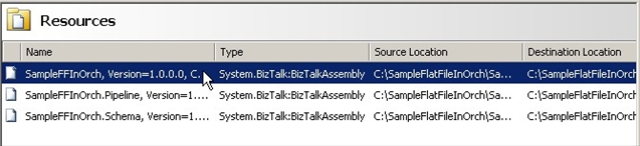
Step 1: Open BizTalk 2006 Administration, select your Application, click on Resources.
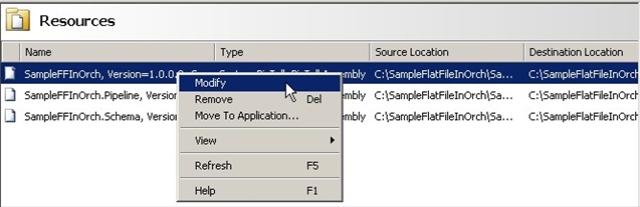
Step 2: Select the first BizTalk Assembly Resource, right click, select Modify
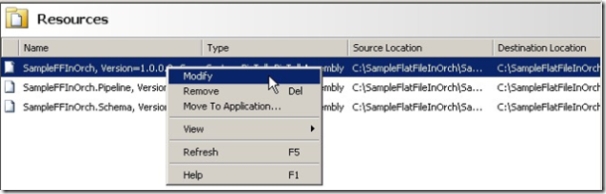
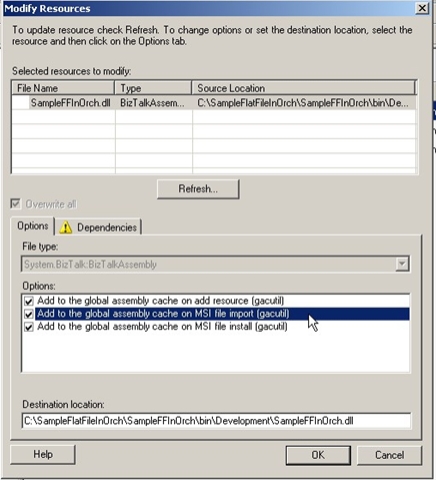
Step 3: Under Modify Resources – Options box, check the “Add to the Global Assembly Cache on MSI file import (gacutil)”

4. Repeat for each BizTalk Assembly or other resources in your application that you needed GACed.
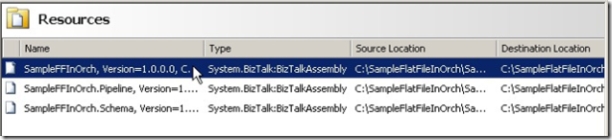
It is that easy! Now when you import the MSI your BizTalk resources will be put into the global assembly cache without any additional effort.
Now remember, just because you can do something does not mean you should. This most likely would be most valuable on a single computer install and remember you MSI will not show up under Add/Remote programs.

by community-syndication | Nov 28, 2006 | BizTalk Community Blogs via Syndication
The deployment story in BizTalk Server 2006 is greatly improved over that of 2004. A typical deployment in BizTalk Server 2006 goes something like this:
1. Export the MSI using BizTalk Administration or BtsTask
2. Move the MSI to the target computer
3. Import the MSI using BizTalk Administration or BtsTask
4. Run the MSI to put the DLLs in the global assembly cache (GAC)
This is a simple and straight forward process. But why do you need to run the MSI after it is imported?
This accomplishes a few things:
1. It puts the DLL's into the GAC
2. Adds the MSI package to show up under Add/Remove programs
But what if you only wanted to move the code to one target computer and you did not care about seeing the items under Add/Remove programs?
Then you could change the DLL properties (Resources) inside the BizTalk Administration tool to
actually place your DLLs into the GAC on MSI import.
How to Change Resource Properties in BizTalk Server 2006
Step 1: Open BizTalk Administration, select your Application, click on Resources.

Step 2: Select the first BizTalk Assembly Resource, right click, select Modify

Step 3: Under Modify Resources – Options box, check the "Add to the Global Assembly Cache on MSI file import"

4. Repeat for each Assembly or other resources in your application that you want in the GAC.
Now when the MSI is imported your resources will be put into the GAC without any additional effort.
Just remember that the MSI will not show up under Add/Remote programs as it would when you run it on the target system.
by community-syndication | Nov 28, 2006 | BizTalk Community Blogs via Syndication
Richard Seroter has just posted about the BizTalk 2006 R2 beta 1 installation experience and new functionality – it would appear there is lots of .Net 3.0 and WCF, along with Microsoft EDI/AS2 and BAM Evening goodies!
The installation experience appears to be along the same lines as BizTalk 2006, with added EDI/AS2 configuration options (which […]
by community-syndication | Nov 28, 2006 | BizTalk Community Blogs via Syndication
Yesterday I did a quick evaluation of the Beta 1 release of BizTalk Server 2006 R2, and thought I’d walk through the installation process and highlight some new things I noticed.
The Beta 1 release looks to be for early adopters only, so there is no “public” release at the moment. Hopefully there will be one in the Spring. Also please note that anything shown here is subject to change by Beta 2 or final release.
First, I walked through the standard installation.
Next I chose the components to install. You can see from my image below that there are additional EDI/AS2 components, Windows Communication Foundation (WCF) bits, and additional BAM Eventing (new interceptors for both Windows Workflow and WCF).
After installing, I jumped right to configuration. As you can see here, not a whole lot of changes.
You will see additional configuration, however, for the new EDI/AS2 functionality.
Next I went through and installed the new BizTalk .NET adapters. These adapters allow you to ping various Line of Business (LOB) systems directly through .NET code without going through BizTalk.
Once everything was installed, I went to see if anything new showed up in the BizTalk Administration Console. First thing I saw was a new “Application” called BizTalk EDI Application. Inside, there were a couple of orchestrations, lots of schemas, ad a few pipelines.
Next I checked out the “Adapters” section and saw all the new WCF adapters available. Nice.
I read in one of the documents that the BAM Management tool had been upgraded, so I looked at the bm.exe command line tool to see what new options were available. You’ll see below that there are now options to deal directly with interceptors. This will allow you to instrument your WF and WCF process to feed data directly into the common BAM infrastructure. I like it.
I wanted to see all the options available for the WCF adapters, so I went ahead and build a couple new receive locations. The first receive location uses the WCF – WSHttp adapter.
Then I built a WCF – Custom location. Check out all the various options below:
Finally, I jumped into Visual Studio.NET 2005 and kicked off the WCF Service Publishing Wizard. If you’ve ever used the standard Web Services Publishing Wizard, then you’d be fairly familiar with this one.
In future posts I’ll dig more into how to actually use all these great new functions. Some folks are already digging into the functionality, like my buddy Jesus Rodriguez who has a post on Invoking TCP-Hosted WCF Services using BizTalk Server R2.
Technorati Tags: BizTalk
by community-syndication | Nov 28, 2006 | BizTalk Community Blogs via Syndication
Wow, its been a busy couple of months here.
I was looking forward to getting to the Microsoft SOA conference in Seattle back at the start of October, but I ended up being pulled back to Toronto for a pressing BizTalk opportunity we had going. That opportunity pretty much took all of my time for the first couple of weeks of October. The team here was pretty busy running the Canadian BizTalk Partner Roadshow (outlined in my last post). I had a chance to meet some great partners during the roadshow, but I’ll save that discussion for a future post.
For now, I wanted to some of the work we had to do for the that opportunity that kept me from getting to the Microsoft SOA conference. One of the things that we had to show was how the BizTalk SAP adapter could be installed, configured and used. Since the process can be a bit confusing and tricky, I thought I’d post the steps I followed.
Step 1 – The obvious first step is to install and configure BizTalk 2006. I won’t go into the details of this as there are already a bunch of detailed documents out there that outline this process. Once this is done, you’ll likely wonder where the SAP adapter is. It isn’t installed as part of the core BizTalk Server installation process. The adapter comes in a separate installation package and you’ll need to make sure you have this before you proceed further.
Step 2 – The SAP.NET Connector is a prerequisite for the BizTalk SAP adapter and must be installed before you try installing the adapter. This is the trickiest step for most people and is often the most frustrating part of the process. The frustration comes from trying to figure out what version of the connector you need to install for your BTS 2006 environment. There are multiple versions of the connector and if you don’t have the correct one, then nothing is going to work for you. One of the most common errors people hit when installing connector is that the it has a dependancy on Visual Studio 2003. Since BizTalk 2006 is dependant on Visual Studio 2005, the installation fails and you’re stuck. Beyond this specific error, there are a number of other errors that you can run into if you aren’t using the correct version. The key to getting past these issue is to install the SAP.NET Connector Runtime version 1.0.3. The runtime version does not have the VS 2003 dependancy and you’ll be able to install it in your BizTalk 2006 environment. A key note, the Connector is not provided by Microsoft and you will have to obtain this from SAP.
Step 3 -Before you get too far into this process, you’ll want to contact your SAP administrator to get your hands on the connection/username/password information. You’ll obviously need this information when we set about configuring the adapter. From my experience, getting connection information and username/password info can often take a few days. Therefore, I recommend asking for this as soon as you find out you’ll need to use the adapter.
In all honesty, getting your hands on the connector and getting the proper connection information will take the majority of your time (It did for me). Once you’re past these steps, the remaining steps can be completed quite quickly. In fact, I’ve attached a short AVI file that shows the remaining steps. Feel free to download it and use it however you need (training, client demos etc) as it really shows how simple it is to configure and use the adapter. The entire movie is only 4 minutes long and its about 1.5 megs zipped.
Step 5 – You’ll need to install the SAP adapter. It’s a pretty simple install and when its done, you’ll be able to see the new SAP adapter using the Biztalk Admistration Console. (This is shown in the AVI)
Step 6 – Once the adapter is installed, we’ll need to configure it and setup a send port that we can use to connect to the live environment and generate our message schemas. (Shown in the AVI) Note, that we want to configure the adapter before we do anything else in Visual Studio.
Step 7 – Now that the adapter is installed, we can use it to generate our schemas. To generate the SAP schemas, right click on your project, select “Add->Add Generated Item”. From the pop-up window, select the “Add Adapter Metadata” option and the Adapter Metadata wizard will launch. One the wizard’s first screen, select the SAP option. You’ll need to provide the name of the SQL Server and the database where your SAP Adapter is configured. Once you have entered this info, the adapter you already created will show in the third drop down. You’ll then be presented with a search screen that will allow you to search against the IDOCs and RFC functions in your SAP environment. (Note, you can use the * wildcard when searching). Once you select the IDOC or RFC you want to generate the schema for, select the next button and the schemas will be generated for you.
Setp 8 – You’re done, go ahead and develop the rest of the BizTalk project as you normally would.
The AVI file will show as a link at the end of this post. I filmed it at 1024×768 so set your resolution to this before running.
Cheers and keep on BizTalking.
Peter
by community-syndication | Nov 28, 2006 | BizTalk Community Blogs via Syndication
I recently worked on a pilot to access RPG programs on an IBM AS/400 from BizTalk Server 2006. We used the new Host Applications adapter which is included with the Microsoft BizTalk Adapters for Host Systems (which is available for free as long as you have a BizTalk Server 2006 license.)
The pilot went smoother than I thought it would and it was pretty easy for the most part. We did run into a few issues which I will cover in this post. Before I cover the issues though, I would like to provide some context for using the Host Applications adapter:
- The documentation is heavily focused on Host Integration Server 2006 (my naïve understanding is that the BizTalk Adapters for Host Systems and HIS 2006 are largely the same product) and it is hard to get a grasp of what you need to review in the docs; however, in the Operations section of the docs there are sections on the BizTalk Adapters for Host Systems: Host Applications, Host Files, DB2, WebSphere MQ (client-side, does not require a Windows version of WebSphere MQ.)
- For the Host Applications adapter, you can’t just install the adapter – you need TI Manager, Dev Tools, etc. When installing the adapters, we used the default settings, which installs lots of HIS components (and the 4 BizTalk adapters) but it does not upgrade Enterprise Single Sign-On to version 4.0 (version 4.0 is included with HIS 2006, version 3.0 is included with BizTalk 2006.)
- You will have additional services running after installing the BizTalk Adapters for Host Systems so make sure you have a beefy development machine if you are going to be utilizing these adapters.
- The docs state that you need Windows 2003 to connect to an RPG program using the Host Applications adapter but it works fine from my laptop running Windows XP SP2.
- You must generate metadata (.dll and .xsd) to use the Host Applications adapter – check out the docs for more info on doing this.
- You must configure a Remote Environment in TI Manager to use the Host Applications adapter – check out the docs for more info on doing this.
Issues
We only ran into a couple of major issues. The first issue was that when connecting to RPG programs we would get an error message complaining that the programs didn’t have a PLIST – when using the Host Applications adapter to communicate with an RPG programs that RPG program must have PLIST. If it doesn’t, you will not be able to generate the Transaction Integrator .dll and .xsd (metadata necessary for connecting to the RPG programs.) My understanding of a PLIST is that is something analogous to an interface in the .NET world. We examined two different courses of action to work around this issue. The first was to call the RPG programs from DB2 stored procedures and then use the DB2 adapter to access the mainframe. The second option, which we opted to use, was to have the mainframe developers create small wrapping RPG programs which contained PLISTs and then call the program that we really want to access. This worked very well.
The second major issue was that we didn’t know the port number that we needed to use to connect to the mainframe. In our case it was 8475 (this appears to be the standard port to call RPG programs on AS/400s.)
Minor Issues and Other Notes
We did not use SSO with the Host Application Adapter (some parts of the docs seem to imply that you must use SSO.) We used the TIClientContext elements that are part of the generated .xsd and passed in the USERID and PASSWORD by including them in the message sent through the adapter:
<ns0:TIClientContext TIContextKeyword="USERID" TIContextValue="theuserid" />
<ns0:TIClientContext TIContextKeyword="PASSWORD" TIContextValue="thepassword" />
If you do this, you must set the Set the ‘Allow Security Overrides’ send port adapter configuration property to ‘Yes’. Additionally, in TI Manager, for your Remote Environment, you must check the ‘Require client provided security’ on the Properties-Security tab.
We had to use the XmlReceive pipeline on the solicit-response Host Application adapter send port to get the response message back to our orchestration. The default is of course the PassThruReceive pipeline.
by community-syndication | Nov 27, 2006 | BizTalk Community Blogs via Syndication
Whenever we work on BizTalk projects we feel why there is no provision for App.Config file so that one can store Key/Value pairs in it. So to have a work around for it we save key/value pair in Btsntsvc.config file.
It is one of the easiest work around.
1. But can you store sensitive data like your domain password in a place which is visible and accessible to all.
2. Do you feel changing btsntsvc.config file is right from developer point of view.
I do feel your answer is Nonot at all. Well in such scenario SSODB comes in picture. The key/value pair is stored in encrypted format so nobody can access sensitive data. No btsntsvc.config file is involved in it. Single Sign-On database (SSODB) is a standard Database which gets installed while one installs BizTalk Server.
My Dummy Solution contains 3 projects.
1. SSODB Helper class to query SSODB.
2. MMC3.0 Snap-in for Administrators to add key/value pairs.
3. Windows Form to test the SSODB helper class.
We can user SSODB Helper class in our Orchestration to get any key/value pair. I won’t get into technical details of how to develop it. MMC 3.0 developments with C# is not officially supported by Microsoft. “Sample Snap In” development code can be downloaded from Microsoft site.
http://msdn.microsoft.com/library/default.asp?url=/library/en-us/managedMMC/html/a335f609-a929-449a-86f6-29ac7c227709.asp
I had a thread runnig regarding Developing “MMC 3.0 Snap IN” at
http://groups.google.com/group/microsoft.public.management.mmc/browse_thread/thread/88b4e3da49af3ceb/71f5ee87514f63ac?lnk=gst&q=mmc3.0&rnum=12&hl=en#71f5ee87514f63ac
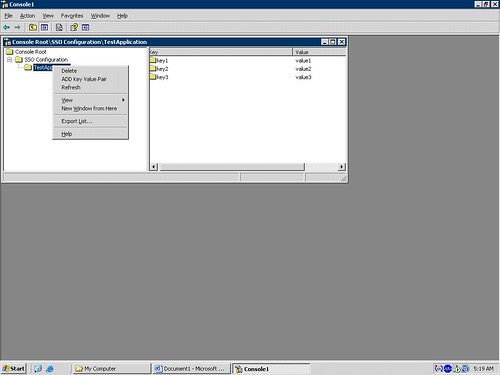
The Snap-In looks like the one below. One can create Applicationwhich in turn contains Key/value pairs. SSODB stores in terms of Application Name-ConfigName-Key/value pairs. So one Application can contain more then one ConfigName which contains many key/value pairs. For simplicity I had only one ConfigName which contains many key/value pairs. So in my current solution I have no Provision for multiple ConfigNames.

One needs to first Add an Application. A new application with name “NewChild”. One needs to rename it to the Application Name one wants. Application Names are user friendly namesSo you can name it as per your convenience. Then one can add key/value pair. It’s worthwhile to work with SSODB and its pretty challenging. Queries and Bugs are always welcomed.