by Sandro Pereira | Jul 3, 2018 | BizTalk Community Blogs via Syndication
An error never comes alone … When an error appears, it always appears two or three, and I still have thousands to published, but this one but this one made me crazy for a few minutes: The type or namespace name ‘SerializableAttributeAttribute’ does not exist in the namespace!
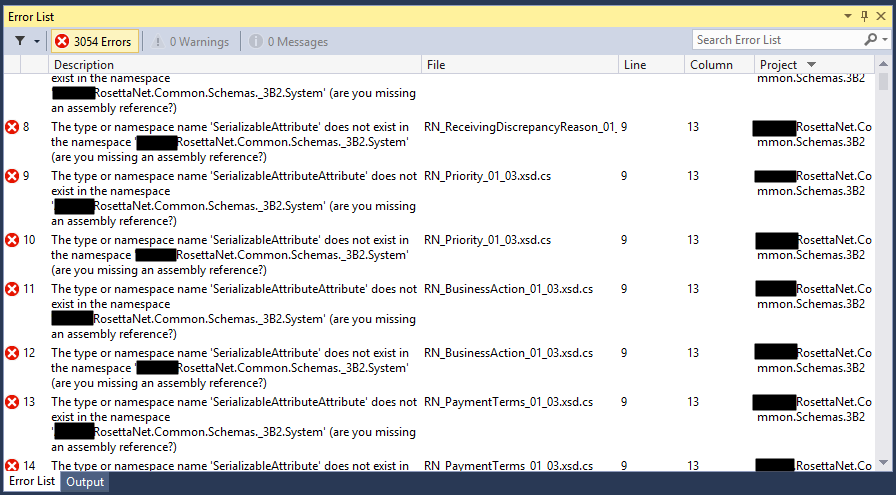
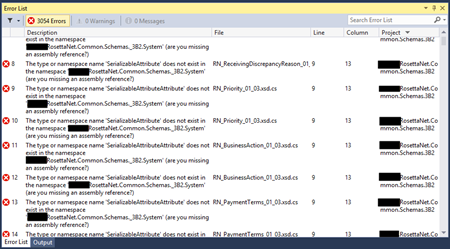
Yes, you read it right, while I was trying to compile a RosettaNet schemas projects, in this particular case a PIP3B2 Advance Shipment Notification I got thousands of errors, 3054 to be exact saying:
Error 1 The type or namespace name ‘SerializableAttributeAttribute’ does not exist in the namespace
RosettaNet.Common.Schemas._3B2.System’ (are you missing an assembly reference?)
C:TFS…RosettaNet.Common.Schemas.3B2DomainLogisticsCodeListRN_FreightPaymentTerms_01_03.xsd.cs 9 13 RosettaNet.Common.Schemas.3B2 …
Error 3054 The type or namespace name ‘NonSerializedAttribute’ does not exist in the namespace ‘RosettaNet.Common.Schemas._3B2.System’ (are you missing an assembly reference?) C:TFS… RosettaNet.Common.Schemas.3B2DomainProcurementINT_Procurement_02_07_01_09.xsd.cs 5072 21 RosettaNet.Common.Schemas.3B2
… and several other schemas as you may see in the picture below.
But do not be fooled into thinking this is a problem related exclusively to RosettaNet, it is not, and it can happen with any “normal” or any kind of schemas.
Cause
There are certain keywords, type names, and identifier names that you should use because they are internally used by BizTalk and it way enter in conflict and sometimes originate problems and errors, keywords like activate, atomic, body, task, compensate, method and several ones, you can see the full list here XLANG-s Reserved Words. But there are other keywords that depending on the artifact, may give you problems like:
- BTS (associated with Microsoft.BizTalk.GlobalPropertySchemas assembly)
- “-“ in RootNode Typename inside schemas
- …
And “System”!
If you use the keyword “System” inside a schema namespace like:
- “RosettaNet.Common.Schemas._3B2.System”
- “MyNamspace.System.Schemas”
You will not be able to compile your schema project.
The problem, if you download from the GS1 RosettaNet Standards certain PIP’s they will have the following structure:
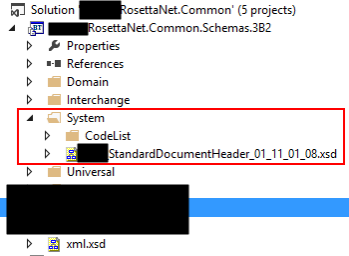
And as you see, there is a folder “System” that inside have several schemas and normally the schema namespace is composed by the project name or (assembly name) and the path to the schema, for example in this case:
- RosettaNet.Common.Schemas._3B2.System.CodeList
- Or RosettaNet.Common.Schemas._3B2.System
And this is causing all of these problems because in this case, “System” is a reserved keyword that shouldn’t be used.
Solution
The difficult part of this error was finding the cause of the problem. Once you know what is causing the problem the solution is quite simple. You just need to:
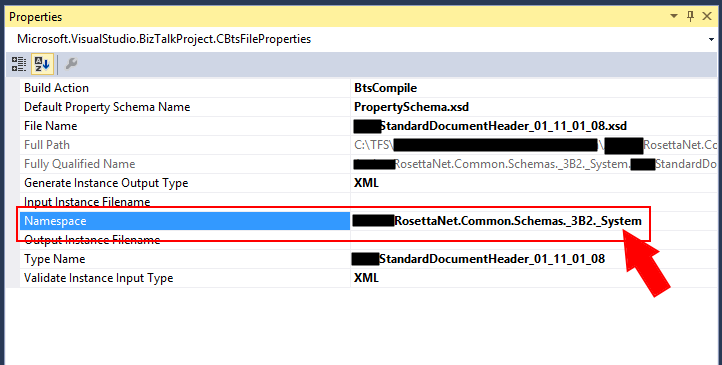
- Change the “Namespace” property on all the schemas the word “System” to another name, for example, “_System” (to maintain the consistency but it can be other word/value)
In my case, I hade the change the “Namespace” property of the schemas in the “System” folder
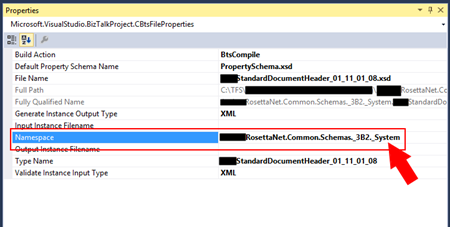
You can now rebuild your schema solution and this error should go away.
Author: Sandro Pereira
Sandro Pereira lives in Portugal and works as a consultant at DevScope. In the past years, he has been working on implementing Integration scenarios both on-premises and cloud for various clients, each with different scenarios from a technical point of view, size, and criticality, using Microsoft Azure, Microsoft BizTalk Server and different technologies like AS2, EDI, RosettaNet, SAP, TIBCO etc. He is a regular blogger, international speaker, and technical reviewer of several BizTalk books all focused on Integration. He is also the author of the book “BizTalk Mapping Patterns & Best Practices”. He has been awarded MVP since 2011 for his contributions to the integration community. View all posts by Sandro Pereira
by Sandro Pereira | Jul 2, 2018 | BizTalk Community Blogs via Syndication
I’m back with “Errors and Warnings, Causes and Solutions” and this time targeting developers – BizTalk Deploy operation failed – that work until late and they are a bit tired… believe me, It’s never a good recipe!
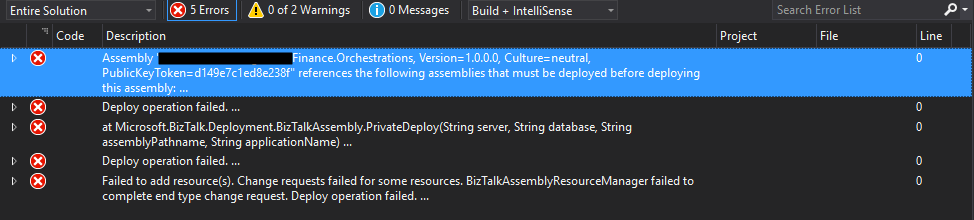
Today will I was deploying a BizTalk Server Solution from Visual Studio I had a rookie problem that, because I was tired, I took 20 minutes to find out the problem:
Severity Code Description Project File Line
Error Assembly “Finance.Orchestrations, Version=1.0.0.0, Culture=neutral, PublicKeyToken=d149e7c1ed8e238f” references the following assemblies that must be deployed before deploying this assembly:
Assembly “Staging.Orchestrations, Version=1.0.0.0, Culture=neutral, PublicKeyToken=d149e7c1ed8e238f”.
Deploy operation failed…
At Microsoft.BizTalk.Deployment.BizTalkAssembly.PrivateDeploy(String server, String database, String assemblyPathname, String applicationName)…
…
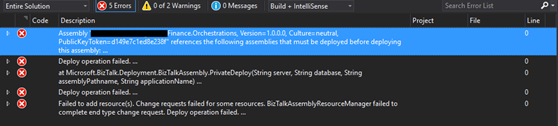
… a rookie problem that if you read carefully the error message you will know the problem.
Cause
Basically, this is a dependency problem… “Finance.Orchestrations” assembly references certain “Staging.Orchestrations” artifacts, and for this reason, this last assembly (Staging.Orchestrations) must be deployed before deploying the assembly that references these artifacts (Finance.Orchestrations).
When you deploy BizTalk assembly you must ensure that any referenced assembly is deployed first. BizTalk actually, helps you out, by enforcing that “deployment rule” by not letting you applying adding resource action without deploying all its references and that is the reason why this error is happens
Although I’m almost sure that I had deployed all the resources – common schemas, maps, and orchestrations – that was being consumed in this BizTalk Solution. When I decide to check if they were actually deployed in the environment, I found out that they weren’t… again a rookie mistake.
Solution
The solution to this problem is easy, make sure that all the dependencies are deployed before you deploy your solution.
In my case, I deployed the “Staging.Orchestrations” assembly and then I was able to indeed deploy the “Finance.Orchestrations”.
Author: Sandro Pereira
Sandro Pereira lives in Portugal and works as a consultant at DevScope. In the past years, he has been working on implementing Integration scenarios both on-premises and cloud for various clients, each with different scenarios from a technical point of view, size, and criticality, using Microsoft Azure, Microsoft BizTalk Server and different technologies like AS2, EDI, RosettaNet, SAP, TIBCO etc. He is a regular blogger, international speaker, and technical reviewer of several BizTalk books all focused on Integration. He is also the author of the book “BizTalk Mapping Patterns & Best Practices”. He has been awarded MVP since 2011 for his contributions to the integration community. View all posts by Sandro Pereira
by Sandro Pereira | Sep 15, 2017 | BizTalk Community Blogs via Syndication
The funniest part of having an intern working and learning from you, especially for a person like me that really love to write about “Errors and Warnings, Causes and Solutions”, is that they are able to make the funniest and unexpected questions, they will find things that because we are so accustomed to doing the job and to avoiding them, that we do not even realize anymore that they exist and they are there.
So yesterday, after a solution deployment, my intern was complaining that he was always receiving the following error while creating a receive port:
TITLE: BizTalk Server Administration
——————————
Concurrency Violation encountered while Updating the ReceivePort ‘rprtReceive’. The local, cached version of the BizTalk Server group configuration is out of date. You must refresh the BizTalk Server group configuration before making further changes. (Microsoft.BizTalk.ExplorerOM)
For help, click: http://go.microsoft.com/fwlink/?LinkId=47400&ProdName=Microsoft+BizTalk+Server+2016&ProdVer=3.12.774.0&EvtSrc=Microsoft.BizTalk.ExplorerOM.Resources&EvtID=IDS_ERR_OBJECT_CONCURRENCY
——————————
BUTTONS:
OK
—————————–
Cause
While open and navigating in the BizTalk Administration Console you will notice that the first request on expanding the navigation tree or open a BizTalk Server Application or Host Instance will take longer time that further interactions, this because in the first request the Administration Console will query your BizTalk databases for information and after that in cache the result.
So, unless you force a refresh it will use that cache information, nevertheless it will have some kind of mechanism (like a hash) to verify if the cache is updated will the current BizTalk Server Configuration on the database when you try to perform an operation like create or change a Receive Location.
Assuming that you deploy a new version or new artifact to a BizTalk Application, you need to refresh that Application before you perform any kind of operations, otherwise, you will receive this or similar errors.
The reason for this error to happen was that my intern already had the BizTalk Administration Console running and he was already focused (selected) the Application in concern before he went and deploy a new version of the solution from Visual Studio. After he deploy
SOLUTION
This is, in fact, a simple problem to solve:
- Concurrency Violation encountered while Updating the ReceivePort – Option 1:
- Close the BizTalk Administration Console and open again (stupid and simple)
- Concurrency Violation encountered while Updating the ReceivePort – Option 2:
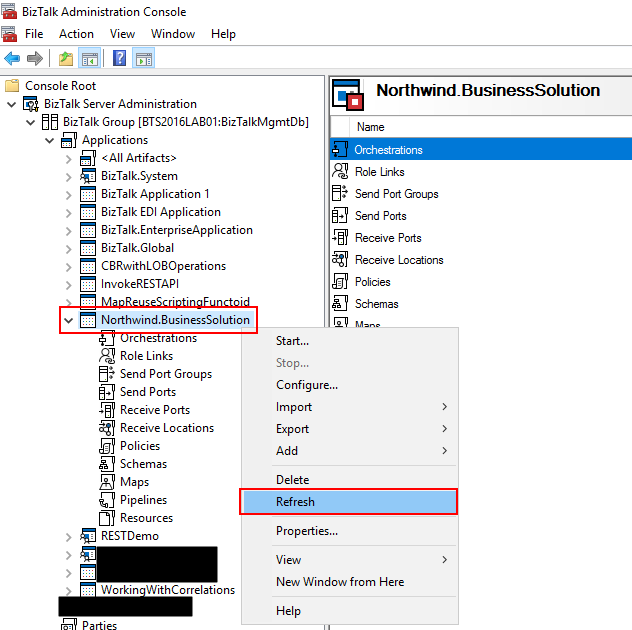
- Right-click on the BizTalk Application you want to refresh, and then select the “Refresh” option
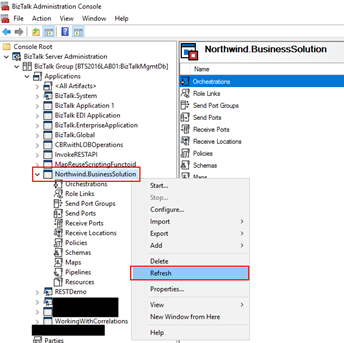
- Concurrency Violation encountered while Updating the ReceivePort – Option 3:
- Select the resource inside your BizTalk Application you want to refresh, for example, “Receive Locations” and press F5
There are several alternatives. The important is to refresh the BizTalk Administration Console if something had changed in your BizTalk Server environment.
Author: Sandro Pereira
Sandro Pereira lives in Portugal and works as a consultant at DevScope. In the past years, he has been working on implementing Integration scenarios both on-premises and cloud for various clients, each with different scenarios from a technical point of view, size, and criticality, using Microsoft Azure, Microsoft BizTalk Server and different technologies like AS2, EDI, RosettaNet, SAP, TIBCO etc. He is a regular blogger, international speaker, and technical reviewer of several BizTalk books all focused on Integration. He is also the author of the book “BizTalk Mapping Patterns & Best Practices”. He has been awarded MVP since 2011 for his contributions to the integration community. View all posts by Sandro Pereira
by Sandro Pereira | Sep 7, 2017 | BizTalk Community Blogs via Syndication
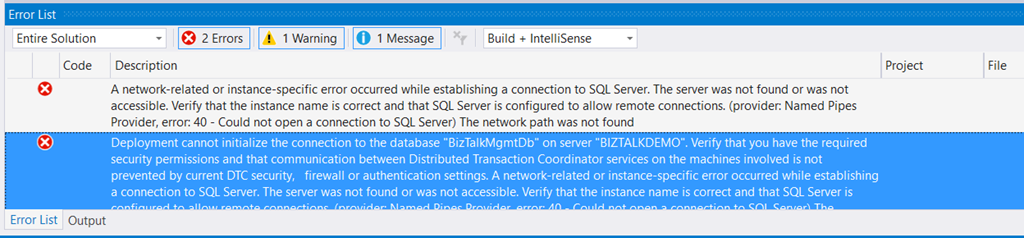
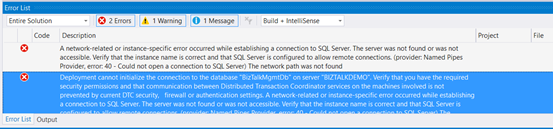
Typical basic error for beginners that also occur sometimes even with experienced BizTalk developers… While trying to deploy a BizTalk Server solution directly from Visual Studio 2017 I got the following errors messages:
| Severity |
Code |
Description |
Project |
File |
Line |
Suppression State |
| Error |
|
A network-related or instance-specific error occurred while establishing a connection to SQL Server. The server was not found or was not accessible. Verify that the instance name is correct and that SQL Server is configured to allow remote connections. (provider: Named Pipes Provider, error: 40 – Could not open a connection to SQL Server) The network path was not found |
|
|
0 |
|
| Severity |
Code |
Description |
Project |
File |
Line |
Suppression State |
| Error |
|
Deployment cannot initialize the connection to the database “BizTalkMgmtDb” on server “BIZTALKDEMO”. Verify that you have the required security permissions and that communication between Distributed Transaction Coordinator services on the machines involved is not prevented by current DTC security, firewall or authentication settings. A network-related or instance-specific error occurred while establishing a connection to SQL Server. The server was not found or was not accessible. Verify that the instance name is correct and that SQL Server is configured to allow remote connections. (provider: Named Pipes Provider, error: 40 – Could not open a connection to SQL Server) The network path was not found |
|
|
0 |
|
Cause
This error may occur for several reasons, like BizTalk Server cannot communicate with SQL Server machine because some firewall restrictions or SQL Server does not accept Remote Connections or that SQL Server Network Protocols are not properly configured – I wrote a few days ago a blog post about that: WCF-SQL Adapter: Connecting to the LOB system has failed. A network-related or instance-specific error occurred while establishing a connection to SQL Server– and so on.
However, in the cause of this problem is quite different, the first error doesn’t tell us to much about the main cause of the problem but the second one:
Deployment cannot initialize the connection to the database “BizTalkMgmtDb” on server “BIZTALKDEMO”…
Gives you a good clue about the problem.
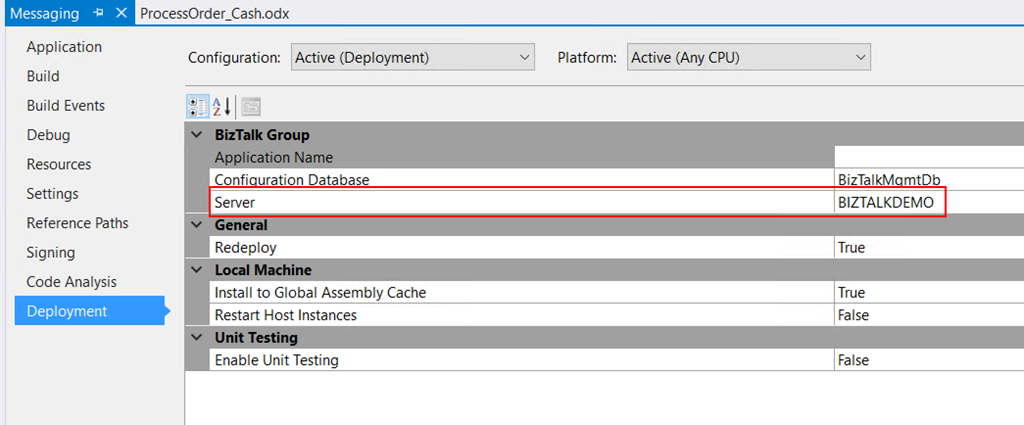
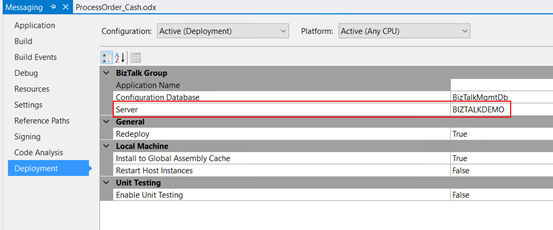
In fact, I was migrating an existing BizTalk Server solution to a new server and I forgot to update the Visual Studio deployment properties and the Server was pointing an incorrect to an incorrect an inaccessible SQL Server.
Solution
Again, this is a typical a beginner error and quite easy to fix, so to solve the problem you just need to properly configure the BizTalk Server deployment properties in all your Visual Studio projects inside your solution by:
- In Visual Studio Solution Explorer, right-click a project for which you want to configure properties, and then click “Properties”.
- Click the “Deployment” tab in Project Properties Designer.
- And make sure you properly configure the following properties:
- Application Name: Name of the BizTalk application to which to deploy the assemblies in this project. If the application already exists, the assemblies will be added to it when you deploy the project. If the application does not exist, the application will be created. If this field is blank, the assemblies will be deployed to the default BizTalk application in the current group. Names that include spaces must be enclosed by double quotation marks (“).
- Configuration Database: Name of the BizTalk Management database for the group, “BizTalkMgmtDb” by default.
- Server: Name of the SQL Server instance that hosts the BizTalk Management database on the local computer. In a single-computer installation, this is usually the name of the local computer. Note: If you move this BizTalk project to a different computer, you probably will need to modify the Server property to reflect the new computer name before you will be able to deploy the assembly.
Note: there are other properties but these three (3) are the most important ones (see the full list of properties here: How to Set Deployment Properties in Visual Studio)
- Save the file and then redeploy the BizTalk Server solution (or project).
Author: Sandro Pereira
Sandro Pereira lives in Portugal and works as a consultant at DevScope. In the past years, he has been working on implementing Integration scenarios both on-premises and cloud for various clients, each with different scenarios from a technical point of view, size, and criticality, using Microsoft Azure, Microsoft BizTalk Server and different technologies like AS2, EDI, RosettaNet, SAP, TIBCO etc. He is a regular blogger, international speaker, and technical reviewer of several BizTalk books all focused on Integration. He is also the author of the book “BizTalk Mapping Patterns & Best Practices”. He has been awarded MVP since 2011 for his contributions to the integration community. View all posts by Sandro Pereira

by Sandro Pereira | Mar 13, 2017 | BizTalk Community Blogs via Syndication
I am really excited to announce that all the arrangements for first Oporto Global Integration Bootcamp are almost finalized and I can now release 90% of the event agenda. This event will be held at DevScope offices in Oporto on March 25, 2017, between 09:00 – 17:00.

What is Global Integration Bootcamp?

This is a free, event driven by user groups and communities around the world, backed by Microsoft, for anyone who wants to learn more about Microsoft’s integration story. In this full-day boot camp, we will deep-dive into Microsoft’s integration stack with hands-on sessions and labs, delivered to you by the experts and community leaders. In this Boot Camp, we will focus on:
- BizTalk Server 2016: BizTalk Server 2016, what’s new, and using the new Logic Apps adapter.
- Logic Apps: Creating Logic Apps using commonly-used connectors.
- Service Bus: Build reliable and scalable cloud messaging and hybrid integration solution
- Enterprise Integration Pack: Using the Enterprise Integration Pack (EIP) with Logic Apps
- API Management: How does API management help you organize your APIs and how does it increase security?
- On-Premise Gateway: Connecting to on-prem resources using the On-Premise Gateway
- Hybrid Integration: Hybrid integrations using BizTalk Server and Logic Apps
- Microsoft Flow: Learn to compose flows with Microsoft Flow
But much more. Porto will be joining locations all over the globe holding this event on the same day. Check out the global website for information about the global organizers and other locations, or follow the Twitter hashtag #integrationbootcamp.
Oporto Global Integration Bootcamp Agenda
09:00 Registration opens and welcome
10:00 BIZTALK 2016 IN A HYBRID WORLD
The integration landscape has definitely evolved to be a hybrid, significant on-premise investment has been accumulated over the years while at the same time cloud computing brought new challenges and new ways of implementing integration. Let’s navigate through the innovations in both worlds and how BizTalk and the cloud currently live together. – Ricardo Torre
11:00 BIZTALK OCTOPUS DEPLOY
How to deploy BizTalk solutions with Octopus – José António Silva & Pedro Sousa, DevScope
11:30 Coffee-break
11:45 UNLEASH THE POWER OF IOT WITH SHAREPOINT
SharePoint is becoming modern, there are modern sites ready for mobile, a modern framework to develop web parts, but what about embracing modern concepts?
Internet of things will be everywhere in a blink of an eye and probably you are already dealing with it every day without even knowing.
In this session, we will explain how to collect data from sensors, send it to SharePoint and how to display it in a modern dashboard using modern SharePoint sites.
The possibilities are endless, from temperature sensors to access control devices you can have all this data inside your SharePoint Intranet with a modern look and feel. – João Ferreira, BindTuning
12:45 THE SPEAKER NIGHTMARE: Eval Forms & OCR & Logic Apps & Power BI
In this session, I will show and explain a real live demo on how we can easily build a robust solution for process evaluation forms, using an OCR software and easily integrate them with Power BI to present the results in an interactive and beautiful way. But most important: How you can educate your enterprise Developers and IT pros users to easily extend capabilities for power users, who understand their business challenges the best, and allowing them to use their familiar tools like: OCR software to process Evaluation forms and quickly build and deliver Power BI solutions to build Interactive Data dashboards. And at the same time integrate these tools, platforms or systems and a very quick and robust way using integrate feature on Azure, like, Logic Apps, API Apps and Azure Functions. How to start from a simple solution and evolve them enabling new functionalities. – Sandro Pereira, Microsoft Integration MVP
13:15 Lunch and Networking
Register
The agenda is not completely defined, you see that there are some sessions to be announced and can be subject to changes in terms of order of the sessions.
Thanks to sponsorship from DevScope, this event will be free of charge, including the catering, however, capacity will be limited in the venue so don’t delay and reserve your ticket at https://www.eventbrite.com/e/oporto-global-integration-bootcamp-tickets-31508629158. I’m looking forward to welcoming you to the Oporto Global Integration Bootcamp on March 25, 2017!
Author: Sandro Pereira
Sandro Pereira lives in Portugal and works as a consultant at DevScope. In the past years, he has been working on implementing Integration scenarios both on-premises and cloud for various clients, each with different scenarios from a technical point of view, size, and criticality, using Microsoft Azure, Microsoft BizTalk Server and different technologies like AS2, EDI, RosettaNet, SAP, TIBCO etc. He is a regular blogger, international speaker, and technical reviewer of several BizTalk books all focused on Integration. He is also the author of the book “BizTalk Mapping Patterns & Best Practices”. He has been awarded MVP since 2011 for his contributions to the integration community. View all posts by Sandro Pereira

by stephen-w-thomas | Nov 28, 2006 | Stephen's BizTalk and Integration Blog
Deployment in BizTalk 2006 is a greatly improved process over that of BizTalk 2004. The typical deployment process in BizTalk 2006 goes something like this:
1. Export the MSI using BizTalk Administration
2. Move to target computer
3. Import MSI through BizTalk Administration or BTSTASK
4. Run the MSI to GAC the DLL’s
Simple and straight forward. But why do we need to run the MSI after we import it?
This accomplishes a few things, mostly to GAC the DLL’s and to have the MSI package show up under Add/Remove programs. This makes is easy to see what has been deployed to the target computer.
But what if you only wanted to move the code to one target computer and you did not care about seeing the items under Add/Remove programs?
Well, then you could change the DLL properties (a.k.a. Resources) inside BizTalk Administration to
actually GAC your DLLs on MSI import.
How to change the Resource properties in BizTalk 2006
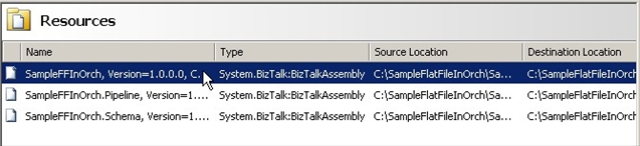
Step 1: Open BizTalk 2006 Administration, select your Application, click on Resources.
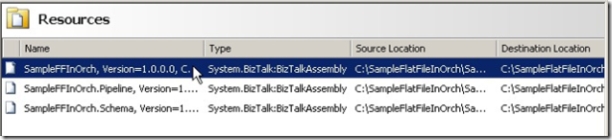
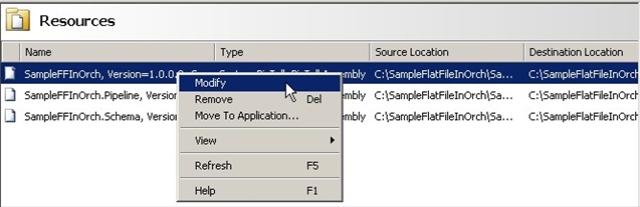
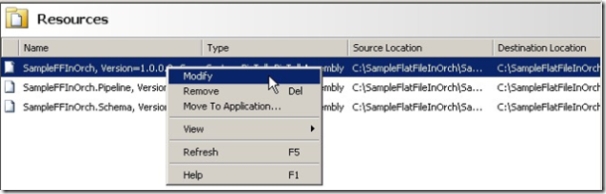
Step 2: Select the first BizTalk Assembly Resource, right click, select Modify
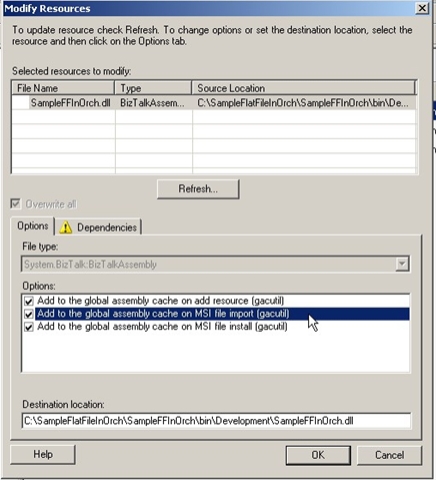
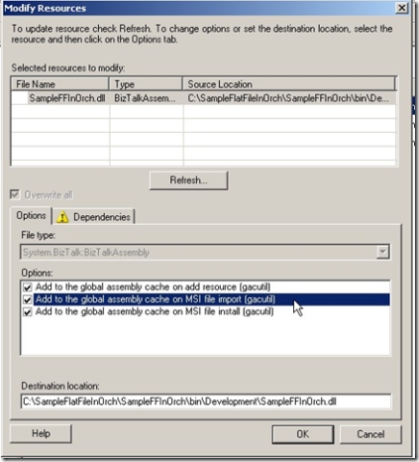
Step 3: Under Modify Resources – Options box, check the “Add to the Global Assembly Cache on MSI file import (gacutil)”
4. Repeat for each BizTalk Assembly or other resources in your application that you needed GACed.
It is that easy! Now when you import the MSI your BizTalk resources will be put into the global assembly cache without any additional effort.
Now remember, just because you can do something does not mean you should. This most likely would be most valuable on a single computer install and remember you MSI will not show up under Add/Remote programs.
by stephen-w-thomas | Sep 27, 2006 | Stephen's BizTalk and Integration Blog
Recently I was working with a custom pipeline component in BizTalk 2006. As you know, a change was made to how these components behave in BizTalk 2006. That is, now they can be placed in the GAC as well as in the \Pipeline Components directly. So what does this mean? Put them in both place, one place, who knows?
In general, the rule is when working with custom pipeline components on a development system put the components in the \Pipeline Components folder and put them in the GAC on non-development systems. Although this is not really the approach the help guide says (under Developing Custom Pipeline Components), this approach works great since it simplifies deployment.
Today, I found a big GOT YOU with this approach if the custom component is not GACed before it is used inside the designer. All in all, you must GAC the custom pipeline components as soon as your create them and BEFORE adding them to the Visual Studios Toolbox.
Let's take a look at what happens when you add an unsigned and unGACed custom pipeline component to a project.
When you add the component to the Toolbox and drag it into the design surface, a reference is added to the pipeline component. As seen below, when the component is not signed and not in the GAC a reference is added to the component in the \Pipeline Components folder.
Fig 1: Unsigned and unGaced
Now, let's take a look at what happens when you add a signed and GACed custom pipeline to a project.
When you add the component to the Toolbox and use it in a pipeline, a reference is added to the pipeline component (as before). But this time, the signed and GACed pipeline is referenced to the GACed version of the pipeline component as seen below.
Fig 2: Signed and GACed
So why does this matter? Well, the problem I ran into was I added my custom pipeline component to my pipeline before I signed and GACed it. So when I went to deploy my solution to the development server with the pipeline component only in the GAC, I got a .net error saying it could not find the pipeline.
Something else to point out is that the pipeline must be GACed before you add the pipeline component to the Toolbox. Just being signed is not good enough.
The moral of the story: If you only want to put your component into the GAC and not into the Pipeline Component folder make sure you GAC it before you use it.
by stephen-w-thomas | Sep 13, 2006 | Downloads
This sample shows how to use multiple binding files inside an Application to allow for one MSI to be used on multiple target environments. When you add multiple binding files as resources to your application, a drop list will appear when you import your MSI on your target environments.
This sample works with BizTalk 2006 and BizTalk 2006 R2.
Get more information from the original blog post on this topic: http://www.biztalkgurus.com/biztalk_server/biztalk_blogs/b/biztalk/archive/2006/09/12/how-to-add-multiple-binding-files-to-an-application-in-biztalk-2006.aspx
by stephen-w-thomas | Sep 12, 2006 | Stephen's BizTalk and Integration Blog
BizTalk 2006 makes it easy to add multiple binding files to an Application. By adding multiple binding files to an Application, you can easily select environment specific settings during deployment.
So if you have a Dev, Test, and Prod environment you can have three binding files all built into the same MSI package. Of course, you need to create and maintain multiple version of your binding files in order to use them in this manner.
To add multiple binding files to an Application, just follow these steps.
1. Export your binding files using BizTalk Server Administration (you'll need to change your setting for each environment).
2. Once you have all the binding files, inside BizTalk Server Administration add them as a Resource to your Application.
3. Add each Binding file and specify the Target Environment name.
4. Repeat for each Binding file and make sure the Environment variable is set for each file.
5. Create your MSI for your Application.
6. When you import your MSI on another Environment, you will get a selection menu to select what binding file you want to use.
I've put together a simple sample to show this. It will not actually run or do anything. It is just intended to show how to set up multiple binding files.
Download: Multiple Binding Files in an Application
by stephen-w-thomas | Aug 29, 2006 | Stephen's BizTalk and Integration Blog
Tired of having to go into BizTalk Server Admin and terminate any suspended Orchestration instance before you want to redeploy?
Scripting this task is very simple using WMI. Just create a file called Terminate.vb and copy in this code:
Running the script will terminate all Orchestration instances.
Note: This will terminate all Orchestrations so please use caution.
It could be further parameterized to only terminate specific Orchestrations. The Query would look like:
Query = "SELECT * FROM MSBTS_ServiceInstance where ServiceClass = 1 and AssembliName='<name>'"
With <name> being the Assembly name of the Orchestration.
If you are using a helper .net class in your Solution, you can set this up as a pre or post build event so every time you deploy you'll not have to worry about deployment errors due to suspended Orchestration instances.
To set this up, just put the path to the vb script file in the event text box.
Again, I better stress this should only be used in cases that you are sure terminating all Orchestrations is what you really want to do. But it can be a great time saver for development.